
Chapter 13
Parameter Queries
Introduction
In this chapter you will learn how to create queries that prompt the user for information. You will learn how to create a parameter query, customize a dialog box, create multiple prompts to the user, use the LIKE keyword to prompt the user, prompt the user for dates, and create a button on a form that will prompt a user.
Definitions
Parameter query — A query that enables the user to set the criteria for selecting records at run time by filling in a dialog box.
Parameter Queries
Up to this point you have learned how to create queries that display results based on the design of the query. You can also create queries that display results that are based on criteria set by a user. This type of query prompts the user for information when the query is executed. It is referred to as a parameter query. Parameter queries enable the user to set the criteria for selecting records at run time by filling in a dialog box. They are very useful because they enable the user to change the outcome of a query. Parameter queries can be created in either Design view or SQL view. In this chapter we will use SQL view to create simple queries and then use Design view to create a criterion that will prompt the user for information. You will also learn how to create queries to prompt the user in SQL view.
Creating a Simple Query
Let’s begin by creating a simple query in SQL view. Take a 1ook at Example 1.
Example 1

Figure 13-1. Tools table
Use the Tools table in Figure 13-1 to retrieve tools that are manufactured by Porter. Look at the following script:
SELECT *
FROM Tools
WHERE Manufacturer = 'Porter';
This script uses a simple SELECT statement to retrieve every column (SELECT *) from the Tools table where the Manufacturer is Porter. Take a look at the results in Figure 13-2.

Figure 13-2. Results (output)
As you can see, the result shows all of the tools that were manufactured by Porter.
Creating a Parameter Query
The query in Example 1 is used to retrieve tools that are manufactured by Porter. Say you wanted to use the query to retrieve tools made by a manufacturer other than Porter. In fact, say you wanted to prompt the user to change the manufacturer name on the fly. Take a look at Example 2.
Example 2
In this example we will switch from SQL view to Design view to customize the query from Example 1 to prompt the user to enter a manufacturer name.
Let’s begin by switching from SQL view to Design view. To do this, click the View button and select Design View.

Figure 13-3. Design view
In Figure 13-3, notice the criteria in the Manufacturer field. As you can see, the criteria is specified as 'Porter'. To prompt the user to enter a manufacturer name you must change the criteria from 'Porter' to [x], as shown in Figure 13-4.

Figure 13-4. Design view criteria
Note: If you completed Example 1, you do not have to specify the separate column names shown in Figure 13-4. However, if you did not complete Example 1, make sure you select all of the column names shown in Figure 13-4.
Now save the query as ManufacturerQry. Finally, run the query and enter a manufacturer name (e.g., Bosch) in the dialog box that appears (Figure 13-5), then click OK. It is just that simple to prompt the user.

Figure 13-5. Enter Parameter Value dialog box
The above example works because of the variable you typed between the brackets ([ ]). Make sure that you always include the brackets.
When Microsoft Access detects a variable during the execution of a query, it tries to bind the variable to a value. If Access cannot find a value (i.e., the name of a column or a calculated field in the query, the value on an open form) to bind the variable to, it asks the user for the value of the parameter using the Enter Parameter Value dialog box.
The dialog box contains an “x” because we typed an “x” between the brackets. You can edit the “x” to whatever you want. Customizing your prompts will make them more user-friendly. Take a look at Example 3.
Customizing Your Dialog Box
Example 3
In this example you will customize the Enter Parameter Value dialog box that the user sees when prompted.
In Example 2, the user saw a very simple and somewhat cryptic dialog box. Generally you will want to make things a bit easier for the user by providing prompts that are meaningful.
So, let’s change the “x” in the dialog box to “Type the name of a Manufacturer.” To accomplish this, select Design view and change the criteria from [x] to [Type the name of a Manufacturer]. Now run the query. Your dialog box should now look like Figure 13-6.

Figure 13-6. Updated dialog box
Type Porter in the updated dialog box and click OK. Look at the results in Figure 13-7.

Figure 13-7. Results (output)
The result shows all of the records for which the manufacturer is Porter.
You can type whatever you want in place of the “x” as long as you enclose your variables in brackets. Unfortunately, you need to make the prompt meaningful enough to be useful and short enough that the variable name does not become too unwieldy. More on this later.
Creating Multiple Prompts
In some cases you may need to prompt the user for information more than once. For example, you may want the user to be able to retrieve a range of values or to obtain multiple criteria. In Example 4 we will prompt the user for two values (a lower and an upper value).
Example 4

Figure 13-8. Tools table
Say you want to use the Tools table in Figure 13-8 to prompt the user to retrieve tool IDs between two specified values.
To prompt the user to enter a lower and an upper value, complete the following steps:
1. In Design view, select the ToolID, ToolName, Manufacturer, Type, Location, and Price fields.
2. Select the Tools table.
3. Type the following in the Criteria cell of the ToolID column:
>[Type the first number:] AND <[Type the second number:]
Take a look at Figure 13-9.

Figure 13-9. Design view
Note: In Design view, if you do not see specific column names in the Design view grid, double-click the column name in the appropriate table located above the Design view grid.
4. Run the query and you will be prompted twice. In the first dialog box, enter the number 1 (lower limit) and click OK. In the second dialog box, enter the number 4 (upper limit) and click OK. Look at the results in Figure 13-10.

Figure 13-10. Results (output)
The results from the preceding query only include the values (2, 3) between the lower and upper values specified by the user. It does not include records that match the values entered into the dialog box. To additionally include the values the user entered you must use the BETWEEN keyword or replace the criteria with >=[Type the first number:] AND <=[Type the second number:]. Refer to Example 5 for more on this.
Make sure you save the query for future use.
Example 5
Say you want to use the Tools table in Figure 13-8 to prompt the user for a lower and an upper value, yet you want the output to additionally include the two values the user specifies.
1. In Design view, select the ToolID, ToolName, Manufacturer, Type, Location, and Price fields.
2. Select the Tools table.
3. Type the following in the Criteria cell of the ToolID column:
BETWEEN [Type the first number:] AND [Type the second number:]
4. Run the query. In the first dialog box enter the number 1 (lower limit) and click OK. In the second dialog box enter the number 4 (upper limit) and click OK. Look at the results in Figure 13-11.

Figure 13-11. Results (output)
The results include the values between the lower and upper values as well as the values entered by the user.
Make sure you save the query for future use.
Using the LIKE Keyword to Prompt the User
Example 6
Suppose you want to prompt the user to enter only the first character of a value. For example, say you want the user to be able to retrieve tools based on the type of tool using only the first character of a type of tool.
1. In Design view, select the ToolID, ToolName, Manufacturer, Type, Location, and Price fields.
2. Select the Tools table.
3. Type the following in the Criteria cell of the Type column: Like [Enter the letter the word begins with:] & "%"
Note: If your Access database is set to SQL-89 use an asterisk (*) instead of a percent sign (%) in the above SQL script.
4. Next, run the query and type the letter s in the dialog box. Look at the results in Figure 13-12.

Figure 13-12. Results (output)
The result shows all of the records that have a value in the Type column beginning with the letter s.
Prompting the User for Dates
You can also use a parameter query to prompt a user for a date. Take a look at Example 7.
Example 7

Figure 13-13. Sales table
Suppose you want to use the Sales table in Figure 13-13 to prompt the user to enter the date an item was sold. Follow these steps:
1. Click the Design tab from the top menu; click the Show table button to add the Sales table to Query Design view. After you add the Sales table to Query Design view, click Close.
2. In the Query Design Grid, select the SalesID, ProductID, CustomerID, and DateSold fields.
3. Select the Sales table.
4. Next, type the following in the Criteria cell of the DateSold column:
[Enter a date (mm/dd/yyyy):]
Note: We included the format of the dates stored in the database so that the user types the date in the correct format.
5. Next, run the query and type the following date in the dialog box:
03/03/2008
6. Click the OK button and review the results.
Figure 13-14. Results (output)
The results in Figure 13-14 show one product that was sold on 03/03/2008.
Creating a Button to Prompt the User
Parameter queries can also be used within forms. A common practice is to create a button that when clicked prompts the user for information. Take a look at Example 8, which does exactly that.
Example 8
Suppose you wanted to create a button on a form that when clicked implements the query created in Example 2. That query uses the Tools table to prompt the user to enter a manufacturer name.
To create a button that prompts the user in Microsoft Access 2007, use the following steps:
1. Highlight (click) the Tools table under Tables from the Navigation pane.
2. Click Create from the menu running across the top of the Microsoft Access interface.
3. Click the Form button.
4. Save the form as ToolsFrm by clicking the Microsoft Office button and selecting Save from the drop-down menu.
5. Switch to Design view by clicking the View button and selecting Design View.
6. Click the Button form control in the Controls section.
Note: Your cursor will change to a plus sign and a rectangle after you click on the Button control.
7. Click anywhere on the form. A Command Button Wizard will appear.
8. Select Miscellaneous under Categories.
9. Select Run Query under Actions, as shown in Figure 13-15.

Figure 13-15. Selecting a category and action
10. Click the Next button.
11. Select the ManufacturerQry query and click Next, as shown in Figure 13-16.

Figure 13-16. Selecting a query
12. Choose Text and type the following text: Query by Manufacturer.
13. Click Next and type the following text: Query by Manufacturer.
14. Click Finish.
To create a button that prompts the user in Microsoft Access 2003, complete the following steps:
1. Create a simple form in Design view. (Double-click Create form in Design View under Forms on the main interface of Access.)
2. Save the form as ToolsFrm.
3. Click the Command button on the toolbar.
Note: Your cursor will change to a plus sign and a rectangle after you click on the Command button.
4. Click anywhere on the form. A Command Button Wizard will appear.
Note: If the Command Button Wizard does not appear, you need to first click/select the Control Wizards button on the toolbar.
5. Select Miscellaneous under Categories.
6. Select Run Query under Actions, as shown in Figure 13-17.

Figure 13-17. Selecting a category and action
7. Click the Next button.
8. Select the ManufacturerQry query and click Next, as shown in Figure 13-18.

Figure 13-18. Selecting a query
9. Choose Text and type the following text: Query by Manufacturer.
10. Click Next and type the following text: Query by Manufacturer.
11. Click Finish.
View the New Button on the Form
1. To view the form, click the View button and select Form View. Refer to Figure 13-19.
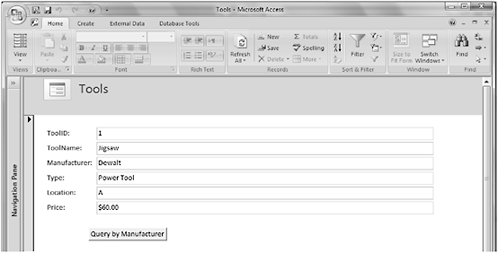
Figure 13-19. Form view
Now we can use the newly created button on the form.
2. Click the Query by Manufacturer button and type Bosch in the dialog box, then click OK.

Figure 13-20. Query by Manufacturer
Look at the results in Figure 13-21, which shows all of the tools that were manufactured by Bosch.

Figure 13-21. Results (output)
SQL Syntax for a Parameter Query in SQL View
Although we created all of the criteria for each of our parameter queries in Design view, you can also create parameter queries in SQL view. Take a look at the following example, which shows the SQL view equivalent of Example 3.
Example 9
This example shows the SQL script created when you wrote the criteria in Example 3. Remember that even if you use Design view to specify the criteria, you can click the View button and select SQL view to view the SQL script. Take a look at the following scripts, which are equivalent to Example 3.
SELECT *
FROM Tools
WHERE (((Tools.Manufacturer)=[Type the name of a Manufacturer]));
OR
SELECT *
FROM Tools
WHERE Tools.Manufacturer=[Type the name of a Manufacturer];
Either of the above queries will run. Microsoft Access tends to add additional brackets and parentheses.
The brackets enclose the text that will be displayed on the dialog box. Whenever you create a parameter you must include the brackets.
Example 10

Figure 13-22. Sales table
Suppose you want to use the Sales table in Figure 13-22 to create a query in SQL view that accepts two input date ranges. The following query will display customer order information (SalesID, ProductID, CustomerID, DateSold) that is based on two dates entered by the user:
SELECT SalesID, ProductID, CustomerID, DateSold
FROM Sales
WHERE DateSold BETWEEN [Type the first date (mm/dd/yyyy):] AND [Type
the second date (mm/dd/yyyy):];
This query prompts the user to enter two dates. The dates are used to pinpoint orders placed between the two dates specified. The WHERE clause specifies the criteria for the two input date ranges. It uses the DateSold column, the BETWEEN and AND operators, and text in brackets to prompt the user to enter two dates.
If the user entered 01/04/2007 for the first date and 12/29/2007 for the second date, the following results would be displayed:

Figure 13-23. Results (output)
While parameter queries are extremely useful, many programmers (including one of the authors) tend to shy away from them. The main reason is that you are extremely limited in your ability to check the user input when you let the system handle things. Usually it is better to have the user input the desired parameters into a text field on a form, then validate the input before the query is processed. This prevents strange error messages from popping up and allows the designer to handle errors in a manner appropriate to the program.
We have shown in a previous chapter that it is possible to dynamically create a query before its execution. This same logic can be applied here as an alternative to a parameter query.
With that said, there is a variation of the parameter query that is extremely useful. As you will see in Chapter 16, it is possible to create a stored procedure with a passed parameter. The advantage of this parameter query over a dynamically built query is that the code for the query can be preprocessed on the server. This results in faster query execution and a generally happier user.
Non-parameter Parameter Queries
One of the more interesting situations that can occur in the SQL world is when you do not have the ability to build a true parameter query to work with your data. In fact, there often comes a time when you cannot directly build queries that allow you to set up parameters. An instance of this is when you have stored procedures on an SQL server that you cannot change either because of system limitations of where you are working or simply because you want maximum speed and do not want the overhead of building a new query and then compiling it. There is a way around this problem that might not be obvious to the casual user.
Remember that a parameter query is just a filter. Up to this point we have discussed the placement of the filter value in the WHERE clause, but there is another way to create a filter that does not require you to rebuild the query.
Let’s go back to our first query in this section where we wanted to find all the tools manufactured by Porter. This time, though, let’s assume that we can’t change the query after it is built. So, instead of changing the existing query we construct one that is slightly different and includes a join between our current table Tools and a new table tempTools (Figure 13-24).

Figure 13-24. Temporary tools table
Now build a query that joins this table to the primary Tools table (Figure 13-25).

Figure 13-25. Join query
It might not seem intuitive, but any value used as a filter can be placed into a row in the tempTools table and it will have the same effect as placing the value as a criterion. You begin by deleting all records from the tempTools table. Next, you add the values you want to filter for to tempTools. Finally, you run the query.
If the tempTools table only consists of a single record with Porter, the result of the above query would be the same recordset as the first example. Simple, elegant, and no modifying or creating of any new query would be needed.
Summary
In this chapter, you learned what a parameter query is and how it can be used in Access to create customized queries. You learned how to create a parameter query, customize a dialog box, create multiple prompts to the user, use the LIKE keyword to prompt the user, prompt the user for dates, and create a button that prompts the user. You also learned how to create and view parameter queries in SQL view.
Quiz 13
1. True or False. A parameter query is a query that enables the user to set the criteria for selecting records at run time by filling in a dialog box.
2. True or False. When you use the BETWEEN keyword in a parameter query, it does not include records that match the values entered by the user.
3. True or False. Parameter queries can be used within forms.
4. True or False. The use of brackets in a parameter query is optional.
5. True or False. The asterisk is used with the LIKE keyword to match characters in a parameter query.
Project 13
Use the Sales table in Figure 13-13 to create a parameter query that prompts the user for two dates.