
Chapter 7. Administrative AAA on ASA/PIX
This chapter covers the following subjects:
• Introduction to Administrative sessions, Authentication, and Privilege levels on Cisco Security appliances
• Authentication of administrative sessions on Cisco Security Appliances
• Troubleshooting authentication on Cisco Security Appliances
• Authorization of administrative sessions on Cisco Security Appliances
• Command authorization on Cisco Security Appliances
• Troubleshooting authorization on Cisco Security Appliances
• Accounting of Administrative sessions and commands on Cisco Security Appliances
Cisco security appliances, including the Cisco PIX Firewall and Cisco Adaptive Security Appliance (ASA) have become staples of network security found in enterprise networks today. Their very design is security focused and the use of them within an authenticated infrastructure is a given. In this chapter, you will learn two aspects of the Cisco security appliance:
• How to perform authentication and authorization using local database.
• How to perform authentication, authorization, and accounting (AAA) using AAA servers.
You’ll also learn some valuable tips for troubleshooting AAA issues should they arise.
Note
The term “ASA” is used in this chapter to represent both the PIX Firewall as well as the ASA running OS version 7.0 and later. Where a feature is relevant only to ASA or PIX, it will be specifically mentioned.
Local Database
ASA provides three methods for administrative access to the device:
• Console (also called serial)
• Telnet/SSH
• HTTP
Administrative access is granted based on username and/or password. By default, the console port is usually unprotected to allow initial configuration.
Access to the device through Telnet and SSH is protected using a default password of cisco. This can be changed using the password password command.
Note
Before the security appliance can authenticate a Telnet, SSH, or HTTP user, you must first configure access to the security appliance using the telnet, ssh, and http commands. These commands identify the IP addresses that are allowed to communicate with the security appliance. More information regarding allowing Telnet, SSH, and HTTP access to ASA can be found at the following URL:
http://www.cisco.com/en/US/docs/security/asa/asa80/configuration/guide/mgaccess.html
In the ASA, you can create a database of users called the local database, and use it to authenticate administrative sessions instead of using just a password. To add a user to the local database, use the following command in the global configuration mode:
username user password password
After creating the database, you will need to configure the ASA to use the local database for authentication instead of just the password. To do this, use the following command:
aaa authentication {telnet | ssh | http | serial} console LOCAL
Note
As soon as this command is entered, the authentication prompt on login will change from password to username. If a local database does not exist, you will not be able to login to the device.
Privilege Levels
All users in the local database that you just created have an equal level of access. It is usually desired to have differing levels of access for users depending on their job role, experience, and so on. Such authorization can also be configured on the device without an AAA server.
Similar to Cisco IOS, ASA also provides 16 levels of access called privilege levels. By default, the following three levels are defined on the device:
• privilege level 0: Includes the show checksum, show curpriv, enable, help, show history, login, logout, page, show pager, clear pager, quit, and show version commands. You cannot really access this level because after login the first level accessible is level 1. Hence, the commands defined in this level are available to all users and do not affect the configuration of the device.
• privilege level 1: Normal level on Telnet; includes all user-level commands at the ASA> prompt. This level is also known as User-EXEC mode. Commands at this level do not affect the configuration of the device.
• privilege level 15: Includes all enable-level commands at the ASA# prompt. At this level, all commands are available and any configuration can be viewed or changed. This level is also known as Privileged-EXEC mode.
When you login to the device, you arrive at privilege level 1. To get to level 15, you have to use the enable command and enter the configured enable password. The enable password is configured using the following command in global configuration mode:
enable password password
As you already know, all commands that can change configuration of the device are available at level 15. Access to this level is not something which you will want to give to everyone. To provide differential access, you will need to reduce the privilege level of a command from 15 to one of the custom levels (2 to 14). For example, if you want user1 to be able to use the clock command, then you will need to reduce the privilege level of the command. After this, user1 can access the custom level and use the clock command. The user will not have access to any other level 15 command.
To enter the custom privilege level, the users will need an enable password for that level. The enable password for a custom level can be configured using the following command:
enable password password level privilege-level
To enter the custom privilege level, users have to use the following command at level 1:
enable level
To reduce the privilege level of a command and make it available at a lower privilege level, use the following global configuration command:
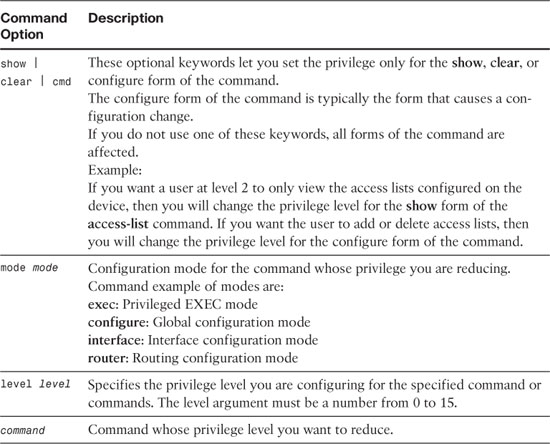
privilege [show | clear | cmd] level level [mode mode] command command
Table 7-1 explains the command syntax for this command. Repeat this command for each command you want to reassign.
Table 7-1. Syntax Description: privilege Command
Starting with OS version 8.0(2), by default, ASA does not match the privilege level of the command with the privilege level of the user. To enforce this match, use the following command:
aaa authorization command LOCAL
Previous versions of the OS match the privilege level of the command and the user without additional configuration.
Example 7-1 shows the configuration required to create a custom level where the users have access to the configuration mode and can use any form of the hostname and clock commands.
Example 7-1. Custom Level Configuration

Lab Scenario #4: Local Authentication and Privilege Levels on ASA
XYZ Inc. is installing a new ASA in a small network. They have basic access restriction in place using login and enable passwords. They want to use a local database now for Telnet and SSH authentication. They also want to configure level 5 on the device, such that users at this level can shutdown interfaces and change interface duplex and speed. Your task is to configure the ASA to support their requirement. In addition to that, user1 and user2 with a password of abcd should exist in the local database. The enable password for level 5 should be limited.
Lab Setup
This Lab Scenario requires an ASA or PIX running OS 7.x or later. IP connectivity is necessary to test Telnet/SSH.
Lab Solution
Step 1. Add users in the local database:
ASA(config)#username user1 password abcd
ASA(config)#username user2 password abcd
Step 2. Create an enable password for level 5:
ASA(config)#enable password limited level 5
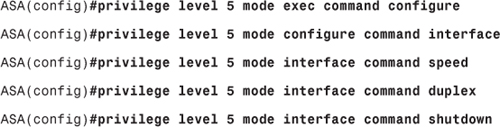
Step 3. Change privilege level for the required commands:
Step 4. Enable authentication using local database:
ASA(config)#aaa authentication telnet console LOCAL
ASA(config)#aaa authentication ssh console LOCAL
Step 5. (For ASA 8.0(2) and later only) Enable command authorization:
ASA(config)#aaa authorization command LOCAL
Lab Verification
To verify the solution, login to the device and enter level 5 using the enable 5 command. You should be able to enter the interface configuration mode and execute the shutdown, speed, and duplex commands. You should not be able to execute any other command.
Using AAA
In the previous sections you learned how to use the local database and privilege levels on ASA to secure access to the device. ASA also supports the AAA framework for administrative access. You already know that AAA provides an easy and centralized method of identity management and access control. In this section you will learn to configure ASA to use TACACS+ for authentication, authorization, and accounting of administrative sessions.
Note
ASA supports both TACACS+ and RADIUS for administrative AAA but using TACACS+ is highly recommended due to support of command authorization.
Before you can configure authentication using AAA, you need to add the IP address, shared secret key, and optionally the port of the AAA server to be used. On ASA, the AAA servers are added to server groups. These protocol-specific server groups contain one or more servers and are referenced to in the authentication, authorization, and accounting commands.
You can define up to 100 server groups in single mode or four server groups per context in multiple mode on the ASA. Each group can have up to 16 servers in single mode or four servers in multiple mode.
When the ASA needs to contact an AAA server, it tries to contact the first server defined in the group. It will keep moving down the server list until it gets a response. If no response is received from any of the servers in the group, ASA will use the fallback method, if defined. If you do not have a fallback method, then the AAA transaction is deemed failed.
Note
As you already know, the fallback method defines what method to use for AAA if the primary method, AAA server group in this case, is not available. The types of fallback methods available depend on the service for which AAA is being configured. Sections relevant to different services discuss available fallback methods throughout the book.
The server group needs to be created before adding a server to it. To create the server group, use the following command:
aaa-server group-tag protocol {tacacs+ | radius}
exit
Now you can add servers to this group using the following commands:
aaa-server group-tag host [(ifname)] {ip-address | hostname}
key shared-secret-key
exit
In the preceding command, pay special attention to the ifname parameter. This parameter denotes the interface through which the AAA server can be reached. This parameter defaults to the inside interface and in some OS versions, ASA will not reference the routing table before sending the AAA request. It will send the request out the interface mentioned in the aaa-server host command. You should enter the correct interface name in the aaa-server host command to ensure that the ASA can reach the AAA server.
Note
If you use a hostname to define the server, ensure that the device is able to resolve it.
Example 7-2 shows an AAA server added in ASA. Subsequent sections will build on this example.
Example 7-2. AAA Server Group in ASA

Now that you have added a server group, you have to consider what happens when the servers in the group are not available. When all the servers in a group fail to respond, the group is considered inactive. If a fallback method is configured in the authentication, authorization, or accounting command, the group will be marked inactive for a default period of 10 minutes. During this period, all requests will use the fallback method.
The method and period used by ASA to mark a server as active again might not be suitable in all environments. To overcome this, ASA allows you to choose between the following two methods of reactivation of servers:
• Depletion Mode: This is the default mode used by ASA. In this mode, when a server is unresponsive, it is marked as inactive. It remains inactive until all servers in the group are marked inactive. When this happens, a configurable timer, 10 minutes by default, is started. During this time, the fallback method is used by all requests. At the end of the configured time, all servers in the group are marked active and ASA tries to contact the servers for new requests. If the servers are still unresponsive, the cycle is repeated.
• Timed Mode: In this mode, unresponsive servers are marked inactive for a period of 30 seconds. After this period, they are marked active and new requests can be sent to the servers. If the server is still unresponsive, then the 30 second cycle is repeated.
Note
If a fallback method is not configured, ASA continues to retry the servers in the group.
You can configure the reactivation method using the following commands:
aaa-server group-tag protocol {tacacs+ | radius}
reactivation-mode {depletion [deadtime minutes] | timed}
The depletion and timed keywords define the reactivation mode and the optional deadtime parameter defines the time to be used for the depletion mode.
Configuring Authentication on ASA Using AAA
After adding AAA servers, you can begin to configure AAA on ASA. In this section you will learn how to configure authentication of all administrative sessions including console, Telnet, SSH, and HTTP.
To enable authentication using AAA, use the following command in global configuration mode:
aaa authentication {ssh | telnet | serial | http} console group-tag [LOCAL]
The group-tag parameter is case sensitive. If you specify the LOCAL keyword, ASA will fallback to the local database if the AAA servers in the specified group do not respond.
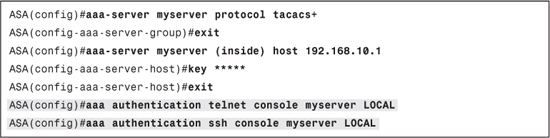
Before moving to the next section, take some time to understand the complete configuration given in Example 7-3. This example builds up on Example 7-2 to enable authentication of Telnet and SSH using AAA with local database as failover.
Example 7-3. Authentication Configuration on ASA Using TACACS+
Configuring ACS 4.2 and 5.1 for Authentication
Now that you have configured the device for authentication using TACACS+ or RADIUS, it is time to configure ACS to accept the requests from the device and authenticate users. Configuring ACS for authentication of login services requires the following steps:
Step 1. Add the device as an AAA client in ACS.
Step 2. Create a user.
Step 3. (ACS 5.1 only) Create an access service for the authentication request.
You already know how to add an AAA client, create a user, and access services from Chapter 3 and 4 depending on your ACS version. In case you have forgotten or have skipped the previous chapters, please refer back to them.
Verifying and Troubleshooting Authentication
During initial configuration of AAA, the most common reason of failure is a communication problem between the device and the AAA server. A quick way to verify authentication is to use the following command on the device:
test aaa-server authentication group-tag username username password password
If the user is successfully authenticated then the communication between the device and the AAA server is working properly. If not, check the following:
• The hostname or IP address of the AAA server is correctly added in the device. If you are using hostname then make sure it can be resolved by the device.
• Verify IP communication between the device and the AAA server using ping.
• Ensure that the device can reach the AAA server on TACACS+ or RADIUS ports. A firewall or access list might be blocking these ports.
• Ensure that shared secret key is the same on both the device and the server. In case of TACACS+, a mismatch of the secret key will be obvious in the AAA server logs; however, in the case of RADIUS, the AAA server will report an authentication failure due to a user password mismatch.
• In the case of ACS 5.1, ensure that an access service is properly configured to authenticate the request.
When troubleshooting authentication, the following debugs are most useful:
• debug aaa authentication
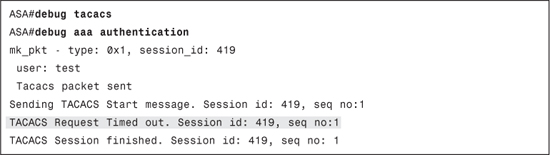
The debugs will help pinpoint the problem area. Example 7-4 shows the debug seen when authentication fails due to key mismatch and Example 7-5 shows the debugs seen when the AAA server is unreachable.
Example 7-4. debug aaa authentication and debug tacacs: Key Mismatch

Example 7-5. debug aaa authentication and debug tacacs: Server Unreachable
If the device is able to reach the AAA server, then the logs on the server will be more useful than debugs to troubleshoot the problem. ACS logs are covered in detail in Chapter 3 and 4.
Authorization of Administrative Sessions
In the previous section, you learned how to authenticate administrative sessions using TACACS+. Such configuration does not check whether a valid user should have access to the shell. For optimum security, you should have explicit control over who can access the shell of the device. Authorization of administrative sessions, or EXEC authorization as it is commonly called, forces the device to check for explicit shell access permission in a user profile.
To enable EXEC authorization, use the following command in the global configuration mode:
aaa authorization exec authentication-server
Configuring ACS 4.2 and 5.1 for EXEC Authorization
The steps to configure ACS 4.2 and 5.1 for EXEC authorization of sessions on ASA and IOS are same. These steps are covered in Chapter 6 under the section “Configuring ACS 4.2 and 5.1 for EXEC Authorization.”
One exception for ASA is that it does not support any attributes except the default privilege level attribute. Even the support for the default privilege level attribute is different on ASA. This attribute affects only the privilege level of the user on Adaptive Security Device Manager (ASDM). The ASA will put the user in level 1 in the CLI irrespective of the value of this attribute.
Verifying and Troubleshooting EXEC Authorization
If authentication using TACACS+ is working then authorization usually works well also. Most problems with authorization are due to absence of required attributes or incorrect attributes or values. If authorization fails, check the following:
• User or group in ACS 4.2 and access service in ACS 5.1 has Shell (EXEC) privilege
• Attribute values are correctly configured
The following debugs are useful is troubleshooting authorization:
• debug aaa authorization
• debug tacacs
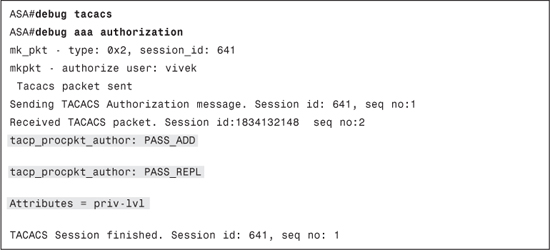
Example 7-6 shows debugs from a successful authorization request.
Example 7-6. EXEC Authorization debugs on ASA
Command Authorization
Like Cisco IOS, ASA also supports authorization of commands entered by the user. Once command authorization is enabled, the device will send each command to the TACACS+ server for authorization. If authorization is successful, the command will be executed. If the authorization fails, the user will see a failure message and the command will not be executed.
To do this, you will need to configure command authorization on ASA and apply shell command authorization sets on the user or group profile in ACS.
Before configuring command authorization, you should have session authentication working on the device with TACACS+. In addition to that, you have to configure ASA to authenticate the enable password using TACACS+ instead of the local enable password. To do this, use the following command in global configuration mode:
aaa authentication enable console group-tag [LOCAL]
Note
When ASA is configured to authenticate the enable password from the TACACS+ server, the enable password for every user will be different. The enable password of the user is configured in the User Profile in ACS and it can be configured to be the same as the login password of the user. In addition to configuring the enable password on the user profile, on ACS 4.2 you need to set the Maximum Enable Privilege for the user to 15 for enable authentication to work. The Maximum Enable Privilege option can be found in the User Setup Page under Advanced TACACS+ Settings section.
To enable command authorization, use the following command in the global configuration mode:
aaa authorization command group-tag [LOCAL]
Note
When enable authentication and command authorization are enabled, they affect the console session also. Ensure that console sessions are authenticated using TACACS+ also; otherwise, the console user will not be able to login to the privilege mode or execute any command. You should also use the LOCAL database as a fall back method for command authorization to prevent a lock out situation if the TACACS+ server is not reachable.
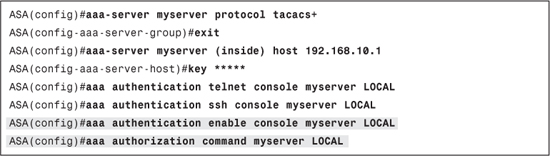
Example 7-7 builds up on Example 7-3 to add enable authentication and command authorization.
Example 7-7. Command Authorization Configuration on ASA
Configuring ACS 4.2 and 5.1 for Command Authorization
The steps to configure ACS 4.2 and 5.1 for command authorization of sessions on ASA and IOS are identical and you can find coverage of this process in Chapter 6 under the section “Configuring ACS 4.2 and 5.1 for Command Authorization.”
Verifying and Troubleshooting Command Authorization
If authentication using TACACS+ is working, then command authorization usually works well also. Most problems with authorization are due to incorrect configuration. Check the following if command authorization is not working as desired:
• User or group in ACS 4.2 and access service in ACS 5.1 have the correct command set applied.
• Commands in the set should match the case and format used by the device in the authorization request. If you are unsure of how the command is sent by the device, take a look at the debugs or failure logs on ACS. Sometimes devices will omit special characters such as slash (/).
• Command authorization often causes problem with ASDM sessions. This is because ASDM issues a series of commands when it starts up and they are not present in the command set. Take a look at ACS failure logs to see the commands that need to be permitted for ASDM to work properly.
The following debugs are useful is troubleshooting authorization:
• debug aaa authorization
• debug tacacs
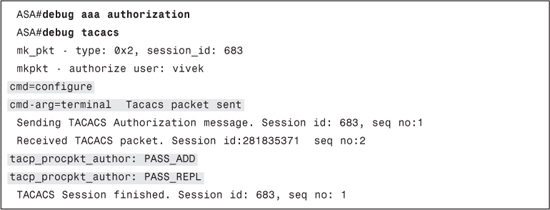
Example 7-8 shows the debugs from a successful command authorization request.
Example 7-8. debug aaa authorization and debug tacacs: Command Authorization
Accounting of Administrative Sessions and Commands
ASA provides accounting feature to help monitor administrative sessions and commands entered in a session.
To enable accounting for administrative sessions, use the following command in the global configuration mode:
aaa accounting {telnet | ssh | serial} console group-tag
To enable accounting for commands entered in a sessions, use the following command in the global configuration mode:
aaa accounting command [privilege level] group-tag
You can use the optional privilege level parameter to specify the level for which you want to enable command accounting. The command can be repeated to configure accounting for multiple levels.
Example 7-9 builds on Example 7-7 to enable accounting for Telnet and SSH sessions and all commands entered in an administrative session.
Example 7-9. Accounting Configuration on ASA

There is no configuration required on ACS to accept accounting, if the device is added as an AAA client.
You can see the EXEC accounting logs in ACS 4.2 under Reports and Activity > TACACS+ Accounting and command accounting logs under Reports and Activity > TACACS+ Administration.
In ACS 5.1 you can see both the EXEC and command accountings logs under AAA Protocol > TACACS+ Accounting.
Lab Scenario #5: Authentication, Authorization and Accounting of Administrative Sessions on ASA using TACACS+
XYZ Inc. has purchased Cisco ACS and they want to use TACACS+ to authenticate all administrative session on their ASA. In addition to that, they want to ensure that users belonging to the Admins can execute all commands except shutdown. They also want that all sessions and commands should be logged in ACS using TACACS+.
Your task is to configure the ASA and ACS to meet all of these requirements. XYZ Inc. does not use ASDM so you can ignore HTTP sessions for this task.
The IP address of the ASA is 192.168.1.1 and the IP address of ACS is 192.168.1.10.
Lab Setup
You require a simple setup connecting an ASA to your ACS. The ASA should have IP connectivity to ACS.
Before starting the lab, add the ASA in ACS as an AAA client. If you are using ACS 4.2, then rename a group to Admins. If you are using ACS 5.1, then create an Identity Group named Admins. You can use the Default Device Admin access service for this lab. You also need to create an Authorization Policy in the access service which matches the Admins Identity Group.
You should also have the following configuration on the ASA before starting the lab:
telnet 0 0 inside
ssh 0 0 inside
Lab Solution
Step 1. Configure the device for authentication, authorization and accounting:

Step 2. Create a command set in ACS which denies the command shutdown with all arguments and permits all other commands.
Step 3. (ACS 4.2 only) Apply the command set to ACS 4.2 group called Admins and select Shell (exec) under TACACS+ Settings. Click Submit + Restart
Step 4. (ACS 5.1 only) Apply the default Permit shell profile and the command set to the authorization policy created at the start of the lab.
Lab Verification
To verify the solution, create a user in the Admins group and initiate a Telnet or SSH to the ASA. Authenticate using the user from the Admins group. You will notice that the user is able to execute any command except the shutdown command in the interface configuration mode.
Summary
In this chapter you learned the basics of AAA configuration on ASA and PIX running OS version 7.0 and later. Understanding these basic steps is crucial to implementing advanced AAA discussed later in this book. Along with the configuration, this chapter also discussed troubleshooting steps for AAA on ASA/PIX. Most of these troubleshooting techniques will be used later in the book as well.