
Chapter 3. Getting Familiar with ACS 4.2
In this chapter, you learn the following topics:
• Administration Control—GUI Control
• Network Configuration—Managing Devices and Servers
• Group Setup—Managing User Groups
• Reports and Activities—Accounting and Logs
• Working with ACS Log files
One thing you’ll notice between ACS 4.2 and ACS 5.1 is that the interface has changed. This might take some getting used to since the ACS interface has basically been the same for years. In this chapter you will discover, or rediscover, the ACS interface of version 4.2. In Chapter 4, you’ll have a chance to get familiar with ACS 5.1.
Now you might ask, “Where does it all begin?” The answer is, “With the install.” And although that seems to be one of those things that you say, “Uh, yeah” to, it’s assumed here that you’ve already done that. In fact, I personally believe that out of all the Cisco products I’ve worked with, the ACS is the easiest to install. That is, if you are using a version for Windows; it’s even easier if you are using the appliance model.
This chapter begins with a discussion of what is running on your server now that ACS is there.
The Seven Services of ACS
When you install ACS, a number of services begin to run on your machine, each one having a specific purpose. These services include the following:
• CSAdmin
• CSAuth
• CSDBSync
• CSLog
• CSMon
• CSRadius
• CSTacacs
Each of these ACS services runs as a local system service by default. Often you need to modify the ACS services to use a specific domain account to get the access they need. These services can be seen running in Windows Task Manager, as seen in Figure 3-1.
Figure 3-1. ACS Services
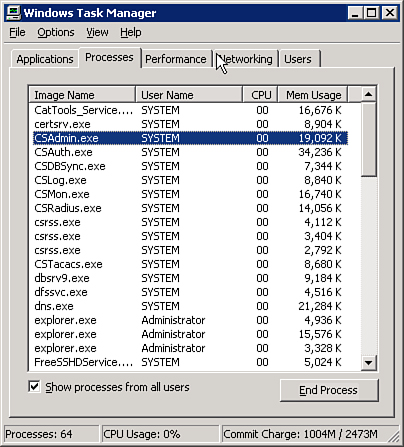
The sections that follow cover each of these services in greater detail.
CSAdmin
CSAdmin is the service that handles your administrative access to ACS. The CSAdmin service handles the browser interface that you see when working with ACS. You can access the ACS web server by browsing to http://127.0.0.1:2002 on the machine on which it is installed. A link is also placed on the desktop during the install process. You cannot browse to the ACS server remotely until you have configured an administrative user in the ACS interface or using the CLI on an ACS appliance.
Note
If you were to restart the ACS services from within the ACS GUI, CSAdmin would be the only service that would not restart. If it did, you would lose connectivity to ACS.
Another important point to mention is that ACS does not stay on port 2002. In fact, as soon as you connect to the web server, it redirects you to a random high number port. This causes some issues with access from outside of firewalls. To get around this issue, you can administratively change the scope of high number ports that you are redirected to in the Administration Control section of the web interface. This will be shown later in this chapter in the section “Administration Control.”
CSAuth
When a device initiates a request, it is received by a protocol-specific service on ACS (CSTacacs and CSRadius). These services hand over the authentication and authorization request to the CSAuth service. CSAuth’s job is to locate the user, in ACS database or external databases, and determine whether a permit or deny action should be taken.
If a permit action has to be taken, CSAuth also determines the privilege of the user. After that, it hands over the result to the service from which the request was received.
CSAuth is also responsible for all communication between ACS and external databases.
Note
Why and how ACS checks external databases is covered in Chapter 5, “Configuring External Databases with ACS.” For now, it is important to remember that ACS can use external databases and CSAuth takes care of all communication between the external database and ACS.
CSDBSync
There are times when you might want to add many users and network devices in ACS. Adding them one at a time is a long process. To overcome this, ACS provides the option to load user and device information from an external database, such as a CSV file, or any other relational database, such as SQL. This feature is called RDBMS synchronization.
CSDBSync is the service that communicates between the ACS database and the external database for synchronization.
Note
RDBMS synchronization is covered in detailed in Chapter 14, “ACS 4.2 Advanced Configuration.”
CSLog
As the name suggests, CSLog is responsible for logging. After CSAuth completes processing an authentication or authorization request, it sends the information to CSLog. CSLog, in turn, captures the event information and stores it in comma separated value (CSV) files.
In addition to these event logs, CSLog also receives accounting packets from CSRadius and CSTacacs and stores the information contained in the packets in CSV files.
All the CSV files maintained by CSLog can be access under the Reports and Activity Section. These files are discussed in detailed later in the chapter.
ACS also enables you to log events and accounting information on a remote server. CSLog handles all communication between the remote logging server and ACS.
CSMon
There are four separate activities that the CSMon service performs:
• It monitors other ACS services.
• It records and reports errors found with other services.
• It notifies the administrator of potential issues with ACS services.
• It uses an application-specific utility to resolve these issues automatically.
CSRadius
CSRadius monitors the RADIUS ports and receives RADIUS packets from AAA clients. CSRadius parses the packets and sends authentication and authorization requests to CSAuth for processing. When it receives a response from CSAuth, CSRadius builds a RADIUS packet using the information from CSAuth and the original packet received from the AAA client. This packet is then sent to the AAA client in response to the request.
In addition to this, CSRadius parses RADIUS accounting packets received and sends them to CSLog for processing.
CSTacacs
Similarly to what CSRadius does, CSTacacs monitors TACACS+ ports and receives TACACS+ packets from AAA clients. It then parses the packets and sends authentication and authorization request to CSAuth for processing. When a response is received, CSTacacs creates a TACACS+ packet and sends to the AAA client in response to the request.
In addition, CSTacacs parses all TACACS+ accounting packets and sends them to CSLog for processing.
The Grand Tour of the ACS Interface
If this is your first time using ACS, it is important to take the time to learn how to navigate the interface.
The main web interface of ACS is divided into frames. You access different menu items on the left side of the page, perform configuration in the middle, and have access to some help on the right side.
Because you use the menu a great deal in your configurations, the next sections look at each menu item and what types of configuration can be performed at each level. This section is not covered in a top-down process, rather in an order that makes sense to setting up your server for functionality. The discussion begins with a look at Administration Control.
Administration Control
The Administration Control section is where you configure all aspects of ACS for administrative access as shown in Figure 3-2. Here you have the ability to add administrators and configure access policy. You can configure information such as IP addresses that are allowed to access ACS, IP addresses that are not allowed to access ACS, and HTTP port allocation here.
Figure 3-2. Administration Control

Session policy enables you to alter the timeout, allow automatic local logins, and respond to invalid IP addresses. You can also choose to lock administrator access after a certain number of failed authentication attempts.
Recall that ACS uses port 2002 as the listening port, but after a connection to that port is made, you are redirected to a random port number. When ACS is positioned behind a firewall, this random port assignment becomes an issue with gaining connectivity. You could simply allow all ports inbound to the ACS server, but that wouldn’t be very security minded. As a better alternative, you have the ability to specify a range of ports used so that you can configure access restrictions within your firewall to match, as seen in Figure 3-3.
Figure 3-3. HTTP Port Allocation

Securing Access to ACS
You can take steps to secure ACS by applying administrator passwords and controlling access to the ACS device. The steps that follow demonstrate how to add an administrator and secure access to the ACS administrative interface.
You begin by assigning an administrator password to the ACS device. Follow these steps to complete this task, referring to Figure 3-4:
Step 1. Select Administration Control from the left menu bar.
Step 2. Select Add Administrator.
Step 3. Enter the required information into the input fields, such as admin name and password.
Step 4. If this is the first entry for an administrator, select the Grant All
Note
The Grant All option allows your administrator to have full administrative access. Later, as you add more administrators, you can specify what groups they can modify.
Step 5. Select Submit. You now see that your administrator has been added to the ACS device. If you access the ACS device from the server on which it is installed, you will, by default, not need to authenticate. This is against some security policies, so change that. Following the remaining steps will force ACS to authenticate administrators even when they access ACS from the server itself.
Step 6. Select Session Policy.
Step 7. Deselect Allow automatic local login.
Step 8. Select Submit.
Step 9. To test your work, click the X in the top right corner of the screen. Then, you can log back in to the ACS device. If you see Username and Password fields, you wer
As discussed earlier, ACS redirects to a random port for GUI access after login. This can be a problem when accessing the GUI from outside a firewall. To restrict the ports used by ACS, go back to the Administration Control section and control the ports that are redirected when ACS is accessed.
Step 10. Select Access Policy.
Step 11. Scroll to the HTTP Configuration section.
Step 12. Select the radio button that indicates you want to Restrict Administration Sessions to the following port range.
Step 13. Add a port range, such as 65501 to 65535.
Step 14. Select Submit.
Figure 3-4. Adding an Administrator to ACS

This now restricts the port ranges that ACS redirects your browser to your defined range.
Network Configuration
Network Configuration is where you will add AAA clients to the ACS server. AAA clients can be anything from a firewall to a router. What defines a device as being an AAA client is that it can communicate with the AAA server using the TACACS+ or RADIUS protocol.
Another aspect of Network Configuration is that you can add additional ACS servers here in a distributed configuration or for a database synchronization scenario. In Figure 3-5, you can see the screen that is used for adding an AAA client. Depending on whether you use RADIUS or TACACS+, the interface might look slightly different.
Figure 3-5. Network Configuration
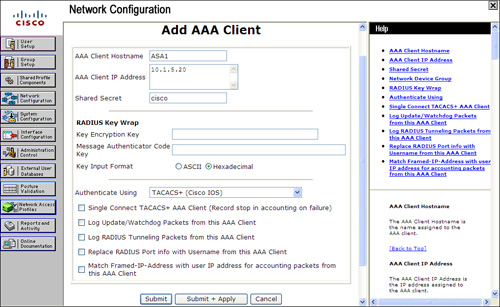
The various options that can be configured for TACACS+ clients include the following:
• Single Connect TACACS+ AAA Client (Record stop in accounting on failure): Single Connect TACACS+ AAA Client allows a single TCP connection between this AAA client and ACS. The normal operation is to establish a separate TCP connection for each request. For example, if you are using TACACS+ and you have a user that connects to the AAA client, a TCP connection is established when authentication occurs. When another user connects, another session is established, and so on. This option eliminates those multiple TCP sessions. However, this is not recommended unless the connection between the TACACS+ AAA client and ACS is extremely reliable. If you decide to use this option and the connection between the ACS and TACACS+ AAA client goes down, ACS never receives accounting stop packets for all users accessing the network through that AAA client. This causes them to remain in the logged in users list until it’s purged.
• Log Update/Watchdog Packets from this AAA Client: The Log Update/Watchdog Packets from this AAA Client allows accounting packets sent by the AAA client to be logged by ACS—specifically the logging of update or watchdog packets. It does not control overall logging of accounting packets. Watchdog packets are a means of creating better session length granularity to safeguard against the possibility of a device going down and thus never sending accounting stop packets for the users accessing the network via that device. Customers who have high priority on maintaining session length data might find this more useful than others. An example of an update packet is a RADIUS interim-accounting packet. These packets can be used to account for customer activity and then be used in billing.
• Log RADIUS Tunneling Packets from this AAA Client: The Log RADIUS Tunneling Packets from this AAA Client option allows RADIUS tunneling packets from the AAA client to be logged by ACS.
• Replace RADIUS Port Info with Username from this AAA Client: This enables the use of a username rather than port numbers for session state tracking. This option is useful when the AAA client cannot provide unique port values. For example, if you use the Cisco Secure ACS IP Pools server and the AAA client does not provide a unique port for each user, Cisco Secure ACS assumes that a reused port number indicates that the previous user session has ended, and Cisco Secure ACS can reassign the IP address previously assigned to the session with the non-unique port number. By default, this check box is not selected.
When you make changes to an AAA client, you must submit and restart the ACS services, similar to group changes. If you want to delete an AAA client, you are also required to submit and restart the service for changes to take effect.
Network Access Profiles
The way ACS 4.2 works is by applying a combination of user and group policy to a request. On top of that, a user can belong to a single group only. This leaves no scope for defining policies that can change automatically depending on some factors. For example, you might want to enforce lesser restriction if a user connects via the local network compared to when the same user connects remotely.
To overcome this, ACS provides a feature called Network Access Profiles (NAP). These profiles classify a network access request and apply a policy based on the classification.
Chapter 14 covers NAP in detail along with configuration examples.
Interface Configuration
Moving on to the Interface Configuration menu item, as seen in Figure 3-6, you find a selection from the following subconfiguration links, depending on whether you have selected TACACS+ or a form of RADIUS when you entered your AAA client:
Figure 3-6. Interface Configuration
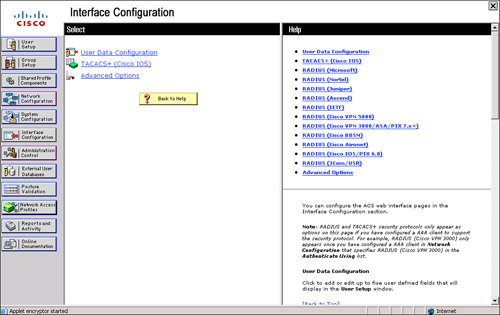
• User Data Configuration
• TACACS+ (Cisco IOS)
• RADIUS (Microsoft)
• RADIUS (Ascend)
• RADIUS (IETF)
• RADIUS (IOS/PIX)
• Advanced Options
Note
If you do not see RADIUS options here, you need to add an AAA client that uses the RADIUS protocol. Interface Configuration is directly affected by Network Configuration.
The User Data Configuration link enables you to customize the fields that appear in the user setup and configuration. Here you can add fields such as phone number, work location, supervisor name, or any other pertinent information.
The TACACS+ (Cisco IOS) link enables the administrator to configure TACACS+ settings as well as add new TACACS+ services. You can also configure advanced options that affect what you see in your interface. It is important you understand how this works. Depending on the current configuration of your server, if you go to the TACACS+ link, you might or might not see two columns. If you do see two columns, this means that per-use level attributes have been enabled. Figure 3-7 displays what you see before enabling per-user TACACS+/RADIUS attributes.
Figure 3-7. TACACS+ (Cisco IOS) Before User Attributes

In Figure 3-8, you can see the change to the TACACS+ (Cisco IOS) settings page after going through the following steps:
Step 1. Select the Interface Configuration button on the left side menu.
Step 2. Select Advanced Options.
Step 3. Select Per-user TACACS+/RADIUS Attributes.
Step 4. Select Submit.
Step 5. Select TACACS+ (Cisco IOS).
Figure 3-8. TACACS+ (Cisco IOS) After User Attributes
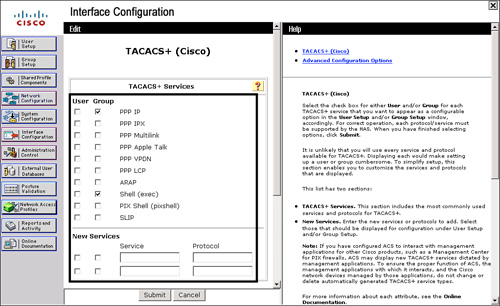
You should now have two columns available: User and Group. By selecting these options at the user level or group level, you enable these configuration options within each menu.
Here is where the user-to-group relationship comes into play. If an option is selected to appear in both the user and group configurations, and the user-level configuration is different than the group level, the user-level configuration takes precedence. Most of the features are available in both user and group configurations with a few exceptions. At the user level, you can configure passwords, expiration, and static IP addresses. At the group level, you can configure password aging as well as time-of-day restrictions for different categories.
TACACS+ Settings
To ease your configuration and help make things a little easier while you are learning, you need to disable some of the advanced TACACS+ features. You disable any advanced configurations at this point, and as you increase the functionality of ACS by adding more for it to do, you bring these configuration parameters back. Follow these steps to turn off the advanced TACACS+ settings:
Step 1. Begin with accessing the Interface Configuration section by clicking the left menu button titled Interface Configuration.
Step 2. In the beginning of this chapter, Interface Configuration was discussed as well as how selecting an option makes certain options visible in the HTML interface. Here, simply select the link TACACS+ (Cisco IOS). This refreshes your screen to the edit page.
Step 3. Deselect Advanced TACACS+ Features.
Step 4. Select the Display Time-of-Day access grid for every TACACS+ service so that you can override the default Time-of-Day settings as shown in Figure 3-9.
Step 5. Ensure that Display a window for each service selected in which you can enter customized TACACS+ attributes is deselected.
Step 6. Ensure that Display enable default (Undefined) service configuration is deselected.
Step 7. Select Submit.
Figure 3-9. Configuring Time-of-Day Settings

The preceding steps are going to enable you to see a Time-of-Day grid where you have the control to configure Time-of-Day parameters. This might not be the first thing you always want to do; however, it is very noticeable when made visible, and that is the goal here.
To check your work, follow these steps:
Step 1. Click Group Setup.
Step 2. Select Edit Settings.
Step 3. You should be able to see the Time-of-Day grids.
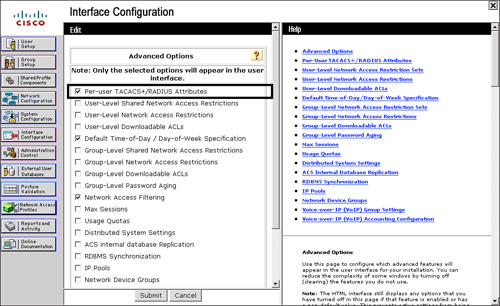
Advanced Options
Another way to clear out some of the clutter when you are learning is to disable the Advanced Configuration options. You might want to configure these settings, but for now, turn all of them off except for the Per-user TACACS/RADIUS Attributes. To do so, follow these simple steps:
Step 1. Select Interface Configuration.
Step 2. Select Advanced Options.
Step 3. Ensure sure that everything except Per-user TACACS+/RADIUS Attributes is deselected. This enables you to do some individual user configurations without crowding the interface with all the available options.
Step 4. After you complete these steps, your configuration should look similar to Figure 3-10. This demonstrates the selection of Per-user TACACS+/RADIUS Attributes.
Figure 3-10. Per-User TACACS+/RADIUS Attributes
User Setup: Managing Users
When you select the User Setup menu item, your middle frame changes to the Select screen as shown in Figure 3-11. Here you can do a few things, such as add a new user, search for an existing user, find users alphabetically or numerically, or simply list all users at one time.
Figure 3-11. User Setup

To begin your configuration, add a username. To do so, follow these steps:
Step 1. Enter a username; for this example, use aaauser and select the Add/Edit button.
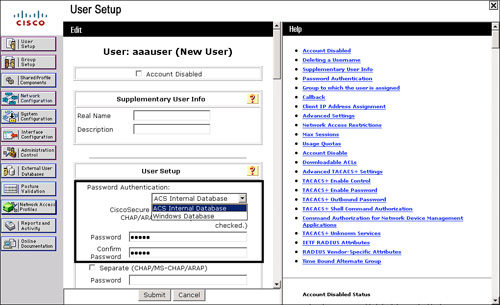
Step 2. Now, you can edit user attributes. Moving from top to bottom, you can disable a user account, enter supplementary information, and configure the user’s passwords. Figure 3-12 displays the option for authenticating against a Windows database (if you selected Windows Database during installation) or the Cisco Secure database.
Step 3. Enter the password cisco for this user. Optionally, you could select the option to use the Windows database. The default is to check the Cisco Secure database.
Here, you can also distinguish which group the user is a member of. By not specifying a group, the user is placed in the default group (group 0). You can have the same attributes to configure in the group setup as you have in the individual user setup; however, user configurations override that of the group of which they are a member.
Within User Setup, you can also configure callback settings, IP address assignment, and account disable properties.
Step 4. Click Submit to create your first AAA user in ACS. Because you have not selected a group, this user is placed in the default (group 0) group.
Figure 3-12. Authentication Location Options
Note
By selecting the List All Users button after creating your user, you should see a single user entry on the right side of the ACS interface. This ensures that the entry has been successfully created.
Customizing User Attributes
After a user has been added, you might decide that you want to customize the interface a little more. The information displayed under User Setup is good, but you could add more information that might help you in keeping track of users. Notice that in the ACS user configuration, you have the ability, by default, to include supplementary user info. This information includes real name and description, as shown in Figure 3-13.
Figure 3-13. Supplementary User Info

To add additional fields for more information to be added, follow these steps:
Step 1. Access the Interface Configuration menu.
Step 2. Select User Data Configuration. Place a check mark in the box titled Display for number 3 and 4 to indicate that you want these fields to be displayed.
Step 3. Edit or input the relevant headings for each field you plan to use in addition to the two defaults. The example in Figure 3-14 uses Extension and Cubicle.
Step 4. Select Submit.
Figure 3-14. User Data Configuration

You can check your work by following these steps:
Step 1. Select User Setup.
Step 2. Enter aaauser in the field provided.
Step 3. Select Add/Edit.
Step 4. You should now see the two new Supplementary User Info fields that you created as shown in Figure 3-15.
Figure 3-15. Supplementary User Info (After Edits)

Group Setup: Managing User Groups
To begin your configuration, recap what you have configured thus far. You have a user called aaauser who has a password of cisco and is placed in the default group. This user is authenticated to the Cisco Secure database only. To examine the group that this user is in, follow these steps:
Step 1. Select the Group Setup menu item. As Figure 3-16 illustrates, you have three options from which to choose: Users in Group, Edit Settings, and Rename Group. Users in Group lists all the users assigned to the group that is visible in the drop-down menu. A total of 500 groups numbered 0 through 499 exist.
Figure 3-16. Group Setup

Step 2. To view the group settings that your first AAA user is a member of (by default), simply select the 0:Default Group and then select Edit Settings. This selection changes the main window, and you are now in the Group Configuration section, as shown in Figure 3-17.
Figure 3-17. Configuring the Default Group

You can note a few highlights while you are here. First, look at the Jump To option at the top of the screen. This feature is a real time-saver. Try it out a few times by jumping to the IP address assignment section and then back to access restrictions. Notice that in the group configuration you have the ability to configure time-of-day access restrictions. This is not available at the user level. You can also configure callback, IP assignment, and TACACS+ settings. Under TACACS+ Settings, you can configure shell command authorizations, apply privilege levels, set auto-commands, and so on.
Note
Some of the fields might not be visible in either the Group Setup or User Setup screen. As you become more familiar with ACS, you will be able to enable or disable certain fields at either the group level or the user level screens.
When you make group changes, you are required to submit and restart the ACS services. Your changes do not take place until you have done so. If you are making multiple changes to a group, it is best to submit without restart after each change until you have completed all changes, and then restart the ACS services.
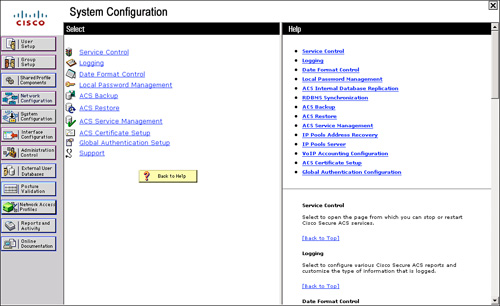
System Configuration
Under System Configuration, you find many subconfiguration links beginning with Service Control as shown in Figure 3-18. This is where you can stop and start the ACS services. You can also do so in the Service Control of Windows 2003 or using the CLI net start and net stop commands (for example, net stop csadmin). By stopping the ACS service inside of ACS, you do not stop the ACS web server. If you want to stop the ACS web server, you need to do so in the Service Control of Windows. This web service is called CSAdmin.
Figure 3-18. System Configuration
The next System Configuration feature that you can manipulate is Logging, where you can configure the local logging configuration, such as failed attempts and TACACS+ and RADIUS accounting. You also configure Open DataBase Connectivity (ODBC) and remote logging here.
Date Format Control is straightforward. This is where you can change the format of the date displayed on reports. After you change the format, you must log out of the server to actually see the changes take place.
Note
You can log out of ACS, short of closing the browser, in a few ways. One way is by clicking the Cisco Systems logo in the top left corner of the web browser screen and then selecting the Log Off button. Another method is by clicking on the X in the top right portion of the window.
The next option is Local Password Management. From here, you can set password length as well as password options. You can also configure options for remote password change and logging of password changes.
As for ACS Backup, you can schedule backups to be done manually or at specific times. You can specify a location for the backup files to be stored as well as manage the files. When ACS is backed up, it creates a file with the extension of .dmp. This file is now present when you enter the ACS Restore link. Here you have the ability to select from numerous backup files, as well as determine whether you want to restore the users and groups, system configuration, or both.
ACS Service Management enables the administrator to determine how often to test the availability of ACS authentication services. This is the CSMon service configuration. This allows ACS to test itself and take action when its test is unsuccessful. The available actions, should no authentications be recorded, are as follows:
• Restart all
• Restart RADIUS/TACACS
• Reboot
• Take no action
If the reboot option is selected, this causes the server that is running ACS to reboot. You also have the ability to add custom actions to this list via a script that controls the action to take.
You can also decide that you want to log attempts to log in to disabled accounts. Do this by selecting the check box labeled Generate event when an attempt is made to log in to a disabled account.
This is also where you can configure email notifications and Windows Event Log setup.
The ACS Certificate Setup is where you configure the ACS device with digital certificates. You use this when you configure the ACS to use HTTPS for administrative sessions or EAP authentication.
Global Authentication Setup is where you can allow protocols such as PEAP, EAP-TLS, EAP-MD5, and MS-CHAP.
Shared Profile Components
Shared Profile Components enables you to specify shell command authorization sets and PIX shell command authorization sets. By creating these command authorization sets, you can control the commands a user can execute on a device by applying the command authorization set to the user profile in the TACACS+ settings or at the group level. Figure 3-19 displays the Shared Profiles Components configuration menu. By default, you can select Shell Command Authorization Sets and PIX Shell Command Authorization Sets. Optionally, you can configure Downloadable ACLs or Management Center Authorization Sets. For these options to be visible, you must select them in the Interface Configuration page.
Figure 3-19. Shared Profile Components

Other benefits to the Shared Profile Components configuration page is the ability to configure shared network access restrictions and the ability to create a policy once and then use it in more than one group rather that defining the same policy multiple times under multiple groups.
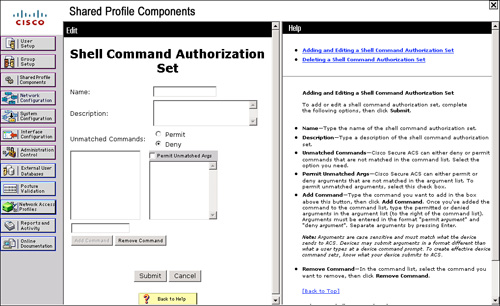
By selecting one of these links, for example, Shell Command Authorization Sets, you are taken to the configuration page for this shared profile component as shown in Figure 3-20. As you can tell, at this point, none are defined.
Figure 3-20. Shell Command Authorization Sets
External User Databases
In this section of the ACS interface, you have the ability to configure an unknown user policy. You also configure database group mappings to external user databases as well as perform the actual database configuration. You can also see the compatible databases here.
The servers available for use as an external database are as follows:
• Windows Database
• Generic LDAP
• External ODBC Database
• LEAP Proxy RADIUS Server
• RADIUS Token Server
• RSA SecurID Token Server
• RSA SecurID Token and LDAP Group Mapping
Each version of ACS includes more and more support for external databases while greatly improving the functionality of the ACS database.
Reports and Activity
The Reports and Activity section provides a wealth of tools in not only troubleshooting, but also in monitoring your network. If you are going to log it, you better look at it. So many times I have been in networks running intrusion prevention systems, SYSLOG, and other types of monitoring, yet nobody takes the time to look through the logs. Figure 3-21 shows the Reports and Activity page.
Figure 3-21. Reports and Activity

Within ACS, you have the ability as an administrator to monitor your network security on a number of levels. The available logs that ACS keeps for you are as follows:
• TACACS+ Accounting: Accounting information from TACACS+ clients is parsed and stored in these files. All the TACACS+ Accounting reports include information such as time/date, username, type of connection, amount of time logged in, and bytes transferred. The information included in these reports is configurable by the administrator in the System Configuration section under Logging. These reports can be found at Program FilesCiscoSecure ACS v4.xLogsTACACS+Accounting.
• TACACS+ Administration: The TACACS+ Administration reports include all the command requests from AAA clients such as routers or firewalls where command authorization is configured. These reports can be found on the hard disk of ACS at Program FilesCiscoSecure ACS v4.xLogsTACACS+Administration.
• RADIUS Accounting: Accounting information from the RADIUS clients is parsed and stored in these files. It functions similar to the TACACS+ Accounting logs,; these reports can be found in Program FilesCiscoSecure ACS v4.xLogsRADIUSAccounting.
• VoIP Accounting: Clients can send VoIP accounting information to ACS for logging. This report includes information such as VoIP session start and stop times, CLID information, and other attributes. The information included in these reports is configurable by the administrator in the System Configuration section under Logging. These reports can be found in Program FilesCiscoSecure ACS v4.xLogsVoIP Accounting.
• Passed Authentications: Passed Authentication reports store information regarding every successful authentication and authorization request. These logs are generated by CSAuth events and do not depend on accounting information from AAA clients. These reports are very important to assess your security policies because they show which users are using various services that are authenticated. A thorough look at these reports will help determine whether some users have more access than they are supposed to have. These reports can be found in Program FilesCiscoSecure ACS v4.xLogsPassed Authentications. You should note that this report is not enabled by default and can be enabled from System Configuration > Logging.
• Failed Attempts: Failed attempts reports store information regarding every failure authentication and authorization request. These logs are also generated by CSAuth events. This is the first place you should look at if authentication or authorization is failing. These reports provide username, device IP address, and failure reason, among other information, and are usually very precise in pointing out the reason for failure. These reports can be found in Program FilesCiscoSecure ACS v4.xLogsFailed Attempts. Figure 3-22 shows the Failed attempts log. You can see that the logs show an authentication failure with the reason Unknown NAS. You can make out from the reason that there is a problem with the AAA Client entry in ACS. Similarly, the failure reasons help easily identify the cause of failures in most cases.
Figure 3-22. Failed Attempts Report

• Logged-in Users: Logged-in Users is another report that assists with user administration as well as in troubleshooting users that are failing authentication; when an Accounting Start packet is received from an AAA client, the user is added into this report. The user gets removed from the report when a corresponding Accounting Stop packet is received. This log is not maintained in a CSV format. The idea behind this report is to provide a way in which you can tell how many users are logged in via different devices at a given time. This will help you identify login trends and abnormalities.
• Disabled Accounts: This report enables you to view accounts that have been disabled.
• ACS Backup and Restore: The ACS Backup and Restore report is available only if the option in Interface Configuration is enabled. This log maintains a history of the dates and times that ACS was backed up and/or restored. This report also shows whether there were any problems during the backup or restore. These reports can be found in Program FilesCiscoSecure ACS v4.xLogsBackup and Restore.
• Remote Database Management Source (RDBMS) Synchronization: The RDBMS Synchronization report is also available only when the option is configured in Interface Configuration Advanced Options. You don’t enable the report; you enable RDBMS Synchronization. This allows ACS to keep report information on RDBMS synchronization. This log also shows whether there were any problems during the RDBMS sync. This logs the time and reason for RDBMS synchronization. These reports can be found in Program FilesCiscoSecure ACS v4.xLogsDbSync.
• Database Replication: Database Replication is yet another report that must be enabled in Interface Configuration. This report logs the time that the ACS database was replicated to the backup server. This log additionally shows if there were any issues with replication. These reports can be found in Program FilesCiscoSecure ACS v4.xLogsDBReplicate.
• Administration Audit: Administration Audit logs all the activity in ACS that is performed by administrators. This keeps track of who logged in, what users and groups they made changes to, and what time they logged out. These reports can be found in Program FilesCiscoSecure ACS v4.xLogsAdminAudit.
• User Password Changes: This report tracks changes to users’ passwords performed through the User Changeable Password Module. These reports can be found in Program FilesCiscoSecure ACS v4.xCSAuthPasswordLogs.
• ACS Service Monitoring: The last report is the ACS Service Monitoring report. This report keeps track of all the events that ACS has had within the services it monitors. An example of a service that might be monitored is CSAdmin or CSTacacs. CSMon can be enabled during the install process. This is, however, configurable. To configure this, you must go to System Configuration and then ACS Service Management. Here, you can choose to monitor the login process, generate events when someone tries to log in to disabled accounts, and so on. These reports can be found in Program FilesCiscoSecure ACSv4.xLogsServiceMonitoring.
As far as viewing these reports goes, you can view them in the ACS interface or from the hard drive of the ACS server if you are using ACS for Windows. The logs are stored as CSV files. Applications such as ACS View can also parse these logs and generate various reports based on these logs.
Note
For more information on ACS View, see http://www.cisco.com/en/US/partner/products/ps9302/index.html.
Summary
At this point, you should be familiar with the interface of ACS and be prepared to add a user to the database. Remember that the look and feel of your interface depends on what features you have made available in the Interface Configuration section. As you progress with your configuration of ACS, you will add more features and make more configuration options visible in the interface. This is merely a starting point and an overview of ACS 4.2; however, it’s important to note that although ACS 4.2 has the largest install base, the latest version of ACS, 5.2, is the next generation of ACS with which you should begin to get acquainted.