Despite the best efforts of IT staff, it’s now commonplace for workers to use their own laptops and tablets at work. Indeed, some companies and organizations actively encourage this practice to reduce overall costs. We know, it’s depressing, isn’t it?
The potential upside to this, however, is that there’s a reasonable chance that “Mr. or Mrs. On Your Case the Whole Time” might be working from home or from the coffee shop around the corner where they like to deprive other patrons of a table.
Of course, this presents its own challenges to support staff. Unless said coffee shop happens to be on the ground floor of your building, you can’t pop over to the desk of the person who needs help. It also means that rather than being connected to the company network over a nice, stable, reliable, and secure Ethernet line, they’re forced to use a Wi-Fi connection that’s horribly insecure, as in the case of the aforementioned coffee shop, or they’re at home sharing a connection that’s being monopolized by a teenager on an Xbox.
So, how do you support mobile workers or workers in satellite offices, especially when it comes to network issues?
Helping the Worker Help Themselves
This, of course, is the big challenge. Normally if a user has a problem, you’d tunnel into it through Remote Desktop or some remote-control software, which you’ll look at later in this chapter. The sensible place to begin, though, is with what happens when the user doesn’t have a network connection and can’t get online at all.
Throughout this book we’ve shown you all the technical ways in which you can repair network connections and get detailed diagnostic information about what’s going on. Let’s face it, normal people can’t do any of that stuff. They can normally only just download something from an app store, so you have to use different tools and techniques to help them out when you can’t get to where they are.
McGyvering the Situation
We don’t know if you’re old enough to remember, but back in the mid-1980s there was an action show on TV starring Richard Dean Anderson called McGyver. He played an ex-spy who would solve problems by creating something like a complex explosive out of a piece of string, a pair of trousers, and a cow. There was also a more recent remake, but the less said about that, the better.
Now we’re not suggesting that you ask the person with the network problem what they’re wearing…that could go wrong for you. However, asking what else is around or might be available can be a good start.
Do they have a smartphone, for instance? If so, does their cellular contract support tethering? If it does, you might have a usable Internet connection for their laptop. You probably won’t be able to use it to get Remote Desktop access, but it at least means the user can send you stuff.
If they don’t have tethering or if the Wi-Fi on the laptop isn’t working, is there a friendly person with a laptop nearby who might be prepared to e-mail you a file? Also, does the user or somebody else nearby have a USB flash drive so you can transfer a file to said laptop?
All of these methods can help you McGyver a situation to your advantage, meaning you can help the user far more quickly and effectively, while also making yourself look like the hero who’s saving the day.
The Problem Steps Recorder
The Problem Steps Recorder was included with the beta release of Windows 7 and was only intended to be used for that and nothing else. It proved so popular with beta-testers that Microsoft decided to keep it in the final release, and it eventually made its way to Windows 8.1 and Windows 10.
You can find the Problem Steps Recorder by searching in the Start menu for PSR, where it will be listed as “Steps Recorder.” In short, this is a tool that has only three buttons and that enables a user to record annotated screenshots of what they see and do on the PC; these screenshots are then compiled into a single file they can e-mail to you.
Figure 7-1 shows what the user sees when they start the Problem Steps Recorder. There are three buttons (four if you include Help), called Start Record, Stop Record, and Add Comment.

Figure 7-1. The Problem Steps Recorder toolbar
When the user clicks Start Record, they’re not recording a video, so they don’t need to rush with what they’re doing. This means you can ask them to click specific things and open specific information and status panels if you need.
When the user clicks the Stop Record button, a file will be displayed showing annotated screenshots of everything they’ve done on the PC and everything they’ve clicked, as shown in Figure 7-2.

Figure 7-2. A file is displayed when the user stops the recording
Below these screenshots is an Additional Details section containing more technical information about the events that unfolded, such as the names of apps or services the user ran.
Additionally, at any time throughout the recording, the user can click the Add Comment button at which point their screen will freeze, and a dialog box will appear in which they can type a message, perhaps about what they’re doing or what they expected to happen at that time. This comment will be annotated to the screenshot taken at that moment so that you can read it.
The user needs to click the Save button at the top left of this window to save the file to their PC; the desktop is the default save location for this tool. That file, which is only small in size, can then be sent to yourself for review.
Overall, the Problem Steps Recorder is an excellent tool that shouldn’t be underestimated because it allows you to see exactly what the user is doing…or at least what they’re doing wrong again!
Game DVR
We want to mention a gaming feature that’s exclusive to Windows 10, as there are a few occasions where it might be useful as a support tool. It is limited in functionality, though, and there are rules you need to follow to get it to work effectively. You won’t find Game DVR in the Enterprise editions of Windows 10, but it’s in Pro.
You open Game DVR on a Windows 10 PC by pressing the Windows Key+G. At first, the user will asked to confirm that the app they’re using is in fact a game, as Windows 10 is sensible enough to know what is and is not.
Once this is done, the user can open the Game DVR toolbar, as shown in Figure 7-3, using the Windows Key+G key combination, and start and stop video recording with Win+Alt+R.

Figure 7-3. Game DVR can sometimes help with support
What this does is save a video file on the PC to the / Users/Videos/Captures folder, which can then be e-mailed to a support person. However, there is a big caveat that you need to be aware of first.
This caveat is that Game DVR works only inside a single app. This means it’s absolutely fine if the user wants to record a problem they’re having with your customer relationship management (CRM) software , but the moment they open the Start menu or switch to another app, it’ll stop working.
That said, it’s worth mentioning here as you never know when a video of a problem might give you greater insight into what’s going on with the PC at the time and what the user is actually doing.
Providing Remote Help and Support
The Problem Steps Recorder and Game DVR are useful tools, but if the user has Internet access, you’ll probably want to sign into their PC remotely and take control. Now you might have a third-party tool you like to use, such as Team Viewer, but there are actually no fewer than three ways you can achieve the same thing with Windows itself.
Configuring a PC for Remote Connections
Before you can help a user remotely, their PC needs to be configured to permit remote connections. You do this from the System Properties panel; open the Control Panel, click System, and then click Remote Settings in to the top-left corner of the windows. You can also search for sysdm.cpl in the Start menu.
The Remote tab of the System Properties Dialog contains the settings you need, as shown in Figure 7-4. Here you can allow (or deny) Remote Assistance (and Quick Assist) connections and also allow or deny Remote Desktop connections. Note that with Remote Desktop, which we’ll look at shortly, you normally need the username and password of a specific user on the PC. However, you can also click the Select Users button to add IT support staff from the company domain.

Figure 7-4. You configure Remote Assist in the System Properties Dialog
Quick Assist
Quick Assist is a feature exclusive to Windows 10, so it can’t be used to provide assistance to or from a Windows 7 or Windows 8.1 PC. You need to be signed into the PC with a Microsoft Account or Azure Active Directory account for it to work, but it provides a six-digit code that enables Microsoft’s Remote Desktop peer-to-peer system to provide remote access to a PC, as shown in Figure 7-5.

Figure 7-5. Quick Assist is a feature of Windows 10
Quick Assist is an improvement over Windows Remote Assistance (which we’ll look a shortly) for several reasons: it’s easy for the user receiving support to use it, the tool allows you to restart the remote PC while keeping the support session active, and the person providing support can also respond to User Account Control requests.
Along the top of the Quick Assist window when you’re providing support is a toolbar containing some useful utilities, as shown in Figure 7-6.

Figure 7-6. Microsoft Quick Assist in action
Annotate allows you draw and scrawl on the screen of the user being supported. You can do this to highlight things for them so they can see what they’ve done wrong or where the option is that they can’t find.
Fit Screen allows you to see their screen at either its native resolution or one that will fit inside the window you have open on your own screen.
Restart restarts the remote PC while keeping the Quick Assist session active.
Task Manager opens Task Manager on the Remote PC.
Reconnect enables you to reconnect to a remote PC where the connection has dropped.
Pause allows you to pause the connection, temporarily giving the end user control again.
Stop closes the Quick Assist connection.
Windows Remote Assistance
Windows Remote Assistance can be found in all supported versions of the operating system. It’s a remote-control application for PCs that’s most easily found in the Start menu by searching for msra.exe.
Just as with Quick Assist, you can either ask for help or offer it, and there are several different options for sending the invitation file Remote Assistance creates, as shown in Figure 7-7.

Figure 7-7. Remote Assistance requires an invitation file to be sent
You can either save the invitation file or send it via e-mail. This second option will not be available to you if you don’t have an e-mail app, such as Microsoft Outlook, already installed and configured on the PC. That’s where saving the file comes in, as it can then be attached to e-mail in a browser.
Activating Easy Connect in the Enterprise
Easy Connect may or may not work for you as it requires the Peer Name Resolution Protocol and IPv6 connectivity to work, and not all routers support the Peer Name Resolution Protocol. You will also find that in Enterprise environments this might be disabled. It will need to be installed on the server, and it will need to be enabled on the remote PC.
You do this in the Group Policy Editor (search for gpedit.msc in the Start menu); navigate to Computer Configuration ➤ Administrative Templates ➤ Network ➤ TCPIP Settings ➤ IPv6 Transition and then change the Set Teredo State option to Enabled, as shown in Figure 7-8.

Figure 7-8. You may need to change a Group Policy setting to get Easy Connect working
Once the invitation files have been sent, the remote user will need to stay at their PC for a few minutes, as they have a couple of extra things to do. The first is to relay to the person providing support the password they’re given, as shown in Figure 7-9. This is best not put in the e-mail with the invitation file for obvious reasons of security.
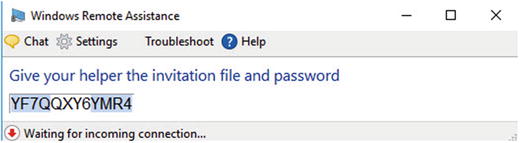
Figure 7-9. In addition to the invitation file, you will need a password
When you have opened the invitation file and Remote Assistance is running on your PC, you’ll first be asked for the password. Then the remote user will be asked if they want you to see their desktop. They still can’t leave, though, as once you have access, you need to click the Request Control button that sits in the top left of the Remote Assistance window.
Once you click this, a message will appear on the remote users’ PC saying you would like to take control of their desktop. It is very important at this stage that you ask them to also select the box that says “Allow [name] to respond to User Account Control Prompts.” Otherwise, the user will have to sit there the whole time and click them for you, as shown in Figure 7-10.

Figure 7-10. You need to request control of the remote PC
Once you have access, it’s fairly standard fare from there on. You can open a chat window to talk to the person you are providing support to, and they can end the support session at any time should they want.
Remote Desktop
If you are an IT professional, the de facto method of taking control of another PC is by using Remote Desktop. This is available in all supported versions of Windows. Just search for Remote Desktop in the Start menu to launch it, though you’ll need to make sure that Remote Desktop connections are permitted on the remote PC, as we detailed earlier in this chapter. Note that in some circumstances you can also use Remote Desktop over the Internet, such as if both PCs are connected to the same VPN.
You will need to know the name of the remote computer on your network, as shown in Figure 7-11. This can be obtained from the System panel in Control Panel, but you can ask someone to type cmd to launch a Command Prompt window, where the command hostname will display the full name of the computer.

Figure 7-11. You need to type the name of the remote PC
Once the connection has been made to the remote PC, you will presented with a security certificate, which is just Remote Desktop’s way of warning you that the remote PC might be infected with malware or some other nasty thing (see Figure 7-12).

Figure 7-12. A security certificate will need to be accepted
Remote Desktop has plenty of great options available to you. By clicking the “Show options” button in the Remote Assistance sign-in dialog, you can choose the display resolution you want the session to run at, the quality of the connection, what Remote Desktop gateway server to use, and also what resources you want to access from your own PC or the network on the remote PC, as shown in Figure 7-13.

Figure 7-13. Various options are available in Remote Desktop
Caution
Do not share remote resources or resources on your own PC if you believe the PC you are supporting may be infected with malware.
We’ve mentioned Remote Desktop gateway servers here, so you might be wondering what they are. They are a feature of Windows Server that allow you to connect to a remote PC over an internal or private network from any Internet-connected PC.
Remote Desktop Gateway (RDG) uses the Remote Desktop Protocol (RDP) over HTTPS to establish an encrypted connection between the two machines, meaning a connection can exist without the need for a virtual private network. RDG needs to be configured for your Windows Server system on Windows Server 2008 R2 and later.
Once a Remote Desktop connection is established, you have full control over the remote PC, including being able to interact with UAC prompts and restart the PC while maintaining the connection, all without the need for user interaction. This makes Remote Desktop useful for those quiet times when the user of the remote PC is away from the machine, though if you’re connecting to a laptop or pro tablet, it might be a good idea to ask the user to leave it plugged in so the battery doesn’t die on you. Sadly, that’s one thing Remote Desktop can’t control.
Remote Management of BYOD PCs
It’s worth pointing out that if you connect a Windows 8.1 or Windows 10 PC to Microsoft Azure or Active Directory using the options in the Settings app, you can enroll the machine in device management. This setting, found in Accounts under “Access work or school,” allows an administrator to remotely administer a PC that belongs to the user, as shown in Figure 7-14.

Figure 7-14. Windows 8.1 and Windows 10 support the remote management of PCs
This remote administration includes being able to specify that minimum security standards, such as Windows Update and antivirus, are up-to-date before the PC can connect to the company network. You can also remotely wipe corporate data, which is stored separately from the user’s own files and documents, at any time.
Summary
Remote users are a pain in the butt, putting it mildly. They might be using their own machine in which case they’ll likely be very protective of it, or they might do something that completely takes their Wi-Fi offline the moment they get to the airport.
We like to think that a little emergency pack handed to each user is a good investment; it could contain a USB recovery drive for the PC, which they can also use for file transfer, and a USB Ethernet dongle. This way, if Wi-Fi completely fails on the PC, they might still be able to get network and Internet access on a wired network.
We rely on our network and Internet connections so much these days, but there’s just so much that can go wrong, and so many different ways to address and repair issues, that networking problems are still the number-one biggest headache for PC users and system administrators alike. Ideally this book has furnished you with the knowledge and skills necessary to alleviate that headache.