The methods and tools that you’ll use to repair networking problems in Windows vary in use and complexity depending on the task at hand. As an example, some tools are completely automated, needing just a click to go off and do their job, while others require delving into complex administrative utilities or even the Windows command prompt.
It’s true then that troubleshooting and repairing networking problems on PCs can be highly complex, especially once you take into account all of the external factors that could also be the cause of problems. In this chapter, though, we’ll guide you through the methods you’ll use to repair many different types of networking issues.
Managing Routers
Routers are the gateways to the wider world, so it’s important that they’re correctly managed. This is both for reasons of maintaining stable and reliable Internet and network connections and for maintaining high levels of security on your network and PCs. Remember that the security on PCs and networks is only ever as good as its weakest component.
Good and proper management of routers is pretty much just best practice, and by following a few simple rules, you can ensure that your router is safe and secure and that it will provide high levels of service throughout its life.
Always change both the default password on the router and the administrator username to something secure. It’s all too easy for people to look up the defaults on the Internet.
Configure one or more guest Wi-Fi networks for visitors to your premises that do not have access to file shares, printers, and servers on the network or that only have access to noncritical file shares and accessible printers.
If the router supports it, configure bandwidth management on specific Wi-Fi networks to prevent individual users or malware from slowing down the network.
If you have any mission-critical systems, connect them to a router that also supports 4G or 5G backup connectivity, but do not permit the rest of the business to use this expensive connection medium.
Always connect your PCs , but especially your primary network and Internet connection equipment, to surge protectors, as storms can quickly fry any hardware connected to the outside world via a cable.
If possible, connect your files shares and critical network infrastructure to two different networks, where the primary one that’s accessible to all PCs on the network can be easily and quickly disabled in the event of a malware or hacking attack. This will leave your critical systems still able to function.
The Windows Automated Troubleshooters
Windows comes with automated troubleshooters that can be accessed through the Troubleshooting section of the Control Panel. These are cmdlets that will just reset specific components to their default states. This is literally all that the troubleshooters do, but they can be useful in some circumstances.
The networking troubleshooters contain utilities that can reset Internet connections, file shares, network adapters, and more, as shown in Figure 5-1. You can find more troubleshooters online through the Microsoft Support web site ( https://support.microsoft.com ) by searching for specific problem types.

Figure 5-1. Automated troubleshooters can repair some types of networking issues
You can also create your own custom automated troubleshooters, perhaps to easily fix common problems with specific hardware in your company. The documentation for this was created for Windows 7 and is online at http://pcs.tv/2vX5YqB .
System Restore
Many IT professionals shy away from using System Restore because back in the days of Windows XP, when it was first introduced, malware would often hide there, waiting to be restored after you thought you’d cleaned it.
With the advent of User Account Control (UAC) in Vista, that all changed, and with Windows 7 and later, security was beefed up even further to prevent malware from infecting the System Restore archive.
System Restore uses the System Volume Information folders you might have seen in the root of each drive on a PC, and when an action occurs in which something changes, such as installing or removing an app or driver or installing a Windows Update, a snapshot of all the critical files and files that are affected by the process is taken. This includes making a backup copy of the Windows Registry.
You configure System Restore from the System controls in the Control Panel, by clicking the “System protection” link in its top-right corner. Perhaps, though, the quickest way is to search for sysdm.cpl in the Start menu.
System Restore can be configured for each drive individually, and while it can be used to cache older copies of files when they are changed, in reality this feature is being deprecated in Windows as it’s never truly worked reliably. Thus, the only drives you really need to have System Restore configured for are your Windows drive and any others on which you installed software.
Clicking the Configure button in the System Protection section of the System Properties panel will enable you to turn System Restore on or off for the selected disk and to choose how much space on the disk is devoted to System Restore, as shown in Figure 5-2.

Figure 5-2. System Restore can be configured from the Control Panel
Remember that the amount of space you allocate will directly determine how many restore points are kept on the machine. If you have a machine with regular installs and updates being applied, you might want to allocate more space than the default.
If you do suspect that malware has somehow wormed its way into System Restore, there is a Delete button that will remove all the contents of the System Volume Information folder for that drive.
Back in the main System Protection panel , you can manually create a restore point should you want, perhaps because you’re taking an action on the PC where you’re unsure if System Restore will operate automatically, and you want to be able to roll back your changes should something go wrong.
If you need to restore Windows to an earlier point, click the System Restore button to launch the restore wizard. This will present you with the most recent restore point and an option to choose from others. If you choose this second option, the window that appears contains a “Show more restore points” check box in its bottom-left corner, as shown in Figure 5-3.

Figure 5-3. You can view just the most recent or all available restore points
If you need to further check what rolling back to a specific restore point will really do, highlight it and then click the “Scan for affected programs” button. This will display a complete list of all the software and drivers on your PC that would be affected, either rolled back to before and updated or removed completely, by the restore, as shown in Figure 5-4.

Figure 5-4. You can see what will be affected by System Restore
Tip
You can run System Restore from the recovery tools if you have a nonbootable copy of Windows. Start the PC from your installation media, a System Repair Disc (Windows 7), or a Recovery Drive (Windows 8.1 and Windows 10), and select the Repair option. System Restore will be available as one of the options and works identically to how it does on the desktop.
Resetting the TCP/IP Stack Using netsh
One of the most common fixes for networking problems on a PC is to reset the TCP/IP stack. In fairness, while the networking stack used to be problematic, it was completely rewritten in the most recent versions of Windows and is now incredibly reliable and robust.
To do this, you use the netsh command from the Windows command prompt (when run as an administrator), which is extremely useful and can do a great many useful things.
The command you use to reset the TCP/IP networking stack is netsh int ip reset. Where netsh gets really useful, though, is in managing Wi-Fi network profiles.
Tip
You can get a full list of netsh commands in Windows at http://pcs.tv/2f08Bed .
Managing Wi-Fi Profiles Using netsh
Wi-Fi profiles can be very bothersome. They can become corrupt, you can forget what the password is for a specific network, and you can accidentally misconfigure a network when you first connect to it. In short, they can be a pain in the butt. Using netsh, you can tame your Wi-Fi profiles using the following commands. We showed you the netsh command in Chapter 3, but there are some specific commands pertinent to repairing Wi-Fi network issues, so it’s worth repeating them here.
netsh wlan show profiles displays a list of all the Wi-Fi networks for which connections are stored on the PC.
netsh wlan show profiles name="SSID" key=clear is a great command as it will display full details about a specific network and also give you the password for that network. This is useful if you want to set up a new device and don’t know the password.
netsh wlan show settings displays the current global settings for all of the PC’s Wi-Fi network connections.
netsh wlan show blockednetworks displays a list of any Wi-Fi profiles that have been specifically blocked using netsh.
netsh wlan set blockednetworks display={show|hide} can be used to show or hide the display of blocked networks from the main networks list.
netsh wlan add filter permission={allow|block|denyall} ssid="SSID" networktype={infrastructure|adhoc} allows or blocks a specific network.
netsh wlan delete filter permission={allow|block|denyall} ssid="SSID" networktype={infrastructure|adhoc} deletes an allow, block, or denyall filter that’s been applied to a network.
netsh wlan set profileorder name="SSID" interface="Network Interface Name" priority=1 sets the connection priority for a specific Wi-Fi network , so the ones you want used first will have the correct priority.
Windows Reset
Windows 10 includes a handy reimaging feature called Reset. It’s an imaging tool that’s really quite clever in how it works, though there are significant downsides too. (It’s called Refresh in Windows 8.1, and it’s absent from Windows 7 where you just have the System Image Backup tool.)
You run Reset (and Refresh) from the Update ➤ Security section of the Settings panel, where you’ll find it in Recovery. What it does is reimage the PC from a backup, but the way it keeps this backup is clever because it is automatically updated to include all Windows Updates that are 30 days old or more. The theory, of course, is that if you’ve been using a PC with an update for 30 days, it can be considered stable and reliable.
The downside, however, is that you will have to reinstall and configure all of your installed software and apps. If you are using a PC running Windows 10 S or if you only use apps from the Windows Store or a Custom Business Store, then this isn’t too much of a problem. If you have a lot of Win32 software installed, however, you might find the System Image Backup option more suitable for your needs.
Reset (Refresh) gives you two options when you run it: “Keep my files” and “Remove everything” and start again, as shown in Figure 5-5. The “Keep my files” option will make sure that any files and documents stored in the Users folder will be preserved.

Figure 5-5. You can reset Windows 10 to recover from problems
Note
We want to make a quick note about System Image Backup. This feature has now been deprecated by Microsoft in Windows 10. This means that while it will always remain in Windows 7 and Windows 8.1, it may be removed by Microsoft at some point in the future from Windows 10.
The Windows Administrative Tools
When it comes to reporting and diagnostics, the Windows administrative tools stand head and shoulders above anything else available in the OS. The level of detail you get from these tools is truly staggering. Here we’ll show you how to use the tools and utilities most pertinent to networking troubleshooting.
Task Manager
We’re going to begin with something that’s not strictly an administrative tool but that is still relevant in many ways, the Task Manager. You’re probably familiar with this already, but it’s launched by right-clicking the taskbar or by performing a Ctrl+Alt+Del operation. In Windows 7 it’s a fairly basic affair, but in Windows 8.1 and Windows 10 it has a few extra tricks up its sleeve.
On the Processes tab in the Task Manager, you will see that all CPU, memory, disk, and network activity for apps and services is heat-mapped, as shown in Figure 5-6. This means you can see your network traffic at a glance and if anything is hogging resources.

Figure 5-6. Apps and services are heat-mapped by activity in the Task Manager
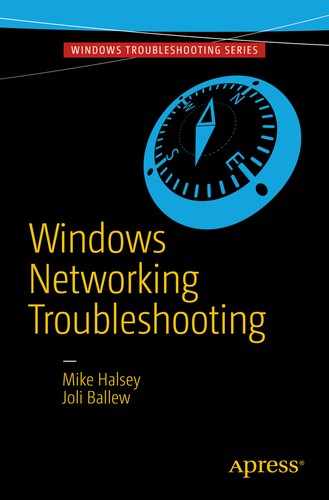
The Performance tab will display your current network activity as a live graph, with details of how much actual data is being sent and received by the PC at that time, as shown in Figure 5-7.
Figure 5-7. You can view useful live network data
Lastly, and this comes back to heat-mapping, the App history tab will show you how much total CPU, network, and metered network (aka cellular data) apps have been using over a period of time, as shown in Figure 5-8. You can use this to see what apps are consuming network resources on the PC.

Figure 5-8. You can track greedy apps in the Task Manager
Resource Monitor
The first administrative tool to detail here is one that’s linked directly from the bottom of the Performance tab in the Task Manager. The Resource Monitor takes the reporting of the Task Manager and scales it up.
The Performance Monitor consists of five tabs, each containing collapsible panels. The Overview tab contains panels displaying the apps, drivers, and services currently using the PC’s CPU, disk, networking, and memory, though switching to one of the other tabs across the top of the window presents much more useful information.
For example, in Figure 5-9 you can see the Network tab open. Here there are collapsible panels including Processes with Network Activity, Network Activity, TCP Connections, and Listening Ports.

Figure 5-9. The Performance Monitor provides huge amounts of live information
Each of the processes using the network on your PC has a check box to the left of its name. By checking an app or service, the rest of the panels will change to show only network information relevant to that particular process, so you can check what it’s doing, knowing that you won’t miss anything.
Additionally, the Network Activity and TCP Connections panels will detail the IP address, network name, or domain name of the resource being accessed so you can see what processes are communicating with the outside world or across your network.
Performance Monitor
The Performance Monitor is similar to the Resource Monitor in some ways, in that it provides live data about what’s happening on your PC. However, the Performance Monitor allows you to display the data according to OS function instead of process activity.
For example, if you click the green plus (+) icon to add a counter, or counters, to the graph and navigate to Network Interface, you will see a whole long list of network functions that you can display for all network adapters in the PC or that you can narrow to a single adapter, as shown in Figure 5-10.

Figure 5-10. The Performance Monitor provides live information about your PC
If you need to keep an eye on specific OS functions, then the Performance Monitor is an excellent tool for doing so.
Event Viewer
Almost nothing happens on a PC without it being recorded in the Windows Event Viewer. This reporting utility separates events into Information, Warnings, Errors, and Critical [Errors]. Each event is clickable and comes with a text description of what happened, along with the time and date of the event and any error codes (in the format 0x000000) that you can search for online, as shown in Figure 5-11.

Figure 5-11. The Event Monitor provides a wealth of information
There are some very useful things you can do in the Event Viewer, however. You can click Create Custom View in the right-side panel. This allows you to gather data on a specific operating system function so you can track errors and events over time, as shown in Figure 5-12.

Figure 5-12. You can create custom views to gather data
Also in the right panel is a Filter Current [Custom] View option that you can use to filter any custom view you have created so that you can narrow down the data contained within it.
Once you have determined what event or error you want to track, you can select Attach Task To This Event by highlighting it and then clicking the correct option near the bottom-right corner of the window.
The reason to attach a task to an event is that you might want to start a program such as an automated troubleshooter, as shown in Figure 5-13; send an e-mail to a support person (you don’t need an e-mail client on the PC, just a valid SMTP address that the Event Viewer can use to send the mail); or display a message on the PC’s screen, such as one telling the user to stop what they’re doing and call support so they can describe exactly what’s running at that time.

Figure 5-13. You can attach tasks to event s
Tip
Event logs in Windows can be exported through the Event Viewer and imported and viewed on another PC.
System Information
Sometimes you need detailed information about the PC, and you can get this in the System Information panel. This will provide extremely detailed, exportable information about the PC and everything installed on it, as shown in Figure 5-14.

Figure 5-14. You can get detailed information about the PC from System Information
Firewall with Advanced Security
The last administrative tool we’ll discuss is the Windows Firewall with Advanced Security . Sometimes you might find that network activity is being blocked by the firewall, perhaps because you have custom software, a secure connection that requires a specific port to be open, or a specific service that requires network access that’s currently denied.
The Windows Firewall with Advanced Security allows you to specify individual rules for inbound and outbound network traffic on the PC, categorized by Program, Port, or Predefined (basically a master list of Windows features), or to create a fully custom rule, as shown in Figure 5-15.

Figure 5-15. The Windows Firewall with Advanced Security allows you to create custom rules
Additionally, you can create connection security rules that will allow you to specify the security, authentication, and peer-to-peer technologies and addresses for secure business networks.
Microsoft SysInternals Suite
Microsoft provides a suite of advanced diagnostic and reporting tools for Windows in its SysInternals Suite, which is available from http://technet.microsoft.com/sysinternals . This suite includes specific network reporting tools, plus some extra utilities that are utterly invaluable to any IT professional. These are the main networking tools for troubleshooting :
PsPing is more configurable than the standard Windows ping command. You can use this to test network connections.
PsTools is a suite of tools for remotely administering other PCs on a network.
TCPView provides detailed information about endpoint network connections, including IP addresses and port data, as shown in Figure 5-16.

Figure 5-16. TCPView provides detailed information about network connections
WhoIs is a handy utility for reporting on the registered owner of domain names or IP addresses online.
There are a few SysInternals utilities, though, that we want to highlight for their out-and-out usefulness.
Autoruns
Earlier in this chapter we detailed the Resource Monitor, which you can use to see everything running on the PC. Where it can’t help, though, is when you have a rogue process, such as a DLL or service that’s running at startup and hogging or causing other problems with network traffic.
That’s where Autoruns comes in, as shown in Figure 5-17. This brilliant utility details absolutely everything that runs when the PC starts, including Registry keys, DLLs, and more besides. You can use this to disable anything that might be causing problems on the PC.

Figure 5-17. Autoruns details everything that runs at startup
Process Explorer
The next two aren’t specifically network tools, but they’re so useful you never know when you might need them. Process Explorer, as shown in Figure 5-18, will detail what program has opened a particular file or directory, as well as detailing process dependencies and associated Registry keys for a process.

Figure 5-18. Process Explorer displays details on running processes on the PC
Process Monitor
Process Monitor , on the other hand, shows real-time information for file system, Registry, and process activity, as shown in Figure 5-19. This makes it easy to get detailed information on individual activities that are impacting the PC at that time.

Figure 5-19. Process Monitor displays information process successes and failures
Microsoft Network Monitor
Outside of the SysInternals Suite there are also additional useful tools that are provided by Microsoft. Microsoft Network Monitor is an archived product but still available from the Microsoft web site at http://pcs.tv/2tW2Hui . It is used to view the contents of data packets that are being sent and received over the network.
Microsoft Message Analyzer
The Microsoft Message Analyzer has replaced the Microsoft Network Monitor. You can download it from http://pcs.tv/2uQnywt , and you can use it to analyze data packets sent across the network as well as to view much more detailed information than the Network Monitor can provide on exactly is being sent and received across your network.
Managing Roaming Network Profiles
Sometimes a PC connected to a company domain can experience corruption in what’s called the roaming profile. This is the user’s specific connection settings to the server and their configuration and customization options. If this happens, you can delete the roaming profile and re-create it the next time the user connects to the domain server.
To do this, open System from the Control Panel and then click Advanced System Settings. On the Advanced tab, you will see a User Profiles section, as shown in Figure 5-20. Click the Settings button, and a dialog will appear containing both local and roaming user profiles that are stored on the PC. You can use this dialog box to change profiles between local and roaming and also to delete a corrupt profile.
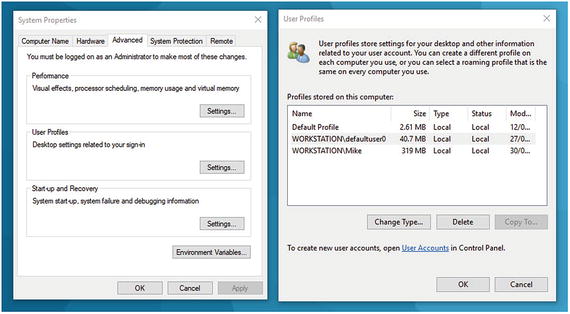
Figure 5-20. You can delete corrupt roaming domain profiles
Managing Domain Settings
Additionally, you can manage the domain settings themselves from the System properties panel by clicking the Computer Name tab and then the Change button. Here a dialog will appear where you can specify whether the computer is attached to a workgroup or a domain, as shown in Figure 5-21. You can use this if the domain settings are incorrect or misconfigured.

Figure 5-21. You can configure domain settings
Troubleshooting Active Directory or Azure
If you are using Windows 10, there is a useful feature to help you troubleshoot problems with Active Directory or Microsoft Azure connections. In the Settings panel, navigate to Accounts and then “Access work or school.” Here a link called “Export your management log files” will save Event log files to your users’ folder. These log files can be viewed to check for any connection problems and errors that may be occurring.
Summary
There’s a lot that can be done in Windows to troubleshoot and repair network problems, and the reporting and configuration tools that are available can provide so much information that it’s incredibly helpful that they can all be filtered to display only the specific information you require in the real world.
In the next chapter, though, you’re going to take a step from the real into the virtual. This doesn’t mean you’ll need a VR headset to read it; you’ll look in depth at how you configure, manage, and troubleshoot networks in Hyper-V and Azure.