
![]()
Deploying Applications
In the final chapter of this book, I’ll show you how to deploy your application. In this chapter, you’ll find out how to do the following:
- use the publish wizard to deploy both desktop and web applications
- set up and configure a web server
- publish your applications onto Windows Azure
There are many ways for you to deploy an application, and the method that you choose depends on your application type and infrastructure. This chapter will explain all the possible options and show you exactly how to carry out a deployment.
Getting Started with Deployment
Deploying a LightSwitch application can be difficult. This is because LightSwitch allows you to create HTML client or Silverlight applications that can run on either the desktop or web. It also relies on the application services that can run on a server, Azure, or the client workstation (in the case of a desktop application). This combination results in several distinct deployment scenarios, each with a unique set of installation tasks. Figure 23-1 highlights the choices in the form of a flow diagram and shows you the main tasks that you need to carry out. You can use this diagram to help identify the sections in this chapter that you should focus on. For example, you can ignore the sections on setting up Internet Information Services (IIS) and ASP.NET if you want to deploy a desktop application and install your application services on the workstation.

Figure 23-1. Deployment steps
The rest of this chapter is arranged as follows. I’ll start by describing the underlying principles of deployment, and then show you how the Publish wizard works. If you want to publish a web application, you’ll need to set up a web server before you run the Publish wizard. The next part of this chapter will show you how to install IIS, and then will show you how to work with the output that the Publish wizard generates.
Choosing an Application Topology
LightSwitch depends on application services that can run in IIS, Windows Azure, or the end user’s machine. If you want to deploy a Silverlight or HTML client web application, you must host your application services in IIS or Windows Azure. However, if you want to deploy a Silverlight desktop application, you have the option to host the application services on the local machine. This configuration is called a “two-tier” setup. The advantage of running the services locally is that it’s easier to set up. Unlike a “three-tier” setup, you don’t need to go through the tricky process of setting up a web server, or understand how Windows Azure works. But the disadvantage is that you need to install the services on every machine where your application runs. Two-tier applications are therefore more suitable for single-user applications or applications that don’t have many users. In this type of deployment, you can also choose to install the database on the end-user machine by using a local instance of SQL Server or SQL Express. This means that you can run your entire application from a single machine.
Choosing Whether to Publish or Package
If you want to host your application services in IIS, you can choose either to publish or to package your application (Figure 23-2).

Figure 23-2. Publishing versus packaging
If you choose to publish your application, LightSwitch deploys it directly from Visual Studio onto your IIS server. It’s very easy to publish an application, but you need to carry out more work to prepare your IIS server beforehand. The operating systems that support publishing are Windows Server 2008 SP2 or above, and Windows 7 or above.
The second option is to package your application. Packaging produces a set of installation files that you manually copy and install on your server. Packaging an application is easier than publishing. There are fewer tasks to carry out on your web server, and you don’t need to struggle to make Visual Studio communicate with IIS. For example, your application will fail to publish if a firewall blocks the ports that the publishing process requires (port 8172 by default). If you develop your application on a machine that isn’t on the same domain as the server that you want to deploy to, packaging is a good choice.
In order to set up a workstation to run LightSwitch, there are actually very few tasks to carry out. HTML client applications require only a web browser, so in almost all cases, you don’t need to carry out any additional work. Silverlight applications require the Silverlight 5 runtime. If a user doesn’t have the runtime installed and attempts to run a Silverlight browser application, the application displays a web page that prompts the user to download the Silverlight runtime from the Microsoft website. In corporate environments, you can distribute the Silverlight runtime by using group policy, SMS (Microsoft Systems Management Server), or some other software distribution mechanism. Some companies have policies in place that block Silverlight or Adobe Flash. If you have a policy like this in place, your Silverlight LightSwitch application will simply not work.
In all deployment scenarios, you need a database server with SQL Server 2008 or above to host your application. If you wanted to deploy your application into Windows Azure, you would need to create an SQL Azure database rather than carry out an on-premises installation of SQL Server.
If you want to deploy a two-tier desktop application, you can install SQL Server Express on the client and run your entire application on the workstation. This type of setup is ideal for single-user or stand-alone applications. SQL Server Express is a free edition of SQL Server, and it’s perfect if you don’t have a license for a higher, paid-for edition of SQL. A disadvantage of SQL Server Express is that it limits performance by placing restrictions on the amount of memory and CPU cores that the database engine can use. You can find out more and download SQL Express from the following website: http://www.microsoft.com/en-us/server-cloud/products/sql-server-editions/sql-server-express.aspx
A detailed explanation of SQL Server is beyond the scope of this book, but if you want to find out more, SQL Server Books Online (BOL) is an excellent resource: http://msdn.microsoft.com/en-us/library/ms187875.aspx
For the purpose of installing LightSwitch, the topics that you should be familiar with are the following:
- installing an instance of SQL Server and using Management Studio
- creating databases, logins, and users
- understanding SQL/Windows authentication and knowing how to create an ADO.NET connection to your database
![]() Tip LightSwitch stores your intrinsic (Application Data) data in SQL Server. When you enable authentication, it also stores role and user data in your Intrinsic database. It’s important to back up your SQL Server database, as this allows you to restore your application’s data in the event of a disaster. You can refer to Books Online to find out more about how to back up and restore an SQL Server database.
Tip LightSwitch stores your intrinsic (Application Data) data in SQL Server. When you enable authentication, it also stores role and user data in your Intrinsic database. It’s important to back up your SQL Server database, as this allows you to restore your application’s data in the event of a disaster. You can refer to Books Online to find out more about how to back up and restore an SQL Server database.
Using the Publish Wizard
The Publish wizard is a tool that guides you step by step through the deployment process. You can use the wizard to package or publish your application onto IIS, or to publish your application into Windows Azure. To start the Publish wizard, right-click your project in Solution Explorer and select the “Publish” menu item.
The first page prompts you to select exactly what you want to install (Figure 23-3). You can install your complete application or just the data service. If your application contains desktop and HTML clients, the “Complete Application” option will publish both clients.

Figure 23-3. Choosing your application type
Notice how the wizard shows a warning message if you set your active configuration to Debug. When you publish an application, you should set the active configuration of your application to Release by using the drop-down menu that appears in Visual Studio’s toolbar.
The second page in the wizard allows you to specify where you want to host your server components, as shown in Figure 23-4. As I mentioned earlier, you can host your application services in either IIS or Azure.
In the case of a desktop application in desktop mode, you have the option to host your application services locally. If your LightSwitch solution includes both desktop and HTML clients, you’ll no longer have the option to deploy your application services locally. Therefore, make sure not to add an HTML client to your solution if you want to run your application services locally.

Figure 23-4. Choosing where to host the application’s services
The remaining steps in the wizard are self-explanatory. In the remainder of this section, I’ll explain the more important steps in greater detail.
Data Connections Page
If you choose to publish your application, the wizard shows the Data Connections page, illustrated in Figure 23-5. This page prompts you for two connection strings. The first connection string specifies the connection that LightSwitch uses to connect to your Intrinsic database at runtime. The wizard uses the second connection string during the publishing stage to create and/or update your Intrinsic database. The buttons next to the connection string textboxes open a dialog that you can use to build a connection string.

Figure 23-5. Data connection settings for published output
Figure 23-5 highlights the warning that the wizard shows when you enter a connection string that uses integrated security. The Publish wizard allows you to specify only connection strings that use SQL Server authentication. If you’re not happy with this type of authentication, I’ll show you later in this chapter how to manually set up your application so that it uses integrated security.
If you choose to package your application rather than publish it, the wizard shows the page that’s shown in Figure 23-6. This page allows you to create a new Intrinsic database or to update an existing database.

Figure 23-6. Data connection settings for packaged output
You would choose the option to update an existing database if you want to update an existing application. When you choose this option, you’ll need to provide a connection string. This allows the wizard to compare your database schema against the existing database and to create an update script.
You might wonder why the wizard doesn’t prompt you to supply database credentials at this point. This is because LightSwitch asks you for the credentials when you actually install the package, and by doing this, it avoids persisting your sensitive credentials in a package file that someone else could get hold of.
If you deploy a two-tier desktop application, you can specify your application’s dependencies using the page that’s shown in Figure 23-7. By default, your setup package includes the LightSwitch prerequisite component, which allows LightSwitch to host your application services without IIS being available.

Figure 23-7. Install Prerequisites dialog
In addition to the LightSwitch prerequisites, you can also specify additional prerequisites by choosing the “Yes, I need to specify additional prerequisites” radio button and using the checkboxes to select the items that you want to include. When you do this, the wizard automatically includes the .NET 4 Framework and Windows Installer 4.5 packages. LightSwitch requires the .NET 4 Framework to run, and Windows needs the Windows Installer to install the .NET 4 Framework. The final set of radio buttons allows you to specify the installation location for your prerequisites. You can select the option that prompts the user to download the prerequisites from the Internet if you want to reduce the file size of your setup package.
The LightSwitch wizard doesn’t allow you to include your own prerequisites. For example, the wizard allows you to add Microsoft SQL Server Express 2008 R2 and 2012. But if there are any other components that you want to include, there isn’t any option for you to add them to this list.
If you enable authentication in your application, you can use the Application Administrator tab to specify your initial application administrator.
Figure 23-8 shows the page that appears when you enable Forms authentication through the properties of your LightSwitch project for a two-tier deployment. If you enable Windows authentication, the wizard doesn’t show the full name and password textboxes. Instead, it prompts you to enter only a domain username. In the case of Windows authentication, make sure that you enter your administrator’s username in a format that includes your domain (for example, DOMAINTIM). If you omit the domain specifier, LightSwitch assumes that you’re referring to a local Windows user on your database server. For three-tier deployments, the option to specify the username and password will not appear. You can specify these details when you install the output into IIS.

Figure 23-8. Application Administrator dialog (for two-tier desktop applications)
If you want to update an application that you’ve already deployed, choose the radio option that specifies that an application administrator already exists.
Digital Signature/Certificate Page
When you publish a Silverlight application, you can optionally specify a certificate. But what’s the purpose of a certificate, and why would you want to add one? A digital certificate allows you to sign your application’s XAP file—this is the compiled Silverlight application that runs on the end-user’s machine. Signing a XAP file verifies the authenticity of your application and makes it difficult for a hacker to tamper with your application without it being noticed.
If you don’t sign your application, Windows shows a warning when the user installs a Silverlight Desktop application. This warning states that Windows can’t verify the publisher and that your application might be harmful (Figure 23-9). Your users might be alarmed by this warning, so it’s a good idea to sign your application with a certificate.

Figure 23-9. Warning dialog shown during installation
Figure 23-10 illustrates the page that allows you to specify a certificate and sign your application. You can purchase a certificate from a third-party company such as VeriSign or use an internal certificate server if your company has one in place. If you want test the process of signing an application, you can generate a self-signed certificate by using a utility called makecert. You can read more about this and find out the command-line switches that you can use by visiting the following MSDN page: http://msdn.microsoft.com/en-us/library/bfsktky3%28v=vs.80%29.aspx

Figure 23-10. Dialog for specifying a certificate
The final page that the wizard shows is the summary page. You can use this page to review your settings and to complete the publishing or packaging process.
Setting Up Your Web Server
Now that you understand how the Publish wizard works, we will review how to set up and configure a web server. A web server is necessary for browser applications and requires you to carry out the following tasks, which I’ll fully describe as this section progresses:
- Install the .NET 4.6 Framework.
- Install the IIS web server.
- Install Web PI and the Web Deploy tool.
- Configure Application pools.
- Optionally, set up SSL.
The version of IIS that you’ll set up depends on your server’s operating system, and in this section I’ll show you how to install LightSwitch on Windows 2008 through to Windows 2012.
Installing the .NET 4.6 Framework
The first task to carry out on your web server is to install the Microsoft .NET Framework 4.6. You can download this from the following address on the Microsoft website:
http://www.microsoft.com/download/en/details.aspx?id=17718
On Windows 8 and Windows 2012, a prerequisite of the Microsoft .NET Framework 4.6 is Windows Update KB 2919355. The .NET Framework Installer prompts you to install this update if it is missing from your machine.
Setting Up IIS on Windows Server 2012/2008
Windows 2008 comes with IIS7, whereas Windows 2012 includes IIS8. With both of these operating systems, you can add IIS through the Server Manager utility. To do this, open Server Manager, go to the Roles Summary group and click the Add Roles link (shown in Figure 23-11). This opens the Add Roles wizard, and you can find a page in this wizard to select the Web Server (IIS) server role.

Figure 23-11. Adding the IIS server role
When you complete the Add Roles wizard, Server Manager adds a Web Server (IIS) section inside the Roles group, as shown in Figure 23-12.

Figure 23-12. Adding role services in Windows 2012
In the Role Services pane, enable the following three role services, as highlighted in Figure 23-12:
- Management Service
- Application Development
 ASP.NET (version 4.6)
 - Security Windows Authentication
The screenshots in this section illustrate the steps for Windows 2008. Windows 2012 provides a simpler interface, as it combines the Role and Role Services settings into a single dialog.
Setting Up IIS on Windows 7 and Above
With client operating systems, you can add IIS through the Windows Features dialog, which you can access via Control Panel. The options that you need to select beneath the Internet Information Services ![]() World Wide Web Services node include:
World Wide Web Services node include:
- Application Development Features ASP.NET 4.6
- Common HTTP Features Default Document
- Common HTTP Features Static Content
To configure ASP.NET, you should check the HTTP Activation item that appears beneath the .NET Framework 4.6 Advanced Services ![]() WCF Services node (Figure 23-13). You need to check this option in order to enable your SVC service endpoint (for example, http://myWebServer/LightSwitchApp/ApplicationData.svc) to return data.
WCF Services node (Figure 23-13). You need to check this option in order to enable your SVC service endpoint (for example, http://myWebServer/LightSwitchApp/ApplicationData.svc) to return data.

Figure 23-13. Configuring WCF services
Configuring the Web Deploy Tool
To publish an application from Visual Studio or to install the packages that the Publish wizard generates, you need to install the Microsoft Web Deploy tool. The simplest way to install this is to use the Web Platform Installer (often abbreviated to Web PI). IIS Manager prompts you to install Web PI when it starts. If it doesn’t, you can download and install it through the following link: http://www.microsoft.com/web/downloads/platform.aspx
When Web PI starts, you can use the search feature to find and add the “Web Deploy 3.5” item (Figure 23-14). Although a higher version of Web Deploy exists (v3.6), this version does not include the menu item that installs packages into IIS. Therefore, you should choose version 3.5.
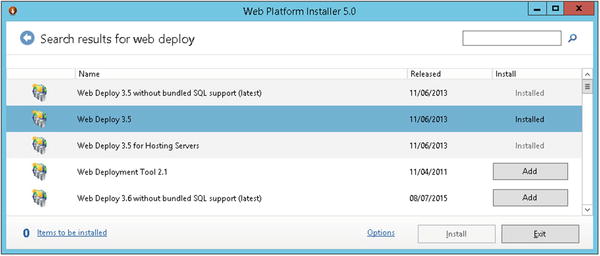
Figure 23-14. Installing the prerequisites using Web PI
When you install the Web Deploy tool, the installer adds a Web Deployment Agent Service (Figure 23-15). To publish applications from Visual Studio, make sure that Windows starts this service. If your application fails to publish, a possible cause is that this service may not have started correctly.

Figure 23-15. The Web Deployment Agent Service must be started
Setting Up IIS Application Pools
Application pools improve the reliability of your web server by isolating the applications that run in IIS. If a website in an application pool crashes, it won’t bring down the other websites that run in other application pools. It therefore makes good sense to deploy each LightSwitch application into its own separate application pool.
Each application pool also runs under a specific security context, which enables you to configure your application services to connect to your SQL Server database through Windows Authentication. Figure 23-16 illustrates this concept.

Figure 23-16. Set up an application pool so as to Windows authenticate to SQL Server
To create a new application pool, open Internet Information Services (IIS) Manager and right-click the Application Pools node on the navigation menu on the left. You’ll find a right-click context-menu option that allows you to create a new application pool, as shown in Figure 23-17. It’s important to set up your application pool to use version 4.6 of the .NET Framework. In IIS7 and above, it is also preferable to choose Integrated Managed Pipeline Mode, as opposed to Classic Mode. Classic mode is primarily designed for legacy code that might not run properly in integrated mode. Your LightSwitch server runs more efficiently when you set the pipeline mode to integrated.

Figure 23-17. Creating an application pool in IIS7
After you deploy your website, you can set it to use the application pool that you added by modifying the website properties in IIS Manager.
Configuring SQL Server for Windows Authentication
Your LightSwitch application services can authenticate to SQL Server through two types of authentication: SQL Server authentication or Windows authentication. SQL Server authentication uses SQL Server to store and manage the login and password credentials. If you use SQL Server authentication, you need to hard-code your SQL server login and password in the connection string that LightSwitch uses to connect to your database. Because your login name and password are hard-coded in a plain-text file, some IT departments regard SQL authentication as being less secure than Windows authentication. If you want to read more about the pros and cons of SQL Server authentication versus Windows authentication, you can find out more in the following TechNet article: http://technet.microsoft.com/en-us/library/ms144284.aspx.
To use Windows authentication, you need to first create a Windows domain user. If your IIS Server and SQL Server are on the same machine, you might find it easier to create a local Windows user rather than a domain user (particularly if you don’t have sufficient permissions to create new domain users).
Select the application pool that your application uses and open the Advanced Settings dialog. Open the Application Pool Identity dialog by clicking the button next to the Process Model ![]() Identity textbox. When the dialog opens, choose the “Custom account” radio button (Figure 23-18) and use the Set button to specify the Windows user account you want to use.
Identity textbox. When the dialog opens, choose the “Custom account” radio button (Figure 23-18) and use the Set button to specify the Windows user account you want to use.

Figure 23-18. Changing the application pool identities
The Windows user you specify needs to have NTFS read permissions on the folders where you install your LightSwitch application. You should also add the user to the local IIS_IUSRS group in order to grant access to the necessary ASP.NET resources. The last step is to make sure that you add an SQL Server login for your Windows user by using SQL Server Management Studio. You’ll need to grant access permissions to the tables in your application as well as grant access rights to the tables that the ASP.NET membership provider uses. The quickest way to do this is to add your user into the following database roles:
- aspnet_Membership*
- aspnet_Roles*
- db_datareader
- db_datawriter
- public
Windows authentication should now work, but if it doesn’t, you might need to configure the NTLM provider or carry out some extra steps to configure authentication. The following TechNet article will help you if you encounter problems: http://technet.microsoft.com/en-us/library/dd759186.aspx.
Configuring Secure Sockets Layer (SSL)
The LightSwitch client communicates with your web server via the HTTP protocol—a clear-text protocol. A hacker who monitors your network can see your LightSwitch data as it passes through the network. This poses a security vulnerability, particularly if your application uses Forms authentication. A hacker can easily discover username and password combinations by monitoring the network while users log in. To mitigate this risk, you can encrypt your data by using the HTTPS protocol.
To set up HTTPS, you need to install an SSL (Secure Sockets Layer) certificate on your web server. This certificate verifies the identity of your server and contains the keys that SSL uses for encryption. You can either purchase a certificate from a third-party company, such as VeriSign, or use an internal certificate server if your company has such infrastructure in place.
The Server Certificates and Site Binding options in IIS Manager allow you to request, install, and configure SSL certificates.
An SSL certificate is valid when it meets the following three conditions: the server name on the certificate matches the server on which it’s installed, the certificate is within its validity period, and the certificate is signed by a trusted certificate authority. What tends to happen is that administrators allow certificates to expire by not renewing them in time. It’s important not to let this happen, because desktop applications won’t work if your web server’s SSL certificate becomes invalid. The security model in Silverlight prevents LightSwitch applications from connecting to web servers with invalid certificates, and there’s no way that you can circumvent this security feature. Silverlight browser and HTML client applications will still work, but the browser warns the user that they “might be visiting a dangerous website.” This doesn’t look professional, so it’s good practice to make sure that your SSL certificates don’t lapse.
If your application stores sensitive data, you might want to mandate encryption on all network traffic that takes place between your client and the server. This is particularly useful on LightSwitch applications that you expose over the public Internet. You can mandate SSL for all traffic by modifying your web.config file as shown in Listing 23-1. When you deploy your application, you can find this file in the root folder of your ASP.NET application.
Listing 23-1. Web.config setting to mandate SSL

Installing the Packages
Now that we’ve covered the server configuration tasks, let’s look at how to install the output from the Publish wizard.
Installing a Two-Tier Desktop Application
When you use the Publish wizard to build a two-tier desktop application, the wizard produces a set of installation files in the output folder that you specify in the wizard. The publish output includes a file called Setup.exe, which is the application that you would run on the client workstation to install your application. If you specify any prerequisites in the Publish wizard (such as the Microsoft .NET Framework), Setup.exe will install these components too. But before you run Setup.exe, you need to carry out the following data tasks:
- Install your SQL Server database.
- Modify your application’s database connection string.
Installing Your SQL Database
The output from the Publish wizard produces an SQL script called <YourApplication>.sql (where <YourApplication> is the name of your LightSwitch application). This script creates the database, tables, stored procedures, and other database objects that support your application. You need to execute this script on your database server, either by using the sqlcmd command-line tool or SQL Server Management Studio.
If you have a basic instance of SQL Server Express without the Management Tools, sqlcmd is the method that you would use. For SQL 2012 Express, the default location of this utility on a 64-bit machine is Program Files(x86)Microsoft SQL Server110ToolsBinn.
To use sqlcmd, open an elevated command prompt, navigate to the directory where it’s installed, and run the following command: sqlcmd.exe -i Helpdesk.sql -S .SQLExpress
You will need to replace the arguments that you supply to sqlcmd.exe as follows:
- -i Helpdesk.sql: This specifies the SQL file that you want to execute. Replace this with the name of the SQL file in your publish folder.
- -S .SQLExpress: This specifies the name of your database server and SQL Server instance.
- -U <username> -P <password>: If you don’t specify the –U and – P switches, sqlcmd connects to your SQL Server instance using Windows authentication. These switches allow you to supply a username and password if you want to use SQL authentication instead.
If you choose to install the SQL script using SQL Server Management Studio, make sure to place your query window into SQLCMD mode by selecting the option in the Query menu. Your script won’t run correctly if you don’t do this. Note that with SQL Server 2014, you must select the “Management Tools” option in SQL Setup to include sqlcmd. Because of this, it’s simpler just to use SQL Management Studio rather than sqlcmd with SQL Server 2014.
Setting the Database Connection String
If you specified a correct and valid connection string in the Publish wizard, you can skip this step. But if not, you need to modify your application’s connection string so that it refers to the database that you installed. The Publish output contains an Application Files subdirectory that includes a file called web.config. Open this file in Notepad and edit the connection string value in the <connectionStrings> section like so:
<add name="_IntrinsicData" connectionString="Data Source=SERVERNAMESQLEXPRESS;Initial
Catalog=HelpDeskDB;Integrated Security=True;Pooling=True;Connect Timeout=30;User
Instance=False" />
Replace SERVERNAMESQLEXPRESS with the name of your database server and instance, and replace HelpDeskDB with the name of your database. If you added additional data sources in your application, you can find the connection strings in the same section of the web.config file, and you can modify these values as appropriate.
If you enable authentication in your application, the Publish wizard will have prompted you set up an administrator. You can find the settings that define your application’s administrator in the web.config file, and you can also modify the values manually if necessary. Once you configure these data tasks, you can run setup.exe on your client workstation. This creates a shortcut on the desktop, and the user can use this to start your application.
Installing a Three-Tier Application in IIS
When you use the Publish wizard to package for IIS, the wizard produces a single zip file rather than a set of files with an installer, as in the case of a two-tier application. The wizard names your zip file after your application (for example, HelpDesk.zip). This zip file is the package that the IIS installer consumes, and to use it, you will need to install the Web Deploy tool.
To install your package, copy the zip file onto your server. Open IIS Manager, use the panel on the left to navigate to your web server, and select the right-click Install option. This opens the Install Application Package wizard. The first page prompts you to enter the path to your zip file. The next page shows the package contents and allows you to review the items that the wizard will install (Figure 23-19). The default items include the SQL script that defines your Intrinsic database, the option to create an IIS application, and the option to install the actual web files. You will need to select all of these for a full installation.

Figure 23-19. Import Application Package dialog—first page
The next page (shown in Figure 23-20) allows you to specify your database connection strings. The first Connection String textbox specifies the connection string that the installer uses to install or update your Intrinsic database. The next textbox allows you to specify the connection that IIS uses at runtime to connect to your Intrinsic database. The wizard provides DatabaseUserName and DatabaseUserPassword textboxes because it expects you to use SQL Server authentication. If you want to use Windows authentication, you need to manually modify your web.config file after the import tool finishes and set up an application pool in IIS, as I described earlier.

Figure 23-20. Import Application Package dialog—database connection strings
Once you complete all the steps in the Import Application Package wizard, your application will be installed. If everything worked correctly, you’ll be able to open a web browser and navigate to the URL where you installed your application. In the case of a desktop application, you’ll see an installation page like the one that’s shown in Figure 23-21. When the user clicks on the Install button, the “Click Once” installer installs your desktop application and creates a desktop icon.
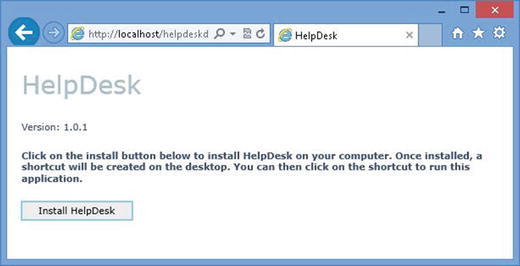
Figure 23-21. Out-of-browser application install page
Although the wizard provides a rich, graphical way for you to deploy an application, you can just as easily deploy your three-tier application manually rather than creating a zip file and using the Web Deploy tool. If you’re a traditional developer, this technique may suit you well. If you know what you’re doing, it’s quicker than using IIS’s Import Application Package wizard and working through each page one by one.
The server-side part of your LightSwitch application is simply an ASP.NET website. Instead of relying on the Import Application Package wizard to create your website, you can create one manually through IIS Manager. You would then use the option in IIS Manager to create an application and configure it to use an application pool that targets the .NET 4 Framework.
To publish your application, you still need to use the Publish wizard from within LightSwitch. Once you complete the wizard, you can find your published files in the folder binReleaseapp.publish. You can now simply copy the contents of this folder into the folder for your website. Before you can run your application, you might need to modify the database connection strings in your web.config file so that they refer to the correct data source.
Deploying Data
When you were developing your application, you may have added records into your Intrinsic database that you want to deploy. Although the Publish wizard deploys the schema of your database, it won’t deploy the data that you entered at design time.
The Publish wizard creates an SQL script that contains the schema of your database, so the easiest way to deploy your data during the installation process is to add SQL INSERT statements to the end of this script file.
If you want to retrieve the data that you entered into your design-time database, you can attach your database’s .MDF file using SQL Server Management Studio. Management Studio includes a feature that you can use to script the data in your tables. To use this feature, right-click your database in Object Explorer and start the Script wizard by selecting Tasks ![]() Generate Scripts. When you reach the options page, set the “Script Data” option to true. When the wizard completes, you can copy the SQL INSERT statements that the Script wizard creates and paste the contents to the end of your deploy script.
Generate Scripts. When you reach the options page, set the “Script Data” option to true. When the wizard completes, you can copy the SQL INSERT statements that the Script wizard creates and paste the contents to the end of your deploy script.
Updating an Application
To update an existing application that you have already deployed, you can simply run the Publish wizard again. Each time you use the Publish wizard, LightSwitch automatically increments the version number of your application. If you change the schema of your database, you can select the option in the Publish wizard to “update an existing database.” When you choose this option, the wizard creates a change script that updates only the database objects that have changed.
In a three-tier setup, you would install your updated version over your old version. Web clients will automatically run the latest version that’s hosted on your website, and desktop clients will detect that a new version is available and install it.
Troubleshooting Deployment Errors
Unfortunately, applications don’t always deploy smoothly, and sometimes it’s very difficult to diagnose the exact cause of a problem. When you deploy a three-tier application, the cause of any problem will often be down to one of three reasons: a problem with IIS’s configuration, a problem with your LightSwitch components, or a problem with database connectivity. Figure 23-22 illustrates some of the common errors that you might encounter.

Figure 23-22. LightSwitch deployment errors
The first error in Figure 23-22 shows an IIS error. If your browser returns an HTTP error code that IIS generates, you have some sort of IIS misconfiguration. This could be a result of permissions or application pool settings. In the case of an IIS error, you can use the HTTP error code to diagnose your problem, and you can also check the Windows Event Log for additional details. Instead of an IIS error, you might encounter what’s known as the “yellow screen of death”—this is a reference to the error page that ASP.NET generates. If this happens, it suggests that you’ve configured IIS and ASP.NET correctly, but have some problem that’s caused by the way that your application is set up in IIS. The error message that ASP.NET returns will hopefully help you diagnose the exact cause of the problem.
The second screenshot in Figure 23-22 illustrates a case where the Silverlight client loads successfully, but the application doesn’t load any further. GetAuthenticationInfo is the first server method that your Silverlight client calls, and because of this, it’s common to see error messages that refer to this method. But, deceptively, your problem might have nothing to do with authentication; the best way to diagnose this problem is to trace your application. (I’ll show you how to do this in the next section.)
The final type of problem that you might encounter is the dreaded “red X” problem. This is a condition where your application loads successfully, but red crosses appear instead of data. Usually, this indicates a database or network connectivity problem. A classic symptom is that your screen shows the spinning hourglass for 30 seconds before it fails and shows the red X. This 30-second period corresponds with SQL Server’s default connection-timeout period of 30 seconds, and it highly suggests a database connection problem. If you see a red X on your screen, try opening a screen that contains a custom screen query that you’ve written in code. When a LightSwitch control such as DataGrid experiences a data problem, it “swallows” the exception and displays a red X. But when a code query experiences a problem, it’ll raise an unhandled exception, and LightSwitch will open the exception details in a dialog box. The error message that you’ll see includes the exact exception (for example, SQL Exception Timeout Exception), and you can use this to confirm whether or not you have a general database connectivity problem.
Tracing Your Application
LightSwitch includes a diagnostic subsystem that integrates with ASP.NET’s tracing functionality. You can use this feature to help diagnose errors, resolve configuration issues, or work out why a query has failed. The trace messages that LightSwitch produces include the server request, the response, and an error description.
For performance and security reasons, LightSwitch turns off tracing by default. To turn it on, you need to make some changes to your web.config file; Listing 23-2 shows the sections that you need to modify.
Listing 23-2. Trace settings in web.config

Let’s take a closer look at some of these settings:
- Enabled: Set this value to true to turn on tracing.
- LocalOnly: When you set this to true, you can view trace messages only when you’re logged on to your web server. If you set this to false, you’ll be able to view the trace data from outside of your server, but note that this is a less secure setting.
- Level: This setting allows you to specify the amount of information that LightSwitch logs. For diagnostic purposes, I recommend the verbose setting. This is the setting that retrieves the maximum amount of information.
- Sensitive: This setting controls whether or not LightSwitch can include your table data in its trace output. If you set this to true, LightSwitch might write sensitive data (for example, addresses, balances, prices) into the trace log.
The final change that you need to make is to enable ASP.NET’s trace.axd handler. You can find this setting lower down in the file, inside the system.web group.
Once you modify your web.config file, you can view your application’s trace by opening a browser and navigating to your website’s trace.axd page (for example, http://MyWebServer/MyApp/trace.axd). When this page opens, you can view a list of trace messages and review additional details by clicking on the View Details link. Figure 23-23 shows an example of the trace output that LightSwitch produces. Notice how the trace registers all calls to the data service. In this example, entries 5 and 6 highlight calls to the data service’s Engineers and Issues methods.

Figure 23-23. Trace.axd page
Deploying to Azure
A great feature of LightSwitch is that you can easily deploy applications to Windows Azure—a cloud-based platform. An excellent use-case scenario is to build an HTML client application and then host your application services in Azure. This allows your users to access your application “on the road” using a mobile phone or tablet device that connects to the Internet via a cellular connection. Other advantages of Azure include simplicity, easier maintainability, and scalability.
Earlier in this chapter, I showed you how to set up IIS and, hopefully, this hasn’t been too difficult for you. Unfortunately, setting up a web server can be quite tricky, particularly if you have limited knowledge of IIS. For your application to work, you need to install all the necessary components, configure permissions correctly, and make sure that you don’t have firewall or antivirus rules that block your HTTP traffic. If you get this wrong, you can find yourself fighting with errors that can be quite obscure—Azure saves you from all of this.
Another benefit of Windows Azure is that it’s easier to maintain your underlying infrastructure. If you’re responsible for managing your own web server (rather than someone else in your company being responsible for it), you’ll appreciate Azure much more. You’ll no longer need to stay at work late every “patch Tuesday” to install Windows Updates, struggle to work out why your server suddenly starts performing sluggishly, or end up being forced to replace a failed hard disk at the most inconvenient moment.
Azure also provides scalability. If you need more performance during busy times, you can simply use the web portal to provision more resources (and pay more money, of course). When demand reduces, you can scale back down again.
To get started, you need to log in to the Windows Azure website (http://www.microsoft.com/windowsazure/) and sign up for an account. Windows Azure is priced on a “pay as you go” basis, so it’s a good idea to study the pricing details that you can find on the website before you continue. If you’re new to Windows Azure, Microsoft provides a free 30-day trial. This is a great way to test out the service. When you sign up to the service, you need to provide a phone number and credit card number. If you intend only to try the service, remember to cancel your subscription before your trial period expires.
Once you create an account, you’ll find it surprisingly easy to publish to Azure. You simply choose the “Azure” option in the Publish wizard and allow the wizard to guide you through the process, step by step. We’ll now examine the publishing process by walking you through the steps that you’ll find in the wizard.
Connecting Visual Studio to Azure
To deploy an application to Azure, start the Publish wizard. When you reach the Application Service Configuration page, select the option to host your application in Microsoft Azure. This opens the page that’s shown in Figure 23-24. Use the control at the top of this page to log in to your Azure account.

Figure 23-24. Publish wizard subscription page
Selecting a Service Type
You can use the radio buttons in the lower part of the Subscription page to select a service type. There are two options you can choose: a Web App or a Cloud Service. At the time of writing (October 2015), only the “Web App” option is fully supported by the Publish wizard.
The Web App service type provides simple hosting and is suitable for most LightSwitch applications. This service provides a hosted IIS environment, and, to give an analogy, this type of service competes with services that web-hosting companies usually offer. Once you create a website, you can increase performance by using the portal to dynamically add additional website instances. Azure will automatically load-balance the web requests between the website instances that you add.
The Cloud Service is an example of what’s commonly called Platform as a Service (PaaS). This service type provides you with a virtual machine that you can “remote desktop” onto. The advantage is that you can install your own applications, modify registry settings, and more easily debug your server-side code by logging in to your server.
If you select the Cloud Service type, the Publish wizard requires you to install the Microsoft Azure SDK before it continues onto the next page. The Publish wizard prompts you to download version 2.6 through Web PI. This version will fail to install because it is not compatible with Visual Studio 2015 RTM. At this point, you might be tempted to download the latest version of the Azure SDK. This is version 2.7.1 at the time of writing. You should not install version 2.7.1, because it breaks the Publish wizard. If you install this version, Visual Studio produces the error “Could not load file or assembly Microsoft.VisualStudio.Azure.CommonAzureTools.Utilities, version 1.3.0.0” when you start the Publish wizard, and this will prevent you from publishing any LightSwitch application. This is a known problem, and I hope that Microsoft will provide a fix for this soon.
Assuming that you choose the “Web App” option, the next page in the wizard prompts you to enter the name of the web app. If you haven’t defined a web app, the page in the wizard includes a hyperlink that takes you directly to Azure Portal, where you can add a service.
Creating a Database
The next significant step is to define the database that supports your application. Figure 23-25 shows the page in the wizard that prompts you to specify your database connection. Notice how this page includes a link to “Provision a database at the Azure Portal.” This link opens the Azure Portal in a new browser window, and you can navigate to the SQL Databases section of the portal to create a new Azure database.

Figure 23-25. Set up your database
Figure 23-26 shows a screenshot of a database in the Azure portal. There are two useful links on this page. The first is the “View SQL Database connections strings” link. This opens a dialog that you can use to copy an ADO.NET connection string into your clipboard. Once you do this, you can paste the value into the Publish wizard’s “Specify the user connections” textbox. Make sure to amend your connection string to include your password. The connection string that the portal shows does will not include your password.

Figure 23-26. Set up your database
For security reasons, SQL Azure includes a built-in firewall that restricts access to your database by IP address. If you want to establish a connection to your SQL Azure database from your development PC (using Management Studio, for example), use the “Set up Windows Azure firewall rules for this IP address” link to add a firewall exception.
Returning to the page in the Publish wizard (Figure 23-25), the lower section of the dialog includes a “Publish database schema” checkbox that you can use to create or update your Intrinsic application database. If you specify an SQL Azure database in this section, the publish process will fail. This is because the Publish wizard executes SQL that attempts to place the database into single-user mode through the command: ALTER DATABASE <YourDatabase> SET SINGLE_USER. SQL Azure does not support this syntax, and the remainder of the database update will fail. Therefore, a more reliable way to publish your Intrinsic database to Azure is to first publish to an interim on-premises, or local, SQL Server database. Once the Publish wizard completes, you can use SQL Server Management Studio to script this database and to restore the contents into your Azure database.
Completing the Publishing Process
The remaining steps in the wizard allow you to specify an HTTPS certificate and to sign your XAP file with a digital certificate (in the case of a Silverlight application). Once you complete all the steps in the wizard, you can click the Publish button and complete the deployment of your application to Azure.
This section hopefully highlights how simple it is to deploy your applications to Windows Azure. If you want to expose your application over the Internet, Windows Azure is a great choice, but it isn’t the only option. You should not overlook the services that web-hosting companies offer. The web-hosting market is competitive, and there are many companies that can host your LightSwitch application for a cheaper price.
You should also consider the security and privacy implications of exposing your application over the Internet. If you expose your application over the Internet, it’s up to you to review the sensitivity of your data and to risk-assess the impact that a data breach could have on your business. With Windows Azure, you should also be aware that because Microsoft is a US company, any data that you store in Azure can be subject to interception by US authorities. You won’t be too shocked by this if you live in the US, but if you live in Europe (for example), you might want to do an Internet search on “US PATRIOT Act” to read more about the impact of choosing to use a US firm for processing and storing your data.
Publishing to SharePoint
With LightSwitch, you can host you applications in SharePoint 2013 (or above) or Office 365. It can be beneficial to host your application in SharePoint if your organization already uses SharePoint. One advantage is that it enables you to customize your application so that it integrates more closely with your SharePoint system. For example, you can implement authentication using SharePoint identities and permissions, or create list items, create workflows, or add images to SharePoint picture libraries.
The SharePoint client object model (CSOM) is the API that allows you to write code that integrates your LightSwitch application with SharePoint. You can find out more about CSOM on the help page:
http://go.microsoft.com/fwlink/?LinkId=285361
The quickest way to get started is to create a SharePoint developer site on Office 365. You can find out how to do this by visiting the following web page: http://go.microsoft.com/fwlink/?LinkId=263490.
After you prepare your SharePoint or Office 365 website, the first step is to enable the SharePoint feature in your LightSwitch project. To do this, right-click your project and select the “Enable SharePoint” menu item. This opens the dialog that’s shown in Figure 23-27. You can use this to specify the address of your SharePoint site.

Figure 23-27. Enabling SharePoint
When you click the Finish button, LightSwitch adds a new project into your solution, and it also adds references to several supporting assemblies. You can modify your SharePoint address afterward through the properties of your LightSwitch project. When you now debug your application, LightSwitch uses SharePoint to provide authentication, and then it redirects you to an instance of your application it hosts locally in IIS Express.
To deploy your application to SharePoint, run the LightSwitch Publish wizard. The key difference is that the Publish wizard provides a page you can use to specify your SharePoint server settings (Figure 23-28). You can complete the deployment of your application by following the remaining pages in the Publish wizard.

Figure 23-28. Configuring your SharePoint settings
Summary
In this chapter, I showed you how to deploy your LightSwitch application. It’s possible to create many different types of applications, which results in several distinct deployment combinations. LightSwitch applications depend on application services that you can install on an IIS server, on Azure, or on the client workstation. You can install your application services on the client only if you’re building a desktop application. This deployment scenario is ideal for stand-alone applications or applications that do not have many users. However, there’s a larger deployment overhead involved, because you’ll need to install the application services on each workstation that accesses your application.
For HTML client or desktop browser applications, you must host your application services in IIS or Windows Azure. If you choose to host your application in IIS, there are several setup tasks that you need to carry out. First, you need to install the .NET 4.6 Framework. Next, you need to install IIS, and the exact way to do this depends on your server’s operating system. Finally, you need to install the Web Deploy tool; a simple way you can do this is to use the Web Platform Installer (Web PI).
Other relevant IIS settings include setting up SSL and adding application pools. SSL makes your application more secure by encrypting the data between your LightSwitch client and server. Application pools improve reliability by isolating the applications that run on your web server. If a web application crashes, it won’t bring down other web applications that run in other application pools. Application pools also allow you to set up your data service to use Windows authentication with your SQL Server.
LightSwitch includes a Publish wizard that allows you to deploy your application. This contains a series of screens that guide you step by step through the deployment process. For three-tier IIS deployments, you can choose to either package or publish your application. The difference between publishing and packaging is that publishing deploys an application immediately to your IIS server, whereas packaging produces setup files that you need to manually install afterward. In the case of Silverlight applications, the Publish wizard allows you to digitally sign your XAP file. If you don’t sign your application, Windows shows a dialog when your user installs your application that warns that your application might be dangerous.
If you choose to package your application, the Publish wizard produces a deployment zip file. To install a package, you can use IIS’s Install Application Package wizard to install your package. This wizard takes care of setting up your application service’s website and creating the SQL Server database that supports your application.
For two-tier desktop applications, the Publish wizard produces a file called Setup.exe, along with supporting database objects and a script that creates your database. To install your application, you need to run the database script against your database server, and run the setup.exe file on the client workstation.
To update an existing application, you can simply rerun the wizard. The Publish wizard can analyze your existing database and produce an SQL script that applies the incremental schema changes that you’ve made.
The Publish wizard also allows you to deploy your application to Windows Azure. Azure is a cloud service that allows you to publish applications that users can access through the Internet. The service works on a “pay as you go” basis, and the cost depends on the resource and network utilization of your application. To use Azure, you need to set up an account by using the Azure web portal. You can host your application by using either a web app or a cloud service. An Azure web app provides simple hosting, whereas the cloud service provides an environment that supports a “remote desktop” and allows you to install custom software.
Finally, you can host your application in SharePoint or Office 365. One of the advantages of hosting your application in SharePoint is that you can integrate your application with lists, libraries, and other SharePoint assets.
Sadly, this brings us to the end of the book. I hope that you found it useful; well done for persevering through all the chapters! You’re now capable of building some excellent LightSwitch applications, and I wish you the very best of luck in all of your LightSwitch endeavors.