
![]()
Generating Office Documents
A common requirement for developers is the ability to produce office documents from applications, such as invoices, receipts, or reports. By adding Office document support, you can also satisfy the needs of users who like to extract data to Excel for analysis purposes. In this chapter, I’ll describe Office-integration techniques, which include how to do the following:
- generate Word documents with the OpenXML SDK
- automate Microsoft Excel and carry out mail merges with Microsoft Word
- generate PDF files on desktop applications
The de facto tool that businesses use is Microsoft Office. Therefore, this chapter focuses on Microsoft Office formats and discusses ways that you can generate Office documents in both desktop and HTML client applications.
Overview of Techniques
In this chapter, I’ll describe two techniques you can use to produce Office documents. The first method uses the OpenXML SDK to create documents on the server, while the second produces documents on the client by accessing Microsoft Office through COM automation. The technique you choose depends on your application type, as shown in Table 17-1.
Table 17-1. Reporting Techniques That You Can Use, by Application Type
|
Technique |
Desktop Application |
Web Application |
|---|---|---|
|
Use the OpenXML SDK to generate documents on the server |
✓ |
✓ |
|
Use Microsoft Office and COM automation to generate documents on the client |
✓ |
The server-based OpenXML technique works for all application types. In contrast, the client-based automation technique works only for desktop applications in desktop client mode. COM automation is not compatible with browser-based desktop applications because of Silverlight security restrictions. The COM client automation technique requires the user to install Microsoft Office, so there’s slightly more set-up work in order to use this technique.
Using the OpenXML SDK
A popular and well-known method for creating office documents is the OpenXML SDK. You can use this SDK to create Word, Excel, and PowerPoint files. This technique is possible because Microsoft Office uses an XML-based document format. This SDK therefore produces documents in the newer Microsoft Word DOCX, Excel XLSX, and PowerPoint PPTX formats.
Technically, this solution consists of two main parts. The first part involves writing the server-side code to handle the request from the user to generate a document. The same server-side code uses the SDK to build the actual Office file. The second part is the client-side code that enables the user to open or save the document locally. Figure 17-1 illustrates the process, which I’ll describe in more detail as this chapter progresses.

Figure 17-1. Overview of the OpenXML document-generation technique
In the remainder of this section, I’ll demonstrate this technique by showing you how to build a Word document that contains a summary of timesheet entries.
Installing the OpenXML SDK
To use the OpenXML SDK, download and install the SDK from the Microsoft website. To do this, download the Open XML SDK 2.5 for Office package from the following page:
http://www.microsoft.com/en-gb/download/details.aspx?id=30425
The download package includes two files: the OpenXML SDK installer and an OpenXML SDK tool (Figure 17-2). Make sure to include the OpenXML SDK tool (OpenXMLSDKToolV25.msi). This tool provides code-generation and document-validation features that will help you more easily work with the SDK.

Figure 17-2. Choose the option to download both the SDK and the tool
Implementing the Command Pattern
Before we write the document-generation code, there are some preparatory tasks we need to carry out. The first is to build the framework that allows users to initiate the server-side document-generation process.
When Microsoft first released LightSwitch, there was no simple way for developers to call server code from LightSwitch screens. To overcome this problem, a popular workaround was to use a technique called the command (or operation table) pattern. This technique still plays a useful role in LightSwitch development today. The technique relies on a table that exists for the sole purpose of executing commands. You attach code to the inserting or inserted methods of this table, which enables you to call server-side code by adding rows to your table. If you want to pass arguments to your server-side methods, you must define table properties.
For this example, Figure 17-3 shows the schema of the table that supports the command pattern.

Figure 17-3. Screenshot of command table
In this example, we’ll add code that creates the document to the row inserting method. The EngineerID property enables the user to specify the engineer record that appears in the report. When the server completes the document, it will store the file in the ReportData property within the same table. You can then use the same techniques that I showed you in Chapter 11 to enable users to download and view the file.
Using the SDK to Build a Document
Let’s now look at how to build a document with the Open XML SDK. There are two broad strategies you can adopt. The first approach is to prepare a template document with Microsoft Word. Once you create a template file, you can write code that copies the template document and apply your customizations to the copy. The second approach is to build your document entirely in code. Since the template approach requires far less code, this is the approach that most developers recommend, and this is the technique that I’ll describe in this section.
The first step is to build your template document with Microsoft Word. Figure 17-4 shows the document that I’ll use in this example.

Figure 17-4. Use Word to build your document
This document includes a header section with engineer details and a table in the body of the document that shows the timesheet entries for the engineer. The technique we’ll use to populate the header section of the document relies on bookmark substitution. To add the timesheet entries into the body of the document, we’ll call OpenXML SDK methods to insert rows.
Adding Bookmarks to a Word Document
Bookmarks enable you to locate sections within a Word document. To insert a bookmark, click the “Insert” menu and click the “Bookmark” item. This opens a dialog you can use to enter a name and insert a bookmark.

Figure 17-5. Inserting a bookmark in a Word document
For the purpose of this example, add two bookmarks to your document. Name your bookmarks EngineerFirstname and EngineerSurname. By default, Word doesn’t show bookmarks, which can make it difficult to author documents. However, you can make bookmarks visible by checking the “Show Bookmarks” checkbox in the Word Options dialog box (shown in Figure 17-6). In Word 2010 or above, you can open the Word Options dialog through the File item in the ribbon bar. When you enable the “Show Bookmarks” option, Word uses a gray I symbol to indicate the locations of the bookmarks within your document.

Figure 17-6. Enabling the option to show bookmarks in Word
Titling Tables in a Word Document
To add the timesheet records to the document, we’ll use the OpenXML SDK to add rows to the existing table. This technique requires us to be able to locate tables in code.
A method we can use to locate tables in a Word document is to identify the tables with a title. To add a title to a table, right-click the table and choose the “Table Properties” menu item. In the Table Properties dialog, switch to the Alt Text tab and use the Title textbox to enter a title (Figure 17-7). To recreate the example in this section, add the title TimesheetEntries to your table.
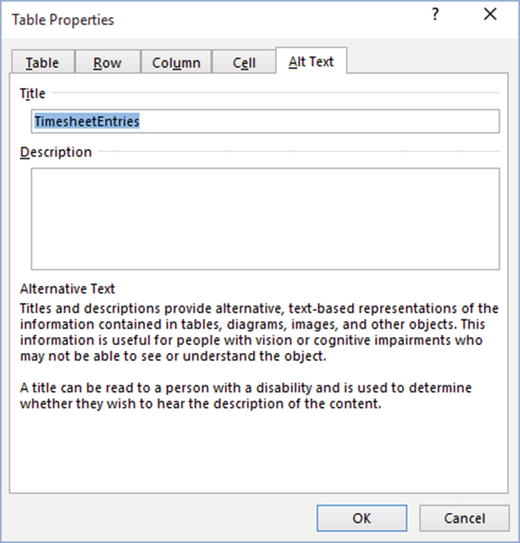
Figure 17-7. Adding a title to a Microsoft Word table
If Word grays out the Alt Text textbox, make sure that you switch off compatibility mode for the document. You can do this through the settings that appear beneath the File menu in Word.
By titling objects in Word, you can use both LINQ and the OpenXML SDK to locate the object in code. Experts in Microsoft Word often use tables to lay out, position, and align the contents in a document. To achieve a finely tuned layout, users often hide borders, merge table cells, and nest tables. Because tables play such an important role in the layout of a document, adding titles and captions to objects can help simplify the development task.
Building a Document with the SDK
Once you prepare your Word template file, you can write the code that uses the SDK to build a Word document. A prerequisite is to make your Word template available in the Server project of your LightSwitch solution. To do this, create a folder called Reports in your Server project. Right-click your Reports folder and click the “Add Existing Item” menu item. Add your Word template file and name it TimesheetTemplate.docx. Once you do this, open the properties sheet for the file and set the Build Action to Content and the Copy to Output Directory setting to Copy always.
Once you add your Word template file, follow the steps to build the document-generation code. To use the SDK, you need to add references to the following DLLs to your Server project:
- DocumentFormat.OpenXml.dll
- Windows.Base
Assuming that you install the SDK in the default location, you’ll find the OpenXML DLL in the following location (in a 64-bit installation of Windows):
C:Program Files (x86)Open XML SDKV2.5libDocumentFormat.OpenXml.dll
The next step is to open the TimesheetReport table in the designer. Click the Write Code button, select the Inserting method, and add the code that’s shown in Listing 17-1. Make sure to add a reference to the DocumentFormat.OpenXml.Packaging namespace at the top of your code file with either the Imports or Using statement.


To create a report for a specific engineer, a user would add a new record to the TimesheetReport table and set the EngineerId value of the new record to the ID of the engineer who should appear in the report. The first part of this code retrieves the engineer record from the Engineer table ![]() . The next part uses LINQ to retrieve the timesheet records for the current month
. The next part uses LINQ to retrieve the timesheet records for the current month ![]() .
.
Following these data-retrieval tasks, the code builds a path to the template Word document ![]() and loads the contents into a byte array
and loads the contents into a byte array ![]() . To return the full physical path of the Word template document, the code calls the MapPath method. When you call this method, you can use the ~ symbol to reference the root of the website that hosts your Server project.
. To return the full physical path of the Word template document, the code calls the MapPath method. When you call this method, you can use the ~ symbol to reference the root of the website that hosts your Server project.
Once the code opens the Word document, it calls a method called InsertBookMark value to substitute the engineer data values into the body of the report ![]() .
.
The next section of code locates the timesheet table in the document ![]() . To locate the table, the code uses LINQ to find the first table property object with the caption TimesheetEntries. The parent of this table property object is the timesheet table.
. To locate the table, the code uses LINQ to find the first table property object with the caption TimesheetEntries. The parent of this table property object is the timesheet table.
The next block of code loops over the timesheet collection. For each timesheet record, the code clones the first empty row in the table ![]() and uses a method named GetParagraph to set the cell values. Note that, in this example, the very first row contains the table column headings.
and uses a method named GetParagraph to set the cell values. Note that, in this example, the very first row contains the table column headings.
The final section of this code saves the changes to the document and saves the output into the TimesheetReport table ![]() .
.
Calling the Document-Creation Procedure from the Client
The whole solution requires you to create a screen that users can use to add records to the TimesheetReport table, and to therefore create Word documents.
To demonstrate the client design tasks, let’s look at how to build a screen that shows a list of engineers. Against each engineer record, we’ll add a link that builds the document and generates a Save dialog that enables the user to save the document locally on their computer. Figure 17-8 illustrates the final appearance of this screen in an HTML client application.

Figure 17-8. An HTML client screen that users can use to generate timesheet documents
Opening Documents from an HTML Client Application
To create this screen in an HTML client application, add a Browse screen for the Engineer table. Change the control type for the Engineers collection to a table. Inside the table row, add a command called DownloadTimesheet. Figure 17-9 shows the layout of your screen.

Figure 17-9. Layout of the HTML client screen
Now, add the JavaScript code that’s shown in Listing 17-2.


At this point, you can build your application and run the screen. When you click the Download Timesheet button, the server-side code will create the Word file, and once this process completes, the browser will prompt you to save the output file locally.
The first part of this code adds a new record in the TimesheetReport table ![]() . The code adds the record in a new data workspace to help keep the data operation independent from the rest of the application. The code sets the engineer ID of the new TimesheetReport record
. The code adds the record in a new data workspace to help keep the data operation independent from the rest of the application. The code sets the engineer ID of the new TimesheetReport record ![]() and calls the SaveChanges method
and calls the SaveChanges method ![]() to commit the changes to the server. This call initiates the server-side code that creates the Word document.
to commit the changes to the server. This call initiates the server-side code that creates the Word document.
When the save operation succeeds, the TimesheetReport record will contain the Word document. The code in this listing calls an IE-specific method called msSaveOrOpenBlob ![]() . This method opens the IE Save dialog to enable the user to save the Word document locally. The TimesheetReport entity contains a base-64 encoded representation of the file. The purpose of the base64toBlob method is to convert this data into a binary representation that works with the Save dialog. The base64toBlob method utilizes a built-in JavaScript method called atob
. This method opens the IE Save dialog to enable the user to save the Word document locally. The TimesheetReport entity contains a base-64 encoded representation of the file. The purpose of the base64toBlob method is to convert this data into a binary representation that works with the Save dialog. The base64toBlob method utilizes a built-in JavaScript method called atob ![]() to provide the underlying conversion.
to provide the underlying conversion.
For this example, I included the msSaveOrOpenBlob technique for brevity. A caveat of this technique is that it works only in HTML5-compatible versions of IE. If you require a cross-browser solution, you can use the technique I showed you in Chapter 11, or you can replace the call to msSaveOrOpenBlob with a more compatible method. One way to do this is to use the FileSaver library, which you can download from https://github.com/eligrey/FileSaver.js/.
Opening Documents from a Desktop Application
For desktop client applications, the screen-design steps follow closely the HTML client design technique. To create the client screen, add an Editable Grid screen for the Engineer table and add a button inside the data grid called DownloadTimesheet. Figure 17-10 shows the layout of this screen.

Figure 17-10. Layout of the desktop client screen
Now, add the .NET code that’s shown in Listing 17-3.


Just like in the HTML client example, this code uses a new data workspace to add a new record to the TimesheetReport table ![]() . The code sets the engineer ID of the new TimesheetReport and calls the SaveChanges method
. The code sets the engineer ID of the new TimesheetReport and calls the SaveChanges method ![]() to commit the changes to the server. As before, this call initiates the server-side code that creates the Word document.
to commit the changes to the server. As before, this call initiates the server-side code that creates the Word document.
Once the document-generation process succeeds, the code opens the Silverlight Save dialog and prompts the user to save the Word file locally. As usual with this type of operation, the code uses the UI thread to open the Silverlight Save dialog ![]() . A caveat of this code is that it works only for applications in desktop client mode, and not for desktop browser applications. A workaround for this issue is to use a Silverlight custom button control, as I described in Chapter 13.
. A caveat of this code is that it works only for applications in desktop client mode, and not for desktop browser applications. A workaround for this issue is to use a Silverlight custom button control, as I described in Chapter 13.
This concludes the section on generating documents on the server. With this technique, the files will accumulate in the TimesheetReport table. Depending on your circumstances, it might be wise to write code that clears this table, or you might want to move the data onto a different table or into a more permanent storage location.
![]() Tip For desktop applications in desktop mode, you can open the file in the registered application rather than show the Save File dialog. You will find out how to do this later in this chapter.
Tip For desktop applications in desktop mode, you can open the file in the registered application rather than show the Save File dialog. You will find out how to do this later in this chapter.
Building Documents with Code
A difficulty with the OpenXML SDK is that you can struggle to work out exactly how to perform a task in code. For example, suppose that you want to add odd and even headers, indexes, or Word art objects to your document. With limited knowledge of the OpenXML SDK, it can be very difficult to work out exactly how to perform these tasks.
A trick that can help you is to use the Open XML SDK 2.5 Productivity Tool. This tool provides a feature that generates the C# code for a document. By default, the installer installs the Open XML SDK 2.5 Productivity Tool into the folder C:Program Files (x86)Open XML SDKV2.5 ool.
To start the tool, run the OpenXmlSdkTool.exe file from the installation folder. Once the tool opens, click the Open File button to open a document that contains the content you want to deconstruct. Next, click the Reflect Code button. When you do this, the tool generates and displays the C# code in the center pane (Figure 17-11). You can then use this reflected code to help build your document.

Figure 17-11. Use the productivity tool to determine the C# code for a document
Performing COM Automation
In this section, I’ll show you how build documents on the client with the use of COM automation. To begin, I’ll briefly describe some of the features of COM automation.
A characteristic of client-side COM automation is that this technique works only for desktop applications in desktop mode. Given this restriction, you might wonder what the benefits of COM automation are. After all, you could just as easily write server-side code that works both for desktop and browser applications.
The biggest benefit of COM automation is that it allows you to integrate more deeply with the client. For instance, you can access local resources such as files, web cameras, and printers. This type of integration isn’t possible with code that runs on the server.
To demonstrate a task that’s difficult to accomplish with server-side code, I’ll show you how to carry out a Microsoft Word mail merge with LightSwitch. But to provide you with a simpler introduction to COM automation, I’ll begin this section by showing you how to automate Microsoft Excel.
Generating Excel Documents
Out of the box, LightSwitch already includes some support for outputting data to Excel. Any data grids you add to the screen can include an Excel button that allows the user to output the data to Excel. Although this built-in feature works well, you can produce better output by building Excel documents with COM automation. For example, you can customize exactly where the data goes, apply different fonts and styles, and add additional worksheets. You can also create documents in the older Excel XLS format, which is something you can’t easily do with the OpenXML SDK.
To demonstrate how to work with Excel, let’s build a spreadsheet that shows an issue record and the associated issue-response records on the same worksheet. As Figure 17-12 shows, the ability to export parent and child data into the same workbook is a feature that users can find helpful.

Figure 17-12. Final spreadsheet
To build this example, create a Details screen for the Issue table and include the IssueResponse data collection on your screen. In the screen designer, create a button called ExportToExcel, as shown in Figure 17-13.

Figure 17-13. Layout of the screen
Now, enter the code that’s shown in Listing 17-4. Make sure to use the imports or using statements to add a reference to the System.Runtime.InteropServices.Automation namespace.


At this point, you can run your screen. When you click the Export to Excel button, your application starts Excel and shows the exported data. Let’s look at how this code works.
To avoid any errors, the first part checks that your application is a desktop application, rather than a browser application ![]() . You can add the same logic to the button’s CanExecute method to prevent the button from appearing in browser applications. The next part of the code creates a COM reference to Excel by calling the AutomationFactory class’s CreateObject method
. You can add the same logic to the button’s CanExecute method to prevent the button from appearing in browser applications. The next part of the code creates a COM reference to Excel by calling the AutomationFactory class’s CreateObject method ![]() . The way that you instantiate a COM object is to supply a string argument called a ProgID. In this example, we supply the ProgID Application.Excel. But, if you want to automate Microsoft Word instead, for example, you’d replace this with a ProgID of Application.Word.
. The way that you instantiate a COM object is to supply a string argument called a ProgID. In this example, we supply the ProgID Application.Excel. But, if you want to automate Microsoft Word instead, for example, you’d replace this with a ProgID of Application.Word.
The technique of creating a COM object by passing a ProgID string is called late binding. The advantage of late binding is that it doesn’t depend on any particular version of Excel. As long as a version of Excel exists on the client computer, your code will work. A major disadvantage, however, is that during design time, Visual Studio’s code designer doesn’t provide you with any IntelliSense. This means that you can easily write buggy and syntactically incorrect code that LightSwitch won’t catch until runtime.
The next part of this code creates a new workbook by calling the Workbooks.Add method ![]() . The next line populates the top part of the spreadsheet with issue data. It then inserts the issue-response data into the rows beneath
. The next line populates the top part of the spreadsheet with issue data. It then inserts the issue-response data into the rows beneath ![]() . At the end of the process, the code shows the Excel document to the user by setting the visibility property of the Excel application object to True
. At the end of the process, the code shows the Excel document to the user by setting the visibility property of the Excel application object to True ![]() .
.
Sending Documents Directly to a Printer
Rather than showing the document to the user on the screen, you can send your Office document directly to a printer and quit the Office application without saving changes. This technique allows you to send reports to a printer without any additional user intervention. This is a feature that users often find useful. For example, you could use this technique to add a button that prints a receipt or invoice.
To highlight the usefulness of COM automation, it’s worth noting that this is a feature that you can’t easily add to an HTML client application. The best that you can achieve in HTML client applications is to open the browser’s Print dialog.
Listing 17-5 shows the code that you would use to send the Excel workbook from the previous example directly to a printer. In this code, the Close method accepts an argument that configures what happens when Excel closes. You can configure Excel to discard or save changes, or you can let the user decide. To make Excel close a document without saving changes, you would pass the value 0 to the Close method.
Performing Mail Merges with Word
Continuing on the theme of COM automation, I’ll now describe how to carry out a mail merge by automating Microsoft Word. The purpose of this example is to demonstrate something slightly complex that you can accomplish with COM automation that would otherwise be difficult to achieve through server code.
There are many practical reasons why you might want to perform a mail merge. These reasons aren’t limited to just building letters, in the conventional sense. For instance, you can use a mail merge to build a report with sections that include multiple header and child sections. You can also use this technique to build name badges, surveys, or other business forms. To demonstrate this technique, I’ll show you how to mail merge a letter with data from the department table.
Creating a Mail Merge Word Template
The underlying document that makes mail merges possible is a mail merge template. To create a mail merge template, open Word and create a new document. From the ribbon bar, select the Mailings group, click the Start Mail Merge button, and select the “Letters” option. Click the Select Recipients button and choose the “Type New List” option. This opens the New Address List window, as shown in Figure 17-14.

Figure 17-14. Creating the mail merge fields
The New Address List window displays the mail merge fields as columns in the grid. As this figure shows, the default mail merge fields include Title, FirstName, LastName, and several more.
You can add fields by clicking the Customize Columns button. For the purpose of this demonstration, add the two new mail merge fields called DepartmentName and DepartmentManager. When you click the OK button to close the New Address List dialog, Word prompts you to save the list as a new Microsoft Office Address List file (or MDB file, if you’re using an earlier version of Word). Name your data file MailMergeData. Once this process completes, Word will enable the Insert Merge Field button in the ribbon bar. At this point, you’ll no longer need this data file. However, you need to create a data file in order to add the mail merge fields to your document.
The next step is to write your letter and to insert the mail merge fields in the appropriate places (Figure 17-15). When you complete your document, save your template file as MailMergeTemplate.dotx.

Figure 17-15. Click the Insert Merge Field button to add a mail merge field
Writing the Mail Merge Code
Once you add your Word template document, it’s time to write the code that carries out the mail merge. To demonstrate the technique, let’s build a screen that performs a mail merge with department data. First, create an Editable Grid screen that’s based on the Department table. Name your screen BuildLetter. Add a button called CreateMailMerge and add the code that’s shown in Listing 17-6.


Listing 17-6 includes plenty of code. Although this process may seem complex, the overall process distills into two main parts.
- The code creates a data document in Microsoft Word format and populates it with data from your LightSwitch screen.
- The code uses your template file to create a new Word document and sets the mail merge data source to the document you created above. The code then initiates the actual mail merge.
Let’s now take a closer look at this code. The entry point to this process is the CreateMailMerge_Execute method. This is the method that runs when the user clicks the Create Mail Merge button.
This process uses the MailMergeTemplate.dotx template file to create a new Word document ![]() . Next, the code calls a method called CreateMailMergeDataFile
. Next, the code calls a method called CreateMailMergeDataFile ![]() . This creates a data document called DataDoc.doc and sets the data source of the new Word document to be this data document. It does this by calling Word’s CreateDataSource method
. This creates a data document called DataDoc.doc and sets the data source of the new Word document to be this data document. It does this by calling Word’s CreateDataSource method ![]() . This method requires you to supply the column headers for your data. The column names you define must match the names of the mail merge fields that you defined in the New Address List dialog. In this example, these headings are called DepartmentName, DepartmentManager, and Address1
. This method requires you to supply the column headers for your data. The column names you define must match the names of the mail merge fields that you defined in the New Address List dialog. In this example, these headings are called DepartmentName, DepartmentManager, and Address1 ![]() . The remaining code in the CreateMailMergeDataFile method loops through the records in the Departments collection and calls the FillRow method to populate the data document (DataDoc.doc).
. The remaining code in the CreateMailMergeDataFile method loops through the records in the Departments collection and calls the FillRow method to populate the data document (DataDoc.doc).
Before you execute the mail merge, you can write additional code to fine tune the contents of your document. To demonstrate this technique, the code in this listing inserts a letter reference at the end of the document. To accomplish this, the code moves the insertion point to the end of the document and calls code to insert text. The code inserts the text “Our Ref” followed by the recipient name and date. To append the name, the code inserts a mail merge field that binds to the DepartmentManager mail merge data item ![]() . By doing this, the actual data substitution occurs during the mail merge process. You can use bookmarks that you define in your template document to help locate sections that you want to want to customize with code. This provides a powerful method that you can use to tailor the contents of a document at runtime. The code that moves the insertion point to the end of the document accomplishes this by calling a method called EndKey. The wdStory argument configures the method to move the selection to the end of the document (as opposed to the end of a column or line), and the wdMove argument configures the method to move the insertion point (as opposed to extending the selection from the current position to the new position).
. By doing this, the actual data substitution occurs during the mail merge process. You can use bookmarks that you define in your template document to help locate sections that you want to want to customize with code. This provides a powerful method that you can use to tailor the contents of a document at runtime. The code that moves the insertion point to the end of the document accomplishes this by calling a method called EndKey. The wdStory argument configures the method to move the selection to the end of the document (as opposed to the end of a column or line), and the wdMove argument configures the method to move the insertion point (as opposed to extending the selection from the current position to the new position).
The remaining code in this procedure performs the mail merge by calling the Execute method on the wordMailMerge object ![]() . This completes the mail merge process, and the remaining code tidies up the objects that it declared earlier. You can optionally add code here to delete the DataDoc.doc file if you want.
. This completes the mail merge process, and the remaining code tidies up the objects that it declared earlier. You can optionally add code here to delete the DataDoc.doc file if you want.
Just before the call to the Execute method, the code sets the Destination property ![]() of the wordMailMerge object to wdSendToNewDocument. This represents the numeric value of 0, which configures Word to show the document to the user. Table 17-2 shows the other acceptable values you can set. So, for example, you could configure the process to send the output directly to a printer.
of the wordMailMerge object to wdSendToNewDocument. This represents the numeric value of 0, which configures Word to show the document to the user. Table 17-2 shows the other acceptable values you can set. So, for example, you could configure the process to send the output directly to a printer.
Table 17-2. Constants You Can Use to Set the Mail Merge Destination
|
Name of Constant |
Value |
Description |
|---|---|---|
|
wdSendToNewDocument |
0 |
Word shows the mail merge in the document. |
|
wdSendToPrinter |
1 |
Word sends the mail merge to a printer. |
|
wdSendToEmail |
2 |
Word sends the mail merge to your default email client. |
|
wdSendToFax |
3 |
Mail merge will be sent to a fax. |
A standard practice that developers apply when they write automation code is to detect the mode of the application and to disable desktop-specific functions in browser applications. The code in the CreateMailMerge_CanExecute method contains logic that does this ![]() .
.
You can now run your application; Figure 17-16 shows the mail merge screen at runtime.

Figure 17-16. Word mail merge at runtime
To conclude this section, let’s look at some behavior you should be aware of when you write code that recourses through a data collection. This code populates your data document by using your screen’s Departments collection. By default, screen collections show only 45 records at a time. Therefore, you might want to increase this by changing the value of the “No. Of Items To Display Per Page” textbox. If you want to mail merge all of the records in a table, you can modify your code so that it uses a query rather than a screen collection.
Distributing the Template with the LightSwitch Client
In the mail merge example I just showed you, the code retrieves the Word template file from a UNC file share. The biggest disadvantages of this technique are that the code works only on the internal network, and that it won’t work in environments where Windows file sharing is disallowed.
You can overcome this problem by embedding your Word template in your application’s XAP file. There are several other pros and cons of using this technique, which are summarized in Table 17-3.
Table 17-3. Template-Distribution Techniques
|
Distribution via a File Share |
Distribution via the XAP File |
|---|---|
|
This technique works only within your local network. |
You can use this technique in applications that you deploy over the Internet. |
|
You can easily update your file template after you deploy your application. |
You’ll need to rebuild and redeploy your LightSwitch application if you want to make changes to your template file. |
|
There isn’t any impact on the load time of your application. |
Adding your Word template to the XAP file makes it larger, which in turn makes your application slower to load. |
|
This technique is more fragile because there’s a dependency on a file outside of your application. |
This technique is more robust, as everything is self-contained. |
Let’s look at how to modify the code from Listing 17-9 to retrieve the Word template from the XAP file, rather than from a UNC file share. To add your MailMergeTemplate.dotx file to your XAP file, use Solution Explorer to add a new folder to your client project. Name this folder Resources. Next, right-click the Resources folder and use the “Add Existing Item” option to add your Word template file. Once you add your template file, open the properties sheet and set the Build Action property of the file to Content, as shown in Figure 17-17.

Figure 17-17. Setting the Build Action to Content
Listing 17-7 shows how to extract a file from your XAP package and then save it into the My Documents folder on the client computer. The code saves your template into the My Documents folder because security restrictions in Silverlight limit the places where you can save files on the local file system. You would add this code to Listing 17-6, just before the initial part that calls the CreateObject method to create a COM reference to Word.
Listing 17-7. Saving the Word template to the My Documents folder

The first part of this code calls the GetResourceStream method ![]() . The purpose of this method is to return resources that are embedded inside a XAP file. This method requires you to supply a relative path that identifies your resource. This path doesn’t require any leading slashes—if you add a leading slash, your code won’t work. Also notice how the directory separator uses a forward slash (/) rather than a backslash. This specifies a letter template that belongs in the Resources folder. But, if you add the template file to the root of your project, the Uri string that you would use would simply be "LetterTemplate.dotx".
. The purpose of this method is to return resources that are embedded inside a XAP file. This method requires you to supply a relative path that identifies your resource. This path doesn’t require any leading slashes—if you add a leading slash, your code won’t work. Also notice how the directory separator uses a forward slash (/) rather than a backslash. This specifies a letter template that belongs in the Resources folder. But, if you add the template file to the root of your project, the Uri string that you would use would simply be "LetterTemplate.dotx".
After the code obtains a resource stream, it builds a string that defines the location within the My Documents folder ![]() , where the code will later save the file. In practice, you might want to save the template to a more specific location, and check that no file with the same name exists before you create your file. Next, the code calls the WriteAllBytes method to write the contents of the resource to file
, where the code will later save the file. In practice, you might want to save the template to a more specific location, and check that no file with the same name exists before you create your file. Next, the code calls the WriteAllBytes method to write the contents of the resource to file ![]() .
.
The extraction of the Word template file from the XAP file is now complete. To finish, you can modify the call to the wordApp.Documents.Open method in Listing 17-6 so that it opens the template from the My Documents folder, rather than from the UNC file location.
Creating Adobe PDF Documents
To conclude this chapter, I’ll show you how to generate PDF documents with a Silverlight library called silverPDF. The PDF format provides several benefits. This format preserves the layout and positioning of your document; it is compatible on a wide range of devices; and it’s generally more difficult for a user to alter the contents of a PDF document.
There are many third-party PDF libraries you can use. In this section, I chose to use silverPDF because of its simplicity and popularity. silverPDF is based on two other open source projects: iTextSharp and PDFsharp. If you’ve used these libraries before, the code in this section will look familiar.
To get started with silverPDF, download the silverPDF.dll file from the CodePlex website at http://silverpdf.codeplex.com/. Next, add a reference to the silverPDF.dll assembly from your client project. At this point, you can begin to build PDF documents with the library.
To show you how to use the PDF library, let’s look at how to add a PDF Export button to a screen that’s based on an issue record. To create this example, create an Add Edit Issue screen for the Issue entity. Add a button called ExportToPDF and insert the code that’s shown in Listing 17-8.


At this point, you can run your application. Let’s look at how this code works. The start of this procedure creates a PDF document ![]() and adds a page to the document
and adds a page to the document ![]() . Next, the code defines a set of fonts that you can apply to the elements in your document
. Next, the code defines a set of fonts that you can apply to the elements in your document ![]() .
.
The next section defines an XGraphics object ![]() . This is an object you can use to add content to your PDF document. It exposes various Draw methods that you can call to create graphical elements, as shown in Figure 17-18. DrawString is a method you can call to add text to your document, and the code calls this method several times, starting with a call that creates a piece of header text
. This is an object you can use to add content to your PDF document. It exposes various Draw methods that you can call to create graphical elements, as shown in Figure 17-18. DrawString is a method you can call to add text to your document, and the code calls this method several times, starting with a call that creates a piece of header text ![]() . The DrawString method requires you to supply the font name, color, X-Y coordinates, sizing, and alignment details so as to properly display the text.
. The DrawString method requires you to supply the font name, color, X-Y coordinates, sizing, and alignment details so as to properly display the text.

Figure 17-18. silverPDF draw methods
Notice how this code invokes the PDF-creation logic on the main UI dispatcher. If you don’t do this, LightSwitch throws an “Invalid cross-thread access” exception. This is because Silverlight guards many of the objects in the System.Windows namespace (and others) and permits the use of these of objects only on the main Silverlight dispatcher thread. Internally, the silverPDF library uses some of these protected objects.
The final part of this procedure calls the PDFDocument object’s Save method to save the PDF file to the user’s My Documents folder. Silverlight’s security model allows you to only save documents to certain folders, one of which is the My Documents folder. Figure 17-19 shows how the final document looks at runtime.

Figure 17-19. PDF output produced with silverPDF
![]() Tip With Microsoft Word 2010 and above, you can natively save documents in PDF format. You can therefore create PDF files by using COM automation and the Word object model (in desktop applications). You would create your PDF file by calling the Save method on your Word document, and then passing in the file format type of 17 (this relates to Word’s wdFormatPDF enumeration value). The C# code would look like this: myWordDoc.Save(17);
Tip With Microsoft Word 2010 and above, you can natively save documents in PDF format. You can therefore create PDF files by using COM automation and the Word object model (in desktop applications). You would create your PDF file by calling the Save method on your Word document, and then passing in the file format type of 17 (this relates to Word’s wdFormatPDF enumeration value). The C# code would look like this: myWordDoc.Save(17);
Summary
A common user requirement is the ability to generate Office documents from a LightSwitch application. This functionality enables users to generate documents such as invoices, receipts, or reports. It also enables users to output data to Excel for further analysis.
In this chapter, I showed you two ways to generate documents. The first method uses the OpenXML SDK to create documents on the server. The second method produces documents on the client with COM automation. The server method works for desktop and HTML client applications, whereas the COM automation technique works only for desktop applications in desktop mode.
Starting with the server-based method, I showed you how to apply a technique called the command pattern. This technique helps you overcome a problem with LightSwitch screen development. The problem is that it can be difficult to call specific server-side code from the client. The command pattern relies on a table that exists for the sole purpose of executing commands. You attach code to the inserting method of this table, which enables you to call server-side code by simply adding rows to your table. You can pass arguments to your server-side methods by defining table properties. The example I showed you uses the OpenXML SDK to generate a Word document when a user adds a row to a command table. The code saves the output document back into the command table. This makes it possible for you to retrieve the document by using the techniques that I showed you in Chapter 11.
The OpenXML SDK provides an object model that you can use to generate documents. It can be difficult to build a document from scratch, because this can require a lot of code. You can simplify the process by basing your new document on a predefined template document. In the case of a Word document, you can predefine elements such as tables, headings, and footnotes in a template document. In the copy of your document, you can then write code that clones, modifies, or deletes these predefined elements. This is easier than creating these elements from scratch in code. I also described how to add bookmarks to a template document so as to insert LightSwitch data into a document, and how to write code with the OpenXML SDK that inserts data values into those bookmark locations. To demonstrate inserting line data into a document, I showed you how to clone rows from an existing Word table and how to populate the table cells with data.
For desktop applications, you can use COM automation to interact with the applications that exist on the end-user PC. The benefit of this technique is that it allows you to integrate more deeply with the client and enables you to access local resources such as files, web cameras, and printers.
To demonstrate this technique, I showed you how to export screen data to Microsoft Excel. The benefit of a custom export feature over the basic export function in the data grids is that you can output header and line data and apply custom styles and formatting.
To give a more complex example of COM automation, this chapter described how to create a Word mail merge with LightSwitch data. You can use mail merges whenever you need to populate a Word document with data. This technique can be useful if you need to generate reports. The mail merge technique relies on code that extracts your LightSwitch data into a data document. Subsequent code then merges this data document with your Word template file.
A useful task you can perform with Microsoft Office integration is to send documents directly to a printer. You can carry out this process without the user ever seeing the Office application on the desktop, and once the file prints, you can discard the document. This enables you to add a button that prints output onto a screen without requiring any further user intervention.
In the final part of this chapter, I showed you how to generate PDF documents with a Silverlight library called silverPDF. Some users prefer the PDF format because it looks more consistent across different computers, and is more difficult for users to edit. To use the silverPDF library, simply download it and add a reference to the assembly in your client project. Once you do this, you can write code that builds your PDF document.