![]()
Manipulating Data
The data stored in most databases is not static. The application users are constantly adding data to tables as customers place orders, the company hires employees, and the payroll department writes checks. Automated processes periodically load new data into reporting databases, such as data warehouses, and into production systems. Users and processes also update existing rows or delete rows from tables.
In Chapters 3 through 9, you learned how to retrieve data from SQL Server. These skills are important for generating reports and displaying data, and they will come in handy as you learn to insert new rows, update the values in existing rows, and delete rows from tables. This chapter covers how to manipulate data in many different scenarios, such as by using one table, joins, and subqueries.
There are many ways to add new rows to tables in SQL Server databases. Be aware that there are other tools such as SQL Server Integration Services (SSIS) that you can use to load data into SQL Server, but because this book is about T-SQL, this section only covers the T-SQL statements to insert data. To learn more about SSIS, read Pro SQL Server 2012 Integration Services by Francis Rodrigues and Michael Coles (Apress, 2012) and also SSIS Design Patterns by Andy Leonard, Tim Mitchell, Jessica Moss, and Michelle Ufford (Apress, 2012).
Run the following code to create a table that you will populate with data in this section:
IF OBJECT_ID('dbo.demoCustomer','U') IS NOT NULL BEGIN
    DROP TABLE dbo.demoCustomer;
END;
CREATE TABLE dbo.demoCustomer(CustomerID INT NOT NULL,
    FirstName NVARCHAR(50) NOT NULL, MiddleName NVARCHAR(50) NULL,
    LastName NVARCHAR(50) NOT NULL
    CONSTRAINT PK_demoCustomer PRIMARY KEY (CustomerID));
![]() Note You may notice that I have used two different techniques to check for the existence of a table before dropping it. When using SQL Server Management Studio to create the script, the code checks for the table in the sys.objects table. When I write the code myself, I usually check the results of the OBJECT_ID function. Either technique works and use whichever one you prefer.
Note You may notice that I have used two different techniques to check for the existence of a table before dropping it. When using SQL Server Management Studio to create the script, the code checks for the table in the sys.objects table. When I write the code myself, I usually check the results of the OBJECT_ID function. Either technique works and use whichever one you prefer.
Adding One Row with Literal Values
Adding one row with literal values is the simplest way to add data to an existing table. For example, a user may fill out a Windows or web form in an application and click Save. At that point, the application builds and sends a single INSERT statement to SQL Server containing the values that the user entered in the form. To insert new rows, you will use the INSERT statement. The syntax of the INSERT statement, which has two variations, is simple:
INSERT [INTO] <table1> [(<col1>,<col2>)] SELECT <value1>,<value2>;

INSERT [INTO] <table1> [(<col1>,<col2>)] VALUES (<value1>,<value2>);
The INTO keyword is optional, but I like to include it. Type in and execute the code in Listing 10-1 to learn this technique. The last statement displays the inserted data.
Listing 10-1. Adding One Row at a Time with Literal Values
--1
INSERT INTO dbo.demoCustomer (CustomerID, FirstName, MiddleName, LastName)
VALUES (1, N'Orlando', N'N.', N'Gee'),

--2
INSERT INTO dbo.demoCustomer (CustomerID, FirstName, MiddleName, LastName)
SELECT 3, N'Donna', N'F.', N'Cameras';

--3
INSERT INTO dbo.demoCustomer
VALUES (4,N'Janet', N'M.', N'Gates'),

--4
INSERT INTO dbo.demoCustomer
SELECT 6,N'Rosmarie', N'J.', N'Carroll';

--5
INSERT INTO dbo.demoCustomer (CustomerID, FirstName, MiddleName, LastName)
VALUES (2, N'Keith', NULL, N'Harris'),

--6
INSERT INTO dbo.demoCustomer (CustomerID, FirstName, LastName)
VALUES (5, N'Lucy', N'Harrington'),

--7
SELECT CustomerID, FirstName, MiddleName, LastName
FROM dbo.demoCustomer;
Figure 10-1 shows the results of query 7. The INSERT INTO clause specifies the table name and optionally the column names. Statement 1 inserts the row using the VALUES clause. Notice that parentheses surround the literal values in the statement. Statement 2 uses a slightly different syntax with the keyword SELECT. In this case, you could successfully run the SELECT part of the statement because it is a valid statement by itself. One more thing to note is the letter N before each hard-coded string value. This converts the string to an NVARCHAR value to match the data type of the column.
Figure 10-1. The results after inserting six rows
![]() Note This book uses the word query for T-SQL commands that return data. It uses the word statement for other T-SQL commands.
Note This book uses the word query for T-SQL commands that return data. It uses the word statement for other T-SQL commands.
Both statements 1 and 2 specify the column names in parentheses. The order of the values to be inserted must match the order of the column names. Statements 3 and 4 look very similar to the first two statements, but these statements don’t specify the column names. Although not specifying the column names will work some of the time, the best practice is to specify the columns. Not only does this help clarify the code, it often, but not always, keeps the code from breaking if new nonrequired columns are added to the table later.
Notice that statement 5 inserts NULL into the MiddleName column. Statement 6 just leaves MiddleName out of the statement altogether. Both of these statements work because the MiddleName column is optional.
Avoiding Common Insert Errors
The statements in the previous section successfully added six rows to the dbo.demoCustomer table because they were carefully written to avoid breaking any of the constraints and column requirements. Listing 10-2 demonstrates several invalid statements. Type in and execute the code to learn about some of the things that can go wrong when inserting data into tables.
Listing 10-2. Attempting to Insert Rows with Invalid INSERT Statements
PRINT '1';
--1
INSERT INTO dbo.demoCustomer (CustomerID, FirstName, MiddleName, LastName)
VALUES (1, N'Dominic', N'P.', N'Gash'),

PRINT '2';
--2
INSERT INTO dbo.demoCustomer (CustomerID, MiddleName, LastName)
VALUES (10, N'M.', N'Garza'),

GO
PRINT '3';
GO

--3
INSERT INTO dbo.demoCustomer
VALUES (11, N'Katherine', N'Harding'),

GO
PRINT '4';
GO

--4
INSERT INTO dbo.demoCustomer (CustomerID, FirstName, LastName)
VALUES (11, N'Katherine', NULL, N'Harding'),

GO
PRINT '5';
GO

--5
INSERT INTO dbo.demoCustomer (CustomerID, FirstName, LastName)
VALUES (N'A', N'Katherine', N'Harding'),
Figure 10-2 shows the error messages that result from running Listing 10-2. Statement 1 attempts to add another row with the CustomerID value 1. Because a row with CustomerID 1 already exists in the table, the INSERT statement violates the primary key constraint. Because the primary key of a table uniquely identifies a row, you may not insert duplicate values. If the primary key is a composite key, however, you can have duplicate values in any of the columns but not duplicates of the entire key. A primary key may not contain any NULL values in the key columns.
Figure 10-2. The results of attempting to insert rows with invalid INSERT statements
Statement 2 violates the NOT NULL constraint on the FirstName column. Every row must contain a non-NULL value in the FirstName and LastName columns.
The database engine doesn’t discover problems with statements 1 and 2 until the code runs. The problems with statements 3 and 4 are compile errors that cause the entire batch to fail. To show all the error messages for the listing, the word GO separates statements 3 and 4 into their own batches. In fact, even the PRINT statement will not run if it is contained in the same batch as these statements. The intent of statements 3 and 4 is to insert a row with a NULL MiddleName. Because statement 3 doesn’t specify the column names, the database engine expects a value for each of the four columns in the table definition. Because the statement supplies only three values, the statement fails. Statement 4 does supply the column names, but the VALUES clause doesn’t supply the same number of values. Once again, the statement fails. Statement 5 also contains a compile error. It attempts to insert a string value when the column, CustomerID, accepts only an integer.
Inserting Multiple Rows with One Statement
You will often see code using multiple UNION ALL queries with SELECT statements to insert several rows with one INSERT statement. Starting with SQL Server 2008, you can use a new technique called row constructors. The row constructor technique uses the keyword VALUES followed by one or more sets of values. Type in and execute Listing 10-3 to learn how to use both techniques.
Listing 10-3. Inserting Multiple Rows with One INSERT
--1
INSERT INTO dbo.demoCustomer (CustomerID, FirstName, MiddleName, LastName)
SELECT 7, N'Dominic', N'P.', N'Gash'
UNION ALL
SELECT 10, N'Kathleen', N'M.', N'Garza'
UNION ALL
SELECT 11, N'Katherine', NULL, N'Harding';

--2
INSERT INTO dbo.demoCustomer (CustomerID, FirstName, MiddleName, LastName)
VALUES (12, N'Johnny', N'A.', N'Capino'),
       (16, N'Christopher', N'R.', N'Beck'),
       (18, N'David', N'J.', N'Liu'),

--3
SELECT CustomerID, FirstName, MiddleName, LastName
FROM dbo.demoCustomer
WHERE CustomerID >=7;
Figure 10-3 displays the rows inserted by Listing 10-3. Statement 1 uses the UNION ALL query technique. You can successfully select just the five lines that make up the UNION ALL query part of the INSERT statement and run it by itself. Statement 2 demonstrates how to use the row constructor technique. By using row constructors, you can specify multiple lists of values, separated by commas, in one VALUES clause.
Figure 10-3. Inserting multiple rows with one INSERT statement
Inserting Rows from Another Table
So far, you have learned how to insert rows into a table using literal values. Often you will need to insert data from one table or query into another table. For example, you may need to load production data into a data warehouse. Often application programmers think about data in terms of individual rows, so they insert data one row at a time when it is possible, and almost always more efficient, to insert more rows at once. They will often loop through one table, saving the values in variables, and then insert the values in the second table.
My favorite analogy involves a pile of 1,000 car keys. How would you move the keys from one location to another location? Would you pick up one key at a time and move it? No, you would probably grab all the keys if you could and just move them all at once. If you could not pick up all the keys in one trip, you could at least move them in two or three batches. Listing 10-4 shows how to import rows from one table into another all within one statement. This example demonstrates “moving all the car keys at once.” Type in and execute the code to see how this works.
Listing 10-4. Inserting Rows from Another Table
--1
INSERT INTO dbo.demoCustomer (CustomerID, FirstName, MiddleName, LastName)
SELECT BusinessEntityID, FirstName, MiddleName, LastName
FROM Person.Person
WHERE BusinessEntityID BETWEEN 19 AND 35;

--2
INSERT INTO dbo.demoCustomer (CustomerID, FirstName, MiddleName, LastName)
SELECT DISTINCT s.SalesOrderID, c.FirstName, c.MiddleName, c.LastName
FROM Person.Person AS c
INNER JOIN Sales.SalesOrderHeader AS s ON c.BusinessEntityID = s.SalesPersonID;

--3
SELECT CustomerID, FirstName, MiddleName, LastName
FROM dbo.demoCustomer
WHERE CustomerID > 18;
Figure 10-4 shows some of the rows added to the dbo.demoCustomer table by insert statements in Listing 10-4. Statement 1 inserts the rows from the Person.Person table where the BusinessEntityID is between 19 and 35. Statement 2 inserts the rows from a query that joins the Person.Person and Sales.SalesOrderHeader tables. The SELECT parts of the statements are valid queries that you can run without the INSERT clauses. You can use any of the techniques you have learned so far to write SELECT statements to insert data into a table as long as the data selected meets the constraints and requirements of the target table.

Figure 10-4. The partial results of adding rows from another table
Inserting Missing Rows
You have seen what can happen when you attempt to insert a new row that violates the primary key. You can use the techniques found in Chapter 6 to insert rows into one table that don’t exist in the source table. Type in and execute the code in Listing 10-5 to learn how the EXISTS method works.
Listing 10-5. Inserting Missing Rows
--1
SELECT COUNT(CustomerID) AS CustomerCount
FROM dbo.demoCustomer;

--2
INSERT INTO dbo.demoCustomer (CustomerID, FirstName, MiddleName, LastName)
SELECT c.BusinessEntityID, c.FirstName, c.MiddleName, c.LastName
FROM Person.Person AS c
WHERE NOT EXISTS (
    SELECT * FROM dbo.demoCustomer a
    WHERE a.CustomerID = c.BusinessEntityID);

--3
SELECT COUNT(CustomerID) AS CustomerCount
FROM dbo.demoCustomer;
Figure 10-5 shows the customer count after adding the missing rows. By using NOT EXISTS to find rows in the target table that don’t match, the SELECT part of the INSERT statement inserts those rows into the table. As mentioned in the “Inserting Rows from Another Table” section, any valid SELECT statement may be used to insert rows into a table. If you run the same code a second or third time, you will find that the row count doesn’t change. Because the code inserted all the missing rows, there are no new rows to insert after the first time.

Figure 10-5. The results of checking the row count after adding the missing rows
Creating and Populating a Table in One Statement
The SELECT INTO statement allows you to create a table and populate it with one statement. Developers often use this technique to create temporary tables, or work tables. The syntax for this is:
SELECT <col1>,<col2>
INTO <table2>
FROM <table1>;
Type in and execute the code in Listing 10-6 to learn how to use this technique. The first part of the code drops the dbo.demoCustomer table because the SELECT INTO statement will fail if the table already exists.
Listing 10-6. Using SELECT INTO to Create and Populate a Table
IF EXISTS (SELECT * FROM sys.objects
            WHERE object_id = OBJECT_ID(N'[dbo].[demoCustomer]')
                AND type in (N'U'))
DROP TABLE dbo.demoCustomer;

GO

--1
SELECT BusinessEntityID, FirstName, MiddleName, LastName,
    FirstName + ISNULL(' ' + MiddleName,'') + ' ' +  LastName AS FullName
INTO dbo.demoCustomer
FROM Person.Person;

--2
SELECT BusinessEntityID, FirstName, MiddleName, LastName, FullName
FROM dbo.demoCustomer;
Figure 10-6 displays the partial results of running this code. Statement 1 lists the columns and an expression along with the word INTO and the name of the table to create. The resulting table contains a column, FullName, that the statement created with the expression. Even though you could write a query that doesn’t specify an alias for the expression, you must specify the alias for the expression when writing SELECT INTO statements. The database engine uses the column and alias names when creating the new table.

Figure 10-6. The partial results of creating and populating a table with SELECT INTO
Figure 10-7 shows the table definition of the dbo.demoCustomer table found by navigating to the table in the Object Explorer window of SQL Server Management Studio. You may have to right-click Tables and select Refresh to see the new table. Except for the missing primary key, the column definitions match the columns from the Person.Person table, which was the source of the data. The data in the FullName column can be 152 characters—the three name columns plus the two spaces.

Figure 10-7. The dbo.demoCustomer table definition
Developers often use the SELECT INTO statement to create an empty table by adding 1=2 to the WHERE clause. Because one never equals two, the statement creates the table but doesn’t add any rows. Even if you want to create and populate a work table, the performance of the entire system is often better by creating the empty table first and then populating it with a regular INSERT statement when you are working with a very large number of rows. This is because the SELECT INTO statement locks system tables that can cause problems for other connections. Using a CREATE TABLE first and then populating it locks the system tables only momentarily. Using the SELECT INTO syntax locks the tables until the entire statement completes.
Inserting Rows into Tables with Default Column Values
Column definitions often specify a default value, called a default constraint, if the INSERT statement doesn’t supply a value for the column. This is different from inserting NULL. When inserting NULL, you specify NULL in the INSERT statement, or the NULL value is a result of the SELECT statement used to insert the data. You might also omit the column from the INSERT statement to insert NULL. If the column definition specifies a default constraint, you can just leave that column out of the INSERT statement to automatically insert the default value. Run the code in Listing 10-7 to learn how to insert data into tables when one or more of the columns have a default value. The first part of the code creates the table and two ALTER TABLE statements add the default constraints.
Listing 10-7. Inserting Data with a Column Default Constraint
IF  EXISTS (SELECT * FROM sys.objects
            WHERE object_id = OBJECT_ID(N'[dbo].[demoDefault]')
               AND type in (N'U'))
DROP TABLE dbo.demoDefault;
GO

CREATE TABLE dbo.demoDefault(
    KeyColumn int NOT NULL PRIMARY KEY,
    HasADefault1 DATETIME2 (1) NOT NULL,
    HasADefault2 NVARCHAR (50) NULL,
);
GO
ALTER TABLE dbo.demoDefault ADD  CONSTRAINT DF_demoDefault_HasADefault
    DEFAULT (GETDATE()) FOR HasADefault1;
GO
ALTER TABLE dbo.demoDefault ADD  CONSTRAINT DF_demoDefault_HasADefault2
    DEFAULT ('the default') FOR HasADefault2;
GO

--1
INSERT INTO dbo.demoDefault(HasADefault1, HasADefault2, KeyColumn)
VALUES ('2009-04-24', N'Test 1', 1),('2009-10-1', NULL, 2);

--2
INSERT INTO dbo.demoDefault (HasADefault1, HasADefault2, KeyColumn)
VALUES (DEFAULT, DEFAULT, 3), (DEFAULT, DEFAULT, 4);

--3
INSERT INTO dbo.demoDefault (KeyColumn)
VALUES (5),(6);

--4
SELECT HasADefault1,HasADefault2,KeyColumn
FROM dbo.demoDefault;
Figure 10-8 shows the results of running this code. Statement 1 inserts literal values into the HasADefault1 and HasADefault2 columns. Even though the two columns have default constraints, you can still override them and insert your own values. Notice that the row inserted with KeyColumn value 2 contains a NULL value in the HasADefault2 column. The statement specified and inserted NULL, not the default value.
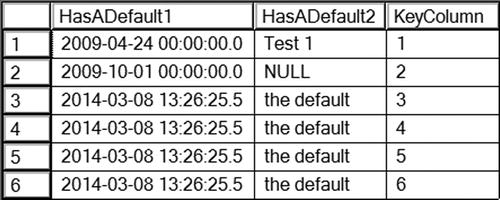
Figure 10-8. The results of inserting rows into a table with column default constraints
Statements 2 and 3 take advantage of the default constraints. Statement 2 specifies the keyword DEFAULT instead of a value. Statement 3 just omits the two columns. Whenever using the keyword DEFAULT or omitting the columns, the default definition determines the values to be inserted. The GETDATE function provides default values for the HasDefault1 column. The literal value “the default” is filled in for HasADefault2. If a table has default values defined for every column, you can also insert a row like this:
INSERT INTO TableWithAllDefaults
DEFAULT VALUES;
Inserting Rows into Tables with Automatically Populating Columns
In addition to default constraints, four types of columns exist that can be auto-populated. In other words, you should not specify values for these columns. The columns types are as follows:
- Rowversion: Formerly called TIMESTAMP, this contains a binary number that is unique within a database. Developers generally use ROWVERSION to determine whether changes have been made to a row.
- Identity: This contains an auto-incrementing numeric value. Developers often use IDENTITY columns when an ID number is needed for a table.
- Computed columns: These have a definition that is usually based on the values of other columns in the same row. The values in a computed column can be stored in the table by specifying the keyword PERSISTED in the column definition. If the table definition doesn’t contain PERSISTED, it will be calculated each time it is accessed.
Be sure to always specify the column names, leaving off the automatically populated columns when you write an INSERT statement to avoid causing an error.
![]() Note There is an exception to the rule about inserting data into IDENTITY columns. You can change a session-specific setting called IDENTITY_INSERT that will allow you to insert a value into an IDENTITY column. Developers and database administrators often do this when loading data and the IDENTITY values must be preserved. After loading the data, the IDENTITY column will work as it did before once you turn off IDENTITY_INSERT in that session or insert data into the table from a different session.
Note There is an exception to the rule about inserting data into IDENTITY columns. You can change a session-specific setting called IDENTITY_INSERT that will allow you to insert a value into an IDENTITY column. Developers and database administrators often do this when loading data and the IDENTITY values must be preserved. After loading the data, the IDENTITY column will work as it did before once you turn off IDENTITY_INSERT in that session or insert data into the table from a different session.
Type in and execute the code in Listing 10-8. The first part of the code creates a table with the special column types.
Listing 10-8. Inserting Rows into Tables with Autopopulated Columns
IF  EXISTS (SELECT * FROM sys.objects
            WHERE object_id = OBJECT_ID(N'[dbo].[demoAutoPopulate]')
                AND type in (N'U'))
DROP TABLE [dbo].[demoAutoPopulate];

CREATE TABLE [dbo].[demoAutoPopulate](
     [RegularColumn] [NVARCHAR](50) NOT NULL PRIMARY KEY,
     [IdentityColumn] [INT] IDENTITY(1,1) NOT NULL,
     [RowversionColumn] [ROWVERSION] NOT NULL,
     [ComputedColumn] AS ([RegularColumn]+CONVERT([NVARCHAR],
     [IdentityColumn],(0))) PERSISTED);
GO

--1
INSERT INTO dbo.demoAutoPopulate (RegularColumn)
VALUES (N'a'), (N'b'), (N'c'),

--2
SELECT RegularColumn, IdentityColumn, RowversionColumn, ComputedColumn
FROM demoAutoPopulate;
Figure 10-9 shows the results of running this code. Statement 1 specified values for RegularColumn only. The database engine automatically determined the values for the other columns. Notice that the IdentityColumn contains an incrementing value. The ComputedColumn contains the result of the expression RegularColumn + CAST(IdentityColumn AS NVARCHAR).

Figure 10-9. The results of inserting rows into a table with autopopulating columns
You have learned how to insert new rows into tables by using literal values or data from a query. Before moving on to the next section, where you will learn how to delete data, practice inserting new rows into a table by completing Exercise 10-1.
Use the AdventureWorks database to complete this exercise. You can find the solutions at the end of the chapter.
Run the following code to create the required tables. You can also download the code from this book’s page at www.apress.com to save typing time.
IF EXISTS (SELECT * FROM sys.objects
WHERE object_id = OBJECT_ID(N'[dbo].[demoProduct]')
AND type in (N'U'))
DROP TABLE [dbo].[demoProduct]
GO
CREATE TABLE [dbo].[demoProduct](
[ProductID] [INT] NOT NULL PRIMARY KEY,
[Name] [dbo].[Name] NOT NULL,
[Color] [NVARCHAR](15) NULL,
[StandardCost] [MONEY] NOT NULL,
[ListPrice] [MONEY] NOT NULL,
[Size] [NVARCHAR](5) NULL,
[Weight] [DECIMAL](8, 2) NULL,
);
IF EXISTS (SELECT * FROM sys.objects
WHERE object_id = OBJECT_ID(N'[dbo].[demoSalesOrderHeader]')
AND type in (N'U'))
DROP TABLE [dbo].[demoSalesOrderHeader]
GO
CREATE TABLE [dbo].[demoSalesOrderHeader](
[SalesOrderID] [INT] NOT NULL PRIMARY KEY,
[SalesID] [INT] NOT NULL IDENTITY,
[OrderDate] [DATETIME] NOT NULL,
[CustomerID] [INT] NOT NULL,
[SubTotal] [MONEY] NOT NULL,
[TaxAmt] [MONEY] NOT NULL,
[Freight] [MONEY] NOT NULL,
[DateEntered] [DATETIME],
[TotalDue] AS (ISNULL(([SubTotal]+[TaxAmt])+[Freight],(0))),
[RV] ROWVERSION NOT NULL);
GO
ALTER TABLE [dbo].[demoSalesOrderHeader] ADD CONSTRAINT
[DF_demoSalesOrderHeader_DateEntered]
DEFAULT (getdate()) FOR [DateEntered];
GO
IF EXISTS (SELECT * FROM sys.objects
WHERE object_id = OBJECT_ID(N'[dbo].[demoAddress]')
AND type in (N'U'))
DROP TABLE [dbo].[demoAddress]
GO
CREATE TABLE [dbo].[demoAddress](
[AddressID] [INT] NOT NULL IDENTITY PRIMARY KEY,
[AddressLine1] [NVARCHAR](60) NOT NULL,
[AddressLine2] [NVARCHAR](60) NULL,
[City] [NVARCHAR](30) NOT NULL,
[PostalCode] [NVARCHAR](15) NOT NULL
);
- Write a SELECT statement to retrieve data from the Production.Product table. Use these values to insert five rows into the dbo.demoProduct table using literal values. Write five individual INSERT statements.
- Insert five more rows using literal values into the dbo.demoProduct table. This time write one INSERT statement.
- Write an INSERT statement that inserts all the rows into the dbo.demoSalesOrderHeader table from the Sales.SalesOrderHeader table. Hint: Pay close attention to the properties of the columns in the dbo.demoSalesOrderHeader table.
- Write a SELECT INTO statement that creates a table, dbo.tempCustomerSales, inserting every CustomerID from the Sales.Customer along with a count of the orders placed and the total amount due for each customer.
- Write an INSERT statement that inserts all the products into the dbo.demoProduct table from the Production.Product table that have not already been inserted.
- Write an INSERT statement that inserts all the addresses into the dbo.demoAddress table from the Person.Address table joined to the Person.StateProvince table. Before running the INSERT statement, type in and run the following command so that you can insert values into the AddressID column:
SET IDENTITY_INSERT dbo.demoAddress ON;
Deleting Rows
You now know how to add new rows to tables. This section will show you how to do exactly the opposite, how to delete existing rows. This is an important but dangerous task. Many developers and database administrators have accidentally removed the data from an entire table when intending to remove just one row. Care must be taken whenever deleting rows, especially when writing ad hoc delete statements.
Using DELETE
The DELETE statement is very simple. At a minimum, you need the word DELETE and the table name. This will remove all rows from the table unless there happens to be foreign keys on the table. Most of the time, your goal will be to remove just a portion of the rows. Here is the syntax:
DELETE [FROM] <table1>
[WHERE <condition>]
If you omit the WHERE clause, the statement removes every row from the table. The table still exists, just without any rows. When writing ad hoc DELETE statements, always test your WHERE clause with a SELECT statement first to make sure you know exactly which rows you are deleting. Type in and execute the code in Listing 10-9. The listing creates several copies of the main tables from the AdventureWorks database. To avoid typing the table creation portion, you can download the code from the book’s page at www.apress.com.
Listing 10-9. Creating Demo Tables
IF  EXISTS (SELECT * FROM sys.objects
            WHERE object_id = OBJECT_ID(N'[dbo].[demoProduct]')
               AND type in (N'U'))
DROP TABLE [dbo].[demoProduct];
GO

SELECT * INTO dbo.demoProduct FROM Production.Product;

IF  EXISTS (SELECT * FROM sys.objects
            WHERE object_id = OBJECT_ID(N'[dbo].[demoCustomer]')
               AND type in (N'U'))
DROP TABLE [dbo].[demoCustomer];
GO

SELECT C.*, LastName, FirstName INTO dbo.demoCustomer
FROM Sales.Customer AS C
JOIN Person.Person AS P ON C.CustomerID = P.BusinessEntityID;

IF  EXISTS (SELECT * FROM sys.objects
            WHERE object_id = OBJECT_ID(N'[dbo].[demoAddress]')
               AND type in (N'U'))
DROP TABLE [dbo].[demoAddress];
GO

SELECT * INTO dbo.demoAddress FROM Person.Address;

IF  EXISTS (SELECT * FROM sys.objects
            WHERE object_id = OBJECT_ID(N'[dbo].[demoSalesOrderHeader]')
               AND type in (N'U'))
DROP TABLE [dbo].[demoSalesOrderHeader];
GO

SELECT * INTO dbo.demoSalesOrderHeader FROM Sales.SalesOrderHeader;

IF  EXISTS (SELECT * FROM sys.objects
            WHERE object_id = OBJECT_ID(N'[dbo].[demoSalesOrderDetail]')
               AND type in (N'U'))
DROP TABLE [dbo].[demoSalesOrderDetail];
GO

SELECT * INTO dbo.demoSalesOrderDetail FROM Sales.SalesOrderDetail;
You should now have several tables that you can use to practice deleting data. Type in and execute the code in Listing 10-10 to learn how to delete rows from tables.
Listing 10-10. Deleting Rows from Tables
--1
SELECT CustomerID
FROM dbo.demoCustomer;

--2
DELETE dbo.demoCustomer;

--3
SELECT CustomerID
FROM dbo.demoCustomer;

--4
SELECT ProductID
FROM dbo.demoProduct
WHERE ProductID > 900;

--5
DELETE dbo.demoProduct
WHERE ProductID > 900;

--6
SELECT ProductID
FROM dbo.demoProduct
WHERE ProductID > 900;
Figure 10-10 shows the rows before and after running the DELETE statements affecting the dbo.demoCustomer and dbo.demoProduct tables. Running a SELECT statement before deleting data is a good idea and it enables you to test your WHERE clause. Make sure you know which rows will be deleted before you delete them. Another thing you can do is to delete rows within a transaction. You can check your results before committing the transaction or roll back in case of a problem. Statement 2 removes every row from dbo.demoCustomer. Statement 5 removes the rows from dbo.demoProduct where the ProductID was greater than 900. The word FROM is optional.

Figure 10-10. The partial results before and after rows deleted
Deleting from a Table Using EXISTS
Listing 10-10 demonstrated how to remove rows from a table when the statement contains just one table. You can also remove rows from a table that is involved in a join to restrict which rows the statement deletes. The preferred method is to use a subquery and EXISTS. Here is the syntax:
DELETE <alias1>
FROM <table1> AS <alias1>
WHERE [NOT] EXISTS (
    SELECT * FROM <table2> AS <alias2>
    WHERE <alias1>.<Col1> = <alias2>.<Col2>);
Type in and execute the code in Listing 10-11 to practice this technique. If you didn’t run the code in Listing 10-9 that creates the tables used in these examples and the code in Listing 10-10 that deletes some of the data, do that first.
Listing 10-11. Deleting When Using EXISTS
--1
SELECT d.SalesOrderID, SalesOrderNumber
FROM dbo.demoSalesOrderDetail AS d
INNER JOIN dbo.demoSalesOrderHeader AS h ON d.SalesOrderID = h.SalesOrderID
WHERE h.SalesOrderNumber = 'SO71797'

--2
DELETE d
FROM dbo.demoSalesOrderDetail AS d
WHERE EXISTS(
    SELECT *
        FROM dbo.demoSalesOrderHeader AS h
        WHERE h.SalesOrderNumber = 'SO71797'
            AND d.SalesOrderID = h.SalesOrderID);

--3
SELECT d.SalesOrderID, SalesOrderNumber
FROM dbo.demoSalesOrderDetail AS d
INNER JOIN dbo.demoSalesOrderHeader AS h ON d.SalesOrderID = h.SalesOrderID
WHERE h.SalesOrderNumber = 'SO71797'

--4
SELECT SalesOrderID, ProductID
FROM dbo.demoSalesOrderDetail AS SOD
WHERE NOT EXISTS
    (SELECT *
         FROM dbo.demoProduct AS P
         WHERE P.ProductID = SOD.ProductID);
--5
DELETE SOD
FROM dbo.demoSalesOrderDetail AS SOD
WHERE NOT EXISTS
    (SELECT *
         FROM dbo.demoProduct AS P
         WHERE P.ProductID = SOD.ProductID);

--6
SELECT SalesOrderID, ProductID
FROM dbo.demoSalesOrderDetail
WHERE ProductID NOT IN
    (SELECT ProductID FROM dbo.demoProduct AS P
        WHERE P.ProductID  IS NOT NULL);
Figure 10-11 shows the results before and after deleting. Again, write SELECT statements first to test your WHERE clause and to make sure you will delete the correct rows or wrap the delete statements in implicit transactions that you can roll back in case of a mistake. Statement 2 deletes the rows from the dbo.demoSalesOrderDetail table that have a SalesOrderNumber of SO71797 in the dbo.demoSalesOrderHeader table. The value in one table determines which rows in another table will be deleted.

Figure 10-11. The partial results before and after deleting rows using EXISTS
Statement 4 uses a subquery in the WHERE clause to determine which rows to delete. Statement 5 deletes the rows using NOT EXISTS. Finally, statement 6 checks to make sure the correct rows were deleted.
Another way to delete the rows specifies the table name after the DELETE keyword instead of specifying the alias. Using the alias ensures that the DELETE part of the statement is tied to the SELECT part of the statement. I have seen developers write DELETE statements that inadvertently deleted all rows from a production table because the DELETE part of the statement wasn’t really connected to the rest of the statement. I recommend that you always use the technique shown in Listing 10-11 to avoid deleting all the rows in a table by mistake. Here is an example that is really a DELETE statement and a SELECT statement when the intention is just a DELETE statement:
--Don't do this!
DELETE dbo.demoSalesOrderDetail
SELECT d.SalesOrderID
FROM dbo.demoSalesOrderDetail AS d
WHERE EXISTS(
    SELECT *
        FROM dbo.demoSalesOrderHeader AS h
        WHERE d.SalesOrderID = h.SalesOrderID
    AND h.SalesOrderNumber = 'SO71797'),
Truncating
A way to quickly delete all the rows from a table is to use the TRUNCATE TABLE statement. This is a very fast way to empty a large table. Although deleting rows requires that the user account have DELETE permission on the table, truncating a table requires the user be in the dbo or db_ddladmin database roles or the sysadmin server role or have ALTER permission on the table. Here is the syntax:
TRUNCATE TABLE <table1>
Listing 10-12 demonstrates how to use TRUNCATE. If you didn’t run Listing 10-9 to create the tables, do that first before typing and running the code in Listing 10-12.
Listing 10-12. Truncating Tables
--1
SELECT SalesOrderID, OrderDate
FROM dbo.demoSalesOrderHeader;

--2
TRUNCATE TABLE dbo.demoSalesOrderHeader;

--3
SELECT SalesOrderID, OrderDate
FROM dbo.demoSalesOrderHeader;
Figure 10-12 shows the results before and after truncating the table. One of the reasons that TRUNCATE is so much more powerful than DELETE is because it actually re-creates the table behind the scenes. That is much quicker than deleting all the rows, but no WHERE clause is allowed with TRUNCATE. The TRUNCATE statement can be used only when you intend to empty the table.

Figure 10-12. The results before and after truncating
Deleting data is a very risky operation. It’s why database administrators consider a good backup strategy an important part of their jobs. Practice what you have learned about deleting data by completing Exercise 10-2.
Use the AdventureWorks database to complete this exercise. Before starting the exercise, run Listing 10-9 to re-create the demo tables. You can find the solutions at the end of the chapter.
- Write a query that deletes the rows from the dbo.demoCustomer table where the LastName values begin with the letter S.
- Delete the rows from the dbo.demoCustomer table if the sum of the TotalDue from the dbo.demoSalesOrderHeader table for the customer is less than $1,000.
- Delete the rows from the dbo.demoProduct table that have never been ordered.
Updating Existing Rows
Updating data is a very important part of T-SQL but it also requires extreme caution. Only deleting rows, which was discussed in the previous section, requires more care. Well, maybe that’s not quite true; you could actually drop tables or entire databases accidentally. Within applications, the user will usually be working with one row at a time. For example, they may be viewing a screen that displays and allows editing of one employee, one department, or one order. Automated processes often update data in entire tables or many rows at one time. In this section, you will learn how to use the UPDATE statement to update existing rows in several scenarios, including single tables, joins, and aggregates. Run the code in Listing 10-9 to repopulate the tables you will use for the examples in this section.
Using the UPDATE Statement
To update existing rows in a table, use the UPDATE statement. Usually you will add a WHERE clause to make sure you update only the appropriate rows. Often database administrators have to restore backups of databases to get back data that has been accidentally updated because the WHERE clause was incorrect or missing. Here is the syntax of the UPDATE statement:
UPDATE <table1>
SET <col1> = <new value1>,<col2> = <new value2>
[WHERE <condition>]
You can use expressions, literal values, or other columns to update existing data. Developers often think that updating data must be done one row at a time. I have talked to many developers who insist on updating one row at a time because some of the rows must be updated with one value and some with another. In those cases, maybe they could write an UPDATE statement for each business rule or use the CASE expression but not perform one update for each row. Type in and execute the code in Listing 10-13 to learn how to update data.
Listing 10-13. Updating Data in a Table
IF  EXISTS (SELECT * FROM sys.objects
    WHERE object_id = OBJECT_ID(N'[dbo].[demoPerson]')
    AND type in (N'U'))
DROP TABLE [dbo].[demoPerson];
GO

SELECT *, ' ' Gender INTO dbo.demoPerson
FROM Person.Person
WHERE Title in ('Mr.', 'Mrs.', 'Ms.'),

--1
SELECT BusinessEntityID, Title, Gender
FROM dbo.demoPerson
ORDER BY BusinessEntityID;

--2
UPDATE dbo.demoPerson
SET Gender = CASE WHEN Title = 'Mr.' THEN 'M' ELSE 'F' END;

--3
SELECT BusinessEntityID, Title, Gender
FROM dbo.demoPerson
ORDER BY BusinessEntityID;
Figure 10-13 shows the results before and after the updates. Query 1 just displays a few rows from the table. Statement 2 updates all the rows in the table, changing the Gender column based on the title.

Figure 10-13. The partial results before and after updating
Updating Data with Expressions and Columns
The statements in the previous section updated the dbo.demoCustomer table with literal values. You can also perform updates using scalar expressions more complex than a literal value or even other columns. Developers and database administrators often must perform large updates to data, sometimes on a periodic basis or to fulfill one-time requests. Here is the syntax for this technique:
UPDATE <table1>
SET <col1> = <expression>
[WHERE <condition>]
Again, you can use expressions, hard-coded values, or other columns in your statement’s SET clause. When multiple rows must be updated, such as batch processing that happens after business hours, whenever possible, you should perform updates in sets, not one row at a time. Type in and execute the code in Listing 10-14 to learn how to perform these updates.
Listing 10-14. Update with Expressions, Columns, or Data from Another Table
IF  EXISTS (SELECT * FROM sys.objects
    WHERE object_id = OBJECT_ID(N'[dbo].[demoPersonStore]')
    AND type in (N'U'))
DROP TABLE [dbo].[demoPersonStore];
GO

CREATE TABLE [dbo].[demoPersonStore] (
[FirstName] [NVARCHAR] (60),
[LastName] [NVARCHAR] (60),
[CompanyName] [NVARCHAR] (60)
);

INSERT INTO dbo.demoPersonStore (FirstName, LastName, CompanyName)
SELECT a.FirstName, a.LastName, c.Name
FROM Person.Person a
JOIN Sales.SalesPerson b
ON a.BusinessEntityID = b.BusinessEntityID
JOIN Sales.Store c
ON b.BusinessEntityID = c.SalesPersonID;

--1
SELECT FirstName,LastName, CompanyName,
   LEFT(FirstName,3) + '-' + LEFT(LastName,3) AS NewCompany
FROM dbo.demoPersonStore;

--2
UPDATE dbo.demoPersonStore
SET CompanyName = LEFT(FirstName,3) + '-' + LEFT(LastName,3);

--3
SELECT FirstName,LastName, CompanyName,
    LEFT(FirstName,3) + '-' + LEFT(LastName,3) AS NewCompany
FROM dbo.demoPersonStore;
Figure 10-14 shows the results before and after the update. Query 1 displays the data before the update. The NewCompany column contains the expression that will be used in the UPDATE statement. You will find it is useful to display the expression, especially if it is complicated, to make sure your update will do exactly what you expect. Statement 2 updates the data, changing CompanyName in the dbo.demoPersonStore table to the new value derived from the FirstName and LastName columns. Finally, Query 3 displays the updated data. At this point, the CompanyName should be equivalent to the NewCompany expression.

Figure 10-14. The results before and after updating with an expression
You cannot directly perform updates with aggregate functions. You’ll learn more about this and how to work around it in Chapter 11.
Updating with a Join
So far, you have seen how to write UPDATE statements with a single table. When joining, you can update only a single table, but by joining with another table, you can limit the rows to be updated or use the second table to provide the value. Here is the syntax:
UPDATE <alias>
SET <col1> = <expression>
FROM <table1> AS <alias>
INNER JOIN <table2> on <alias>.<col2>  = <table2>.<col3>
The syntax shows an INNER JOIN, but you could perform an OUTER JOIN if that makes sense for the particular update. Type in and execute the code in Listing 10-15 to learn how to perform an update using this technique.
Listing 10-15. Updating with a Join
--1
SELECT AddressLine1, AddressLine2
FROM dbo.demoAddress;

--2
UPDATE dA
SET AddressLine1 = P.FirstName + ' ' + P.LastName,
    AddressLine2 = AddressLine1 + ISNULL(' ' + AddressLine2,'')
FROM dbo.demoAddress AS dA
INNER JOIN Person.BusinessEntityAddress BEA ON dA.AddressID = BEA.AddressID
INNER JOIN Person.Person P ON P.BusinessEntityID = BEA.BusinessEntityID;

--3
SELECT AddressLine1, AddressLine2
FROM dbo.demoAddress;
Figure 10-15 shows the results before and after the update. In this case, statement 2 uses columns from the second table, the Person.Person table, to build an expression to update AddressLine1. The statement uses another expression to move the original AddressLine1 and AddressLine2, if any, to AddressLine2. The dbo.demoAddress table doesn’t join directly to the Person.Person table but must join through an intermediary table, Person.BusinessEntityAddress.

Figure 10-15. The results before and after updating with a join
Like deleting data, you should exercise caution when updating data. Always view the data you are about to change. Look for problems like incorrect joins. You now know how to update data in existing tables with literal values, expressions, and other columns. Now practice what you have learned by completing Exercise 10-3.
Use the AdventureWorks database to complete this exercise. Run the code in Listing 10-9 to re-create the tables used in this exercise. You can find the solutions at the end of the chapter.
- Write an UPDATE statement that changes all NULL values of the AddressLine2 column in the dbo.demoAddress table to N/A.
- Write an UPDATE statement that increases the ListPrice of every product in the dbo.demoProduct table by 10 percent.
- Write an UPDATE statement that corrects the UnitPrice with the ListPrice of each row of the dbo.demoSalesOrderDetail table by joining the table on the dbo.demoProduct table.
Thinking About Performance
SQL Server performs best when working on sets of data instead of one row at a time. Often developers write code that loops through a record set and performs an update or insert for each pass through the loop. The example code in Listing 10-16 demonstrates the difference in performance between the two techniques. Download and run the code from this book’s page on www.apress.com. You may need to stop the code execution after a few minutes.
Listing 10-16. The Difference between the Set-Based and Iterative Approaches
SET NOCOUNT ON; -- turns off rows affected message
--Create a work table
IF  EXISTS (SELECT * FROM sys.objects
            WHERE object_id = OBJECT_ID(N'[dbo].[demoPerformance]')
               AND type in (N'U'))
DROP TABLE [dbo].[demoPerformance];
GO

CREATE TABLE [dbo].[demoPerformance](
    [CustomerID] [int] NOT NULL
 CONSTRAINT [PK_demoPerformance] PRIMARY KEY CLUSTERED
(
    CustomerID ASC
)WITH (PAD_INDEX  = OFF, STATISTICS_NORECOMPUTE  = OFF, IGNORE_DUP_KEY = OFF,
    ALLOW_ROW_LOCKS  = ON, ALLOW_PAGE_LOCKS  = ON) ON [PRIMARY]
) ON [PRIMARY]


GO

PRINT 'Insert all rows start';
PRINT SYSDATETIME();

--Insert all rows from the Sales.SalesOrderDetail table at once
INSERT INTO demoPerformance
SELECT CustomerID
FROM Sales.Customer;

PRINT 'Insert all rows end';
PRINT SYSDATETIME();

--Remove all rows from the first insert
TRUNCATE TABLE [dbo].[demoPerformance];

PRINT 'Insert rows one at a time begin';
PRINT SYSDATETIME();


--Set up a loop to insert one row at a time
WHILE EXISTS(

    SELECT *
    FROM Sales.Customer AS c
        WHERE NOT EXISTS(
            SELECT * FROM dbo.demoPerformance AS p
        WHERE c.CustomerID = p.CustomerID)
        ) BEGIN

    INSERT INTO demoPerformance(CustomerID)
        SELECT TOP(1) CustomerID
        FROM Sales.Customer AS c
        WHERE NOT EXISTS(SELECT * FROM dbo.demoPerformance WHERE CustomerID = c.CustomerID);


END
PRINT 'Insert rows one at a time end';
PRINT SYSDATETIME();
After the code executes or you stop execution after a few minutes, click the Messages tab to see the results (Figure 10-16).

Figure 10-16. The results of comparing one insert vs. a loop with multiple inserts
Run this statement to see how many rows were actually inserted from the loop:
SELECT COUNT(*) FROM dbo.demoPerformance;
The loop took about 12 minutes to complete on my laptop with 8GB of RAM and an SSD hard drive! The first INSERT statement, inserting 19,820 rows, took less than a second to run.
Database Cleanup
Run the script in Listing 10-17 to clean up the tables used in this chapter. You can download the script from this book’s page at www.apress.com. Alternately, you can reinstall the sample databases by following the instructions in the “Installing the Sample Databases” section in Chapter 1.
Listing 10-17. Deleting Demo Tables
IF  EXISTS (SELECT * FROM sys.objects
    WHERE object_id = OBJECT_ID(N'[dbo].[demoPersonStore]')
    AND type in (N'U'))
DROP TABLE [dbo].[demoPersonStore]
GO


IF  EXISTS (SELECT * FROM sys.objects
    WHERE object_id = OBJECT_ID(N'[dbo].[demoPerson]')
    AND type in (N'U'))
DROP TABLE [dbo].[demoPerson];


IF  EXISTS (SELECT * FROM sys.objects
            WHERE object_id = OBJECT_ID(N'[dbo].[demoProduct]')
               AND type in (N'U'))
DROP TABLE [dbo].[demoProduct];
GO

IF  EXISTS (SELECT * FROM sys.objects
            WHERE object_id = OBJECT_ID(N'[dbo].[demoCustomer]')
               AND type in (N'U'))
DROP TABLE [dbo].[demoCustomer];
GO

IF  EXISTS (SELECT * FROM sys.objects
            WHERE object_id = OBJECT_ID(N'[dbo].[demoAddress]')
               AND type in (N'U'))
DROP TABLE [dbo].[demoAddress];
GO

IF  EXISTS (SELECT * FROM sys.objects
            WHERE object_id = OBJECT_ID(N'[dbo].[demoSalesOrderHeader]')
               AND type in (N'U'))
DROP TABLE [dbo].[demoSalesOrderHeader];
GO

IF  EXISTS (SELECT * FROM sys.objects
            WHERE object_id = OBJECT_ID(N'[dbo].[demoSalesOrderDetail]')
               AND type in (N'U'))
DROP TABLE [dbo].[demoSalesOrderDetail];
GO

IF  EXISTS (SELECT * FROM sys.objects
            WHERE object_id = OBJECT_ID(N'[dbo].[demoDefault]')
               AND type in (N'U'))
DROP TABLE [dbo].[demoDefault];
GO

IF  EXISTS (SELECT * FROM sys.objects
            WHERE object_id = OBJECT_ID(N'[dbo].[demoAutoPopulate]')
               AND type in (N'U'))
DROP TABLE [dbo].[demoAutoPopulate];


IF  EXISTS (SELECT * FROM sys.objects
            WHERE object_id = OBJECT_ID(N'[dbo].[demoPerformance]')
               AND type in (N'U'))
DROP TABLE [dbo].[demoPerformance];
Summary
Writing data modification statements is not difficult once you’ve mastered the basics of selecting data. These tasks do, however, require much more care because it’s possible to unintentionally modify and delete rows or even empty entire tables. This type of mistake could cost you your job! Always check the WHERE clause with a SELECT statement first when writing ad hoc statements.
Whenever possible, do modifications on sets of data, not one row at a time. You will often see amazing differences in performance. Many developers learn to operate on one row at a time, but this is not the best way for SQL Server to work.
In Chapter 11 you will learn some advanced query techniques including more ways to use CTEs and paging.
Answers to the Exercises
This section provides solutions to the exercises found on writing statements that modify data.
Solution to Exercise 10-1: Inserting New Rows
Use the AdventureWorks database to complete this exercise. Download the code to create the tables for this exercise from www.apress.com._SPi_aTag_cXXX.422_/SPi_aTag_
- Write a SELECT statement to retrieve data from the Production.Product table. Use these values to insert five rows into the dbo.demoProduct table using literal values. Write five individual INSERT statements. The rows you choose to insert will vary.
INSERT INTO dbo.demoProduct(ProductID,
    Name, Color, StandardCost,
    ListPrice, Size, Weight)
VALUES (680,'HL Road Frame - Black, 58','Black',1059.31,1431.50,'58',1016.04);


INSERT INTO dbo.demoProduct(ProductID, Name,
    Color,StandardCost, ListPrice, Size, Weight)
VALUES (706,'HL Road Frame - Red, 58','Red',1059.31, 1431.50,'58',1016.04);

INSERT INTO dbo.demoProduct(ProductID, Name,
    Color,StandardCost, ListPrice, Size, Weight)
VALUES (707,'Sport-100 Helmet, Red','Red',13.0863,34.99,NULL,NULL);

INSERT INTO dbo.demoProduct(ProductID, Name,
    Color,StandardCost, ListPrice, Size, Weight)
VALUES (708,'Sport-100 Helmet, Black','Black',13.0863,34.99,NULL,NULL);

INSERT INTO dbo.demoProduct(ProductID, Name,
    Color,StandardCost, ListPrice, Size, Weight)
VALUES (709,'Mountain Bike Socks, M', 'White',
3.3963, 9.50, 'M',NULL); - Insert five more rows using literal values into the dbo.demoProduct table. This time write one INSERT statement. The rows you choose to insert may vary.
INSERT INTO dbo.demoProduct(ProductID, Name,
    Color, StandardCost, ListPrice, Size, Weight)
VALUES (711,'Sport-100 Helmet, Blue','Blue',
    13.0863,34.99,NULL,NULL),
    (712,'AWC Logo Cap','Multi',6.9223,
     8.99,NULL,NULL),
    (713,'Long-Sleeve Logo Jersey,S','Multi',
     38.4923,49.99,'S',NULL),
    (714,'Long-Sleeve Logo Jersey,M','Multi',
     38.4923,49.99,'M',NULL),
    (715,'Long-Sleeve Logo Jersey,L','Multi',
38.4923,49.99,'L',NULL); - Write an INSERT statement that inserts all the rows into the dbo.demoSalesOrderHeader table from the Sales.SalesOrderHeader table. Hint: Pay close attention to the properties of the columns in the dbo.demoSalesOrderHeader table.
-- Don't insert a value into the SalesID,
-- DateEntered, and RV columns..

INSERT INTO dbo.demoSalesOrderHeader(
    SalesOrderID, OrderDate, CustomerID,
    SubTotal, TaxAmt, Freight)
SELECT SalesOrderID, OrderDate, CustomerID,
    SubTotal, TaxAmt, Freight
FROM Sales.SalesOrderHeader; - Write a SELECT INTO statement that creates a table, dbo.tempCustomerSales, inserting every CustomerID from the Sales.Customer along with a count of the orders placed and the total amount due for each customer.
SELECT COUNT(ISNULL(SalesOrderID,0))
    AS CountOfOrders, c.CustomerID,
    SUM(TotalDue) AS TotalDue
INTO dbo.tempCustomerSales
FROM Sales.Customer AS c
LEFT JOIN Sales.SalesOrderHeader
    AS soh ON c.CustomerID = soh.CustomerID
GROUP BY c.CustomerID; - Write an INSERT statement that inserts all the products into the dbo.demoProduct table from the Production.Product table that have not already been inserted.
INSERT INTO dbo.demoProduct (ProductID, Name,
    Color, StandardCost,
    ListPrice, Size, Weight)
SELECT ProductID, Name, Color, StandardCost,
    ListPrice, Size, Weight
FROM Production.Product AS P
WHERE NOT EXISTS (
    SELECT ProductID
    FROM dbo.demoProduct AS DP
WHERE DP.ProductID = P.ProductID); - Write an INSERT statement that inserts all the addresses into the dbo.demoAddress table from the Person.Address table joined to the Person.StateProvince table. Before running the INSERT statement, type in and run the following command so that you can insert values into the AddressID column:
SET IDENTITY_INSERT dbo.demoAddress ON;

INSERT INTO dbo.demoAddress(AddressID,
          AddressLine1, AddressLine2,
          City, PostalCode)
      SELECT AddressID, AddressLine1, AddressLine2,
          City, PostalCode
      FROM Person.Address AS A
      JOIN Person.StateProvince AS SP ON A.StateProvinceID = SP.StateProvinceID;
      --to turn the setting off
      SET IDENTITY_INSERT dbo.demoAddress OFF;
Solution to Exercise 10-2: Deleting Rows
Use the AdventureWorks database to complete this exercise. Before starting the exercise, run Listing 10-9 to re-create the demo tables. .
- Write a query that deletes the rows from the dbo.demoCustomer table where the LastName values begin with the letter S.
DELETE FROM dbo.demoCustomer
WHERE LastName LIKE 'S%'; - Delete the rows from the dbo.demoCustomer table if the sum of the TotalDue from the dbo.demoSalesOrderHeader table for the customer is less than $1,000.
DELETE C FROM  dbo.demoCustomer AS C
WHERE NOT EXISTS (
    SELECT *
    FROM dbo.demoSalesOrderHeader AS SOH
    WHERE C.CustomerID = SOH.CustomerID
    GROUP BY SOH.CustomerID
HAVING SUM(TotalDue) >=1000); - Delete the rows from the dbo.demoProduct table that have never been ordered.
DELETE P FROM dbo.demoProduct AS P
WHERE NOT EXISTS    (
    SELECT *
    FROM dbo.demoSalesOrderDetail AS SOD
    WHERE P.ProductID = SOD.ProductID);
Solution to Exercise 10-3: Updating Existing Rows
Use the AdventureWorks database to complete this exercise. Run the code in Listing 10-9 to re-create tables used in this exercise.
- Write an UPDATE statement that changes all NULL values of the AddressLine2 column in the dbo.demoAddress table to N/A.
UPDATE dbo.demoAddress SET AddressLine2 = 'N/A'
WHERE AddressLine2 IS NULL; - Write an UPDATE statement that increases the ListPrice of every product in the dbo.demoProduct table by 10 percent.
UPDATE dbo.demoProduct
SET ListPrice =ListPrice * 1.1; - Write an UPDATE statement that corrects the UnitPrice with the ListPrice of each row of the dbo.demoSalesOrderDetail table by joining the table on the dbo.demoProduct table.
UPDATE SOD
SET UnitPrice = P.ListPrice
FROM dbo.demoSalesOrderDetail AS SOD
INNER JOIN dbo.demoProduct AS P
    ON SOD.ProductID = P.ProductID;