![]()
Getting Started
If you are reading this book, you probably already know something about T-SQL. T-SQL, also known as Transact-SQL, is Microsoft’s implementation of the Structured Query Language (SQL) for SQL Server. T-SQL is the language that is most often used to extract or modify data stored in an SQL Server database, regardless of which application or tool you use. SQL Server 2014 T-SQL is based on standards created by the American National Standards Institute (ANSI), but Microsoft has added several functionality enhancements. You will find that T-SQL is a very versatile and powerful programming language.
T-SQL consists of Data Definition Language (DDL), Data Manipulation Language (DML), and control-of-flow statements. Although the book focuses primarily on the DML statements, which you will use to retrieve and manipulate data, this book covers DDL statements and programming logic as well.
This chapter will explain how to install a free edition of SQL Server and get it ready for running the example code and performing the exercises in the rest of this book. This chapter also gives you a quick tour of SQL Server Management Studio.
Installing SQL Server Express Edition
Microsoft makes SQL Server 2014 available in several editions. If you don’t have access to SQL Server, you can download and install the free SQL Server Express edition from Microsoft’s web site at http://msdn.microsoft.com/en-us/library/dn434042.aspx. To fully take advantage of all the concepts covered in this book, download SQL Server 2014 Express with Advanced Services. This will give you the database engine and SQL Server Management Studio. You will be able to run all of the queries demonstrated in this book, including Full Text Search queries. Be sure to choose either the 64-bit or 32-bit download according to the operating system you are running. The Express with Advanced Services edition will run on the following operating systems available at the time of this writing: Windows Server 2012, Windows Server 2012 R2, Windows Server 2008 R2 SP1 or SP2, Windows 8.1, Windows 8, and Windows 7 SP1.
![]() Note SP is shorthand for service pack, so SP2 refers to Service Pack 2. A service pack is an update to the operating system or to other software that fixes bugs and security issues.
Note SP is shorthand for service pack, so SP2 refers to Service Pack 2. A service pack is an update to the operating system or to other software that fixes bugs and security issues.
The .NET Framework 3.5.1 is required before installing SQL Server 2014. If this is not enabled, you will see an error message during the SQL Server installation process. The instructions are different depending on the operating system you are running, so be sure to use your favourite search engine to learn how to do this on your computer.
The order of the installation steps are slightly different if an instance of SQL Server has already been installed on your computer. These instructions assume that this is the first install.
Here are the steps to follow to install SQL Server Express:
- Once you have downloaded the SQL Server 2014 Express with Advanced Services installation file from Microsoft’s site, double-click the file to extract and start up the SQL Server Installation Center. Figure 1-1 shows the Planning pane of the SQL Server Installation Center once the extraction has completed. You may need to click Planning in the left-hand side to see these options.

Figure 1-1. SQL Server Installation Center’s Planning pane
- To make sure your system meets all the requirements to install SQL Server Express with Advanced Services, click the System Configuration Checker link, which opens the Global Rules screen (Figure 1-2). Click Show details to see more information if the system does not meet the requirements. Click OK to dismiss the screen when you are done or the screen may close on its own if there are no issues.

Figure 1-2. The Global Rules details page
- If your system doesn’t meet the requirements, click the Hardware and Software Requirements link on the Planning pane of the SQL Server Installation Center, which will take you to a web page on Microsoft’s web site. Be sure to scroll down the web page to find the information for the Express edition. The hardware requirements are not difficult to meet with today’s PCs.
- Once you are certain that your computer meets all the requirements, switch to the Installation pane, shown in Figure 1-3, and click New SQL Server stand-alone installation or add features to an existing installation.

Figure 1-3. The Installation pane
- Once the installation wizard starts up, read and accept the license terms. Click Next.
- On the Microsoft Update screen, check if you wish to get automatic updates for SQL Server. Click Next.
- Several screens checking for product updates, installing setup files, and checking rules will quickly display. If there are no problems, these screens will advance to the Feature Selection screen shown in Figure 1-4. Be sure to select the Database Engine Services, Full Text, the Documentation Components, and the Management Tools. Click Next.

Figure 1-4. Select the Installation Type
- On the Instance Configuration screen (Figure 1-5), you can choose a Default instance or a Named instance. When installing SQL Server Express edition, it will be named SQLEXPRESS unless you change it. Write down what you decide to do on this screen because you will need this information when connecting to SQL Server later. Click Next.

Figure 1-5. The Instance Configuration screen
 Named Instances Multiple SQL Server installations can run on one computer. Each installation is called an instance. You may have only one default instance on a computer. Any additional instances must be named. When connecting to named instances, use the computer name plus the instance name: computerNameinstanceName.
 - On the Service Configuration screen, you must specify accounts under which SQL Server will run. If you are setting up SQL Server for a production environment, you may want to have a special service account to make sure that the installation is secure. Installing a secure SQL Server instance is beyond the scope of this book. Because you are just installing the Express edition for learning purposes here, choose the defaults for all the services and click Next.
- On the Database Engine Configuration screen’s Server Configuration tab (Figure 1-6), you will either select the Windows authentication mode option or the Mixed Mode option. For the purposes of this book, you can leave the authentication mode as “Windows authentication mode.” Click the Add Current User button near the bottom of the page to make sure that the account you are using is added as an administrator.
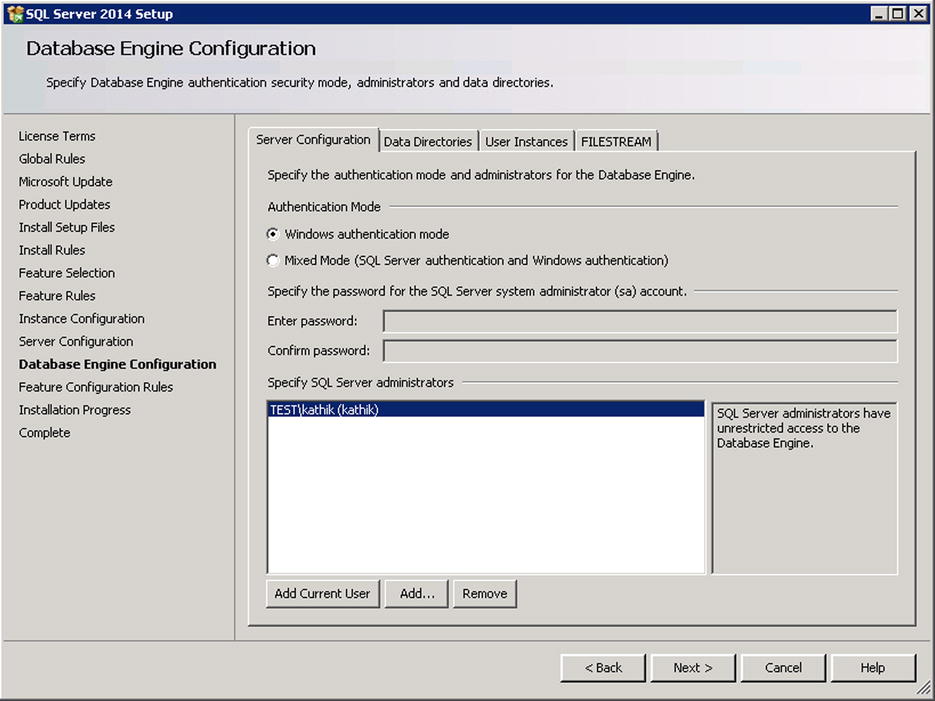
Figure 1-6. The Server Configuration screen
- Click the FILESTREAM tab on the current screen to enable FILESTREAM functionality, as shown in Figure 1-7. FILESTREAM was introduced in SQL Server 2008 and I will explain that in more detail in Chapter 16. Click Next.

Figure 1-7. Configure FILESTREAM
- The installation will perform additional rule checks based on the components you chose to install. If the requirements are met, the installation will immediately begin. Figure 1-8 shows the Installation Progress screen.

Figure 1-8. The Installation Progress screen
- Once the install is complete, you can view a report to help you solve any issues with the installation. Figure 1-9 shows the report from a successful installation.

Figure 1-9. The installation is complete
- Click the Close button. Congratulations! You have just installed SQL Server Express.
After the installation completes, the SQL Server Installation Center displays once more. You may be interested in viewing some of the resources available in this application at a later time. Luckily, you don’t have to start the install again. You can run the Installation Center by selecting Start ![]() All Programs
All Programs ![]() Microsoft SQL Server 2014
Microsoft SQL Server 2014 ![]() Configuration Tools
Configuration Tools ![]() SQL Server Installation Center at any time.
SQL Server Installation Center at any time.
You have the choice of accessing Books Online via the Internet or locally. When you first install SQL Server, you have the option to install the Books Online components. These components allow for better integration with the web-based documentation. The online components allow for updates to Books Online on the Internet to be applied to your local installation. Follow these steps to install Books Online locally:
- Open the SQL Server Management Studio and select Help from the menu. Under Help, select Manage Help Settings.
- If you are prompted for a location, accept the default and click OK.
- A window will pop up with a list of items. Select Install Content from Online.
- Scroll down until you find the entry for SQL Server 2014 Books Online and click Add, as shown in Figure 1-10, and then click Update.

Figure 1-10. Installing Books Online
Using Books Online
Once SQL Server Books Online is installed, you can launch it by opening SQL Server Management Studio and selecting Help from the top menu. Under the Help menu, select View Help.
Books Online is now part of the standardized Help Viewer. The screen for Microsoft Help Viewer is divided into two sections, as shown in Figure 1-11. The contents are displayed in the left pane. You can expand each entry to see the sections and click a topic to view each article on the right.

Figure 1-11. The two panes of Microsoft Help Viewer
In the top right corner there is a search bar. Type in a term, such as query, to see the results found in the local help system and any articles posted online.
You will learn how to write T-SQL from reading this book, but I recommend that you check Books Online frequently to learn even more!
Using SQL Server Management Studio
Now that you have SQL Server and SQL Server Books Online, it’s time to get acquainted with SQL Server Management Studio (SSMS). SSMS is the tool that ships with most editions of SQL Server, and you can use it to manage SQL Server and the databases as well as write T-SQL code. If you have installed SQL Server Express with Advanced Services as outlined earlier, you should be able to find SSMS by selecting Start ![]() All Programs
All Programs ![]() Microsoft SQL Server 2014
Microsoft SQL Server 2014 ![]() SQL Server Management Studio. If you are using Windows 8.X or Windows Server 2012, just type SSMS in the search box. SSMS is your window into SQL Server. You can manage your database, create scripts, and, most importantly, execute T-SQL code and see the results.
SQL Server Management Studio. If you are using Windows 8.X or Windows Server 2012, just type SSMS in the search box. SSMS is your window into SQL Server. You can manage your database, create scripts, and, most importantly, execute T-SQL code and see the results.
Launching SQL Server Management Studio
Launch SSMS. After the splash screen displays, you will be prompted to connect to an instance of SQL Server, as shown in Figure 1-12.
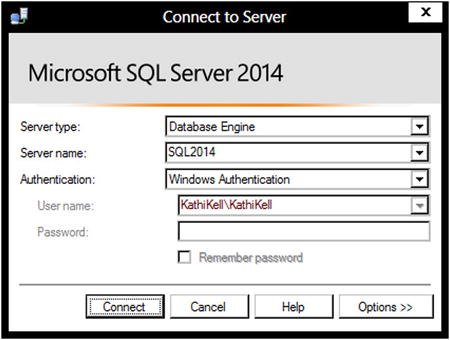
Figure 1-12. Connect to Server dialog box
Notice in this example that the Server (computer) name is SQL2014, which is a default instance. If you installed a named instance, you will need to type in the computer name followed by a backward slash () and then the instance name. You can also use (local), Localhost, or a period (.) instead of the computer name as long as you are logged on locally and not trying to connect to a remote SQL Server. Make sure that the appropriate Server name is filled in, and click Connect. If you installed SQL Server Express edition, your instance name probably will be SQLEXPRESS.
Once connected to an instance of SQL Server, you can view the databases and all the objects in the Object Explorer. The Object Explorer is located on the left side of the screen by default. You can expand each item to see other items underneath. For example, once you expand the Databases folder, you can expand one of the databases. Then you can expand the Tables folder for that database. You can expand a table name and drill down to see the columns, indexes, and other properties. In the right pane, you can see a list of some additional details such as the Create Date for the selected item. If you don’t see the details, press the F7 key. Figure 1-13 shows the Object Explorer window and details.

Figure 1-13. The Object Explorer and details
One SSMS feature that you will use extensively during this book is the Query Editor. In this window you will type and run queries as you learn about T-SQL. The following steps will guide you through writing your first query in the Query Editor.
- Make sure your SQL Server instance is selected in the Object Explorer, and click New Query, which is located right above the Object Explorer, to open the Query Editor window.
- Type the following code in the Query Editor window on the right. It’s a list of all the databases on the SQL Server.
SELECT * FROM sys.databases; - You will notice as you type that IntelliSense (Figure 1-14) is available in the Query Editor window. IntelliSense helps you by eliminating keystrokes to save you time. It also validates the code before the code is compiled. It doesn’t work when connecting to versions earlier than SQL Server 2008.

Figure 1-14. IntelliSense
- Click Execute or press the F5 key to see the results.
Installing the Sample Databases
Sample databases are very useful to help beginners practice writing code. Several databases, such as Pubs, Northwind, and AdventureWorks, have been available for this purpose over the many releases of SQL Server. You can download the sample databases from the CodePlex samples web site at www.codeplex.com. Because the link will change frequently as updated samples become available, search for SQL Server Database Product Samples. At the time of this writing, a regular version of the database was not available specifically for SQL Server 2014. There is a special version available for the new In-Memory OLTP (online transaction processing) features. For this book, you will need the traditional AdventureWorks database, and it will work for all examples in this book.
Make sure you are downloading the latest version of the sample databases. Figure 1-15 shows a portion of the download page that was current the day this section was written.
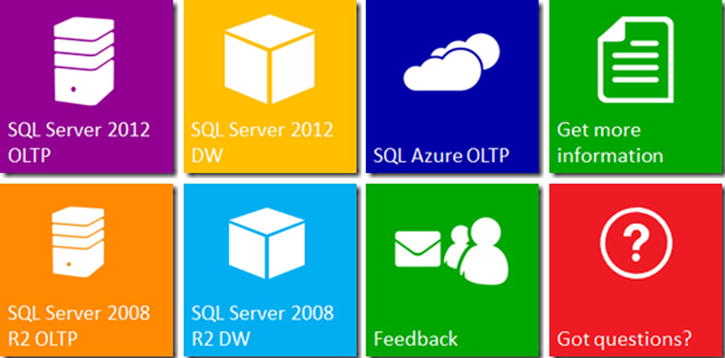
Figure 1-15. The source for the AdventureWorks databases
The following steps will guide you through installing the sample databases:
- Click the link for SQL Server 2012 OLTP.
- Click the link for AdventureWorks2012 Data file.
- Click Save to download the files.
- Navigate to a location that you will remember, and click Save.
- Once the download completes, open SQL Server Management Studio and start a new query. In the query windows, execute the command shown in Listing 1-1. You will need to change the path to match the location where you downloaded the AdventureWorks2012 data file. Figure 1-16 shows how your screen should look.
Listing 1-1. Script to Create the AdventureWorks2012 Database
CREATE DATABASE AdventureWorks ON (FILENAME = '<drive>:<file path>AdventureWorks2012_Data.mdf') FOR ATTACH_REBUILD_LOG ;

Figure 1-16. The sample database install
You should now have the AdventureWorks database installed on your SQL Server instance. All of the examples in this book assume that you have named the database AdventureWorks, not AdventureWorks2012 or with any other version year. The error message, File activation failure, appears in the message if the file is not in the folder SQL Server expects it to be in.
Get Started with SSMS
SSMS has several scripting features to help you write code. Follow these steps to learn how to create a query without typing:
- Make sure that the Tables folder is expanded, and select the HumanResources.Employee table, as in Figure 1-17.

Figure 1-17. The HumanResources.Employee table
- Right-click the HumanResources.Employee table, and select Script Table as
 Select To New Query Editor Window.
 - A new window will automatically open with some code (Figure 1-18). Click Execute.
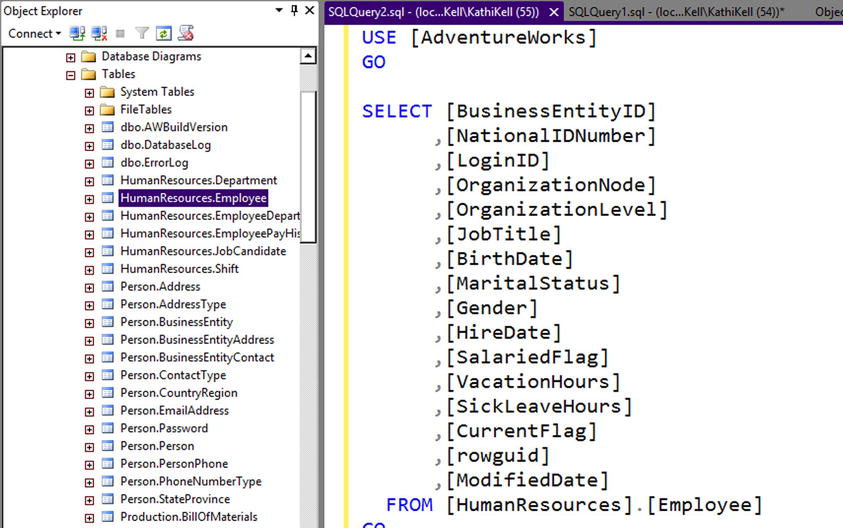
Figure 1-18. Automatically generated code
Sometimes you will end up with multiple statements in one Query Editor Window. To run only some of the statements in the window, select what you want to run, and click Execute or press F5. Figure 1-19 shows an example. When you execute, only the first query will run.

Figure 1-19. Selected code
Sections of code can be collapsed to get them out of your way by clicking the minus sign to the left of the code. You can search and replace just like a regular text editor, and, of course, you have IntelliSense to help you write the code.
Results can be saved to text files by clicking the Results to File icon shown in Figure 1-20 before you execute the code. You can also select and copy the results for pasting into Excel or Notepad.

Figure 1-20. Results to File icon
You can add documentation to your code or just keep code from running by adding comments. To comment a section of code, begin the section with /* and end the section with */. You can comment out a line of code or the end of a line of code with two hyphens (--). To automatically comment out code, select the lines you want to comment, and click the Comment button circled in Figure 1-21. Uncomment code by selecting commented lines and clicking the Uncomment button next to the Comment button.

Figure 1-21. Commented code
The Object Explorer allows you to manage the databases, security, maintenance jobs, and other aspects of SQL Server. Most of the tasks that can be performed are within the realm of database administrators, so I will not explore them in this book.
Summary
This chapter provided the information you need to install SQL Server Express Edition with Advanced Services on your local computer and get the sample database set up. You also got a quick tour of SSMS, which you will use to interact with SQL Server in this book and beyond.
Chapter 2 provides an introduction of databases and the objects that make them up. You will need this background knowledge when you begin writing your own queries in Chapter 3.