![]()
Managing Transactions
In Chapter 10, you learned how to manipulate data using T-SQL statements. In this chapter, you will learn about a very important aspect of manipulating data: transactions. A transaction is a unit of work in SQL Server. Most of the time, a transaction is one statement that inserts, updates, or deletes data. It is possible, however, to define an explicit transaction that includes one or more statements. You can also include SELECT statements in a transaction. A transaction can be committed or rolled back as a unit.
The classic example involves a bank ATM where a customer can transfer money from a savings account to a checking account. Imagine the problems created if an error occurred after the system subtracted the money from the savings account but before the money showed up in the checking account! By using an explicit transaction, any error between the two updates can cause a roll back of both of them. If an error occurred, the money would just go back to the savings account like nothing had happened. This chapter covers writing multiple statements within explicit transactions, how to commit or roll back transactions, and what happens when transactions last longer than needed.
ACID Properties
One of the most common questions at an interview for a DBA or database developer job is to explain the ACID (atomicity, consistency, isolation, durability) properties of a database system. These properties guarantee the reliability of the data in a database. Imagine that you have deposited your check at the bank. I’m sure you don’t want record of that check to disappear when the bank reboots its servers! Table 13-1 lists the ACID properties and what they mean.
Table 13-1. The ACID Properties
|
Property |
Purpose |
|---|---|
|
A transaction is one unit of work. |
|
|
A transaction must leave the database in a consistent state. A transaction must follow the rules, like constraints, defined in the database. |
|
|
A transaction cannot affect other transactions. |
|
|
Once a transaction has been committed, it will not be lost, even after a reboot or power outage. |
These properties are not important for every database. You may have heard about database systems like NoSQL and MySQL that are not generally ACID compliant.
Writing an Explicit Transaction
The important thing to remember when working with SQL Server is to keep transactions as short as they can be and still do the work. Once a transaction starts, the database engine puts locks on rows or tables involved within the transaction so that the rows usually may not be accessed by another query when the default settings are in place. Here is the syntax for a simple transaction:
BEGIN TRAN|TRANSACTION
    <statement 1>
    <statement 2>
COMMIT [TRAN|TRANSACTION]
Listing 13-1 demonstrates what happens when a transaction fails for some types of errors. Type in and execute the code.
Listing 13-1. Explicit Transactions
IF  EXISTS (SELECT * FROM sys.objects
            WHERE object_id = OBJECT_ID(N'[dbo].[demoTransaction]')
               AND type in (N'U'))
DROP TABLE [dbo].[demoTransaction];
GO

CREATE TABLE dbo.demoTransaction (col1 INT NOT NULL);
GO

--1
BEGIN TRAN
    INSERT INTO dbo.demoTransaction (col1) VALUES (1);
    INSERT INTO dbo.demoTransaction (col1) VALUES (2);
COMMIT TRAN;

--2
BEGIN TRAN
    INSERT INTO dbo.demoTransaction (col1) VALUES (3);
    INSERT INTO dbo.demoTransaction (col1) VALUES ('a'),
COMMIT TRAN;

GO
--3
SELECT col1
FROM dbo.demoTransaction;
Figure 13-1 shows the results of running this code. After running the batch, the query window will display the Messages tab first with an error message. You will have to click the Results tab to see the inserted rows. Transaction block 1 successfully inserts two rows with integer values into the table. Transaction block 2 inserts the value 3 and the value a. Because you can’t insert the string value a into a column of type INT, the statement fails. In this case, the entire transaction fails. Query 3 returns the inserted rows, which are only the rows inserted in the first transaction. In reality, not all error types will cause the entire transaction to fail. You must add error handling, which you will learn about later in the chapter.

Figure 13-1. The results of using explicit transactions to insert data
Rolling Back a Transaction
You can purposely roll a transaction back before it is committed by issuing a ROLLBACK command even without an error condition. For example, when transferring money from your savings account to your checking account, what if the bank ATM added the money to the checking account before removing it from the savings account and didn’t check the savings account balance first? The transaction could roll back the transaction once the balance was checked but before the transaction was committed. Here is the syntax for rolling back a transaction:
BEGIN TRAN|TRANSACTION
    <statement 1>
    <statement 2>
ROLLBACK [TRAN|TRANSACTION]
Before rolling back a transaction, you can also check the value of the @@TRANCOUNT variable. This is a count of the BEGIN TRAN statements and it resets to 0 after a COMMIT or ROLLBACK. Later in this chapter you will learn how to trap errors and use conditional logic that will allow your code to COMMIT or ROLLBACK based on certain conditions. For now, type in and execute Listing 13-2 to learn how to use the ROLLBACK command.
Listing 13-2. Using a ROLLBACK Command
IF  EXISTS (SELECT * FROM sys.objects
            WHERE object_id = OBJECT_ID(N'[dbo].[demoTransaction]')
               AND type in (N'U'))
DROP TABLE [dbo].[demoTransaction];
GO

CREATE TABLE dbo.demoTransaction (col1 INT NOT NULL);
GO

--1
BEGIN TRAN
    INSERT INTO dbo.demoTransaction (col1) VALUES (1);
    INSERT INTO dbo.demoTransaction (col1) VALUES (2);
COMMIT TRAN


--2
BEGIN TRAN
    INSERT INTO dbo.demoTransaction (col1) VALUES (3);
    INSERT INTO dbo.demoTransaction (col1) VALUES (4);
ROLLBACK TRAN

GO
--3
SELECT col1
FROM dbo.demoTransaction;

DROP TABLE dbo.demoTransaction;
Figure 13-2 shows the results of running this code. Transaction block 1 completes successfully and inserts the two rows in the table. Transaction block 2 contains two valid statements, but because it contains the ROLLBACK command instead of the COMMIT command, the transaction doesn’t complete. Query 3 shows that the batch inserts only values 1 and 2 into the table.

Figure 13-2. The results of a rolled-back transaction
Using the XACT_ABORT Setting
The XACT_ABORT setting automatically rolls back transactions and stops the batch in the case of runtime errors such as violating primary or foreign keys. Listing 13-3 is an example that shows the default behavior, the setting is turned off.
Listing 13-3. Using XACT_ABORT with the Setting Off
--1
CREATE TABLE #Test_XACT_OFF(COL1 INT PRIMARY KEY, COL2 VARCHAR(10));

--2
--What happens with the default?
BEGIN TRANSACTION
    INSERT INTO #Test_XACT_OFF(COL1,COL2)
    VALUES(1,'A'),

    INSERT INTO #Test_XACT_OFF(COL1,COL2)
        VALUES(2,'B'),

    INSERT INTO #Test_XACT_OFF(COL1,COL2)
        VALUES(1,'C'),
COMMIT TRANSACTION;

--3
SELECT * FROM #Test_XACT_OFF;
Figure 13-3 shows that only two rows have been inserted. The second insert has failed, but the other two insert statements succeeded in adding the two rows. If you take a look at the Messages tab, you’ll see that the primary key has been violated.

Figure 13-3. The results of using the default XACT_ABORT behavior
To see what happens when the setting is turned on, run Listing 13-4.
Listing 13-4. Testing XACT_ABORT with the Setting On
--1
CREATE TABLE #Test_XACT_ON(COL1 INT PRIMARY KEY, COL2 VARCHAR(10));

--2
--Turn on the setting
SET XACT_ABORT ON;
GO

--3
BEGIN TRANSACTION
    INSERT INTO #Test_XACT_ON(COL1,COL2)
    VALUES(1,'A'),

    INSERT INTO #Test_XACT_ON(COL1,COL2)
        VALUES(2,'B'),

    INSERT INTO #Test_XACT_ON(COL1,COL2)
        VALUES(1,'C'),
COMMIT TRANSACTION;

GO
--4
SELECT * FROM #Test_XACT_ON;
GO

--5
SET XACT_ABORT OFF;
Statement 2 turns on the XACT_ABORT setting. Statement 3 is identical to the transaction in Listing 13-3. In this case, because the setting is turned on, none of the rows are inserted. The entire transaction is rolled back. Finally, statement 5 turns the setting back off. When using this setting, it is only in effect within the current connection or until it is toggled off. Practice what you have learned by completing Exercise 13-1.
Use the AdventureWorks database to complete this exercise. Run the following script to create a table for this exercise. You can find the solutions at the end of the chapter.
IF OBJECT_ID('dbo.Demo') IS NOT NULL BEGIN
DROP TABLE dbo.Demo;
END;
GO
CREATE TABLE dbo.Demo(ID INT PRIMARY KEY, Name VARCHAR(25));
- Write a transaction that includes two INSERT statements to add two rows to the dbo.Demo table.
- Write a transaction that includes two INSERT statements to add two more rows to the dbo.Demo table. Attempt to insert a letter instead of a number into the ID column in one of the statements. Select the data from the dbo.Demo table to see which rows made it to the table.
Error Handling
Applications must gracefully handle errors, especially those occurring within the context of a transaction. T-SQL has two ways to deal with errors, one of which you will learn about in this section in detail. The legacy way to handle errors was by checking the value of the @@ERROR function. This older method was messy and inefficient. In this section, you will learn the modern way to handle errors. If you are writing T-SQL code within an application (for example, with a .NET language), your program will probably deal with the errors. If, however, you are writing a T-SQL script, you can handle errors at the T-SQL level. You can and should do both; you can handle errors within T-SQL and decide what you want sent back to the calling application.
Using TRY . . . CATCH
The TRY . . . CATCH error handling method is similar to the error handling in other programming languages such as C# and VB.NET. Along with this newer method, you use several functions that provide information about the error. You can also avoid sending an error message to the client if you choose. Here is the syntax:
BEGIN TRY
    <statements that might cause an error>
END TRY
BEGIN CATCH
    <statements to access error information and deal with the error>
END CATCH
Table 13-2 lists the functions you use along with TRY . . . CATCH. One benefit is that the functions retain their values while in the CATCH block. You can access the values as many times as needed. Once outside the CATCH block, the values of the error functions revert to NULL.
Table 13-2. The Error Functions
|
Function |
Purpose |
|---|---|
|
ERROR_NUMBER() |
Provides the error number. This was the only information you could get in previous releases. |
|
ERROR_SEVERITY() |
Provides the severity of the error. The severity must exceed 10 in order to be trapped. |
|
ERROR_STATE() |
Provides the state code of the error. This refers to the cause of the error. |
|
ERROR_PROCEDURE() |
Returns the name of a stored procedure or trigger that caused the error. |
|
ERROR_LINE() |
Returns the line number that caused the error. |
|
ERROR_MESSAGE() |
Returns the actual text message describing the error. |
Listing 13-5 demonstrates how to use TRY . . . CATCH. Type in and execute the code to learn how to use it.
Listing 13-5. Using TRY . . . CATCH
--1
BEGIN TRY
    PRINT 1/0;
END TRY
BEGIN CATCH
    PRINT 'Inside the Catch block';
    PRINT ERROR_NUMBER();
    PRINT ERROR_MESSAGE();
    PRINT ERROR_NUMBER();
END CATCH
PRINT 'Outside the catch block';
PRINT CASE WHEN ERROR_NUMBER() IS NULL THEN 'NULL'
    ELSE CAST(ERROR_NUMBER() AS VARCHAR(10)) END;
GO

--2
BEGIN TRY
    DROP TABLE testTable;
END TRY
BEGIN CATCH
    PRINT 'An error has occurred.'
    PRINT ERROR_NUMBER();
    PRINT ERROR_MESSAGE();
END CATCH;
Figure 13-4 shows the results of running this code. One difference between TRY . . . CATCH and @@ERROR is that you can print the error numbers and messages multiple times within the CATCH block. The values reset to NULL once execution leaves the CATCH block. When using TRY . . . CATCH, the error will not print at all unless you purposely print it. It is possible to just ignore the error, but most of the time you will want to do something else. You might want to record the error in a log table or retry the transaction.

Figure 13-4. The results of using TRY . . . CATCH
Viewing Untrappable Errors
TRY . . . CATCH can’t trap some errors. For example, if the code contains an incorrect table or column name or a database server is not available, the entire batch of statements will fail, and the error will not be trapped. One interesting way to work around this problem is to encapsulate calls within stored procedures and then call the stored procedure inside the TRY block. You will learn about stored procedures in Chapter 14. Database administrators might use the stored procedure technique for management jobs, for example, checking the job history on each server. If one server is down, the database administrator would want the code to continue to check the other servers. Type in and execute Listing 13-6 to see some examples.
Listing 13-6. Untrappable Errors
--1
PRINT 'Syntax error.';
GO
BEGIN TRY
    SELECT FROM Sales.SalesOrderDetail;
END TRY
BEGIN CATCH
    PRINT ERROR_NUMBER();
END CATCH;
GO

--2
PRINT 'Invalid column.';
GO
BEGIN TRY
    SELECT ABC FROM Sales.SalesOrderDetail;
END TRY
BEGIN CATCH
    PRINT ERROR_NUMBER();
END CATCH;
Figure 13-5 shows the results of running this code. I put the PRINT statements before each TRY . . . CATCH block in separate batches because they wouldn’t print along with these incorrect statements. Example 1 is a syntax error; the SELECT list is empty. Example 2 contains an invalid column name.

Figure 13-5. The results of running untrappable errors
Using RAISERROR
By using TRY . . . CATCH, you can avoid having an error message return to the client application, basically “trapping” the error. Sometimes you might want to return a different error or return an error to the client when one doesn’t exist. For example, you might want to return an error message to a client when the code tries to update a nonexistent row. This wouldn’t cause a database error, but you might want to cause an error to fire anyway from SQL Server to the client application. You can use the RAISERROR function to raise an error back to the client. Here is the syntax:
RAISERROR(<message>,<severity>,<state>)
The RAISERROR function has several other optional parameters that provide additional functionality, but for a first look, these three parameters may be all you need. You can create reusable custom error messages by using the sp_addmessage stored procedure or just use a variable or hard-coded string with RAISERROR. Type in and execute Listing 13-7 to learn how to use RAISERROR.
Listing 13-7. Using RAISERROR
USE master;
GO

--1 This code section creates a custom error message
IF EXISTS(SELECT * FROM sys.messages where message_id = 50002) BEGIN
    EXEC sp_dropmessage 50002;
END;
GO
PRINT 'Creating a custom error message.'
EXEC sp_addmessage 50002, 16,
   N'Customer missing.';
GO

USE AdventureWorks;
GO
--2
IF NOT EXISTS(SELECT * FROM Sales.Customer
          WHERE CustomerID = -1) BEGIN
   RAISERROR(50002,16,1);
END;
GO

--3
BEGIN TRY
    PRINT 1/0;
END TRY
BEGIN CATCH
    IF ERROR_NUMBER() = 8134 BEGIN
        RAISERROR('A bad math error!',16,1);
    END;
END CATCH;
Figure 13-6 shows the results of running this code. You can provide either a message number or a message string for the message parameter. Batch 1 sets up a custom error message that you can use later when raising an error, as in batch 2. Batch 3 returns a different error message to the client than the one that actually happened. Because the code returned an ad hoc error message, the database engine supplied the default number, 50000. The second parameter, severity, ranges from 1 to 25. When under 11, the message is a warning or information. You might want to build a dynamic error based on what happened in your code. If you would like to do this, make sure you save the message in a variable. You can’t build the message dynamically inside the RAISERROR function, you can only use a variable or literal value. See the Books Online article “Database Engine Error Severities” to learn more about error severities, but you will generally use 16 for errors correctable by the user. The state parameter is an integer between 1 and 255. You can use state to define where in the code the error occurred.

Figure 13-6. The results of using RAISERROR
Using TRY . . . CATCH with Transactions
You can use TRY . . . CATCH to make sure that explicit transactions complete successfully so the transaction may be rolled back if necessary. Include the transaction in the TRY block. Type in and execute Listing 13-8, which shows a simple example.
Listing 13-8. Using TRY . . . CATCH with a Transaction
--1
CREATE TABLE #Test (ID INT NOT NULL PRIMARY KEY);
GO

--2
BEGIN TRY
    --2.1
    BEGIN TRAN
        --2.1.1
        INSERT INTO #Test (ID)
        VALUES (1),(2),(3);
        --2.1.2
        UPDATE #Test SET ID = 2 WHERE ID = 1;
    --2.2
    COMMIT
END TRY

--3
BEGIN CATCH
    --3.1
    PRINT ERROR_MESSAGE();
    --3.2
    PRINT 'Rolling back transaction';
    IF @@TRANCOUNT > 0 BEGIN
        ROLLBACK;
    END;
END CATCH;
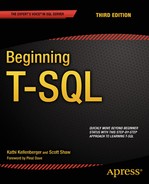
Figure 13-7 shows the error message and the transaction rolled back. Statement 2.1.2 attempts to set the value ID to 2 in the row where it equals 1. This violates the primary key; you can’t have two rows with the value 2. If the entire transaction had been successful, the COMMIT statement would have committed the transaction. Instead, the CATCH block fired, giving you the chance to handle the error.
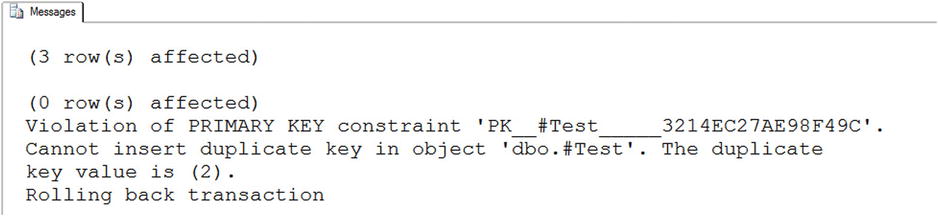
Figure 13-7. The results of using TRY . . . CATCH with a transaction
Using THROW Instead of RAISERROR
New in SQL Server 2012 is the THROW statement. You’ll find using THROW to be much simpler than using RAISERROR. For example, the error number in the THROW statement doesn’t have to exist in sys.messages. Here is the syntax:
THROW [ { error_number | message | state } ] [ ; ]
Any statement prior to the THROW command must end with a semicolon. Any error occurring in the THROW statement will cause the batch execution to end. Listing 13-9 shows a basic THROW command. The severity will always be 16. Figure 13-8 shows the output.
Listing 13-9. Simple THROW Statement
THROW 999999, 'This is a test error.', 1;

Figure 13-8. Results of THROW statement
Now let’s see how to use the THROW statement in a TRY CATCH block. For this example, you’ll attempt to insert a duplicate row into the Person.PersonPhone table. Run the script in Listing 13-10. Figure 13-9 shows the output. Feel free to change the error message to anything you want.
Listing 13-10. Using THROW in a transaction
BEGIN TRY
INSERT INTO Person.PersonPhone (BusinessEntityID, PhoneNumber, PhoneNumberTypeID)
VALUES (1, '697-555-0142', 1);
END TRY
BEGIN CATCH
THROW 999999, 'I will not allow you to insert a duplicate value.', 1;
END CATCH;
Figure 13-9. Results of THROW statement in a transaction
As you can see, the THROW statement is easy to use and extremely customizable. The command is especially useful for those unusual application errors that SQL Server may not be aware of or may not explain with a clearly expressive message indicating the content of the error. As always, though, try to keep your error messages easily understandable and detailed enough to help diagnose the error.
Trapping and handling errors is a very important part of T-SQL. If anything can go wrong, it often will. Practice what you have learned by completing Exercise 13-2.
Use AdventureWorks to complete this exercise. You can find the solutions at the end of the chapter.
- Write a statement that attempts to insert a duplicate row into the HumanResources.Department table. Use TRY . . . CATCH to trap the error. Display the error number, message and severity.
- Change the code you wrote in question 1 to raise a custom error message instead of the actual error message.
Thinking About Performance
The old programming joke is that a transaction includes waiting for the end user to click an OK button. But instead of clicking the button, the end user goes to lunch, effectively locking up the application for the rest of the users until he gets back to his desk. Make sure that explicit transactions only update data that must be updated as a unit, not just because you have a batch of statements that go together. Transactions should be kept as short as possible to decrease performance issues caused by excessive blocking in your applications.
SQL Server has several isolation levels to control how transactions from one connection affect statements from another connection. This section will demonstrate the default behavior and then compare it to another isolation level that is sometimes used to increase performance, but with unfortunate side effects. The default SQL Server isolation level is called Read Committed. This means that while a transaction happens, other connections cannot see the data that the transaction has locked. Although looking at transaction levels at a deep level is beyond the scope of this book, I recommend reading SQL Server Concurrency: Locking, Blocking and Row Versioning by Kalen Delaney (Redgate, 2013) to learn more.
For this example, you will use two query windows, so follow the instructions carefully.
From query window 1, run this code:
IF  EXISTS (SELECT * FROM sys.objects
            WHERE object_id = OBJECT_ID(N'[dbo].[demoTransaction]')
               AND type in (N'U'))
DROP TABLE [dbo].[demoTransaction];
GO

CREATE TABLE dbo.demoTransaction (col1 INT NOT NULL);
GO

BEGIN TRAN
    INSERT INTO dbo.demoTransaction (col1) VALUES (1);
    INSERT INTO dbo.demoTransaction (col1) VALUES (2);
Switch to window 2, and run this code:
SELECT col1 FROM dbo.demoTransaction;
At this point, you will see nothing returned from the code from step 2 as it waits for the transaction in window 1 to complete. The code in window 2 is blocked by the transaction in window 1. Switch to window 1, and run this code:
COMMIT TRAN;
Switch back to window 2 to view the results.
Once you committed the transaction, the SELECT statement in window 2 could complete. Obviously, this isolation level will affect the performance of your application, and the application must be written to keep transactions short and have retry logic.
To get around the isolation aspect of the ACID properties and eliminate blocking, some shops use another isolation level called Read Uncommitted, the least restrictive level available. Before using this isolation level, it is important to understand just how this can cause incorrect results as uncommitted data, called dirty reads, is returned. This isolation can be enabled in two ways. First, the SET TRANSACTION ISOLATION LEVEL command can be used. This changes the isolation level for the connection. The second way is to use the NOLOCK hint in a query. Follow the instructions carefully to see how this works. Run this code in window 1:
--1
IF  EXISTS (SELECT * FROM sys.objects
            WHERE object_id = OBJECT_ID(N'[dbo].[demoTransaction]')
               AND type in (N'U'))
DROP TABLE [dbo].[demoTransaction];
GO

CREATE TABLE dbo.demoTransaction (col1 INT NOT NULL);
GO
--2
INSERT INTO dbo.demoTransaction (col1) VALUES (1);
INSERT INTO dbo.demoTransaction (col1) VALUES (2);

--3
BEGIN TRANSACTION
UPDATE dbo.demoTransaction SET Col1 = 100;
Now switch to window 2 and run this code:
SET TRANSACTION ISOLATION LEVEL READ UNCOMMITTED;
GO
SELECT col1 FROM dbo.demoTransaction;
Even though the transaction to update the rows has not committed in window 1, the change can be seen in window 2. This update has not been committed in the database, but the second connection still returns the change.
Go back to window 1 and run this code to undo the change:
ROLLBACK;
Rerun the code in window 2. Now the correct results are displayed, the data is back to the original values. Obviously, this isolation level can be very dangerous. It can cause invalid results to be returned. Starting with SQL Server 2005, Microsoft introduced a new type of isolation level called Snapshot that creates copies of the data in tempdb before the data is changed. This is called row versioning. Any reads of the data during the transaction comes from the row version copies. That way updates to the data do not block reads of the data.
Summary
When manipulating data, you are performing transactions. These transactions are either implicit, each statement is a transaction, or explicit, one or more statements marked by BEGIN TRANSACTION and COMMIT TRANSACTION or ROLLBACK TRANSACTION statements. Be sure to know, based on the requirements of your application, when explicit transactions should be used.
Answers to the Exercises
This section provides solutions to the exercises found on using transactions.
Solutions to Exercise 13-1: Writing an Explicit Transaction
Use the AdventureWorks database to complete this exercise. Run the following script to create a table for this exercise.
IF OBJECT_ID('dbo.Demo') IS NOT NULL BEGIN
    DROP TABLE dbo.Demo;
END;
GO
CREATE TABLE dbo.Demo(ID INT PRIMARY KEY, Name VARCHAR(25));
- Write a transaction that includes two INSERT statements to add two rows to the dbo.Demo table.
Here’s a possible solution:
BEGIN TRAN
    INSERT INTO dbo.Demo(ID,Name)
    VALUES (1,'Test1'),

    INSERT INTO dbo.Demo(ID,Name)
    VALUES(2,'Test2'),
COMMIT TRAN; - Write a transaction that includes two INSERT statements to add two more rows to the dbo.Demo table. Attempt to insert a letter instead of a number into the ID column in one of the statements. Select the data from the dbo.Demo table to see which rows made it to the table.
Here’s a possible solution:
BEGIN TRAN
    INSERT INTO dbo.Demo(ID,Name)
    VALUES(3,'Test3'),
    INSERT INTO dbo.Demo(ID,Name)
    VALUES('a','Test4'),
COMMIT TRAN;
GO
SELECT ID,Name
FROM dbo.Demo;
Solutions to Exercise 13-2: Error Handling
Use AdventureWorks to complete this exercise.
- Write a statement that attempts to insert a duplicate row into the HumanResources.Department table. Use TRY . . . CATCH to trap the error. Display the error number, message and severity.
BEGIN TRY
    INSERT INTO
        HumanResources.Department
        (Name, GroupName, ModifiedDate)
    VALUES ('Engineering','Research and Development', GETDATE());
END TRY
BEGIN CATCH
    SELECT ERROR_NUMBER() AS
        ErrorNumber,ERROR_MESSAGE()
             AS ErrorMessage,
        ERROR_SEVERITY() AS ErrorSeverity;
END CATCH; - Change the code you wrote in question 1 to raise a custom error message instead of the actual error message.
BEGIN TRY
    INSERT INTO
        HumanResources.Department
            (Name, GroupName, ModifiedDate)
    VALUES ('Engineering',
        'Research and Development',
        GETDATE());
END TRY
BEGIN CATCH
    IF ERROR_NUMBER() = 2627 BEGIN
        RAISERROR(
           'You attempted to insert a duplicate!',
           16, 1);
   END;
END CATCH;