
![]()
Migrating RafaEShop Application on OpenShift
In Chapter 9 you saw how to migrate MongoDB databases to two cloud platforms—MongoHQ and MongoLab. As their names suggest, these platforms are cloud-based, hosted database solutions dedicated to MongoDB, which means that the applications that use these databases must be hosted in another place. But if you don’t have such a place, or you want to have the entire application (not just the database) in the cloud, you have to focus more on cloud computing platforms, like OpenShift from Red Hat. As quoted on the www.openshift.com web site, “OpenShift is Red Hat’s free, auto-scaling Platform as a Service (PaaS) for applications. As an application platform in the cloud, OpenShift manages the stack so you can focus on your code.”
OpenShift allows you to use almost any programming language, framework, and middleware, supports many kinds of architectures and servers, provides out-of-the-box templates for various types of applications, maintains dedicated tools for developing and migrating applications, and is always focused on assistance and documentation for developers.
OpenShift uses the notion of a cartridge to refer to all the supported servers, frameworks, database management systems, and so on. For example, GlassFish AS, MongoDB, MySQL, SwitchYard, Cron, RockMongo, and JBoss AS are all cartridges, and applications are built on one or more cartridges. As you’ll see, OpenShift provides a user interface for adding, removing, and configuring cartridges of applications, but its real power comes from the OpenShift Client tools, known as rhc. For simple applications (like some web applications), it’s very convenient to use the OpenShift GUI, while for more complex applications (web applications with databases, web services, and the like) a mix of both GUI and rhc provides full control.
In this chapter, you’ll see how to migrate the RafaEShop application to the OpenShift cloud. The application was hosted and tested on GlassFish AS 3 running on localhost, but now we’re going to migrate it to GlassFish AS 3 and JBoss AS 7 running in the cloud. The aim is to apply the necessary modifications to the source code (the MongoDB connection credentials, configuration files, and so on) and migrate this code to the cloud, first on GlassFish AS 3 as a Web Archive (WAR), and, second, on JBoss AS 7 as a WAR and a Maven project. At the end, you’ll have three applications in the cloud: one deployed on GlassFish AS 3 and two deployed on JBoss AS 7.
Creating a Free Account on OpenShift
Before getting started with OpenShift, you need to create a free account at www.openshift.com/. This can be accomplished quickly and easily by pressing the SIGN UP link, which opens a form like the one shown in Figure 10-1.
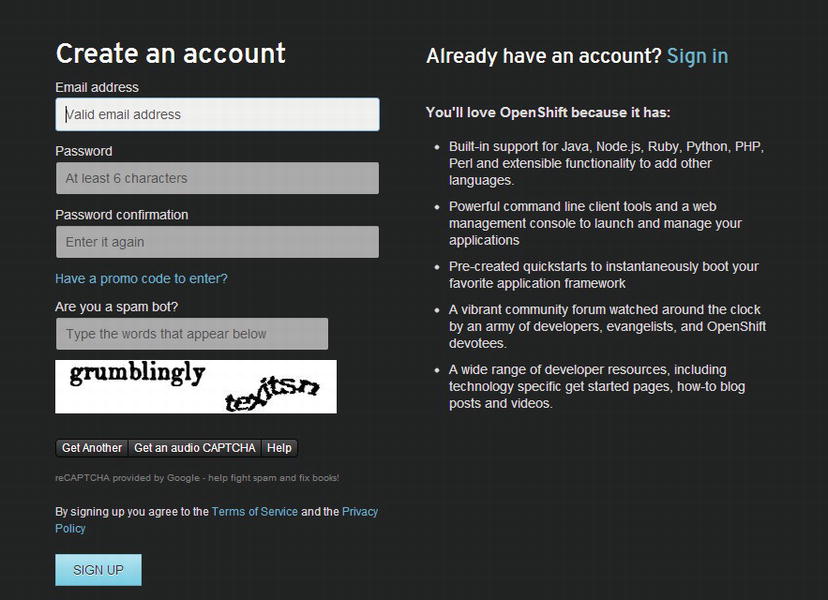
Figure 10-1. Creating a free OpenShift account
Notice that you have to provide a valid e-mail address because you’ll receive an e-mail from OpenShift containing a link for activating the account (Figure 10-2).
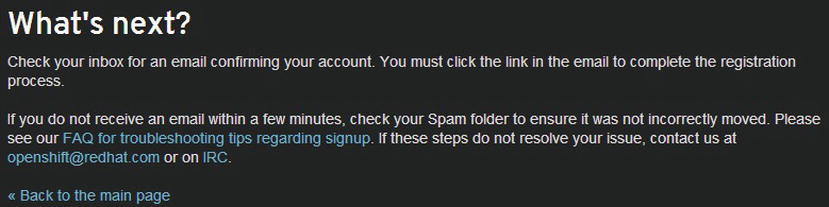
Figure 10-2. Activating your account from e-mail
After creating and activating your account, you have to accept the legal terms and conditions. Read them and then press the I Accept button (Figure 10-3).
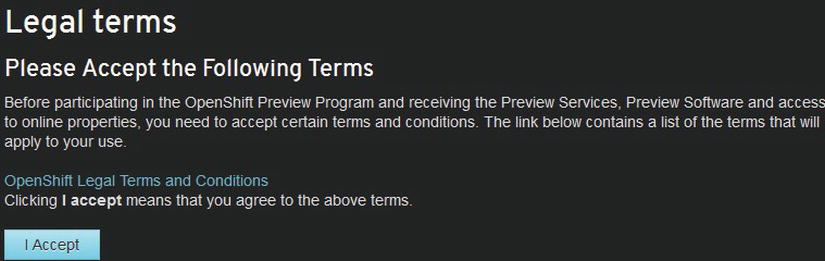
Figure 10-3. OpenShift legal terms
Once you accept the legal terms, you’ll be redirected to your personal management console where you can see and create applications, get help, and modify account settings (see Figure 10-4). By default, the Create Application wizard will be active.

Figure 10-4. User management console tabs
From now on, the management console page can be accessed by clicking the MY APPS link on the OpenShift start page and signing in using your e-mail address and password, as shown in Figure 10-5.
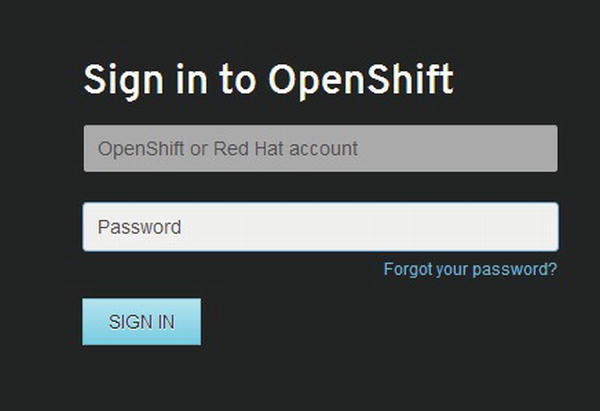
Figure 10-5. Signing in to OpenShift
If you sign in successfully, you should see the Create Application wizard (Figure 10-6). This wizard starts automatically because you don’t yet have any application available. Once you do, the default wizard will be My Applications. Note that a free OpenShift account allows you to have at most three applications in the cloud. When you reach three applications, you can’t create a new one until you delete or scale down an existing one. (The message you’ll get is: “Currently you do not have enough free gears available to create a new application. You can either scale down or delete existing applications to free up resources.”)
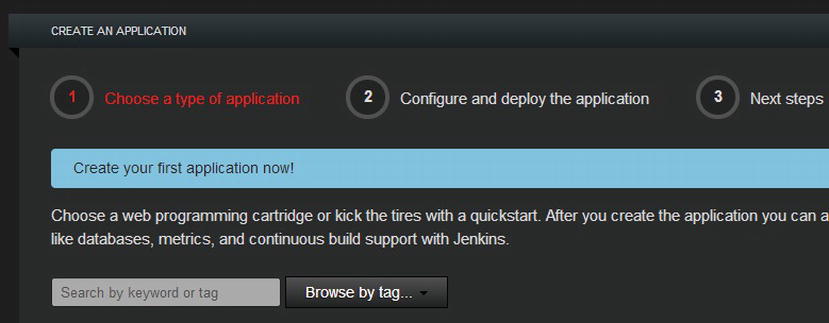
Figure 10-6. OpenShift Create Application wizard
Before creating your first application, you must create a namespace that’s unique to your account and is the suffix of the public URLs OpenShift will assign to your applications. (If you don’t create the namespace now, you’ll be prompted for it later.) First, in your personal management console, switch to the My Account wizard, shown in Figure 10-7. (If you don’t see this image, click on the Create a domain for your application link, in the Domain section).

Figure 10-7. OpenShift My Account wizard
Type a valid namespace and save it. As you can see in Figure 10-7, I typed hogm. After the namespace is successfully created, you’ll see a message like the one in Figure 10-8. (Note that in place of the Public Keys message, you might see an SSH Keys section, with a link indicating to upload your public key to access the code.)

Figure 10-8. Domain was successfully created
There are two important messages in Figure 10-8. The first confirms that the domain was created successfully, and the second tells you need an SSH public key to securely encrypt the connection between your local machine and your applications. I’ll show you later how to do this from the shell so you can sign out.
At this point, you have an account and a domain, but there are a few more steps before you can start migrating the RafaEShop application. To communicate with the OpenShift platform from the local shell, you need to install and configure the OpenShift RHC Client Tools (rhc) on your machine. These tools, which were built and packaged using the Ruby programming language, will help you with many tasks, such as uploading or removing applications to or from the cloud; monitoring server status and logs; controlling available services (start/stop/restart); adding and removing security permissions; forwarding ports, and so on. Some of the capabilities provided by these tools are also available through OpenShift wizards, but the power of these tools goes beyond OpenShift web GUIs.
Installing the OpenShift RHC Client Tools on Windows
In this section, you’ll see how to install the OpenShift RHC Client Tools on Windows. You’ll also install the Git version control system, which is used by rhc to provide powerful command-line support for controlling your application.
Installing Ruby
Because rhc is built and packaged using Ruby, you need to install Ruby on your computer. The recommended version is Ruby 1.9.x; I installed Ruby 1.9.3-p392, available at http://rubyinstaller.org/downloads/. For Windows, Ruby comes as an executable file, so the installation process is monitored and guided by an intuitive wizard. During installation, many settings have default values that fit most cases, but you must select the “Add Ruby executables to your PATH” check box to run Ruby from the shell (Figure 10-9).
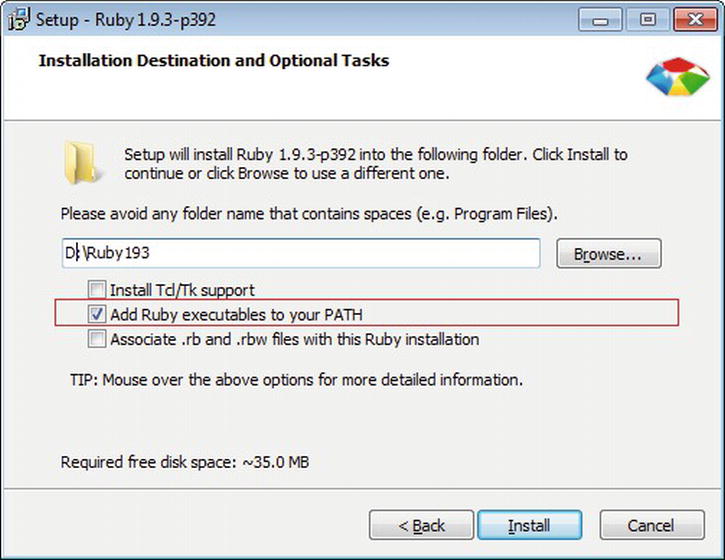
Figure 10-9. Installing Ruby; adding Ruby executables to your PATH
![]() Note If you decide to install Ruby versions later than 1.9.x (Ruby 2.0.0, for example), you might get a warning of type “DL is deprecated, please use Fiddle” in the shell. Everything else should work as expected.
Note If you decide to install Ruby versions later than 1.9.x (Ruby 2.0.0, for example), you might get a warning of type “DL is deprecated, please use Fiddle” in the shell. Everything else should work as expected.
Installing Git
As quoted on the www.git-scm.com web site, “Git is a free and open source distributed version control system designed to handle everything from small to very large projects with speed and efficiency.” OpenShift rhc needs Git to provide version control for your source code, so you need to download and install it from www.git-scm.com/downloads.
I downloaded Git 1.8.1.2 and installed it using the installation wizard. During installation, ensure that Git is added to your PATH so you can run it from the shell (Figure 10-10).
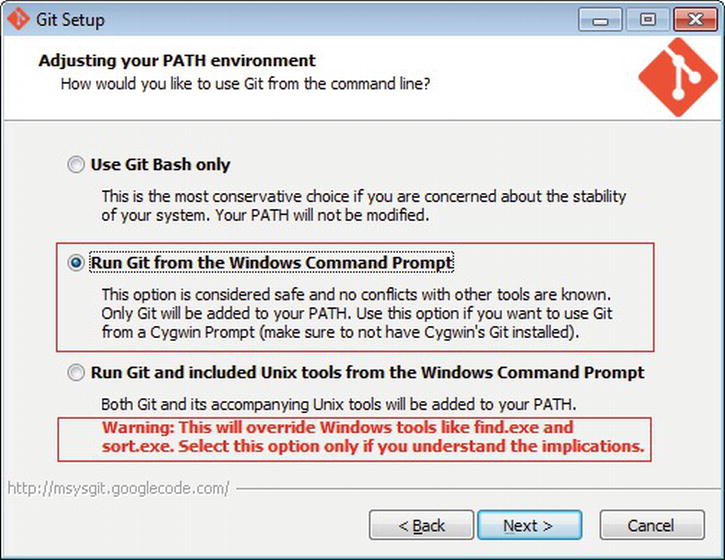
Figure 10-10. Installing Git; adding Git executables to your PATH
If you don’t want to alter your PATH, you can use the Git Bash shell (the first radio button in Figure 10-10), which will put a shortcut on your desktop.
Testing Ruby and Git from the Shell
Before going further, it’s a good idea to do a quick test of Ruby and Git by executing some simple commands. To test Ruby, open a shell and type the following command, which is also shown in Figure 10-11:
ruby -e 'puts "Hello from Ruby"'

Figure 10-11. Testing Ruby
The output of this command is also visible in this figure.
Now type the following command, which is also shown in Figure 10-12, to test that Git was successfully installed and is available from the shell:
git –version
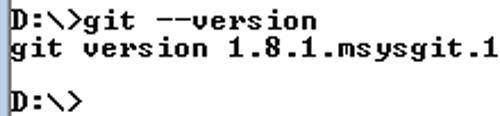
Figure 10-12. Testing Git
The expected output is also visible in this figure.
There are situations when adding the Ruby and Git paths to the Windows PATH during installation doesn’t have the expected result. In such cases, Ruby and/or Git will not be available from the shell, and instead of the expected results, you’ll get an error message stating “'ruby or git' is not recognized as an internal or external command, operable program or batch file.” If this happens to you, keep reading. If you did get the expected results, just jump to the next section.
This issue can be fixed in at least two ways. I like to use a batch (*.bat) file. The idea is simple:
- Create a file named autoexec.bat anywhere on your computer (the name doesn’t actually have to be autoexec).
- In this file, add a line like the SET PATH entry in Figure 10-13, adjusting the Ruby and Git paths to correspond to yours.
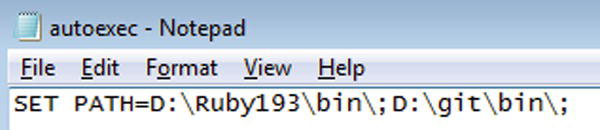
Figure 10-13. Creating a Windows .bat file
- Open a shell, navigate to the location of the .bat file, and type the file name (see Figure 10-14).

Figure 10-14. Running the batch file
Now, Ruby should be accessible from the shell. Keep in mind that each time you open a new shell, you need to run this command to be able to access Ruby and Git. This can be a pain, but it works. If you already have such a .bat file, then just add these entries in the SET PATH section. For example, my autoexec.bat looks like what’s shown in Figure 10-15.
![]()
Figure 10-15. Windows batch file sample for settings paths
Another approach is to use Windows wizards:
- From the Desktop, right-click My Computer and click Properties.
- Click the Advanced System Settings link in the left column (Figure 10-16).
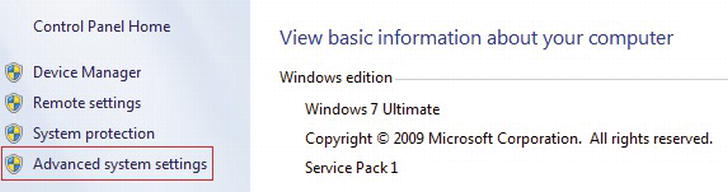
Figure 10-16. Windows 7 Control Panel
- In the System Properties window, click the Environment Variables button.
- Locate the Path variable (Figure 10-17) and add to it the Ruby and Git paths.

Figure 10-17. Adding Ruby and Git paths in Windows 7
- Restart your machine and test Ruby and Git from the shell.
Installing the OpenShift Gem
Finally, we’ll install the OpenShift gem. After Ruby and Git are correctly installed, we’ll use the RubyGems package manager (included in Ruby) to install the OpenShift client tools. This is straightforward and consists of a simple command, gem install rhc, as shown in Figure 10-18. This command downloads and installs the rhc gem from www.rubygems.org/gems/rhc.

Figure 10-18. Downloading and installing the OpenShift gem
After installation completes, run the rhc setup command (this is recommended when you install the rhc tools for the first time). To do this, sign in with your e-mail address and password, then you’ll be prompted to answer a few questions. The first is about creating a token on your disk for accessing the server without using your password. Type yes and the token will be saved in the C:/Users/{USER}/.openshift/express.conf file, as shown in Figure 10-19.
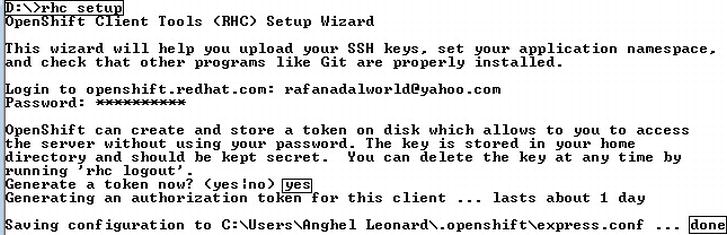
Figure 10-19. The rhc setup shell wizard; generating a token
Remember the SSH public key needed to securely encrypt communication between your local machine and your applications? Well, you should now be informed that you don’t have such a key and that OpenShift can create and upload to the server an SSH key for you. Type yes; the SSH key will be saved locally in the C:/Users/{USER}/.ssh/id_rsa.pub file and uploaded to the server, as shown in Figure 10-20.

Figure 10-20. The rhc setup shell wizard; creating and uploading the SSH key
After a few informational messages and a list of applications that can be created on OpenShift, you should see a message like “Your client tools are now configured” (see Figure 10-21).

Figure 10-21. The rhc setup shell wizard; the configuration was successful
This message confirms that rch was successfully created and everything is set to start developing applications.
The SSH key was successfully generated and uploaded. You can check this in your personal management console, in the My Account wizard, as shown in Figure 10-22.

Figure 10-22. Accessing your SSH key using the My Account wizard
![]() Note This section describes installing the rhc tools only on Windows. But rhc can also run on other operating systems, such as Mac OS X, Fedora 16, 17, and 18, Red Hat Enterprise Linux 6.4, Ubuntu, and more. To see how to install rhc on these operating systems, please see the instructions at www.openshift.com/developers/rhc-client-tools-install.
Note This section describes installing the rhc tools only on Windows. But rhc can also run on other operating systems, such as Mac OS X, Fedora 16, 17, and 18, Red Hat Enterprise Linux 6.4, Ubuntu, and more. To see how to install rhc on these operating systems, please see the instructions at www.openshift.com/developers/rhc-client-tools-install.
Fixing a Known Issue
In Windows 7 it’s very possible to get the error “Permission denied (publickey, gssapi-keyex, gssapi-with-mic)” when you try to execute Git commands. The easiest way to fix this is to copy the two files named id_rsa from the C:/Users/{USER}/.ssh folder to the {GIT_HOME}/.ssh folder. This should fix the issue!
Migrating the RafaEShop Application to OpenShift with JBoss AS 7
Now let’s see how to migrate the RafaEShop application from your computer to OpenShift cloud on JBoss AS 7. We’re going to look at two scenarios: one for migrating this application as a WAR (Web Archive) and one as a Maven project.
![]() Note Of course, if you are interested in only one of the scenarios, only read about that one and ignore all references to the other.
Note Of course, if you are interested in only one of the scenarios, only read about that one and ignore all references to the other.
To start, though, there are several steps to complete that are common to both.
Step 1: Create a base folder. Create a folder named JBossAS on one of your local disks (such as D:/JBossAS). We will use this as the base folder for our two scenarios.
Step 2: Create two scenario folders. In the D:/JBossAS folder, create two subfolders, one named war, and the other named mvn.
Step 3: Create a default project based on the JBoss Application Server 7.1 cartridge.
Before deploying an application such as RafaEShop, you need to create a default JBoss Application Server 7.1 application. This is one of the cartridges supported by OpenShift, as shown in Figure 10-23.

Figure 10-23. JBoss Application Server 7.1 cartridge
This step can be accomplished from the OpenShift GUI or from the shell. I prefer the latter, so open a shell and navigate to the D:/JBossAS/war folder. Use the rhc tools to create the new project by using the following command, which is also shown in Figure 10-24:
rhc app create -a RafaEShopW -t jbossas-7

Figure 10-24. Creating the JBoss Application Server 7.1 default application
![]() Note During this step, you may receive the question “Are you sure you want to continue connecting (yes/no)?” The answer is yes. OpenShift needs to add this host to the list of trusted hosts.
Note During this step, you may receive the question “Are you sure you want to continue connecting (yes/no)?” The answer is yes. OpenShift needs to add this host to the list of trusted hosts.
Switch to the D:/JBossAS/mvn folder and repeat this step, this time typing the following:
rhc app create -a RafaEShopM -t jbossas-7
Now you have two identical default applications. We’ll deploy the RafaEShop application as a WAR file under RafaEShopW and as a Maven project under RafaEShopM.
At this point, if you check the D:/JBossAS/war and D:/JBossAS/mvn folders, you’ll see that the applications were created in the RafaEShopW and RafaEShopM subfolders. Here you’ll find several folders and files, described in the D:/JBossAS/war/RafaEShopW/README.txt and the D:/JBossAS/war/RafaEShopM/README.txt) files, from which I’ve copied the following fragment:
deployments/ - location for built wars
src/ - Maven src structure
pom.xml - Maven build file
.openshift/ - location for openshift specific files
.openshift/config/ - location for configuration files such as standalone.xml (used to modify jboss config such as datasources)
.openshift/action_hooks/pre_build - Script that gets run every git push before the build (on the CI system if available)
.openshift/action_hooks/build - Script that gets run every git push as part of the build process (on the CI system if available)
.openshift/action_hooks/deploy - Script that gets run every git push after build but before the app is restarted
.openshift/action_hooks/post_deploy - Script that gets run every git push after the app is restarted
.openshift/action_hooks/pre_start_jbossas-7 - Script that gets run prior to starting AS7
.openshift/action_hooks/post_start_jbossas-7 - Script that gets run after AS7 is started
.openshift/action_hooks/pre_stop_jbossas-7 - Script that gets run prior to stopping AS7
.openshift/action_hooks/post_stop_jbossas-7 - Script that gets run after AS7 is stopped
.openshift/markers - directory for files used to control application behavior. See README in markers directory
Read the entire file for complete details. The application links are available in your personal management console, as shown in Figure 10-25. The links are functional, and they open the default welcome page of the applications.

Figure 10-25. Two JBoss Application Server 7.1 application links
If you click on an application’s link, you’ll see the application details, such as the Git repository associated with the application, and you’ll be able to manage cartridges (see Figure 10-26).
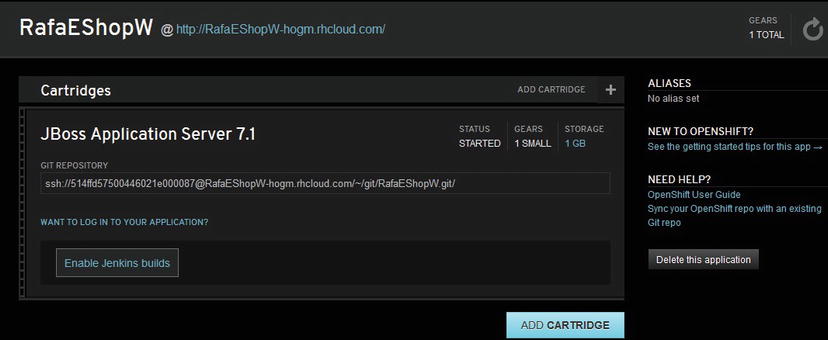
Figure 10-26. RafaEShopW application details
Now that you’ve seen the structure of a default JBoss Application Server 7.1 application, it’s time to go further.
Step 4: Add a MongoDB NoSQL Database 2.2 cartridge (see Figure 10-27).

Figure 10-27. MongoDB NoSQL Database 2.2 cartridge
This will add a MongoDB server instance ready to be populated with data. By default, OpenShift will create a MongoDB database with the same name as the application. As you can see in Figure 10-27, there’s a Select button that lets you add this cartridge using a dedicated wizard. I’ll let you explore that approach on your own, while I show you how to do this from the shell using rhc. Use the following rhc command, which is also shown in Figure 10-28, to add the MongoDB to the RafaEShopW application:
rhc cartridge add -a RafaEShopW -c mongodb-2.2
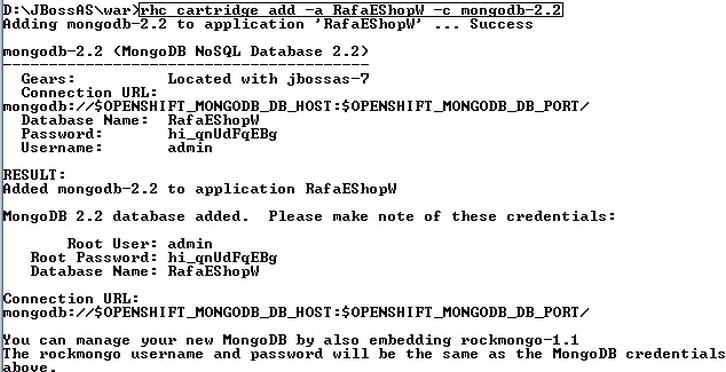
Figure 10-28. Adding the MongoDB NoSQL Database 2.2 cartridge using rhc tools
Repeat this step to obtain a MongoDB instance for the RafaEShopM application by switching to the D:/JBossAS/mvn folder and typing the following command:
rhc cartridge add -a RafaEShopM -c mongodb-2.2
Notice that the MongoDB database was added and you have access to it through the listed credentials. The MongoDB cartridge is now available in your personal management console, as shown in Figure 10-29.

Figure 10-29. MongoDB cartridge is listed in the RafaEShopW application
Step 5: Add the RockMongo 1.1 cartridge, as shown in Figure 10-30. (This step is optional.)

Figure 10-30. RockMongo 1.1 cartridge
Adding the RockMongo administration tool is not mandatory, but it can be very useful to have access to the MongoDB database through a friendly web GUI that makes it easy to manage database content (add and delete collections, query data, manage users, import and export data, and so on). You can add this cartridge from the shell (for the RafaEShopW application) by using the following command, which is also shown in Figure 10-31:
rhc cartridge add -a RafaEShopW -c rockmongo-1.1

Figure 10-31. Adding the RockMongo 1.1 cartridge using rhc tools
Of course, you can also try the visual approach by pressing the Select button.
After you add the RockMongo cartridge, you can access it from the listed URL https://RafaEShopW-hogm.rhcloud.com/rockmongo/. (The credentials are the same as for the MongoDB managed instance: user: admin, password: hi_qnUdFqEBg). In Figure 10-32, I accessed the RockMongo interface for the MongoDB instance belonging to the RafaEShopW application.
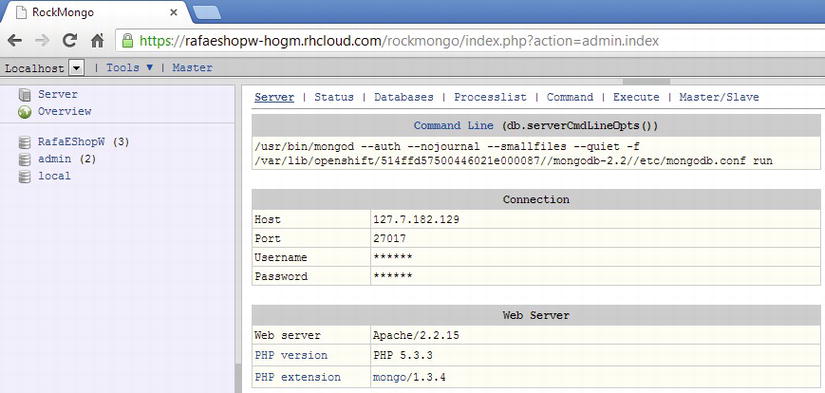
Figure 10-32. RockMongo interface for the RafaEShopW database
Repeat this step to add the RockMongo cartridge to the RafaEShopM application. Switch to D:/JBossAS/mvn and type the following:
rhc cartridge add -a RafaEShopM -c rockmongo-1.1
Sign in to OpenShift to see the RockMongo cartridge, as shown in Figure 10-33.

Figure 10-33. RockMongo cartridge is listed in the RafaEShopW application
Step 6: Add the org.hibernate:ogm module to JBoss AS 7.
In Chapter 4, in the section “Hibernate OGM in a built-in JTA environment (EJB 3, JBoss AS 7),” you saw how to add in JBoss AS 7 the module for Hibernate OGM. The same module must be added to the D:/JBossAS/war/RafaEShopW/.openshift/config/modules folder (and to the equivalent folder for RafaESHopM). Simply copy the {JBOSS_HOME}/modules/org/hibernate/main and {JBOSS_HOME}/modules/org/hibernate/ogm folders, as shown in Figure 10-34.
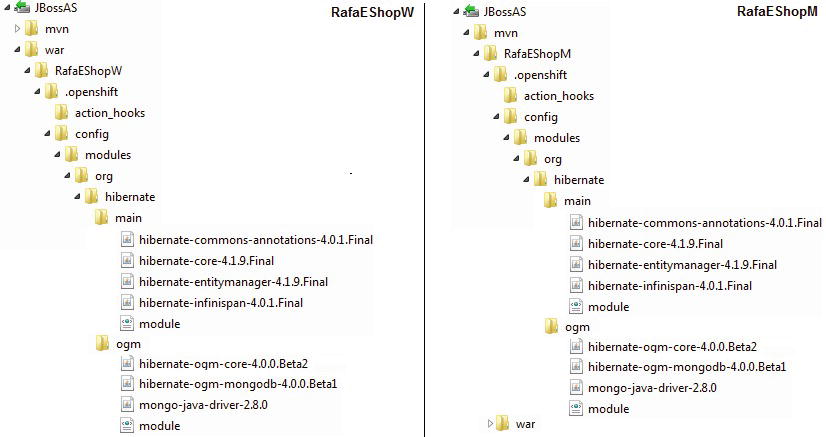
Figure 10-34. Adding the Hibernate OGM-specific module to JBoss AS 7
Step 7: Adjust the persistence.xml settings. You need to modify the persistence.xml file according to your cloud application. I recommend you work on a copy of this file. The original is located in the {RafaEShop_HOME}/src/conf folder and currently contains the settings shown in Listing 10-1.
Listing 10-1. Original persistence.xml File
<?xml version="1.0" encoding="UTF-8"?>
<persistence version="2.0" xmlns=" http://java.sun.com/xml/ns/persistence"
xmlns:xsi=" http://www.w3.org/2001/XMLSchema-instance"
xsi:schemaLocation=" http://java.sun.com/xml/ns/persistence
http://java.sun.com/xml/ns/persistence/persistence_2_0.xsd">
    <persistence-unit name="HOGM_eSHOP-ejbPU" transaction-type="JTA">
        <provider>org.hibernate.ogm.jpa.HibernateOgmPersistence</provider>
        <class>eshop.entities.Categories</class>
        <class>eshop.entities.Customers</class>
        <class>eshop.entities.Inventory</class>
        <class>eshop.entities.Orders</class>
        <class>eshop.entities.Products</class>
    <properties>
        <property name="hibernate.search.default.directory_provider" value="filesystem"/>
        <property name="hibernate.search.default.indexBase" value="D:/eshop"/>
        <property name="hibernate.search.default.locking_strategy" value="single"/>
        <property name="hibernate.transaction.jta.platform"
                        value="org.hibernate.service.jta.platform.internal.SunOneJtaPlatform"/>
        <property name="hibernate.ogm.datastore.provider" value="mongodb"/>
        <property name="hibernate.ogm.datastore.grid_dialect"
                        value="org.hibernate.ogm.dialect.mongodb.MongoDBDialect"/>
        <property name="hibernate.ogm.mongodb.database" value="eshop_db"/>
        <property name="hibernate.ogm.mongodb.host" value="127.0.0.1"/>
        <property name="hibernate.ogm.mongodb.port" value="27017"/>
    </properties>
</persistence-unit>
</persistence>
You have to adjust several settings, as shown in the following set of instructions (this is specific to the RafaEShopW application).
Apache Lucene indexes are stored in the file system, in the D:/eshop folder. You need to modify this folder path (base folder) with a valid cloud folder path. Or, to make it much simpler, you can use a memory-based directory by replacing the following code:
<property name="hibernate.search.default.directory_provider" value="filesystem"/>
<property name="hibernate.search.default.indexBase" value="D:/eshop"/>
<property name="hibernate.search.default.locking_strategy" value="single"/>
with this code:
<property name="hibernate.search.default.directory_provider" value="ram"/>
<property name="hibernate.search.default.locking_strategy" value="single"/>
Because the application is being deployed on JBoss AS, you need to adjust the JTA platform by replacing the following setting:
<property name="hibernate.transaction.jta.platform"
        value="org.hibernate.service.jta.platform.internal.SunOneJtaPlatform"/>
with this setting:
<property name="hibernate.transaction.jta.platform"
        value="org.hibernate.service.jta.platform.internal.JBossAppServerJtaPlatform"/>
Also, you need to add a few properties that help JBoss AS locate and use the org.hibernate:ogm module, as described in Chapter 4, in the section “Hibernate OGM in a built-in JTA environment (EJB 3, JBoss AS 7):”
<property name="jboss.as.jpa.adapterModule" value="org.jboss.as.jpa.hibernate:4"/>
<property name="jboss.as.jpa.providerModule" value="org.hibernate:ogm"/>
<property name="jboss.as.jpa.classtransformer" value="false"/>
<property name="hibernate.listeners.envers.autoRegister" value="false"/>
Finally, you need to set the MongoDB database name, host, port, user, and password. To do this, replace the following code:
<property name="hibernate.ogm.mongodb.database" value="eshop_db"/>
<property name="hibernate.ogm.mongodb.host" value="127.0.0.1"/>
<property name="hibernate.ogm.mongodb.port" value="27017"/>
with this code:
<property name="hibernate.ogm.mongodb.database" value="RafaEShopW"/>
<property name="hibernate.ogm.mongodb.host" value="127.7.182.129"/>
<property name="hibernate.ogm.mongodb.port" value="27017"/>
<property name="hibernate.ogm.mongodb.username" value="admin"/>
<property name="hibernate.ogm.mongodb.password" value="hi_qnUdFqEBg"/>
![]() Note The MongoDB remote server IP address can be easily obtained if you connect to the MongoDB server using RockMongo. In Figure 10-32, you can see the IP address 127.7.182.129 listed in the Host field. The port is always 27017, while the user and password are those used for the connection with RockMongo and provided by OpenShift when you added the MongoDB cartridge.
Note The MongoDB remote server IP address can be easily obtained if you connect to the MongoDB server using RockMongo. In Figure 10-32, you can see the IP address 127.7.182.129 listed in the Host field. The port is always 27017, while the user and password are those used for the connection with RockMongo and provided by OpenShift when you added the MongoDB cartridge.
The “new” persistence.xml is shown in Listing 10-2.
Listing 10-2. New persistence.xml File
<?xml version="1.0" encoding="UTF-8"?>
<persistence version="2.0" xmlns=" http://java.sun.com/xml/ns/persistence "
xmlns:xsi=" http://www.w3.org/2001/XMLSchema-instance "
xsi:schemaLocation=" http://java.sun.com/xml/ns/persistence
http://java.sun.com/xml/ns/persistence/persistence_2_0.xsd ">
    <persistence-unit name="HOGM_eSHOP-ejbPU" transaction-type="JTA">
        <provider>org.hibernate.ogm.jpa.HibernateOgmPersistence</provider>
        <class>eshop.entities.Categories</class>
        <class>eshop.entities.Customers</class>
        <class>eshop.entities.Inventory</class>
        <class>eshop.entities.Orders</class>
        <class>eshop.entities.Products</class>
    <properties>
        <property name="hibernate.search.default.directory_provider" value="ram"/>
        <property name="hibernate.search.default.locking_strategy" value="single"/>
        <property name="jboss.as.jpa.adapterModule" value="org.jboss.as.jpa.hibernate:4"/>
        <property name="jboss.as.jpa.providerModule" value="org.hibernate:ogm"/>
        <property name="jboss.as.jpa.classtransformer" value="false"/>
        <property name="hibernate.listeners.envers.autoRegister" value="false"/>
        <property name="hibernate.transaction.jta.platform"
                        value="org.hibernate.service.jta.platform.internal.JBossAppServerJtaPlatform"/>
        <property name="hibernate.ogm.datastore.provider" value="mongodb"/>
        <property name="hibernate.ogm.datastore.grid_dialect"
                        value="org.hibernate.ogm.dialect.mongodb.MongoDBDialect"/>
        <property name="hibernate.ogm.mongodb.database" value="RafaEShopW"/>
        <property name="hibernate.ogm.mongodb.host" value="127.7.182.129"/>
        <property name="hibernate.ogm.mongodb.port" value="27017"/>
        <property name="hibernate.ogm.mongodb.username" value="admin"/>
        <property name="hibernate.ogm.mongodb.password" value="hi_qnUdFqEBg"/>
    </properties>
</persistence-unit>
</persistence>
Repeat Step 7 for the RafaEShopM application. All you need to modify is the MongoDB database name and credentials. Now, you have two persistence.xml files, one for the RafaEShopW application and one for the RafaEShopM application. Just keep them handy.
Now we’re done with the steps that are common to both the WAR and Maven projects.
Monitoring the JBoss AS 7 Log
OpenShift will restart the JBoss AS instance for every Git commit session. More specifically, when you commit changes, OpenShift stops the JBoss AS instance, uploads and processes the changes, and starts JBoss AS instance again. If something goes wrong during the restart (for example, if there’s an error in the code or a missing JAR), then the JBoss AS instance starts with errors, which means that the application will not be available online. In such cases, it’s very helpful to be able to look at the JBoss AS log for debugging purposes; otherwise, it’s very difficult to know what’s happening.
You can monitor (in real-time) the server log by opening a Secure Shell (SSH) session to your application.
![]() Note The easiest way to find the specific SSH command you need for connecting to your application is to access the application page and copy from there (as shown in Figure 10-35 for the RafaEShopW application). More details about remote access using SSH are available at www.openshift.com/developers/remote-access.
Note The easiest way to find the specific SSH command you need for connecting to your application is to access the application page and copy from there (as shown in Figure 10-35 for the RafaEShopW application). More details about remote access using SSH are available at www.openshift.com/developers/remote-access.
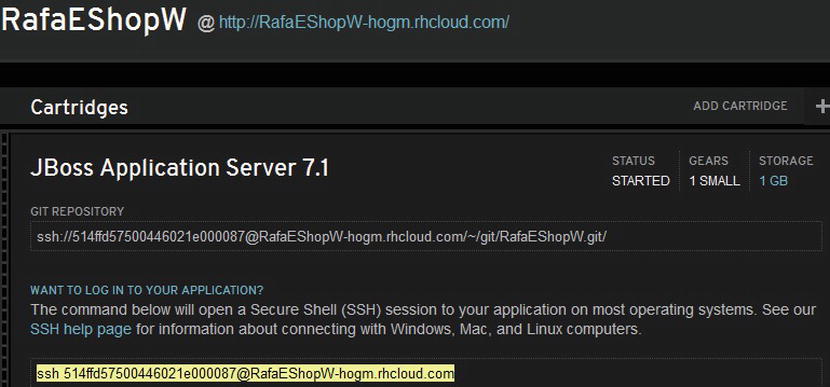
Figure 10-35. Finding the specific SSH command for an application (RafaEShopW sample)
This can be done from the shell using the following ssh command, which is also shown in Figure 10-36:
ssh [email protected]
This is for opening a Secure Shell session to the RafaEShopW application; it’s very intuitive to do the same thing for the RafaEShopM application.
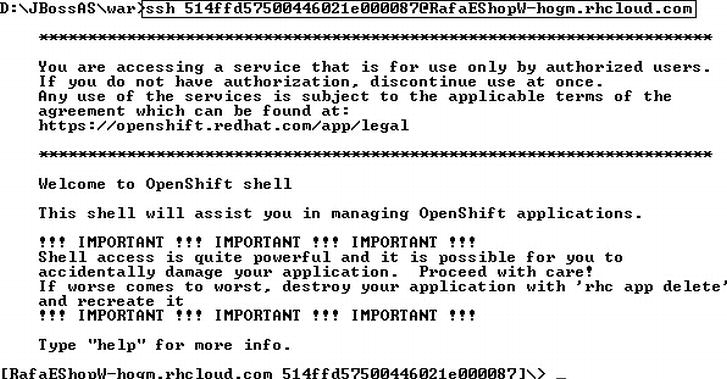
Figure 10-36. Executing the ssh command from the shell
Next, type the tail_all command, as shown in Figure 10-37. Notice that this command will tail all available logs for the current application. (The logs specific to JBoss AS are jbossas-7/logs/boot.log and jbossas-7/logs/server.log.)
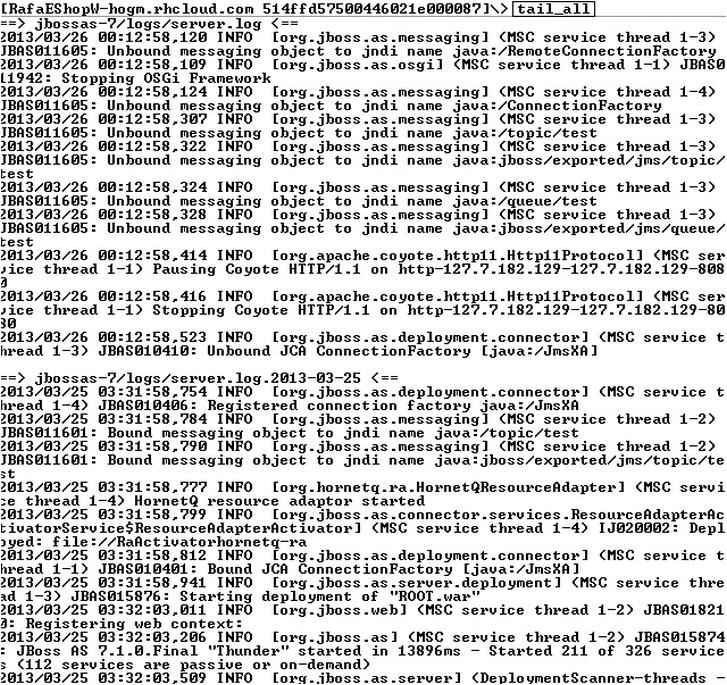
Figure 10-37. Tail JBoss AS logs
Now you can monitor the logs in real-time. Don’t close the monitor during commits because this process is “connected” to the logs files; just open another shell for other commands.
![]() Note Besides tail_all, the Secure Shell session allows you to execute other commands. To see the list of these commands with a description, type the help command after the SSH session is established.
Note Besides tail_all, the Secure Shell session allows you to execute other commands. To see the list of these commands with a description, type the help command after the SSH session is established.
Commit Changes
Every change made in the local application folder should be committed on OpenShift (you have to synchronize the content of this folder with the application on OpenShift). For this, you can use Git commands (open a shell for monitoring server logs, if you haven’t already done so).
Open a new shell and navigate to the D:/JBossAS/war/RafaEShopW folder (this is also valid for the RafaEShopM application). Type the command git add ., as shown in Figure 10-38, to prepare the content staged for the next commit. Don’t worry about LF-CRLF warnings.

Figure 10-38. Executing the git add . command
Good to know (details at www.kernel.org/pub/software/scm/git/docs/git-add.html):
git add -A Stages All
git add. Stages new and modified, without deleted
git add -u Stages modified and deleted, without new
Type the command git commit -m "first commit" (the text first commit can be any text, as long as it’s different for every execution of this command). The changes are stored and listed, in this case, in the new JBoss AS module files, as shown in Figure 10-39.

Figure 10-39. Executing the git commit -m “first commit” command
Good to know (details at www.kernel.org/pub/software/scm/git/docs/git-commit.html):
If you make a commit and then find a mistake immediately afterwards, you can recover from it using the git reset command.
Use the git push command to propagate changes to OpenShift (see Figure 10-40). During execution of this command, which can take from a few seconds to several minutes, you can check the server log, which is updated in real-time. Notice how the server is stopped and started during push. When no changes are detected, you’ll see a message that informs you that everything is up to date.
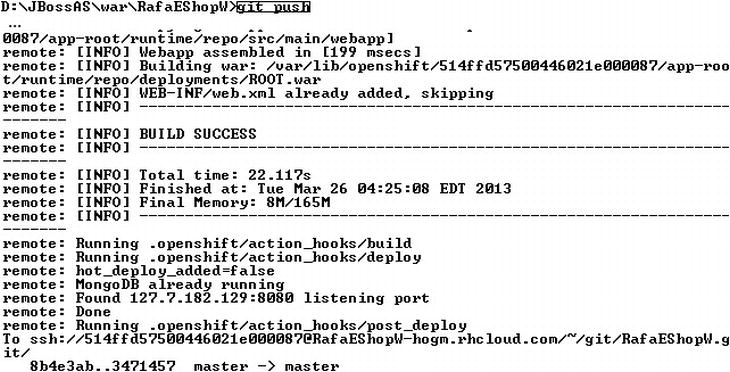
Figure 10-40. Executing the git push command
Good to know (details at www.kernel.org/pub/software/scm/git/docs/git-push.html):
git push --delete All listed changes are deleted from the remote repository.
Migrating the RafaEShop Application as a WAR
After all this hard work, it’s time to prepare the RafaEShop WAR for deployment under JBoss AS 7 in the cloud. First, locate the WAR in your local project RafaEShop/dist folder or in the Apress repository in the RafaEShop/dist folder. Copy this WAR to the D:/JBossAS/war/RafaEShopW/deployments folder. Finally, override the persistence.xml file in the RafaEShop WAR archive (you can use any archive tool, like WinRAR).
Before committing the WAR in the cloud, there’s one more step to complete. You need to add to the /lib folder two more JARs, named jackson-core-asl-1.9.12.jar (http://mvnrepository.com/artifact/org.codehaus.jackson/jackson-core-asl) and jackson-mapper-asl-1.9.12.jar (http://mvnrepository.com/artifact/org.codehaus.jackson/jackson-mapper-asl).
Finally, commit the changes, as shown in Figure 10-41.

Figure 10-41. Committing the RafaEShop WAR
The application was successfully deployed and started. The JBoss server log should look like what’s shown in Figure 10-42.
![]()
Figure 10-42. JBoss AS log
If you’re interested only in this application, you can jump to the “Test It!” section.
Migrating the RafaEShop Application as a Maven Project
Now I’ll focus on the RafaEShopM application. A quick look at the /mvn/RafaEShopM folder reveals a pom.xml file and a /src folder with three subfolders: /main/java, /main/resources, and /main/webapp. This is actually the default application created by OpenShift; it’s a simple demo that runs on JBoss AS 7 and serves as a starting point for developers.
As you can see, this demo has a Maven project structure, which means that we should be able to replace it with the RafaEShop application. To do this, we have to add the RafaEShop components in the right places and adjust the pom.xml accordingly.
Following are the steps for deploying the RafaEShop application as a Maven project:
Step 1: Locate the RafaEShop NetBeans project. You can download the RafaEShop NetBeans project from the Apress repository.
Step 2: Empty the contents of /webapp folder. Just delete the current contents of the D:/JBossAS/mvn/RafaEShopM/src/main/webapp folder.
Step 3: Copy the RafaEShop sources. Copy the folder {RafaEShop_HOME}/src/java/eshop folder to the D:/JBossAS/mvn/RafaEShopM/src/main/java folder, as shown in Figure 10-43.

Figure 10-43. Copying the /eshop folder from the RafaEShop application to the RafaEShopM application
Step 4: Copy the RafaEShop /web folder contents. Copy the contents of the {RafaEShop_HOME}/web folder to the D:/JBossAS/mvn/RafaEShopM/src/main/webapp folder, as shown in Figure 10-44.
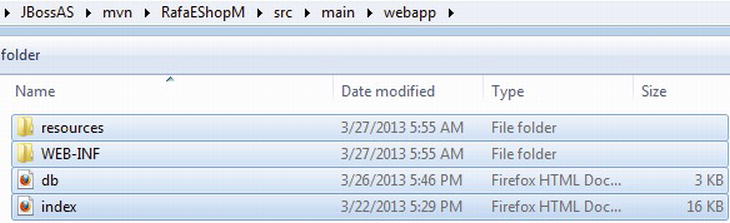
Figure 10-44. Copying the /web folder contents from the RafaEShop application to the RafaEShopM application
Step 5: Create the /META-INF folder. Create an empty folder named META-INF in D:/JBossAS/mvn/RafaEShopM/src/main/resources (see Figure 10-45).

Figure 10-45. Creating the empty META-INF folder
Step 6: Copy persistence.xml. Earlier, in the section, “Migrating the RafaEShop Application to OpenShift with JBoss AS 7,” you created a persistence.xml file for the RafaEShopM application. Now, copy it to the D:/JBossAS/mvn/RafaEShopM/src/main/resources/META-INF folder (see Figure 10-46).

Figure 10-46. Copying the persistence.xml file
Step 7: Adjust pom.xml. Edit the default pom.xml file, as shown in Listing 10-3. You have to add the necessary dependencies (Hibernate OGM, Hibernate Search, and PrimeFaces).
Listing 10-3. Editing the pom.xml File
<project xmlns=" http://maven.apache.org/POM/4.0.0 " xmlns:xsi=" http://www.w3.org/2001/XMLSchema-instance "
  xsi:schemaLocation=" http://maven.apache.org/POM/4.0.0 http://maven.apache.org/maven-v4_0_0.xsd ">
  <modelVersion>4.0.0</modelVersion>
  <groupId>RafaEShopM</groupId>
  <artifactId>RafaEShopM</artifactId>
  <packaging>war</packaging>
  <version>1.0</version>
  <name>RafaEShopM</name>
  <properties>
    <project.build.sourceEncoding>UTF-8</project.build.sourceEncoding>
    <maven.compiler.source>1.6</maven.compiler.source>
    <maven.compiler.target>1.6</maven.compiler.target>
  </properties>

  <repositories>
       <repository>
            <id>prime-repo</id>
            <name>PrimeFaces Maven Repository</name>
            <url> http://repository.primefaces.org</url >
            <layout>default</layout>
        </repository>
       <repository>
          <id>jboss-public-repository-group</id>
          <name>JBoss Public Maven Repository Group</name>
          <url> https://repository.jboss.org/nexus/content/groups/public-jboss/</url >
          <layout>default</layout>
          <releases>
            <enabled>true</enabled>
            <updatePolicy>never</updatePolicy>
          </releases>
          <snapshots>
            <enabled>true</enabled>
            <updatePolicy>never</updatePolicy>
          </snapshots>
        </repository>
    </repositories>

    <!--
    <pluginRepositories>
        <pluginRepository>
          <id>jboss-public-repository-group</id>
          <name>JBoss Public Maven Repository Group</name>
          <url> https://repository.jboss.org/nexus/content/groups/public-jboss/</url >
          <layout>default</layout>
          <releases>
            <enabled>true</enabled>
            <updatePolicy>never</updatePolicy>
          </releases>
          <snapshots>
            <enabled>true</enabled>
            <updatePolicy>never</updatePolicy>
          </snapshots>
        </pluginRepository>
      </pluginRepositories>
       -->

 <dependencyManagement>
        <dependencies>
            <dependency>
                <groupId>org.primefaces</groupId>
                <artifactId>primefaces</artifactId>
                <version>3.4.2</version>
            </dependency>
            <dependency>
    <groupId>org.hibernate</groupId>
    <artifactId>hibernate-search</artifactId>
    <version>4.2.0.Beta1</version>
            </dependency>
            <dependency>
                <groupId>org.hibernate.ogm</groupId>
                <artifactId>hibernate-ogm-core</artifactId>
                <version>4.0.0.Beta2</version>
            </dependency>
            <dependency>
                <groupId>org.hibernate.ogm</groupId>
                <artifactId>hibernate-ogm-mongodb</artifactId>
                <version>4.0.0.Beta1</version>
            </dependency>
        </dependencies>
  </dependencyManagement>

  <dependencies>
    <dependency>
      <groupId>org.primefaces</groupId>
      <artifactId>primefaces</artifactId>
      <version>3.4.2</version>
    </dependency>
 <dependency>
   <groupId>org.hibernate</groupId>
   <artifactId>hibernate-search</artifactId>
   <version>4.2.0.Beta1</version>
      </dependency>
   <dependency>
        <groupId>org.hibernate.ogm</groupId>
        <artifactId>hibernate-ogm-core</artifactId>
        <version>4.0.0.Beta2</version>
      </dependency>
      <dependency>
        <groupId>org.hibernate.ogm</groupId>
        <artifactId>hibernate-ogm-mongodb</artifactId>
        <version>4.0.0.Beta1</version>
      </dependency>
    <dependency>
      <groupId>org.jboss.spec</groupId>
      <artifactId>jboss-javaee-6.0</artifactId>
      <version>1.0.0.Final</version>
      <type>pom</type>
      <scope>provided</scope>
    </dependency>
  </dependencies>
  <profiles>
    <profile>
     <!-- When built in OpenShift the 'openshift' profile will be used when invoking mvn. -->
     <!-- Use this profile for any OpenShift specific customization your app will need. -->
     <!-- By default that is to put the resulting archive into the 'deployments' folder. -->
     <!-- http://maven.apache.org/guides/mini/guide-building-for-different-environments.html -->
     <id>openshift</id>
     <build>
        <finalName>RafaEShopM</finalName>
        <plugins>
          <plugin>
            <artifactId>maven-war-plugin</artifactId>
            <version>2.1.1</version>
            <configuration>
              <outputDirectory>deployments</outputDirectory>
              <warName>RafaEShop</warName>
            </configuration>
          </plugin>
        </plugins>
      </build>
    </profile>
  </profiles>
</project>
Finally, commit the changes, as shown in Figure 10-47.

Figure 10-47. Commit RafaEShop as an Apache Maven project
The application was successfully deployed and started. The JBoss server log should look like what’s shown in Figure 10-48.
![]()
Figure 10-48. RafaEShop was successfully deployed
If you are interested only in this application, you can now jump to the “Test It!” section.
Migrating the RafaEShop Application to OpenShift with GlassFish 3 AS
In the first part of this chapter you saw that OpenShift offers excellent support for JBoss AS. In just a few minutes you can obtain a default application running on JBoss AS, and with several clicks and commands you can build and deploy your own applications as WARs or even as Apache Maven projects.
In the second part of this chapter, we’re going to see how to migrate the RafaEShop application from your computer to the OpenShift cloud on GlassFish 3 AS. At the time of this writing, OpenShift does not provide a default GlassFish cartridge, but it does allow you to extend OpenShift to support GlassFish (or other unsupported languages, frameworks, and middleware) using the Do-It-Yourself application type, as shown in Figure 10-49.
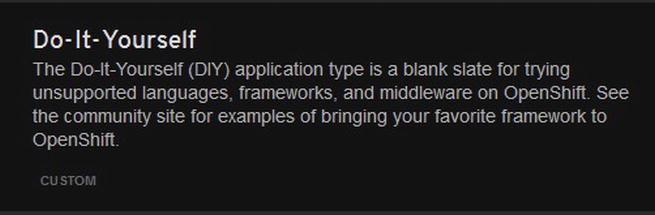
Figure 10-49. Do-It-Yourself cartridge
Following are the steps for creating such applications:
Step 1: Prepare GlassFish AS for OpenShift. Before creating a DIY application, you need to prepare GlassFish for working with OpenShift. There are several modifications that affect GlassFish domain configuration, so it’s not recommended you perform these modifications on your local GlassFish distribution. It’s much better to download a new GlassFish distribution from download.java.net/glassfish/3.1.2.2/release/glassfish-3.1.2.2.zip (version 3.1.2.2 was used in this example) and extract the ZIP archive content in a convenient place on your computer.
Here are the modifications you’ll need to make:
- Bind the HTTP listener to the application IP (represented by the environment variable $OPENSHIFT_INTERNAL_IP).
- Disable the administrator console.
- Disable other listeners.
- Update some ports to permitted ones.
These modifications will affect a single GlassFish file, {GlassFish_HOME}/glassfish/domains/domain1/config/domain.xml. The modified version of this document will be shown completely after I present the list of modifications. You’ll find more details about the contents and format of this file at http://docs.oracle.com/cd/E19798-01/821-1753/abhar/index.html.
You should make the following modifications. These modifications are indicated by the OpenShift Blog at https://www.openshift.com/blogs and are presented in order from the top of the document to the bottom:
Modification 1: Replace “localhost” with “OPENSHIFT_INTERNAL_IP,” as shown in Figure 10-50.

Figure 10-50. Modification 1
Modification 2: Replace “localhost” with “OPENSHIFT_INTERNAL_IP,” as shown in Figure 10-51.

Figure 10-51. Modification 2
Modification 3: Remove “http-listener-2,” as shown in Figure 10-52.

Figure 10-52. Modification 3
Modification 4: Comment the lines <iiop-service></iiop-service>, as shown in Figure 10-53.
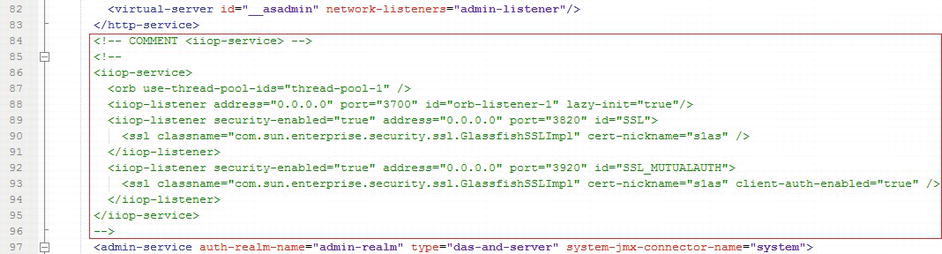
Figure 10-53. Modification 4
Modification 5: Replace “0.0.0.0” with “OPENSHIFT_INTERNAL_IP” and “8686” with “7600,” as shown in Figure 10-54.

Figure 10-54. Modification 5
Modification 6: Replace “localhost” with “OPENSHIFT_INTERNAL_IP” and “7676” with “5445,” as shown in Figure 10-55.

Figure 10-55. Modification 6
Modification 7: Replace “127.0.0.1” with “OPENSHIFT_INTERNAL_IP,” as shown in Figure 10-56.

Figure 10-56. Modification 7
Modification 8: Comment the lines <protocol></protocol>, as shown in Figure 10-57.
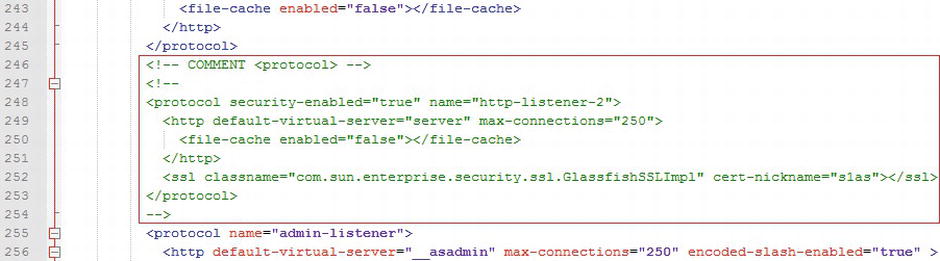
Figure 10-57. Modification 8
Modification 9: Add address="OPENSHIFT_INTERNAL_IP," as shown in Figure 10-58.

Figure 10-58. Modification 9
Modification 10: Comment the lines <network-listener></network-listener>, as shown in Figure 10-59.

Figure 10-59. Modification 10
Modification 11: Delete http-listener-2, as shown in Figure 10-60.

Figure 10-60. Modification 11
Modification 12: Comment the lines <iiop-service></iiop-service>, as shown in Figure 10-61.

Figure 10-61. Modification 12
Modification 13: Replace “127.0.0.1” with “OPENSHIFT_INTERNAL_IP,” as shown in Figure 10-62.

Figure 10-62. Modification 13
Modification 14: Comment the lines <protocol></protocol>, as shown in Figure 10-63.
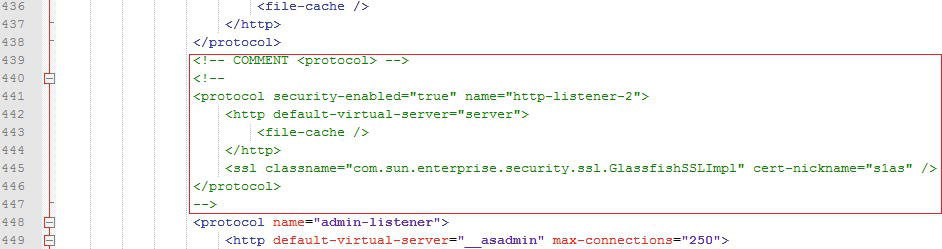
Figure 10-63. Modification 14
Modification 15: Replace “0.0.0.0” with “OPENSHIFT_INTERNAL_IP” and “${HTTP_LISTENER_PORT}” with “9999,” as shown in Figure 10-64.

Figure 10-64. Modification 15
Modification 16: Comment the lines <network-listener></network-listener>, as shown in Figure 10-65.

Figure 10-65. Modification 16
![]() Note The real environment variable is $OPENSHIFT_INTERNAL_IP. The string OPENSHIFT_INTERNAL_IP is just a placeholder, so you can use any other text.
Note The real environment variable is $OPENSHIFT_INTERNAL_IP. The string OPENSHIFT_INTERNAL_IP is just a placeholder, so you can use any other text.
After all the modifications are performed, the domain.xml becomes what you see in Listing 10-4.
Listing 10-4. Modified domain.xml File
<!--

    DO NOT ALTER OR REMOVE COPYRIGHT NOTICES OR THIS HEADER.

    Copyright (c) 2010-2012 Oracle and/or its affiliates. All rights reserved.

    The contents of this file are subject to the terms of either the GNU
    General Public License Version 2 only ("GPL") or the Common Development
    and Distribution License("CDDL") (collectively, the "License").  You
    may not use this file except in compliance with the License.  You can
    obtain a copy of the License at
    https://glassfish.dev.java.net/public/CDDL+GPL_1_1.html
    or packager/legal/LICENSE.txt.  See the License for the specific
    language governing permissions and limitations under the License.

    When distributing the software, include this License Header Notice in each
    file and include the License file at packager/legal/LICENSE.txt.

    GPL Classpath Exception:
    Oracle designates this particular file as subject to the "Classpath"
    exception as provided by Oracle in the GPL Version 2 section of the License
    file that accompanied this code.

    Modifications:
    If applicable, add the following below the License Header, with the fields
    enclosed by brackets [] replaced by your own identifying information:
    "Portions Copyright [year] [name of copyright owner]"

    Contributor(s):
    If you wish your version of this file to be governed by only the CDDL or
    only the GPL Version 2, indicate your decision by adding "[Contributor]
    elects to include this software in this distribution under the [CDDL or GPL
    Version 2] license."  If you don't indicate a single choice of license, a
    recipient has the option to distribute your version of this file under
    either the CDDL, the GPL Version 2 or to extend the choice of license to
    its licensees as provided above.  However, if you add GPL Version 2 code
    and therefore, elected the GPL Version 2 license, then the option applies
    only if the new code is made subject to such option by the copyright
    holder.

-->

<?xml version="1.0" encoding="UTF-8"?>
<domain log-root="${com.sun.aas.instanceRoot}/logs" application-root="${com.sun.aas.instanceRoot}/applications" version="10.0">
  <system-applications />
  <applications />
  <resources>
    <jdbc-resource pool-name="__TimerPool" jndi-name="jdbc/__TimerPool" object-type="system-admin" />
    <jdbc-resource pool-name="DerbyPool" jndi-name="jdbc/__default" />
    <jdbc-connection-pool name="__TimerPool" datasource-classname="org.apache.derby.jdbc.EmbeddedXADataSource" res-type="javax.sql.XADataSource">
      <property value="${com.sun.aas.instanceRoot}/lib/databases/ejbtimer" name="databaseName" />
      <property value=";create=true" name="connectionAttributes" />
    </jdbc-connection-pool>
    <jdbc-connection-pool is-isolation-level-guaranteed="false" name="DerbyPool" datasource-classname="org.apache.derby.jdbc.ClientDataSource" res-type="javax.sql.DataSource">
      <property value="1527" name="PortNumber" />
      <property value="APP" name="Password" />
      <property value="APP" name="User" />
      <property value="OPENSHIFT_INTERNAL_IP" name="serverName" />
      <property value="sun-appserv-samples" name="DatabaseName" />
      <property value=";create=true" name="connectionAttributes" />
    </jdbc-connection-pool>
  </resources>
  <servers>
    <server name="server" config-ref="server-config">
      <resource-ref ref="jdbc/__TimerPool" />
      <resource-ref ref="jdbc/__default" />
    </server>
  </servers>
  <nodes>
    <node name="localhost-domain1" type="CONFIG" node-host="OPENSHIFT_INTERNAL_IP" install-dir="${com.sun.aas.productRoot}" />
  </nodes>
  <configs>
    <config name="server-config">
      <http-service>
        <access-log />
        <virtual-server id="server" network-listeners="http-listener-1" />
        <virtual-server id="__asadmin" network-listeners="admin-listener" />
      </http-service>
      <admin-service auth-realm-name="admin-realm" type="das-and-server" system-jmx-connector-name="system">
        <jmx-connector auth-realm-name="admin-realm" security-enabled="false" address="OPENSHIFT_INTERNAL_IP" port="7600" name="system" />
        <property value="/admin" name="adminConsoleContextRoot" />
        <property value="${com.sun.aas.installRoot}/lib/install/applications/admingui.war" name="adminConsoleDownloadLocation" />
        <property value="${com.sun.aas.installRoot}/.." name="ipsRoot" />
      </admin-service>
      <connector-service shutdown-timeout-in-seconds="30" />
      <web-container>
        <session-config>
          <session-manager>
            <manager-properties />
            <store-properties />
          </session-manager>
          <session-properties />
        </session-config>
      </web-container>
      <ejb-container steady-pool-size="0" max-pool-size="32" session-store="${com.sun.aas.instanceRoot}/session-store" pool-resize-quantity="8">
        <ejb-timer-service />
      </ejb-container>
      <mdb-container steady-pool-size="0" max-pool-size="32" pool-resize-quantity="8" />
      <jms-service type="EMBEDDED" default-jms-host="default_JMS_host">
        <jms-host name="default_JMS_host" host="OPENSHIFT_INTERNAL_IP" port="5445" admin-user-name="admin" admin-password="admin" lazy-init="true" />
      </jms-service>
      <security-service>
        <auth-realm classname="com.sun.enterprise.security.auth.realm.file.FileRealm" name="admin-realm">
          <property value="${com.sun.aas.instanceRoot}/config/admin-keyfile" name="file" />
          <property value="fileRealm" name="jaas-context" />
        </auth-realm>
        <auth-realm classname="com.sun.enterprise.security.auth.realm.file.FileRealm" name="file">
          <property value="${com.sun.aas.instanceRoot}/config/keyfile" name="file" />
          <property value="fileRealm" name="jaas-context" />
        </auth-realm>
        <auth-realm classname="com.sun.enterprise.security.auth.realm.certificate.CertificateRealm"name="certificate" />
        <jacc-provider policy-configuration-factory- provider="com.sun.enterprise.security.provider.PolicyConfigurationFactoryImpl" policy-provider="com.sun.enterprise.security.provider.PolicyWrapper" name="default">
          <property value="${com.sun.aas.instanceRoot}/generated/policy" name="repository" />
        </jacc-provider>
        <jacc-provider policy-configuration-factory-provider="com.sun.enterprise.security.jacc.provider.SimplePolicyConfigurationFactory" policy-provider="com.sun.enterprise.security.jacc.provider.SimplePolicyProvider" name="simple" />
        <audit-module classname="com.sun.enterprise.security.Audit" name="default">
          <property value="false" name="auditOn" />
        </audit-module>
        <message-security-config auth-layer="SOAP">
          <provider-config provider-id="XWS_ClientProvider" class-name="com.sun.xml.wss.provider.ClientSecurityAuthModule" provider-type="client">
            <request-policy auth-source="content" />
            <response-policy auth-source="content" />
            <property value="s1as" name="encryption.key.alias" />
            <property value="s1as" name="signature.key.alias" />
            <property value="false" name="dynamic.username.password" />
            <property value="false" name="debug" />
          </provider-config>
          <provider-config provider-id="ClientProvider" class-name="com.sun.xml.wss.provider.ClientSecurityAuthModule" provider-type="client">
            <request-policy auth-source="content" />
            <response-policy auth-source="content" />
            <property value="s1as" name="encryption.key.alias" />
            <property value="s1as" name="signature.key.alias" />
            <property value="false" name="dynamic.username.password" />
            <property value="false" name="debug" />
            <property value="${com.sun.aas.instanceRoot}/config/wss-server-config-1.0.xml"name="security.config" />
          </provider-config>
          <provider-config provider-id="XWS_ServerProvider" class-name="com.sun.xml.wss.provider.ServerSecurityAuthModule" provider-type="server">
            <request-policy auth-source="content" />
            <response-policy auth-source="content" />
            <property value="s1as" name="encryption.key.alias" />
            <property value="s1as" name="signature.key.alias" />
            <property value="false" name="debug" />
          </provider-config>
          <provider-config provider-id="ServerProvider" class-name="com.sun.xml.wss.provider.ServerSecurityAuthModule" provider-type="server">
            <request-policy auth-source="content" />
            <response-policy auth-source="content" />
            <property value="s1as" name="encryption.key.alias" />
            <property value="s1as" name="signature.key.alias" />
            <property value="false" name="debug" />
            <property value="${com.sun.aas.instanceRoot}/config/wss-server-config-1.0.xml"name="security.config" />
          </provider-config>
        </message-security-config>
        <message-security-config auth-layer="HttpServlet">
          <provider-config provider-type="server" provider-id="GFConsoleAuthModule" class-name="org.glassfish.admingui.common.security.AdminConsoleAuthModule">
            <request-policy auth-source="sender" />
            <response-policy />
            <property name="restAuthURL" value=" http://localhost:${ADMIN_LISTENER_PORT}/management/sessions " />
            <property name="loginPage" value="/login.jsf" />
            <property name="loginErrorPage" value="/loginError.jsf" />
          </provider-config>
        </message-security-config>
        <property value="SHA-256" name="default-digest-algorithm" />
      </security-service>
      <transaction-service tx-log-dir="${com.sun.aas.instanceRoot}/logs" />
      <java-config classpath-suffix="" system-classpath="" debug-options="-Xdebug -Xrunjdwp:transport=dt_socket,server=y,suspend=n,address=9009">
        <jvm-options>-XX:MaxPermSize=192m</jvm-options>
        <jvm-options>-XX:PermSize=64m</jvm-options>
        <jvm-options>-client</jvm-options>
        <jvm-options>-Djava.awt.headless=true</jvm-options>
        <jvm-options>-Djavax.management.builder.initial=com.sun.enterprise.v3.admin.AppServerMBeanServerBuilder</jvm-options>
        <jvm-options>-XX:+UnlockDiagnosticVMOptions</jvm-options>
        <jvm-options>-Djava.endorsed.dirs=${com.sun.aas.installRoot}/modules/endorsed${path.separator}${com.sun.aas.installRoot}/lib/endorsed</jvm-options>
        <jvm-options>-Djava.security.policy=${com.sun.aas.instanceRoot}/config/server.policy</jvm-options>
        <jvm-options>-Djava.security.auth.login.config=${com.sun.aas.instanceRoot}/config/login.conf</jvm-options>
        <jvm-options>-Dcom.sun.enterprise.security.httpsOutboundKeyAlias=s1as</jvm-options>
        <jvm-options>-Xmx512m</jvm-options>
        <jvm-options>-Djavax.net.ssl.keyStore=${com.sun.aas.instanceRoot}/config/keystore.jks</jvm-options>
        <jvm-options>-Djavax.net.ssl.trustStore=${com.sun.aas.instanceRoot}/config/cacerts.jks</jvm-options>
        <jvm-options>-Djava.ext.dirs=${com.sun.aas.javaRoot}/lib/ext${path.separator}${com.sun.aas.javaRoot}/jre/lib/ext${path.separator}${com.sun.aas.instanceRoot}/lib/ext</jvm-options>
        <jvm-options>-Djdbc.drivers=org.apache.derby.jdbc.ClientDriver</jvm-options>
        <jvm-options>-DANTLR_USE_DIRECT_CLASS_LOADING=true</jvm-options>
        <jvm-options>-Dcom.sun.enterprise.config.config_environment_factory_class=com.sun.enterprise.config.serverbeans.AppserverConfigEnvironmentFactory</jvm-options>
        <!-- Configuration of various third-party OSGi bundles like
             Felix Remote Shell, FileInstall, etc. -->
        <!-- Port on which remote shell listens for connections.-->
        <jvm-options>-Dosgi.shell.telnet.port=6666</jvm-options>
        <!-- How many concurrent users can connect to this remote shell -->
        <jvm-options>-Dosgi.shell.telnet.maxconn=1</jvm-options>
        <!-- From which hosts users can connect -->
        <jvm-options>-Dosgi.shell.telnet.ip=OPENSHIFT_INTERNAL_IP</jvm-options>
        <!-- Gogo shell configuration -->
        <jvm-options>-Dgosh.args=--nointeractive</jvm-options>
        <!-- Directory being watched by fileinstall. -->
        <jvm-options>-Dfelix.fileinstall.dir=${com.sun.aas.installRoot}/modules/autostart/</jvm-options>
        <!-- Time period fileinstaller thread in ms. -->
        <jvm-options>-Dfelix.fileinstall.poll=5000</jvm-options>
        <!-- log level: 1 for error, 2 for warning, 3 for info and 4 for debug. -->
        <jvm-options>-Dfelix.fileinstall.log.level=2</jvm-options>
        <!-- should new bundles be started or installed only?
             true => start, false => only install
        -->
        <jvm-options>-Dfelix.fileinstall.bundles.new.start=true</jvm-options>
        <!-- should watched bundles be started transiently or persistently -->
        <jvm-options>-Dfelix.fileinstall.bundles.startTransient=true</jvm-options>
        <!-- Should changes to configuration be saved in corresponding cfg file? false: no, true: yes
             If we don't set false, everytime server starts from clean osgi cache, the file gets rewritten.
        -->
        <jvm-options>-Dfelix.fileinstall.disableConfigSave=false</jvm-options>
        <!-- End of OSGi bundle configurations -->
        <jvm-options>-XX:NewRatio=2</jvm-options>
      </java-config>
      <network-config>
        <protocols>
          <protocol name="http-listener-1">
            <http default-virtual-server="server" max-connections="250">
              <file-cache enabled="false" />
            </http>
          </protocol>
          <protocol name="admin-listener">
            <http default-virtual-server="__asadmin" max-connections="250" encoded-slash-enabled="true">
              <file-cache enabled="false" />
            </http>
          </protocol>
        </protocols>
        <network-listeners>
          <network-listener address="OPENSHIFT_INTERNAL_IP" port="8080" protocol="http-listener-1" transport="tcp" name="http-listener-1" thread-pool="http-thread-pool" />
        </network-listeners>
        <transports>
          <transport name="tcp" />
        </transports>
      </network-config>
      <thread-pools>
        <thread-pool name="admin-thread-pool" max-thread-pool-size="50" max-queue-size="256" />
        <thread-pool name="http-thread-pool" max-queue-size="4096" />
        <thread-pool name="thread-pool-1" max-thread-pool-size="200" />
      </thread-pools>
    </config>
    <config name="default-config" dynamic-reconfiguration-enabled="true">
      <http-service>
        <access-log />
        <virtual-server id="server" network-listeners="http-listener-1">
          <property name="default-web-xml" value="${com.sun.aas.instanceRoot}/config/default-web.xml" />
        </virtual-server>
        <virtual-server id="__asadmin" network-listeners="admin-listener" />
      </http-service>
      <admin-service system-jmx-connector-name="system" type="server">
        <!-- JSR 160  "system-jmx-connector" -->
        <jmx-connector address="0.0.0.0" auth-realm-name="admin-realm" name="system" port="${JMX_SYSTEM_CONNECTOR_PORT}" protocol="rmi_jrmp" security-enabled="false" />
        <!-- JSR 160  "system-jmx-connector" -->
        <property value="${com.sun.aas.installRoot}/lib/install/applications/admingui.war"                                                             name="adminConsoleDownloadLocation" />
      </admin-service>
      <web-container>
        <session-config>
          <session-manager>
            <manager-properties />
            <store-properties />
          </session-manager>
          <session-properties />
        </session-config>
      </web-container>
      <ejb-container session-store="${com.sun.aas.instanceRoot}/session-store">
        <ejb-timer-service />
      </ejb-container>
      <mdb-container />
      <jms-service type="EMBEDDED" default-jms-host="default_JMS_host"
                                                                 addresslist-behavior="priority">
        <jms-host name="default_JMS_host" host="localhost" port="${JMS_PROVIDER_PORT}"
                               admin-user-name="admin" admin-password="admin" lazy-init="true" />
      </jms-service>
      <log-service log-rotation-limit-in-bytes="2000000"
                                          file="${com.sun.aas.instanceRoot}/logs/server.log">
        <module-log-levels />
      </log-service>
      <security-service>
        <auth-realm classname="com.sun.enterprise.security.auth.realm.file.FileRealm" name="admin-realm">
          <property name="file" value="${com.sun.aas.instanceRoot}/config/admin-keyfile" />
          <property name="jaas-context" value="fileRealm" />
        </auth-realm>
        <auth-realm classname="com.sun.enterprise.security.auth.realm.file.FileRealm" name="file">
          <property name="file" value="${com.sun.aas.instanceRoot}/config/keyfile" />
          <property name="jaas-context" value="fileRealm" />
        </auth-realm>
        <auth-realm classname="com.sun.enterprise.security.auth.realm.certificate.CertificateRealm" name="cetificate" />
        <jacc-provider policy-provider="com.sun.enterprise.security.provider.PolicyWrapper" name="default" policy-configuration-factory-provider="com.sun.enterprise.security.provider.PolicyConfigurationFactoryImpl">
          <property name="repository" value="${com.sun.aas.instanceRoot}/generated/policy" />
        </jacc-provider>
        <jacc-provider policy-provider="com.sun.enterprise.security.jacc.provider.SimplePolicyProvider" name="simple" policy-configuration-factory-provider="com.sun.enterprise.security.jacc.provider.SimplePolicyConfigurationFactory" />
        <audit-module classname="com.sun.enterprise.security.Audit" name="default">
          <property name="auditOn" value="false" />
        </audit-module>
        <message-security-config auth-layer="SOAP">
          <provider-config provider-type="client" provider-id="XWS_ClientProvider"
                                class-name="com.sun.xml.wss.provider.ClientSecurityAuthModule">
            <request-policy auth-source="content" />
            <response-policy auth-source="content" />
            <property name="encryption.key.alias" value="s1as" />
            <property name="signature.key.alias" value="s1as" />
            <property name="dynamic.username.password" value="false" />
            <property name="debug" value="false" />
          </provider-config>
          <provider-config provider-type="client" provider-id="ClientProvider"
                              class-name="com.sun.xml.wss.provider.ClientSecurityAuthModule">
            <request-policy auth-source="content" />
            <response-policy auth-source="content" />
            <property name="encryption.key.alias" value="s1as" />
            <property name="signature.key.alias" value="s1as" />
            <property name="dynamic.username.password" value="false" />
            <property name="debug" value="false" />
            <property name="security.config"
                     value="${com.sun.aas.instanceRoot}/config/wss-server-config-1.0.xml" />
          </provider-config>
          <provider-config provider-type="server" provider-id="XWS_ServerProvider"
                              class-name="com.sun.xml.wss.provider.ServerSecurityAuthModule">
            <request-policy auth-source="content" />
            <response-policy auth-source="content" />
            <property name="encryption.key.alias" value="s1as" />
            <property name="signature.key.alias" value="s1as" />
            <property name="debug" value="false" />
          </provider-config>
          <provider-config provider-type="server" provider-id="ServerProvider"
                              class-name="com.sun.xml.wss.provider.ServerSecurityAuthModule">
            <request-policy auth-source="content" />
            <response-policy auth-source="content" />
            <property name="encryption.key.alias" value="s1as" />
            <property name="signature.key.alias" value="s1as" />
            <property name="debug" value="false" />
            <property name="security.config"
                     value="${com.sun.aas.instanceRoot}/config/wss-server-config-1.0.xml" />
          </provider-config>
        </message-security-config>
      </security-service>
      <transaction-service tx-log-dir="${com.sun.aas.instanceRoot}/logs" automatic-recovery="true" />
      <diagnostic-service />
      <java-config debug-options="-Xdebug -Xrunjdwp:transport=dt_socket,server=y,suspend=n,
                         address=${JAVA_DEBUGGER_PORT}" system-classpath="" classpath-suffix="">
        <jvm-options>-XX:MaxPermSize=192m</jvm-options>
        <jvm-options>-XX:PermSize=64m</jvm-options>
        <jvm-options>-server</jvm-options>
        <jvm-options>-Djava.awt.headless=true</jvm-options>
        <jvm-options>-XX:+UnlockDiagnosticVMOptions</jvm-options>
        <jvm-options>-Djava.endorsed.dirs=${com.sun.aas.installRoot}/modules/endorsed${path.separator}${com.sun.aas.installRoot}/lib/endorsed</jvm-options>
        <jvm-options>-
             Djava.security.policy=${com.sun.aas.instanceRoot}/config/server.policy</jvm-options>
        <jvm-options>-Djava.security.auth.login.config=${com.sun.aas.instanceRoot}/config/                                                                        login.conf</jvm-options>
        <jvm-options>-Dcom.sun.enterprise.security.httpsOutboundKeyAlias=s1as</jvm-options>
        <jvm-options>-Djavax.net.ssl.keyStore=${com.sun.aas.instanceRoot}/config/keystore.jks</jvm-options>
        <jvm-options>-Djavax.net.ssl.trustStore=${com.sun.aas.instanceRoot}/config/cacerts.jks</jvm-options>
        <jvm-options>- Djava.ext.dirs=${com.sun.aas.javaRoot}/lib/ext${path.separator}${com.sun.aas.javaRoot}/jre/lib/ext${path.separator}${com.sun.aas.instanceRoot}/lib/ext</jvm-options>
        <jvm-options>-Djdbc.drivers=org.apache.derby.jdbc.ClientDriver</jvm-options>
        <jvm-options>-DANTLR_USE_DIRECT_CLASS_LOADING=true</jvm-options>
        <jvm-options>-Dcom.sun.enterprise.config.config_environment_factory_class=com.sun.enterprise.config.serverbeans.AppserverConfigEnvironmentFactory</jvm-options>
        <jvm-options>-XX:NewRatio=2</jvm-options>
        <jvm-options>-Xmx512m</jvm-options>
        <!-- Port on which remote shell listens for connections.-->
        <jvm-options>-Dosgi.shell.telnet.port=${OSGI_SHELL_TELNET_PORT}</jvm-options>
        <!-- How many concurrent users can connect to this remote shell -->
        <jvm-options>-Dosgi.shell.telnet.maxconn=1</jvm-options>
        <!-- From which hosts users can connect -->
        <jvm-options>-Dosgi.shell.telnet.ip=OPENSHIFT_INTERNAL_IP</jvm-options>
        <!-- Gogo shell configuration -->
        <jvm-options>-Dgosh.args=--noshutdown -c noop=true</jvm-options>
        <!-- Directory being watched by fileinstall. -->
        <jvm-options>-Dfelix.fileinstall.dir=${com.sun.aas.installRoot}/modules/autostart/</jvm-options>
        <!-- Time period fileinstaller thread in ms. -->
        <jvm-options>-Dfelix.fileinstall.poll=5000</jvm-options>
        <!-- log level: 1 for error, 2 for warning, 3 for info and 4 for debug. -->
        <jvm-options>-Dfelix.fileinstall.log.level=3</jvm-options>
        <!-- should new bundles be started or installed only?
                 true => start, false => only install
             -->
        <jvm-options>-Dfelix.fileinstall.bundles.new.start=true</jvm-options>
        <!-- should watched bundles be started transiently or persistently -->
        <jvm-options>-Dfelix.fileinstall.bundles.startTransient=true</jvm-options>
        <!-- Should changes to configuration be saved in corresponding cfg file? false: no, true: yes
                  If we don't set false, everytime server starts from clean osgi cache, the file gets rewritten.
             -->
        <jvm-options>-Dfelix.fileinstall.disableConfigSave=false</jvm-options>
        <!-- End of OSGi bundle configurations -->
      </java-config>
      <availability-service>
        <web-container-availability />
        <ejb-container-availability sfsb-store-pool-name="jdbc/hastore" />
        <jms-availability />
      </availability-service>
      <network-config>
        <protocols>
          <protocol name="http-listener-1">
            <http default-virtual-server="server">
              <file-cache />
            </http>
          </protocol>
          <protocol name="admin-listener">
            <http default-virtual-server="__asadmin" max-connections="250">
              <file-cache enabled="false" />
            </http>
          </protocol>
          <protocol security-enabled="true" name="sec-admin-listener">
            <http default-virtual-server="__asadmin" encoded-slash-enabled="true">
              <file-cache />
            </http>
            <ssl client-auth="want" classname="com.sun.enterprise.security.ssl.GlassfishSSLImpl"                                                              cert-nickname="glassfish-instance" />
          </protocol>
          <protocol name="admin-http-redirect">
            <http-redirect secure="true" />
          </protocol>
          <protocol name="pu-protocol">
            <port-unification>
              <protocol-finder protocol="sec-admin-listener" name="http-finder"                                           classname="com.sun.grizzly.config.HttpProtocolFinder" />
              <protocol-finder protocol="admin-http-redirect" name="admin-http-redirect"                                           classname="com.sun.grizzly.config.HttpProtocolFinder" />
            </port-unification>
          </protocol>
        </protocols>
        <network-listeners>
          <network-listener address="OPENSHIFT_INTERNAL_IP" port="9999" protocol="http-listener-1"
                          transport="tcp" name="http-listener-1" thread-pool="http-thread-pool" />
        </network-listeners>
        <transports>
          <transport name="tcp" />
        </transports>
      </network-config>
      <thread-pools>
        <thread-pool name="http-thread-pool" />
        <thread-pool max-thread-pool-size="200" idle-thread-timeout-in-seconds="120"                                                                            name="thread-pool-1" />
      </thread-pools>
      <group-management-service />
      <management-rules />
      <system-property name="ASADMIN_LISTENER_PORT" value="24848" />
      <system-property name="HTTP_LISTENER_PORT" value="28080" />
      <system-property name="HTTP_SSL_LISTENER_PORT" value="28181" />
      <system-property name="JMS_PROVIDER_PORT" value="27676" />
      <system-property name="IIOP_LISTENER_PORT" value="23700" />
      <system-property name="IIOP_SSL_LISTENER_PORT" value="23820" />
      <system-property name="IIOP_SSL_MUTUALAUTH_PORT" value="23920" />
      <system-property name="JMX_SYSTEM_CONNECTOR_PORT" value="28686" />
      <system-property name="OSGI_SHELL_TELNET_PORT" value="26666" />
      <system-property name="JAVA_DEBUGGER_PORT" value="29009" />
    </config>
  </configs>
  <property name="administrative.domain.name" value="domain1" />
  <secure-admin special-admin-indicator="3047aff3-3214-4ac9-aa5e-a5dad78b2eea">
    <secure-admin-principal dn="CN=localhost,OU=GlassFish,O=Oracle Corporation,L=Santa Clara,ST=California,C=US" />
    <secure-admin-principal dn="CN=localhost-instance,OU=GlassFish,O=Oracle Corporation,L=Santa Clara,ST=California,C=US" />
  </secure-admin>
</domain>
Done! GlassFish is prepared and you can go on to the next step.
Step 2: Create the DIY application stub. It’s time to create the OpenShift default DIY application:
- Create an empty folder on local disk D: and name it GlassFishAS.
- Open a shell and navigate to the GlassFishAS folder.
- Type the command rhc app create -a RafaEShop -t diy-0.1, as shown in Figure 10-66.

Figure 10-66. Creating the default DIY application
Just for a quick check, sign in to the OpenShift web site and locate the application link in your management console (Figure 10-67).

Figure 10-67. Application links listed in the management console
![]() Note Before going further, take your time and read the D:/GlassFishAS/RafaEShop/README.txt file. This file describes the application folders and some environment variables.
Note Before going further, take your time and read the D:/GlassFishAS/RafaEShop/README.txt file. This file describes the application folders and some environment variables.
Step 3: Copy the GlassFish files. Now copy the GlassFish files into the D:/GlassFishAS/RafaEShop/diy folder, as shown in Figure 10-68.
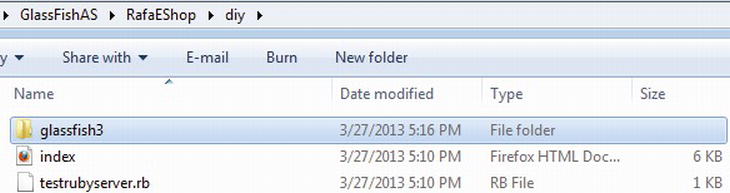
Figure 10-68. Copying GlassFish files
Step 4: Modify the start and stop action hooks (you should be familiar with these files from the README.txt file).
You need to adjust the start file before starting the GlassFish server. Locate the file D:/GlassFishAS/RafaEShop/.openshift/action_hooks/start and append to its code the following lines. These modifications are indicated by the OpenShift Blog at https://www.openshift.com/blogs:
cd $OPENSHIFT_REPO_DIR/diy/glassfish3/glassfish/domains/domain1/config/
mv domain.xml domain.xml_2
sed 's/'$( grep serverName domain.xml_2 | cut -d" -f 2 )'/'$OPENSHIFT_INTERNAL_IP'/g' domain.xml_2 > domain.xml
../../../bin/asadmin start-domain &> $OPENSHIFT_DIY_LOG_DIR/server.log
The start file should look like what you see in Figure 10-69.

Figure 10-69. Modifying the start file
GlassFish is stopped according to the D:/GlassFishAS/RafaEShop/.openshift/action_hooks/stop file. The default contents of this file should be replaced with the following lines. These modifications are indicated by the OpenShift Blog at https://www.openshift.com/blogs:
#!/bin/bash
# The logic to stop your application should be put in this script.
kill `ps -ef | grep glassfish3 | grep -v grep | awk '{ print $2 }'` > /dev/null 2>&1
exit 0
Now it should look like what you see in Figure 10-70.

Figure 10-70. Modifying the stop file
Step 5: Add the MongoDB NoSQL Database 2.2 cartridge, as you saw earlier in Figure 10-27. In the first part of this chapter, you saw how to add the MongoDB cartridge. The process is exactly the same, so type the command rhc cartridge add -a RafaEShop -c mongodb-2.2 in the shell, as shown in Figure 10-71.

Figure 10-71. Adding the MongoDB cartridge
Step 6: Add the RockMongo 1.1 cartridge, as you saw earlier in Figure 10-30.
It can be useful to add the RockMongo administration tool for managing MongoDB databases using a visual approach. Use the following command to add RockMongo, as shown in Figure 10-72:
rhc cartridge add -a RafaEShop -c rockmongo-1.1

Figure 10-72. Adding the RockMongo cartridge
Step 7: Adjust the persistence.xml settings. Locate the persistence.xml file in the RafaEShop application. You need to modify these file settings to work with the new MongoDB database; I recommend you make a copy of it before modifying it. At this point, the persistence.xml file should have the contents shown in Listing 10-5.
Listing 10-5. Modified persistence.xml File
<?xml version="1.0" encoding="UTF-8"?>
<persistence version="2.0" xmlns=" http://java.sun.com/xml/ns/persistence "
xmlns:xsi=" http://www.w3.org/2001/XMLSchema-instance "
xsi:schemaLocation=" http://java.sun.com/xml/ns/persistence
http://java.sun.com/xml/ns/persistence/persistence_2_0.xsd ">
    <persistence-unit name="HOGM_eSHOP-ejbPU" transaction-type="JTA">
        <provider>org.hibernate.ogm.jpa.HibernateOgmPersistence</provider>
        <class>eshop.entities.Categories</class>
        <class>eshop.entities.Customers</class>
        <class>eshop.entities.Inventory</class>
        <class>eshop.entities.Orders</class>
        <class>eshop.entities.Products</class>
    <properties>
        <property name="hibernate.search.default.directory_provider"
                  value="filesystem"/>
        <property name="hibernate.search.default.indexBase" value="D:/eshop"/>
        <property name="hibernate.search.default.locking_strategy"
                  value="single"/>
        <property name="hibernate.transaction.jta.platform"
                  value="org.hibernate.service.jta.platform.
                                                 internal.SunOneJtaPlatform"/>
        <property name="hibernate.ogm.datastore.provider" value="mongodb"/>
        <property name="hibernate.ogm.datastore.grid_dialect"
                  value="org.hibernate.ogm.dialect.mongodb.MongoDBDialect"/>
        <property name="hibernate.ogm.mongodb.database" value="eshop_db"/>
        <property name="hibernate.ogm.mongodb.host" value="127.0.0.1"/>
        <property name="hibernate.ogm.mongodb.port" value="27017"/>
    </properties>
</persistence-unit>
</persistence>
You have to adjust several settings, as shown in the following set of instructions.
Apache Lucene indexes are stored in the file system (in the D:/eshop folder). You need to modify this folder path (base folder) with a valid cloud folder path. As a simpler option, you can use a memory-based directory by replacing the following code:
<property name="hibernate.search.default.directory_provider" value="filesystem"/>
<property name="hibernate.search.default.indexBase" value="D:/eshop"/>
<property name="hibernate.search.default.locking_strategy"
value="single"/>
with this code:
<property name="hibernate.search.default.directory_provider"
          value="ram"/>
<property name="hibernate.search.default.locking_strategy"
          value="single"/>
Set the MongoDB database name, host, port, user, and password. To do so, replace the following snippet of code:
<property name="hibernate.ogm.mongodb.database" value="eshop_db"/>
<property name="hibernate.ogm.mongodb.host" value="127.0.0.1"/>
<property name="hibernate.ogm.mongodb.port" value="27017"/>
with this code:
<property name="hibernate.ogm.mongodb.database" value="RafaEShop"/>
<property name="hibernate.ogm.mongodb.host" value="127.9.57.129"/>
<property name="hibernate.ogm.mongodb.port" value="27017"/>
<property name="hibernate.ogm.mongodb.username" value="admin"/>
<property name="hibernate.ogm.mongodb.password" value="YhH7s7eLYrR4"/>
The “new” persistence.xml should be the following:
<?xml version="1.0" encoding="UTF-8"?>
<persistence version="2.0" xmlns=" http://java.sun.com/xml/ns/persistence "
xmlns:xsi=" http://www.w3.org/2001/XMLSchema-instance "
xsi:schemaLocation=" http://java.sun.com/xml/ns/persistence
http://java.sun.com/xml/ns/persistence/persistence_2_0.xsd ">
    <persistence-unit name="HOGM_eSHOP-ejbPU" transaction-type="JTA">
        <provider>org.hibernate.ogm.jpa.HibernateOgmPersistence</provider>
        <class>eshop.entities.Categories</class>
        <class>eshop.entities.Customers</class>
        <class>eshop.entities.Inventory</class>
        <class>eshop.entities.Orders</class>
        <class>eshop.entities.Products</class>
    <properties>
        <property name="hibernate.search.default.directory_provider"
                  value="ram"/>
        <property name="hibernate.search.default.locking_strategy"
                  value="single"/>
        <property name="hibernate.transaction.jta.platform"
                  value="org.hibernate.service.jta.platform.
                                              internal.SunOneJtaPlatform"/>
        <property name="hibernate.ogm.datastore.provider" value="mongodb"/>
        <property name="hibernate.ogm.datastore.grid_dialect"
                  value="org.hibernate.ogm.dialect.mongodb.MongoDBDialect"/>
        <property name="hibernate.ogm.mongodb.database" value="RafaEShop"/>
        <property name="hibernate.ogm.mongodb.host" value="127.9.57.129"/>
        <property name="hibernate.ogm.mongodb.port" value="27017"/>
        <property name="hibernate.ogm.mongodb.username" value="admin"/>
        <property name="hibernate.ogm.mongodb.password" value="YhH7s7eLYrR4"/>
    </properties>
</persistence-unit>
</persistence>
Step 8: Add the RafaEShop WAR in GlassFish. Locate the RafaEShop application WAR in your local project RafaEShop/dist folder or in the Apress repository in the RafaEShop/dist folder.
Copy this WAR to the D:/GlassFishAS/RafaEShop/diy/glassfish3/glassfish/domains/domain1/autodeploy folder (see Figure 10-73). Finally, override the persistence.xml file in the RafaEShop WAR archive. You can use any archive tool, such as WinRAR.
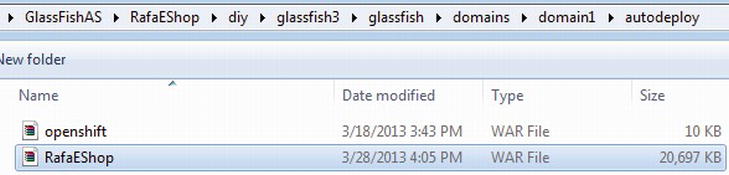
Figure 10-73. Copying the RafaEShop WAR
Notice that in this folder, besides your WAR, there’s another WAR named openshift. This is the default application generated by OpenShift when you used the DIY cartridge.
You have completed the final step. You can now upload the application to the OpenShift platform. However, before committing the changes it’s a good idea to open a separate process for monitoring the GlassFish AS start/stop status.
Monitoring GlassFish Start/Stop
If you read the first part of this chapter, you are already familiar with connections made using a secure shell session and how to open such a connection from your computer. You can now open an SSH session to monitor the GlassFish AS start/stop status in real-time using the following command, as shown in Figure 10-74:
ssh [email protected].

Figure 10-74. Monitoring the GlassFish start/stop status
Next, type the tail_all command. This command will tail all available logs for the current application, including the server start/stop status. Most probably, at this point you’ll see some errors or notices from the RockoMongo log. Ignore them for now and leave this process open.
Commit Changes
Each time you commit changes to your application, OpenShift will automatically stop GlassFish AS, commit the changes, and start GlassFish AS again. Open a new shell, navigate to the D:/GlassFishAS/RafaEShop folder, and type the following three commands:
git add .
git commit -m "first commit"
git push
Because this is the first commit, it will take some time until everything is pushed to the application.
At the end of the commit, GlassFish is started and, in the shell that’s monitoring this action, you should see something like what’s shown in Figure 10-75.
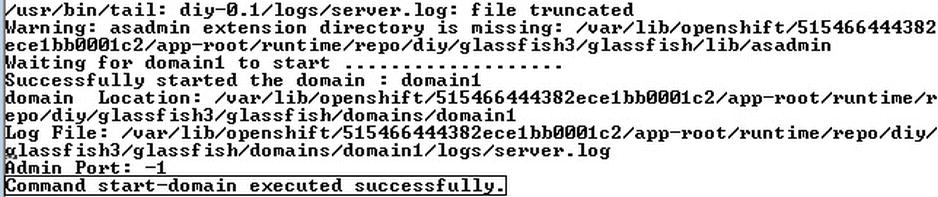
Figure 10-75. GlassFish domain was successfully started
Obviously, this is exactly the message we expected. If you see this message, jump directly to the section “Monitoring the GlassFish Log.” If not, you have a problem, perhaps the one described next.
Fixing Known Issues
Sometimes, instead of success you’ll get a message stating “Permission denied !” (see Figure 10-76).

Figure 10-76. Permission denied
To fix this problem, you need to grant yourself certain permissions to application files and directories. Open a new SSH session (don’t close the one monitoring the GlassFish start/stop status) and type the following chmod commands (also shown in Figure 10-77).
chmod +x app-root/runtime/repo/diy/glassfish3/bin/*
chmod +x diy-0.1/repo/diy/glassfish3/glassfish/bin/*
chmod +x diy-0.1/runtime/repo/.openshift/action_hooks/*

Figure 10-77. Grant permission to application files
Start the application again by typing the command ctl_app start (see Figure 10-78).
![]()
Figure 10-78. Starting the application from the shell
![]() Note To stop the application, type ctl_app stop. To restart the application, type ctl_app restart. More details about these commands (and others) can be obtained by typing the help command.
Note To stop the application, type ctl_app stop. To restart the application, type ctl_app restart. More details about these commands (and others) can be obtained by typing the help command.
This time, in the shell that monitors the GlassFish domain start/stop status, you should see a success message like the one in Figure 10-75.
Monitoring the GlassFish Log
When the GlassFish domain successfully starts, you can see the location and name of the GlassFish log file, as in Figure 10-79 (this was extracted from Figure 10-75).
![]()
Figure 10-79. Locating the GlassFish AS log file
The contents of server.log can be listed in a shell (you need to be patient until the application is deployed). Open a new SSH session and type the following command, which is also shown in Figure 10-80:
tail app-root/rutime/repo/diy/glassfish3/glassfish/domains/domain1/logs/server.log

Figure 10-80. Listing the contents of the GlassFish AS log file
Based on this log content, you can easily debug your application.
In Figure 10-80, the log message indicates that the application RafaEShop was successfully deployed. Now you can close all the shells and enjoy the application.
Test It!
Since you’ve gotten this far, you’ve probably successfully deployed the application in at least one of the three presented approaches. No matter which approach you selected, the test can be performed is the same manner. If you tried all three approaches, your OpenShift management console should look like the one in Figure 10-81.

Figure 10-81. All the application links listed in the management console
![]() Note I’m going to present the steps for testing the RafaEShopW application deployed as a WAR on GlassFish AS 3. You can easily adapt these steps for the other two approaches.
Note I’m going to present the steps for testing the RafaEShopW application deployed as a WAR on GlassFish AS 3. You can easily adapt these steps for the other two approaches.
Because this is the first time you’re running the application, you need to populate the MongoDB e-commerce database. As you know, this can be done from the db.xhml administration page. The link to this is http://rafaeshopw-hogm.rhcloud.com/RafaEShop/faces/db.xhtml.
After populating the database, you can access the e-shop at http://rafaeshopw-hogm.rhcloud.com/RafaEShop/faces/index.xhtml (see Figure 10-82).

Figure 10-82. Running the RafaEShopW application
Cautions
In case you need to repopulate the MongoDB database (from the db.xhtml administration page), DO NOT FORGET to drop the existing collections. You can do this easily from the RockMongo interface by pressing the Drop All button, as shown in Figure 10-83.

Figure 10-83. Dropping database collections from the RockMongo interface
Then restart the server. You can use either the ctl_app restart command or the management console, as shown in Figure 10-84.

Figure 10-84. Restarting the application
Restarting the server will reset the Lucene indexes (since they are stored in RAM), which means that you also need to drop the database collections and repopulate the database from the db.xhml administration page.
Trying to populate the MongoDB database without using the db.xhtml administration page will cause errors. Because the application isn’t capable of indexing an existing database, the Lucene indexes will not be updated.
Don’t worry that initially the orders_c collection is missing. This will be created when the first purchase order is submitted.
Good To Know
OpenShift allows you to remotely connect to available services using port forwarding (generally speaking, this technique lets you connect remote computers to services within a private local area network). This can be done using the rhc command rhc port-forward -a RafaEShopW, as shown in Figure 10-85.
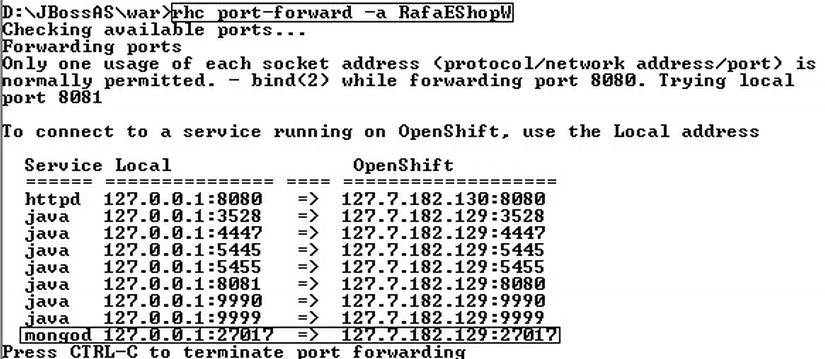
Figure 10-85. Port forwarding
In Figure 10-85, you can see the available ports for the RafaEShopW application. Notice that the mongod server is also listed.
Disclaimer
When this book was written, the applications I discussed were available online. I can’t guarantee that when you read this book, OpenShift will make these applications available (if the applications don’t have much traffic, OpenShift might shut down the servers).
Summary
In this final chapter, you saw how to migrate the RafaEShop application to the OpenShift PaaS. The chapter began with several introductory tasks, such as creating an account on OpenShift, activating and signing into this account, and becoming familiar with OpenShift web interface. Further, you saw how to deploy RafaEShop as a WAR and as an Apache Maven project on JBoss AS 7 running in the cloud. In the second part of this chapter, you configured a GlassFish AS 3 domain for running in OpenShift, and you deployed the RafaEShop application on this domain.