
![]()
Getting Started with Hibernate OGM
Chances are, you’re familiar with Hibernate ORM, a powerful, robust tool for converting data between relational databases (RDBMS) and object-oriented programming languages. As an object-relational mapping (ORM) framework, Hibernate ORM works with SQL stores. In recent years, however, developers have become interested in NoSQL databases, which are optimized for storing and retrieving enormous quantities of data. NoSQL databases tend to be non-relational, open-source, horizontally scalable, distributed, and schema-free.
There are a number of ways to describe NoSQL stores, but they are generally classified by data model, particularly the following:
- Document stores (Mongo DB, RavenDB, CouchDB and more)
- Wide column stores (Hypertable, Cassandra, HBase and more)
- Key value/tuple stores (DynamoDB, LevelDB, Redis, Ryak and more)
- Graph databases (Neo4J, GraphBase, InfoGrid and more)
These are also common:
- Multimodel databases (OrientDB, ArangoDB and more)
- Object databases (db4o, Versant and more)
- Grid and cloud databases (GigaSpaces, Infinispan and more)
- XML databases (eXist, Sedna and more)
Clearly, NoSQL stores are complex and very diverse. Some have significant user bases, while others are barely known. And each has its own strong points and weaknesses. You could even say that NoSQL is such a keenly disputed topic that programmers talk about it more than they actually use it.
That’s likely to change, however, with the recent release of the Hibernate OGM (Object Grid Mapper) project, which offers a complete Java Persistence API (JPA) engine for storing data in NoSQL stores. This project gives a real boost to Java developers looking to exploit NoSQL stores, since it provides a common interface—the well-known JPA programming model—as a front end to various NoSQL approaches. Hibernate OGM is based on the Hibernate ORM Core engine, reuses the Java Persistence Query Language (JP-QL) as an interface for querying stored data, and already provides support for three NoSQL stores: MongoDB, Ehcache, and Infinispan, and Apache Cassandra should see support in the future. Despite the youth of the project, the aims of the Hibernate OGM team guarantee it has huge potential in the future—and a lot of work to accomplish.
Features and Expectations
As this book is written, the latest Hibernate OGM distribution is 4.0.0 Beta2, which already successfully provides a common interface for different NoSQL approaches; rapid scaling of a data store up or down; independence from the underlying store technology; and Hibernate Search. Here’s what Hibernate OGM supports so far:
- Storing data in document stores (MongoDB)
- storing data in key/value stores (Infinispan's data grid and Ehcache)
- Create, Read, Update and Delete (CRUD) operations for JPA entities
- Polymorphic entities (support for superclasses, subclasses, and so forth)
- Embeddable objects (for example, embeddable classes, annotated in JPA with @Embeddable; collections of instances of embeddable classes, annotated in JPA with @ElementCollection)
- Basic types (such as numbers, String, URL, Date, enums)
- Associations (@ManyToOne, @OneToOne, @OneToMany and @ManyToMany)
- Bidirectional associations
- Collections (Set, List, Map, etc)
- Hibernate Search's full-text queries
- JPA and native Hibernate ORM API (Hibernate OGM can be bootstrapped via JPA or via Hibernate Session, as I’ll show you in Chapter 3.)
In the future, Hibernate OGM will support:
- Other key/value pair systems
- Other NoSQL engines
- Declarative denormalization
- Complex JP-QL queries, including to-many joins and aggregation
- Fronting existing JPA applications
![]() Note Denormalization is a database technique for speeding up the read process. The idea is to reduce the number of joins in queries as much as possible; joins slow read performance because data must be picked up from multiple tables without disrupting their associations. While normalization promotes splitting related data into multiple associated tables, denormalization encourages adding a small number of redundancies to limit joins. Even if some data gets duplicated, performance generally improves.
Note Denormalization is a database technique for speeding up the read process. The idea is to reduce the number of joins in queries as much as possible; joins slow read performance because data must be picked up from multiple tables without disrupting their associations. While normalization promotes splitting related data into multiple associated tables, denormalization encourages adding a small number of redundancies to limit joins. Even if some data gets duplicated, performance generally improves.
Because Hibernate OGM uses the existing Hibernate ORM modules as much as possible, the OGM architecture essentially extends the ORM architecture by plugging different components in and out. Hibernate ORM converts and persists data between relational databases and object-oriented programming languages using a set of interfaces and classes. These include the JDBC layer, used for connecting to databases and sending queries, and the Persisters and Loaders interfaces, responsible for persisting and loading entities and collections, as shown in Figure 1-1.

Figure 1-1. Hibernate ORM Architecture
Hibernate OGM is meant to accomplish the same goals, but using NoSQL stores. Thus, Hibernate OGM doesn't need the JDBC layer anymore and instead comes with two new elements: a datastore provider and a datastore dialect, as shown in Figure 1-2. Both of these act as adaptors between Hibernate OGM Core and the NoSQL store. (A datastore is an adaptor that connects the core mapping engine with the specific NoSQL technology.)

Figure 1-2. Hibernate OGM datastore provider and datastore dialect
The datastore provider is responsible for managing connections to NoSQL stores, while the datastore dialect manages communications with NoSQL storage engines. Practically, these notions are materialized in two interfaces, org.hibernate.ogm.datastore.spi.DatastoreProvider and org.hibernate.ogm.dialect.GridDialect. The DatastoreProvider interface is responsible for starting, maintaining, and stopping a store connection, while the GridDialect interface deals with data persistence in NoSQL stores. Moreover, the Persisters and Loaders interfaces were rewritten to support NoSQL store features.
Currently there are four implementations of DatastoreProvider:
- EhcacheDatastoreProvider (for NoSQL Encache)
- InfinispanDatastoreProvider (for NoSQL Infinispan)
- MongoDBDatastoreProvider (for NoSQL MongoDB)
- MapDatastoreProvider (for testing purposes)
There are five implementations of GridDialect for abstracting Hibernate OGM from a particular grid implementation:
- EhcacheDialect (for EhCache)
- InfinispanDialect (for Infinispan)
- MongoDBDialect (for MongoDB)
- HashMapDialect (for testing)
- GridDialectLogger (for logging calls performed on the real dialect)
![]() Note If you decide to write a new datastore, you have to implement a DatastoreProvider and a GridDialect. Find more details about this at https://community.jboss.org/wiki/HowToWriteADatastoreInHibernateOGM.
Note If you decide to write a new datastore, you have to implement a DatastoreProvider and a GridDialect. Find more details about this at https://community.jboss.org/wiki/HowToWriteADatastoreInHibernateOGM.
Persisting Data
Through the modified Loaders and Persisters interfaces, Hibernate OGM is capable of saving data to NoSQL stores. Before doing so, however, OGM needs to represent and store the data internally. For this purpose, Hibernate OGM retains as much as it can of the relational database concepts, and adapts these notions according to its needs. Some concepts, like storing entities, follow the relational model fairly completely, while others, like storing associations, do so partially. Data, therefore, is stored as basic types (entities are stored as tuples); the notions of primary key and foreign key are still employed; and the application data model and the store data model relationships are abstractly maintained through notions like table and column.
OGM uses the tuple to represent the basic unit of data. Tuples are meant to conceptually store entities as a Map<String, Object>. The key is the column name (the entity property/field or the @Column annotation value) and the value is the column value as a primitive type (see Figure 1-3).
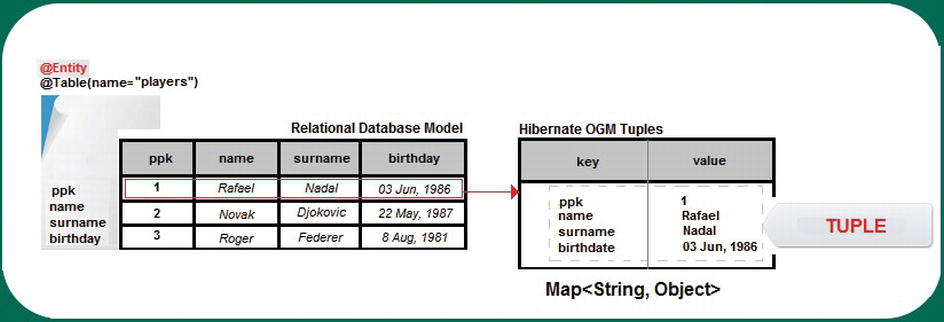
Figure 1-3. The Hibernate OGM tuple
Each tuple, representing an entity instance, is stored in a specific key. An entity instance is identified with a specific key lookup composed of the table name, the primary key column name(s), and the primary key column value(s). See Figure 1-4.
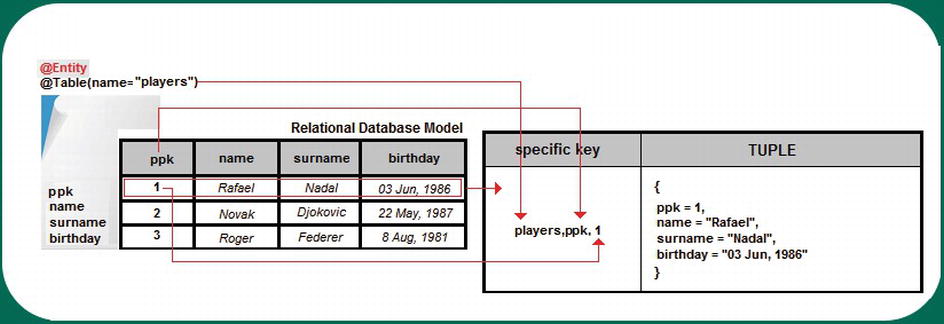
Figure 1-4. Hibernate OGM storing an entity instance
![]() Note Java collections are represented as a list of tuples. The specific key is composed of the name of the table containing the collection, and column names and column values representing the foreign key.
Note Java collections are represented as a list of tuples. The specific key is composed of the name of the table containing the collection, and column names and column values representing the foreign key.
Figure 1-5 shows the relational database model of a many-to-many association.
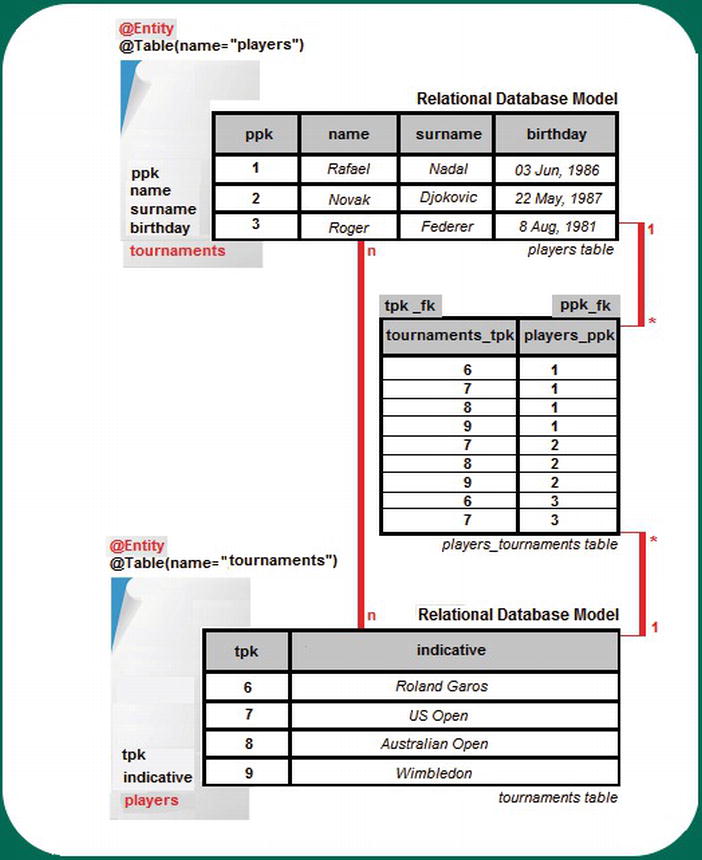
Figure 1-5. Relational database model of a many-to-many association
Associations in Hibernate OGM, in contrast, are stored as sets of tuples of type Map<String, Object>. For example, for a many-to-many association, each tuple stores a pair of foreign keys. Hibernate OGM stores the information necessary to navigate from an entity to its associations in a specific key composed of the table name and the column name(s) and value(s) representing the foreign key to the entity we come from. This @ManyToMany association is stored internally by Hibernate OGM as shown in Figure 1-6. (You can see the association tuples starting with row 8.) This approach fosters reachable data via key lookups, but it has disadvantages: that data may be redundant since the information has to be stored for both sides of the association.

Figure 1-6. Hibernate OGM data grid of a many-to-many relationship
Hibernate OGM stores JPA entities as tuples instead of serializable blobs. This is much closer to the relational model. There are a few disadvantages in serializing entities:
- Entities that are in associations with other entities must be also be stored, very possibly resulting in a big graph.
- It’s hard to guarantee object identity or even consistency among duplicated objects.
- It’s hard to add or remove a property or include a superclass and deal with deserialization issues.
![]() Note Hibernate OGM stores seeds (when identifiers requires seeds) in the value whose key is composed of the table name and the column name and column value representing the segment.
Note Hibernate OGM stores seeds (when identifiers requires seeds) in the value whose key is composed of the table name and the column name and column value representing the segment.
Obviously, this representation is not common to all NoSQL stores. It’s different, for instance, for MongoDB, which is a document-oriented store. In such cases, GridDialect is used, and its main task consists of converting this representation into the expected representation for the NoSQL store. For MongoDB, the MongoDBDialect converts it into MongoDB documents.
![]() Note Since NoSQL stores are not aware of the schema notion, Hibernate OGM tuples are not tied to schemas.
Note Since NoSQL stores are not aware of the schema notion, Hibernate OGM tuples are not tied to schemas.
Of course, Hibernate OGM needs to offer a powerful querying data engine and, at the time of this writing, this is implemented in a number of different ways depending on the nature of the query and the NoSQL querying support.
CRUD operations are the responsibility of the Hibernate ORM engine and they follow a straightforward process. Independently of JPA or the Hibernate Native API, Hibernate ORM delegates persistence and load queries to the OGM engine, which delegates CRUD operations to DatastoreProvider/GridDialect, which interacts with the NoSQL store. Figure 1-7 depicts this process.
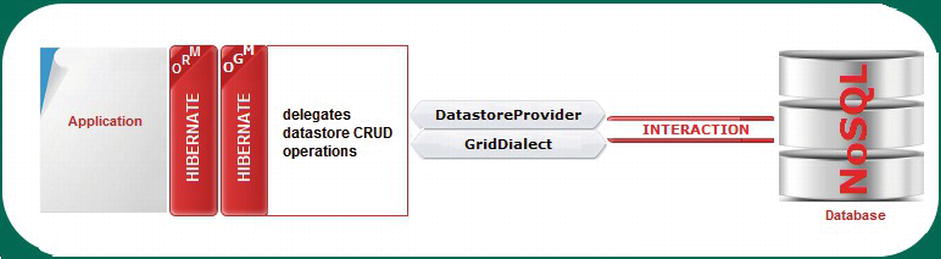
Figure 1-7. Hibernate OGM and CRUD operations
Because Hibernate OGM wants to offer the entire JPA, it needs to support JP-QL queries. This implies a sophisticated query engine (QE) that should be sensitive to the particular NoSQL store querying capabilities and to JP-QL query complexity. The most optimistic instance is NoSQL with query capabilities and simple JP-QL queries. In this case, the query is delegated to the NoSQL-specific query translator, and the results are managed by Hibernate OGM to compose the specific objects (see Figure 1-8).

Figure 1-8. Hibernate OGM and JP-QL simple queries (NoSQL with query support)
A less optimistic case arises when a NoSQL store does not support the current query. In this case, the JBoss Teiid data virtualization system intervenes to split the JP-QL query into simple queries that can be executed by the data store. (See www.jboss.org/teiid for more information). Teiid also processes the results to obtain the final query result, as Figure 1-9 shows.
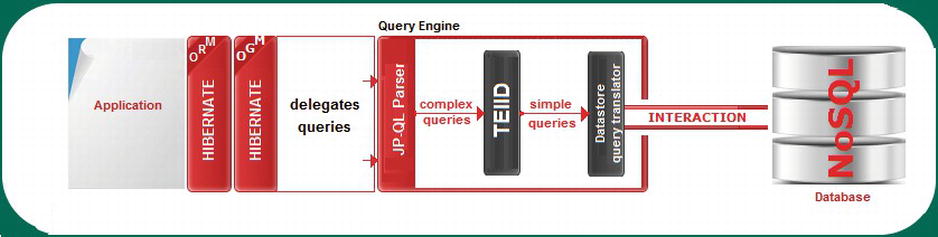
Figure 1-9. Hibernate OGM and JP-QL complex queries
The worst case is a NoSQL store that has little or no query support. Since this is a hard case, it requires heavy artillery, like Hibernate Search, an enterprise full-text search tool based on Hibernate Core and Apache Lucene. Basically, the Hibernate Search Indexing Engine receives events from the Hibernate ORM Core and keeps the entity indexing process up to date, while the JP-QL Query Parser delegates query translation to the Hibernate Search Query Engine (for simple queries) or to Teiid (for intermediate to complex queries), and executes them using Lucene indexes (see Figure 1-10). In addition, Hibernate Search provides clustering support and an object-oriented abstraction that includes a query domain-specific language (DSL).
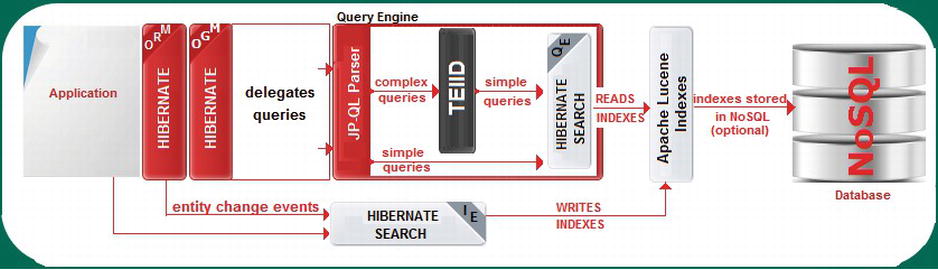
Figure 1-10. Hibernate OGM and JP-QL queries (little or no NoSQL support)
Get the Hibernate OGM Distribution
At the time of writing, the Hibernate OGM distribution was 4.0.0.Beta2. The best way to get it with full documentation, sources, and dependencies is to access www.hibernate.org/subprojects/ogm.html and download the corresponding ZIP/TGZ archive.
Unfortunately, this isn’t as simple as it might seem. Since the focus of this book is Hibernate OGM and MongoDB, you’ll want to locate the JARs dedicated to “connecting” OGM with MongoDB: hibernate-ogm-mongodb- x .jar and mongo-java-driver- x .jar. (MongoDB has client support for most programming languages; this is the MongoDB Java driver developed by MongoDB team and used by Hibernate OGM to interact with MongoDB). In Hibernate OGM version 4.0.0.Beta1, you’ll find these JARs in the hibernate-ogm-4.0.0.Beta1distlibmongodb folder: hibernate-ogm-mongodb-4.0.0.Beta1.jar and mongo-java-driver-2.8.0.jar. In Hibernate OGM version 4.0.0.Beta2, the mongodb folder is missing, so the new JARs are not bundled out of the box.
This means you can still use hibernate-ogm-mongodb-4.0.0.Beta1.jar and mongo-java-driver-2.8.0.jar with Hibernate OGM 4.0.0.Beta2, or you can compile the source code of Hibernate OGM 4.0.0.Beta2 to obtain the newest snapshots. For compiling the code, visit www.sourceforge.net/projects/hibernate/files/hibernate-ogm/4.0.0.Beta2/. I have compiled the code and obtained the MongoDB JAR, named hibernate-ogm-mongodb-4.0.0-SNAPSHOT.
If you take a look at the Hibernate OGM change log shown in Figure 1-11, you’ll see that Hibernate OGM 4.0.0.Beta2 has been upgraded to support MongoDB Java Driver 2.9.x. This means that if you decide to compile the code and use the resulting snapshot of the MongoDB profile, you can also add a 2.9.x MongoDB Java driver, instead of 2.8.x.
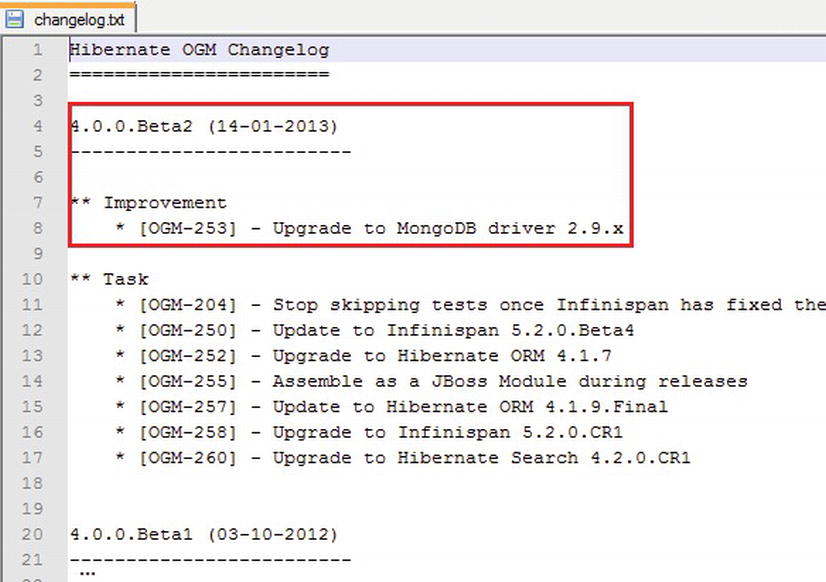
Figure 1-11. Hibernate OGM change log
For this book, I chose to use the Hibernate OGM 4.0.0.Beta2 with Hibernate OGM for MongoDB 4.0.0.Beta1.
Getting Hibernate OGM from the Maven Central Repository
You can also download Hibernate OGM from the Maven Central Repository (www.search.maven.org/). Search for “hibernate ogm,” which will return what you see in Figure 1-12.
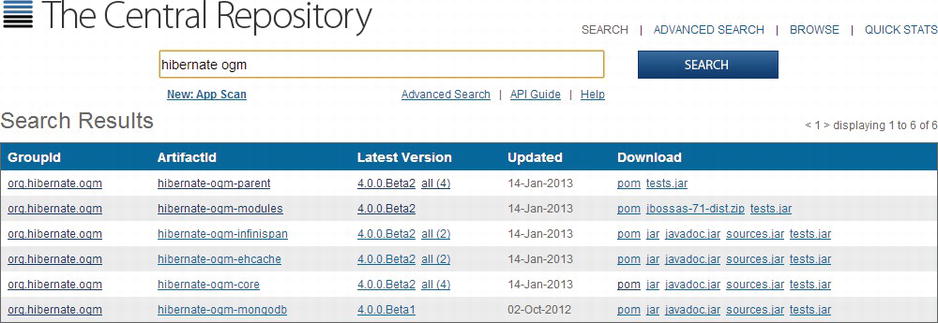
Figure 1-12. Hibernate OGM distribution listed in Maven Central Repository
As you can see, it’s very easy to dowload the Hibernate OGM core and profiles, including the MongoDB profile. You can download the JARs or the POMs (Project Object Model) files.
Getting Hibernate OGM from the Maven Command Line
Hibernate OGM is also available from the Apache Maven command line. Obviously, Maven must be installed and configured on your computer. First, you have to modify your settings.xml document, which is stored in the Maven local repository .m2 folder (the default location). For Unix/Mac OS X users, this folder should be ∼/.m2; for Windows users, it’s C:Documents and Settings{your username}.m2 or C:Users{your username}.m2. If the settings.xml file doesn’t already exist, you should create it in this folder, as shown in Listing 1-1. (If you already have this file, just modify its contents accordingly.)
![]() Note If it seems too complicated to create or modify settings.xml since it’s so verbose, you can simply use <repository> and <dependency> tags in your pom.xml.
Note If it seems too complicated to create or modify settings.xml since it’s so verbose, you can simply use <repository> and <dependency> tags in your pom.xml.
Listing 1-1. Settings.xml
<?xml version="1.0" encoding="UTF-8"?>

<settings xmlns=" http://maven.apache.org/SETTINGS/1.0.0 " xmlns:xsi=" http://www.w3.org/2001/XMLSchema-instance "
          xsi:schemaLocation=" http://maven.apache.org/SETTINGS/1.0.0
                                             http://maven.apache.org/xsd/settings-1.0.0.xsd ">
 <!-- jboss.org config start -->
 <profiles>
    <profile>
      <id>jboss-public-repository</id>
      <repositories>
        <repository>
          <id>jboss-public-repository-group</id>
          <name>JBoss Public Maven Repository Group</name>
          <url> https://repository.jboss.org/nexus/content/groups/public-jboss/</url >
          <layout>default</layout>
          <releases>
            <enabled>true</enabled>
            <updatePolicy>never</updatePolicy>
          </releases>
          <snapshots>
            <enabled>true</enabled>
            <updatePolicy>never</updatePolicy>
          </snapshots>
        </repository>
      </repositories>
      <pluginRepositories>
        <pluginRepository>
          <id>jboss-public-repository-group</id>
          <name>JBoss Public Maven Repository Group</name>
          <url> https://repository.jboss.org/nexus/content/groups/public-jboss/</url >
          <layout>default</layout>
          <releases>
            <enabled>true</enabled>
            <updatePolicy>never</updatePolicy>
          </releases>
          <snapshots>
            <enabled>true</enabled>
            <updatePolicy>never</updatePolicy>
          </snapshots>
        </pluginRepository>
      </pluginRepositories>
    </profile>
    <profile>
      <id>jboss-deprecated-repository</id>
      <repositories>
        <repository>
          <id>jboss-deprecated-repository</id>
          <name>JBoss Deprecated Maven Repository</name>
          <url> https://repository.jboss.org/nexus/content/repositories/deprecated/</url >
          <layout>default</layout>
          <releases>
            <enabled>true</enabled>
            <updatePolicy>never</updatePolicy>
          </releases>
          <snapshots>
            <enabled>false</enabled>
            <updatePolicy>never</updatePolicy>
          </snapshots>
        </repository>
      </repositories>
    </profile>
    <!-- jboss.org config end -->
  </profiles>

  <!-- jboss.org config start -->
  <activeProfiles>
    <activeProfile>jboss-public-repository</activeProfile>
  </activeProfiles>
  <!-- jboss.org config end -->
</settings>
![]() Note You can modify the default location of the Maven local repository by adding into settings.xml the tag localRepository, like this: <localRepository> new_repository_path </localRepository>.
Note You can modify the default location of the Maven local repository by adding into settings.xml the tag localRepository, like this: <localRepository> new_repository_path </localRepository>.
Next, you need to create a pom.xml file. Obviously, this file’s content depends on what you want to obtain from the Hibernate OGM repository. For example, the pom.xml in Listing 1-2 will download the Hibernate OGM Core distribution (including dependencies) and store it locally in D:/Hibernate_OGM (you can also use the default ./m2 folder, but this makes it much clearer and easier to navigate).
Listing 1-2. Pom.xml
<project xmlns=" http://maven.apache.org/POM/4.0.0 "
             xmlns:xsi=" http://www.w3.org/2001/XMLSchema-instance "
             xsi:schemaLocation=" http://maven.apache.org/POM/4.0.0 http://maven.apache.org/xsd/maven-4.0.0.xsd ">
    <modelVersion>4.0.0</modelVersion>
    <groupId>maven.hibernate.ogm</groupId>
    <artifactId>Maven_HOGM</artifactId>
    <version>1.0-SNAPSHOT</version>
    <packaging>pom</packaging>
    <name>Maven_HOGM</name>
    <dependencies>
        <dependency>
            <groupId>org.hibernate.ogm</groupId>
            <artifactId>hibernate-ogm-core</artifactId>
            <version>4.0.0.Beta2</version>
        </dependency>
    </dependencies>
    <build>
       <directory>D:/Hibernate_OGM</directory>
       <defaultGoal>dependency:copy-dependencies</defaultGoal>
    </build>
</project>
The final step consists of executing the Maven mvn command. To do so, open a command prompt, navigate to the folder containing the pom.xml file, and run the mvn command (see Figure 1-13). After a few seconds, you should find the Hibernate OGM binary (including dependencies) in the path specified in the pom.xml file.
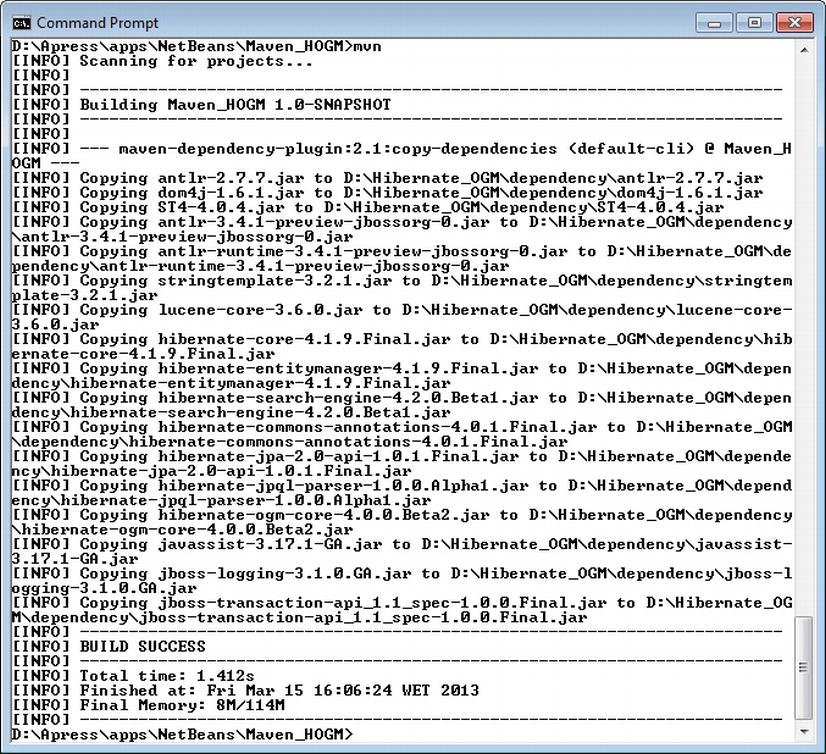
Figure 1-13. Running the mvn command
Adding MongoDB Artifacts
Now you know how to obtain the Hibernate OGM 4.0.0.Beta2 Core (and dependencies), but without any NoSQL data store artifacts. Currently, you can add artifacts for the following NoSQL stores: Ehcache, Infinispan, and MongoDB. Since our focus is Hibernate OGM and MongoDB, you’ll need to add MongoDB artifacts by placing the following dependency into the pom.xml file:
...
<dependency>
   <groupId>org.hibernate.ogm</groupId>
   <artifactId>hibernate-ogm-mongodb</artifactId>
   <version>4.0.0.Beta1</version>
 </dependency>
...
![]() Note For Infinispan, just replace the artifact id with hibernate-ogm-infinispan, and for Ehcache with hibernate-ogm-ehcache.
Note For Infinispan, just replace the artifact id with hibernate-ogm-infinispan, and for Ehcache with hibernate-ogm-ehcache.
Now, running the mvn command again will add two more JARs, hibernate-ogm-mongodb-4.0.0.Beta1.jar and mongo-java-driver-2.8.0.jar, as shown in Figure 1-14. The MongoDB drivers are also available for download as JARs at www.mongodb.org/display/DOCS/Drivers address.
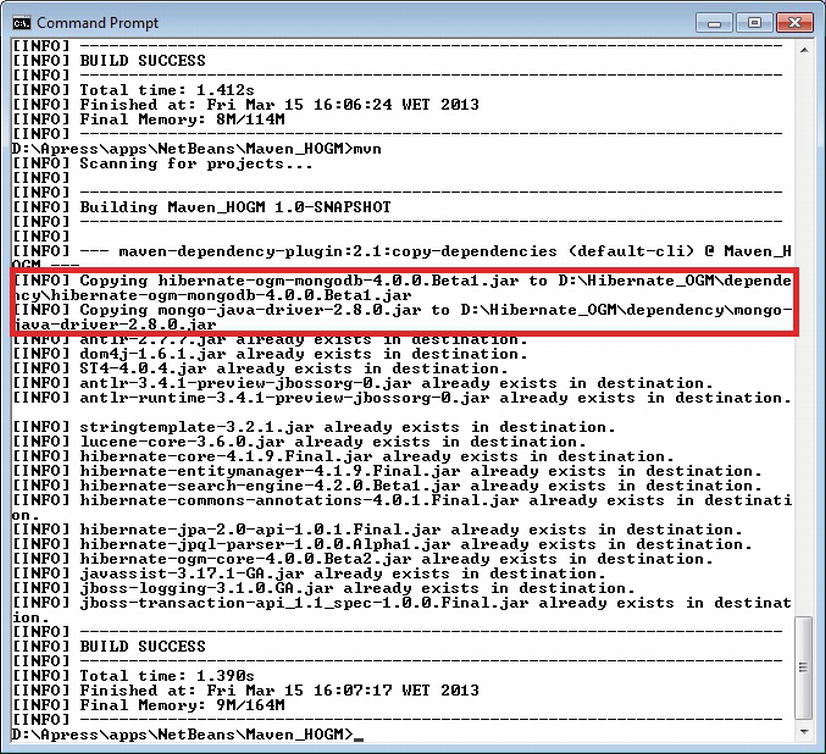
Figure 1-14. Running the mvn command after adding MongoDB artifacts
Getting a Hibernate OGM Distribution Using the NetBeans IDE
If you’re a NetBeans fan, it’s much simpler to use Maven from a NetBeans Maven project. This section describes the main steps in creating such a project to obtain the Hibernate OGM distribution as a NetBeans Library ready to be used in other projects. Launch NetBeans (I tested on NetBeans 7.2.1) and follow these steps:
- From the File menu, select the New Project option. In the New Project wizard, select Maven in the Categories list and POM Project in the Projects list, as shown in Figure 1-15.
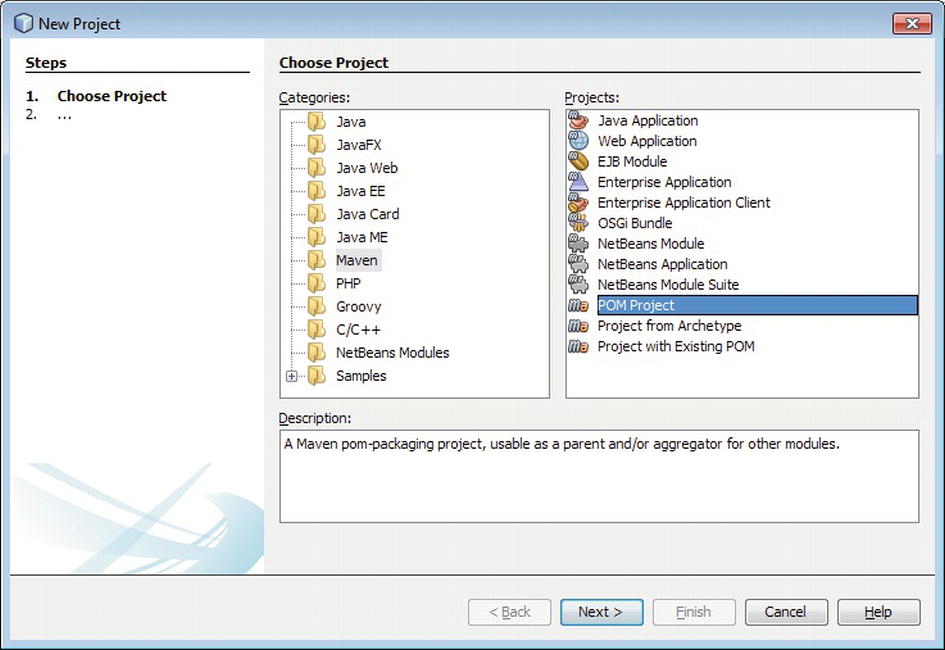
Figure 1-15. Creating a POM project with NetBeans 7
 Note If Maven isn’t available in your NetBeans distribution, you can install it by following the tutorial about third-party plug-in installations at http://wiki.netbeans.org/InstallingAPlugin.
 - Type the project name (Maven_HOGM), select the project location (D:ApressappsNetBeans), type the group id (maven.hibernate.ogm) and the version (1.0-SNAPSHOT) and click Finish as shown in Figure 1-16. (Note that I’ve used example names and locations here. Feel free to choose your own.) The empty project will be created and listed under the Projects panel.

Figure 1-16. Setting the project name and location
- Expand the Maven_HOGM | Project Files node and locate pom.xml and settings.xml. If settings.xml isn’t listed, right-click on the Project Files node, select Create settings.xml (as shown in Figure 1-17), and fill the file with the appropriate content.

Figure 1-17. Creating the settings.xml file from NetBeans 7
- Edit pom.xml according to your needs. At this point, both files should be ready to be processed by Maven.
- Right-click on the Maven-HOGM node and select Clean and Build. Wait until the task ends successfully, then expand the Maven_OGM | Dependencies node to see the downloaded JARs.
- Now you can create a NetBeans library. (I recommend that you create this library because the applications developed with NetBeans, in later chapters, refer to it.) From the NetBeans main menu, select Tools | Ant Libraries. In the Ant Library Manager, click the New Library button, provide a name for the library, such as Hibernate OGM Core and MongoDB, and click OK. Next, click on the Add JAR/Folder button and navigate to the JARs (if you followed my example path, you’ll find them in D:Hibernate_OGMdependency, as shown in Figure 1-18). Select all of the JARs and add them to this library. Click OK to finish creating the library.
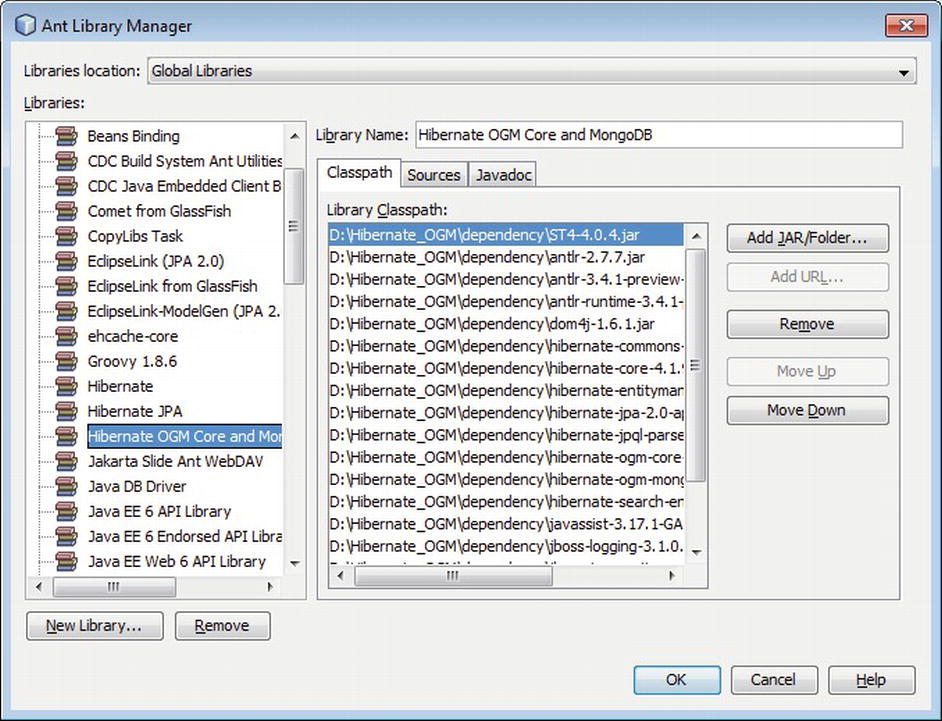
Figure 1-18. Creating a user library for Hibernate OGM and MongoDB
Now you can easily integrate the Hibernate OGM/MongoDB distribution into any of your NetBeans projects by adding Hibernate OGM Core/Hibernate OGM Core and MongoDB library into your project libraries.
The complete application is available in the Apress repository. It’s a NetBeans project named Maven_HOGM.
Getting the Hibernate OGM Distribution Using the Eclipse IDE
If you’re an Eclipse fan, it’s much simpler to use Maven from an Eclipse Maven project. This section describes the main steps for creating such a project to obtain the Hibernate OGM distribution as an Eclipse library ready to be used in other projects. So launch Eclipse (we tested on Eclipse JUNO) and follow these steps:
- From the File menu, select New | Other. In the New wizard, expand the Maven node and select Maven Projectas shown in Figure 1-19. Click Next.
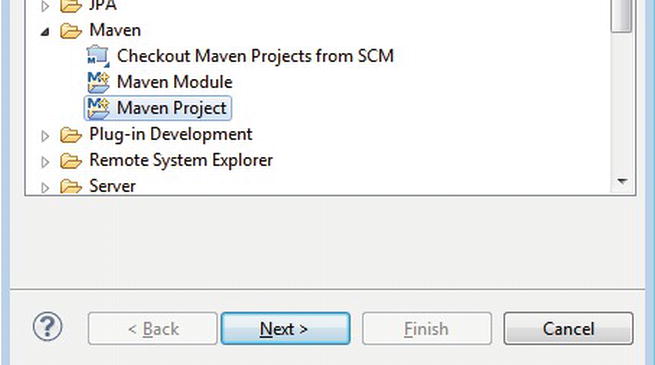
Figure 1-19. Creating a new Maven project with Eclipse JUNO
If Maven isn’t available in your Eclipse distribution, you can either download a standalone Maven distribution and install it from Window | Preferences | Maven | Installations, or you can install Maven for Eclipse from the Eclipse Marketplace, which you’ll find on the Help menu. Once you locate Maven in the Marketplace, follow the wizard to complete the installation (see Figure 1-20).

Figure 1-20. Creating a new Maven project with Eclipse JUNO
- Check the box labeled Create a simple project (skip archetype selection). You can choose the default workspace and click Next.
- Type the group id (maven.hibernate.ogm) and artifact id (Maven_HOGM). Click he Finish button and wait until the project has been successfully created and is listed in the Package Explorer panel.
- Manually update or create the settings.xml file in the maven local repository.
- Locate pom.xml in the Maven_HOGM project and double-click it.
- Next, in the editor, switch to the pom.xml tab where you’ll see a pom.xml skeleton. Add to it the missing parts from your pom.xml and save the project (see Figure 1-21).
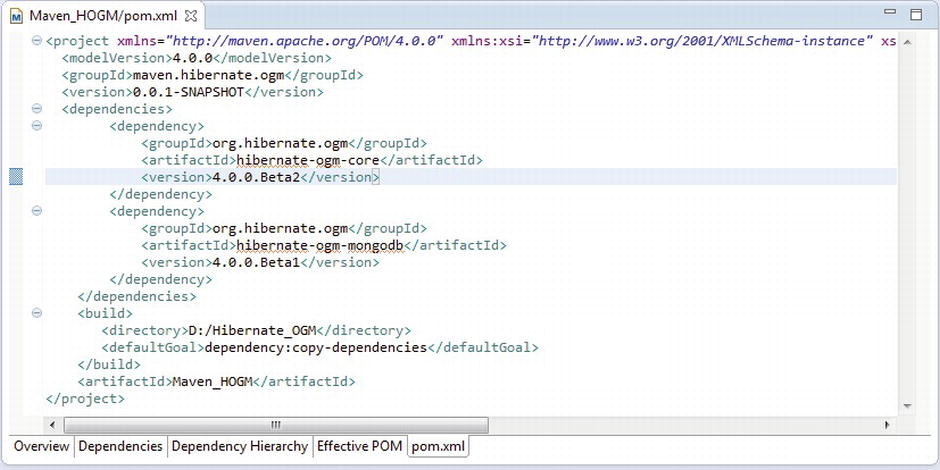
Figure 1-21. Editing pom.xml file in Eclipse JUNO
- In the Package Explorer panel, right-click the project name and select Run As | Maven build. When the process ends successfully, you should see the Hibernate OGM distribution (including dependencies) under the path defined by the <directory> tag in pom.xml.
- Select Preferences in the Window menu. In the tree on the left, expand the Java | Build Path node and select User Libraries.
- Click the New button to create a new library. Type a name for the new library, such as Hibernate OGM Core and MongoDB, and click the OK.
- Click the Add External JARs button and navigate to the folder where the Hibernate OGM distribution was downloaded. Select all of the JARs and add them to the library. Click OK.
Now you can easily integrate Hibernate OGM/MongoDB distribution into any of your Eclipse projects by adding Hibernate OGM Core/Hibernate OGM Core and MongoDB library into your project build path.
![]() Note If you’d prefer to create the entire project with Maven, just add the Hibernate OGM dependencies accordingly. All you have to do is add the corresponding <repository> and <dependency> tags.
Note If you’d prefer to create the entire project with Maven, just add the Hibernate OGM dependencies accordingly. All you have to do is add the corresponding <repository> and <dependency> tags.
The complete application is available in the Apress repository. It’s an Eclipse project named Maven_HOGM.
Obtain the MongoDB Distribution
When this book was written, the recommended MongoDB distribution was version 2.2.2 (I chose this version because is “preferred” by Hibernate OGM and OpenShift). You can easily download it from the official web site at http://www.mongodb.org/. You’ll find the installation steps at http://docs.mongodb.org/manual/installation/. The examples in this book were developed and tested under the 64-bit versions of Windows 7 and 8, for which the installation is straightforward.
After downloading and installing the MongoDB distribution, you’re ready to see if the MongoDB server starts and responds to commands. Open a command prompt, navigate to the {MONGODB_HOME}/bin folder and type mongod --dbpath ../ command to start the server (the --dbpath option indicates the location of the /data/db folder you manually created in the {MONGODB_HOME} folder, following installation guide). If there are no errors, open another command prompt, navigate to the same folder, and type mongo. If you see something similar to what’s shown in Figure 1-22, MongoDB was successfully installed.

Figure 1-22. Checking MongoDB server availability
To test more thoroughly, try the commands from the Getting Started tutorial at http://docs.mongodb.org/manual/tutorial/getting-started/. You can easily shut down the MongoDB server by pressing CTRL-C.
Summary
In this introductory chapter we took the first steps toward understanding and using Hibernate OGM. We looked at Hibernate OGM concepts, features and aims, as well as giving a brief overview of the Hibernate OGM architecture. (It’s important to know how things are managed internally if you want to understand the next chapter).
You then saw how to obtain the Hibernate OGM distribution as a ZIP/TGZ, as a command-line Maven project, and as a NetBeans/Eclipse Maven based project. Finally, you learned how to install a MongoDB distribution and how to add the corresponding JARs to the Hibernate OGM distribution.