
![]()
Data Management
This chapter explains how an app can manage data through the new API available in WinRT. We will take a look at data access and manipulation in different types of storage and how to handle user settings. Step by step, we will show these features using examples.
Handling Data in a Windows Store App
The Windows Storage APIs are a simple way to access and manipulate data and files whether they are on the local machine or elsewhere (such as the cloud). The APIs are located in the Windows.Storage namespace. All the languages available for developing Windows Store apps allow the use of Windows Storage APIs but unfortunately there are slight differences (as we explain later in this chapter). But first of all, we have to point out that there are two different kinds of data that you can access or use inside your app:
- App Data: The data created, used, and dismissed by the application to maintain runtime state, user preferences, and general settings.
- User Data: The data created by a user that uses the application, like documents or media files.
Both kinds of data can be stored on the local machine and, depending on what folder is used, permissions must be set. Indeed, Windows Store app has restrictions regarding folder access: in order to read the content of a specific folder, you have to set the relative app capability in your app using the package manifest. This can be opened inside Visual Studio 2013 by double-clicking in Solution Explorer the Package.appmanifest item, and opening the Package Designer, as shown in Figure 8-1.

Figure 8-1. The Package Designer
In the Capabilities section, you can select what folder an app can access.
![]() Note The DocumentsLibrary capability is dropped starting with Windows 8.1. However, it can be enabled manually by editing the Package.appmanifest and compiling the app, but we advise you to avoid this technique. And note that you should use the DocumentsLibrary capability just for specific situations (like embedded content), not to store data! For more information, go to blogs.msdn.com/b/wsdevsol/archive/2013/05/09/dealing-with-documents-how-not-to-use-the-documentslibrary-capability-in-windows-store-apps.aspx.
Note The DocumentsLibrary capability is dropped starting with Windows 8.1. However, it can be enabled manually by editing the Package.appmanifest and compiling the app, but we advise you to avoid this technique. And note that you should use the DocumentsLibrary capability just for specific situations (like embedded content), not to store data! For more information, go to blogs.msdn.com/b/wsdevsol/archive/2013/05/09/dealing-with-documents-how-not-to-use-the-documentslibrary-capability-in-windows-store-apps.aspx.
Table 8-1 shows the available capabilities with their relative location.
Table 8-1. Location and Capability
Location |
Capability |
|---|---|
Documents Library (until Windows v.8) |
DocumentsLibrary (file extension in app manifest) |
Music Library |
MusicLibrary |
Pictures Library |
PicturesLibrary |
Videos Library |
VideosLibrary |
Homegroup Libraries |
One of the following: |
Removable devices |
RemovableDevices |
Media Server Devices (DLNA) |
One of the following: |
Universal Naming Convention (UNC) |
PrivateNetworkClientServer |
Whenever an app tries to access to a folder without the proper capability, a System.UnauthorizedAccessException is raised, as shown in Figure 8-2.

Figure 8-2. A pop-up in Visual Studio 2013 shows the System.UnauthorizedAccessException
App Capabilities help developers take full control of what information apps can access or use. Besides, when a Windows Store app is submitted to the Windows Store, the description is checked to see if it matches all enabled capabilities. As a result, a customer always knows what data is used before he buys the app. Figure 8-3 shows a description sample from the Contacts app.

Figure 8-3. An example of enabled app capabilities from Windows Store
A good practice is to show on the first use of the app what capability is going to be enabled (Figure 8-4). And of course you can always check what app capabilities are allowed inside the app by using the permission section in the settings charm (Figure 8-5).

Figure 8-4. A pop-up asking to use a capability
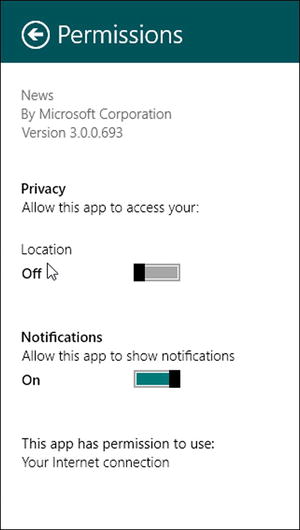
Figure 8-5. Permission section in settings charm
Once you have enabled app capabilities for your app, you must choose the way to access data: thanks to Storage APIs, you have a simple way to do that!
In a desktop app, all app data is stored inside the system registry, installation folder, or user profile folder (like AppData); guidelines suggest to always use one of these locations! Otherwise, when you develop a Windows Store app, you can’t access data directly where is stored, but you can use something called data stores: these are similar to data containers and are created per-user once a Windows 8 Store app is installed.
There are three different types of data stores (Figure 8-6):
- Local Data: Data stored on the local machine.
- Roaming Data: Data stored on the cloud.
- Temporary Data: Data stored on the local machine in a temporary folder.

Figure 8-6. The three data stores
Of course, you know that local data stores keep your app data somewhere on the local machine, but only the Storage APIs take care of accessing and manipulating it.
So why are data stores helpful? Using data stores offers some advantages. The first is isolation, which helps to avoid data being shared in other apps or in other user instances. Next is the lifetime of the data, which is closely related to the app lifetime: when you install an app, data is maintained in data stores and will remain so until the app is uninstalled (except for roaming data, as you will see later).
Moreover, when you install updates, data is updated too, allowing for the possibility of versioning: with this feature you can prevent a bad headache caused by incompatibility between data application versions. The way to do this is simple: just check the version. If it is less than the installed app version, it needs to be updated.
Choosing one data store or the other depends on what the data contains and how long it needs to be kept. Let’s see in detail how data stores work.
Local data can be used to maintain information about the configuration of the app and to store large dataset without any storage limit. This kind of storage is ideal if there is no need to share this data with other app instances on other devices. Figure 8-7 shows the Storage APIs main classes.

Figure 8-7. Windows Storage API main classes
These APIs allow storing of both data and files. Data is stored inside containers, which are created whenever they are needed, and help to hide (and simplify) the access to the system registry. Containers can be nested up to 32 levels. In the following code, a LocalSettings object is user to retrieve or store local information:
C#
public CultureInfo CurrentCulture
{
    get
   {
        var localSettings = Windows.Storage.ApplicationData.Current.LocalSettings;

        if (localSettings.Containers.ContainsKey("localization"))
        {
            var cultureName = localSettings.Containers["localization"].Values["language"] as String;
            return (cultureName != null) ? new CultureInfo(cultureName) : CultureInfo.CurrentCulture;
        }

        return new CultureInfo("en-US");
    }
    set
    {
        var localSettings = Windows.Storage.ApplicationData.Current.LocalSettings;

        if (!localSettings.Containers.ContainsKey("localization"))
        {
            //Create a new container
            localSettings.CreateContainer("localization", Windows.Storage.ApplicationDataCreateDisposition.Always);
         }

         localSettings.Containers["localization"].Values["language"] = value.Name;
    }
}
VB
Public Property CurrentCulture() As CultureInfo
    Get
        Dim localSettings = Windows.Storage.ApplicationData.Current.LocalSettings
        Dim culture As CultureInfo

        If localSettings.Containers.ContainsKey("localization") Then
            Dim cultureName = TryCast(localSettings.Containers("localization").Values("language"), [String])
            culture = New CultureInfo(cultureName)
        Else
            culture = CultureInfo.CurrentCulture
        End If

        Return culture
    End Get
    Set(value As CultureInfo)
        Dim localSettings = Windows.Storage.ApplicationData.Current.LocalSettings

        If Not localSettings.Containers.ContainsKey("localization") Then
            'Create a new container
            localSettings.CreateContainer("localization", Windows.Storage.ApplicationDataCreateDisposition.Always)
        End If

        localSettings.Containers("localization").Values("language") = value.Name
    End Set
End Property
Sometimes you need to store more values that are logically related. Storage APIs provide a specific ApplicationDataCompositeValue (Figure 8-8). This type helps keep different values together, solving the problems associated with data concurrency, consistency, and integrity.

Figure 8-8. ApplicationDataCompositeValue class
The code below shows how to create a composite value.
C#
public CultureInfo CurrentCultureDetailed
{
    get
    {
        var localSettings = Windows.Storage.ApplicationData.Current.LocalSettings;

        if (localSettings.Containers.ContainsKey("localization"))
        {
            ApplicationDataCompositeValue composite =
(ApplicationDataCompositeValue)localSettings.Containers["localization"].Values["language"];

            return (composite != null) ? new CultureInfo(composite["selectedLanguage"].ToString())
                : CultureInfo.CurrentCulture;
        }

        return new CultureInfo("en-US");
    }
    set
    {
        var localSettings = Windows.Storage.ApplicationData.Current.LocalSettings;

        if (!localSettings.Containers.ContainsKey("localization"))
        {
            //Create a container
            localSettings.CreateContainer("localization",
                Windows.Storage.ApplicationDataCreateDisposition.Always);
        }

        ApplicationDataCompositeValue composite = new ApplicationDataCompositeValue();
        composite["selectedLanguage"] = value.Name;
        composite["lastChangeTime"] = DateTime.Now.ToString();

        localSettings.Containers["localization"].Values["language"] = composite;
    }
}
VB
Public Property CurrentCultureDetailed() As CultureInfo
    Get
        Dim localSettings = Windows.Storage.ApplicationData.Current.LocalSettings

        If localSettings.Containers.ContainsKey("detailedLocalization") Then
            Dim composite As ApplicationDataCompositeValue =
                DirectCast(localSettings.Containers("detailedLocalization").Values("language"),
                    ApplicationDataCompositeValue)

            Return If((composite IsNot Nothing), New CultureInfo(composite("selectedLanguage").ToString()),
                      CultureInfo.CurrentCulture)
        Else
            Return New CultureInfo("en-US")
        End If
    End Get
    Set(value As CultureInfo)
        Dim localSettings = Windows.Storage.ApplicationData.Current.LocalSettings

        If Not localSettings.Containers.ContainsKey("detailedLocalization") Then
            'Create a container
            localSettings.CreateContainer("detailedLocalization",
                                          Windows.Storage.ApplicationDataCreateDisposition.Always)
        End If

        Dim composite As New ApplicationDataCompositeValue()
        composite("selectedLanguage") = value.DisplayName
        composite("lastChangeTime") = DateTime.Now.ToString()

        localSettings.Containers("detailedLocalization").Values("language") = composite
    End Set
End Property
Besides settings, the Storage APIs also store files using CreateFileAsync() and GetFileAsync() methods from the LocalFolder object. Files are accessed both in read and write mode. Because of the lack of a binary type inside WinRT, sometimes files can be used as substitute. Some good examples are the SaveAsync() and RestoreAsync() methods inside the SuspensionManager class, shown next.
C#
public static async Task SaveAsync()
{
    try
    {
    // Save the navigation state for all registered frames
    foreach (var weakFrameReference in _registeredFrames)
    {
        Frame frame;
        if (weakFrameReference.TryGetTarget(out frame))
        {
            SaveFrameNavigationState(frame);
        }
    }

    // Serialize the session state synchronously to avoid asynchronous access to shared
    // state
    MemoryStream sessionData = new MemoryStream();
    DataContractSerializer serializer =
        new DataContractSerializer(typeof(Dictionary<string, object>), _knownTypes);
    serializer.WriteObject(sessionData, _sessionState);

        // Get an output stream for the SessionState file and write the state asynchronously
        StorageFile file = await
            ApplicationData.Current.LocalFolder.CreateFileAsync(sessionStateFilename,
            CreationCollisionOption.ReplaceExisting);
        using (Stream fileStream = await file.OpenStreamForWriteAsync())
        {
            sessionData.Seek(0, SeekOrigin.Begin);
            await sessionData.CopyToAsync(fileStream);
            await fileStream.FlushAsync();
        }
    }
    catch (Exception e)
    {
        throw new SuspensionManagerException(e);
    }
}

public static async Task RestoreAsync()
{
    _sessionState = new Dictionary<String, Object>();

    try
    {
        // Get the input stream for the SessionState file
        StorageFile file =
            await ApplicationData.Current.LocalFolder.GetFileAsync(sessionStateFilename);
        using (IInputStream inStream = await file.OpenSequentialReadAsync())
        {
            // Deserialize the Session State
            DataContractSerializer serializer =
                new DataContractSerializer(typeof(Dictionary<string, object>), _knownTypes);
            _sessionState = (Dictionary<string, object>)serializer.ReadObject(inStream.AsStreamForRead());
        }

        // Restore any registered frames to their saved state
        foreach (var weakFrameReference in _registeredFrames)
        {
            Frame frame;
            if (weakFrameReference.TryGetTarget(out frame))
            {
                frame.ClearValue(FrameSessionStateProperty);
                RestoreFrameNavigationState(frame);
            }
        }
    }
    catch (Exception e)
    {
        throw new SuspensionManagerException(e);
    }
}
VB
Public Shared Async Function SaveAsync() As Task
    Try

        ' Save the navigation state for all registered frames
        For Each weakFrameReference As WeakReference(Of Frame) In _registeredFrames
            Dim frame As Frame = Nothing
            If weakFrameReference.TryGetTarget(frame) Then
                SaveFrameNavigationState(frame)
            End If
        Next

        ' Serialize the session state synchronously to avoid asynchronous access to shared
        ' state
        Dim sessionData As New MemoryStream()
        Dim serializer As New Runtime.Serialization.DataContractSerializer(
            GetType(Dictionary(Of String, Object)), _knownTypes)
        serializer.WriteObject(sessionData, _sessionState)

        ' Get an output stream for the SessionState file and write the state asynchronously
        Dim file As Windows.Storage.StorageFile =
            Await Windows.Storage.ApplicationData.Current.LocalFolder.CreateFileAsync(
            sessionStateFilename, Windows.Storage.CreationCollisionOption.ReplaceExisting)
        Using fileStream As Stream = Await file.OpenStreamForWriteAsync()
            sessionData.Seek(0, SeekOrigin.Begin)
            Await sessionData.CopyToAsync(fileStream)
            Await fileStream.FlushAsync()
        End Using
    Catch ex As Exception
        Throw New SuspensionManagerException(ex)
    End Try
End Function

Public Shared Async Function RestoreAsync() As Task
    _sessionState = New Dictionary(Of String, Object)()

    Try

        ' Get the input stream for the SessionState file
        Dim file As Windows.Storage.StorageFile =
            Await Windows.Storage.ApplicationData.Current.LocalFolder.GetFileAsync(sessionStateFilename)
        If file Is Nothing Then Return

        Using inStream As Windows.Storage.Streams.IInputStream = Await file.OpenSequentialReadAsync()

            ' Deserialize the Session State
            Dim serializer As New Runtime.Serialization.DataContractSerializer(
                GetType(Dictionary(Of String, Object)), _knownTypes)
            _sessionState = DirectCast(serializer.ReadObject(inStream.AsStreamForRead()),
                Dictionary(Of String, Object))
        End Using

        ' Restore any registered frames to their saved state
        For Each weakFrameReference As WeakReference(Of Frame) In _registeredFrames
            Dim frame As Frame = Nothing
            If weakFrameReference.TryGetTarget(frame) Then
                frame.ClearValue(FrameSessionStateProperty)
                RestoreFrameNavigationState(frame)
            End If
        Next
    Catch ex As Exception
        Throw New SuspensionManagerException(ex)
    End Try
End Function
To access a file programmatically, you can use the StorageFile object (Figure 8-9). Remember that it is a really good practice to use this Local Store just for data that is not needed on other devices or just for a large set of data.
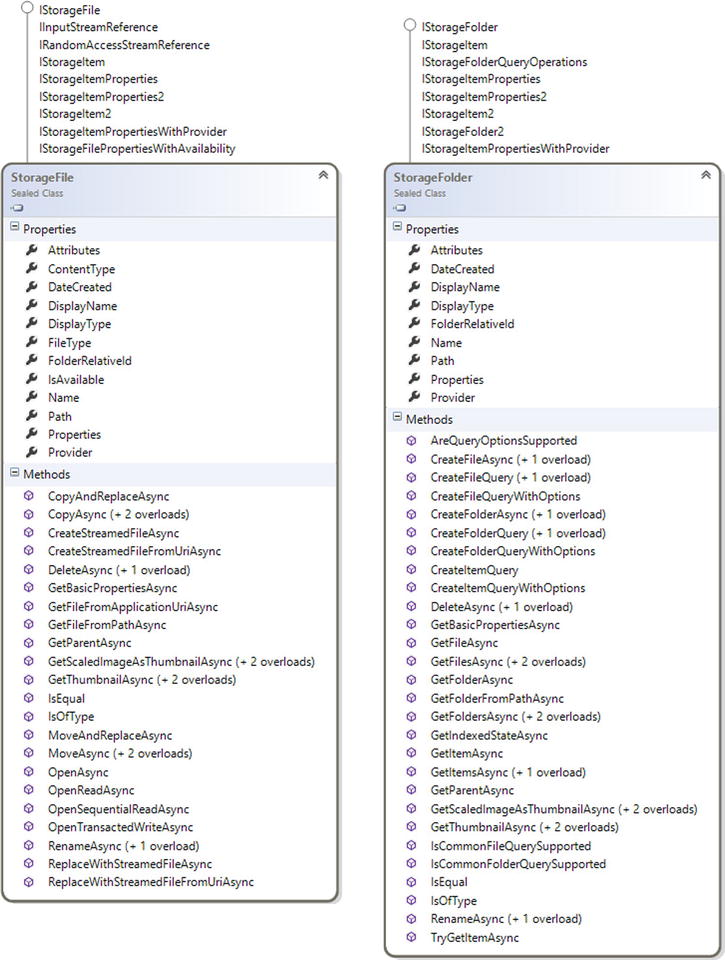
Figure 8-9. StorageFile and StorageFolder classes
Through this object you can also use the IsEqual property to check if two files are equal. Also, StorageFolder includes a few methods to get files or folders async:
- GetFileAsync, to get a file asynchronously
- GetFilesAsync, to get a collection of files asynchronously
- GetFoldersAsync, to get a folder asynchronously
- GetItemAsync, to get a file or a sub-folder asynchronously
It is also possible to use the method TryGetItemAsync to retrieve a file without worrying about an exception when a file is not found. In this case, the method returns null.
Roaming data stores are an innovative way to simplify data management inside Windows Store apps. The use of this feature allows users to have the same user experience on different devices, thereby avoiding multiple configurations. In addition, users are able to resume their activities when switching from one device from another (such as from a home PC to a tablet).
Once a user has installed an app, he usually sets an initial configuration. This step can take some time, and repeating the entire procedure on different devices is frustrating. Roaming data provides really good assistance for this: after the first configuration, all user preferences are set to be roaming. Afterwards, when user installs the Windows Store app on other devices, the user preferences are already available. Of course, the developer should check the existence of settings and retrieve them from the cloud. The most interesting aspect is that the application just needs to retrieve the settings using the Storage APIs object without any further configuration (e.g., services, login)! In this way you can guarantee a full user experience.
All roaming data is synched to the cloud, using the user’s Microsoft account. The synch process is not immediate and there is also a limit on the storage size that can be checked using the ApplicationData.Current.RoamingStorageQuota property.
C#
var quota = ApplicationData.Current.RoamingStorageQuota; //Usually 100KB
VB
Dim quota = ApplicationData.Current.RoamingStorageQuota
If this limit is exceeded, data won’t be synched until the roaming data is less than the limit again. Because of this, you should use roaming data only for small information like user preferences or small data files. It is also a good practice to avoid sending the content of web pages and instead send links directly. Typically you should choose at design time what data will roam, thereby avoiding serious headaches later. Here is how to take advantage of Roaming Data using the RoamingSettings object.
C#
get
{
    var roamingSettings = Windows.Storage.ApplicationData.Current.RoamingSettings;

    if (roamingSettings.Containers.ContainsKey("localization"))
    {
        var cultureName = roamingSettings.Containers["localization"].Values["language"] as String;
        return (cultureName != null) ? new CultureInfo(cultureName) : CultureInfo.CurrentCulture;
    }

    return new CultureInfo("en-US");
}
set
{
    var roamingSettings = Windows.Storage.ApplicationData.Current.RoamingSettings;

    if (!roamingSettings.Containers.ContainsKey("localization"))
    {
        //Create a container
        roamingSettings.CreateContainer("localization", Windows.Storage.ApplicationDataCreateDisposition.Always);
    }

    roamingSettings.Containers["localization"].Values["language"] = value.Name;
}
VB
Get
        Dim roamingSettings = Windows.Storage.ApplicationData.Current.RoamingSettings

        If roamingSettings.Containers.ContainsKey("localization") Then
            Dim cultureName =
                TryCast(roamingSettings.Containers("localization").Values("language"), [String])
            Return If((cultureName IsNot Nothing),
                      New CultureInfo(cultureName), CultureInfo.CurrentCulture)
        End If

        Return New CultureInfo("en-US")
End Get
Set(value As CultureInfo)
        Dim roamingSettings = Windows.Storage.ApplicationData.Current.RoamingSettings

        If Not roamingSettings.Containers.ContainsKey("localization") Then
            'Create a container
            roamingSettings.CreateContainer("localization",
                                            Windows.Storage.ApplicationDataCreateDisposition.Always)
        End If

        roamingSettings.Containers("localization").Values("language") = value.Name
    End Set
It is possible to roam a group of settings together using the ApplicationDataCompositeValue object, increasing data consistency:
C#
get
{
    var roamingSettings = Windows.Storage.ApplicationData.Current.RoamingSettings;

    if (roamingSettings.Containers.ContainsKey("localization"))
    {
        ApplicationDataCompositeValue composite =
            (ApplicationDataCompositeValue)roamingSettings.Containers["localization"].Values["language"];

        return (composite != null) ? new CultureInfo(composite["selectedLanguage"].ToString())
            : CultureInfo.CurrentCulture;
    }

    return new CultureInfo("en-US");
}
set
{
    var roamingSettings = Windows.Storage.ApplicationData.Current.RoamingSettings;

    if (!roamingSettings.Containers.ContainsKey("localization"))
    {
        //Create a container
        roamingSettings.CreateContainer("localization",
            Windows.Storage.ApplicationDataCreateDisposition.Always);
    }

    ApplicationDataCompositeValue composite = new ApplicationDataCompositeValue();
    composite["selectedLanguage"] = value.Name;
    composite["lastChangeTime"] = DateTime.Now.ToString();

    roamingSettings.Containers["detailedLocalization "].Values["language"] = composite;
}
VB
Get
    Dim roamingSettings = Windows.Storage.ApplicationData.Current.RoamingSettings

    If roamingSettings.Containers.ContainsKey("detailedLocalization") Then
        Dim composite As ApplicationDataCompositeValue =
            DirectCast(roamingSettings.Containers("detailedLocalization").Values("language"),
                ApplicationDataCompositeValue)

        Return If((composite IsNot Nothing),
                  New CultureInfo(composite("selectedLanguage").ToString()), CultureInfo.CurrentCulture)
    Else
        Return New CultureInfo("en-US")
    End If
End Get
Set(value As CultureInfo)
    Dim roamingSettings = Windows.Storage.ApplicationData.Current.RoamingSettings

    If Not roamingSettings.Containers.ContainsKey("detailedLocalization") Then
        'Create a container
        roamingSettings.CreateContainer("detailedLocalization",
                                        Windows.Storage.ApplicationDataCreateDisposition.Always)
    End If

    Dim composite As New ApplicationDataCompositeValue()
    composite("selectedLanguage") = value.DisplayName
    composite("lastChangeTime") = DateTime.Now.ToString()

    roamingSettings.Containers("detailedLocalization").Values("language") = composite
End Set
In order to better the user experience, you can use a special setting to override the order of the data synch process, the HighPriority setting. Like the previous examples, is sufficient to create a container named HighPriority.
The roaming engine will automatically prioritize this container among the others. It is not suggested to use the HighPriority option to store settings related to user preferences; instead it’s better to memorize the last action or state before an app is suspended (e.g., save the number of the actual page of an opened book). Then, when the app is resumed, either on the same machine or another device, the values stored inside the HighPriority container will be read. The HighPriority container can also store composite values, but be aware that there is a limit of 8kb. If the container size hits this limit, the container will be roamed just like the others with no priority. In the default template for a Windows Store app, if you suspend an app, an event called SaveAsync() saves the state for you. You can use the same method to roam information on app suspension with HighPriority:
C#
SuspensionManager.cs:
// Save last suspending time
var storageSettings = ApplicationData.Current.RoamingSettings;
storageSettings.Values["HighPriority"] = DateTime.Now.ToString();

App.xaml.cs:
//Get the last suspending time
var roamingSettings = Windows.Storage.ApplicationData.Current.RoamingSettings;
if (roamingSettings.Values.Count > 0 && roamingSettings.Values["HighPriority"] != null)
{
    DateTime lastSuspensionTime = Convert.ToDateTime(roamingSettings.Values["HighPriority"].ToString());
}
VB
SuspensionManager.vb:
' Save last suspending time
Dim storageSettings = ApplicationData.Current.RoamingSettings
storageSettings.Values("HighPriority") = DateTime.Now.ToString()

App.xaml.vb:
Dim roamingSettings = Windows.Storage.ApplicationData.Current.RoamingSettings
If roamingSettings.Values.Count > 0 And Not roamingSettings.Values("HighPriority") Is Nothing Then
    Dim lastSuspensionTime As DateTime =
        Convert.ToDateTime(roamingSettings.Values("HighPriority").ToString())
End If
A Windows Store application automatically checks for new roaming data. Inside the app, it is enough to register to handle the DataChanged() event. Of course, the synchronization between devices is not immediate and it is not recommended to use this technique to exchange data among PCs. Here is a usage example of forcing the trigger of the DataChanged() event by calling SignalDataChanged() event.
C#
RoamingData.xaml.cs:
public RoamingData ()
{
    this.InitializeComponent();
    this.initComboBoxes();

    Windows.Storage.ApplicationData.Current.DataChanged +=
        new TypedEventHandler<Windows.Storage.ApplicationData, object>(DataChangedHandler);

    var roamingSettings = Windows.Storage.ApplicationData.Current.RoamingSettings;
    roamingSettings.Values["lastRoamingSettingDate"] = DateTime.Now.ToString();
    Windows.Storage.ApplicationData.Current.SignalDataChanged();
}

async void DataChangedHandler(Windows.Storage.ApplicationData sender, object args)
{
    // DataChangeHandler may be invoked on a background thread,
    // so use the Dispatcher to invoke the UI-related code on the UI thread.
    await this.Dispatcher.RunAsync(CoreDispatcherPriority.Normal, () =>
    {
        var roamingSettings = Windows.Storage.ApplicationData.Current.RoamingSettings;
        if (roamingSettings.Values.Count > 0)
        {
             DateTime lastSuspensionTime = Convert.ToDateTime(
                    roamingSettings.Values["lastRoamingSettingDate"].ToString());
        }
    });
}
VB
RoamingData.xaml.vb:
Public Sub New()
    InitializeComponent()
    Me._navigationHelper = New Common.NavigationHelper(Me)
    AddHandler Me._navigationHelper.LoadState,
        AddressOf NavigationHelper_LoadState

    'Get quota
    Dim quota = ApplicationData.Current.RoamingStorageQuota
    'Usually 100KB
    RoamingDataQuota.Text = [String].Format("{0} KB", quota.ToString())

    'Roaming data - Single value
    RoamingSettingsSingleValue.Text = CurrentCulture.DisplayName

    'Roaming data - Composite data
    CurrentCultureDetailed = New CultureInfo("en-US")
    GetCompositeData()

    'Roaming Data - DataChanged Event Handler
    AddHandler Windows.Storage.ApplicationData.Current.DataChanged, AddressOf DataChangeHandler

    Dim roamingSettings = Windows.Storage.ApplicationData.Current.RoamingSettings
    roamingSettings.Values("lastRoamingSettingDate") = DateTime.Now.ToString()
    Windows.Storage.ApplicationData.Current.SignalDataChanged()
End Sub

Private Async Sub DataChangeHandler(ByVal appData As Windows.Storage.ApplicationData, ByVal o As Object)
    ' DataChangeHandler may be invoked on a background thread,
    ' so use the Dispatcher to invoke the UI-related code on the UI thread.

    Await Me.Dispatcher.RunAsync(CoreDispatcherPriority.Normal,
Sub()
    Dim roamingSettings = Windows.Storage.ApplicationData.Current.RoamingSettings
    Dim lastSuspensionTime As DateTime =
           Convert.ToDateTime(roamingSettings.Values("lastRoamingSettingDate").ToString())

    DataChangedInvoked.Text = "Yes"
    End Sub)
End Sub
Roaming data also provides application data versioning to avoid incompatibility between app versions. When the data settings inside a Windows Store app are upgraded or the format is modified, there is no automatic mechanism to upgrade data to the new version. It is up to the developer to check if the app data has the same version. Note that data is roamed only if the version between apps matches. The Windows Storage APIs simplify version checking by providing the Application.Version property to verify the version number and the ApplicationData.SetVersionAsync() to set the version number:
C#
RoamingData.xaml.cs
...//Roaming Data - Check data version
            VersionHelper.CheckVersion();
...

VersionHelper.cs
public static class VersionHelper
{
    public static void CheckVersion()
    {
        uint version = ApplicationData.Current.Version;

        switch (version)
        {
            case 0:
                //Need to upgrade data from v0 to v1
                Upgrade_Version0_to_Version1();
                break;
            case 1:
                //Right version, do nothing...
                break;
            default:
                throw new Exception("Unexpected ApplicationData Version: " + version);
        }
    }

    static async void Upgrade_Version0_to_Version1()
    {
        await ApplicationData.Current.SetVersionAsync(1,
            new ApplicationDataSetVersionHandler(SetVersion1Handler));
    }

    private static void SetVersion1Handler(SetVersionRequest setVersionRequest)
    {
        SetVersionDeferral deferral = setVersionRequest.GetDeferral();

        //Change the data format for all needed settings
        ApplicationData.Current.LocalSettings.Values["LocalData"] = "this-is-a-new-data-format";

        deferral.Complete();
    }
}
VB
RoamingData.xaml.vb
'Roaming Data - Check data version
VersionHelper.CheckVersion()
...

VersionHelper.vb
Public NotInheritable Class VersionHelper
    Private Sub New()
    End Sub
    Public Shared Sub CheckVersion()
        Dim version As UInteger = ApplicationData.Current.Version

        Select Case version
            Case 0
                'Need to upgrade data from v0 to v1
                Upgrade_Version0_to_Version1()
                Exit Select
            Case 1
                'Right version, do nothing...
                Exit Select
            Case Else
                Throw New Exception("Unexpected ApplicationData Version: " + version)
        End Select
    End Sub

    Private Shared Async Sub Upgrade_Version0_to_Version1()
        Await ApplicationData.Current.SetVersionAsync(1,
                              New ApplicationDataSetVersionHandler(AddressOf SetVersion1Handler))
    End Sub

    Private Shared Sub SetVersion1Handler(setVersionRequest As SetVersionRequest)
        Dim deferral As SetVersionDeferral = setVersionRequest.GetDeferral()

        'Change the data format for all needed settings
        ApplicationData.Current.LocalSettings.Values("LocalData") = "this-is-a-new-data-format"

        deferral.Complete()
    End Sub

    Public Shared ReadOnly Property AppVersion() As UInteger
        Get
            Return ApplicationData.Current.Version
        End Get
    End Property
End Class
In addition to settings, an app can also roam files. For this scope, the ApplicationData namespace contains the RoamingFolder object. It is important to open and close any handles to the files before the roaming process starts. Here is an extended version of the previous SaveAsync() and RestoreAsync() examples inside the SuspensionManager class.
C#
public static async Task SaveAsync()
{
    try
    {
        // Save the navigation state for all registered frames
        foreach (var weakFrameReference in _registeredFrames)
        {
            Frame frame;
            if (weakFrameReference.TryGetTarget(out frame))
            {
                SaveFrameNavigationState(frame);
            }
        }

        // Serialize the session state synchronously to avoid asynchronous access to shared
        // state
        MemoryStream sessionData = new MemoryStream();
        DataContractSerializer serializer =
            new DataContractSerializer(typeof(Dictionary<string, object>), _knownTypes);
        serializer.WriteObject(sessionData, _sessionState);

        // Get an output stream for the SessionState file and write the state asynchronously
        StorageFile file = await
            ApplicationData.Current.RoamingFolder.CreateFileAsync(sessionStateFilename,
            CreationCollisionOption.ReplaceExisting);
        using (Stream fileStream = await file.OpenStreamForWriteAsync())
        {
            sessionData.Seek(0, SeekOrigin.Begin);
            await sessionData.CopyToAsync(fileStream);
            await fileStream.FlushAsync();
        }
    }
    catch (Exception e)
    {
        throw new SuspensionManagerException(e);
    }
}

public static async Task RestoreAsync()
{
    _sessionState = new Dictionary<String, Object>();

    try
    {
        // Get the input stream for the SessionState file
        StorageFile file =
            await ApplicationData.Current.RoamingFolder.GetFileAsync(sessionStateFilename);
        using (IInputStream inStream = await file.OpenSequentialReadAsync())
        {
            // Deserialize the Session State
            DataContractSerializer serializer =
                new DataContractSerializer(typeof(Dictionary<string, object>), _knownTypes);
            _sessionState = (Dictionary<string, object>)serializer.ReadObject(inStream.AsStreamForRead());
        }

        // Restore any registered frames to their saved state
        foreach (var weakFrameReference in _registeredFrames)
        {
            Frame frame;
            if (weakFrameReference.TryGetTarget(out frame))
            {
                frame.ClearValue(FrameSessionStateProperty);
                RestoreFrameNavigationState(frame);
            }
        }
    }
    catch (Exception e)
    {
        throw new SuspensionManagerException(e);
    }
}
VB
Public Shared Async Function SaveAsync() As Task
    Try

        ' Save the navigation state for all registered frames
        For Each weakFrameReference As WeakReference(Of Frame) In _registeredFrames
            Dim frame As Frame = Nothing
            If weakFrameReference.TryGetTarget(frame) Then
                SaveFrameNavigationState(frame)
            End If
        Next
        ' Serialize the session state synchronously to avoid asynchronous access to shared
        ' state
        Dim sessionData As New MemoryStream()
        Dim serializer As New Runtime.Serialization.DataContractSerializer(
            GetType(Dictionary(Of String, Object)), _knownTypes)
        serializer.WriteObject(sessionData, _sessionState)

        ' Get an output stream for the SessionState file and write the state asynchronously
        Dim file As Windows.Storage.StorageFile =
            Await Windows.Storage.ApplicationData.Current.RoamingFolder.CreateFileAsync(
            sessionStateFilename, Windows.Storage.CreationCollisionOption.ReplaceExisting)
        Using fileStream As Stream = Await file.OpenStreamForWriteAsync()
            sessionData.Seek(0, SeekOrigin.Begin)
            Await sessionData.CopyToAsync(fileStream)
            Await fileStream.FlushAsync()
        End Using
    Catch ex As Exception
        Throw New SuspensionManagerException(ex)
    End Try
End Function

''' <summary>
''' Restores previously saved <see cref="SessionState"/>.  Any <see cref="Frame"/> instances
''' registered with <see cref="RegisterFrame"/> will also restore their prior navigation
''' state, which in turn gives their active <see cref="Page"/> an opportunity restore its
''' state.
''' </summary>
''' <returns>An asynchronous task that reflects when session state has been read.  The
''' content of <see cref="SessionState"/> should not be relied upon until this task
''' completes.</returns>
Public Shared Async Function RestoreAsync() As Task
    _sessionState = New Dictionary(Of String, Object)()

    Try

        ' Get the input stream for the SessionState file
        Dim file As Windows.Storage.StorageFile =
            Await Windows.Storage.ApplicationData.Current.RoamingFolder.GetFileAsync(sessionStateFilename)
        If file Is Nothing Then Return

        Using inStream As Windows.Storage.Streams.IInputStream = Await file.OpenSequentialReadAsync()

            ' Deserialize the Session State
            Dim serializer As New Runtime.Serialization.DataContractSerializer(
                GetType(Dictionary(Of String, Object)), _knownTypes)
            _sessionState = DirectCast(serializer.ReadObject(inStream.AsStreamForRead()),
                Dictionary(Of String, Object))
        End Using

        ' Restore any registered frames to their saved state
        For Each weakFrameReference As WeakReference(Of Frame) In _registeredFrames
            Dim frame As Frame = Nothing
            If weakFrameReference.TryGetTarget(frame) Then
                frame.ClearValue(FrameSessionStateProperty)
                RestoreFrameNavigationState(frame)
            End If
        Next
    Catch ex As Exception
        Throw New SuspensionManagerException(ex)
    End Try
End Function
Make sure to check if roaming a file exceeds the roaming storage quota!
Temporary data stores can be used as a temporary area to store information. It is important to understand that files in this location can be deleted at any time by the operating system internal tasks (for example, the Disk Cleanup utility). For this reason, it is not guaranteed that these files are always available during app execution. Here is how to manage this type of data using the TemporaryFolder object:
C#
TempDataHelper.cs
public async static void SaveTempData(string data)
{
    ;
    StorageFile tempFile =
        await ApplicationData.Current.TemporaryFolder.CreateFileAsync("temporary.txt",
        CreationCollisionOption.ReplaceExisting);
    await FileIO.WriteTextAsync(calFile, data);
}

public async static Task<String> GetTempData()
{
    try
    {
        StorageFile tempFile = await ApplicationData.Current.TemporaryFolder.GetFileAsync("temporary.txt");
        String content = await FileIO.ReadTextAsync(tempFile);
        return content;
    }
    catch
    {
        throw new Exception("Data not found!");
    }
}

TempData.xaml.cs
private void SaveTempDataButton_Click(object sender, RoutedEventArgs e)
{
    TempDataHelper.SaveTempData(UserTempDataTextBox.Text);
}

private async void GetTempDataButton_Click(object sender, RoutedEventArgs e)
{
    StoredTempData.Text = await TempDataHelper.GetTempData();
}
VB
TempDataHelper.vb
Public NotInheritable Class TempDataHelper
    Private Sub New()
    End Sub
    Public Shared Async Sub SaveTempData(data As String)
        Dim tempFile As StorageFile =
            Await ApplicationData.Current.TemporaryFolder.CreateFileAsync(
                "temporary.txt", CreationCollisionOption.ReplaceExisting)
        Await FileIO.WriteTextAsync(tempFile, data)
    End Sub

    Public Shared Async Function GetTempData() As Task(Of [String])
        Try
            Dim tempFile As StorageFile =
                Await ApplicationData.Current.TemporaryFolder.GetFileAsync("temporary.txt")
            Dim content As [String] = Await FileIO.ReadTextAsync(tempFile)
            Return content
        Catch
            Throw New Exception("Data not found!")
        End Try
    End Function
End Class

TempData.xaml.vb
Private Sub SaveTempDataButton_Click(sender As Object, e As RoutedEventArgs)
    TempDataHelper.SaveTempData(UserTempDataTextBox.Text)
End Sub

Private Async Sub GetTempDataButton_Click(sender As Object, e As RoutedEventArgs)
    StoredTempData.Text = Await TempDataHelper.GetTempData()
End Sub
Until now you have seen the different ways to handle AppData inside your Windows Store app.
For user data, you need to use other classes to read or write data and files. First, this type of data can be stored in one of the user libraries, installation folders, or accessible folders (based on the available capabilities). Storage APIs offer a simple way to access to these locations using Windows.Storage.KnownFolders. Figure 8-10 shows the static properties available in KnownFolders static class.

Figure 8-10. KnownFolders Properties
You can access PicturesLibrary after the related capability is enabled in Package.appxmanifest:
C#
UserData.xaml.cs
        private async void SaveDataButton_Click(object sender, RoutedEventArgs e)
        {
            StorageFile userFile = await KnownFolders.PicturesLibrary.CreateFileAsync("userdata.txt", CreationCollisionOption.ReplaceExisting);
            await FileIO.WriteTextAsync(userFile, UserDataTextBox.Text);
        }

        private async void GetDataButton_Click(object sender, RoutedEventArgs e)
        {
            try
            {
                StorageFile userFile = await KnownFolders.PicturesLibrary.GetFileAsync("userdata.txt");
                StoredData.Text = await FileIO.ReadTextAsync(userFile);
            }
            catch
            {
                throw new Exception("Data not found!");
            }
        }
VB
UserData.xaml.vb
Private Async Sub SaveDataButton_Click(sender As Object, e As RoutedEventArgs)
    Dim userFile As StorageFile =
        Await KnownFolders.PicturesLibrary.CreateFileAsync("userdata.txt",
                                                           CreationCollisionOption.ReplaceExisting)
    Await FileIO.WriteTextAsync(userFile, UserDataTextBox.Text)
End Sub

Private Async Sub GetDataButton_Click(sender As Object, e As RoutedEventArgs)
    Try
        Dim userFile As StorageFile = Await KnownFolders.PicturesLibrary.GetFileAsync("userdata.txt")
        StoredData.Text = Await FileIO.ReadTextAsync(userFile)
    Catch
        Throw New Exception("Data not found!")
    End Try
End Sub
Starting in Windows 8.1 it is also possible to use another class to retrieve all libraries folders: StorageLibrary. With this object you can easily handle your libraries thanks to integration with the FilePicker object.
In the previous section you saw how to access user libraries. The problem is that KnownFolders is the only available location inside the app (if the relative app capability is enabled). If you want to store files in another location, you can take advantage of the FilePicker class.
The FilePicker is a user-driven control that allows a user to choose the location for a file. This helps to minimize the number of enables capabilities in the app and simplify the submission process to the Windows Store.
The following images show an example of FilePicker: you can see the current location (Figure 8-11), a scrollable menu to navigate in the local folders (Figure 8-12), and the list of selected items (Figure 8-13).

Figure 8-11. An example of FilePicker

Figure 8-12. FilePicker available folders

Figure 8-13. Selected file inside FilePicker
Once a file is picked using the FilePicker, an instance of the StorageFile class is returned.
In addition to FilePicker, the Storage APIs also provide a FolderPicker object that lets the user choose a folder. Once a folder is picked using the FolderPicker, an instance of StorageFolder is returned.
In order to use the FilePicker or the FolderPicker object, it is necessary to follow these steps:
- Create and customize a FilePicker/FolderPicker object, setting different properties before the control. Some of these properties are listed in Table 8-2.
Table 8-2. FilePicker/FolderPicker Properties
Property
Description
Possible Values
ViewMode
Item Visualization
List, Thumbnail
SuggestedStartLocation
Default folder
A file system location
fileTypeFilter
A list of different extension to filter showed items
List of extensions
- Show the FilePicker/FolderPicker using
- pickSingleFileAsync() (just one file)
- pickMultipleFileAsync() (multiple files, returning a list of storage files)
- pickSingleFolderAsync() (just one folder)
Also remember that file picker can be opened both in split-screen and a full-screen display.
Let’s add the code inside your Organizer app:
C#
UserData.xaml.cs
public async void GetFile()
{
    FileOpenPicker openPicker = new FileOpenPicker();
    openPicker.ViewMode = PickerViewMode.List;
    openPicker.SuggestedStartLocation = PickerLocationId.Desktop;
    openPicker.FileTypeFilter.Add(".txt");
    StorageFile file = await openPicker.PickSingleFileAsync();

    if (file != null)
    {
        //do something
    }
}

UserData.xaml.cs
public async void GetFolder()
{
    FolderPicker openPicker = new FolderPicker();
    openPicker.ViewMode = PickerViewMode.List;
    openPicker.SuggestedStartLocation = PickerLocationId.Desktop;
    openPicker.FileTypeFilter.Add(".txt");
    StorageFolder folder = await openPicker.PickSingleFolderAsync();

    if (folder != null)
    {
        //do something
    }
}
VB
UserData.xaml.vb
Public Async Sub GetFile()
    Dim openPicker As New FileOpenPicker()
    openPicker.ViewMode = PickerViewMode.List
    openPicker.SuggestedStartLocation = PickerLocationId.Desktop
    openPicker.FileTypeFilter.Add(".txt")
    Dim file As StorageFile = Await openPicker.PickSingleFileAsync()

    If file IsNot Nothing Then
        'do something
    End If
End Sub

UserData.xaml.vb
Public Async Sub GetFolder()
    Dim openPicker As New FolderPicker()
    openPicker.ViewMode = PickerViewMode.List
    openPicker.SuggestedStartLocation = PickerLocationId.Desktop
    openPicker.FileTypeFilter.Add(".txt")
    Dim folder As StorageFolder = Await openPicker.PickSingleFolderAsync()

    If folder IsNot Nothing Then
          'do something
    End If
End Sub
If you need to save a file to a location, you need to use the FileSavePicker. Once the window is opened by calling the PickSaveFileAsync() method, the user can type a name or leave the default file name set using the SuggestedFileName property. It is also possible to set the following:
- The default folder using the SuggestedStartLocation property
- The default extension using the DefaultFileExtension property
Then the user confirms the saving of the file and PickSaveFileAsync() returns a StorageFile object that is the saved file. Remember that it is possible to share your files in other applications by integrating the file picker contracts.
Using SQLite for Windows Store Apps
Sometimes you need to store more structured data than single values or a data file. Often the appropriate choice in this situation is a database. Unfortunately, in a Windows Store app you can’t directly access SQL Server or SQL Server CE (the only way is to access to them using services). The available solution is SQLite.
For those who don't know, SQLite is an open source transactional database (more often defined as a library). It is multi-platform and consists of a single file containing all the data (other details at en.wikipedia.org/wiki/SQLite). In order to use SQLite in your application, you need to download it from www.sqlite.org/download.html (Figure 8-14) and install it (Figure 8-15).

Figure 8-14. SQLite download page

Figure 8-15. SQLite VSIX Installer window
Once installed (Figure 8-16), you need to add a reference to your Windows Store app project: right-click the project name in the Solution Explorer, select the References item, and then Add New Reference.

Figure 8-16. Installed extension section
Inside the windows that shows up (Figure 8-17), check the SQLite for Windows Runtime item.

Figure 8-17. Add reference window
Now you can add through NuGet a wrapper to connect and use SQLite via the following command:
Install-Package sqlite-net
You are now ready to learn how to create a table for a SimpleAppointment entity and how to access to it:
C#
SQLiteHelper.cs
public async static void CreateDatabase()
{
    var storagePath = Windows.Storage.ApplicationData.Current.LocalFolder;
    var file = await storagePath.TryGetItemAsync("db.sqlite");

    if (file == null)
    {
        var dbPath = System.IO.Path.Combine(
            Windows.Storage.ApplicationData.Current.LocalFolder.Path, "db.sqlite");

        try
        {
            using (var db = new SQLiteConnection(dbPath))
            {
                db.CreateTable<SimpleAppointment>();
            }
        }
        catch (Exception ex)
        {
            throw ex;
        }
    }
}

public static void AddAppointment(SimpleAppointment appointment)
{
    var dbPath = System.IO.Path.Combine(
        Windows.Storage.ApplicationData.Current.LocalFolder.Path, "db.sqlite");

    try
    {
        using (var db = new SQLiteConnection(dbPath))
        {
            db.RunInTransaction(() =>
                    {
                        db.Insert(new SimpleAppointment()
                        {
                            Id = appointment.Id,
                            Subject = appointment.Subject,
                            Location = appointment.Location,
                            StartDate = appointment.StartDate,
                            EndDate = appointment.EndDate
                        });
                    }
            );
        }
    }
    catch (Exception ex)
    {
        throw ex;
    }
}

public static SimpleAppointment GetAppointment(int id)
{
    var dbPath = System.IO.Path.Combine(
        Windows.Storage.ApplicationData.Current.LocalFolder.Path, "db.sqlite");

    try
    {
        using (var db = new SQLiteConnection(dbPath))
        {
            return db.Find<SimpleAppointment>(id);
        }
    }
    catch (Exception ex)
    {
        throw ex;
    }
}

SQLiteAccess.xaml.cs
private void SaveButton_Click(object sender, RoutedEventArgs e)
{
    SQLiteHelper.AddAppointment(new SimpleAppointment
                                    {
                                        Subject = SubjectTextBox.Text,
                                        Location = LocationTextBox.Text,
                                        StartDate = StartDatePicker.Date.Date,
                                        EndDate = EndDatePicker.Date.Date
                                    });

    ResultTextBlock.Text = "Appointment saved!";

}

private void ClearButton_Click(object sender, RoutedEventArgs e)
{
    SubjectTextBox.Text = String.Empty;
    LocationTextBox.Text = String.Empty;
    StartDatePicker.Date = DateTime.Now;
    EndDatePicker.Date = DateTime.Now;
}

private void LoadButton_Click(object sender, RoutedEventArgs e)
{
    SimpleAppointment appointment = SQLiteHelper.GetAppointment(1);

    SubjectTextBox.Text = appointment.Subject;
    LocationTextBox.Text = appointment.Location;
    StartDatePicker.Date = appointment.StartDate;
    EndDatePicker.Date = appointment.EndDate;
}


public SQLiteAccess()
{
    this.InitializeComponent();
    this.navigationHelper = new NavigationHelper(this);

    //Create a SQLite database if not exists
    SQLiteHelper.CreateDatabase();
}

SimpleAppointment.cs
public class SimpleAppointment
{
    [SQLite.PrimaryKey]
    [SQLite.AutoIncrement]
    public int Id { get; set; }
    public string Subject { get; set; }
    public string Location { get; set; }
    public DateTime StartDate { get; set; }
    public DateTime EndDate { get; set; }
}
After adding a reference to SQLite in your project, a file named SQLite.cs is added. This file is a wrapper that helps you use SQLite. Unfortunately, there’s no official wrapper for SQLite to use with languages other than C#. But there are unofficial wrappers like Visual Basic Sqlite WinRT Wrapper (code.msdn.microsoft.com/windowsapps/Visual-Basic-Sqlite-WinRT-bf6fe131).
There is another good way to use the official library inside your project via a language other than C#. You just need to create a DLL (or WinRT component) and then add it to your project. A good explanation from Tim Heuer is at timheuer.com/blog/archive/2012/08/07/updated-how-to-using-sqlite-from-windows-store-apps.aspx.
Finally, to explore SQLite data inside your db, you can use a tool like SQLite Browser: sourceforge.net/projects/sqlitebrowser.
Until now you’ve faced the management of user data that resides on the same machine where the app is running. More often, however, you need data that is reachable through the Internet using web services.
Happily, Windows Store apps can retrieve remote data through the Internet from different sources, such as Active Server Methods (ASMX), Windows Communication Services, and the new Windows Azure Mobile Services. In this section, we will go to into details on how to retrieve remote data from these sources.
Retrieving Data from Windows Communication Foundation
Windows Store apps support a subset of features of Windows Communication Foundation (WCF for short). Table 8-3 summarizes them.
Table 8-3. WCF Features for Windows Store Apps
Binding |
BasicHttpBinding |
Binding Elements |
BinaryMessageEncodingBindingElement |
Enconding |
Text |
Security Modes |
None |
ClientCredentialType |
None |
Transfer Mode |
Buffered |
Serializer |
DataContractSerializer |
Misc |
ChannelFactory |
If you need to add a WCF service to your project, nothing changes from the past. The steps are the following: right-click the Service Reference inside the project in Solution Explorer, choose Add Service Reference, type or paste the URL into the Address box, press the Go button, and once the service shows up, click the Ok button. Visual Studio 2013 takes care to create all related files for the connection. But good news always has bad news behind it: there’s no Windows Communication Foundation XML configuration! In Visual Studio 2013, in a project different from a Windows Store app, you can change WCF bindings and behavior using the XML configuration. Instead, in a Windows Store app, you must edit any configuration in the Reference.cs related to the referenced service. To open this file (Figure 8-18), you need to enable the “All files” viewing option (1) and then open and edit Reference.cs file (2).

Figure 8-18. Reference.cs location
Once open, note that all operations are generated using the Task-based asynchronous pattern and the Configure() method is declared as partial class. But why? Unfortunately, every time you update the service reference, all changes to the Configure() method are overwritten. So, if you want to keep your changes stored, you need to implement a partial class for the client (pay attention to namespaces):
C#
FakeServiceClient.cs
namespace Win8Organizer.CSharp.Model.FakeServiceReference
{
    public partial class FakeServiceClient :
        System.ServiceModel.ClientBase<Win8Organizer.Csharp.Model.FakeServiceReference.IfakeService>,
            Win8Organizer.Csharp.Model.FakeServiceReference.IfakeService
    {
        static partial void ConfigureEndpoint(System.ServiceModel.Description.ServiceEndpoint serviceEndpoint,
            System.ServiceModel.Description.ClientCredentials clientCredentials)
        {
            if (serviceEndpoint.Name ==
                FakeServiceReference.FakeServiceClient
                    .EndpointConfiguration.BasicHttpBinding_IfakeService.ToString())
            {
                serviceEndpoint.Binding.SendTimeout = new System.TimeSpan(0, 1, 0);
            }
        }
    }
}
VB
Partial Public Class FakeServiceClient
    Inherits System.ServiceModel.ClientBase(Of FakeServiceReference.IFakeService)
    Implements FakeServiceReference.IFakeService

    Partial Private Shared Sub ConfigureEndpoint(ByVal serviceEndpoint As System.ServiceModel.Description.ServiceEndpoint,
                                                 ByVal clientCredentials As System.ServiceModel.Description.ClientCredentials)
        ' Implementation is moved after the FakeServiceClient instantiation
        ' because partial method must have empty body
    End Sub

    Public Function GetSimpleAppointmentAsync() As Task(Of FakeServiceReference.SimpleAppointment)
                                Implements FakeServiceReference.IFakeService.GetSimpleAppointmentAsync
        Return MyBase.Channel.GetSimpleAppointmentAsync
    End Function
End Class
Now that you’ve configured the service reference, you are ready to create a proxy class and retrieve data inside your application. Let’s see how to add your app to a WCF Service to get appointments information.
![]() Note You need a copy of Visual Studio Express 2013 for Web to create a WCF Service.
Note You need a copy of Visual Studio Express 2013 for Web to create a WCF Service.
C#
IFakeService.cs
    [ServiceContract]
    public interface IFakeService
    {

        [OperationContract]
        SimpleAppointment GetSimpleAppointment();
    }


    // Use a data contract as illustrated in the sample below to add composite types to service operations.
    [DataContract]
    public class SimpleAppointment
    {
        [DataMember]
        public int Id { get; set; }

        [DataMember]
        public string Subject { get; set; }

        [DataMember]
        public string Location { get; set; }

        [DataMember]
        public DateTime StartDate { get; set; }

        [DataMember]
        public DateTime EndDate { get; set; }
    }

FakeService.svc.cs
public class FakeService : IFakeService
{
    SimpleAppointment IFakeService.GetSimpleAppointment()
    {
        return new SimpleAppointment()
        {
            Id = 1,
            Subject = "New Appointment",
            Location = "12, Kennedy Street, Washington",
            StartDate = DateTime.Now,
            EndDate = DateTime.Now.AddDays(1)
        };
    }
}
![]() Note You will reuse the same service for VB language.
Note You will reuse the same service for VB language.
In Figure 8-18 you saw how to add reference to the FakeService. Now let’s see how to call the web service. Remember: web service calls must be asynchronous!
C#
WCFClient.xaml.cs
private async void LoadButton_Click(object sender, RoutedEventArgs e)
{
    try
    {
        FakeServiceReference.FakeServiceClient svc = new FakeServiceReference.FakeServiceClient();

        FakeServiceReference.SimpleAppointment appointment = await svc.GetSimpleAppointmentAsync();

        SubjectTextBox.Text = appointment.Subject;
        LocationTextBox.Text = appointment.Location;
        StartDatePicker.Date = appointment.StartDate;
        EndDatePicker.Date = appointment.EndDate;
    }
    catch
    {
        ResultTextBlock.Text = "Oops! Something went wrong!";
    }
}
VB
Private Async Sub LoadButton_Click(sender As Object, e As RoutedEventArgs)
    Try
        Dim svc As New FakeServiceReference.FakeServiceClient

        If svc.Endpoint.Name = FakeServiceReference.FakeServiceClient.EndpointConfiguration.BasicHttpBinding_IFakeService.ToString() Then
            svc.Endpoint.Binding.SendTimeout = New System.TimeSpan(0, 1, 0)
        End If

        Dim appointment As FakeServiceReference.SimpleAppointment = Await svc.GetSimpleAppointmentAsync()

        SubjectTextBox.Text = appointment.Subject
        LocationTextBox.Text = appointment.Location
        StartDatePicker.[Date] = appointment.StartDate
        EndDatePicker.[Date] = appointment.EndDate
    Catch
        ResultTextBlock.Text = "Oops! Something went wrong!"
    End Try
End Sub
WinRT provides also the SyndicationApi. It is a set of classes that helps retrieve feeds from the Web. The usage is very simple: the class SyndicationClient performs the whole process, starting a connection, reading the feed, and returning a list of SyndicationItem:
C#
RssHelper.cs
public async static Task<string> GetFeedTitleAsync()
{
    string response = String.Empty;
    SyndicationFeed feed = new SyndicationFeed();
    SyndicationClient client = new SyndicationClient();

    try
    {
        feed = await client.RetrieveFeedAsync(
            new Uri("http://www.apress.com/index.php/dailydeals/index/rss"));

        response = feed.GetXmlDocument(SyndicationFormat.Rss20).GetXml();
    }
    catch (Exception ex)
    {
        SyndicationErrorStatus status = SyndicationError.GetStatus(ex.HResult);
        if (status == SyndicationErrorStatus.InvalidXml)
        {
            response += "Invalid XML!";
        }

        if (status == SyndicationErrorStatus.Unknown)
        {
            response = ex.Message;
        }
    }

    return response;
}
VB
RSSHelper.vb
Public NotInheritable Class RssHelper
    Private Sub New()
    End Sub
    Public Shared Async Function GetFeedTitleAsync() As Task(Of String)
        Dim response As String = [String].Empty
        Dim feed As New SyndicationFeed()
        Dim client As New SyndicationClient()

        Try
            feed = Await client.RetrieveFeedAsync(New Uri("http://www.apress.com/index.php/dailydeals/index/rss"))

            response = feed.GetXmlDocument(SyndicationFormat.Rss20).GetXml()
        Catch ex As Exception
            Dim status As SyndicationErrorStatus = SyndicationError.GetStatus(ex.HResult)
            If status = SyndicationErrorStatus.InvalidXml Then
                response += "Invalid XML!"
            End If

            If status = SyndicationErrorStatus.Unknown Then
                response = ex.Message
            End If
        End Try

        Return response
    End Function
End Class
Starting with Windows 8.1 there is new namespace to handle HTTP web requests and REST web services: Windows.Web.Http. Inside this namespace you can find several helpful objects to achieve simple or complex tasks related to the Web. The features include the following:
- Handling HTTP common verbs (DELETE, GET, PUT and POST)
- Support for common authentication settings and patterns
- Support for SSL
- Customized filters
- Full support for cookies
- Asynchronous operations
The main class is HTTPClient and it allows you to send and receive requests over the HTTP protocol. Using the filtering mechanism, it is possible to customize the request based on the scenario:
C#
HTTPClient.xaml.cs
private async void navigationHelper_LoadState(object sender, LoadStateEventArgs e)
{
    // TODO: Create an appropriate data model for your problem domain to replace the sample data
    var item = await SampleDataSource.GetItemAsync((String)e.NavigationParameter);
    //this.DefaultViewModel["Item"] = item;

    ResultTextBlock.Text = await
        new HttpClient().GetStringAsync(
            new Uri("http://www.apress.com/index.php/dailydeals/index/rss"
            )
        );
}
VB
HTTPClient.xaml.vb
Private Async Sub NavigationHelper_LoadState(sender As Object, e As Common.LoadStateEventArgs)
    ' TODO: Create an appropriate data model for your problem domain to replace the sample data
    Dim item As Data.SampleDataItem = Await Data.SampleDataSource.GetItemAsync(DirectCast(e.NavigationParameter, String))
    Me.DefaultViewModel("Item") = item

    ResultTextBlock.Text = Await New HttpClient().
        GetStringAsync(New Uri("http://www.apress.com/index.php/dailydeals/index/rss"))
End Sub
Retrieving Data from Windows Azure Mobile Services
Some of the big news these days about Windows Store apps is the full support for Windows Azure Mobile Service, which allows you to store structured data on the cloud and provide authentication, push notification, and scalability. All of these features can be configured using a very intuitive portal (which is the same for Microsoft Windows Azure). Let’s start from beginning!
First, you need an active Microsoft Account. It can be created at https://signup.live.com/. After creating the account, you must connect to Windows Azure Portal using the Microsoft Account at https://windows.azure.com/ and activate the trial period for Windows Azure (it will last 90 days) and participate in the preview program. Then, in the Windows Azure menu (Figure 8-19) click the New button. Then select Compute and choose Create from the Mobile Service items (Figure 8-20). At this point, you have created a mobile service. You need to provide a URL, like buildingwindows8appsfromthegroundupmobileservice (it is the name of the mobile service and it will appear in the final URL like this: https://buildingwindows8appsfromthegroundupmobileservice.azure-mobile.net/), choose to create or re-use a database, and select the region (Figure 8-21). Click the Next button and type all the information about the new database, such as name, server, login, and password, and then press the Complete button (Figure 8-22).

Figure 8-19. Windows Azure menu
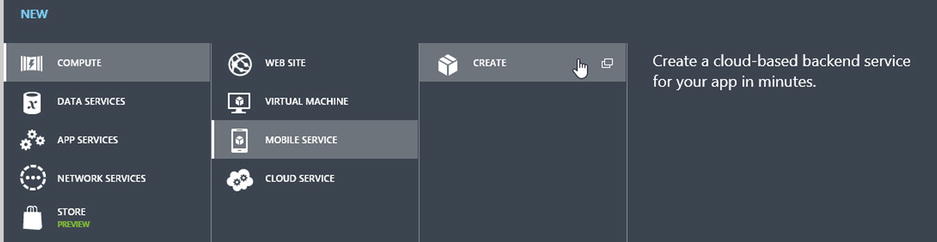
Figure 8-20. Mobile Service menu

Figure 8-21. Mobile service creation (1)

Figure 8-22. Mobile service creation (2)
Through these steps, you have created your first mobile service and you can check out its state using the Windows Azure Portal in the main page by selecting the Mobile Services item on the menu: you can see your buildingwindows8appsfromthegroundupmobileservice in Figure 8-23.

Figure 8-23. Mobile services summary in Windows Azure Portal
Clicking the mobile service name brings you to its dashboard (Figure 8-24).

Figure 8-24. Mobile service dashboard
In it, select DATA and create a new table named SimpleAppointment by using the “Add a table” button (Figure 8-25).

Figure 8-25. New table creation wizard
Finally, you have your table (Figure 8-26) and it has just one column (Figure 8-27) to handle all your data.

Figure 8-26. SimpleAppointment dashboard

Figure 8-27. SimpleAppointment columns
Other items in the Table menu are the following:
- Browse: To list all data
- Script: To apply some logic to CRUD operations in JavaScript code without the need of an external application (Figure 8-28)

Figure 8-28. Script section in Table dashboard
- Permission: To set user permissions to CRUD operations (Figure 8-29)

Figure 8-29. Permissions section in Table dashboard
Let’s see how to call this service from your Organizer. First, you need to install the Mobile Services SDK (download it at www.windowsazure.com/en-us/develop/mobile/developer-tools/). You can also use a quick and simple NuGet command instead of the previous steps:
Install-Package WindowsAzure.MobileServices
Then, from your project inside Visual Studio 2013 right-click the project name, select Add, and then select Connected Services (Figure 8-30). Now, in the Service Manager window, select Mobile Services and Import Subscription to open a pop-up to load the subscription file for your Azure Account. If you don’t have the subscription file (*.publishsettings), you can simply click Download Subscription File to connect to your account and download it. Once the file is imported, you need to refresh the Services Manager window and your Mobile Service will appear. Just click it and press OK (Figure 8-31).

Figure 8-30. Add a Windows Azure Mobile Service to your project

Figure 8-31. Services Manager window
To connect your app to the Windows Azure Mobile Service, you need an API key that is automatically added in the previous step inside the App.xaml.cs or App.xaml.vb and is used to initialize the MobileServiceClient class:
C#
public static Microsoft.WindowsAzure.MobileServices.MobileServiceClient
    buildingwindows8appsfromthegroundupmobileserviceClient =
    new Microsoft.WindowsAzure.MobileServices.MobileServiceClient(
"https://buildingwindows8appsfromthegroundupmobileservice.azure-mobile.net/",
"YOUR_APP_KEY");
VB
Public Shared bw8agu_mobileserviceClient As New Microsoft.WindowsAzure.MobileServices.MobileServiceClient(
"https://buildingwindows8appsfromthegroundupmobileservice.azure-mobile.net/",
"YOUR_APP_KEY")
This key can be retrieved in the Windows Azure Mobile Services dashboard via the “Connect an existing Windows Store app” item (Figure 8-32).

Figure 8-32. Mobile Service key and address
Here is how to execute some basic operations on the table behind the Windows Azure Mobile Service just created:
C#
public static class AzureMobileServicesHelper
{
    public async static void InsertDataFromAzureMobileSvc(SimpleAppointment item)
    {
        await App.bw8agu_mobileserviceClient.GetTable<SimpleAppointment>()
            .InsertAsync(item);
    }

    public async static Task<MobileServiceCollection<SimpleAppointment, SimpleAppointment>> GetDataFromAzureMobileSvc()
    {
        try
        {
            IMobileServiceTable<SimpleAppointment> table =
                App.bw8agu_mobileserviceClient
                .GetTable<SimpleAppointment>();

            return await table.ToCollectionAsync<SimpleAppointment>();
        }
        catch (Exception ex)
        { throw ex; }
    }

    public static void UpdateDataFromAzureMobileSvc(SimpleAppointment item)
    {
        try
        {
            IMobileServiceTable<SimpleAppointment> table = App.bw8agu_mobileserviceClient.GetTable<SimpleAppointment>();

            table.UpdateAsync(item);
        }
        catch (Exception ex)
        {
            throw ex;
        }
    }
}
VB
Public NotInheritable Class AzureMobileServicesHelper
    Private Sub New()
    End Sub
    Public Shared Async Sub InsertDataFromAzureMobileSvc(item As SimpleAppointment)
        Await App.bw8agu_mobileserviceClient.GetTable(Of SimpleAppointment)().InsertAsync(item)
    End Sub

    Public Shared Async Function GetDataFromAzureMobileSvc() As Task
                As Task(Of MobileServiceCollection(Of SimpleAppointment, SimpleAppointment))
        Try
            Dim table As IMobileServiceTable(Of SimpleAppointment) =
                App.bw8agu_mobileserviceClient.GetTable(Of SimpleAppointment)()

            Return Await table.ToCollectionAsync()
        Catch ex As Exception
            Throw ex
        End Try
    End Function

    Public Shared Async Sub UpdateDataFromAzureMobileSvc(item As SimpleAppointment)
        Try
            Dim table As IMobileServiceTable(Of SimpleAppointment) =
                App.bw8agu_mobileserviceClient.GetTable(Of SimpleAppointment)()

            Await table.UpdateAsync(item)
        Catch ex As Exception
            Throw ex
        End Try
    End Sub
End Class
The following code can be used to call one of these operations.
C#
AzureMobileServices.xaml.cs
private void SaveButton_Click(object sender, RoutedEventArgs e)
{
    try
    {
        AzureMobileServicesHelper.InsertDataFromAzureMobileSvc(new SimpleAppointment
                                        {
                                            Subject = SubjectTextBox.Text,
                                            Location = LocationTextBox.Text,
                                            StartDate = StartDatePicker.Date.Date,
                                            EndDate = EndDatePicker.Date.Date
                                        });

        ResultTextBlock.Text = "Appointment saved!";
    }
    catch (Exception ex)
    {
        ResultTextBlock.Text = ex.Message;
    }

}

private void ClearButton_Click(object sender, RoutedEventArgs e)
{
    SubjectTextBox.Text = String.Empty;
    LocationTextBox.Text = String.Empty;
    StartDatePicker.Date = DateTime.Now;
    EndDatePicker.Date = DateTime.Now;
}

private async void LoadButton_Click(object sender, RoutedEventArgs e)
{
    SimpleAppointment appointment = (await AzureMobileServicesHelper.GetDataFromAzureMobileSvc()).FirstOrDefault();

    SubjectTextBox.Text = appointment.Subject;
    LocationTextBox.Text = appointment.Location;
    StartDatePicker.Date = appointment.StartDate;
    EndDatePicker.Date = appointment.EndDate;
}
VB
AzureMobileServices.xaml.vb
Private Sub SaveButton_Click(sender As Object, e As RoutedEventArgs)
    Try
        AzureMobileServicesHelper.InsertDataFromAzureMobileSvc(New SimpleAppointment() With { _
             .Subject = SubjectTextBox.Text, _
             .Location = LocationTextBox.Text, _
             .StartDate = StartDatePicker.[Date].[Date], _
             .EndDate = EndDatePicker.[Date].[Date] _
        })

        ResultTextBlock.Text = "Appointment saved!"
    Catch ex As Exception
        ResultTextBlock.Text = ex.Message
    End Try
End Sub

Private Sub ClearButton_Click(sender As Object, e As RoutedEventArgs)
    SubjectTextBox.Text = [String].Empty
    LocationTextBox.Text = [String].Empty
    StartDatePicker.[Date] = DateTime.Now
    EndDatePicker.[Date] = DateTime.Now
End Sub

Private Async Sub LoadButton_Click(sender As Object, e As RoutedEventArgs)
    Dim appointment As SimpleAppointment = (
        Await AzureMobileServicesHelper.GetDataFromAzureMobileSvc()).FirstOrDefault()
    SubjectTextBox.Text = appointment.Subject
    LocationTextBox.Text = appointment.Location
    StartDatePicker.[Date] = appointment.StartDate
    EndDatePicker.[Date] = appointment.EndDate
End Sub
Data just inserted can be showed in the Mobile Services panel on the portal in the used table inside the Data section (Figure 8-33).

Figure 8-33. SimpleAppointment records
Last but not least, the Windows Azure Mobile Services portal is a simple and useful environment to check the state and the usage of your services. Indeed, the dashboard shows a chart containing all the API calls, CPU times, and data out info (Figure 8-34). You can also manage notification, scalability, and authentication.
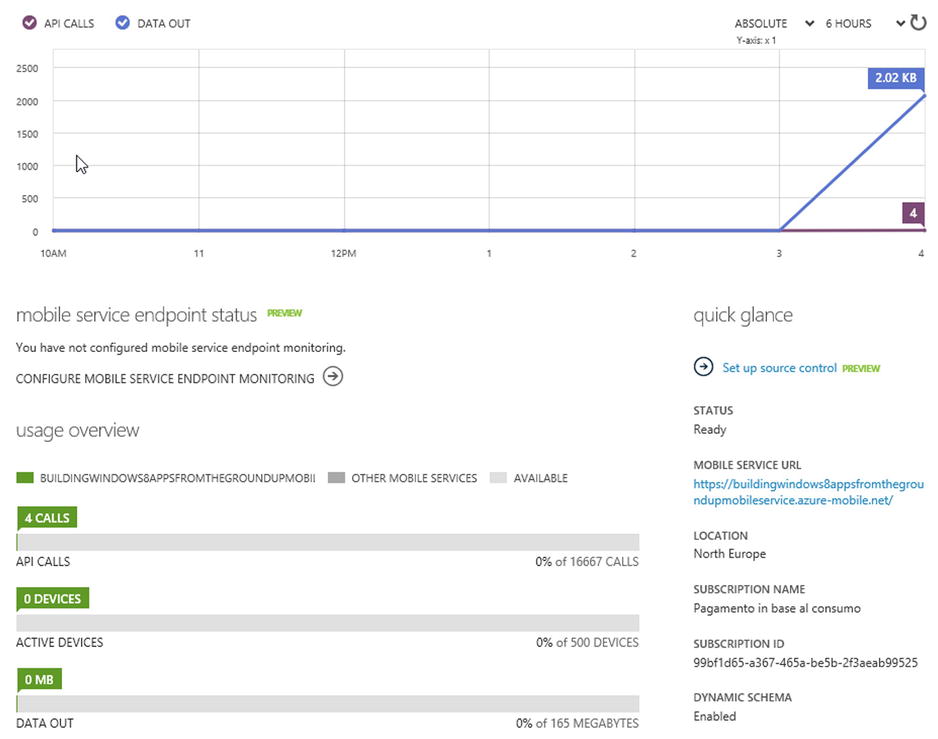
Figure 8-34. Windows Azure Mobile Service dashboard
Managing User Info
In this section you’ll get a quick look at user info management for issues such as roaming credentials, single sign-on using a web authentication broker, and how to manage user contact. Be aware that some of these features require a valid Microsoft Account and a Windows Store developer account (further information can be found in Chapter 11).
Credential Roaming
With these features, apps can store passwords inside the password vault using the Windows.Security.Credentials namespace. The password vault, also called as Credential Locker, is a safe place that allows the credential to roam to other trusted devices. The entire mechanism is based on the following steps.
- Sign in on Windows 8 using your own credentials. This will mark the machine as a trusted device.
- Let the user choose to save or not save their password.
Through these steps, credentials will be roamed to the cloud and are available to the other devices (of course if they are trusted devices too!). Figure 8-35 shows the Windows.Security.Credentials classes.

Figure 8-35. Windows.Security.Credentials classes
Now, let’s see how to memorize and retrieve passwords using the PasswordVault class inside the Login Settings panel (Figure 8-36).
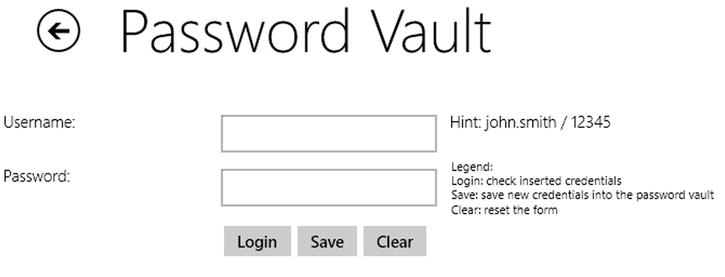
Figure 8-36. Login Settings panel
C#
PasswordVault.xaml.cs
private void LoginButton_Click(object sender, RoutedEventArgs e)
{
    if (PasswordVaultHelper.CheckPassword(UsernameTextBox.Text, PasswordTextBox.Password))
    {
        ResultTextBlock.Text = "Login succeeded!";
    }
    else
    {
        ResultTextBlock.Text = "Login failed!";
    }
    ClearTextboxes();
}

private void SaveButton_Click(object sender, RoutedEventArgs e)
{
    PasswordVaultHelper.SavePasswordToVault(UsernameTextBox.Text, PasswordTextBox.Password);

    ResultTextBlock.Text = "Credentials saved!";
    ClearTextboxes();
}

private void ClearButton_Click(object sender, RoutedEventArgs e)
{
    ClearTextboxes();
    ResultTextBlock.Text = String.Empty;
}

private void ClearTextboxes()
{
    UsernameTextBox.Text = String.Empty;
    PasswordTextBox.Password = String.Empty;
}

PasswordVaultHelper.cs
public class PasswordVaultHelper
{
    private static PasswordVault vault =
        new Windows.Security.Credentials.PasswordVault();

    public static IList<PasswordCredential> LoadPasswordVault()
    {
        //Load all credentials
        IReadOnlyList<PasswordCredential> creds = vault.RetrieveAll();

        return creds.ToList<PasswordCredential>();
    }

    public static bool CheckPassword(string username, string password)
    {
        bool res = false;

        try
        {
            IReadOnlyList<PasswordCredential> creds = vault.FindAllByUserName(username);

            foreach (PasswordCredential cred in creds)
            {
                cred.RetrievePassword();
                res = cred.Password == password;
            }
        }
        catch
        {
            //do nothing
        }

        return res;
    }

    public static void SavePasswordToVault(string username, string password)
    {
        LoadPasswordVault();

        PasswordCredential cred = new PasswordCredential("BW8AGU", username, password);

        vault.Add(cred);
    }
}
VB
PasswordVault.xaml.vb
Private Sub LoginButton_Click(sender As Object, e As RoutedEventArgs)
    If PasswordVaultHelper.CheckPassword(UsernameTextBox.Text, PasswordTextBox.Password) Then
        ResultTextBlock.Text = "Login succeeded!"
    Else
        ResultTextBlock.Text = "Login failed!"
    End If
    ClearTextboxes()
End Sub

Private Sub SaveButton_Click(sender As Object, e As RoutedEventArgs)
    PasswordVaultHelper.SavePasswordToVault(UsernameTextBox.Text, PasswordTextBox.Password)

    ResultTextBlock.Text = "Credentials saved!"
    ClearTextboxes()
End Sub

Private Sub ClearButton_Click(sender As Object, e As RoutedEventArgs)
    ClearTextboxes()
    ResultTextBlock.Text = [String].Empty
End Sub

Private Sub ClearTextboxes()
    UsernameTextBox.Text = [String].Empty
    PasswordTextBox.Password = [String].Empty
End Sub

PasswordVaultHelper.vb
Public Class PasswordVaultHelper
    Private Shared vault As PasswordVault = New Windows.Security.Credentials.PasswordVault()

    Public Shared Function LoadPasswordVault() As IList(Of PasswordCredential)
        'Load all credentials
        Dim creds As IReadOnlyList(Of PasswordCredential) = vault.RetrieveAll()

        Return creds.ToList()
    End Function

    Public Shared Function CheckPassword(username As String, password As String) As Boolean
        Dim res As Boolean = False

        Try
            Dim creds As IReadOnlyList(Of PasswordCredential) = vault.FindAllByUserName(username)

            For Each cred As PasswordCredential In creds
                cred.RetrievePassword()
                res = cred.Password = password
            Next
            'do nothing
        Catch
        End Try

        Return res
    End Function

    Public Shared Sub SavePasswordToVault(username As String, password As String)
        LoadPasswordVault()

        Dim cred As New PasswordCredential("BW8AGU", username, password)

        vault.Add(cred)
    End Sub
End Class
The Credential Locker also allows you to store multiple credentials, and it’s possible to set a default one using the Default property in the PasswordCredential.Properties collection. Besides, you can share credentials across apps using the ApplicationSuiteId property.
Many social networks or picture-sharing web sites provide OAuth or Open ID protocols. Using these protocols with single sign-on (SSO), you can avoid re-typing passwords each time you switch between devices. In a Windows Store app, the WebAuthenticationBroker class handles this mechanism without any further interaction by users. Table 8-4 shows the steps to set SSO for a Windows Store app on both the developer and online provider sides.
Table 8-4. SSO Configuration Steps
SSO for Developers |
|
SSO for Online Providers |
|
(*): The ms-app URI can be found on the Developer Portal under the “Manage your cloud services” setting and then “Application Authentication” under Advanced Features.
Let’s have a quick look at the WebAuthenticationBroker class. In the following code, you access Facebook and send a post. Remember that you must register the app in the Facebook Developer page using this simple tutorial: https://developers.facebook.com/docs/appcenter/.
C#
public static class FacebookHelper
{
    private const string _appID = "<your_app_id>";  //retrieved from Facebook app page
    private const string _url = "https://www.facebook.com/connect/login_success.html";
    private const string _wallUrl = "https://graph.facebook.com/<your_facebook_username>/feed";
    private static string _accessToken = String.Empty;
    private static string _urlAccessToken = String.Empty;

    public static async Task<bool> Authenticate()
    {
        bool res = false;

        try
        {
            String FacebookURL = "https://www.facebook.com/dialog/oauth?client_id=" +
                Uri.EscapeDataString(_appID) +
                "&redirect_uri=" + Uri.EscapeDataString(_url) +
                "&scope=read_stream,user_about_me,read_stream," +
                "publish_stream&display=popup&response_type=token";

            System.Uri requestUri = new Uri(FacebookURL);
            System.Uri callbackUri = new Uri(_url);

            WebAuthenticationResult WebAuthenticationResult =
                await WebAuthenticationBroker.AuthenticateAsync(
                                        WebAuthenticationOptions.None,
                                        requestUri,
                                        callbackUri);

            if (WebAuthenticationResult.ResponseStatus ==
                WebAuthenticationStatus.Success)
            {
                _urlAccessToken = WebAuthenticationResult.ResponseData.ToString();
                _accessToken = _urlAccessToken.Substring(_urlAccessToken.IndexOf('=') + 1);
            }
            else if (WebAuthenticationResult.ResponseStatus ==
                WebAuthenticationStatus.ErrorHttp)
            {
                throw new Exception("HTTP Error: " +
                    WebAuthenticationResult.ResponseErrorDetail.ToString());
            }
            else
            {
                throw new Exception("Error: " +
                    WebAuthenticationResult.ResponseStatus.ToString());
            }

            res = true;
        }
        catch (Exception Error)
        {
            //log the error somewhere
        }

        return res;
    }

    public static async Task<string> PostOnFacebook(string text)
    {
        string res = String.Empty;

        try
        {
            var client = new HttpClient();

            // Create the HttpContent for the form to be posted.
            var requestContent = new FormUrlEncodedContent(new[] {
                    new KeyValuePair<string, string>("message", text)
                });

            // Get the response.
            HttpResponseMessage response = await client.PostAsync(
                "https://graph.facebook.com/<your_facebook_username>/feed?access_token=" + _accessToken,
                requestContent);

            // Get the response content.
            HttpContent responseContent = response.Content;

            // Get the stream of the content.
            using (var reader = new StreamReader(await responseContent.ReadAsStreamAsync()))
            {
                // Write the output.
                res = reader.ReadToEnd();
            }
        }
        catch (Exception ex)
        {
            //log the error somewhere
            res = ex.Message;
        }

        return res;
    }
}

FacebookAuth.xaml.cs
private async void Authenticate()
{
    bool res = await FacebookHelper.Authenticate();

    if (!res)
    {
        ResultTextBlock.Text = "Something went wrong!";
    }
}

private void PostButton_Click(object sender, RoutedEventArgs e)
{
    Authenticate();

    PostIt();
}

private async void PostIt()
{
    ResultTextBlock.Text = await FacebookHelper.PostOnFacebook(MessageTextBox.Text);
}
VB
FacebookHelper.vb
Public NotInheritable Class FacebookHelper
    Private Sub New()
    End Sub
    Private Const _appID As String = "<your_app_id>"
    'retrieved from Facebook app page
    Private Const _url As String = "https://www.facebook.com/connect/login_success.html"
    Private Const _wallUrl As String = "https://graph.facebook.com/<your_facebook_username>/feed"
    Private Shared _accessToken As String = [String].Empty
    Private Shared _urlAccessToken As String = [String].Empty

    Public Shared Async Function Authenticate() As Task(Of Boolean)
        Dim res As Boolean = False

        Try
            Dim FacebookURL As [String] = "https://www.facebook.com/dialog/oauth?client_id=" +
                Uri.EscapeDataString(_appID) + "&redirect_uri=" + Uri.EscapeDataString(_url) +
                "&scope=read_stream,user_about_me,read_stream," +
                "publish_stream&display=popup&response_type=token"

            Dim requestUri As System.Uri = New Uri(FacebookURL)
            Dim callbackUri As System.Uri = New Uri(_url)

            Dim WebAuthenticationResult As WebAuthenticationResult =
                Await WebAuthenticationBroker.AuthenticateAsync(WebAuthenticationOptions.None, requestUri, callbackUri)

            If WebAuthenticationResult.ResponseStatus = WebAuthenticationStatus.Success Then
                _urlAccessToken = WebAuthenticationResult.ResponseData.ToString()
                _accessToken = _urlAccessToken.Substring(_urlAccessToken.IndexOf("="c) + 1)
            ElseIf WebAuthenticationResult.ResponseStatus = WebAuthenticationStatus.ErrorHttp Then
                Throw New Exception("HTTP Error: " + WebAuthenticationResult.ResponseErrorDetail.ToString())
            Else
                Throw New Exception("Error: " + WebAuthenticationResult.ResponseStatus.ToString())
            End If

            res = True
            'log the error somewhere
        Catch [Error] As Exception
        End Try

        Return res
    End Function

    Public Shared Async Function PostOnFacebook(text As String) As Task(Of String)
        Dim res As String = [String].Empty

        Try
            Dim client = New HttpClient()

            ' Create the HttpContent for the form to be posted.
                        Dim requestContent = New FormUrlEncodedContent(New () {
                                             New KeyValuePair(Of String, String)("message", text)})

            ' Get the response.
            Dim response As HttpResponseMessage = Await client.PostAsync(
Convert.ToString("https://graph.facebook.com/<your_facebook_username>/feed?access_token=") & _accessToken, requestContent)

            ' Get the response content.
            Dim responseContent As HttpContent = response.Content

            ' Get the stream of the content.
            Using reader = New StreamReader(Await responseContent.ReadAsStreamAsync())
                ' Write the output.
                res = reader.ReadToEnd()
            End Using
        Catch ex As Exception
            'log the error somewhere
            res = ex.Message
        End Try

        Return res
    End Function
End Class

FacebookAuth.xaml.vb
Private Async Sub Authenticate()
    Dim res As Boolean = Await FacebookHelper.Authenticate()

    If Not res Then
        ResultTextBlock.Text = "Something went wrong!"
    End If
End Sub

Private Sub PostButton_Click(sender As Object, e As RoutedEventArgs)
    Authenticate()

    PostIt()
End Sub

Private Async Sub PostIt()
    ResultTextBlock.Text = Await FacebookHelper.PostOnFacebook(MessageTextBox.Text)
End Sub
Calling the method Authenticate() will open up Facebook login form (Figure 8-37).
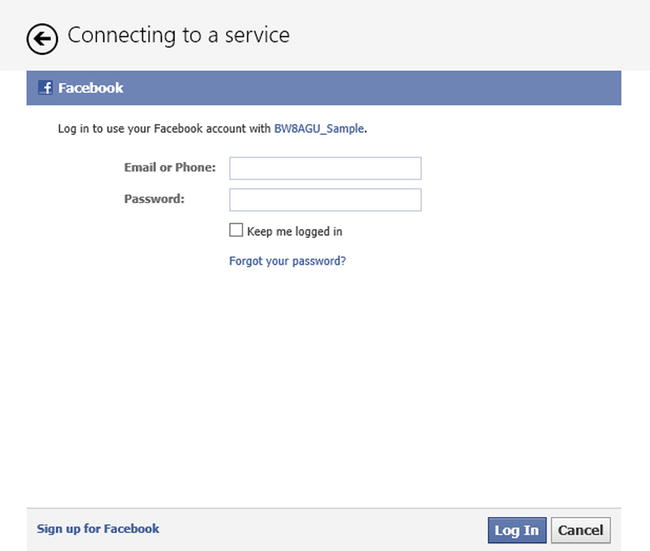
Figure 8-37. Facebook login pop-up
The Windows Store API provides an entire namespace to manage contacts: the Windows.ApplicationModel.Contacts namespace. With it you can easily select one or more contacts from your contacts and retrieve information that you need. Figure 8-38 shows the main classes inside the namespace.

Figure 8-38. Windows.ApplicationModel.Contacts main classes
The main class is ContactPicker. It has the same functionality of the FilePicker classes; the only difference that instead of files, you can select contacts.
Before launch, use the PickSingleContactAsync() or PickMultipleContactsAsync() method to show the picker. It’s suggested to set a few properties, such as the following:
- CommitButtonText, to help the user to confirm selection
- SelectionMode, to set what kind of information you need to retrieve. It allows ContactSelectionMode enumeration values.
- Contacts, to select the entire contact
- Fields, to select just certain fields
- DesiredFields, to set what fields you want to use
- The Add() class method accepts as an input a KnownContactField. It allows multiple field declarations, filtering the contact search. For example, if you set just one field, all contacts with that field filled are considered. If you set more than one field, all contacts with any of these filled are considered.
Here is how to use the ContactPicker class.
C#
ContactPicker.xaml.cs
private void ContactPickerButton_Click(object sender, RoutedEventArgs e)
{
    GetContact();
}

private async void GetContact()
{
    //Create a new instance of ContactPicker class
    var contactPicker = new Windows.ApplicationModel.Contacts.ContactPicker();
    contactPicker.CommitButtonText = "Select";

    //Set the selection mode
    contactPicker.SelectionMode = ContactSelectionMode.Fields;

    //Set desired fields
    contactPicker.DesiredFieldsWithContactFieldType.Add(ContactFieldType.Email);

    //Open the ContactPicker
    Contact contact = await contactPicker.PickContactAsync();

    if (contact != null)
    {
        ResultTextBlock.Text = contact.FirstName;
    }
}
VB
Private Sub ContactPickerButton_Click(sender As Object, e As RoutedEventArgs)
    GetContact()
End Sub

Private Async Sub GetContact()
    'Create a new instance of ContactPicker class
    Dim contactPicker = New Windows.ApplicationModel.Contacts.ContactPicker()
    contactPicker.CommitButtonText = "Select"

    'Set the selection mode
    contactPicker.SelectionMode = ContactSelectionMode.Fields

    'Set desired fields
    contactPicker.DesiredFieldsWithContactFieldType.Add(ContactFieldType.Email)

    'Open the ContactPicker
    Dim contact As Contact = Await contactPicker.PickContactAsync()

    If contact IsNot Nothing Then
        ResultTextBlock.Text = contact.FirstName
    End If
End Sub
Figure 8-39 shows an example of ContactPicker (for privacy, most parts of the image are blanked).

Figure 8-39. ContactPicker window
Conclusion
In this chapter, you took a deep look into data management for your Windows Store app. Probably most of the apps you will develop are data-centric, so you must have a good understanding of these concepts to create a functional application with a great user experience.