![]()
Sell Your App
In your life as a developer, regardless of which methodology you choose for your application lifecycle management, you must deliver your app to the end user. In this chapter we are going to analyze what you need to do before you submit your app to the Windows Store, and why your app should appear in the Store.
We will start with a brief introduction to the Windows Store and the opportunities it offers economically and in terms of visibility for your application. Then we will show the entire process of app submission.
When we talk about the Windows Store we refer to the entire ecosystem that help us to distribute our apps to users all around the world, and allows them to buy and install the apps on their devices. There are many reasons you might choose to learn to develop Windows Store apps, but two popular reasons are the following:
- Get paid for your work (and passion!).
- Increase your visibility as a developer or company.
The Windows Store can be a good choice to accomplish these targets. We’ll explain why.
Presenting the Windows Store
The Windows Store is simply the Windows Store app marketplace. Inside this marketplace are a great number of apps that can be installed on the Windows 8.x operating systems. Since Windows OSs are largely diffuse, it could be a good way to expose your apps to a large number of customers. The Windows Store is right now accessible from over 200 countries and supports more than 100 languages. This means that you can choose to sell your apps in countries other than your own, and you can enable different languages inside them (we will talk more about this later in the chapter).
Once your app is published, it can be found by potential customers directly on their PCs, using the Windows Store integrated app. This app can be launched on the Windows 8.x operating system directly from Start window (Figure 11-1).

Figure 11-1. The Windows Store integrated app tile
Once opened, it shows different apps in the store, based on category or relevance; you can also search a specific app through the integrated search box (Figure 11-2).
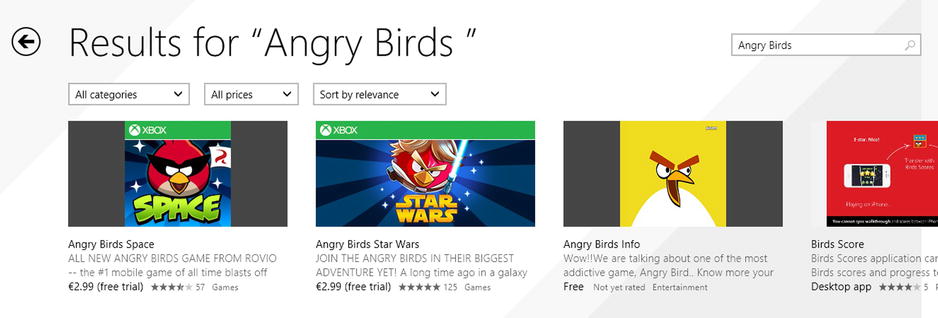
Figure 11-2. Search feature using the Windows Store integrated app
Inside the store, you can find free or paid apps. For this reasons you need to add a payment method in your account settings (Figure 11-3).

Figure 11-3. Payment method inside the Windows Store integrated app
Inside the store, you can choose to install an app. Each app has a detail page, which shows the following information (also shown in Figure 11-4):
- Name
- Price
- Buttons to install, try, or buy the app
- Rating
- Terms of use and permissions
- Description text
- Rating certificate
- App’s features
- App’s screenshots
- Publisher name
- Copyright and trademark info
- App’s category
- App’s size (MB)
- Age rating
- Supported processor (x32, x64, ARM)
- Languages
- Keywords
- Release date
- Countries and regions
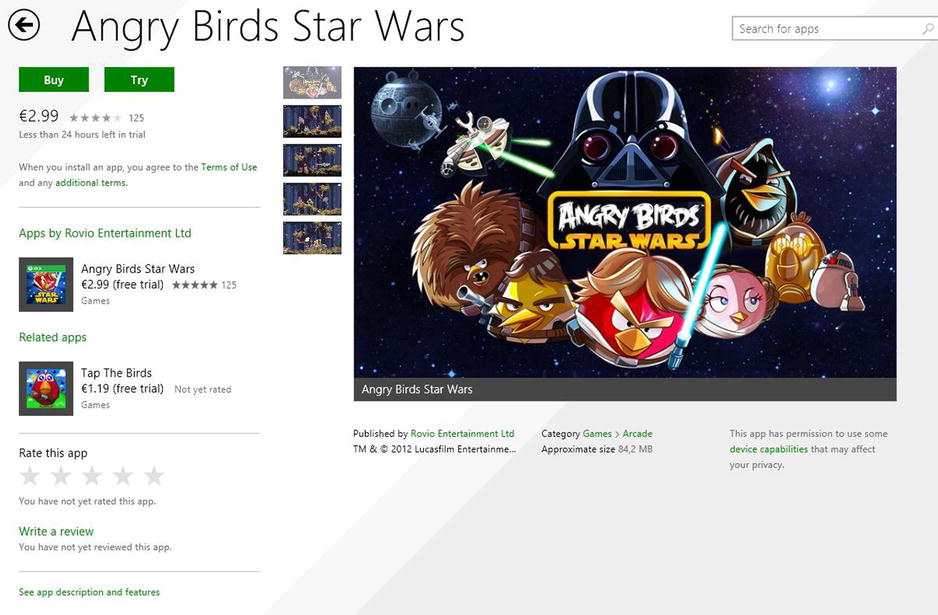
Figure 11-4. Angry Birds Star Wars app detail page
All of this information is filled in by the developer during the app’s submission process.
The installation process is executed in the background so you can continue to work (Figure 11-5). At the end of the installation, a notification will appear (Figure 11-6).
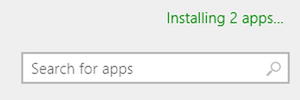
Figure 11-5. App installation message
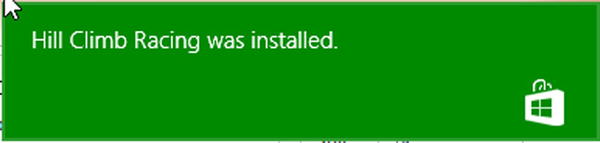
Figure 11-6. Notification after app installation
A great feature of a Windows Store integrated app is the update management. It will automatically manage all updates of an installed app, notifying the user when an update is available on the tile in the Start window (Figure 11-7) and letting the user choose what update to install (Figure 11-8).
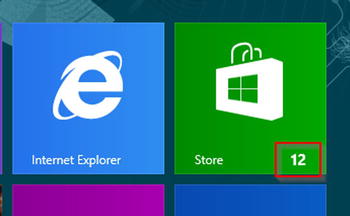
Figure 11-7. Windows Store app tile update notification
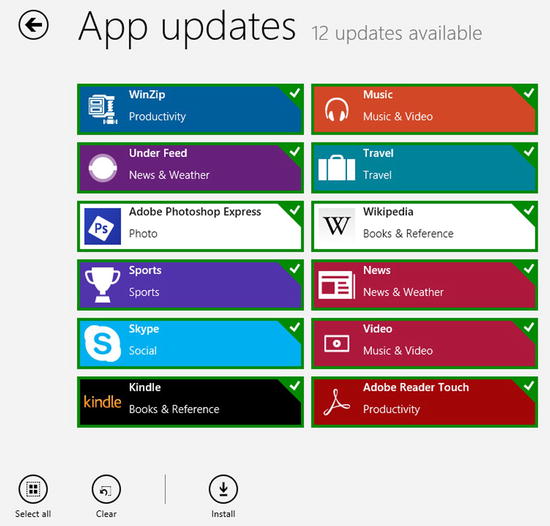
Figure 11-8. Windows Store app tile update options
Now that you understand the Windows Store, let’s see how to submit an app.
![]() Note Before submitting an app, you need a Windows Store App Developer Account. Appendix B fully explains the entire creation process.
Note Before submitting an app, you need a Windows Store App Developer Account. Appendix B fully explains the entire creation process.
Once you have set all information related to your account, you are ready to submit the app. In the Dashboard of your profile, you can select the “Submit an app” item. The submission process consists of the following steps (Figure 11-9):
- App name
- Selling details
- Services
- Age rating and rating certificates
- Cryptography
- Packages
- Description
- Notes to testers
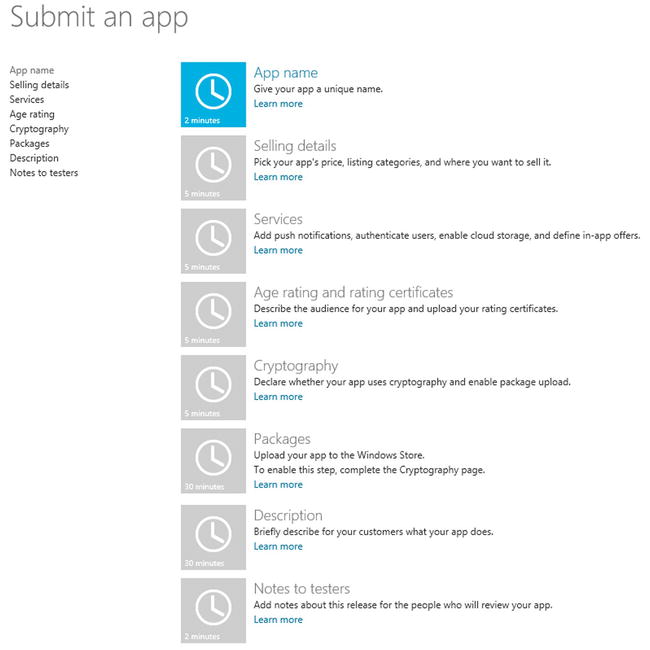
Figure 11-9. App submission page
Let’s look at each one of these.
App Name
One of the most important choices about your app is the name. This can be a difficult decision to make. I would suggest that you make your app’s name:
- Short: Your app name is listed in the store or in tiles. It is better to choose a short one, although it can have up to 256 characters.
- Simple: Just choose a simple, clear, and creative name. Avoid appending info at the end of the name. Try to use different images for different app editions.
- Avoid trademarks: Don’t use trademarks. If you have chosen a trademarked name, your app will be removed from the store and will be not published until the trademarked word is completely removed from your app.
When you start to develop an app, you can decide to reserve a name. This can be realized through Visual Studio using the following steps.
- Select the Store item in the menu and then select Reserve App Name (Figure 11-10). This step will open the page to submit an app.

Figure 11-10. Reserve App Name menu item
 Note You can reserve an app name using the contextual menu of your solution project. This is the path: select Store
  Associate App with the Store. This will open a window to manage your apps, and below you can find the “Reserve a new app name” textbox (Figure 11-11). If you use an edition of Visual Studio 2013 different from the Express version, you can use just this path.
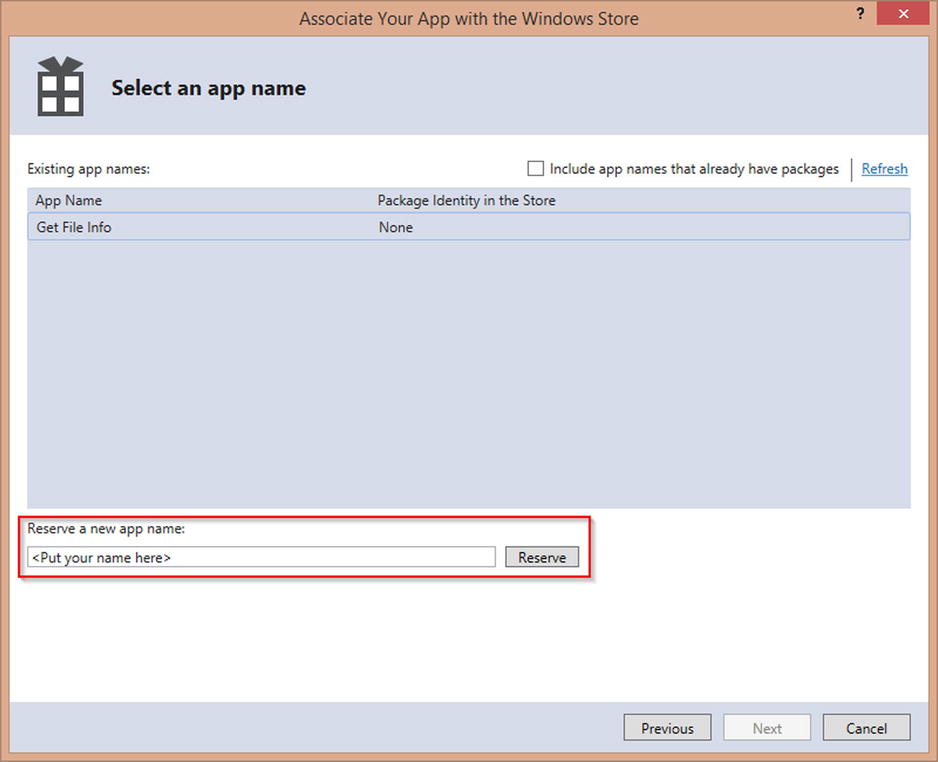
Figure 11-11. Another way to reserve an app name
- Click the App Name option.
- Type your app name in the App name textbox. If the name you have chosen for your app is not available, an error message will appear.
- Click the “Reserve app name” button (Figure 11-12).
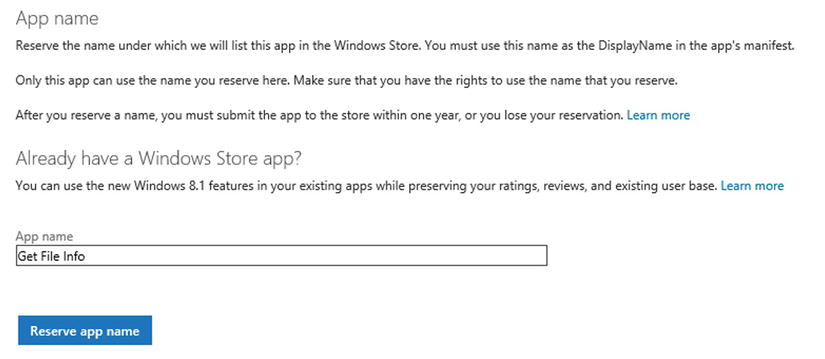
Figure 11-12. The process for reserving an app name
- If the file name is not already taken, a confirmation will be shown. Click the Save button (Figure 11-13).
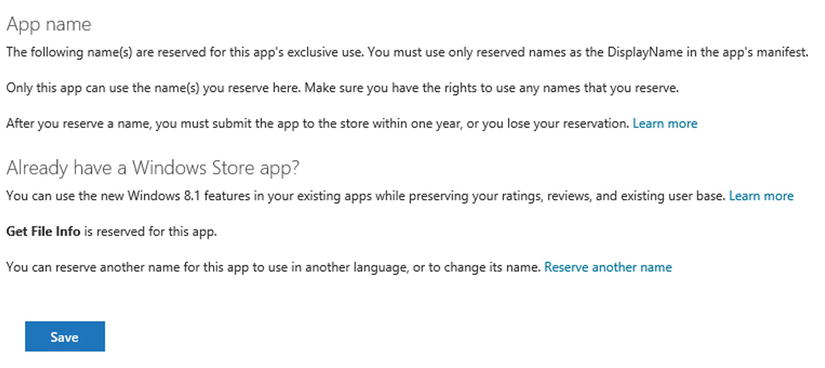
Figure 11-13. Saving app name information
It is also possible to reserve an app name in another language, if you plan to submit an app for a different market. You can accomplish this by clicking “Reserve another name” on the App Name page in the Windows Dev Center (Figure 11-14).

Figure 11-14. Reserve another app name
Once you have completed the app name reservation, you need to change a few settings in your Package.appxmanifest.
First, change the Display Name and Description properties in the Application section to match the name you chose and add some information about what the app does (Figure 11-15). Then you can make the same change to the Name property in the Packaging section (Figure 11-16).
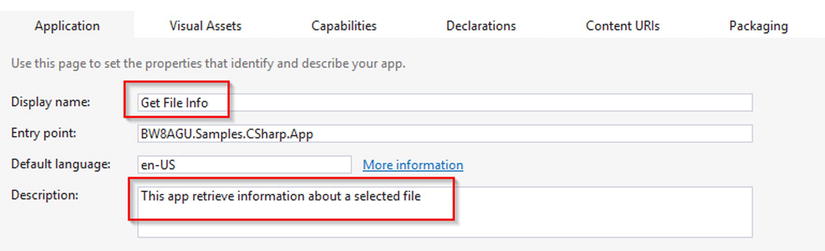
Figure 11-15. Fill in the app info in the Application section
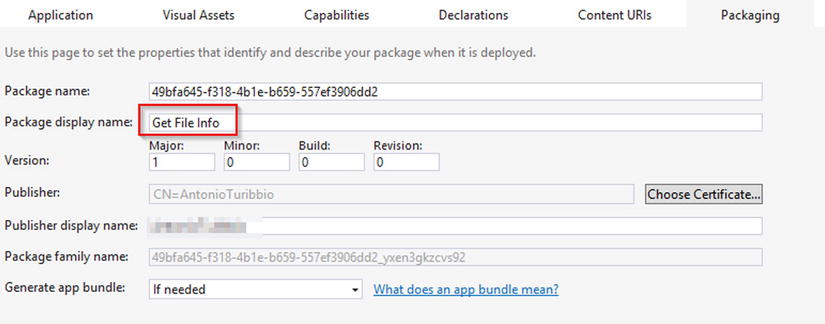
Figure 11-16. Fill in the app info in the Packaging section
Now you have completed the first step of the app submission process. Let’s move to the next step.
In this section, you can set all the information about app selling. The first subsection you need to select is if the app is free to download and use or if the user needs to pay money to buy it. If you choose to sell your app, you can offer a free trial period (Figure 11-17).
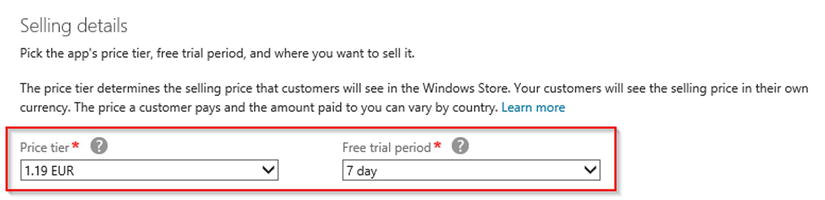
Figure 11-17. Select a price and a free trial period for your app
![]() Note Since the account is registered to a person that lives in Europe, the price is shown in EUR currency. Of course, a customer will see the price in their own currency inside the Windows Store.
Note Since the account is registered to a person that lives in Europe, the price is shown in EUR currency. Of course, a customer will see the price in their own currency inside the Windows Store.
Let’s change the app price to “Free” and then move to the next subsection.
In-app purchase is a simple way to add new features to your apps and then let the users pay for them. So let’s say that you want to submit an app for free, you can choose to add new features using the Windows Store in-app purchase system to manage them and sell them. You can also choose a third-party commerce system for in-app purchases (Figure 11-18).
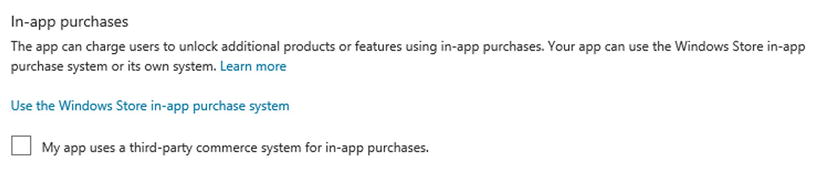
Figure 11-18. In-app purchases feature
If you select the link “Use the Windows Store in-app purchase system,” a new page will open (Figure 11-19), which is the same page linked to the Services item you saw in Figure 11-9.
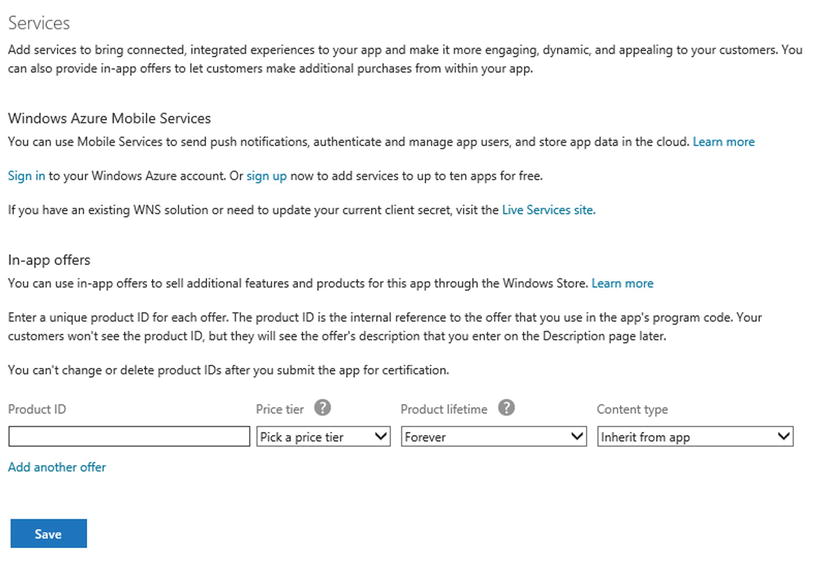
Figure 11-19. In-app purchase options
In this page you can add up to 10 Windows Azure Mobile Services to integrate push notification, authentication, or to store app data, or you can add In-app offers that a user can buy. Each offer has the following information:
- Product Id: A unique id for your app that you can use inside your app to enable features. This key is not shown to the user, but could be linked to a description to show to the user.
- Price Tier: To set if the offer is free of charge or not.
- Product Lifetime: To set how long this offer is valid.
- Content Type: The category related to the offer.
Next subsection is Markets (Figure 11-20). Here you can choose all the markets in which your app will be available. Be careful in this step, considering that each market could have some restrictions. For example, there are few markets that only accept free apps (like Isle of Man) or that 18+ (minimal age for a user) apps are not allowed in countries like Australia or Germany. Information on various restrictions can be found at msdn.microsoft.com/en-us/library/windows/apps/hh694064.aspx.

Figure 11-20. List of available markets
Also, when you select a different market than your own, you need to provide some globalization features to your app or it will not pass the submission tests. Some other things that need to be considered are the ethnic, cultural, and religious perspectives. For example, if your app includes some information that goes against a religion foundation of the country in your selected market, then the app will not pass the submission.
For a sample app, let’s choose two markets: United States and Italy.
The Release date subsection allows you to postpone the app release date to a specific day. This could cause delay in the submission process (Figure 11-21).
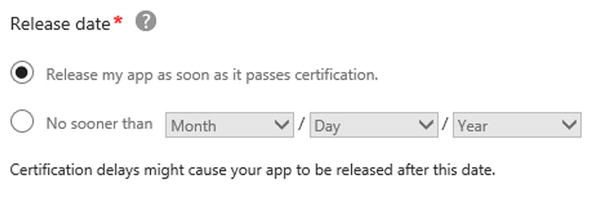
Figure 11-21. Release date options
App category and subcategories let you choose in what category of the Windows Store your app will appear (Figure 11-22). Subcategories are not are not always required. Always pick the correct category for the app. For this sample app, choose “Productivity.”
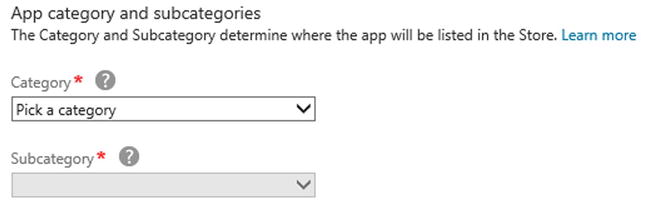
Figure 11-22. Categories selection step
The next subsection is Hardware Requirements. Here you can select DirectX and RAM requirements that a device needs to have to let the user download the app. For example, if you are submitting a game, you might need to choose one of the available options to let the user play the game on a required platform (Figure 11-23).
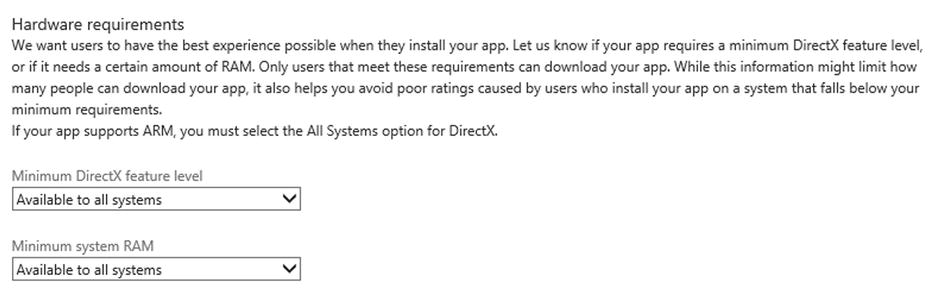
Figure 11-23. Hardware Requirements selection
Finally, the last option in Selling Details is Accessibility. Once selected, your app will be tested to verify if all the accessibility guidelines are met (Figure 11-24).

Figure 11-24. Accessibility subsection
Age Rating and Rating Certificates
In this section you can choose the suitable age for the app’s users and the rating certificates. The first option allows you to select the minimum age for users. There are several options:
- 3+ Suitable for young children
- 7+ Suitable for ages 7 and older
- 12+ Suitable for ages 12 and older
- 16+ Suitable for ages 16 and older
- 18+ Suitable for adults only
Apps for young children should meet basic requirements such as no violence or sexual references. The 18+ option is available only for games that are rated by a third-party ratings board and follow all Windows content policies. Usually the ratings board releases an approval to sell the game. These authorities check if the game is suitable for an appropriate age group, and are not available in all countries (you can find more at msdn.microsoft.com/en-us/library/windows/apps/hh694080.aspx). Once the game is rated, you can update a certificate (.GDF file) as a rating certificate inside the Age Rating and Rating Certificates page (Figure 11-25). For this sample app, let’s select 3+ option for the user age.

Figure 11-25. Age rating certificate section
In this page, you can report if your app uses cryptography or encryption (Figure 11-26). If yes, you need to be aware of the laws and regulations of the destination markets to avoid failing submission process. Some tasks are not considered in the cryptography category, such as the following:
- Password encryption
- Copy protection
- Authentication
- Digital rights management
- Using digital signatures
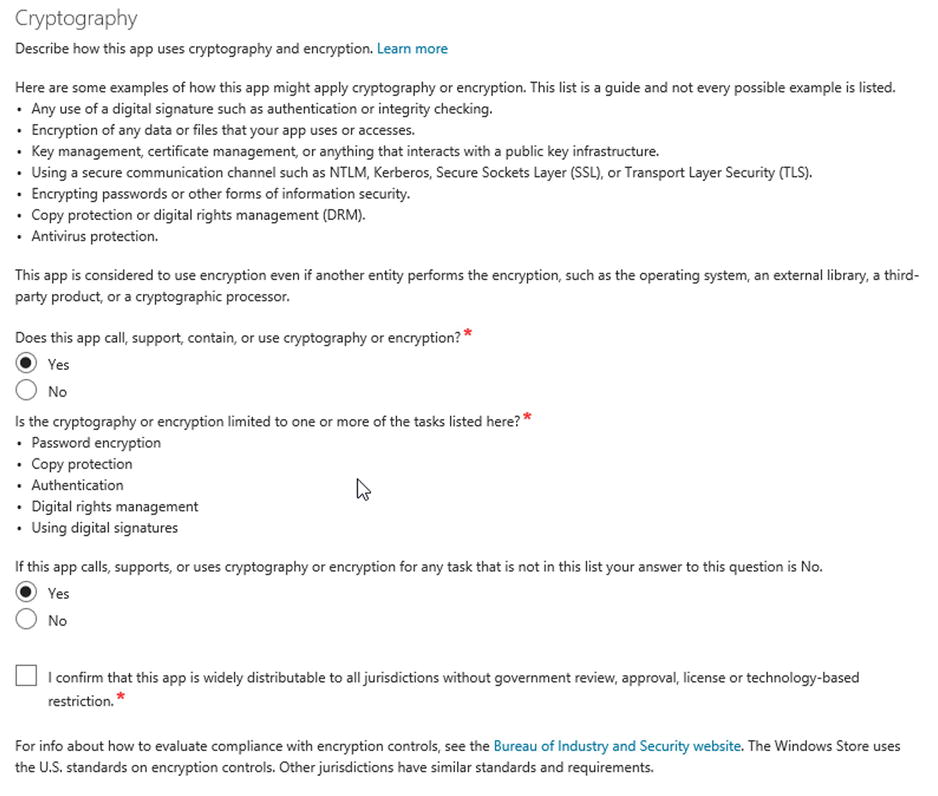
Figure 11-26. Cryptography settings
If in your app you use any cryptography or encryption process different from those listed, you need an Export Commodity Classification Number (ECCN). In this sample app you do not use any cryptography.
In this step you submit your app packages to the Windows Store. This step is divided into three phases:
- Validate your app with the Windows App Certification Kit.
- Create app packages in Visual Studio 2013.
- Upload your app packages.
The Windows App Certification Kit is a tool that allows you to test the app before you submit it to the Store. This helps you avoid submitting an app that does not follows all of the requirements.
This tool executes different tests on your app to check if everything is ok. The following is a list of tests that are executed:
- Crashes and Hangs Test
- App Manifest Compliance Test
- Windows Security Features Test
- Supported Windows Store API Test
- Performance Test
- App Manifest Resources Test
- Debug Configuration Test
- Filed Encoding Test
- App Capabilities Test
- Windows Runtime Metadata Validation
- Package Sanity Check
- Resource Usage Test
The Windows App Certification Kit can be installed with the Windows 8.1 SDK here: msdn.microsoft.com/en-us/windows/apps/bg127575. Note that if you are planning to deploy your app for an ARM device, you also need to install the Windows App Certification Kit for Windows RT.
![]() Note Visual Studio Express 2013 for Windows already installs the Windows App Certification Kit.
Note Visual Studio Express 2013 for Windows already installs the Windows App Certification Kit.
Let’s see how to use it. When you open the Windows App Certification Kit, you can pick one of the three following items (Figure 11-27):
- Validate Windows Store App
- Validate Desktop App
- Validate Desktop Device App
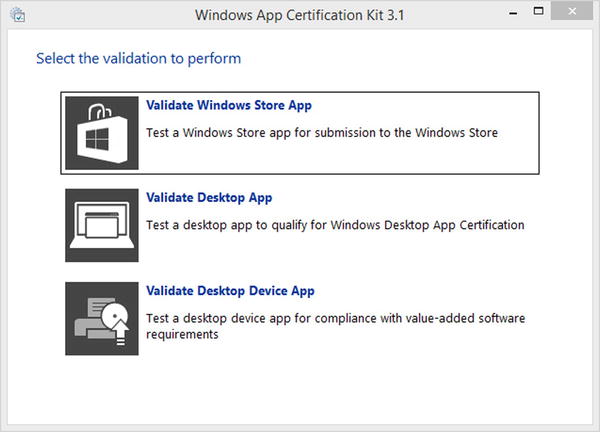
Figure 11-27. Windows App Certification Kit 3.1
![]() Note Windows Store allows also you to submit a Windows Desktop app. Check this here: blogs.msdn.com/b/windowsstore/archive/2012/06/08/listing-your-desktop-app-in-the-store.aspx
Note Windows Store allows also you to submit a Windows Desktop app. Check this here: blogs.msdn.com/b/windowsstore/archive/2012/06/08/listing-your-desktop-app-in-the-store.aspx
After choosing the first item, Validate Windows Store App, a list of apps is shown so you can choose the one you want to validate (Figure 11-28).
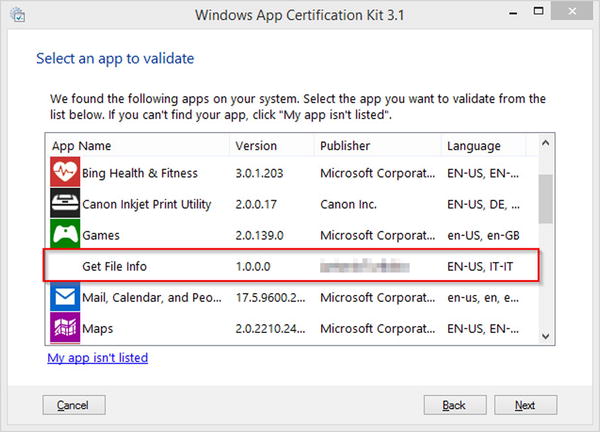
Figure 11-28. App selection in Windows App Certification Kit
In this case, choose the “Get File Info” app that you are ready to submit to the store.
![]() Note If you could not find your app on the list, you can go into Visual Studio Express 2013 for Windows, open your app project, select “Release” as a build configuration mode, and then click Build
Note If you could not find your app on the list, you can go into Visual Studio Express 2013 for Windows, open your app project, select “Release” as a build configuration mode, and then click Build ![]() Deploy. After that deploy is completed, you can click the “My app isn’t listed” link.
Deploy. After that deploy is completed, you can click the “My app isn’t listed” link.
Next, you need to choose what tests are executed by the Windows App Certification Kit (Figure 11-29). Let’s select all tests and then click the Next button. In the next step, the app will be tested. This means that the app will be open different times by the tool; it is suggested to let the tool work until it has finished (Figure 11-30). If the app did not pass a test, you will be prompted to save a report file and the message in Figure 11-31 will be shown.
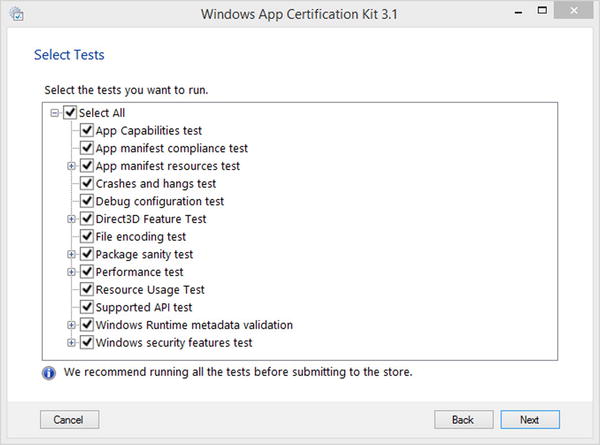
Figure 11-29. List of selectable tests
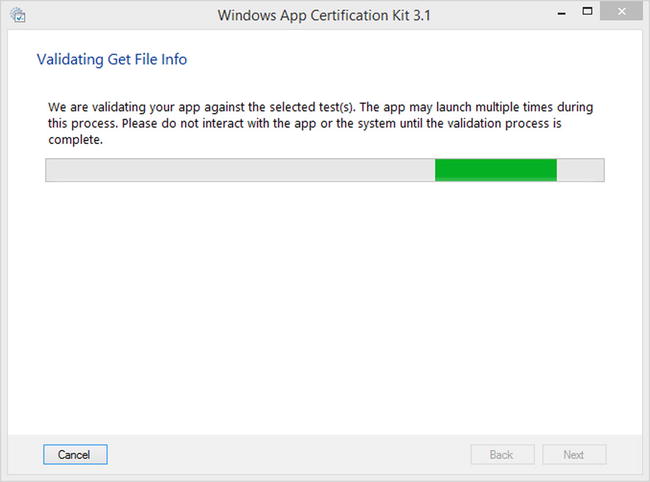
Figure 11-30. Testing phase in Windows App Certification Kit
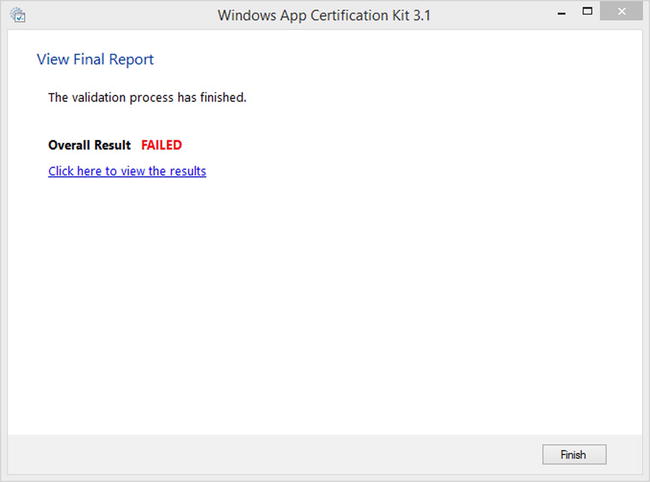
Figure 11-31. An example of a failed process
If you want to understand what happened, you just need to click the link “Click here to view the results,” which will open a web page with all the information about the error and resolution (Figure 11-32).

Figure 11-32. An example of an error and a hint for resolution
Once you have resolved all the issues, you can re-run the Windows App Certification Kit validation. If everything is ok (Figure 11-33), you are ready to create the packages. Remember that if the Windows App Certification Kit successfully validates your app, this does not mean that your app will pass app submission. It is just a tool to check basic settings and configuration of your app.
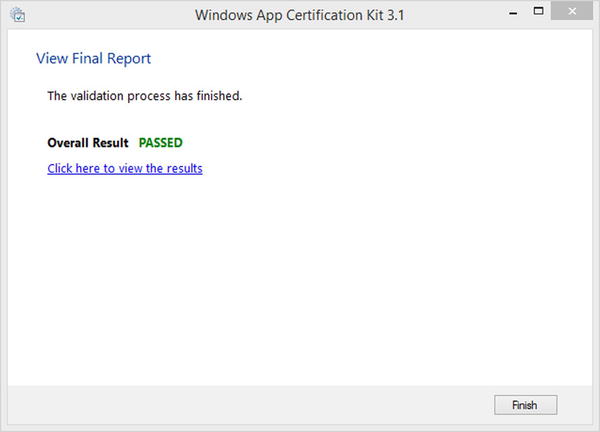
Figure 11-33. Successful validation of a Windows Store app
The process of creation of an app package is very simple. First, you need to go in the Solution Explorer, right-click the project, and then go to Store ![]() Associate app with the Store (Figure 11-34). In this way, the Packaging section of the Package.appxmanifest is updated with the information regarding the app name and author. A wizard is opened, so type your credentials for the Windows Store account, select the app name (Figure 11-35) you want to use, and then it will display all the updated information (Figure 11-36).
Associate app with the Store (Figure 11-34). In this way, the Packaging section of the Package.appxmanifest is updated with the information regarding the app name and author. A wizard is opened, so type your credentials for the Windows Store account, select the app name (Figure 11-35) you want to use, and then it will display all the updated information (Figure 11-36).
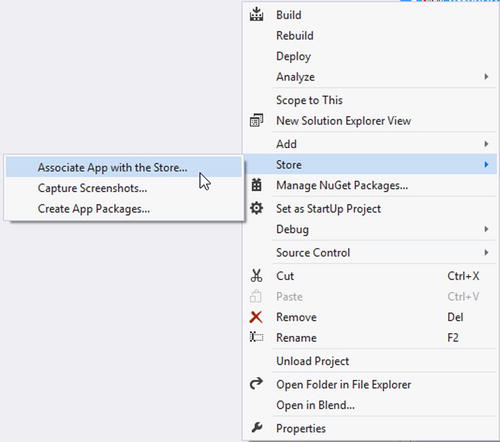
Figure 11-34. How to associate an app with the Store
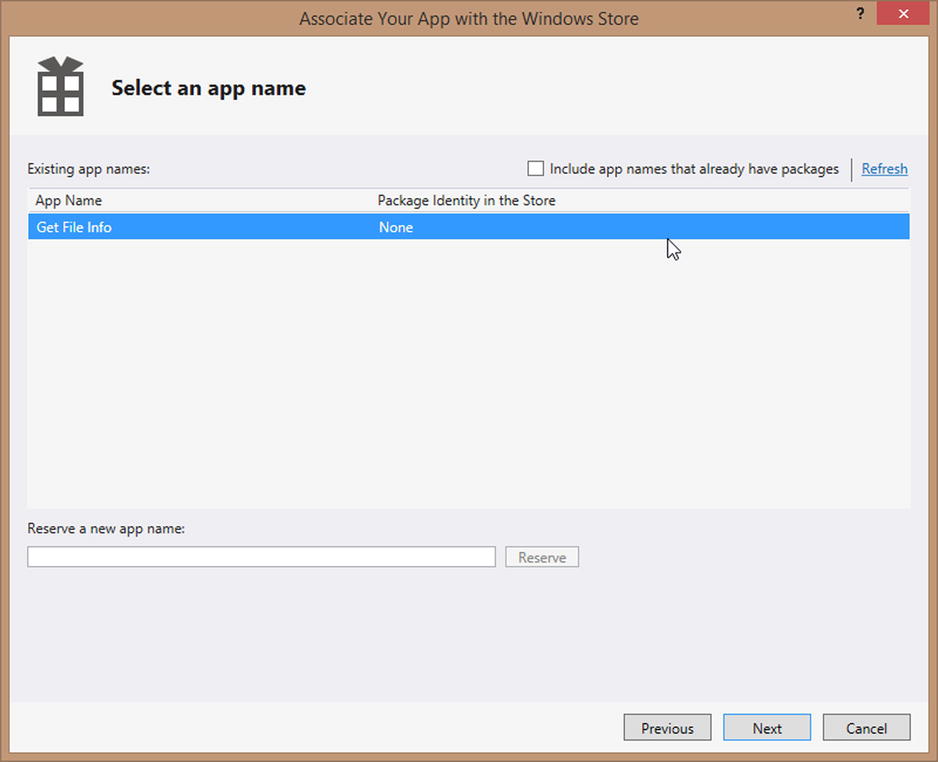
Figure 11-35. Select a reserved app name from the Store
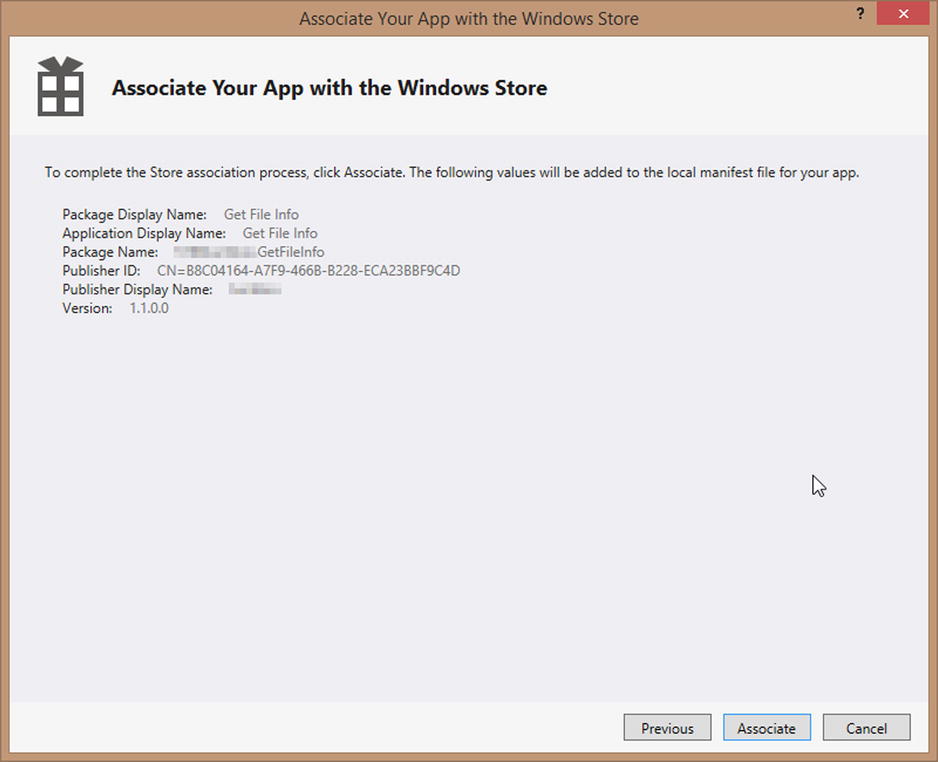
Figure 11-36. Review of the app name Store association
Now you need to create your app packages, which is a set of files with the .appxupload extension that you will upload on the Windows Store. You go again to the Solution Explorer, right-click the project, and then go to Store ![]() Create App Packages (Figure 11-37). Once again a wizard will open (Figure 11-37). In the first step you can choose to create an app package to upload it in the store, or choose to create a package to use for testing purposes on a device that has a developer license installed. Then you need to follow the same path as the app association until you arrive at the step in Figure 11-38.
Create App Packages (Figure 11-37). Once again a wizard will open (Figure 11-37). In the first step you can choose to create an app package to upload it in the store, or choose to create a package to use for testing purposes on a device that has a developer license installed. Then you need to follow the same path as the app association until you arrive at the step in Figure 11-38.
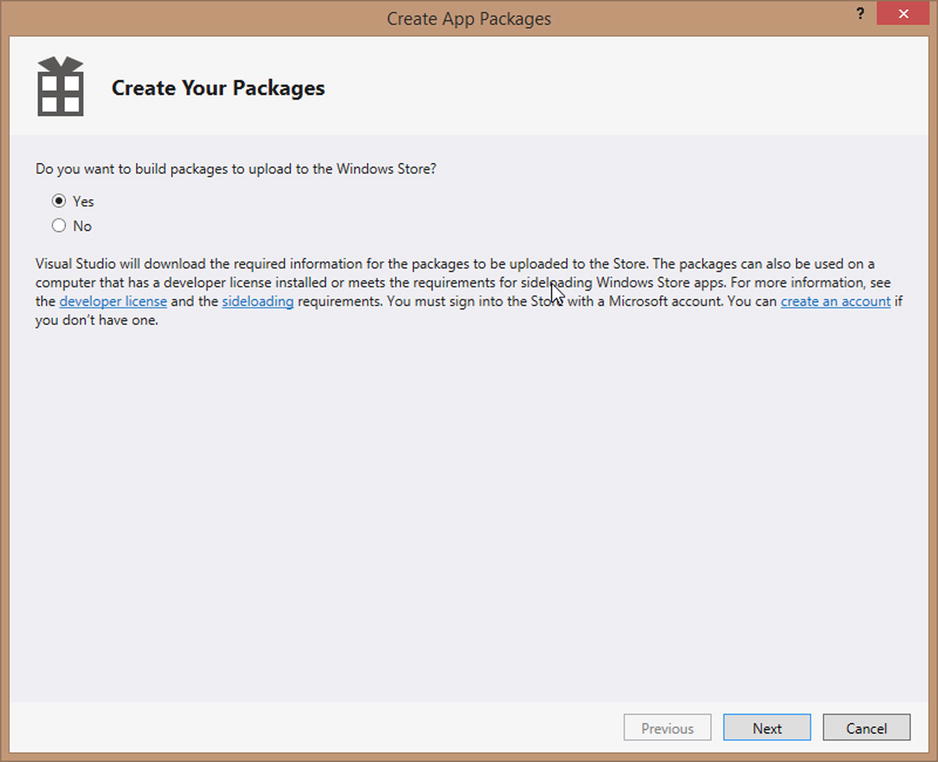
Figure 11-37. App package creation wizard
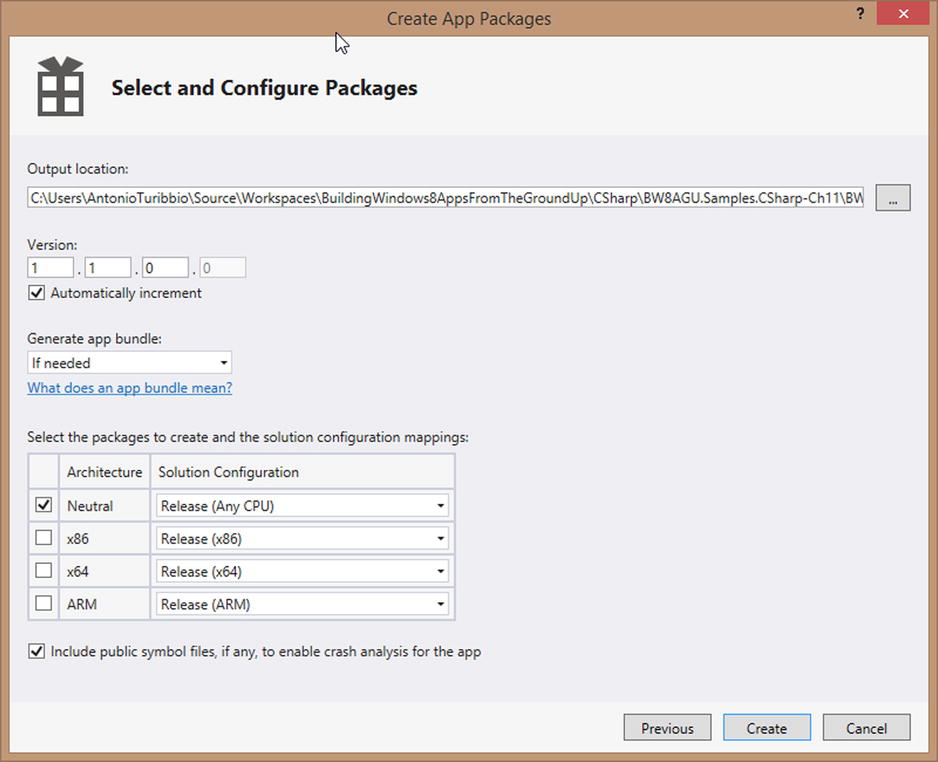
Figure 11-38. Package configuration step
In this step you need to configure the following options:
- Output Location: The drop folder for the package.
- Version: The app version number. It can be set manually or automatically.
- Generate App Bundle: This option can be useful if you have a localized app with many localized resources. This helps the customer to download only localized resources for his language instead of all the localized files. There are three options: If needed, Always, and Never.
- Select the packages to create and the solution configuration mappings: A package is created for different platforms, and different build configuration can be chosen.
- Include public symbol files, if any, to enable crash analysis for the app: These files can be used to collect information about bugs and crashes. If this option is selected, debug symbols are included inside the .appxupload file.
After you click the Create button and the package is correctly created, you can re-execute the validation process through Windows App Certification Kit (you can also choose a remote machine) or open the output location and check if a file with extension .appxupload is in it (Figure 11-39).
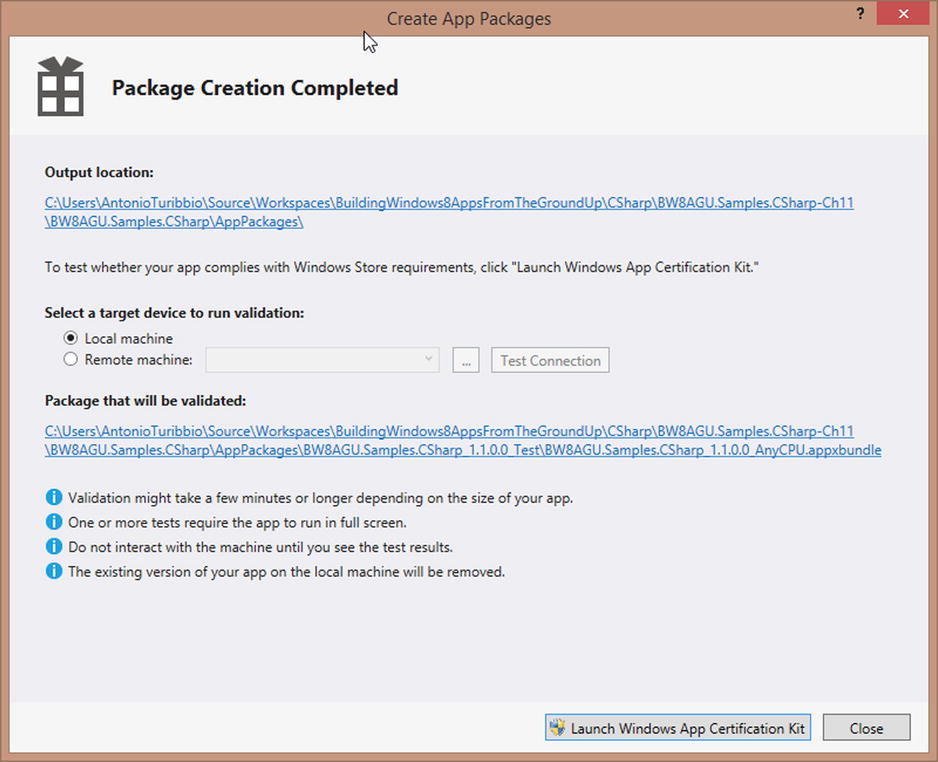
Figure 11-39. Package creation completed
Now you have to submit your package to the Store. Go to the Windows Store dashboard and in the app section select Edit ![]() Packages. On this page you can just drag and drop the package from the output location to the browser and the package will be uploaded. Then click Save (Figure 11-40).
Packages. On this page you can just drag and drop the package from the output location to the browser and the package will be uploaded. Then click Save (Figure 11-40).
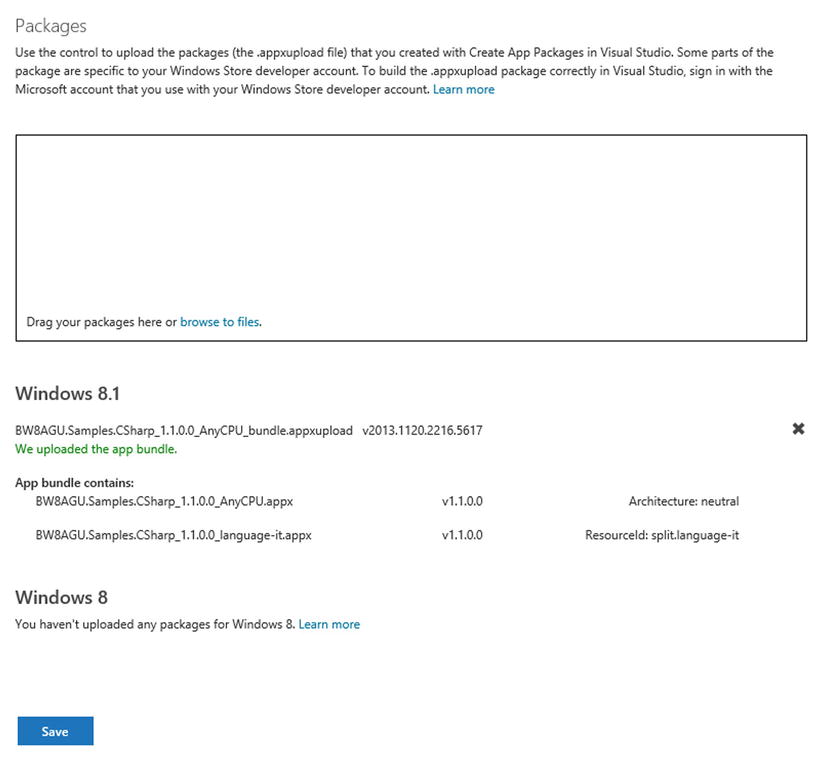
Figure 11-40. App package upload page
There are two more steps to complete: Description and Notes to testers.
In this step, you need to provide a description of your app based on supported languages and different platforms (Windows 8 and 8.1). This step consists of the following sections:
- Description: Your main app description. It’s important to be very detailed to help customers understand what your app does and wisely choose words to grab attention.
- App Features: These are short descriptions in a bulleted list for your app.
- Screenshot: You can provide up to nine app screenshots. These can be created directly from Visual Studio 2013 using the Capture Screenshots menu item, as shown in Figure 11-34, that will start the Windows Store App simulator. You can also choose a few settings using the Screenshot Settings button (the default location is Windows Simulator folder in the Pictures library). You need to click the Copy Screenshot icon to create images (Figure 11-41). Each screenshot must be in .png format with a size less than 2MB and a resolution of 1366x768 or 768x1366 and must have a description.
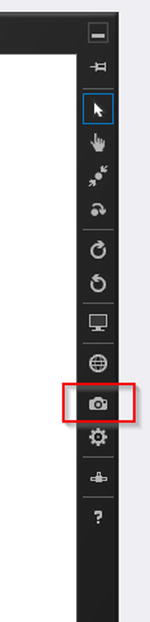
Figure 11-41. Copy Screenshot button in the Windows Store App Simulator
- Notes: You can add few notes like the features in this release version.
- Recommended Hardware: Minimal hardware requirements for your app.
- Keywords: A list of tags that can improve your app searchability.
- Copyright and Trademark Info: Provide your copyright information.
- Additional License Terms: In this field you can provide more information about license terms that are different from the Standard Application License Terms (more details at msdn.microsoft.com/en-us/library/windows/apps/hh694058.aspx).
- Promotional Images: A set of images that can be used in the store to promote your app.
- App Web Site: The link to the web site that is about your app.
- Support Contact Info: An e-mail address or a web site link to help customers get support.
- Privacy Policy: In this field, you need to provide a URL that declares if you collect or use personal info inside your app. For example, if you enable internet client capability, you must specify a privacy policy description here and inside the app settings pane.
In this step, you can provide any useful information to Microsoft testers to help them to understand and test your app (Figure 11-42). This can help to accelerate the app submission process. Some useful information could include the following:
- Login credentials for testing purposes
- Explain what feature your app provides that is visible or locked and how to test it
- If an update, explain what has changed
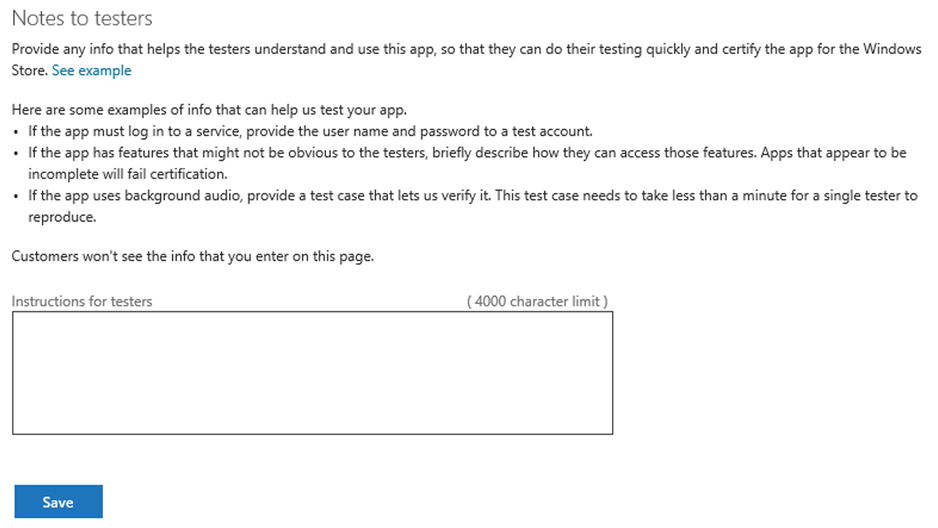
Figure 11-42. Notes to testers page
You have finally completed app submission process. In the detail page of your app you have two new buttons at the bottom: “Review release info” and “Submit for certification.” The first one shows all the information provided; the second one sends your app for the submission process. After clicking the latter button, you need to wait about six business days to know if your app has passed the submission process (Figure 11-43).
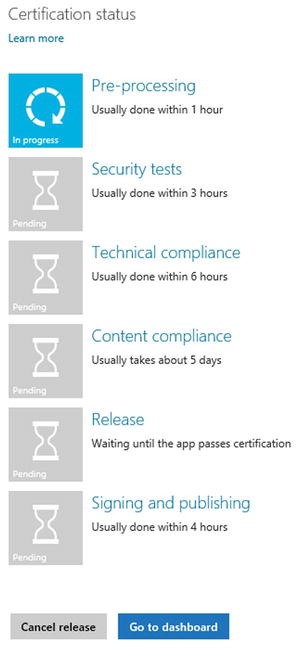
Figure 11-43. App certification status
If your app did not pass the submission process, a failure notification will be shown on the dashboard. A full report about what went wrong is available, with notes from testers (see Figure 11-44).
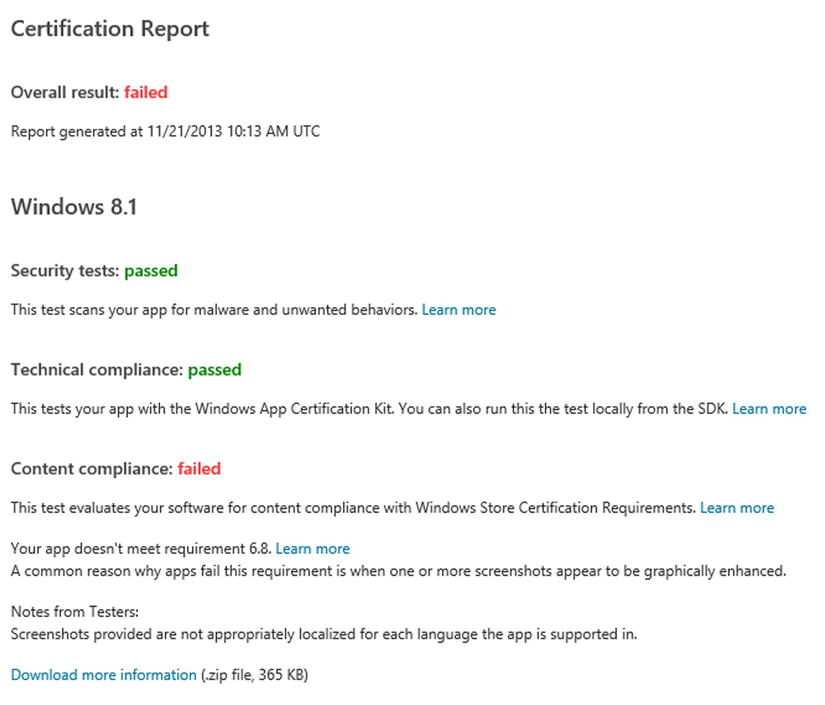
Figure 11-44. An example of failed certification
After you have solved all certification errors, you can upload once again the package to restart the submission process. Finally, once your app passes the submission process, it will be available in the chosen markets using the search feature in the Windows Store.
After your app is published in the store, you can check the number of downloads and the app usage. To check download history, go to the Windows Dev Center dashboard, click the Details option on your app tile, and then Downloads. This page shows a chart that lists all downloads over time (Figure 11-45). You can also export this information in CSV format.
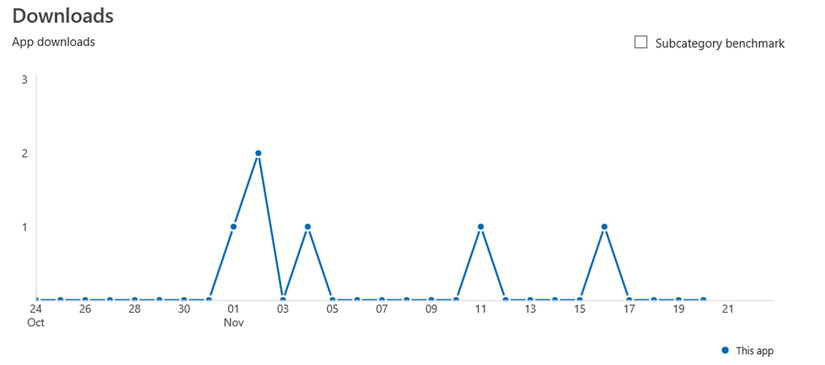
Figure 11-45. History download chart on the Download page
To show app usage, go to the Windows Dev Center dashboard, click Details ![]() Usage. Here, you can use filters to show app usage (Figure 11-46).
Usage. Here, you can use filters to show app usage (Figure 11-46).
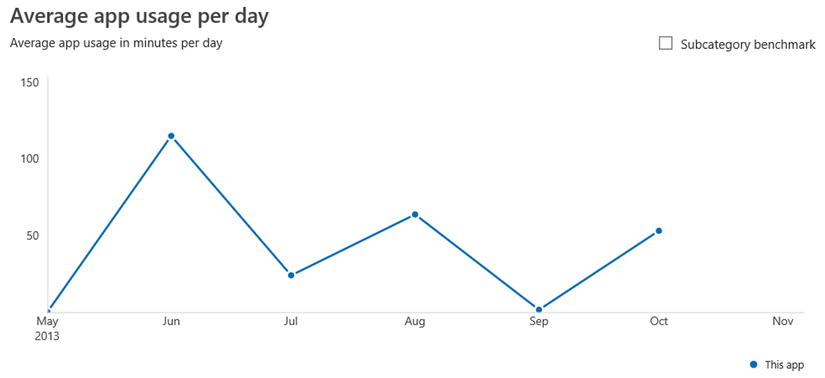
Figure 11-46. Usage chart on the Usage page
Another interesting feature is monitoring app quality on the Quality page. You can open this page in the Windows Dev Center dashboard, clicking Details ![]() Quality. In this section, you can find charts and useful information about app crashes, unresponsive events, and JavaScript exceptions. You can use all this information to fix bugs and improve your app. To use this feature you need to enable telemetry data collection in your account profile. Also, your .appxupload file needs to include public symbols.
Quality. In this section, you can find charts and useful information about app crashes, unresponsive events, and JavaScript exceptions. You can use all this information to fix bugs and improve your app. To use this feature you need to enable telemetry data collection in your account profile. Also, your .appxupload file needs to include public symbols.
If you have found bugs or you want to add new features to your app, you need to upload it again to the store. To submit an app update, you just need to go to the Window Dev Center dashboard, and select Edit ![]() Packages. Here you just drag and drop a new package of your app with an assembly version number greater than the actual release. You also need to update the Notes section in the Description page and list new features. Then you can submit your app for certification.
Packages. Here you just drag and drop a new package of your app with an assembly version number greater than the actual release. You also need to update the Notes section in the Description page and list new features. Then you can submit your app for certification.
Conclusion
In this final chapter, you took a deep dive into the Windows Store and the Windows Store app submission process. All this information will help you understand how to take advantage of the Store to improve your app downloads and increase your earnings. Now that you have read all of these chapters, you’re finally ready to start creating a great number of quality apps!