
![]()
Take Advantage of the Environment
In this chapter, you will learn how to integrate your apps with the operating system, adding the ability to activate functionality directly from the Charm Bar. The first section explores geolocation and sensors integration. You will start sharing media content through the Digital Living Network Alliance (DLNA) protocol participating in the Play To contract.
In the third section, you’ll see how to integrate your apps with the system, activating a Background Task that will wait for an available Internet connection (but you will often see other types of activations) to perform tasks that will keep your app useful even when closed, such as contacting your remote web service.
Finally, and importantly, you will take advantage of the environment with charms to implement contracts. The first contract that you will implement is the Settings contract because usually your app requires a place to manage settings to customize the user experience (UX). Then you will learn about the Share charm, with which you can integrate through the Share contract.
In this section, you will see how to enrich the UX in an app with the use of various sensors. First, you will see how to use the Geolocation namespace (Windows.Devices.Geolocation) that will help us to retrieve the position of the device using GeoCoordinate (Latitude, Longitude, and Altitude). Later you will learn how Windows 8.1 supports a wide range of sensors and how you can access them through the classes contained in Windows.Device.Sensors namespace. This namespace offers the following classes to support the relative sensor:
- Accelerometer
- Compass
- Gyrometer
- Inclinometer
- LightSensor
- OrientationSensor
- SimpleOrientationSensor
SimpleOrientationSensor doesn’t refer to a real class of sensor; it’s a simplified version of the orientation sensor that helps you to easily access information about the current orientation of the device without the need to interpret the SensorQuaternion that you can retrieve by using of OrientationSensor.
Geolocation
The core class to manage is the Geolocator class available in the Windows.Devices.Geolocation namespace (shown in Figure 7-1 ). Classes contained in this namespace are responsible to manage Geolocation (as the namespace suggest). The Geolocator class is the entry point for these functionalities, through PositionChanged and StatusChanged, events which respectively rise when the position of the device changes and when position data availability changes states (every state will be expressed through a PositionStatus value). Otherwise, if you need a single position check, you can use the available GetLocationAsync method.
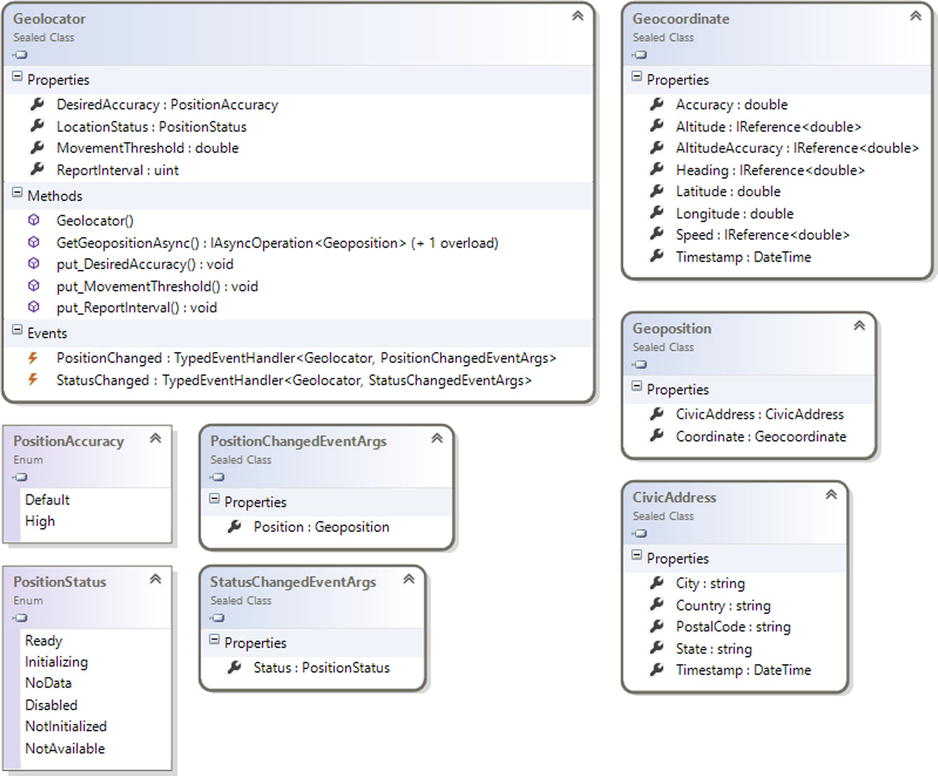
Figure 7-1. Windows.Devices.Geolocation namespace
The Geolocator class has other interesting members such as the DesiredAccuracy property, which you can use to express the accuracy needed by your app, and the MovementThreshold property, which you can set to specify the threshold before the PositionChanged event fires.
When the PositionChanged event fires, you can get the actual position of the device by accessing the Position property of the PositionChangedEventArgs instance passed as an argument of the event handler.
The type of Position property is Geoposition, which provides information such as CivicAddress and Geocoordinate. CivicAddress provides information about the Country, State, City, and PostalCode of the current position.
Geocoordinate provides low-level information about the following:
- Latitude: The angular distance north or south of the earth’s equator, measured in degrees along a meridian, as on a map or globe
- Longitude: The distance in degrees east or west of the prime meridian at 0 degrees, measured by the angle between the plane of the prime meridian and that of the meridian through the point in question, or by the corresponding time difference
- Altitude: The height of something above a reference level, especially above sea level or above the earth’s surface
- Speed: The actual speed of the device expressed as meters per seconds
- Heading: The actual direction of the device expressed in degrees relative to true north
- Accuracy: The accuracy of a location in meters
![]() Note True north, also known as geodetic north, is the direction from any point toward the North Pole.
Note True north, also known as geodetic north, is the direction from any point toward the North Pole.
Remember that only Latitude, Longitude, and Accuracy are always provided; whereas Altitude, Accuracy, Heading, and Speed are provided only if available. You should keep this in mind to avoid possible NullReferenceExceptions.
Prepare the UI
To show a map in XAML, you can use the Bing Maps SDK for Windows 8.1 Store apps (because this SDK adds a control for XAML), which is available here: http://visualstudiogallery.msdn.microsoft.com/224eb93a-ebc4-46ba-9be7-90ee777ad9e1
Before you can use Map control in your app, you need a Bing Maps key that you can get in this way:
- Connect to http://www.bingmapsportal.com/.
- Log on with a Windows Live account.
- Create a new Bing Maps key. Don’t worry about the application name; you can use a key on every app.
- Inside the App.xaml file, create a resource identified by the BingCredentials key in this way: <x:String x:Key="BingMapKey">your key</x:String>, where “your key” is the Bing Maps key created before. This is a good practice if your app uses this control in other pages, and it is a good way to keep only information about how to draw the view inside the XAML.
XAML
![]() Note For this version of the library, you must change Target CPU to a specific platform instead of Any CPU.
Note For this version of the library, you must change Target CPU to a specific platform instead of Any CPU.
After the installation, add a reference to Bing Maps, as shown in Figure 7-2, so you can import the Bing.Maps namespace into your code.
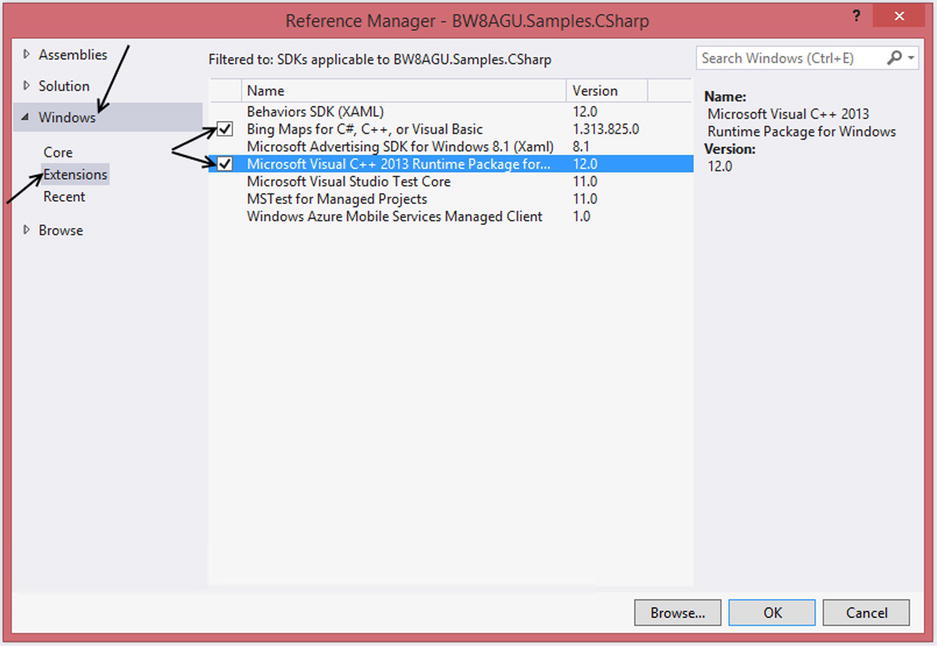
Figure 7-2. Referencing the Bing.Maps namespace
If your solution is configured to build for Any CPU, your project won’t compile and will notify you that something has gone wrong (as you can see Figure 7-3).

Figure 7-3. Invalid reference
To solve this problem, open the Configuration Manager from the Build menu of Visual Studio. From the Configuration Manager, you can select the target platform for projects inside your solution, changing the selected value of the Active Solution Platform combo box (see Figure 7-4).

Figure 7-4. Active solution platform drop-down list
Now you are ready to include Map control inside your application and you will do it in a project dedicated to this chapter named BW8AGU.Samples.CSharp/BW8AGU.Samples.VB in a page named GeoLocationSample. You must import the Bing.Maps namespace inside the page of your app where you want to add the Map control. You can do so by adding the bold XAML as an attribute of the Page element in XAML:
<Page
    x:Name="pageRoot"
    x:Class="BW8AGU.Samples.CSharp.GeoLocationSample"
    DataContext="{Binding DefaultViewModel, RelativeSource={RelativeSource Self}}"
    xmlns="http://schemas.microsoft.com/winfx/2006/xaml/presentation"
    xmlns:x="http://schemas.microsoft.com/winfx/2006/xaml"
    xmlns:local="using:BW8AGU.Samples.CSharp"
    xmlns:common="using:BW8AGU.Samples.CSharp.Common"
    xmlns:maps="using:Bing.Maps"
    xmlns:d="http://schemas.microsoft.com/expression/blend/2008"
    xmlns:mc="http://schemas.openxmlformats.org/markup-compatibility/2006"
    mc:Ignorable="d">
In this way, you have imported the Bing.Maps namespace, and then you are ready to add the Map control on your user interface (UI). You will do it using the map element that you can find in the maps namespace (that you have imported):
<maps:Map x:Name="MapControl" Credentials="{StaticResource BingMapKey}" ShowBuildings="False" />
The control is ready to show the position that you’ll retrieve using a GeoLocator instance. You just have to do two steps:
- Declare in the app manifest that your application will use Location capability.
- Use Location capability in your code.
To declare that your application will use Location capability, you must open the app manifest and, in Capabilities tab, check Location (see Figure 7-5).
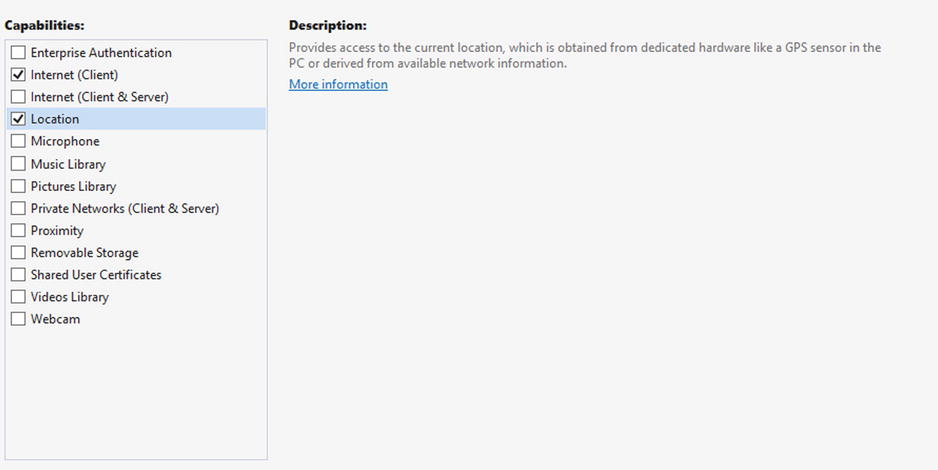
Figure 7-5. Using the Location capability
To use location capability in your code, at the class level you can declare a Geolocator type variable and you can create a method to initialize it. If you need to track the position of the user in your app (e.g., the Navigation app), you can subscribe to the PositionChanged event, and if your code retrieves the position without the use of an async pattern, you can subscribe to the StatusChanged event in order to detect the state of Geolocator. Now choose the language that is appropriate for you and follow your directives.
In the code-behind of your XAML file, you must include the Windows.Devices.Geolocation and Bing.Maps namespaces so you need an instance that you declare inside the page class as a class private field. After the declaration, you will write a method that initializes the instance with an accuracy of 2 meters and a threshold of 1 meter. Finally, you must subscribe to the PositionChanged event with an event handler that will report information on the UI, updating the map center and updating the viewmodel used by the UI with information about longitude, latitude, and other data provided by location services. You can do it with the following code:
C#
using Bing.Maps;
using Windows.Devices.Geolocation;

public sealed partial class GeoLocationSample : Page
 {
        private Geolocator locator = null;

      private void InitializeGeolocator()
        {
            if (locator == null)
            {
                locator = new Geolocator();
                locator.DesiredAccuracyInMeters = 2;
                locator.MovementThreshold = 1;
                locator.PositionChanged += OnLocatorPositionChanged;
            }
        }

private async void OnLocatorPositionChanged(Geolocator sender, PositionChangedEventArgs args)
        {
            DefaultViewModel["Coordinate"] = args.Position.Coordinate;
            await MapControl.Dispatcher.RunAsync(Windows.UI.Core.CoreDispatcherPriority.Normal,
            () =>
            {
                MapControl.Center = new Bing.Maps.Location
                {
                    Longitude = args.Position.Coordinate.Point.Position.Longitude,
                    Latitude = args.Position.Coordinate.Point.Position.Latitude,
                };
                Pushpin pin = new Bing.Maps.Pushpin();
                pin.SetValue(Bing.Maps.MapLayer.PositionProperty, new Bing.Maps.Location(MapControl.Center));
                MapControl.Children.Clear();
                MapControl.Children.Add(pin);

                MapControl.SetZoomLevel(10,TimeSpan.FromSeconds(1));
            });
        }
    ...
    }
VB
Imports Bing.Maps
Imports Windows.Devices.Geolocation

public sealed partial class GeoLocationSample : Page
 {
        Private locator As Geolocator

Private Async Sub InitializeGeolocator()
        If locator Is Nothing Then
            locator = New Geolocator()
            locator.DesiredAccuracyInMeters = 2
            locator.MovementThreshold = 1
            AddHandler locator.PositionChanged, AddressOf OnLocatorPositionChanged
            Dim actualPosition = Await locator.GetGeopositionAsync()
            AddHandler locator.StatusChanged, AddressOf OnStatusChanged
        End If
    End Sub

Private Async Sub OnLocatorPositionChanged(sender As Geolocator, args As PositionChangedEventArgs)
        DefaultViewModel("Coordinate") = args.Position.Coordinate
        Await MapControl.Dispatcher.RunAsync(Windows.UI.Core.CoreDispatcherPriority.Normal,
 Sub()
        MapControl.Center = New Bing.Maps.Location() With {
            .Longitude = args.Position.Coordinate.Point.Position.Longitude,
            .Latitude = args.Position.Coordinate.Point.Position.Latitude
        }
        Dim pin As Pushpin = New Bing.Maps.Pushpin()
        pin.SetValue(Bing.Maps.MapLayer.PositionProperty, New Bing.Maps.Location(MapControl.Center))
                                                 MapControl.Children.Clear()
                                                 MapControl.Children.Add(pin)

        MapControl.SetZoomLevel(10, TimeSpan.FromSeconds(1))

        End Sub)
    End Sub
    ...
This code uses the Geolocator class to track the user position continuously. However, nothing until now has called the InitializeGeolocator method; for this scope, you have a button on the UI to start tracking the user position, and all you have to write is the following:
C#
private void OnGetPositionButtonClick(object sender, RoutedEventArgs e)
        {
            InitializeGeolocator();
        }
VB
Private Sub OnGetPositionButtonClick(sender As Object, e As RoutedEventArgs) Handles GetPositionButton.Click
        InitializeGeolocator()
    End Sub
Windows.Device.Sensors
Windows.Device.Sensors is the namespace that contains all classes that you can use to access to sensors. In this namespace, shown in Figure 7-6, you can find classes to manage:
- Accelerometer
- Compass
- Gyrometer
- Inclinometer
- LightSensor
- OrientationSensor
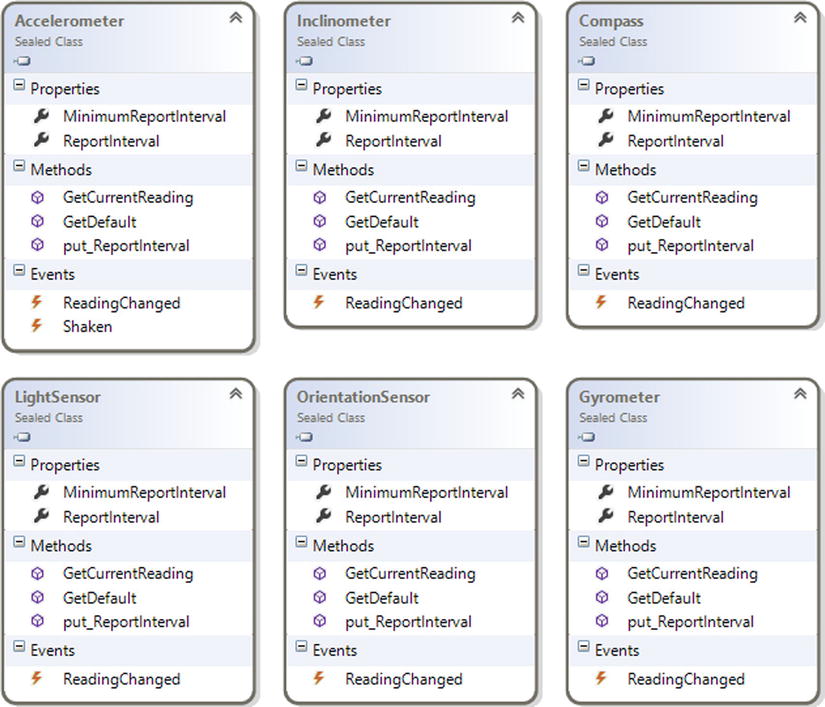
Figure 7-6. Windows.Devices.Sensors namespace
All these classes offer the same methods and events (with the exception of the Shake event in the Accelerometer class). Every class can be activated in the same way:
- Create an instance.
- Subscribe to the ReadingChanged event.
- Manage the reading changed event argument.
About the third step: you need to see it through because every class uses its own event argument implementation.
Moreover, as you can deduce from Figure 7-6, every sensor can be used following the same programming model. For this reason, we will show you how to use a Compass sensor so that you learn how to also use other sensors. Of course, every sensor will provide different kind of data, as shown in Figure 7-7.
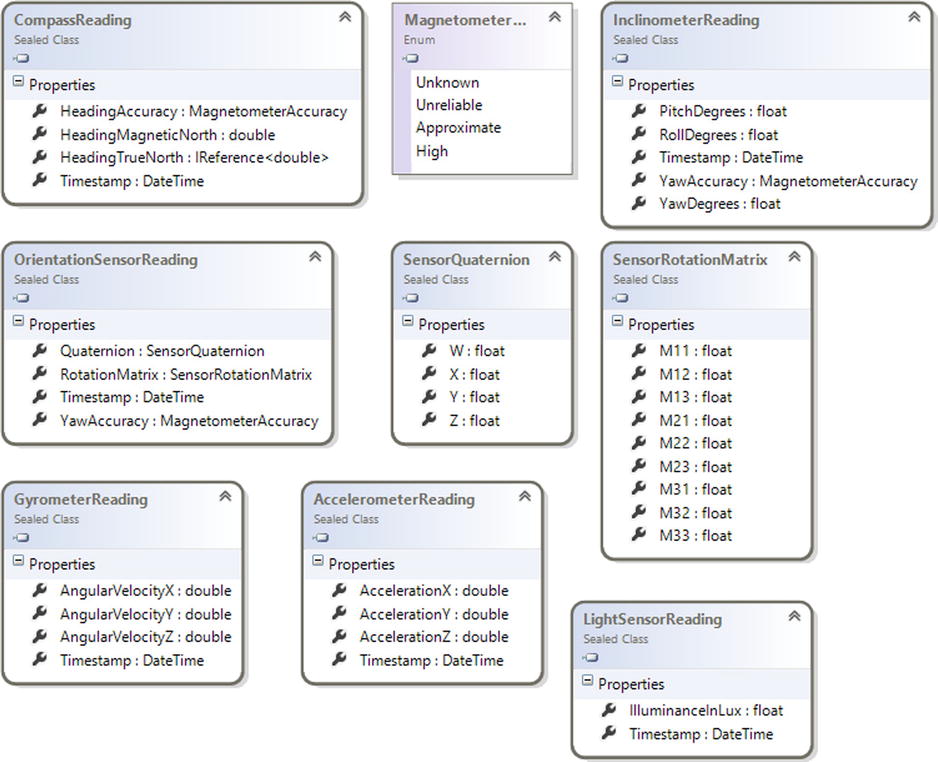
Figure 7-7. Sensors data classes
For the Compass sensor, the CompassReading class contains Heading data (Accuracy, Magnetic North, True North) and the timestamp of the measurement. Just like the Inclinometer reading the accuracy is expressed by an enumeration that shows how accurate the reading is.
Inclinometer provides information about Pitch, Roll, and Yaw through the InclinometerReading class. Using data provided by this sensor, we could retrieve the position of the device against the horizon.
OrientationSensorReading is the class used by OrientationSensor to understand how the device is oriented, against spherical coordinates. The Quaternion property is the SensorQuaternion type that contains values of versors in a mathematical notation.
Gyrometer provides data through the GyrometerReading class that exposes four properties. Three properties are dedicated to the angular velocity of the device against three axes, and the last one is the TimeStamp of the measurement.
The behavior of Accelerometer is similar to Gyrometer, but it provides information about the acceleration of the device on three axes.
Finally, the LightSensor provides information about the light that hits the device. IlluminanceInLux assumes values that you can use to understand at which type of light is exposed the device. Table 7-1 summarizes how to use the value provided by this sensor.
Table 7-1. Illuminance Values
Lighting Condition |
From (lux) |
To (lux) |
|---|---|---|
Pitch Black |
0 |
10 |
Very Dark |
11 |
50 |
Dark Indoors |
51 |
200 |
Dim Indoors |
201 |
400 |
Normal Indoors |
401 |
1000 |
Bright Indoors |
1001 |
5000 |
Dim Outdoors |
5001 |
10,000 |
Cloudy Outdoors |
10,001 |
30,000 |
Direct Sunlight |
30,001 |
100,000 |
In this section, you see how to use the Compass sensor in order to learn the code required to work with sensors. Your UI will be simple and will show information retrieved by the sensor in text form.
XAML
<Grid Grid.Row="1">
            <Grid.RowDefinitions>
                <RowDefinition Height="36"/>
                <RowDefinition Height="36"/>
                <RowDefinition Height="36"/>
                <RowDefinition Height="36"/>
            </Grid.RowDefinitions>
            <Grid.ColumnDefinitions>
                <ColumnDefinition Width="118"/>
                <ColumnDefinition Width="Auto"/>
                <ColumnDefinition/>
            </Grid.ColumnDefinitions>
            <TextBlock Grid.Row="0" Text="Magnetic North" />
            <TextBlock Grid.Row="1" Text="True North" />
            <TextBlock Grid.Row="2" Text="Heading Accuracy" />
            <TextBlock Grid.Row="0" Grid.Column="1" Text="{Binding CompassData.MagneticNorth}" />
            <TextBlock Grid.Row="1" Grid.Column="1" Text="{Binding CompassData.TrueNorth}" />
            <TextBlock Grid.Row="2" Grid.Column="1" Text="{Binding CompassData.Accuracy}" />
            <Button Grid.Row="3" Content="Get Data" Click="OnGetDataButtonClick" />
        </Grid>
C#
using Windows.Devices.Sensors;

private void OnGetDataButtonClick(object sender, RoutedEventArgs e)
        {
            var compass = Compass.GetDefault();
            if (compass == null)
            {
                this.DefaultViewModel["CompassData"] =
                    new
                {
                    MagneticNorth = "Compass not found",
                    TrueNorth= "Compass not found",
                    Accuracy = "Compass not found"
                };
            }
            else
            {
                var reading = compass.GetCurrentReading();
                compass.ReadingChanged += OnCompassReadingChanged;
                SetCompassReading(reading);
            }
        }

private void SetCompassReading(CompassReading reading)
        {
            this.DefaultViewModel["CompassData"] =
                new
                {
                    MagneticNorth = reading.HeadingMagneticNorth,
                    TrueNorth = reading.HeadingTrueNorth,
                    Accuracy = reading.HeadingAccuracy
                };
        }

        private void OnCompassReadingChanged(Compass sender, CompassReadingChangedEventArgs args)
        {
            SetCompassReading(args.Reading);
        }
VB
private void OnGetDataButtonClick(object sender, RoutedEventArgs e)
        {
            var compass = Compass.GetDefault();
            if (compass == null)
            {
                this.DefaultViewModel["CompassData"] =
                    new
                {
                    MagneticNorth = "Compass not found",
                    TrueNorth= "Compass not found",
                    Accuracy = "Compass not found"
                };
            }
            else
            {
                var reading = compass.GetCurrentReading();
                compass.ReadingChanged += OnCompassReadingChanged;
                SetCompassReading(reading);
            }
        }

        private void SetCompassReading(CompassReading reading)
        {
            this.DefaultViewModel["CompassData"] =
                new
                {
                    MagneticNorth = reading.HeadingMagneticNorth,
                    TrueNorth = reading.HeadingTrueNorth,
                    Accuracy = reading.HeadingAccuracy
                };
        }

        private void OnCompassReadingChanged(Compass sender, CompassReadingChangedEventArgs args)
        {
            SetCompassReading(args.Reading);
        }
Media
Windows 8.1 offers various ways to manage Media elements, even a good update to the MediaElement control (that was limited in Windows 8), which offers a standardized way to present media onscreen.
This section discusses using the Play To contract to stream Media elements contained in your application to DLNA devices. The capability to stream media is provided by classes (shown in Figure 7-8) that you can find in the Windows.Media.PlayTo namespace. Inside this namespace, you can find other classes that can act as DLNA clients.
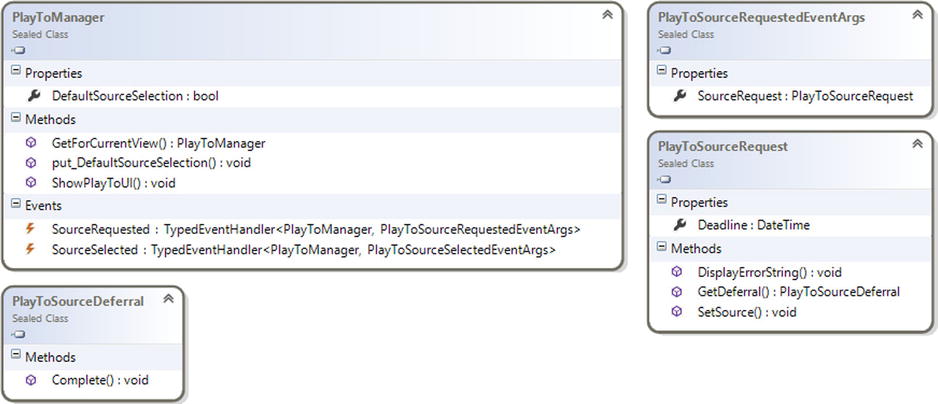
Figure 7-8. PlayToSource fundamental classes
The entry point for the Play To contract is PlayToManager, which returns an instance of itself through the GetForCurrentView method and allows you to subscribe to two events: SourceRequested and SourceSelected.
SourceRequested fires when the user interacts with the Device charm. The EventArg for this event is PlayToSourceSelectedEventArgs, which contains the body of the request contained in the PlayToSourceRequest class. This type allows you to set a source for the stream (that you can get from a MediaElement or Image control). That is all you have to know to start streaming your contents.
In your app, you’ll simulate a video application that will allow the user to stream a video during its reproduction to a DLNA-ready client (such as Xbox 360).
![]() Note If you want to test code in this section, you must have a DLNA–compliant client device. If you don’t have one, you can use Window Media Player to receive the stream. To enable this feature, start Windows Media Player, open the Stream menu, and select Allow Remote Control Of My Player to enable this feature.
Note If you want to test code in this section, you must have a DLNA–compliant client device. If you don’t have one, you can use Window Media Player to receive the stream. To enable this feature, start Windows Media Player, open the Stream menu, and select Allow Remote Control Of My Player to enable this feature.
Prepare the UI
Before you start using the PlayToManager class, you need to add a MediaElement control to your page:
XAML
Inside the XAML file, you need one thing:
<MediaElement Source="{Binding Path='Path'}" AutoPlay="False" x:Name="mediaElement" />
Implementing the Play To Contract
To implement the Play To contract, you must declare and retrieve an instance of PlayToManager and an instance of Dispatcher that will help you avoid the CrossThreadException later.
To start using the Play To contract, you need an instance of PlayToManager (contained in the Windows.Media.PlayTo namespace) that is the entry point for DLNA features. You also need an instance of CoreDispatcher (available in the Windows.UI.Core namespace) in order to stream contents asynchronously.
C#
...
using Windows.Media.PlayTo;
using Windows.UI.Core;
...
public sealed partial class PlayToSample : Page
    {
        private PlayToManager playtoManager = null;
        private CoreDispatcher dispatcher;
   ...
}
VB
...
Import Windows.Media.PlayTo
Import Windows.UI.Core
...
public sealed partial class PlayToSample : Page
    {
        private PlayToManager playtoManager = null;
        private CoreDispatcher dispatcher;
   ...
}
Of course, you must initialize it before use. For this reason, you will write the InitPlayToManager method that initializes both the PlayToManager and Dispatcher objects.
C#
private void InitPlayToManager()
{
    dispatcher = Window.Current.CoreWindow.Dispatcher;
    if (playtoManager == null)
    {
      playtoManager = PlayToManager.GetForCurrentView();
      playtoManager.SourceRequested += OnPlayToSourceRequested;
      playtoManager.SourceSelected += OnPlayToSourceSelected;
    }
}
VB
Private Sub InitPlayToManager()
        dispatcher = Window.Current.CoreWindow.Dispatcher
        If playtoManager Is Nothing Then
                playtoManager = PlayToManager.GetForCurrentView()
                AddHandler playtoManager.SourceRequested, AddressOf OnPlayToSourceRequested
                AddHandler playtoManager.SourceSelected, AddressOf OnPlayToSourceSelected
        End If
End Sub
This method will be called inside the LoadState method that was previously written in order to be sure that these objects are initialized when the page is loaded.
C#
protected override void LoadState(Object navigationParameter, Dictionary<String, Object> pageState)
{
...
   InitPlayToManager();
...
}
VB
Protected Overrides Sub LoadState(navigationParameter As [Object], pageState As Dictionary(Of [String], [Object]))
   ...
        InitPlayToManager()
   ...
End Sub
As you have seen, in the InitPlayToManager method, you subscribe to the SourceRequested and SourceSelected events with the OnPlayToSourceSelected and OnPlayToSourceRequested event handlers. The first fires after the user selects the device from the device pane; this event might be useful to retrieve information about the specific device that the user selects. The second one fires when the user selects the Device charm and must be used to provide content to the stream.
C#
private void OnPlayToSourceSelected(PlayToManager sender, PlayToSourceSelectedEventArgs args)
{
   //Report the name of the client
}

private async void OnPlayToSourceRequested(PlayToManager sender, PlayToSourceRequestedEventArgs e)
        {
            await dispatcher.RunAsync(Windows.UI.Core.CoreDispatcherPriority.Normal,
                () =>
                {
                    PlayToSourceDeferral deferral = e.SourceRequest.GetDeferral();
            PlayToSourceRequest sr = e.SourceRequest;
                    sr.SetSource(videoMediaElement.PlayToSource);
                    deferral.Complete();
                });
        }
VB
Private Sub OnPlayToSourceSelected(sender As PlayToManager, args As PlayToSourceSelectedEventArgs)
        'Report the name of the client
End Sub


Private Async Sub OnPlayToSourceRequested(sender As PlayToManager, e As PlayToSourceRequestedEventArgs)
   Await coreDispatcherInstance.RunAsync(Windows.UI.Core.CoreDispatcherPriority.Normal,
     Async Sub()
      Dim deferral As PlayToSourceDeferral = e.SourceRequest.GetDeferral()
      Dim sr As PlayToSourceRequest = e.SourceRequest
      ‘Set the media element as source for incoming SourceRequest
      sr.SetSource(videoMediaElement.PlayToSource)
      deferral.Complete()
   End Sub)
End Sub

private async void OnPlayToSourceRequested(PlayToManager sender, PlayToSourceRequestedEventArgs e)
        {
            await dispatcher.RunAsync(Windows.UI.Core.CoreDispatcherPriority.Normal,
                () =>
                {
                    PlayToSourceDeferral deferral = e.SourceRequest.GetDeferral();
                    PlayToSourceRequest sr = e.SourceRequest;
                    sr.SetSource(videoMediaElement.PlayToSource);
                    deferral.Complete();
                });
        }
Background Task
With version 8, Windows introduced a new concept of application behavior. Every app works only while it is in the foreground, but the environment offers various ways to “simulate” that your app is still working:
- Background Task: “Queues” a task in order to update data inside the application
- Push Notification: Notifies from the outside that something is ready for the application
- Background Transfer API: Starts a transfer that requires a long time and must continue while the application is suspended
- Playback Manager: Provides content to play to the playback infrastructure
- File Share contract: Shares contents between applications
This section discusses Background Tasks in Windows 8.1, which are enriched in this edition of the OS. This feature enables your app to run code in the background, allowing you to write real-time applications such as a chat or a Voice over Internet Protocol (VOIP) app. As you read before, a Background Task works even if your app is suspended or not running. While you build one, you can specify a set of conditions that must be verified to run the task and one trigger that launches the task. Figure 7-9 shows how the Background Task system works.
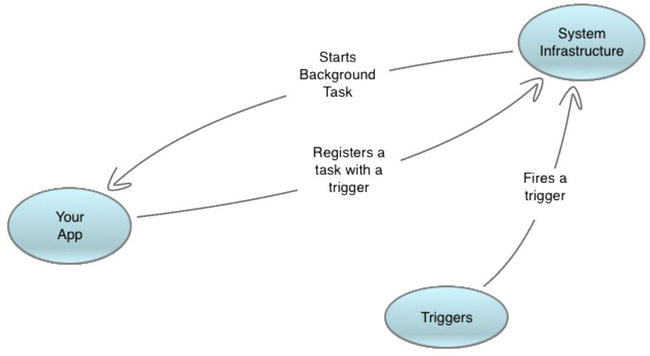
Figure 7-9. BackgroundTask process
First, register a task that will start with a specific trigger (see Table 7-2) with optional conditions (see Table 7-3). When a trigger fires, the system infrastructure looks for Background Tasks registered for it. If conditions (optionally) associated with the task are fulfilled, the task starts independently from the application status. In the case of unsatisfied conditions, the infrastructure waits until all conditions are satisfied and then executes the task. This mechanism is called latching because the infrastructure latches the trigger to a fired state.
Table 7-2. Background Task Triggers
Trigger Type |
Event |
When it Fires |
|---|---|---|
ControlChannelTrigger |
ControlChannelTrigger |
When the control channel receives a message |
MaintenanceTrigger |
MaintenanceTrigger |
When the device is plugged in |
PushNotificationTrigger |
PushNotificationTrigger |
When a raw notification arrives |
SystemEventTrigger |
InternetAvailable |
When the Internet becomes available |
SystemEventTrigger |
LockScreenApplicationAdded |
When an app tile is added to the lock screen |
SystemEventTrigger |
LockScreenApplicationRemoved |
When an app tile is removed from the lock screen |
SystemEventTrigger |
ControlChannelReset |
When a network channel is reset |
SystemEventTrigger |
NetworkStateChange |
When a change on network connectivity occurs |
SystemEventTrigger |
OnlineIdConnectedStateChange |
When the online ID associated with the account changes |
SystemEventTrigger |
ServicingComplete |
When the app is updated |
SystemEventTrigger |
SessionConnected |
When the session is connected |
SystemEventTrigger |
SessionDisconnected |
When the session is disconnected |
SystemEventTrigger |
SmsReceived |
When a new Short Message System (SMS) message is received (if the device supports it) |
SystemEventTrigger |
TimeZoneChange |
When the time zone changes (e.g., for automatic clock regulation for Daylight Saving Time [DST]) |
SystemEventTrigger |
UserAway |
When the user is absent |
SystemEventTrigger |
UserPresent |
When user is present |
TimeTrigger |
TimeTrigger |
After a time period elapses |
LocationTrigger |
LocationTrigger |
When user is inside a Geofencing |
Table 7-3. Background Task Conditions
Condition |
Meaning |
|---|---|
InternetAvailable |
The Internet must be available. |
InternetNotAvailable |
The Internet must be unavailable. |
SessionConnected |
The session must be connected (logged in). |
SessionDisconnected |
The session must be disconnected (logged out). |
UserNotPresent |
The user must have the status set to away. |
UserPresent |
The user must have the status set to present. |
Every trigger type described in Table 7-2 reflects a class of framework (see Figure 7-10) that even shows the SystemTriggerType enumeration, which reflects events that are classified as SystemEvent.
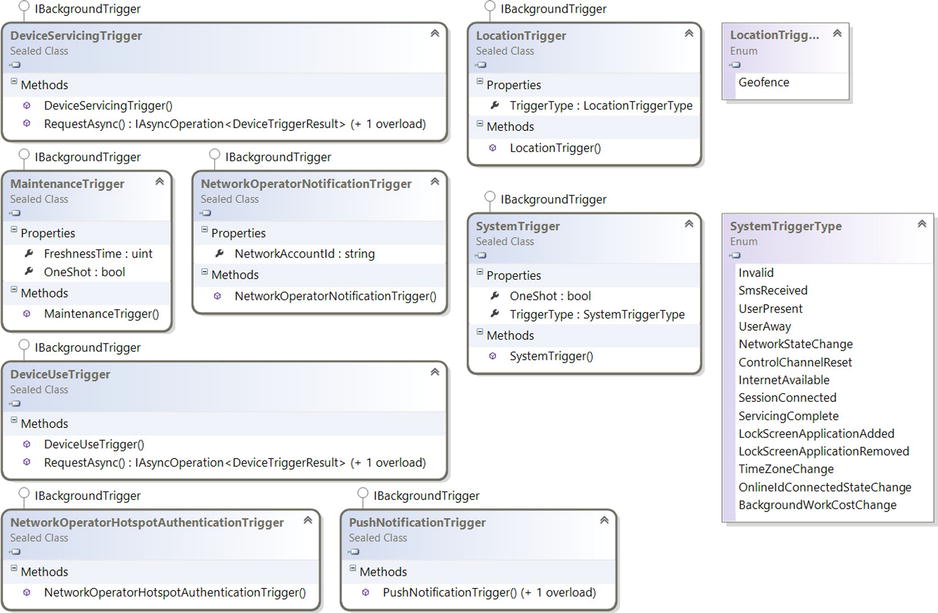
Figure 7-10. Trigger classes
In this example, you’ll implement the infrastructure for an app that downloads messages from a server. Because you don’t know that the user will be always connected, you can create a Background Task that will synchronize with the server when the Internet becomes available. Figure 7-11 shows how to add a Background Task.
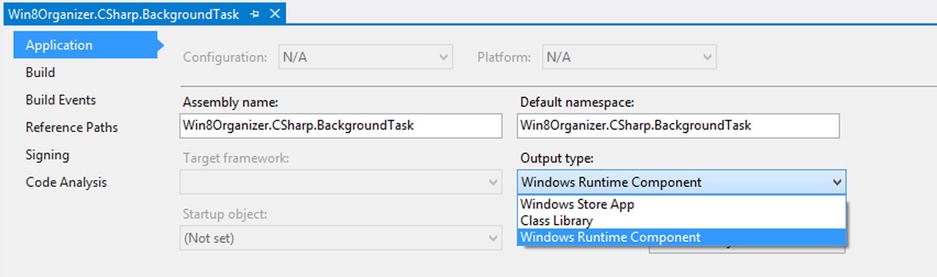
Figure 7-11. Adding a Background Task
Implementing the Background Task
When you work with C# and VB, you must add a new project to your solution using the template for the Windows Runtime Component, as shown in Figure 7-12. You do this because when you create a Background Task, the output type of the project must be set to Windows Runtime Component (see Figure 7-13), allowing the Background Task infrastructure to manage it.
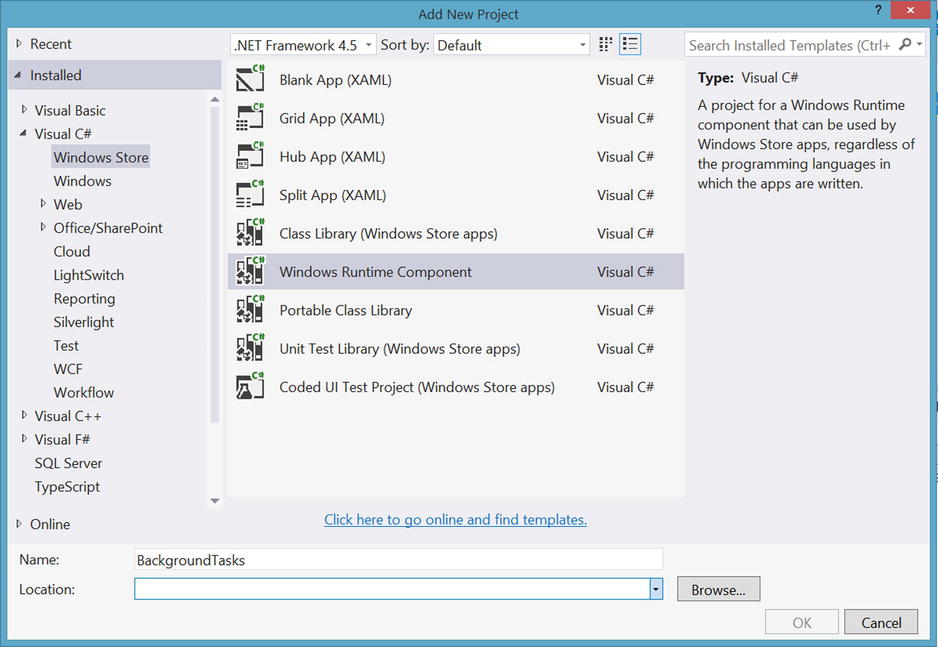
Figure 7-12. Creating the project
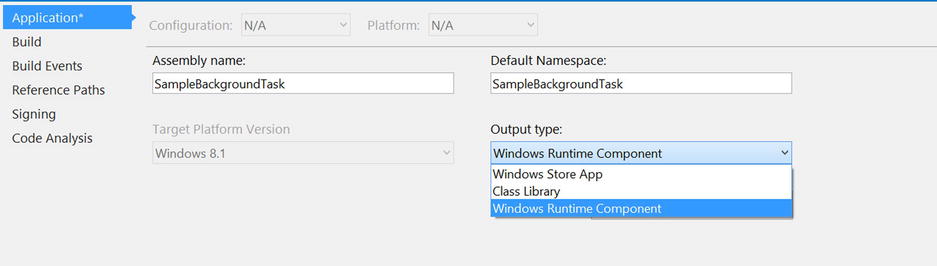
Figure 7-13. Project output type
When the project is created, delete the autogenerated class and create a new class named DownloadMessagesBackgroundTask. This class must be declared as sealed if you work with C# and as NotInheritable if you use VB. In the declaration of the class, you must always implement the IBackgroundTask interface containing only one method named Run (see Figure 7-14). Remember that when the Background Task works for a long time, you should use the BackgroundTaskDeferral to tell the infrastructure of Windows 8.1 that your async process has finished.
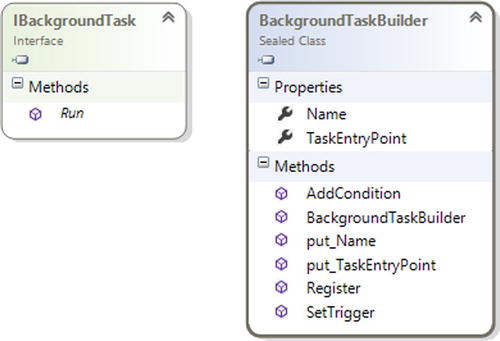
Figure 7-14. Background Task essential class and interface for C#, C++, and VB
Then your code will look like this, where MessagesDownloader is your class that exposes an operation that simulates the download of 20 messages:
C#
using Windows.ApplicationModel.Background;

namespace SampleBackgroundTask
{
    public sealed class DownloadMessagesBackgroundTask : IBackgroundTask
    {
        public async void Run(IBackgroundTaskInstance taskInstance)
        {
            BackgroundTaskDeferral deferral = taskInstance.GetDeferral();
            await MessagesDownloader.GetMessagesAsync();
            deferral.Complete();
        }
    }
}
VB
Imports Windows.ApplicationModel.Background

Namespace SampleBackgroundTask
    Public NotInheritable Class DownloadMessagesBackgroundTask
        Implements IBackgroundTask
        Public Async Sub Run(taskInstance As IBackgroundTaskInstance) Implements IBackgroundTask.Run
            Dim deferral As BackgroundTaskDeferral = taskInstance.GetDeferral()
            Await MessagesDownloader.GetMessagesAsync()
            deferral.Complete()
        End Sub
    End Class
End Namespace
Registering the Background Task
After the implementation of the Background Task, the most interesting part of the code to write is the registration of the Background Task. In Figure 7-14, you can see the essential class and interface involved in Background Task creation. IBackgroundTask is the previous interface that we developed in the introduction to the Background Task. BackgroundTaskBuilder is the class to use to register the Background Task in the system.
To register a Background Task you will create a private method named RegisterBackgroundTask that you can call wherever you prefer in your code. This method will do these next steps:
- Retrieves all tasks registered for the current application
- Looks for a task with a name equal to the string in the SaveTaskName constant
- If it is the first time that you are registering the Background Task, it creates an instance of BackgroundTaskBuilder:
- Sets as the name the content of the SaveTaskName constant
- Sets as the TaskEntryPoint the full name of the SaveBackgroundTask type
- Registers a trigger with the Internet available
- Registers the Background Task and subscribes to the Progress (reporting) event and the Completed event.
- If it is not the first registration, it:
- Gets the task from the collection of registered tasks
- Subscribes to the Progress (reporting) event, and the Completed event.
As you can read in the step-by-step method description, two events, Progress and Completed, are subscribed to, exposed by the BackgroundTaskRegistration class. By handling the Completed event, you can notify users that the Background Task has finished or simply use it to unregister the BackgroundTaskRegistration. The Progress event fires when you set the Progress property of the IBackgroundTaskInstance argument inside the Run method.
C#
public sealed partial class BackgroundTaskSample : Page
{
private const string GetMessagesTaskName = "GetMessagesTask";
        private void RegisterBackgroundTask()
        {
            var registeredTasks = BackgroundTaskRegistration.AllTasks;
            bool alreadyRegistered = registeredTasks.Any(t => t.Value.Name.Equals(GetMessagesTaskName));
            if (!alreadyRegistered)
            {
                BackgroundTaskBuilder backgroundTaskBuilder = new BackgroundTaskBuilder();
                backgroundTaskBuilder.Name = GetMessagesTaskName;
                backgroundTaskBuilder.TaskEntryPoint = typeof(SampleBackgroundTask.DownloadMessagesBackgroundTask).FullName;
                backgroundTaskBuilder.SetTrigger(
                    new SystemTrigger(SystemTriggerType.InternetAvailable, true));

                var registration = backgroundTaskBuilder.Register();
                registration.Progress += OnSaveBackgroundTaskProgressReported;
                registration.Completed += OnSaveBackgroundTaskCompleted;

            }
            else
            {
                //Use the task already registered
                var task = registeredTasks.First(t => t.Value.Name.Equals(GetMessagesTaskName));
                task.Value.Progress += OnSaveBackgroundTaskProgressReported;
                task.Value.Completed += OnSaveBackgroundTaskCompleted;
            }
        }

        private void OnSaveBackgroundTaskCompleted(BackgroundTaskRegistration sender, BackgroundTaskCompletedEventArgs args)
        {
            //Put here the code to manage the end of a task
            //Notify the user about the end of the execution
        }

        private void OnSaveBackgroundTaskProgressReported(BackgroundTaskRegistration sender, BackgroundTaskProgressEventArgs args)
        {
            //Put here the code to manage progress of a task
            //Notify task progress
        }
}
VB
Public NotInheritable Class BackgroundTaskSample
    Inherits Page
...
Private Const GetMessagesTaskName As String = "GetMessagesTask"
    Private Sub RegisterBackgroundTask()
        Dim registeredTasks = BackgroundTaskRegistration.AllTasks
        Dim alreadyRegistered As Boolean = registeredTasks.Any(Function(t) t.Value.Name.Equals(GetMessagesTaskName))
        If Not alreadyRegistered Then
            Dim backgroundTaskBuilder As New BackgroundTaskBuilder()
            backgroundTaskBuilder.Name = GetMessagesTaskName
            backgroundTaskBuilder.TaskEntryPoint = GetType(DownloadMessagesBackgroundTask).FullName
             backgroundTaskBuilder.SetTrigger(New SystemTrigger(SystemTriggerType.InternetAvailable, True))

            Dim registration = backgroundTaskBuilder.Register()
            AddHandler registration.Progress, AddressOf OnSaveBackgroundTaskProgressReported

            AddHandler registration.Completed, AddressOf OnSaveBackgroundTaskCompleted
        End If

    End Sub

    Private Sub OnSaveBackgroundTaskCompleted(sender As BackgroundTaskRegistration, args As BackgroundTaskCompletedEventArgs)
        'Put here the code to manage the end of a task
        'Notify the user about the end of the execution
    End Sub

    Private Sub OnSaveBackgroundTaskProgressReported(sender As BackgroundTaskRegistration, args As BackgroundTaskProgressEventArgs)
        Throw New NotImplementedException()
    End Sub
End Class
You’ve now created your Background Task and written code to register it in the system. But to make everything work, you must declare in the application manifest that you intend to benefit from the Background Task infrastructure. To do so, open the application manifest and click the Declarations tab; then open the Available Declarations combo box (see Figure 7-15). From the list, select Background Task and click the Add button.
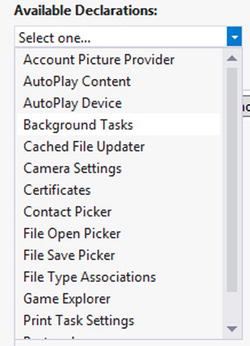
Figure 7-15. Declaring Background Tasks
This operation will open a panel like the one in Figure 7-16, in which you can set the entry point and task types. There is a clarification that you must keep in mind about the configuration of task types: remember that TimeTrigger, PushNotificationTrigger, ControlChannelTrigger and some SystemTriggerTypes (SessionConnected, ControlChannelReset, UserPresent, and UserAway) require that your app is in lock screen to work. To complete this operation, call the RequestAccessAsync method of the BackgroundExecutionManager class, which will ask the users whether they want to add the application to the lock screen.
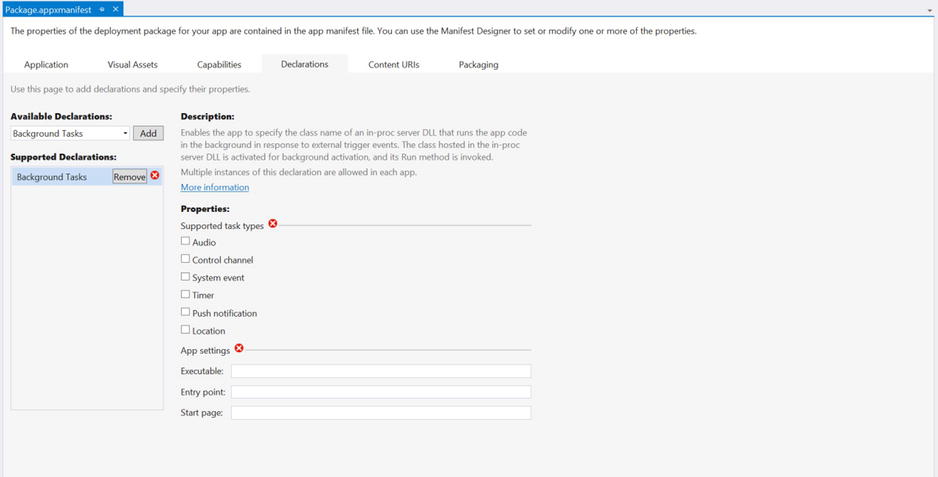
Figure 7-16. Configuring Background Tasks
For C# and VB projects, you must declare the entry point of the Background Task that is the full name of the class that implements IBackgroundTask. In this case, it is set to SampleBackgroundTask.DownloadMessagesBackgroundTask.
Soon after the registration of the Background Task in the Debug Location bar, you can see the process ID (PID) that Windows gives to your app and a combo button that allows you to fire events to help you debug your application. Inside the combo box, you can see the name that you have given to your task (see Figure 7-17).

Figure 7-17. Background Task debugging
If you click your Background Task, it will run, enabling you to debug your code.
This section discusses how to integrate with the heart of the new Windows UI: charms. You will implement the following:
- Search contract: Provides suggestions based on a list of names and results after a query from the search pane
- Share contract: Allows the user to share as text the content of your application
- Settings contract: Provides a settings panel for your application
The Search contract is definitely the simplest contract to implement; just right-click the app project and select Add ![]() New Item from the context menu. The Add New Item dialog box opens, as shown in Figure 7-18. Select the Windows Store node on the left side and look for the Search Contract item. Select it and choose a name for the result page; then click Add.
New Item from the context menu. The Add New Item dialog box opens, as shown in Figure 7-18. Select the Windows Store node on the left side and look for the Search Contract item. Select it and choose a name for the result page; then click Add.
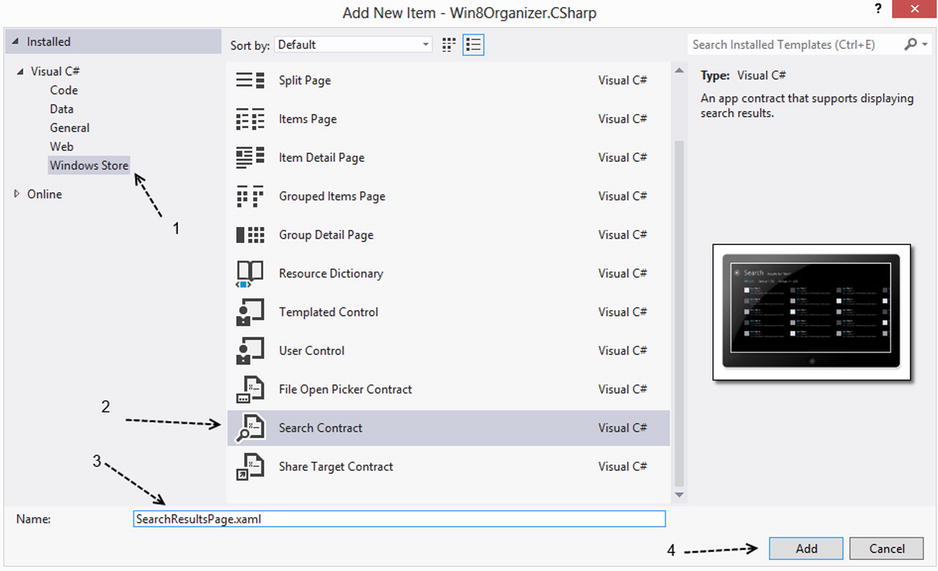
Figure 7-18. Adding a Search contract
When you add a Search contract to your project, Visual Studio automatically adds a new class named BooleanNegationConverter. Now you must declare that your app is a search provider in the application manifest. Open the app manifest; under Declaration, add the Search entry.
In version 8.1, Microsoft introduced the SearchBox control because the use of the Charm Bar is not as intuitive as hoped because not all users read the OS user manual. For this reason, you can add search functionality on your own app using the SearchBox control. This control is not properly related to the use of Search charm, but you should to see how to provide search results in your app using both ways, so you can choose which one meets your needs.
Search Contract
The core class that the Search contract is based on is SearchPane (shown in Figure 7-19). The most important method of SearchPane is GetForCurrentView, which returns an instance of SearchPane that you can use as an entry point for search functionality. Another interesting member is the ShowOnKeyboardInput property that, if set to true, automatically shows the search panel if the user writes something. SearchPane also exposes several events that you can handle if you want to collect information about the usage of this functionality.
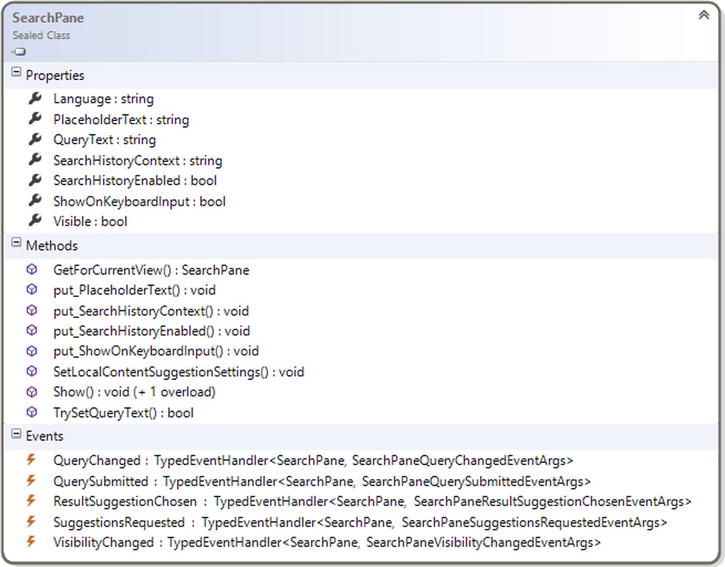
Figure 7-19. SearchPane class
Adding a Search contract is not the only way to provide search functionality in your app. You can subscribe to the QuerySubmitted event that delegates to your handler all the work to do. For example, you can use it in a game to provide hints based on the query submitted.
When the user starts searching, your app can provide suggestions to autocomplete the word. To do it, you must handle the SuggestionsRequested event that fires when the user changes the text in the search panel.
Another interesting event is ResultSuggestionChosen, which fires when the user hits a suggestion. This event should be handled to collect suggestions usage information in order to see the most frequently used suggestions and increase their points in your relevance algorithm.
For Win8Organizer, you start from the provided suggestions; in AppointmentManager, two new methods were added to support search functionality. The first is GetSearchSuggestions, which accepts a string as input and returns a list (a maximum of five elements) of the string that will populate the suggestions list. The second method, GetAppointmentsFiltered, accepts the string to query, looks for it inside the description or subject of the appointments, and returns a collection of appointments; we suggest limiting the number of items in the result page if they’re too many to be charged.
Providing Suggestions
To provide suggestions inside your app, you subscribe to the SuggestionsRequested event with the OnSearchSuggestionRequested handler, declaring a SearchPane object at the class level of the AppointmentsGrouped page; the code will look like the examples in the next two sections.
![]() Note You must declare a SearchPane in order to initialize it inside the OnLaunched method, subscribing the SuggestionsRequested event in order to provide suggestions while the user writes a query.
Note You must declare a SearchPane in order to initialize it inside the OnLaunched method, subscribing the SuggestionsRequested event in order to provide suggestions while the user writes a query.
C#
sealed partial class App : Application
{

protected override async void OnLaunched(LaunchActivatedEventArgs e)
   {
        SearchPane.GetForCurrentView().SuggestionsRequested += OnSearchSuggestionRequested;
   }

}

private async void OnSearchSuggestionRequested(SearchPane sender, SearchPaneSuggestionsRequestedEventArgs args)
        {
            var deferral = args.Request.GetDeferral();
            var suggestions = await SuggestionProvider.GetSuggestionsAsync(args.QueryText);
            args.Request.SearchSuggestionCollection.AppendQuerySuggestions(suggestions);
            deferral.Complete();
        }
VB
NotInheritable Class App
    Inherits Application

    Protected Overrides Async Sub OnLaunched(e As LaunchActivatedEventArgs)
...
        AddHandler SearchPane.GetForCurrentView().SuggestionsRequested, AddressOf OnSearchSuggestionRequested
    End Sub

    Private Async Sub OnSearchSuggestionRequested(sender As SearchPane, args As SearchPaneSuggestionsRequestedEventArgs)
        Dim deferral = args.Request.GetDeferral()
        Dim suggestions = Await SuggestionProvider.GetSuggestionsAsync(args.QueryText)
        args.Request.SearchSuggestionCollection.AppendQuerySuggestions(suggestions)
        deferral.Complete()
    End Sub
Providing Results
We have added the SearchResultsPage before, which in standard implementation comes ready to manage a query and provide filters in results. Because it is up to you to decide how to show search results in your app, we will concentrate on what you need to do in order to complete the implementation of the Search contract.
You must override the OnSearchActivated Method, which fires even when the application was closed but activated as a Search provider. In this method, you will do the same work as with the Launched method, changing the destination page.
C#
protected async override void OnSearchActivated(Windows.ApplicationModel.Activation.SearchActivatedEventArgs args)
        {
            var previousContent = Window.Current.Content;
            var frame = previousContent as Frame;

            // If the app does not contain a top-level frame, it is possible that this
            // is the initial launch of the app. Typically this method and OnLaunched
            // in App.xaml.cs can call a common method.
            if (frame == null)
            {
                // Create a Frame to act as the navigation context and associate it with
                // a SuspensionManager key
                frame = new Frame();
                SuspensionManager.RegisterFrame(frame, "AppFrame");

                if (args.PreviousExecutionState == ApplicationExecutionState.Terminated)
                {
                    // Restore the saved session state only when appropriate
                    try
                    {
                        await SuspensionManager.RestoreAsync();
                    }
                    catch (SuspensionManagerException)
                    {
                        //Something went wrong restoring state.
                        //Assume there is no state and continue
                    }
                }
            }

            frame.Navigate(typeof(SearchResultsPage), args.QueryText);
            Window.Current.Content = frame;

            // Ensure the current window is active
            Window.Current.Activate();
        }
VB
Protected Overrides Async Sub OnSearchActivated(args As Windows.ApplicationModel.Activation.SearchActivatedEventArgs)
        Dim previousContent = Window.Current.Content
        Dim frame = TryCast(previousContent, Frame)

        ' If the app does not contain a top-level frame, it is possible that this
        ' is the initial launch of the app. Typically this method and OnLaunched
        ' in App.xaml.cs can call a common method.
        If frame Is Nothing Then
            ' Create a Frame to act as the navigation context and associate it with
            ' a SuspensionManager key
            frame = New Frame()
            SuspensionManager.RegisterFrame(frame, "AppFrame")

            If args.PreviousExecutionState = ApplicationExecutionState.Terminated Then
                ' Restore the saved session state only when appropriate
                Try
                    Await SuspensionManager.RestoreAsync()
                    'Something went wrong restoring state.
                    'Assume there is no state and continue
                Catch generatedExceptionName As SuspensionManagerException
                End Try
            End If
        End If

        frame.Navigate(GetType(SearchResultsPage), args.QueryText)
        Window.Current.Content = frame

        ' Ensure the current window is active
        Window.Current.Activate()
    End Sub
SearchBox is a new control that allows your app to implement an in-app search behavior. It is important to remember that you must choose which strategy you want in your app. If you want the SearchBox, forget using the SearchPane because it requires the activation of the contract (including the contract in the app) that will make the SearchBox unable to work.
In the XAML file, the code needed to include the control looks like this:
<SearchBox Height="40" Width="200" />
Using this control, you can provide (in your app) the same UX that Windows provides in the SettingsPane, but we suggest putting the control in a position in which the user can easily find it.
Providing Suggestions
In this example, we provide suggestions to the control, using the list of files accessible to the app.
C#
private void navigationHelper_LoadState(object sender, LoadStateEventArgs e)
        {
            var settings = new Windows.ApplicationModel.Search.LocalContentSuggestionSettings
            {
                Enabled = true
            };
            settings.Locations.Add(Windows.Storage.KnownFolders.MusicLibrary);
            settings.Locations.Add(Windows.Storage.KnownFolders.PicturesLibrary);
            musicSearchBox.SetLocalContentSuggestionSettings(settings);
        }
VB
Private Sub navigationHelper_LoadState(sender As Object, e As LoadStateEventArgs)
    Dim settings = New Windows.ApplicationModel.Search.LocalContentSuggestionSettings() With {
        .Enabled = True
    }
    settings.Locations.Add(Windows.Storage.KnownFolders.MusicLibrary)
    settings.Locations.Add(Windows.Storage.KnownFolders.PicturesLibrary)
    mediaSearchBox.SetLocalContentSuggestionSettings(settings)
End Sub
With this approach, suggestions about the files container are shown in the Music and Pictures Library, so you can apply this code in a music application.
In recent years, the Internet has changed the way people live. They are always connected and every day they share work with others using software. So you should allow your users to share contents from your app because if your application favors user activity, they use it more readily.
The entry point for share source functionality is the DataTransferManager class (shown in Figure 7-20) that allows you to manage the Search charm activation through the DataRequested event. When this event fires, you can populate a DataPackage with data taken from the content you intend to distribute. You can put different types of data inside the DataPackage:
- SetText adds a text as the body of your share
- SetBitmap adds an image as part of the data
- SetStorageItems adds files or folders stored
- SetUri adds an URI to the DataPackage
- SetRtf adds contents in Rich Text Format
- SetHtmlFormat adds HTML as body of the DataPackage
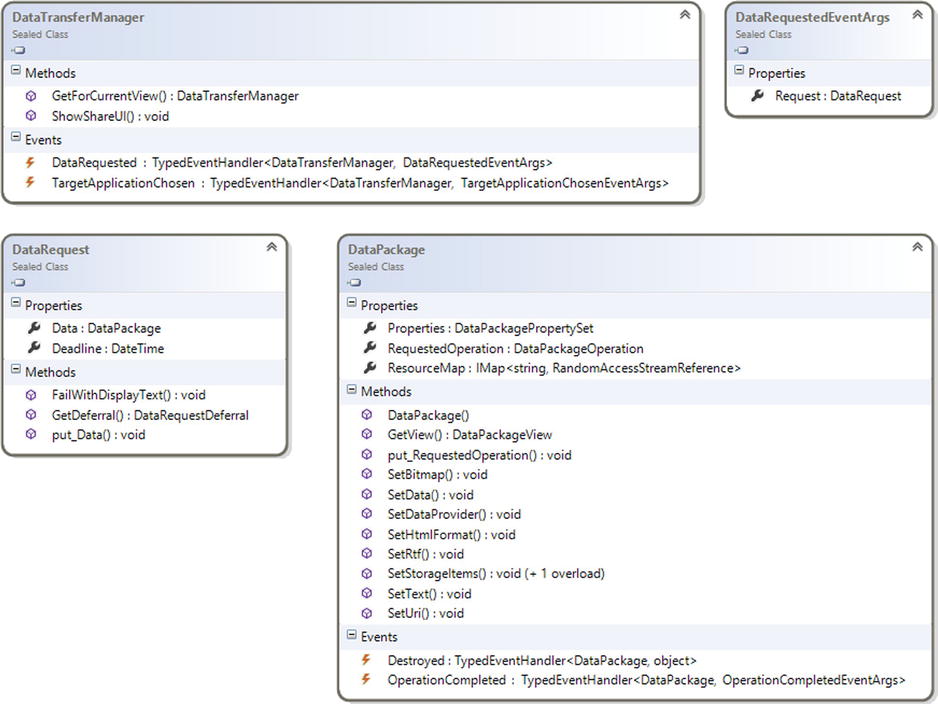
Figure 7-20. Share source core classes
To prepare your app to share content, you must modify the code-behind of your page, getting an instance of DataTransferManager and subscribing the DataRequested event. Inside, the event handler will fill the DataPackage with contents about the appointment:
C#
private void navigationHelper_LoadState(object sender, LoadStateEventArgs e)
        {
            Windows.ApplicationModel.DataTransfer.DataTransferManager manager = Windows.ApplicationModel.DataTransfer.DataTransferManager.GetForCurrentView();
            manager.DataRequested += OnShareDataRequested;
        }

private void OnShareDataRequested(Windows.ApplicationModel.DataTransfer.DataTransferManager sender, Windows.ApplicationModel.DataTransfer.DataRequestedEventArgs args)
        {
            args.Request.Data.Properties.Title = "Shared by Apress Sample App";
            args.Request.Data.SetText(shareableTextBox.Text);
        }
VB
Private Sub NavigationHelper_LoadState(sender As Object, e As Common.LoadStateEventArgs)
    Dim manager As Windows.ApplicationModel.DataTransfer.DataTransferManager =
    Windows.ApplicationModel.DataTransfer.DataTransferManager.GetForCurrentView()
        AddHandler manager.DataRequested, AddressOf OnShareDataRequested
    End Sub

Private Sub OnShareDataRequested(sender As DataTransfer.DataTransferManager, args As DataTransfer.DataRequestedEventArgs)
        args.Request.Data.Properties.Title = "Shared by Apress Sample App"
        args.Request.Data.SetText(shareableTextBox.Text)
    End Sub
Settings
Most of the applications require a settings panel, a part of the UI dedicated to app configuration, in which users can decide whether they want another color for text or how often the application can try to connect to the server. For this reason, Microsoft UI engineers introduced the Settings charm.
The Settings charm offers a unified way for every application to show a menu of settings. It was discussed theoretically in Chapter 3, and in this section you get your hand dirty with the code required to participate in this contract. Every Windows Store app has two default entries inside the Settings pane:
- Rate: Used to rate the application in the Windows Store
- Permissions: Helps the user to choose app-specific permissions about capabilities
To help you become familiar with some concepts, we’ll create a settings pane that will be applied when user navigates starts the application. For accuracy, remember that you can apply a new layout to your settings pane page by page, in order to offer a specific settings pane between pages. This is in contrast with what you see implemented in a lot of applications because a settings pane is intended to be global across the application; however, this example is intended to explain the extreme freedom that you have.
Add a folder to your project and name it SettingsPanels. Inside this folder, add a UserControl named ApplicationSettingsPanel.
As with other contracts, there is a class that acts as the entry point for the ApplicationSettings namespace (shown in Figure 7-21). This class exposes the GetForCurrentView method, already seen in other contracts, that returns an instance of SettingsPane specific for the current view you are using. The other method is Show, which opens the Settings panel.
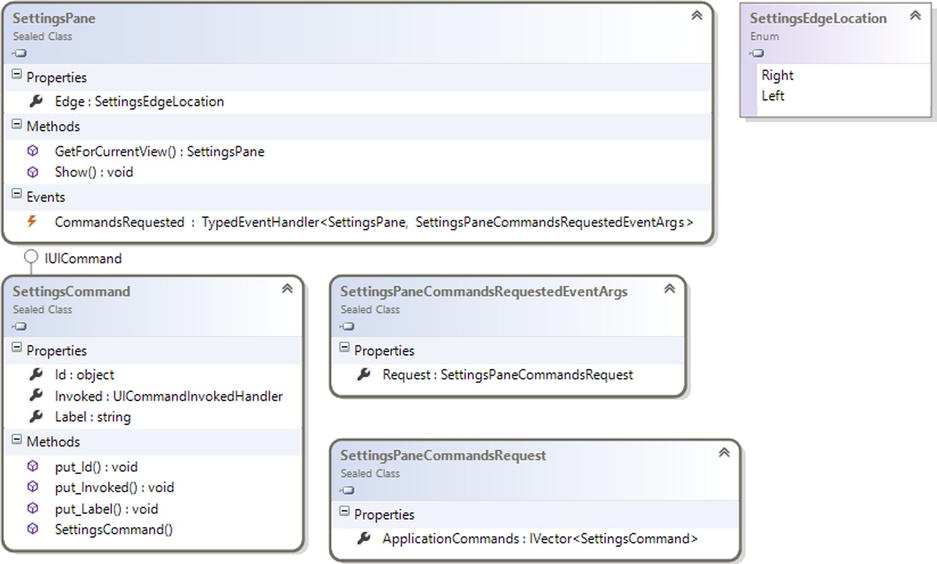
Figure 7-21. ApplicationSettings namespace
What you haven’t yet seen is the Edge property that indicates whether the Settings pane will appear on the left or right side of the screen. This property helps you (if you evaluate it) to define in which side of the screen your settings view must appear.
Last but not least is the CommandsRequested event that fires when the user interacts with the Settings charm. This event accepts as an EventArg a SettingsPaneCommandRequestedEventArgs that contains the Request property, which in turn contains a collection of SettingsCommand.
SettingsCommand is what is called an “entry point” for settings in Chapter 3. Every instance of this class is an entry for a submenu that will be designed as a UserControl.
The Application Settings panel (shown in Figure 7-22) enables you to choose the language that your application must use and whether it must use push notification.
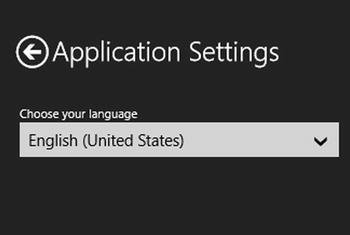
Figure 7-22. Application Settings panel
XAML
To create this panel, we’ll skip a lot of uninteresting XAML that defines the template and visual state for the back button so it’s really easy to read, and you can navigate from the code attached to this book. Here is the XAML required to create the panel shown in Figure 7-22:
<Grid Background="{StaticResource SettingsPanelBackgroundBrush}" >
        <Grid.RowDefinitions>
            <RowDefinition Height="80" />
            <RowDefinition Height="Auto" />

        </Grid.RowDefinitions>

        <Grid Grid.Row="0" >
            <Grid.ColumnDefinitions>
                <ColumnDefinition Width="*" />
            </Grid.ColumnDefinitions>

            <StackPanel Margin="40,20,10,0" Orientation="Horizontal" Grid.Column="0" VerticalAlignment="Center" HorizontalAlignment="Left">
                <Button Click="OnApplicationSettingsBackButtonClick"  Style="{StaticResource BackButtonStyle}"/>
                <TextBlock FontSize="25" Text="Application Settings" />
            </StackPanel>
        </Grid>
        <Grid Grid.Row="1" >

            <StackPanel Margin="40,20,10,0" >
                <TextBlock Text="Choose your language" />
                <ComboBox x:Name="languageCombobox" ItemTemplate="{StaticResource CultureInfoDataTemplate}" />
            </StackPanel>
        </Grid>
    </Grid>
CultureInfoDataTemplate is a data template created this way:
<DataTemplate x:Key="CultureInfoDataTemplate">
    <TextBlock Text="{Binding EnglishName}" />
</DataTemplate>
C#
public ApplicationSettings()
{
   this.InitializeComponent();
   Loaded += OnLoaded;
}


private void OnLoaded(object sender, RoutedEventArgs e)
{
   languageCombobox.ItemsSource = ApplicationSettingsHelper.Instance.AvailableLanguages;
   languageCombobox.SelectedItem = ApplicationSettingsHelper.Instance.CurrentCulture;
   languageCombobox.SelectionChanged += OnLanguageSelectionChanged;
}

private void OnLanguageSelectionChanged(object sender, SelectionChangedEventArgs e)
{
   //Set the language immediately (from Settings Charm guidelines)
   ApplicationSettingsHelper.Instance.CurrentCulture = e.AddedItems.First() as CultureInfo;
}

private void OnApplicationSettingsBackButtonClick(object sender, RoutedEventArgs e)
{
   Popup parent = this.Parent as Popup;
   if (parent != null)
   {
      parent.IsOpen = false;
      SettingsPane.Show();
   }
}
A Helper class was used previously. This time, you use ApplicationSettingsHelper, which is a singleton application that helps you populate the Settings panel and has the following implementation:
public class ApplicationSettingsHelper
    {
        private static ApplicationSettingsHelper instance = new ApplicationSettingsHelper();

        private ApplicationSettingsHelper()
        {
            AvailableLanguages =
                new ObservableCollection<CultureInfo>
                {
                    new CultureInfo("en-US"),
                    new CultureInfo("it-IT"),
                };
        }

        public static ApplicationSettingsHelper Instance
        {
            get
            {
                return instance;
            }
        }

        public ObservableCollection<CultureInfo> AvailableLanguages { get; set; }

        public CultureInfo CurrentCulture
        {
            //Read Settings in Get
            get;
            //Save Settings in Set
            set;
        }
    }
VB
Public Sub New()
        Me.InitializeComponent()
        AddHandler Me.Loaded, AddressOf OnLoaded
End Sub

Private Sub OnLoaded(sender As Object, e As RoutedEventArgs) Handles Me.Loaded
        languageCombobox.ItemsSource = ApplicationSettingsHelper.Instance.AvailableLanguages
        languageCombobox.SelectedItem = ApplicationSettingsHelper.Instance.CurrentCulture
AddHandler languageCombobox.SelectionChanged, AddressOf OnLanguageSelectionChanged
End Sub

Private Sub OnLanguageSelectionChanged(sender As Object, e As SelectionChangedEventArgs)
        'Set the language immediatly (from Settings Charm guidelines)
        ApplicationSettingsHelper.Instance.CurrentCulture = TryCast(e.AddedItems.First(), CultureInfo)
End Sub

Private Sub OnApplicationSettingsBackButtonClick(sender As Object, e As RoutedEventArgs)
        Dim parent As Popup = TryCast(Me.Parent, Popup)
        If parent IsNot Nothing Then
                parent.IsOpen = False
                SettingsPane.Show()
        End If
End Sub
A Helper class was used previously. This time, you use ApplicationSettingsHelper, which is a singleton application that helps you populate the Settings panel and has the following implementation:
Public Class ApplicationSettingsHelper
    Private Shared m_instance As New ApplicationSettingsHelper()

    Private Sub New()
        AvailableLanguages = New ObservableCollection(Of CultureInfo)()
        AvailableLanguages.Add(New CultureInfo("en-US"))
        AvailableLanguages.Add(New CultureInfo("it-IT"))
        }
    End Sub

    Public Shared ReadOnly Property Instance() As ApplicationSettingsHelper
        Get
            Return m_instance
        End Get
    End Property

    Public Property AvailableLanguages() As ObservableCollection(Of CultureInfo)
        Get
            Return m_AvailableLanguages
        End Get
        Set(value As ObservableCollection(Of CultureInfo))
            m_AvailableLanguages = value
        End Set
    End Property
    Private m_AvailableLanguages As ObservableCollection(Of CultureInfo)

    Public Property CurrentCulture() As CultureInfo
        'Read Settings in Get
        Get
            Return m_CurrentCulture
        End Get
        'Save Settings in Set
        Set(value As CultureInfo)
            m_CurrentCulture = value
        End Set
    End Property
    Private m_CurrentCulture As CultureInfo
End Class
Activating the Settings Charm on Master
You can now start creating an InitSettingsPane method inside the App.xaml.cs file that gets an instance of SettingsPane and subscribes to the CommandsRequest event with the OnSettingsPaneCommandsRequested handler. This handler clears the application commands collection (that populates the Settings entry in the Search panel).
When you create a SettingsCommand, you must provide three things:
- An identifier
- A label to show on the panel
- A method that accepts an IUICommand object
This method is triggered when the user chooses an item from the panel. To simplify your life, we’ll create a class named SettingsPanelHelper to create a pop-up that will have an instance of a CustomControl as a Child. Your code will look like this:
C#
#region Settings Contract

        private SettingsPane settingsPane = null;

        private void InitSettingsPane()
        {
            settingsPane = Windows.UI.ApplicationSettings.SettingsPane.GetForCurrentView();
            settingsPane.CommandsRequested += OnSettingsPaneCommandsRequested;
        }

        private void OnSettingsPaneCommandsRequested(SettingsPane sender, SettingsPaneCommandsRequestedEventArgs args)
        {
            args.Request.ApplicationCommands.Clear();
            args.Request.ApplicationCommands.Add(
                new SettingsCommand(
                    "applicationCommand",
                    "Application",
                    ApplicationCommandInvokedHandler));

            args.Request.ApplicationCommands.Add(
                new SettingsCommand(
                    "tileCommand",
                    "Tile and Notifications",
                    TileCommandInvokedHandler));
        }

        private void ApplicationCommandInvokedHandler(IUICommand command)
        {
            ApplicationSettings content =
                new ApplicationSettings
                {
                    Width = 346,
                    Height = Window.Current.Bounds.Height
                };
            Popup settingsPopup = SettingsPanelHelper.CreateSettingsPanel(content, Window.Current.Bounds);
            settingsPopup.IsOpen = true;
        }

        #endregion
VB
Private Sub InitSettingsPane()
   settingsPane = Windows.UI.ApplicationSettings.SettingsPane.GetForCurrentView()
   AddHandler settingsPane.CommandsRequested, AddressOf OnSettingsPaneCommandsRequested
End Sub

Private Sub OnSettingsPaneCommandsRequested(sender As SettingsPane, args As SettingsPaneCommandsRequestedEventArgs)
   args.Request.ApplicationCommands.Clear()
   args.Request.ApplicationCommands.Add(New SettingsCommand("applicationCommand", "Application", ApplicationCommandInvokedHandler))
End Sub

Private Sub ApplicationCommandInvokedHandler(command As IUICommand)
   Dim content As New ApplicationSettings() With { _
      .Width = 346, _
      .Height = Window.Current.Bounds.Height _
   }
   Dim settingsPopup As Popup = SettingsPanelHelper.CreateSettingsPanel(content, Window.Current.Bounds)
   settingsPopup.IsOpen = True
End Sub
Again, you use a Helper to improve the readability of the code. The CreateSettingsPanel of this class helps you create a pop-up that will contain the UserControl that is the SettingsPane. The implementations of this class are discussed in the following section.
A Look Inside SettingsPanelHelper
SettingsPanelHelper is a class that we wrote to support you with your development of Windows Store apps. It enables you to avoid always writing the same code to show a Settings pane. The code is really simple: you accept a UserControl that will be the content of the pop-up that the CreateSettingsPanel method returns. You also accept a Rect instance that will be used to pass the actual resolution reserved to your application and a double with a default value of 346 that specifies the size of the pop-up. This method evaluates whether the Search panel appears on the left or right side of the screen and creates a pop-up that will be positioned in the right side.
C#
public class SettingsPanelHelper
{
   public static Popup CreateSettingsPanel(UserControl content, Rect bounds, double settingsSize = 346)
{
   Popup p = new Popup
   {
       IsLightDismissEnabled = true,
       Width = settingsSize,
       Height = bounds.Height
   };
   p.ChildTransitions = new TransitionCollection
   {
      new PaneThemeTransition
      {
         Edge = SettingsPane.Edge == SettingsEdgeLocation.Right
            ? EdgeTransitionLocation.Right
            : EdgeTransitionLocation.Left
      }
   };
   p.SetValue(Canvas.LeftProperty,
      SettingsPane.Edge == SettingsEdgeLocation.Right ? (bounds.Width - settingsSize) : 0);

   p.SetValue(Canvas.TopProperty, 0);
   p.Child = content;
   return p;
   }
}
VB
Imports Windows.UI.ApplicationSettings
Imports Windows.UI.Xaml.Controls.Primitives
Imports Windows.UI.Xaml.Media.Animation

Public Class SettingsPanelHelper
    Public Shared Function CreateSettingsPanel(content As UserControl, bounds As Rect, Optional settingsSize As Double = 346) As Popup
        Dim p As New Popup() With { _
            .IsLightDismissEnabled = True, _
            .Width = settingsSize, _
            .Height = bounds.Height _
        }
        p.ChildTransitions = New TransitionCollection()
        Dim transition As New PaneThemeTransition()
        transition.Edge = If(SettingsPane.Edge = SettingsEdgeLocation.Right, EdgeTransitionLocation.Right, EdgeTransitionLocation.Left)
        p.ChildTransitions.Add(transition)

        p.SetValue(Canvas.LeftProperty, If(SettingsPane.Edge = SettingsEdgeLocation.Right, (bounds.Width - settingsSize), 0))
        p.SetValue(Canvas.TopProperty, 0)

        p.Child = content
        Return p
    End Function
End Class
Conclusion
With Windows 8.1, it is really simple to integrate your app with others. The use of contracts follows the same flow for all of them, which translates into a brief learning curve when you have to use a new contract. In the next chapter, you’ll see how to persist the data of your application so you can save information about settings.