![]()
Listening to the World
The first thing that a user sees after the installation of your app is the tile. This is a static representation of your app on the Start screen and it allows the user to start it; this is true until you do not evolve a static tile in a live tile. At this point of the book you know that Windows 8 keeps only one app active at a time; therefore you should use live tiles to give real-time feedback to the user about the state of the app. You can update app tiles in one of two ways:
- From your app code
- Using push notifications
In this chapter, we will talk about different types of notifications. Most of them are configured with an XML template that we will introduce in specific sections. The scope of this chapter is to explain how to choose the best template.
Notifications Overview
There are several ways to notify the user when the application is not in the foreground.
- Live Tiles: Useful to provide information when the user puts your app tile on the Start screen.
- Badge Notification: Provides a way to notify users about the status of your application.
- Lock Screen Notification: Useful to show textual information on the lock screen.
- Toast Notification: Pops up a message that shows information about something that happened in your application (generated from local code or from a remote event).
If the user pins your app on the Start screen, you can provide information through live tiles.
A live tile is a showcase for your app, and just like a shop, the showcase should persuade people to come in and buy something. For this reason, a live tile must be well designed, providing a good set of helpful information for the user. When we say “helpful information,” we mean content that the user will find valuable.
The more interesting and fresh the content shown in your live tile is, the more the user will want to touch or click it. This must be a rule when you design your live tile. This rule can be explained in the following way:
- More interesting: You must show information related to the user’s interests, which can be expanded upon in your app.
- Fresh: All the information that you put in your live tile must be current. For example, a weather app should update the live tile to show the forecast for the next day. If the user sees the forecast for three days ago, he/she will reconsider the use of your app.
- Content: Choosing what to put inside your live tile is probably the hardest part of its design. The content must be clean, quick to understand, and well positioned. Happily, you can find many templates ready to use for all tile sizes in the framework.
- More the user will want to touch or click it: This is not difficult to understand. If your live tile follows the guidelines discussed here, there is a greater possibility that the user will like your app, thereby promoting its tile to a prominent place on their Start screen and using your app frequently.
We mentioned the square and wide tile sizes. If you look at Figure 9-1 you can see four tile formats.
- The weather app, which shows information about forecast and temperature, is in a large tile.
- The desktop uses a medium tile.
- The travel app is in a wide tile.
- Skype, IE, VS, and Blend are in small tiles.
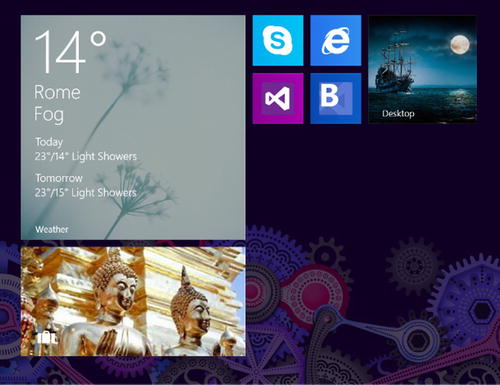
Figure 9-1. Example of tile sizes
When choosing which tile size you want to support for your app, note that a wide format is useful for a high level of information, while a square tile is good for a small amount of data. If your app does not support live tiles, you could choose to support at most the square tile in order to avoid wasting space on the Start screen. Wide and large tiles are best suited to be a live tile because they offer a lot of space for information.
You can declare which size of tile your app will support by modifying the app manifest. As you can see in Figure 9-2, you can configure multiple tile sizes; for every size you can provide an image (used as default tile content), and for each image you provide you enable the associated size. An exception is made for the small logo; if you don’t provide an image, Windows will scale the medium image. Because Windows runs on multiple types of devices, and every device has its own display resolution, in some scenarios Windows must scale your icon; for this reason you can supply images to be used in that situation.
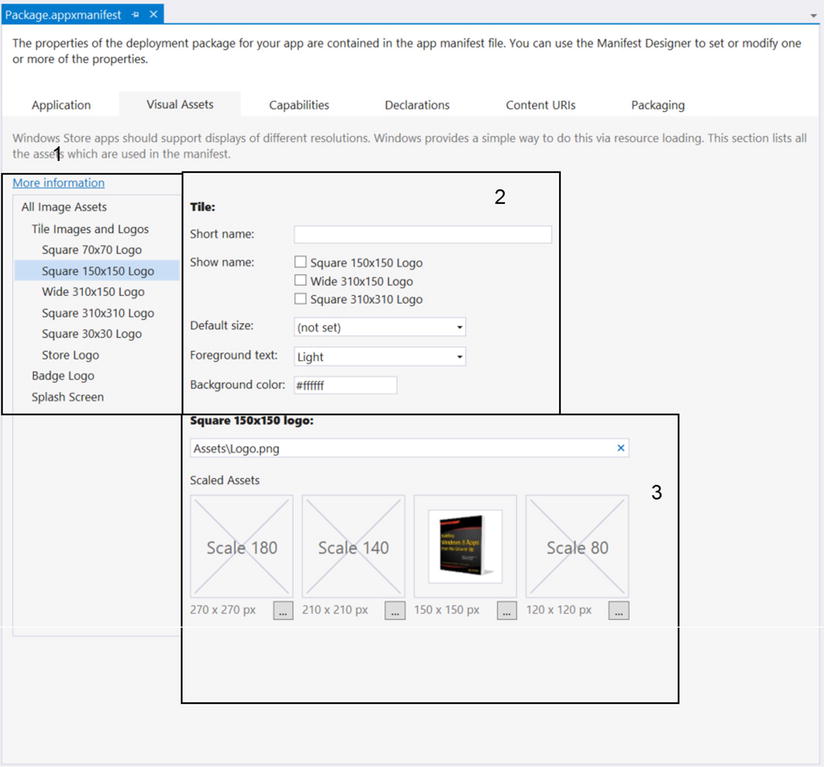
Figure 9-2. Default tile configuration
In Figure 9-2, you can see that we highlighted three areas. In area 1, you can choose which asset you want to configure. In area 2, you can choose the text used as the short name on the tile of your application. Area 3 is contextual to the item that you selected in area 1, and here you can configure the image to be used as a logo.
Every tile size has options for formatting: text only, images only, and peek. Peek templates are dynamic; this means that when you use it, the tile will cycle between two frames—one with primary content and one with additional information. An appropriate scenario for a peek template could be an e-mail app that shows the sender and subject in a primary frame and part of the body in a secondary frame.
Every template is defined via an XML template, and is identified by a value in the TileTemplateType enumeration. You can find details about these templates in Appendix A, where you can see examples of them. When you work with live tiles you use mainly two classes, TileUpdateManager and TileNotification, both of which are shown in Figure 9-3.
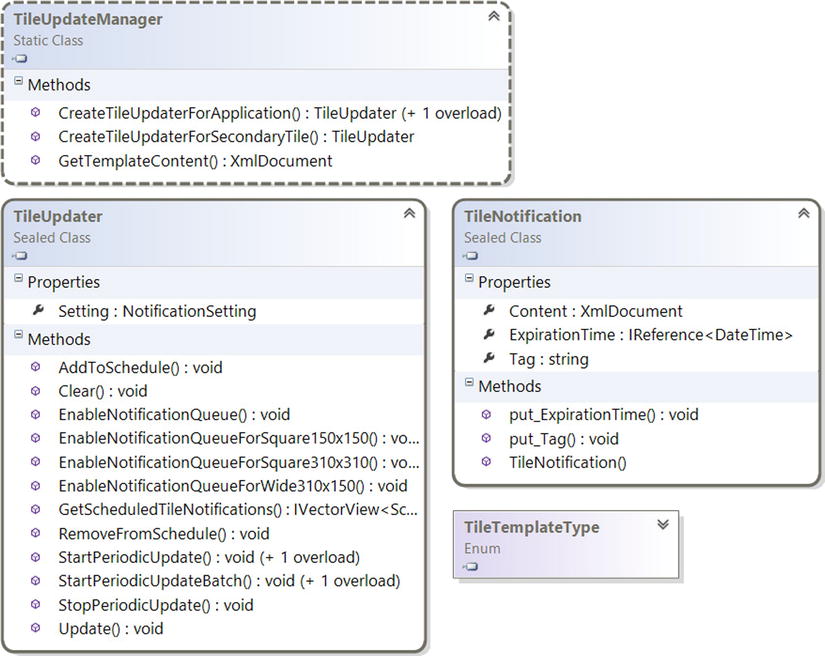
Figure 9-3. Live tile classes
TileUpdater is the entry point for live tiles capability. To get an instance of TileUpdater you must invoke TileUpdateManger’s methods CreateTileUpdaterForApplication or CreateTileUpdaterForSecondaryTile. With TileUpdater you have complete control of your app tiles (primary and secondary). We will give particular attention to the Update method that accepts a TileNotification instance as a parameter. This method updates the actual layout of your live tiles. If you enable the notification queue, your update will be queued; otherwise your update will overwrite every other update that you’ve made.
In your example, you’ll use the TileSquare150x150PeekImageAndText02 template to update your app tile. The XML content for this template is as follows:
<tile>
  <visual version="2">
    <binding template="TileSquare150x150PeekImageAndText02" fallback="TileSquarePeekImageAndText02">
      <image id="1" src="" />
      <text id="1"></text>
      <text id="2"></text>
    </binding>
  </visual>
</tile>
Inside your code, you will retrieve the XmlDocument associated with the template, then you will update information about text and image, and then you will update the tile of your app.
private void ShowTestNotification(object sender, RoutedEventArgs e)
        {
            var selectedTemplate = TileTemplateType. TileSquare150x150PeekImageAndText02;
            var template = TileUpdateManager.GetTemplateContent(selectedTemplate);

                var textItems = template.GetElementsByTagName("text");
                textItems[0].AppendChild(template.CreateTextNode("Title"));
                textItems[1].AppendChild(template.CreateTextNode("SubTitle"));
                var imgItems = template.GetElementsByTagName("image");
                ((XmlElement)imgItems[0]).SetAttribute("src", "ms-appx:///assets/picture.png");

            var updater = TileUpdateManager.CreateTileUpdaterForApplication();
            updater.Update(new TileNotification(template));
        }
Private Sub ShowTestNotification(sender As Object, e As RoutedEventArgs)
        Dim selectedTemplate = TileTemplateType.TileSquare150x150PeekImageAndText02
        Dim template = TileUpdateManager.GetTemplateContent(selectedTemplate)

        Dim textItems = template.GetElementsByTagName("text")
        textItems(0).AppendChild(template.CreateTextNode("Title"))
        textItems(1).AppendChild(template.CreateTextNode("SubTitle"))
        Dim imgItems = template.GetElementsByTagName("image")
        DirectCast(imgItems(0), XmlElement).SetAttribute("src", "ms-appx:///assets/picture.png")


        Dim updater = TileUpdateManager.CreateTileUpdaterForApplication()
        updater.Update(New TileNotification(template))
End Sub
A badge notification is a little summary shown on your app tile in the bottom right corner. This summary can be numeric, with values from 1 to 99 (every number over 99 appears as 99+), or graphic, using a list of predefined glyphs (shown in Table 9-1). This type of information, for example, would be useful for a messaging application that needs to show how many new messages the user has received, or to alert the user that something has happened.
Table 9-1. Glyph Values
Value |
Icon |
|---|---|
Activity |
|
Alert |
|
Available |
|
Away |
|
Busy |
|
NewMessage |
|
Paused |
|
Playing |
|
Unavailable |
|
Error |
|
Attention |
|


![]() Note Glyph notification is based on a string value (and not an enumeration) to recognize which icon must be applied; for this reason, pay attention when you specify which value should be used.
Note Glyph notification is based on a string value (and not an enumeration) to recognize which icon must be applied; for this reason, pay attention when you specify which value should be used.
Badge notification, just like other notification types, is based on an XML template that contains only one element badge with one attribute named value, whose value depends on what type of badge you are going to use. For example, <badge value="25"/> prepares a numeric badge notification, as shown in Figure 9-4. You can change the value to one in Table 9-1 to show an associated image.
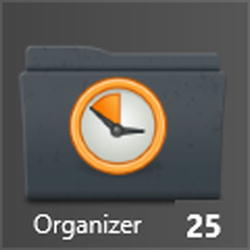
Figure 9-4. Badge notification sample
To update your app tile the core class is BadgeUpdater and it can call the methods CreateBadgeUpdaterForApplication and CreateBadgeUpdaterForSecondaryTile of BadgeUpdateManager. This class exposes the method GetTemplateContent that can be used to retrieve the XmlDocument to be used for the update.
var template = BadgeUpdateManager.GetTemplateContent(BadgeTemplateType.BadgeNumber);
(template.GetElementsByTagName("badge")[0] as XmlElement).SetAttribute("value", 10);
BadgeUpdater updater = BadgeUpdateManager.CreateBadgeUpdaterForApplication();
updater.Update(new BadgeNotification(template));
Dim template = BadgeUpdateManager.GetTemplateContent(BadgeTemplateType.BadgeNumber)
TryCast(template.GetElementsByTagName("badge")(0), XmlElement).SetAttribute("value", 10)
Dim updater As BadgeUpdater = BadgeUpdateManager.CreateBadgeUpdaterForApplication()
updater.Update(New BadgeNotification(template))
The presence of a lock screen is a privilege that the user gives to your app. He does it because the data in your app is very important to him and he/she wants to be notified in real time about every update.
Lock screen notification is closely linked to badge notification and background tasks; an app that uses badge updates and is chosen by the user to stay in lock screen automatically shows the same notification inside the tile and in lock screen.
For an app to stay in lock screen requires that background task are allowed, because there is no reason that your apps updates its badge directly within the app. For this reason you should use one of the following types of background tasks:
- Control Channel
- Push Notification
- Timer
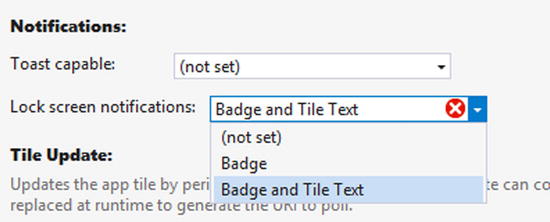
Figure 9-5. Lock screen notification capability
To use lock screen notification, you must declare it in the Application tab of your application manifest, as shown in Figure 9-5. To do it correctly you must do at least two things:
- Declare a background task of one of the types listed above.
- Provide a badge logo in the Visual Assets tab, as show in Figure 9-6.
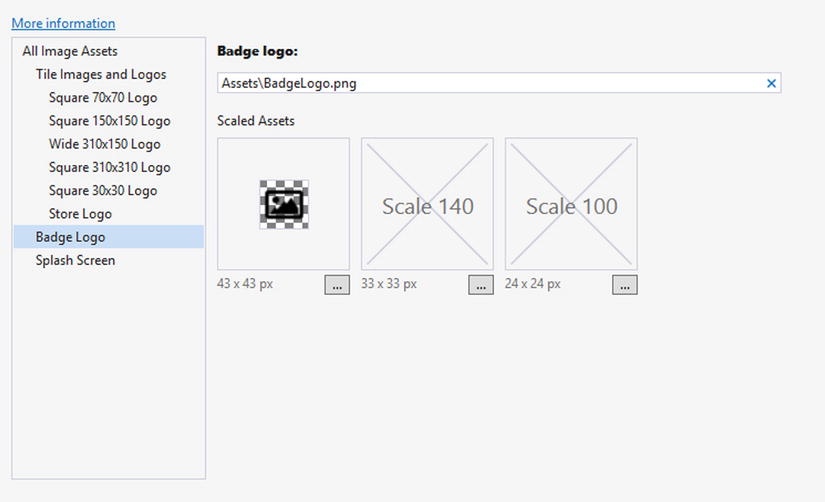
Figure 9-6. Badge logo configuration
These settings will allow the code shown for badge notification to update the badge on the Start screen when the user sets your app as lock screen badge.
A toast notification is an app-specific pop-up shown regardless of what app is in foreground and can be accompanied by a system sound. This type of notification provides quick access to content in an app. When you use a toast notification, you must keep in mind that is an invasive notification; for this reason you should avoid annoying the user with unwanted messages.
There are two types of toast notifications:
- Standard Toast: This type of notification appears for seven seconds in the top-right corner of the screen (top-left for right-to-left languages). This type of notification is useful for IM applications or an organizer app for an incoming invitation.
- Long-Duration Toast: This type of notification is really bothersome because it appears for 25 seconds, looping the sound associated with it. This type of notification should be used only in cases where it is necessary to force the user to pay attention to what is happening (such as an invitation to accept an incoming call in a VOIP app).
A toast notification is just like other notifications: it uses an XML template that can be selected from a catalog where every template is identified by a value in ToastTemplateType enumeration. In Table A-2 of Appendix A you can see all the templates available for toast notifications along with the relative code to be used.
There are two ways to update a tile: using the Windows.UI.Notifications namespace or using push notifications. In previous sections, you’ve seen how to use Windows.UI.Notifications namespace. In this section, you’ll see how to use push notifications.
Using a push notification is slightly more complicated than the other notification methods. The core part of the operating system responsible for push notifications is named the Notification Platform (composed by three DLLs: wpnapps.dll for Windows Push Notification Apps, wpncore.dll for Windows Push Notification Core, and wpnprv.dll for Windows Push Notification Platform Connection Provider). The notification platform inside the system is responsible for interacting with an app to provide a push notification channel, and to notify your app that something has been received on it. A push notification channel is nothing more than an URI exposed by Windows Push Notification Service (WNS), which is the cloud part (managed by Microsoft) of the notification platform, and is responsible for collecting incoming messages sent to a specific channel and pushing them to the device.
Figure 9-7 is a simple diagram that shows the sequence of steps that are required to send a push notification.
- Your app requests a push notification channel from the Notification Platform.
- The Notification Platform asks WNS for a new channel (if the older one has been dropped).
- The Notification Platform answers your app and provides an URI that identifies the channel.
- Your app interacts with your service in the cloud that is responsible for storing the information that identifies the device and associates it with the data related to the user.
- When something must be notified, your device authenticates itself on WNS and sends the message.
- WNS looks for the device if connected.
- If not, it manages a queue of five tile notifications and one badge notification, if the queue is enabled.
- If yes, it sends the notification to your app through the Notification Platform.
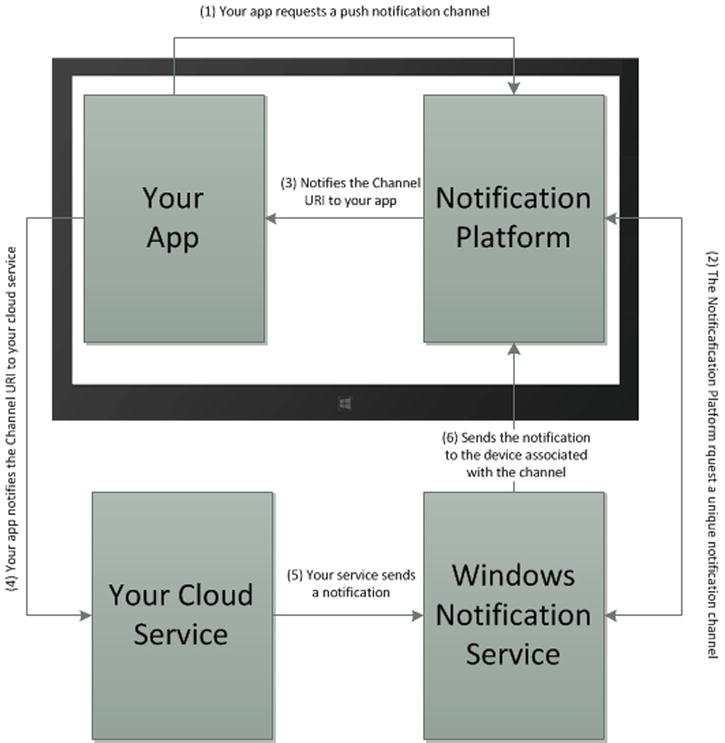
Figure 9-7. Push notification working schema
In the class diagram in Figure 9-8, you can see all classes involved in the Push Notification feature. PushNotificationChannelManager is the static class that must be used to create a new push notification channel.
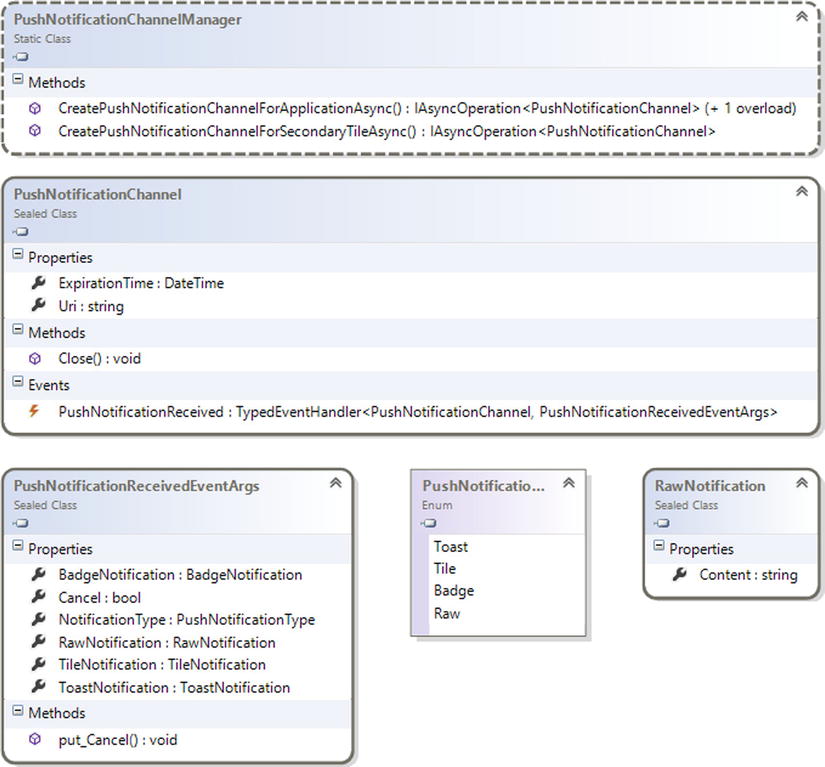
Figure 9-8. PushNotification namespace
![]() Note Every channel expires after 30 days; for this reason you must keep track of the channel in order to update your service data if something changes.
Note Every channel expires after 30 days; for this reason you must keep track of the channel in order to update your service data if something changes.
When your app contacts your service to store a channel, remember to use a secure connection to avoid security issues. Every notification channel URI uses the domain notify.windows.com, and if your app receives a different domain, you must avoid sending data to it or you may compromise user privacy.
As discussed, your service must authenticate itself with WNS. This process is composed of three steps, where the first is passive because it doesn’t depend on WNS or your service code but instead a registration on Window Store Dashboard.
- You register your app in the Windows Store Dashboard in order to retrieve a Package security identifier (SID) and a secret key that you will use to authenticate on the server.
- Your cloud service sends its credentials (Package SID, and key) to WNS using HTTPS protocol according to OAuth 2.0 protocol (you’ll see how later).
- The service answers with an access token that your service can use until it expires.
In this section, we’ll translate the concept introduced above into code. The code will be separated in two parts:
- The client side code that registers a notification channel and sends it to your cloud service.
- The server side code that authenticates with WNS and prepares a tile notification that is received by the app, thereby updating the app tile.
In your App class OnLaunched event handler you’ll call a RegisterPushNotifications method that is responsible for creating a notification channel.
C#
private async void RegisterPushNotifications()
{
   var channel = await PushNotificationChannelManager
      .CreatePushNotificationChannelForApplicationAsync();
   channel.PushNotificationReceived += OnPushNotificationReceived;
   NotificationHelper.StoreNotificationChannel(channel.Uri);
}
VB
Private Async Sub RegisterPushNotifications()
   Dim channel = Await PushNotificationChannelManager
      .CreatePushNotificationChannelForApplicationAsync()
   AddHandler channel. PushNotificationReceived, AddressOf Me. OnPushNotificationReceived
   NotificationHelper.StoreNotificationChannel(channel.Uri)
End Sub
On the server side, you’ll write code that will accomplish the following objectives:
- Authenticate on WNS and get an access token.
- Prepare and send a request.
To authenticate on WNS, you’ll create a class named WNSAuthToken that will contain the authentication token deserialized via the JSON deserializer inside the GetAccessToken method contained in WNSAuthHelper.
C#
    [DataContract]
    public class WNSAuthToken
    {
        [DataMember(Name = "access_token")]
        public string AccessToken { get; set; }
        [DataMember(Name = "token_type")]
        public string TokenType { get; set; }
    }

public WNSAuthToken GetAccessToken(string secret, string sid)
{
   var urlEncodedSecret = HttpUtility.UrlEncode(secret);
   var urlEncodedSid = HttpUtility.UrlEncode(sid);
   var body = String
    .Format(
      "grant_type=client_credentials&client_id={0}&client_secret={1}&scope=notify.windows.com",
      urlEncodedSid,
      urlEncodedSecret);

   string response;
   using (var client = new WebClient())
   {
      client.Headers.Add("Content-Type", "application/x-www-form-urlencoded");
      response = client.UploadString("https://login.live.com/accesstoken.srf", body);
   }

   using (var ms = new MemoryStream(Encoding.Unicode.GetBytes(response)))
   {
      var ser = new DataContractJsonSerializer(typeof(WNSAuthToken));
      var wnsAuthToken = (WNSAuthToken)ser.ReadObject(ms);
      return wnsAuthToken;
   }
}
VB
<DataContract> _
Public Class WNSAuthToken
        <DataMember(Name := "access_token")> _
        Public Property AccessToken() As String
                Get
                        Return m_AccessToken
                End Get
                Set
                        m_AccessToken = Value
                End Set
        End Property
        Private m_AccessToken As String
        <DataMember(Name := "token_type")> _
        Public Property TokenType() As String
                Get
                        Return m_TokenType
                End Get
                Set
                        m_TokenType = Value
                End Set
        End Property
        Private m_TokenType As String
End Class

Public Function GetAccessToken(secret As String, sid As String) As WNSAuthToken
        Dim urlEncodedSecret = HttpUtility.UrlEncode(secret)
        Dim urlEncodedSid = HttpUtility.UrlEncode(sid)
        Dim body = [String].Format("grant_type=client_credentials&client_id={0}&client_secret={1}&scope=notify.windows.com", urlEncodedSid, urlEncodedSecret)

        Dim response As String
        Using client = New WebClient()
                client.Headers.Add("Content-Type", "application/x-www-form-urlencoded")
                response = client.UploadString("https://login.live.com/accesstoken.srf", body)
        End Using

        Using ms = New MemoryStream(Encoding.Unicode.GetBytes(response))
                Dim ser = New DataContractJsonSerializer(GetType(WNSAuthToken))
                Dim wnsAuthToken = DirectCast(ser.ReadObject(ms), WNSAuthToken)
                Return wnsAuthToken
        End Using
End Function
These two classes are useful for the remaining part of the code, which is responsible for sending the notification to the device. You define a method named NotifyNextAppointment that uses GetAccessToken method to retrieve the access token to use WNS.
C#
public void NotifyNextAppointment(object sender, RoutedEventArgs e)
        {
            try
            {
                SendWideTileAppointmentNotification();
            }
            catch (WebException webException)
            {
                string exceptionDetails = webException.Response.Headers["WWW-Authenticate"];
                if (exceptionDetails.Contains("Token expired"))
                {
                    GetAccessToken();
                    SendWideTileAppointmentNotification();
                }
                else
                {
                    // Log the response
                }
            }
            catch (Exception ex)
            {
                //manage the exception
            }

        }

        private voidSendWideTileAppointmentNotification()
        {
            accessToken = GetAccessToken();
            string notificationType = "wns/tile";
            HttpWebRequest request = HttpWebRequest.Create(channelUri) as HttpWebRequest;
            request.Method = "POST";

            request.Headers.Add("X-WNS-Type", notificationType);
            request.Headers.Add("Authorization", String.Format("Bearer {0}", accessToken.AccessToken));

            string xml = NotificationsHelper.PrepareWideTileNotification(); // THIS METHOD CREATES THE XML NOTIFICATION

            byte[] contentBytes = Encoding.UTF8.GetBytes(xml);

            using (Stream requestStream = request.GetRequestStream())
                requestStream.Write(contentBytes, 0, contentBytes.Length);
            string test = string.Empty;
            using (HttpWebResponse webResponse = (HttpWebResponse)request.GetResponse())
                test = webResponse.StatusCode.ToString();
        }

        private WNSAuthTokenGetAccessToken()
        {
           var sid = WNSAuthHelper.GetAppSid();
           var secret = WNSAuthHelper.GetAppSecretKey();

            var urlEncodedSecret = HttpUtility.UrlEncode(secret);
            var urlEncodedSid = HttpUtility.UrlEncode(sid);

            var body =String.Format("grant_type=client_credentials&client_id={0}&client_secret={1}&scope=notify.windows.com", urlEncodedSid, urlEncodedSecret);

            string response;
            using (var client = new WebClient())
            {
                client.Headers.Add("Content-Type", "application/x-www-form-urlencoded");
                response = client.UploadString("https://login.live.com/accesstoken.srf", body);
            }

            using (var ms = new MemoryStream(Encoding.Unicode.GetBytes(response)))
            {
                var ser = new DataContractJsonSerializer(typeof(WNSAuthToken));
                var oAuthToken = (WNSAuthToken)ser.ReadObject(ms);
                return oAuthToken;
            }
}
VB
Public Sub NotifyNextAppointment(sender As Object, e As RoutedEventArgs)
        Try
                SendWideTileAppointmentNotification()
        Catch webException As WebException
                Dim exceptionDetails As String = webException.Response.Headers("WWW-Authenticate")
                If exceptionDetails.Contains("Token expired") Then
                        GetAccessToken()
                        SendWideTileAppointmentNotification()
                                ' Log the response
                Else
                End If
                        'manage the exception
        Catch ex As Exception
        End Try

End Sub

Private Sub SendWideTileAppointmentNotification()
        accessToken = GetAccessToken()
        Dim notificationType As String = "wns/tile"
        Dim request As HttpWebRequest = TryCast(HttpWebRequest.Create(channelUri), HttpWebRequest)
        request.Method = "POST"

        request.Headers.Add("X-WNS-Type", notificationType)
        request.Headers.Add("Authorization", [String].Format("Bearer {0}", accessToken.AccessToken))

        Dim xml As String = NotificationsHelper.PrepareWideTileNotification()

        Dim contentBytes As Byte() = Encoding.UTF8.GetBytes(xml)

        Using requestStream As Stream = request.GetRequestStream()
                requestStream.Write(contentBytes, 0, contentBytes.Length)
        End Using
        Dim test As String = String.Empty
        Using webResponse As HttpWebResponse = DirectCast(request.GetResponse(), HttpWebResponse)
                test = webResponse.StatusCode.ToString()
        End Using
End Sub

Private Function GetAccessToken() As WNSAuthToken
        Dim sid = WNSAuthHelper.GetAppSid()
        Dim secret = WNSAuthHelper.GetAppSecretKey()

        Dim urlEncodedSecret = HttpUtility.UrlEncode(secret)
        Dim urlEncodedSid = HttpUtility.UrlEncode(sid)

        Dim body = [String].Format("grant_type=client_credentials&client_id={0}&client_secret={1}&scope=notify.windows.com", urlEncodedSid, urlEncodedSecret)

        Dim response As String
        Using client = New WebClient()
                client.Headers.Add("Content-Type", "application/x-www-form-urlencoded")
                response = client.UploadString("https://login.live.com/accesstoken.srf", body)
        End Using

        Using ms = New MemoryStream(Encoding.Unicode.GetBytes(response))
                Dim ser = New DataContractJsonSerializer(GetType(WNSAuthToken))
                Dim oAuthToken = DirectCast(ser.ReadObject(ms), WNSAuthToken)
                Return oAuthToken
        End Using
End Function
Sending Other Notifications
The code shown in the previous section is useful for all types of notification; you can simply change the value of notificationType accordingly to these values:
- wns/badge for badge notifications
- wns/tile (seen above) to send a tile notification
- wns/toast to send a toast notification
- wns/raw to trigger a background work item
This makes really simple to rapidly update the content in your application by choosing the appropriate template for the notificationType chosen. Of course, for every update you think to send, you must remember to extract the XML template from Windows 8.1 and send it from your cloud service.
Conclusion
In this chapter, we have introduced the code necessary to work with notifications. As you can see, the behavior of all notification types is quite similar; for this reason, when you learn to use one of them, you know how to use all of them, but you should never forget that every notification has its appropriate use.