C H A P T E R 2
Deploying Web Applications to Tomcat
Now that Tomcat is installed and running, let’s look at the steps necessary to deploy a web application. To do this, we need to first examine the directory structure of Tomcat, and then move on to actually deploying a web application.
In this chapter, we:
- Describe the Tomcat directory structure
- Introduce the structure of Java web applications that can be deployed to Tomcat
- Manually deploy web applications to Tomcat
- Configure Tomcat’s hosts and contexts components
Use Eclipse IDE to deploy sample web application to Tomcat
The Tomcat Directory Structure
Before you can start creating your own web applications, you need to be familiar with the Tomcat directory structure.
The Tomcat installation directory is referred to as CATALINA_HOME. Table 2-1 describes the directories that compose a Tomcat installation. It is assumed that each of these directories is contained within the CATALINA_HOME directory.
Table 2-1. The Tomcat Directory Structure
| Directory | Contents |
| /bin | Contains the startup and shutdown scripts for both Windows and Linux. Jar files with classes required for tomcat to start are also stored here. |
| /conf | Contains the main configuration files for Tomcat. The two most important are server.xml and the global web.xml. |
| /lib | Contains the Tomcat Java Archive (jar) files, shared across all Tomcat components. All web applications deployed to Tomcat can access the libraries stored here. This includes the Servlet API and JSP API libraries. |
| /logs | Contains Tomcat’s log files. |
| /temp | Temporary file system storage. |
| /webapps | The directory where all web applications are deployed, and where you place your WAR file when it is ready for deployment. |
| /work | Tomcat’s working directory where Tomcat places all servlets that are generated from JSPs. If you want to see exactly how a particular JSP is interpreted, look in this directory. |
Executing Tomcat scripts
All Tomcat executable files are located in the CATALINA_HOME/bin directory. Tomcat distributes executables for both Windows and Linux-based systems in this directory, so you will see that it contains pairs of scripts with the same name and different extensions (*.bat for Windows executables and *.sh for Linux executables).
The most important executable located in this directory is Catalina script (catalina.sh on Linux or catalina.bat for Windows). This script is responsible for starting and stopping Tomcat, and it accepts different command line arguments for different operations. For example, to start Tomcat, you can simply invoke the command catalina start from your command line, and catalina stop to stop Tomcat.
Note Catalina script is only available if you download the zip distribution of Tomcat. If you install Tomcat using the Windows service installer, you won’t have access to Catalina script. In that case, you can use the tomcat7w.exe GUI application to manage the Tomcat service.
Table 2-2 shows all the command arguments you can use when executing Catalina script.
Table 2-2. The Catalina script command line argument options
| Command Line Argument | Description |
| catalina start | Starts Tomcat server as a new detached process. On Windows, Tomcat will be started in the new command prompt window. On Linux, the Tomcat will be started in the background, so you can continue using the command line. |
| catalina stop | Stops the Tomcat server. |
| catalina run | Starts the Tomcat server in the current window/terminal. On Windows, the output of the Tomcat startup will be added to the current command prompt window, while on Linux the Tomcat process will run in the current terminal session. It’s useful for diagnostics when Tomcat fails to start. |
| catalina debug | Starts Tomcat in debug mode. |
| catalina version | Displays the Tomcat version. |
| catalina configtest | Checks if the current Tomcat configuration is correct. The script will try to start Tomcat and load all configuration files, and then exit gracefully in case the configuration is correct. If any of the configuration files are incorrect, it will report the problem. |
| catalina jpda start | Starts Tomcat in Java Platform Debugging Architecture (JPDA) debug mode. |
In addition, you can append option –security to any of the start commands, so that Tomcat starts with the security manager enabled. The security manager is the Java mechanism for protecting the Java-managed resources from unauthorized access. For example, if your Java code has a line of code like System.exit(1), and that code is executed in Tomcat, the Tomcat server will exit. Security manager can, using security policies configured, forbid explicit calls to specific classes or methods, so the Tomcat server is protected. In cases where the Tomcat server runs only the known code, running Tomcat with security manager is not required. However, if you’re administering Tomcat with third-party web applications deployed, it’s recommended to run with security manager enabled.
Tomcat’s bin directory also contains two convenient scripts for starting and stopping Tomcat: startup.sh (and the corresponding startup.bat) and shutdown.sh (and shutdown.bat). These scripts are just thin wrappers around the catalina script, and are commonly used instead of catalina script to start and stop Tomcat without any command line arguments.
Passing Runtime Options to Catalina Script
When running Java applications, it is often required to pass different options to the Java Virtual Machine (JVM), such as memory settings, file encoding setting, hostnames, addresses, and ports. These options are passed to Tomcat’s catalina script using the standard Java and Tomcat environment variables.
The JAVA_OPTS environment variable contains options available to all Java processes running on the machine, including Tomcat. For example, to make sure JVM reads all files using UTF-8 encoding, you can add standard file.encoding Java parameter to JAVA_OPTS environment variable:
export JAVA_OPTS="-Dfile.encoding=utf-8"If you start Tomcat after exporting JAVA_OPTS, it will make sure to use UTF-8 encoding for all file reads, but this behavior will not be restricted to Tomcat’s Java process only, but to all JVM processes running on the same machine.
To pass specific JVM arguments to Tomcat only, you can use the CATALINA_OPTS environment variable. A typical scenario is adding more heap memory to the Tomcat process, without affecting the memory settings of other Java applications. The following snippet exports the memory settings to CATALINA_OPTS variable:
export CATALINA_OPTS=" –Xms256m -Xmx1g -XX:MaxPermSize=256m"If you start Tomcat after these setting are exported to the environment variable, catalina start script sets the JVM memory settings as configured, with a maximum heap size of 1GB.
Note You have to restart Tomcat to apply any changes to the JAVA_OPTS or CATALINA_OPTS environment variables.
Tomcat Configuration Files
This directory contains all the configuration files for the Tomcat server. We will be discussing the configuration files in the chapters that cover their specific options; however, we will mention the most important ones here.
The main Tomcat configuration file is server.xml, located in conf directory. The main Tomcat elements like engines, hosts, and contexts are configured here. You can read more about host and context configuration in server.xml file later this chapter. Appendix A contains a reference of all configuration options in server.xml file.
The context.xml configuration contains the default context settings that will be shared across all Tomcat contexts. You can read more about default context configuration in the section “Configuring Web Application Contexts” later in this chapter.
In addition to global context configuration in the server.xml and context.xml files, each context can have its own configuration file within the conf directory. The location of the context configuration file depends on the engine name and the host name in which the context is defined. The convention is that the context with name CONTEXT_NAME, configured within the host with name HOST_NAME, which is configured in engine with name ENGINE_NAME, will have its configuration file located in following file location:
CATALINA_HOME/conf/ENGINE_NAME/HOST_NAME/CONTEXT_NAME.xmlFor example, if you’re deploying a web application to context apress, using the default host with name localhost in the Tomcat’s standard Catalina engine, the configuration file location will be:
CATALINA_HOME/conf/Catalina/localhost/apress.xmlWe will cover the host and context configuration in more detail later in this chapter, in the section “Configuring Hosts and Contexts.
Java Web Applications
The main function of the Tomcat server is to act as a container for Java web applications. Therefore, before we can begin our Tomcat-specific discussion, a brief introduction as to exactly what web applications are is in order. The concept of a web application was introduced with the release of the Java servlet specification 2.2. According to this specification, “a web application is a collection of servlets, html pages, classes, and other resources that can be bundled and run on multiple containers from multiple vendors.” What this really means is that a web application is a container that can hold any combination of the following list of objects:
- Servlets
- Java Server Pages (JSPs)
- Utility classes
- Static documents, including HTML, images, JavaScript libraries, cascading stylesheets, and so on
- Client-side classes
- Meta-information describing the web application
One of the main characteristics of a web application is its relationship to the ServletContext. Each web application has one and only one ServletContext. This relationship is controlled by the servlet container and guarantees that no two web applications will clash when accessing objects in the ServletContext. We discuss this relationship in much more detail in Chapter 3.
The Directory Structure
The container that holds the components of a web application is the directory structure in which it exists. The first step in creating a web application is creating this directory structure. Table 2-3 contains a sample web application, named /apress, and a description of what each of its directories should contain. Each of these directories should be created from the application base directory of the web application container, the root directory where web applications are stored and accessed from the servlet container. The default application base directory for Tomcat is CATALINA_HOME/webapps directory.
Table 2-3. The Directories of a Web Application
| Directory | Description |
| /apress | The root directory of the web application. All JSP and HTML files should be stored here. Usually each type of static content is stored in a separate subdirectory (images/, styles/, js/). |
| /apress/WEB-INF | Contains all resources related to the application that are not in the document root of the application. This is where your web application deployment descriptor is located (defined in the next section). Note that the WEB-INF directory is not part of the public document. No files contained in this directory can be requested directly by a client. |
| /apress/WEB-INF/classes | Where servlet and utility classes are located. |
| /apress/WEB-INF/lib | Contains Java archive files (jar libraries) that the web application is dependent upon. For example, this is where you would place a jar file that contained a JDBC driver or JSP tag library. |
As you look over the contents of the web application’s directory structure, notice that web applications allow for compiled objects to be stored in both the /WEB-INF/classes and /WEB-INF/lib directories. Of these two, the class loader loads classes from the /classes directory first, followed by the jar files that are stored in the /lib directory. If duplicate objects in both the /classes and /lib directories exist, the objects in the /classes directory take precedence.
The Deployment Descriptor
At the heart of all web applications is a deployment descriptor that is an XML file named web.xml. The deployment descriptor is located in the WEB-INF/ directory within the main application directory. It contains configuration information for the entire web application. For our application, the web.xml file is in the CATALINA_HOME/webapps/apress/WEB-INF/ directory. The information that is contained in the deployment descriptor includes the following elements:
- Servlet definitions
- Servlet initialization parameters
- Session configuration parameters
- Servlet/JSP mappings
- MIME type mappings
- Security configuration parameters
- Welcome file list
- List of error pages
- Resource and environment variable definitions
Listing 2-1 is a limited example of a web application deployment descriptor. As we move through this book, we will be looking at the web.xml file and its elements in much more detail.
Listing 2-1. XML Outline of the Web Deployment Descriptor File (web.xml)
<web-app>

        <display-name>

                Apress Demo

        </display-name>


        <servlet>

                <servlet-name>TestServlet</servlet-name>

                <servlet-class>

                        com.apress.TestServlet

                </servlet-class>

                <load-on-startup>1</load-on-startup>

                <init-param>

                        <param-name>name</param-name>

                        <param-value>value</param-value>

                </init-param>

        </servlet>


        <session-timeout>30</session-timeout>


</web-app>
In this example, we are setting three application-level elements, the first of which is the <display-name>. This element simply describes the name of the web application, and doesn’t initiate any actions.
The second web application-level element that we have defined is the <servlet> element, which defines a servlet and its properties.
The last web application-level element is the <session-timeout> element, which controls the lifetime of the application’s HttpSession object. The <session-timeout> value that we have just used tells the JSP/servlet container that the HttpSession object will become invalid after 30 minutes of inactivity. This means that, if you have been logged to the web application using a username and password, after 30 minutes of inactivity, your session will be lost and you will need to log in again. Session handling in Tomcat will be discussed in more detail in Chapter 5.
Manually Deploying Web Applications to Tomcat
In this section, we cover the manual deployment of Web applications using Tomcat, and we perform a manual deployment to fully explain the steps involved when deploying a web application.
The best way to describe the deployment process is to create a sample web application that includes the major components found in most Java web applications, and then package it for deployment. The following sections walk you through all of the steps involved in manually deploying a web application. The name of our web application is /apress.
Creating the Web Application Directory Structure
The first thing you need to create when building a new web application is the directory structure that will contain the application. The following list contains the directories that you must create to contain the /apress web application. Each these directories must be appended to the CATALINA_HOME/webapps/ directory:
- /apress
- /apress/WEB-INF
- /apress/WEB-INF/classes
- /apress/WEB-INF/lib
Note The name of our web application, /apress, is the root of our directory structure.
As the purpose of this example is to show how applications are deployed to Tomcat, we will simply create the web application directory structure within the Tomcat’s /webapps directory. For the day-to-day development and production deployment to Tomcat, you should build a WAR file that will be deployed to Tomcat. We will cover the deployment of WAR-packaged web applications later in this chapter.
The last step in creating the web application directory structure is adding a deployment descriptor. At this point, you will be creating a default web.xml file that contains only the DTD, describing the web.xml file, and an empty <webapp/> element. Listing 2-2 contains the source code for a default web.xml file.
Listing 2-2. The Source Code for a Default web.xml File
<?xml version="1.0" encoding="ISO-8859-1"?>

<web-app xmlns="http://java.sun.com/xml/ns/javaee"

  xmlns:xsi="http://www.w3.org/2001/XMLSchema-instance"

  xsi:schemaLocation="http://java.sun.com/xml/ns/javaee

                      http://java.sun.com/xml/ns/javaee/web-app_3_0.xsd"

  version="3.0">

</web-app>
The most important part in this web.xml file is the XML schema definition. The schema definition will verify that the correct syntax is used for the selected Servlet API version. Because Apache Tomcat 7 supports version 3.0 of Servlet API, we reference its schema (http://java.sun.com/xml/ns/javaee/web-app_3_0.xsd) in the web.xml header.
Adding Static Content
In addition to being a servlet container, Tomcat is also a capable web server, so it can serve static files like images, JavaScript files, Flash movies, and cascading stylesheets (CSS).
In order to add static resources for our sample web application, all we have to do is copy the files that we would like to add to the server to the web application root directory (/apress), on the same level as the WEB-INF directory. It is common practice to split the static resources to subdirectories based on their purpose, so we will create subdirectories for images, JavaScript files, and CSS in the /apress directory. The directory structure of our web applications will now look as follows:
/apress/apress/WEB-INF//apress/images//apress/scripts//apress/styles/
Let’s copy the logo image, logo.jpg, to the /apress/images/ subdirectory. If you restart Tomcat (the web application will be redeployed), you can now access the image in the browser, by entering the following URL:
http://localhost:8080/apress/images/logo.jpg.The logo image will be rendered directly in the browser. You can access all other images in the /apress/images directory in the same way. Similarly, if you copy a stylesheet file main.css to the /apress/styles/ directory, you can open the file in the browser by navigating to http://localhost:8080/apress/styles/main.css.
As you can see, the directories with static content can be accessed from your browser directly by entering the directory structure of your web application. Because all static resources are publicly available to anyone who types the correct URL in the browser, they are sometimes called public directories.
Note that the WEB-INF directory cannot be used to serve static content. Only the servlet container (Tomcat and servlets deployed to it) can access resources stored in the WEB-INF directory. You can test that by copying the same image logo.jpg to the /apress/WEB-INF/ directory, and trying to access it on the URL http://localhost:8080/apress/WEB-INF/logo.jpg. The image will not be displayed; all you will see is the “404 page not found” error in the browser.
Adding JSPs
Java Server Pages (JSPs) are a simple but powerful technology used most often to generate dynamic HTML on the server side. They are a direct extension of Java servlets with the purpose of allowing the developer to embed Java logic directly into a requested page. JSP documents typically have the .jsp extension.
Apache Tomcat comes with JSP configuration out of the box, so all you have to do is create JSP files and deploy them with your web application. Listing 2-3 shows a sample JSP file that simply displays the current date and time, and the greeting to the user based on the time of the day.
Listing 2-3. Displaying Current Date and Time in JSP
<%@ page import="java.util.Calendar" %>                                        #1


<html>

<head>

    <title>Apress Demo</title>

    <meta http-equiv="Content-Type" content="text/html; charset=UTF-8">

</head>

<body>

    <div class="content">
        <b>Welcome to Apress</b>


        <p>Today is <%=Calendar.getInstance().getTime()%>                      #2

        </p>

        <%

            String greeting;                                                   #3

            int hourOfDay =

               Calendar.getInstance().get(Calendar.HOUR_OF_DAY);

            if (hourOfDay < 12) {

                greeting = "Good Morning";

            } else if (hourOfDay >= 12 && hourOfDay < 19) {

                greeting = "Good Afternoon";

            } else {

                greeting = "Good Evening";

            }


        %>

        <p><%=greeting%></p>                                                   #4

    </div>

</body>

</html>
JSP file contains the HTML markup that will be rendered in the browser. As you can see in Listing 2-3, the entire JSP file is formatted using HTML markup (with <HTML>, <HEAD>, <BODY>, and other enclosed HTML tags). However, it contains some Java code as well.
In the first line (#1), we have something that looks like a Java import statement. It does the same job as an import statement in standard Java files, referencing classes and interfaces required for compilation. In JSP, the import statement is implemented using a JSP page directive, which you can recognize because it starts with <%@ characters, and ends with %>.
Next, we invoke the Java method to get current date, and render the result of the method directly to the HTML (#2). The Java code is enclosed between <%= and %>, and the <%= JSP construct takes the return value of the Java method invoked and renders in to the HTML, using Object.toString () Java method. This example of JSP syntax is called JSP expression, and is an easy way to render values that are easily retrieved in Java to the HTML.
Finally, we demonstrate the standard Java code snippet (or JSP scriptlet), enclosed within <% and %> (#3). You can consider code snippet like this as a Java code that will be inserted to the _jspService() method. However, all local variables you define in such code snippet have global visibility, so you can reference them anywhere else on the JSP page, after it has been introduced. We decide what message to use to greet the user in our code snippet, and store it in the variable greeting (#3). We render the stored greeting to the HTML using the JSP expression (<%= syntax) outside the original code where we introduced the greeting variable (#4).
Note All JSP syntax constructs end with the characters %>. The start of the construct depends on the type, so it can be <%@ for directive, <% for standard Java JSP scriptlet, and <%= for JSP expression rendering the result of the Java code to the HTML.
All we need to do now is save the JSP resource from Listing 2-3 in the new directory called jsps under root web application directory. The file location will be /apress/jsps/index.jsps.
Note Tomcat by default recognizes JSP files with either .jsp or jspx extension.
Now you can start Tomcat again. If the Tomcat server has been running all the time, there is no need for the restart, as the new file will be loaded automatically. If you can navigate to http://localhost:8080/apress/jsps/index.jsp, the page will be rendered in the browser. Figure 2-1 shows the resulting page in Firefox browser.
Figure 2-1. JSP page that renders current date and time deployed in Tomcat
Because the JSP page is rendered dynamically, you will see a different result whenever you reload the page, including a different greeting message in the morning, afternoon, or evening. We have our first dynamic page deployed to Tomcat, using Tomcat’s built-in support for JSP resources. We will discuss more JSP capabilities in the next chapter. Let’s now see how we can add a servlet to the Tomcat server.
Adding Servlets
A servlet is a Java program that runs in the servlet container, with the responsibility of accepting requests from the clients and sending back the responses, all over the HTTP protocol. In Java Servlet API, servlets are defined using the Java interface javax.servlet.Servlet, which any concrete servlet class must implement.
To make the developer’s life easier, Java Servlet API ships with javax.servlet.http.HttpServlet class, which is commonly used as a convenient superclass that concrete servlet implementations extend.
Listing 2-4 illustrates the HelloWorldServlet implementation, a simple servlet that renders Hello World message in the browser.
Listing 2-4. Rendering HTML to the Browser Using HelloWorldServlet
package com.apress.apachetomcat7.chapter2;


import java.io.*;

import javax.servlet.*;

import javax.servlet.http.*;
public class HelloWorldServlet extends HttpServlet {


    public void doGet(HttpServletRequest request, HttpServletResponse response)   #1

    throws IOException, ServletException

    {

        response.setContentType("text/html");                                     #2

        PrintWriter out = response.getWriter();                                   #3

        out.println("<html>");

        out.println("<head>");

        out.println("<title>Hello World!</title>");

        out.println("</head>");

        out.println("<body>");

        out.println("<h1>Hello World!</h1>");

        out.println("</body>");

        out.println("</html>");

    }

}
In this example, we extend the doGet() method from the HttpServlet class, which is responsible for handling HTTP GET operations (#1). We are going to render HTML content to the browser, so we set the content type of the HttpServletResponse to “text/html” (#2). Finally, to render text to the browser, we’re obtaining the PrintWriter instance from the HttpServletResponse (#3), and then just write the HTML markup to it.
The next step is to compile our servlet class, so it can be deployed to Tomcat. In addition to standard Java libraries, we will need servlet API classes and interfaces on our classpath to compile HelloWorldServlet successfully. All required servlet API classes and interfaces are already included with Tomcat (in CATALINA_HOME/lib directory), so we can just add it to the classpath for java compiler. To compile the HelloWorldServlet class run the following command:
javac HelloWorldServlet.java -cp CATALINA_HOME/lib/servlet-api.jarThe result of the compilation will be HelloWorldServlet.class file, located in the same directory.
Note JSP files are actually complied into Java servlet classes by the servlet container, and each JSP file is running as a small servlet in Tomcat, invisible to the user.
The next step is to copy the compiled class to the /apress/WEB-INF/classes directory of our web application, so it can be picked up by Tomcat and deployed successfully (compiled Java classes in this directory will be loaded by Tomcat’s class loader). Make sure to copy entire compiled class directory structure, as per Java standard; each Java package must have its own directory, with classes stored in directories matching their packages. The code in Listing 2-4 has package com.apress.apachetomcat7.chaper2, so the directory structure will be as follows:
/apress/WEB-INF/classes/com/apress/apachetomcat7/chapter2/HelloWorldServlet.class. Note As we mentioned before, Tomcat will automatically load compiled Java classes from the /WEB-INF/classes and /WEB-INF/lib directory, in that particular order. You should keep your application classes in the /WEB-INF/classes directory, and all third-party jar dependencies in the /WEB-INF/lib directory.
The final step is to configure our servlet in the web deployment descriptor (web.xml file). We left web.xml empty when we started (see Listing 2-2), so now it’s time to add servlet configuration to it. Listing 2-5 shows the servlet configuration added to web.xml file.
Listing 2-5. HelloWorldServlet Configuration in the web.xml File
<?xml version="1.0" encoding="ISO-8859-1"?>

<web-app xmlns="http://java.sun.com/xml/ns/javaee"

         xmlns:xsi="http://www.w3.org/2001/XMLSchema-instance"

         xsi:schemaLocation="http://java.sun.com/xml/ns/javaee

 http://java.sun.com/xml/ns/javaee/web-app_3_0.xsd" version="3.0">


    <display-name>Chapter 2</display-name>

    <description>Apress demo</description>


    <servlet>                                                          #1

        <servlet-name>helloworld</servlet-name>

        <servlet-class>

            com.apress.apachetomcat7.chapter2.HelloWorldServlet
        </servlet-class>


    </servlet>


    <servlet-mapping>                                                  #2

        <servlet-name>helloworld</servlet-name>

        <url-pattern>/hello.html</url-pattern>

    </servlet-mapping>


</web-app>
The servlet is configured using the <servlet> XML element (#1), with two sub-elements: <servlet-name>, the unique name for this servlet, and <servlet-class>, the fully qualified servlet class name.
Finally, we need to map the servlet to the URL, so that the web application knows which URL should invoke the configured servlet. This is achieved using the <servlet-mapping> XML element (#2). Its nested element <servlet-name> references the name of the configured servlet (it must be the same as <servlet-name> in the servlet class configuration #1). The nested element <url-pattern> specifies the pattern of URLs that will be mapped to this servlet. All URL patterns are relative to the context of the web application. Based on the configuration in Listing 2-5, HelloWorldServlet will be mapped to the URL http://localhost:8080/apress/hello.html.
And this completes the servlet configuration. We will need to restart Tomcat in order to reload the servlet class. After Tomcat starts up, you can navigate to the URL http://localhost:8080/apress/hello.html in your browser, and you will see the page with the “Hello World!” message rendered. Figure 2-2 shows the page displayed in the browser.
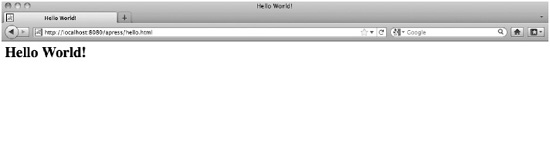
Figure 2-2. Page rendered HelloWorldServlet in the browser
So far, we have covered how to deploy static resources, JSP files, and now servlets to Tomcat server. We deployed a web application in a subdirectory under CATALINA_HOME/webapps directory. The deployment of the Java web application as the directory with structure defined like in our example is called exploded directory</i>. Exploded directory web application deployment is not part of Java servlet specification, and therefore may not work on servlet containers other than Tomcat. In the next section, we will cover the deployment of Java web applications as WAR archives, the deployment method supported by Java Servlet specification.
Deploying WAR Archive
The WAR (Web ARchive) file is a single file that contains all web application resources, and can be deployed directly to Tomcat. The WAR file is actually a zip-compatible archived file that, when unpacked, contains the same directory structure as the exploded directory described in the previous section.
A WAR file is the standard method for packaging Java web applications, and you can create one using Java’s archiving tool, jar. You can create a WAR file from the exploded directory by changing into it and running the following command from the exploded directory (/apress in our example):
jar cvf apress.war. Note The period (.) at the end of the jar cvf apress.war. command references the active directory; make sure to include it when running the command, otherwise the jar packaging won’t work.
This command produces an archive file named apress.war that contains your entire web application. Figure 2-3 shows the contents of the apress.war file.
Figure 2-3. Contents of the WAR-packaged web applications, in the same structure as the exploded directory
Note The *.war file is nothing more than the *.jar file with a different extension. The Java archive standard is the zip file format, so you can read or create jar and war files using any zip-compatible archiving tool.
To deploy a WAR-packaged web application, all you have to do is copy it to the CATALINA_HOME/webapps directory. Make sure you remove the previously deployed application’s exploded directory. Upon server startup, Tomcat will pick up the apress.war file and deploy it automatically. When Tomcat is up and running again, you can access the web application from the browser in the same way as before.
While deploying the WAR archive, Tomcat will unpack it in the CATALINA_HOME/webapps directory, in the subdirectory name matching the name of the WAR file, without extension. For example, our apress.war web application will be unpacked to directory CATALINA_HOME/webapps/apress. You can confirm this by inspecting the CATALINA_HOME/webapps directory after deployment, and you will see that it contains both the apress.war file that we copied there, and the apress/ directory, created by Tomcat. The unpacked directory will contain all web application resources that were packaged into WAR archive.
Tomcat unpacks the WAR file for performance reasons, as it’s much quicker to load files from file system directly, than to unpack them from the archive file every time they are requested. If you’re running Tomcat on a machine where you have limited write permissions, this may not be desired behavior, and you would prefer to serve web resources directory from the WAR archive, without unpacking. You can configure whether WAR files should be unpacked automatically by setting unpackWAR attribute on the <Context> element of your web application. The following code snippet illustrates configuration where the WAR archive won’t be unpacked, and all resources will be served from the archive directly:
<Context path="/apress" docBase="apress" unpackWar="true">You can add this context configuration directly to the CATALINA_HOM/conf/server.xml file, or you can use other available methods to configure web application context described later in the chapter (see the section “Configuring Web Application Contexts”).
Other Methods of Deployment
So far we have seen how to deploy web applications to Tomcat manually, by copying files to an exploded directory, or by creating the WAR archive and copying it to Tomcat’s deployment directory.
Copying the files to remote servers for production deployment can become cumbersome, or simply impossible if you don’t have access to the remote server’s file system. That’s why Tomcat distributes with the Manager web application, a built-in front end for management of web applications, which can be used for deployment. You can navigate to Manager web application’s home page on a remote server from the browser, fill the web form with your web application details, select the WAR archive to deploy, and press submit. The web application will be deployed automatically.
To learn more about Manager web application, see Chapter 4.
In addition to web interface, Tomcat ships with the set of Ant tasks, which can be used for application deployment (and for other web application maintenance tasks) from the command line. This approach is very useful in development and for automated deployment for testing. Ant tasks available with Tomcat will be covered in Chapter 4 as well.
Configuring Hosts and Contexts
In the Tomcat architecture, each deployed web application is representing a Context within a particular <Host> element. Even without specific configuration, Tomcat ships with sensible defaults out of the box, which is why we could deploy web applications in earlier examples without worrying about hosts and contexts. For simple web applications, the default configuration works well. However, if you need to configure advanced Tomcat options for your web application, you will need to configure these elements manually. In the following sections, we will describe the default Tomcat configuration of hosts and contexts elements, and take a look how we can configure these elements manually.
Configuring Hosts
The hosts are configured in the CATALINA_HOME/conf/server.xml file. If you take a look at this file, you will see that one host is already configured when you install Tomcat. The name of that host is localhost, and it will be sufficient for most Tomcat installations. Listing 2-6 shows the default host configuration.
Listing 2-6. Tomcat Ships with Default Host Configuration Out of the Box
<Host                                           #1

      name="localhost"                          #2

      appBase="webapps"                         #3

      unpackWARs="true"                         #4

      autoDeploy="true"                         #5

>
The host is configured using the <Host> XML element (#1). Every host must have a name, configured using name attribute (#2). The name of the host is usually set to the network name of the machine the Tomcat is running on, for example www.mycompany.com. The default host preconfigured on Tomcat has the name localhost, which matches the standard loopback network interface; it always resolves to the machine itself.
The attribute appBase configures the applications base</i> directory, which is the base directory where the web applications deployed to Tomcat exist (#3). It can have absolute path of the directory (for example, /var/deployments on Linux or c:deployedapps on Windows), or it can be relative (without starting slash or drive name), when the actual directory will be located relative to the CATALINA_HOME directory. The default configuration, illustrated in Listing 2-6, has the appBase attribute set to value webapps, meaning that application base is located at the CATALINA_HOME/webapps directory. We described this directory as a base directory for web applications when we discussed Tomcat’s directory structure, but you can easily change it to the path of your choice.
The next attribute configured by default is unpackWARs, which is set to true (#4). This means that all web applications deployed as WAR archives to this host will be unpacked to the exploded directory in the application base. If this is not your desired behavior, change it to false, and all web applications deployed to this host will be served from the WAR archive directly. When we were discussing the WAR deployment, we disabled this behavior on the single <Context> element. If you want to disable WAR unpacking for all web applications deployed, configuring unpackWARs on <Host> element is more efficient way to do it.
The final attribute on the default host configured by Tomcat is the autoDeploy attribute, set to true (#5). This attribute tells Tomcat to periodically check for the updates of the WAR files and exploded directories (not its contents) within the application base directory, and deploy/redeploy then automatically if any changes are detected.
Single host configuration is usually sufficient for common production configuration. If, however, you need multiple hosts to separate web applications in your setup, you should add another configuration similar to the one in Listing 2-6 to the server.xml file.
The configuration options described should be enough to get you started. For more details about all available host configuration options and attributes, see Appendix A.
Configuring Web Application Contexts
Each web application deployed to Tomcat represents a context in Tomcat’s internal architecture. Contexts belong to a configured host, and they are configured using the <Context> XML element. Listing 2-7 illustrates a typical <Context> element configuration.
Listing 2-7. Typical Context Configuration in Tomcat
<Context                                        #1

    path="/apress"                              #2

    docBase="apress"                            #3

    reloadable="true"                           #4
/>As mentioned previously, the web application context is configured using the <Context> XML element (#1).
The path attribute specifies the context path for the web application (#2). Every HTTP request to the Tomcat instance that has a Uniform Resource Identifier (URI) starting with the configured context path (after server and port) will be served by this context. This value should only be set if the context is configured in the server.xml file; in all other cases, the context path is inferred from the file and directory names used, as we will demonstrate later. If specified, the context path must be unique within the host.
Note A URI is a set of characters that identify a resource on the Internet. Some examples include www.mycompany.com:80/apress or http://localhost:8080/chapter2/index.html?page=2. The part of the URI after the server name and port is used to determine the context path on Tomcat.
The docBase attribute defines the context root</i>, which is the path to the contents of the web application deployed under this context (#3). It can contain an absolute path to the WAR file or exploded directory, or a path relative to the application base directory of the host for which it’s configured.
The final attribute configured in this example is reloadable (#4). If set to true, Tomcat will monitor WEB-INF/classes and WEB-INF/lib directories of the context root, and redeploy the application if any changes are detected. This feature is very useful for development and testing, as you don’t have to restart Tomcat with every change you make to the code, but it does add performance overhead, so it’s not recommended in production environments. The default value is false.
Web application context can be configured in the following four ways:
- In
server.xmlfile - In the host configuration directory
CATALINA_HOME/conf/ENGINE_NAME/HOST_NAME/CONTEXT_PATH.xml - As part of the web application code, in the
/META-INF/context.xmlfile in the web application WAR or exploded directory - Implicitly, where Tomcat creates context for a web application for which none of the above applies
When configuring a web application context in the server.xml file, you should specify all configuration attributes illustrated in Listing 2-7. However, because the content of the server.xml file is not reloaded until Tomcat restarts, any changes you make will not be visible until Tomcat is restarted.
The second option is to configure context in the separate XML file, and store it in the specific host configuration directory under CATALINA_HOME/conf. The name of the XML file will represent the context path, so the path attribute must not be set. In addition, the docBase attribute should only be set if it points to the directory outside of the host’s application base.
For our sample web application, the configuration file should be located on CATALINA_HOME/conf/Catalina/localhost/apress.xml, and the content of the apress.xml file will look like the following snippet:
<Context reloadable="false"/>Note that we didn’t specify a path attribute, as it will be inferred from the name of the xml file (in this example context path will be set to apress). In addition, we didn’t set the docBase directory, and it will be inferred from the xml file name as well, relative to the webapps directory.
The third option for context configuration is to configure it in the /META-INF/context.xml file in the actual web application WAR archive or exploded directory. This configuration will only be applied if none of the first two configurations is detected. The context.xml file content will look exactly like the last code snippet.
The fourth option is to omit the context configuration altogether. It applies to the web applications auto deployed from the application base directory (CATALINA_HOME/webapps directory in the default Tomcat setup). All exploded directories deployed under the application base are deployed with an implicit context name that matches the exploded directory name, and the context root is set to the exploded directory itself. All WAR archives deployed under the application base directory will have a context created with the name matching the WAR file name without the extension. The context root for WAR files will be either the unpacked WAR archive directory (in unpackWARs is set to true), or the path to the WAR file itself (if unpackWARs is set to false).
In the previous deployment examples in this chapter, we did not configure any context, and we were still able to deploy and access a sample web application using Tomcat implicit context creation.
Deploying to Root Context
It’s common for a production web application not to have a context name at all, so that their URLs look simpler. For example, we would like our sample web application to be accessible via http://localhost:8080/hello.html instead of http//localhost:8080/apress/hello.html, especially when deployed to a production server (www.apress.com/apress/hello.html contains unwanted word duplication, which is what we would like to avoid).
In the example URL http://localhost:8080/hello.html, the content name is empty (“”), and it’s known as root context.
You have several options to deploy web applications in Tomcat’s root context. But before proceeding, you will have to remove Tomcat’s root web application, which is already deployed in root context by default and is responsible for the Tomcat’s home page. You can remove the default root web application by simply deleting the directory where it’s deployed, CATALINA_HOME/webapps/ROOT, and restarting Tomcat.
Note Remember that the context name has to be unique for every host, so only one web application can be deployed in every single context; otherwise, the deployment will fail.
The first option is to rename your WAR file to ROOT.war (uppercase), and copy it to the CATALINA_HOME/webapps directory. By Tomcat’s convention, WAR with the name ROOT.war will be deployed to the root context. If you’re using exploded directory deployment, you should rename the exploded directory to ROOT.
Using another approach, you can keep the WAR file name, but copy it to a separate location, outside of the CATALINA_HOME/webapps directory. For example, let’s say we copy the file to the /var/deployments/apress.war path. Then we will create a context configuration file in the host’s configuration directory, at following location: CATALINA_HOME/conf/Catalina/localhost/ROOT.xml. The name of the XML file will define the context name, so we have to call it ROOT.xml, to match the Tomcat’s convention name for root context. The xml file contents will match the following code snippet:
<Context docBase="/var/deployments/apress.war" reloadable="false"/>You could do the same by simply adding the <Context> element to the server.xml file within host element; this, however, isn’t a recommended approach for context configuration, so it should be avoided.
After Tomcat restarts, you can access the same apress web application by typing the URL without the context name in the browser’s address bar: http://localhost:8080/hello.html.
Context.xml Configuration File
Tomcat’s conf directory contains another configuration file that you can use to configure web applications contexts: context.xml. This file contains only one <Context> element without any path or docBase attributes set.
Any settings in this file will apply to all contexts for every web application deployed on the Tomcat instance. You can set the general attributes you want to apply to entire server. For example, if you set the reloadable attribute to true in context.xml, all contexts will have the same attribute set, without the need to configure it explicitly again on every <Context> element. This configuration is particularly useful in development and testing environments. As we mentioned before, you should consider your requirements before setting the reloadable attribute to true in production environments, as it comes with the performance overhead of monitoring filesystem changes by Tomcat.
However, you can override any settings made in the context.xml simply by adding the same attribute to the specific context configuration.
Deploying a Web Application from Eclipse IDE
For all the development and deployment work we’ve done in the chapter, all we needed was a text editor and a command line terminal window. While we managed to get everything to work, for any non-trivial project this approach can be rather slow and error prone. That’s why developers use Integrated Development Environments (IDEs) to code, test, and deploy their projects on their development machines. IDEs have been of great help to developers, with integrated code editor, compilation, debugging, packaging, and deployment tools, and have become the standard tool for any kind of development.
Java ecosystems have a few popular IDEs, from open source and free Eclipse and NetBeans to commercial Intellij IDEA. While each of the IDEs mentioned has its pros and cons, it’s probably Eclipse that is used by most of the developers around the world. In this section, we’re going to explore Eclipse’s tooling capabilities for development and deployment of a Java web application on Apache Tomcat.
Before continuing, you will have to download and install the latest version Eclipse IDE from the Eclipse project’s web site: www.eclipse.org/downloads/.
Updating Eclipse for Java Web Development
The basic Eclipse distribution does not contain all the development tools for Java web development, and we need to install them before proceeding. To do so, follow these steps:
- From Eclipse’s Help menu, select the Install New Software option.
- From the list of available update sites, select the entry “All available sites.”
- Find and select the group called “Web, Xml, Java EE and OSGi enterprise development;” it should be located at the bottom of the alphabetically ordered list. Figure 2-4 shows the Eclipse screen at this stage.

Figure 2-4. Select the Web, Java Web, and Java EE tools packages from the list of available software updates for Eclipse.
- Select this software (by clicking on the checkbox in front of it) and press Next button.
- After confirming the selected software and accepting the terms and conditions, press the Finish button and wait for the packages to download.
- After successful download, you will have to restart the Eclipse IDE for the updates to load.
Now that we have all required Eclipse plug-ins installed, we can create Eclipse project for our web application.
Creating a Dynamic Web Project
Now we’ll create a Java web project in Eclipse. Follow these steps:
- From the File menu, select New Project. You will be presented with the New Project dialog to select project wizard.
- In the Wizards text box, start typing web, and you will be presented with the filtered selection of web project wizards.
- Select Dynamic Web Project (Eclipse’s name for the Java Web Project) and press the button. Figure 2-5 shows the filtered dialog for project selection.
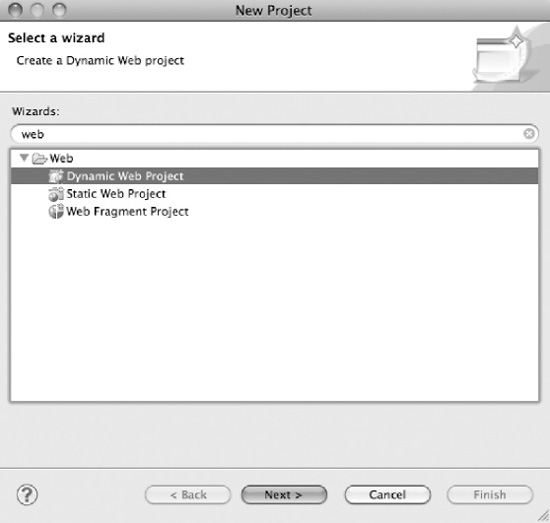
Figure 2-5. From the New Project wizard, select Dynamic Web Project.
7. You will be presented with the Dynamic Web Project details screen, where you should fill in the project name and press Finish. Figure 2-6 shows the details screen.
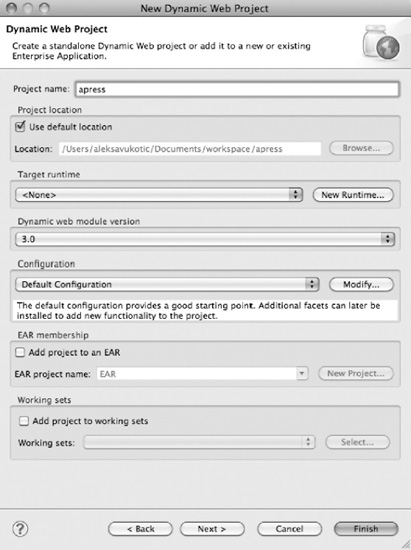
Figure 2-6. Dynamic Web Project details screen
You have now created an empty Java web project. The next step is to create the classes and files within this project to match our sample project. Java classes should be created under the Java Resources/src directory, and the other web resources—XML configuration files, JSPs, and images—in the correct directories in the WebContent directory.
Figure 2-7 shows the Eclipse project structure matching the apress project introduced in this chapter.
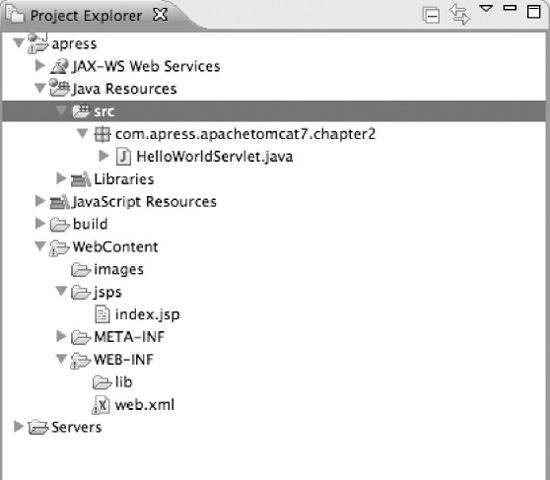
Figure 2-7. Eclipse Project Explorer view with all apress sample project files
Now we have an entire project in Eclipse IDE, and we can avail of all the IDE goodness, such as quick and easy navigation, code auto completion, automatic compilation and packaging, refactoring, and so on.
One thing we still need is to be able to deploy our project to the Tomcat server from the Eclipse. To use Eclipse Tomcat tooling, we first need to add Tomcat runtime environment to Eclipse.
Adding Tomcat Runtime Environment
To configure Server Runtime Environments in Eclipse, go to Tools Settings, and, under Servers, select Runtime Environments. Figure 2-8 shows the Runtime Environments configuration screen.
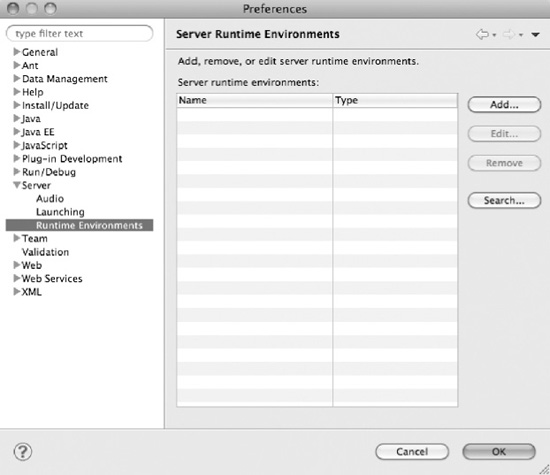
Figure 2-8. The empty Server Runtime Environments configuration screen from Eclipse preferences
Click the Add button on the right-hand side to add a new server. You will be presented with the list of available servers for Eclipse. Figure 2-9 shows this screen.
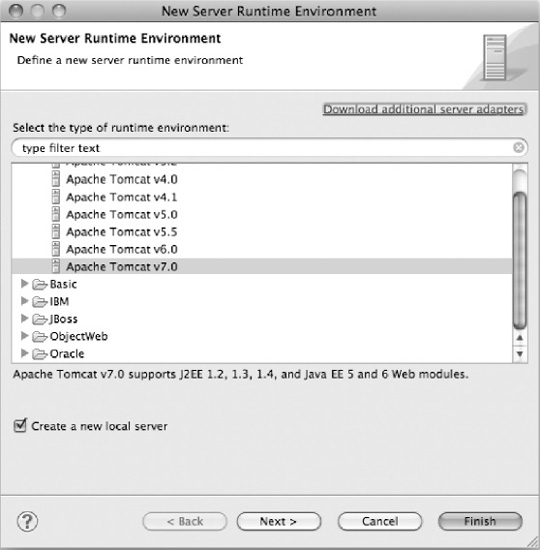
Figure 2-9. Select Apache Tomcat 7 from the list of of available servers.
Select Apache Tomcat 7 from the list of available servers, making sure to check the “Create a new local server” checkbox, and then press Next. On the next screen, select the Tomcat’s installation directory and press Finish.
And that’s it. You now have Tomcat 7 Runtime Environment configured in Eclipse. The next step is to deploy the Java web project to the configured Tomcat instance.
Deploying a Java Web Project to Tomcat from Eclipse
In order to add the Eclipse project to Tomcat server and deploy it, follow these steps:
- Locate the configured server by opening Eclipse’s Servers view. You can open the Servers view like any other view in Eclipse. From the Window menu, select Show View Other.
- Start typing servers in the filter text box.
- Select the Servers view and press OK. You will see new view in your workspace, as shown in Figure 2-10.
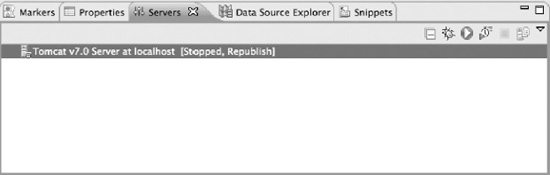
Figure 2-10. Eclipse Servers view displayed in Eclipse perspective
8. To add an Eclipse project to be deployed to a selected Tomcat server, open the server’s context menu (by right-clicking on the server instance in the Servers view), and click on the Add and Remove menu entry. See Figure 2-11.
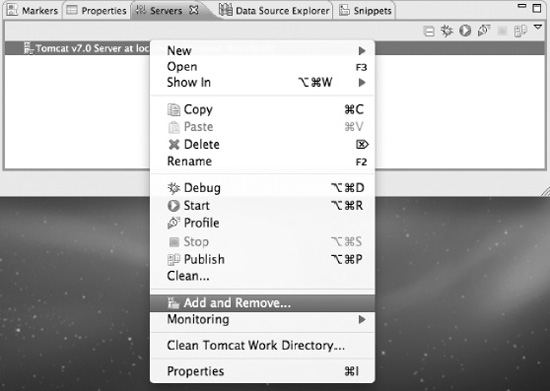
Figure 2-11. Open Tomcat server’s context menu from Eclipse’s Servers view
On the next screen, on the left-hand side, you see a list of all projects in the Eclipse workspace that are available for deployment to the selected server, and on the right-hand side you see all projects that are already configured for deployment to the server. The right-hand side will be empty when you do this the first time.
9. Select the apress project on the left-hand side of the screen, and press Add. Figure 2-12 shows the project selection screen.
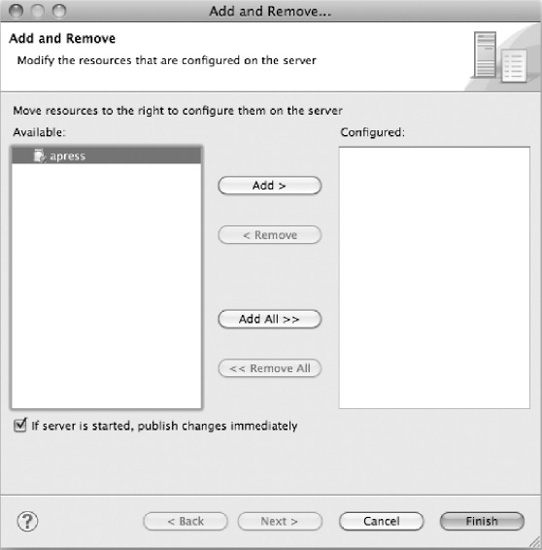
Figure 2-12. The Add and Remove screen, where you can select projects to be deployed to Tomcat
6. Press Finish.
10. Start Tomcat from Eclipse by clicking on the Start button, which you can see in the top right part of Figure 2-11 (a green circle with a white “play” sign). You will see Tomcat’s log output in the Eclipse console view.
If you navigate your browser to the familiar URL http://localhost:8080/apress/hello.html, you will see familiar Hello World message, like the one in Figure 2-2.
Summary
In this chapter, we discussed Tomcat’s directory structure and the role of the main configuration files. We also explained the basics of Java web applications and their packaging structure. We continued with building and deploying a sample web application to Tomcat, demonstrating the deployment of static resources, JSP pages, and servlets, both as exploded directories and WAR archives. Finally, we demonstrated how you can leverage the power of the Eclipse IDE to make Java web application development and deployment to Tomcat easier.
In the next chapter, will cover the details Java Servlets API and its relationship to JSP technology and ServletContext.