
C H A P T E R 8
Valves and Servlet Filters
In this chapter, we will discuss two similar technologies: valves and filters. These technologies were invented for the purpose of intercepting requests for one or more web applications. The first, Tomcat Valve, is a proprietary Tomcat technology. The second, servlet filters, is a server-independent technology that was introduced as part of the Java Servlet specification (since version 2.3). Both of these technologies are used to process HTTP requests and response objects.
We will cover the following:
- Define Tomcat valves and servlet filters, their similarities, differences and usage scenarios
- Describe valve implementation and configuration
- Introduce valves shipped with Apache Tomcat 7 and their configuration
- Implement and configure sample filters
- Discuss useful servlet filters shipped with Tomcat
Introduction to Valves and Filters
Since the early adoption of a Java Servlet web application, the need for a HTTP request pre-processor was recognized. Web developers needed a mechanism to pre-process every request before it reaches the web application, and every response before it’s dispatched to the calling client (usually a browser). There are numerous use cases for such a feature. A few examples include the following:
- Logging details about every request in one place, without adding log calls to every implemented servlet.
- For security, allowing access from certain remote IPs.
- Setting required content encoding uniformly for every response.
- Data compression, to make content smaller before dispatching it to the browser.
- Localizing request and response to a particular locale (language and country).
The requirement was simply to implement a required functionality in one place (one Java class), and then apply it to all requests/responses for one or many web applications deployed.
What Is a Tomcat Valve?
In 2000, when Tomcat 4 (then called Jakarta Tomcat 4) was developed, it included Tomcat’s proprietary technology to enable the pre-processing of the HTTP request and response on the Tomcat’s container level. At the time, such a feature wasn’t part of the Java Servlet specification 2.2, so Tomcat’s developers decided to invent Tomcat Valve to perform the much-required functionality.
A Tomcat Valve allows you to associate an instance of a Java class with a particular Catalina container. This configuration allows the named class to act as a pre-processor for each request. These classes are called valves, and they must implement the org.apache.catalina.Valve interface. To allow easier implementation of valves for web application developers, Tomcat ships with a convenient abstract class that developers can extend to implement various kinds of valves: the org.apache.catalina.valves.ValveBase class. Valves were named after the real-world valves that control flow in a pipeline – just as Tomcat’s valves control the request/response flow within the Tomcat server’s processing pipeline. After processing, each valve can give control to the next valve in the chain, or stop processing altogether, effectively blocking the incoming request.
Valves can be configured with any of the Tomcat Catalina containers described in Chapter 1: Engine, Host, or Context in the CATALINA_HOME/conf/server.xml configuration file.
If you configure a valve with the Engine container, the configured valve will process all requests to all web applications in all hosts for that engine. For example, if you want to log all request to all web applications deployed to Tomcat instance, you can configure a valve with the Engine container.
Similarly, you can configure a valve with the Host container to process all requests to all web applications belonging to the configured Host.
Finally, if you configure a valve with Context element, it will apply to all requests for that context (the single web application).
As we mentioned before, valves are proprietary to Tomcat and cannot be used in a different servlet container. The Java community noticed that a request pre-processing capability needed to be part of the Java Servlet specification, so it could be used across any servlet container.
What Is a Servlet Filter?
The Java Servlet API 2.3 specification was announced in late 2000 and it was confirmed that the Servlet API 2.3 would include the long-anticipated Server filter specification. A filter is a servlet component responsible for intercepting an HTTP request and response, and manipulating them as required. Similarly to valves, filters can modify the contents of an HTTP request and response (they can change headers, or the actual content), and even decide whether to allow requests to progress to a web application or responses to be rendered in user’s browser (in case of security breach, for example). Filters are configured in web deployment descriptors for each web application that uses them. This means you can reuse filters for multiple web applications, but each filter and every web application that uses it must be configured separately. On the other hand, you can configure a valve once for use with multiple applications. The configuration includes the URL pattern configuration to which the filter processing should be applied, so you can easily select only relevant request for filter processing.
![]() Note Filters have been available in Tomcat since version 4, which implements Servlet API 2.3. Therefore, the latest Apache Tomcat 7 supports filters as defined in the Servlet API 3.0 specification.
Note Filters have been available in Tomcat since version 4, which implements Servlet API 2.3. Therefore, the latest Apache Tomcat 7 supports filters as defined in the Servlet API 3.0 specification.
Servlet filter is defined in the Servlet API via the javax.servlet.Filter interface. Every filter class needs to implement this interface, so that the servlet container can invoke it. You will learn more about this interface in the section about filter implementations, later in this chapter.
In addition, you can configure multiple filters for a web application. In such a case, the servlet container chains the filters together, in the order in which they should be executed. Using this chaining mechanism, each filter implementation can have well defined responsibility, decoupled from other filters that are responsible for different tasks, and at the same time decoupled from the servlet implementation, so they can be developed and tested independently.
Tomcat Valves vs. Servlet Filters
As you can see, valves and filters have a similar functionality, as they were developed with the same goal: to allow web application developers to implement components that can intercept HTTP requests and responses, and process them independently to the target web application servlet. Because filters are part of the Java Servlet specification, they have gained in popularity – not least because they are platform-independent and can run on any servlet specification compliant server, unlike valves, which are only available on Tomcat. In addition, filter-chaining functionality is very useful when multiple (unrelated) chained processing needs to be applied to requests or responses to a particular web application.
However, being Tomcat-specific technology, valves can be better performing and robust when it comes to web application deployed on Tomcat. This is because they are part of the Tomcat engine API, and are therefore processed on a lower level than filters in the Tomcat’s request-response cycle. In addition, valves can be configured on the engine or host level (unlike filters, which can only be configured on a single web application level). This makes it easier to apply request/response pre-processing for all web applications deployed on Tomcat instance, without having to repeat configuration for each web application. In such a case, web applications do not have to know that their requests or responses are pre-processed by valves, which can be a good thing if you don’t have access to a web application’s configuration files (for example, if you are deploying a third-party web application to your Tomcat server).
We will take a look at the valve and filter configuration in the coming sections.
Configuring Tomcat Valves
Tomcat uses valves internally quite heavily; for example, to manage authentication or to maintain SSL information in a request, or to log request details. Some of these valves are instantiated and configured internally by Tomcat, but some are configurable in Tomcat’s configuration files, server.xml and context.xml. For example, Tomcat’s BasicAuthenticatorValve is configured automatically for every context that has BASIC authentication configured. Similarly, FormAuthenticatorValve is automatically configured for every context with FORM-based authentication
In this section, we will demonstrate how we can implement and configure a custom valve, and how we can take advantage of some of the useful valves available with Tomcat out of the box.
Implementing a Custom Valve
Let’s see how we can implement a simple valve that logs the Uniform Resource Identifier (URI) of the requested page, as well as the remote IP of the client accessing it.
We mentioned before that every valve has to implement the org.apache.catalina.Valve interface, which is quite complex and requires the defining of no less than the seven methods that need to be implemented correctly in order for valve to work as expected. To ease the developer’s life, Tomcat’s API has a convenient abstract class, org.apache.catalina.valves.ValveBase, which a developer can extend in order to implement a valve. The abstract ValveBase class has only one method that a developer needs to implement: public abstract void invoke(Request request, Response response). By implementing this method, the developer has access to its arguments, which represent Tomcat’s implementations of Servlet API’s interfaces HttpServletRequest and HttpServletResponse, which you can modify using Tomcat Valve. It is important to note that this method should give control to the next configured valve for Tomcat after successful invocation by calling getNext().invoke(request, response) method.
In our example, we are going to inspect a few properties of the Request argument, and write them to the system log. Listing 8-1 shows the implementation of our SimpleLoggingValve class.
Listing 8-1. Valve Implementation That Logs Request Details to System Log
public class SimpleLoggingValve extends ValveBase{

    @Override

    public void invoke(Request request, Response response)                 #1

throws IOException, ServletException {

        String remoteAddress = request.getRemoteAddr();

        String requestUri = request.getRequestURI();


        System.out.println("URI " + requestUri

        + " accessed from remote address: "+remoteAddress);                #2

        Valve nextValve = getNext();                                       #3

        if(nextValve!=null){

            nextValve.invoke(request, response);                           #4

        }

   }

}
In this example, we implemented the invoke(..) method from the abstract ValveBase class (#1), and read HttpServletRequest.requestURI property (the URI of the requested page) and the HttpServletRequest.remoteAddr property (the IP of the client accessing the server) from the request argument. We then logged the property values to system output console (#2).
Finally, we get to the next valve in the pipeline (#3), and if there is any, we give it control over the request and response objects (#4). Once all valves have been executed, the request will reach the target web application.
![]() Note Be sure to include catalina.jar and servlet-api.jar from the
Note Be sure to include catalina.jar and servlet-api.jar from the CATALINA_HOME/lib directory to your project CLASSPATH, so that SimpleLoggingValve compiles successfully.
As you can see, in a few lines of code we implemented a valve. Now we need to configure Tomcat to use this valve.
The first step in adding our Valve implementation to Tomcat is to make the SimpleLoggingValve class visible to Tomcat’s class loader. In order to achieve that, you need to package the SimpleLoggingValve class in a jar file, using the command jar cvf chapter8-valve.jar chapter8-project-compiled-output, where the chapter-8-project-compiled-output is the directory of the project where the compiled classes are located. If you are using Eclipse or any other IDE, you can create the jar file with few mouse clicks; check your IDE documentation for details.
Once you have built the jar file, copy it to the CATALINA_HOME/lib directory, as that directory is on the Tomcat classpath by default. This means that our valve will be on Tomcat’s classpath.
We made our SimpleLoggingValve class visible to Tomcat. Now let’s configure our valve to be executed for all requests for all web applications deployed on Tomcat’s default host. In order to do that, all we need to do is place a valve configuration element within the <Host> element in the CATALINA_HOME/conf/server.xml file. You should open the server.xml file, locate the <Host> element, and add the <Valve> element to it. Listing 8-2 shows the <Valve> element configuration in the server.xml file
Listing 8-2. SimpleLoggingValve Configuration in server.xml File
<Valve className="com.apress.apachetomcat7.chapter8.SimpleLoggingValve" />
The only required attribute for the <Valve> element is the className attribute, where we reference the valve class name to be used – in our case, SimpleLoggingValve. All that is left to do is to restart Tomcat (or start it if it wasn’t already running).
We configured our valve, as part of Tomcat’s default host, which means that SimpleLoggingValve should process all requests to all web applications under this host. To prove this, log in to a few of the standard web applications shipped with Tomcat (Examples web application, Manager web application, or any of the sample web applications from previous chapters), and check the Tomcat log file (the Tomcat main log file is located at CATALINA_HOME/logs/catalina.out). You should see the log messages from our SimpleLoggingValve in the console output, similar to the following output:
URI /manager/html accessed from remote address: 127.0.0.1

URI /manager/html/list accessed from remote address: 127.0.0.1

URI /manager/status accessed from remote address: 127.0.0.1

URI /manager/html/list accessed from remote address: 127.0.0.1

URI /examples/jsp/jsp2/el/basic-arithmetic.jsp accessed from remote address: 127.0.0.1
Because we are accessing Tomcat running on the local machine, you will see the localhost IP address logged for every request (127.0.0.1). If you access the Tomcat server from a remote client over the Internet, you will see the public IP of the client browser accessing the server.
We have implemented a simple valve and demonstrated its configuration in the Tomcat’s server.xml file. Tomcat, however, comes with a number of ready-to-use valves that you can configure to match your needs, without implementing any Java code. Let’s now take a look at few of the useful valves available in Tomcat.
The Access Log Valve
The first of the Tomcat prepackaged valves is the Access Log valve, org.apache.catalina.valves.AccessLogValve. It creates log files to track client access information. Some of the content that it tracks includes page hit counts, user session activity, user authentication information, and much more. The Access Log valve can be associated with an engine, host, or context container.
The Access Log valve is configured by default in Tomcat 7; you can see its configuration in the Tomcat’s server.xml file. Listing 8-3 illustrates an example entry using the AccessLogValve.
Listing 8-3. Access Log Valve Sample Configuration
<Valve
className="org.apache.catalina.valves.AccessLogValve" #1
directory="logs" #2
prefix="localhost_access_log." #3
suffix=".txt" #4
pattern="%h %l %u %t "%r" %s %b" #5
/>
As expected, we set the AccessLogValve full class name as the className attribute value (#1). Next, we tell Tomcat that the log files will be placed in the <CATALINA_HOME>/logs directory (#2), prepended with the value localhost_access_log. (#3), and appended with the .txt suffix (#4).
Finally, we configure the pattern attribute for the log entries, using the default Apache log pattern configuration. The pattern example from Listing 8-3 will log values, in following order: host name (%h), the remote logical username, if it exists (%l), the request timestamp (%t), the request method followed by request URI (%r), HTTP status code (%s), and bytes sent (%b). If you open the CATALINA_HOME/logs/localhost_access_log.txt file, you will see entries, similar to the console output that follows:
127.0.0.1 - - [30/May/2011:17:14:51 +0100] "GET /examples HTTP/1.1" 302 -

127.0.0.1 - - [30/May/2011:17:14:53 +0100] "GET /examples/jsp HTTP/1.1" 302 -

127.0.0.1 - - [30/May/2011:17:14:55 +0100] "GET /examples/jsp/jsp2/el/basic-arithmetic.jsp

 HTTP/1.1" 200 1583
This pattern is known as the common pattern in log file configuration. Table 8-1 shows the log pattern elements you can use to configure the log file output format that best suits your requirements.


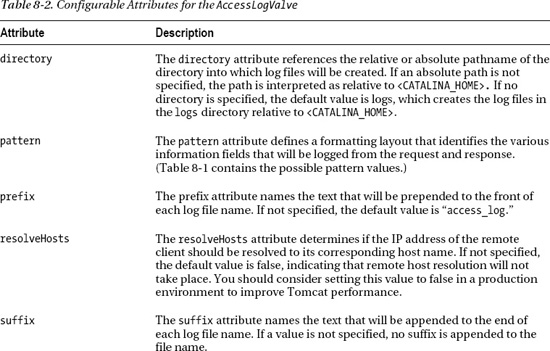
Our sample configuration used only a handful of attributes to configure the Access Log valve. If you need full control over your log files, AccessLogValve leverages a lot of other attributes. Table 8-2 shows all configurable attributes of the AccessLogValve.

The Remote Address Valve
The Remote Address valve, org.apache.catalina.valves.RemoteAddrValve, allows you to compare the IP address of the requesting client against one or more regular expressions to either allow or prevent the request from continuing, based on the results of this comparison. The Remote Address filter supports additional attributes, as listed in Table 8-3.

The following code snippet is an example entry using the org.apache.catalina.valves.RemoteAddrValve:
<Valve className="org.apache.catalina.valves.RemoteAddrValve" deny="127.*"/>
This valve entry denies access to the assigned container for all client IP addresses that begin with 127. If you assign this valve entry to the host container localhost, then all clients with an IP address beginning with 127 will see a standard error page for HTTP status code 403 – Forbidden.
In addition to the Remote Address valve, Tomcat ships with RemoteHostValve. This valve has the same functionality and syntax as Remote Access valve, except that it checks the remote host name of the incoming request, instead of the remote IP address.
Crawler Session Manager Valve
The success of many web sites nowadays depends on how they are discovered and indexed by search engines. Search engines employ special programs, called crawlers or spiders, that browse through the web and index every web site they encounter. These programs browse the sites automatically, mimicking users accessing the site from the regular browser. One problem with crawlers is that they run in great numbers, simultaneously. When hundreds of separate crawler processes access the web site, a user session will be created for each of them. With hundreds of different search engines out there, this can quickly lead to thousands of sessions created for crawlers only, affecting the browsing experience of regular human users of the site.
That’s the main reason why Tomcat ships with org.apache.catalina.valves.CrawlerSessionManagerValve. This valve, when configured, ensures that each unique web crawler is associated with exactly one user session, saving memory and improving performance of web application. Each crawler is uniquely identified by its user-agent header, which is the same for every crawler process that accesses the Tomcat server. The user agent of the known web crawlers can be configured using the crawlerUserAgents attribute name. If this attribute is not set, the default value will recognize the biggest search engines, using value "*[bB]ot.*|.*Yahoo! Slurp.*|.*Feedfetcher-Google.*".
![]() Note You can find the list of all currently known user agents at
Note You can find the list of all currently known user agents at www.user-agents.org. The list includes standard browser, and all crawlers that index the web today, as well.
The following code snippet illustrates simple configuration of the CrawlerSessionManagerValve in the server.xml file:
<Valve

   className=" org.apache.catalina.valves.CrawlerSessionManagerValve"

   crawlerUserAgents="*[bB]ot.*|.*Yahoo! Slurp.*|.*Feedfetcher-Google.*."

   sessionInactiveInterval="3600"

/>
The sessionInactiveInterval configures the time in seconds before inactive crawler session will be marked as inactive.
![]() Note The
Note The CrawlerSessionManagerValve is new feature of Apache Tomcat 7, and it’s not available in previous versions.
Dead Thread Detection Valve
Each request from a single user is processed by a separate Java thread in Tomcat. Because of programming bugs in web applications, and due to network problems, these threads sometimes get stuck, stopping the request from processing. Users browsing the site experience web site freezes, or lost connections – issues that we, as web application developers and server administrators, would like to avoid. In order to fix the underlying problem that is causing thread deaths, we need to be aware of the problem.
To help with detection of such threads, Tomcat ships with DeadThreadDetectionValve, which detects the stuck threads, and logs them as warnings. You can configure the time after which the running thread is considered as stuck, using the threshold attribute. The following code snippet illustrates the configuration of the DeadThreadDetectionValve in the server.xml file:
<Valve

   className=" org.apache.catalina.valves. DeadThreadDetectionValve"

   threshold="300"

/>
The threshold attribute is set in seconds, and it defaults to 600 if omitted.
This concludes our discussion about valves. Let’s now see how we can implement and configure servlet filters to intercept HTTP request and response.
Configuring Servlet Filters
In the previous section, we learned how to use valves, Tomcat’s proprietary technology used for HTTP request and response preprocessing. As mentioned previously, at the same time the Apache Tomcat development team worked on the Valve implementation, the Java Servlet specification 2.3 was released. This specification included servlet filters – new servlet technology for request and response preprocessing. While Tomcat Valves configuration applies to a number of web applications deployed on Tomcat server, Servlet Filters must be configured for every single web application separately. However, because servlet filters are part of the Java Servlet specification, they can be reused for web applications deployed to any Java servlet container, while valves will work exclusively on Tomcat server. In this section we’re going to learn how to configure servlet filters for web application.
The Java Servlet API defines the contract of the servlet filters via javax.servlet.Filter interface. This interface contains three methods that every servlet filter must implement. Table 8-4 describes the methods defined on Filter interface.

In the next section, we are going to demonstrate how we can implement custom filter, and configure it in the web.xml.
Implementing a Servlet Filter
A web application often has to cater to users in different languages, so it has to be able to render content in different alphabets. We are going to try that, and display some foreign language content in the browser. First, we are going to add some German characters to the index.jsp page. The German pangram sentence (Victor jagt zwölf Boxkämpfer quer über den Sylter Deich) is ideal example – it contains all German characters at least once, including special, characters with umlauts (ä, ö and ü). To spice things up a little bit, we are going to display a welcome message in Chinese: (![]() , which translates to “Hello, how are you”). Let’s add these sentences to the index.jsp file. Make sure that the text shows in native alphabet in the JSP. Listing 8-4 shows how the
, which translates to “Hello, how are you”). Let’s add these sentences to the index.jsp file. Make sure that the text shows in native alphabet in the JSP. Listing 8-4 shows how the index.jsp file should look.
Listing 8-4. German and Chinese Alphabet Characters Used in the JSP file
<%@page contentType="text/html;charset=UTF-8"%>

<html>

  <head>

    <title>Apress Demo</title>

    <meta http-equiv="Content-Type" content="text/html; charset=UTF-8">

  </head>

  <body>

    <div class="content">
Chinese: <b> </b> <br/><br/>
German: Victor jagt zwölf Boxkämpfer quer über den Sylter Deich
</div>
</body>
</html>
You will notice that we are using JSP’s @page directive at the top of the page, to tell JSP compiler to use UTF-8 encoding so that foreign language characters are interpreted correctly. We also use the standard HTML <meta> tag to set the encoding of the generated HTML content to UTF-8. UTF-8 is the standard byte encoding for Unicode standard – the text representation standard for most of the known alphabets.
We will now package the Apress web application to apress.war archive, and deploy it to Tomcat, either by copying the file to CATALINA_HOME/webapps directory, or by using the Manager web application.
Let’s access our sample web application, by entering its URL in the browser: http://localhost:8080/apress/jsps/index.jsp. You will see the welcome page, but with some strange characters instead of German umlaut characters and Chinese signs, although we followed all good practices by setting character encoding of the JSP file to UTF-8. Figure 8-1 shows the web page as it appears in the browser.

Figure 8-1. Web page with non-ISO-8859-1 characters displayed in the browser
The reason for this behavior is that the Java Servlet specification states that the default content encoding for the servlet response content must be ISO-8859-1. Tomcat 7 complies with the servlet specification, and sets encoding to ISO-8859-1, which overrides our UTF-8 settings in the index.jsp file. Special characters, like German umlauts and Chinese characters, are not interpreted properly with ISO-8859-1 encoding, so they are rendered with question marks, boxes, or as completely incorrect characters in the browser.
In order to make our page appear correctly in the browser, we have to set character encoding for each response from our web application to UTF-8. To do so, we are going to implement a servlet filter that will intercept every request/response to and from our web application, and set character encoding on the ServletResponse object to UTF-8, before the response is sent to the browser. The character encoding value will be configurable as a filter initialization parameter.
Listing 8-5 shows the implementation of CharacterEncodingFilter.
Listing 8-5. Filter Implemenation for Setting Response Character Encoding
public class CharacterEncodingFilter implements Filter {

    private String encoding;

    public void init(FilterConfig filterConfig)

                   throws ServletException {
        this.encoding = filterConfig.getInitParameter("encoding");                     #1

        System.out.println("Filter initialized.");

    }


    public void doFilter(ServletRequest servletRequest,

                         ServletResponse servletResponse,

                         FilterChain filterChain)

                   throws IOException, ServletException {

        HttpServletRequest httpServletRequest =

                          (HttpServletRequest) servletRequest;

        System.out.println("CharacterEncodingFilter.doFilter invoked for requestURI:"+

 httpServletRequest.getRequestURI());

        servletResponse.setCharacterEncoding(this.encoding);                            #2

        filterChain.doFilter(servletRequest, servletResponse);                          #3

    }


    public void destroy() {                                                             #4

        System.out.println("Filter destroyed.");

        //NOOP

    }

}
The init method reads the initialization parameter encoding, and stores it in private member field with the same name (#1). The doFilter(..) method, simply sets the provided ServletResponse characterEncoding property to the value of encoding field (#2).Finally, we give the control of the request/response processing to the next filter in the chain (#3).
Since this is a simple filter that doesn’t use any resources that would require cleanup, the destroy(..) method doesn’t do anything (#4).
The next step is to configure this filter to be instantiated, and to be applied to every request to our Apress web application. We configure the filter in the web.xml file for our web application. Listing 8-6 illustrates the filter configuration.
Listing 8-6. Filter Configuration in web.xml file
<filter>                                                                          #1

        <filter-name>characterEncodingFilter</filter-name>                        #2

        <filter-class>

                com.apress.apachetomcat7.chapter8.CharacterEncodingFilter         #3

        </filter-class>

        <init-param>                                                              #4

                <param-name>encoding</param-name>                                 #5

                <param-value>UTF-8</param-value>                                  #6

        </init-param>

</filter>

<filter-mapping>                                                                  #7

        <filter-name>characterEncodingFilter</filter-name>                        #8

        <url-pattern>/*</url-pattern>                                             #9

</filter-mapping>
Filter is configured using <filter> XML element (#1). We configure filter name using <filter-name> element (#2). The filter name must be unique within the web.xml file in which it’s configured. Then, we set the class where the filter is implemented (#3). The class name should be fully qualified class name of the CharacterEncodingFilter. Finally, we configure the initialization parameters for the filter, using <init-param> element (#4). Our filter has only one parameter, for which we configure name (#5) and value (#6). In this example, we are going to set character encoding for every response to UTF-8.
This concludes <filter> element configuration, which will make sure the servlet container instantiates the filter correctly. The next step is to configure request URLs to which the filter will be applied, using <filter-mapping> element (#7). We need to specify to which filter mapping applies, using the unique name of the filter configured above (#8). Finally, we set the URL pattern for this filter, to all requests served by our web application (#9).
The wild card parameter value (/*) matches every request that resolves to the web application configured in the same context. To match request URLs more strictly, you can specify the subcontext before the wildcard character – for example /test/*.
In addition to the context configuration, you can configure filter mapping based on request extension – for example <url-pattern>*.html</url-pattern> will match any URL in any subcontext that ends with .html.
Let’s package an updated web application, and deploy it to Tomcat. Once the application is deployed, access it in the browser, using the same URL we used earlier: http://localhost:8080/apress/jsps/index.jsp. The text on the web page will now be displayed correctly, in German and Chinese, just as we wanted it to be. Figure 8-2 shows the welcome page with the CharacterEncodingFilter configured.

Figure 8-2. German and Chinese characters are displayed correctly when encoding is set to UTF-8.
Implementing and configuring a servlet filter that sets response encoding correctly is the typical task for any multi-lingual web application. There are a couple of open source implementations that you can use, but we have demonstrated that implementing your own filter is just as easy.
Let’s now take a look at some of the filter implementations distributed with Tomcat that you can easily configure and use with your web application deployed on Tomcat.
Request Dumper Filter
The Request Dumper filter is a convenient filter implementation that dumps the entire HttpServletRequest to the Tomcat log. It logs all request attributes and properties, along with all HTTP headers and cookies for the current request. This filter is mainly used for debugging while developing and testing web applications on Tomcat. It is not recommended to use this filter in a production environment, due to performance penalties for the excessive logging.
To enable this filter, all you have to do is configure the filter and its mapping in the web.xml file. Listing 8-7 illustrates RequestDumperFilter configuration.
Listing 8-7. Simple Configuration for the Request Dumper Filter, Mapping all JSP Files
<filter>

        <filter-name>dumperFilter</filter-name>

        <filter-class>

                org.apache.catalina.filters.RequestDumperFilter

        </filter-class>

</filter>

<filter-mapping>

        <filter-name>dumperFilter</filter-name>

        <url-pattern>*.jsp</url-pattern>

</filter-mapping>
![]() Note To use
Note To use RequestDumperFilter, or any other filter distributed with Tomcat, you don’t need to add any Tomcat libraries to the classpath. All Tomcat filter classes are already on the Tomcat’s classpath at runtime, located in the CATALINA_HOME/lib/catalina.jar file.
You deploy the web application with Request Dumper filter configured, and access it from the browser; you will see its output in the Tomcat’s log file (catalina.out), similar to the following:
Jun 1, 2011 8:04:26 PM org.apache.catalina.filters.RequestDumperFilter doLog

INFO: "http-bio-8080"-exec-1 START TIME        =01-Jun-2011 20:04:26

Jun 1, 2011 8:04:26 PM org.apache.catalina.filters.RequestDumperFilter doLog

INFO: "http-bio-8080"-exec-1         requestURI=/apress/jsps/index.jsp

Jun 1, 2011 8:04:26 PM org.apache.catalina.filters.RequestDumperFilter doLog

INFO: "http-bio-8080"-exec-1  characterEncoding=UTF-8

Jun 1, 2011 8:04:26 PM org.apache.catalina.filters.RequestDumperFilter doLog

INFO: "http-bio-8080"-exec-1        contextPath=/apress

….

Jun 1, 2011 8:04:26 PM org.apache.catalina.filters.RequestDumperFilter doLog

INFO: "http-bio-8080"-exec-1             header=user-agent=Mozilla/5.0 (Macintosh; Intel

 Mac OS X 10_6_7) AppleWebKit/534.24 (KHTML, like Gecko) Chrome/11.0.696.71 Safari/534.24

Jun 1, 2011 8:04:26 PM org.apache.catalina.filters.RequestDumperFilter doLog

INFO: "http-bio-8080"-exec-1        servletPath=/jsps/index.jsp

Jun 1, 2011 8:04:26 PM org.apache.catalina.filters.RequestDumperFilter doLog

INFO: "http-bio-8080"-exec-1 ------------------=------------------------------
Request Dumper filter is available in Tomcat since version 7. Earlier Tomcat versions had this functionality available through the valve of the same name.
Expires Filter
Tomcat’s Expires filter, implemented in class org.apache.catalina.filters.ExpiresFilter, is the Java version of the popular Apache web server module mod_expires. It controls the HTTP expires header, which tells the client (browser) if the resource it’s trying to access has expired since it was last accessed . It is very useful when determining the caching strategy for the web application, as browsers won’t fetch non-expired resources from the server, but rather use cached ones. You can, for example, expire dynamically generated pages after shorter time periods, and set the expires header to higher value for resources that are not changed that often – cascading stylesheets or images, for example.
Listing 8-8 shows typical configuration of the ExpiresFilter.
Listing 8-8. The Expires Filter Configured in the web.xml File for Different Content Types
<filter>

        <filter-name>ExpiresFilter</filter-name>                                #1

        <filter-class>

                org.apache.catalina.filters.ExpiresFilter                       #2

        </filter-class>

        <init-param>

                <param-name>ExpiresByType image</param-name>                    #3

                <param-value>access plus 24 hours</param-value>                 #4

        </init-param>

        <init-param>

                <param-name>ExpiresByType text/css</param-name>                 #5

                <param-value>access plus 6 months</param-value>

        </init-param>

        <init-param>

                <param-name>ExpiresDefault</param-name>                         #6

                <param-value>lastmodified plus 10 minutes</param-value>         #7

        </init-param>

        <init-param>

                <param-name>ExpiresExcludedResponseStatusCodes</param-name>     #8

                <param-value>500, 404, 401</param-value>                        #9

        </init-param>


</filter> ...

<filter-mapping>                                                               #10

        <filter-name>ExpiresFilter</filter-name>

        <url-pattern>/*</url-pattern>

</filter-mapping>
After configuring the filter name (#1) and class, referencing the ExpiresFilter class (#2), we can use initialization parameters to configure specific expires header rules per content type.
We are using the ExpiresByType directive with the content type that we want to match as the parameter name. In this example, we match all resources with the content type image using ExpiresByType image as the parameter name (#3). The content type part of the name must match the content type value entirely, or at least the first part of it (value image matches image/jpeg content type, but also image/gif, image/png and any other image). The parameter value has a convenient, easy-to-read syntax – access plus 24 hours – meaning that the image resources for this web application will expire 24 hours after they are last accessed by the client (#4).
We add a similar configuration for cascading stylesheets (css files), with only difference that they expire after 6 months – we don’t expect css to change at all, so clients can cache styles for 6 months after accessing them (#5).
For all other content, we configure ExpiresDefault initialization parameter, which matches anything that isn’t matched by other parameters (#6). The value of this parameter is slightly different, lastmodified + 10 mins. Lastmodified directive tells ExpiresFilter to check the last-modified HTTP header of the response and set expires header 10 minutes after that (#7). This part of the configuration will make sure that all other HTML content of our web application is not cached more than 10 minutes after each update – making sure that clients always get up-to-date content from Tomcat.
The last parameter we are going to configure is the ExpiresExcludedResponseStatusCodes parameter (#8). Its value is a comma-separated list of all HTTP status codes that, when set on response, ensure that such response don’t have the expires header set at all. We set this parameter to known error status codes (#9) – with simple reasoning that clients should never cache any error page.
Finally, we configure the filter mapping, using standard <filter-mapping> element (#10).
![]() Note If you are using Tomcat integrated with Apache web server, you can configure Apache’s mod_expires module instead of
Note If you are using Tomcat integrated with Apache web server, you can configure Apache’s mod_expires module instead of ExpiresFilter. We will show you how to integrate Tomcat with Apache web server in Chapter 10.
Cross-Site Request Forgery Prevention Filter
The last Tomcat filter we are going to demonstrate is the Cross-Site Request Forgery Prevention filter, implemented in class org.apache.catalina.filters.CsrfPreventionFilter. Cross-site request forgery (commonly known as CSRF, pronounced ‘sea-surf’) is the hacking technique used to exploit vulnerabilities of web sites by issuing commands to a known web site as a user that the site trusts. The attacker uses the knowledge of the URL that performs some operation using a user’s session, and, if the session is still active, it can access the site and perform harmful operations without the user’s knowledge. A typical CSRF scenario is embedding known secure URL to HTML image tag, for example <img src="http://www.mybank/com/myaccount/sendmoney.html?toaccount=122121">. If the unsuspecting user loads a malicious web page with this URL, and at the same time user has the active session to the www.mybank.com web site, this image tag will be able to transfer money from the user’s account without their knowledge.
Tomcat’s CSRF filter prevents such attacks by generating a random nonce (random number issued once), which is used to encode the request URL, and is stored in the session as well. On every request, the nonce from the request is compared with the session, and if they don’t match, the request will not proceed. This means that a request from the malicious web site will not be able to perform the operation, as it won’t have the nonce associated with the current session.
Listing 8-9 illustrates the configuration of the CsrfPreventionFilter.
Listing 8-9. CsrfPreventionFilter Configuration in the web.xml File
<filter>

   <filter-name>CSRFPreventionFilter</filter-name>

   <filter-class>

      org.apache.catalina.filters.CsrfPreventionFilter                #1

   </filter-class>

   <init-param>

      <param-name>entryPoints</param-name>                            #2

      <param-value>/secure/index.jsp</param-value>

   </init-param>

</filter>

    <filter-mapping>

        <filter-name>CSRFPreventionFilter</filter-name>
        <url-pattern>/secure/*</url-pattern>                          #3

    </filter-mapping>
The filter class must reference the full class name of the CsrfPreventionFilter (#1). The entryPoints is the only required initialization parameter for the Tomcat’s CSFR filter. It specifies the URLs that are mapped to the filter, but that do not require a nonce to be present in the request. These URLs are entry points to the protected part of the web application, and are used to generate nonces for the users who are accessing the application for the first time, and don’t have a nonce in the request. There must be at least one entry point present, otherwise the generated nonce would not be sent to the client. The value for entryPoints parameter is the comma separated list of the URLs (#2). Since access to URLs configured here will be free (entry points URLs won’t be protected by CSFR filter), it is important that those URLs do not perform any security critical operation. In addition, only GET access to entryPoints URLs is allowed (POST will be forbidden).
Finally, we set the filter mapping (#3). It is important that the entryPoints configured (#2) are matching the filter mapping (#3) – otherwise the nonce value will not be generated as required.
Let’s see what this filter does when user tries to access protected URL. A user first must access one of the entryPoints URLs; you can consider these as site home pages. A user will be allowed access, but the CSRF filter will intercept the response and generate a random String (nonce) for it. This nonce will be cached and stored in the user session. At the same time, the response will encode the URL using the same nonce value. If the user wants to access any protected URL (that is not configured as an entry point), the same nonce value will be required to be present as a request parameter. If the parameter is not present, error page for status code 403 Forbidden will be displayed in the browser.
The URL with the nonce as the required parameter will need to be calculated programmatically before it’s rendered as part of HTML on the page. Let’s see an example of this based on the configuration from Listing 8-9. The URL /secure/showAccount.jsp is protected by a CSFR filter, and is not an entry point. Let’s assume that /secure/showAccount.jsp displays account information and must be protected from CSRF attack. User must access entry point URL (/secure/index.jsp) before going to show account page. If malicious web site tries to access account page directly (via HTML image tag for example), nonce will not be present in the request, and access will be forbidden.
But what if the user types the shown account URL directly in the browser (/secure/showAccount.jsp)? The user will still see the forbidden access page! This is because user does not know the nonce value that has been generated, and that must be passed as request parameter. If you are using the CSRF Prevention filter, all pages must be accessed by clicking the links from connected pages, starting from entry point page – you cannot just type the URL in the browser, as you won’t have the required nonce to pass back to the server!
Listing 8-10 shows the /secure/index.jsp page, and how it links to the protected /secure/showAccount.jsp page.
Listing 8-10. Encoding a URL with Nonce Parameter from JSP page
<%

String url = response.encodeURL("apress/secure/showAccount.jsp");        #1

%>

<a href="<%=url%>">Show Account</a>                                      #2
We generate the URL with nonce request parameter, by calling response.encodeURL(…) on the response object in the JSP (#1). As we said before, nonce is generated when entry point is accessed the first time. In addition, the URL encoded with the returned response will have same nonce added as request parameter. We use the encoded URL as link in the anchor HTML tag (#2).
If you take a look at the HTML source code of the generated page in the browser, you will see that the Show Account link points to the following URL:
http://localhost:8080/apress/secure/showAccount.jsp?org.apache.catalina.filters.CSRF_NONCE=CB5C65E1D87A39D5557D6BCBC24E54A9.
The Show Account URL has been encoded by adding nonce parameter. The nonce parameter name is a constant defined in CsrfPreventionFilter - org.apache.catalina.filters.CSRF_NONCE. Its long String value is the actual random generated nonce. The protected Show Account page will only be rendered if the nonce value passed as parameter matches the one stored in the session cache. If the nonce value is missing, or does not match the session – 403 Forbidden page will be rendered instead.
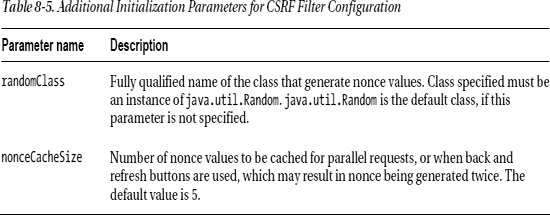
In addition to the required entryPoints, CsrfPreventionFilter has two more configurable initialization parameters, randomClass and nonceCacheSize. Table 8-5 describes these optional parameters.
The CSRF Prevention filter is available from Tomcat version 6.
Summary
In this chapter, we introduced both Tomcat valves and servlet filters, how to use them, and what their similarities and differences are. We implemented a sample valve and described some of the valves included with Tomcat. Next, we demonstrated how you can implement and configure servlet filters. Finally, we described some of the useful filter implementations distributed with Tomcat.
So far, we covered how you can configure Tomcat as a standalone instance, and how you can deploy and access Java web applications deployed on standalone Tomcat. In the next chapter, we will discuss how can we embed Tomcat to standard desktop Java applications, and how we can test web applications by running tests in the embedded Tomcat instance.