C H A P T E R 13
Configuring JNDI in Tomcat
Most real-world web applications store data or process data stored in the relational databases and send e-mails to users. Efficient configuration of these resources is required for the development of web applications, but also for server administration and maintenance. JNDI-configured resources are commonly used to configure such resources in production, mainly for its portability and easy configuration. In this chapter, we will discuss JNDI configuration, and look at how to configure database connectivity and mail sending servers using JNDI resources.
In this chapter, we will
- Introduce JNDI technology and its role and usage in Java applications
- Explain the principles of JDBC usage and configuration in web applications
- Demonstrate database configuration using JNDI
- Introduce the JavaMail API for sending e-mail from Java applications
- Demonstrate mail server configuration using JNDI
Introduction to JNDI
Java Naming Directory Interface (JNDI) is the standard Java API for directory and naming services. You can think of a naming service as a library catalogue. In a library, all books are organized hierarchically by subject, author, and title—so if you’re looking for a particular book, you can locate the catalogue for the particular topic, then find the drawer for the author, and finally find the book you want. In programming, such catalogues contain objects, and are called naming and directory services.
Large enterprise applications can be very complex, and require many services from different providers to work together in order to achieve their goal. A robust, portable way to find resources is very important for such applications.
JNDI is a Java API for accessing and manipulating named resources. It is designed as an interface to the standard naming and directory services, such as Light Directory Access Protocol (LDAP) and Domain Name Server (DNS). However, the naming service can contain objects of any type that can be looked up by name using JNDI.
Naming services store a number of bindings, which bind the unique name to an object. Objects represent services available on the server that clients can look up and use. Clients need to know only the name of a service to look it up. When clients obtain the service by name, they can start using it. A service object usually defines an interface, so that clients can invoke its methods without any knowledge of the internal workings of the service—all clients need to know is the service name and the interface it implements. Figure 13-1 illustrates the naming service and its relationship to a client.
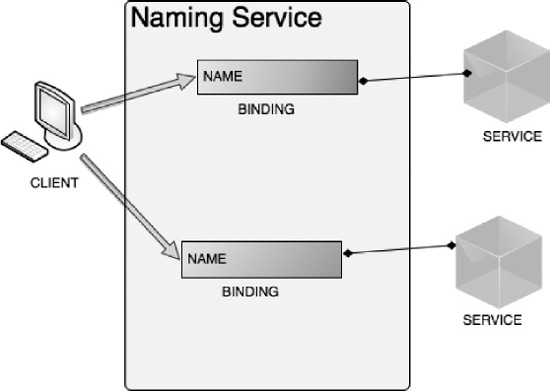
Figure 13-1. Naming service structure, with bindings between JNDI names and objects (services)
Let’s take a look at some of the classes and interfaces defined in the JNDI API.
JNDI API Overview
The main interface in the JNDI API is javax.naming.Context, which represents the abstraction of the naming context in Java. It defines method to create, update, and examine the bindings stored in the naming context by their name. The main implementation of the Context interface is the javax.naming.InitialContext class, which is instantiated based on the environment configuration of the naming service, and is used as a starting point for any resource lookup.
JNDI resources are organized in a hierarchical tree, where lookup is performed relative to the current context. Listing 13-1 shows typical access to JNDI Context from Java code.
Listing 13-1. Looking Up Resources by Name from JNDI Context
Context initContext = new InitialContext();                                 #1

Context rootContext  = (Context)initContext.lookup("java:/comp/env");       #2

Object myService = rootContext.lookup("apress/myservice");                  #3
In the first line, we instantiate InitialContext (#1). You can provide additional settings for the naming service you are using. Tomcat’s naming service does not require any special configuration parameters.
Next, we perform the lookup by name, but the lookup that returns another Context, the sub-context of the initial naming context. The name we use for this Context is "java:/comp/env" (#2), which is the standard convention used for naming a context that stores java components. Finally, we look up the Object (service) from the JNDI context, using the name "apress/myservice" (#3). Because we are performing a lookup operation on the sub-context, the name we look up is relative to the Context we’re using. That means that the full JNDI name for the myService object is "java:/comp/env/apress/myservice". We could have used a single lookup to get the myService object directly, without going via sub-context:
Object myService = initContext.lookup("java:/comp/env/apress/myservice");
Note that we performed lookup on the initContext object in this case.
![]() Note Due to the hierarchical nature of the JNDI naming context, you will get the same result whether you look up the object directly from the initial naming context or by looking up the sub-context first, and then using the relative name to look up the actual object.
Note Due to the hierarchical nature of the JNDI naming context, you will get the same result whether you look up the object directly from the initial naming context or by looking up the sub-context first, and then using the relative name to look up the actual object.
Tomcat JNDI Configuration
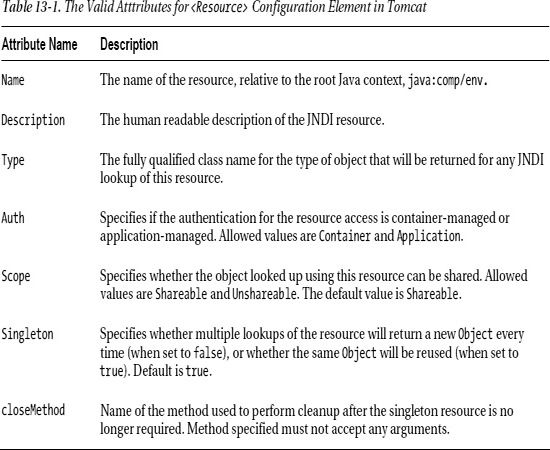
The JNDI resource in Tomcat is configured using the <Resource> XML element. Table 13-1 describes the attributes available for JNDI resource configuration element.
JNDI resources in Tomcat can be defined as global resources, when the configured resource is available to all contexts deployed on the Tomcat instance, or as <Context> elements, when the resource is available to the web application defined in that context only.
If the JNDI resource is configured as global, the <Resource> element needs to be placed within the <GlobalNamingResources> in the server.xml configuration file.
Once the JNDI resource is configured using the <Resource> element, you have to configure the resource reference in the web deployment descriptor of your web application using the <env-ref>, <resource-ref>, or <resource-env-ref> element. Using the <env-entry>, you can specify a custom JNDI environment property for the given web application. The elements <resource-ref> and <resource-env-ref> are defining the reference to the resource factory defined using the <Resource> element in the Tomcat configuration files.
Tomcat will use the information in the web.xml configuration and main <Resource> configuration to create the resource used within the web application. In case the JNDI resource factory is not found (if the settings configured in the web.xml file do not match the <Resource> configuration), Tomcat will throw an exception and the application will fail to start.
Strictly speaking, adding a resource reference to the web.xml configuration is not required when <Resource> is configured in the <Context> element for a single web application. However, it is recommended to include for verification and documentation purposes, so that developers working on the web application know which JNDI resources are required.
Let’s now take a look at some practical examples of JNDI resource configuration, and configure JDBC DataSource as JNDI resource.
Configuring the Database Connection
Accessing a relational database is a must for almost all non-trivial web applications. Relational databases store data in the tables and columns, which are accessed programmatically using SQL language. To connect to the database and issue SQL statements to it, Java provides JDBC. Using the JDBC API, developers can access relational databases using a high-level Java API, which contains a set of classes and interfaces abstracting database connectivity. In addition, the JDBC library requires the database-specific driver, which understands the particular database server used by the application. The JDBC driver is part of the database distribution, and can usually be downloaded from the database vendor’s web site (for example, MySQL JDBC driver, or Oracle JDBC driver).
Introducing JDBC
The main abstraction of a relational database in JDBC is the java.sql.Connection interface, which encapsulates the connection to the database server, through which you can create tables and columns and run select, delete, and update SQL queries.
Let’s take a look at how the database Connections are obtained and used in a typical Java application. For this example, we are going to use a MySQL database of users, which we used for the examples in Chapter 6. If you have already followed the steps for creating the database as outlined in Chapter 6, you can just continue to use the same database. In case you haven’t created the database, Listing 13-2 shows the SQL script required to create the users database and populate it with several rows of data.
Listing 13-2. SQL Script for Creating a Database of Users and Insterting Sample User Data
create user 'test'@'localhost' identified by test;

grant all privileges on tomcatusers.* to test@localhost

create database tomcatusers;

use tomcatusers;

create table users

(

user_name varchar(12) not null primary key,

user_pass varchar(12) not null

);

create table users_roles

(

user_name varchar(12) not null,

role_name varchar(12) not null,

primary key(user_name, role_name)

);


insert into users values("tomcat", "tomcat");

insert into users values("role1", "tomcat");

insert into users values("both", "tomcat");

insert into users values("bob", "password");

insert into user_roles values("tomcat", "tomcat");

insert into user_roles values("role1", "role1");

insert into user_roles values("both", "tomcat");

insert into user_roles values("both", "role1");

insert into user_roles values("bob", "apressuser");
We are going to implement the servlet that will display all users and their roles on the web pages. Listing 13-3 shows the servlet implementation, using the JDBC API to access database.
Listing 13-3. Accessing the Tomcatusers Database from the Servle Using the JDBC API
@WebServlet(urlPatterns = {"/displayUsers.html"})

public class DisplayUsersServlet extends HttpServlet {


    protected void doGet(HttpServletRequest request, HttpServletResponse response)

            throws ServletException, IOException {

        Connection conn = null;

        StringBuffer sb = new StringBuffer("<HTML><BODY>");

        sb.append("<TABLE>");

        sb.append("<TR><TH>USER NAME</TH></TR>");

        try {

            conn = getDbConnection();                                      #1

            Statement statement = conn.createStatement();                  #2

            ResultSet users =

                  statement.executeQuery("select * from users");           #3

            while (users.next()){                                          #4

                sb.append("<TR><TD>");

                String username = users.getString("user_name");

                sb.append(username);
                sb.append("</TD></TR>");

            }

        } catch (Exception e) {

            System.err.println("Error connecting to database server");

        } finally {

            if (conn != null) {

                try {

                    conn.close();

                    System.out.println("Database connection terminated");

                }

                catch (Exception e) {

                    System.err.println("Error closing database connection");

                }

            }

        }

        sb.append("</TABLE>");

        sb.append("</BODY></HTML>");

        response.getOutputStream().write(sb.toString().getBytes());        #5


    }


    private Connection getDbConnection(){

//obtains connection to the database,

//using database URL, username and password

    }

}
The most important part of the code is obtaining the database connection (#1), which is done in the getDbConnection(..) method, which we haven’t implemented in Listing 13-3. We will explain that part in a moment, but let’s skip it for the time being. Once we have the database connection, we prepare the SQL statement (#2). Using the statement, we execute the SQL query (#3). We are loading all rows in the tomcatusers table, using the simple SQL query select * from tomcatusers. The result of the executeQuery(..) method is the ResultSet object, which contains all rows returned by the executed statement. We iterate through the ResultSet (#4) and prepare the HTML table row with each username contained in the database. Finally, we write the generated HTML to the HttpServletResponse’s OutputStream, to be displayed in the browser (#5).
Obtaining a database connection involves loading the JDBC driver for the selected database (in our case, MySQL), and then creating a connection using the database URL, username, and password. Listing 13-4 shows a typical implementation.
Listing 13-4. Obtaining a Database Connection Using DriverManager
    private Connection getDbConnection()

            throws SQLException,

                   ClassNotFoundException,

                   IllegalAccessException,

                   InstantiationException {

        String userName = "test";                                       #1

        String password = "test";                                       #2

        String url = "jdbc:mysql://localhost:3306/tomcatusers";         #3
        Class.forName("com.mysql.jdbc.Driver").newInstance();           #4

        return DriverManager.getConnection(url, userName, password);    #5

    }
First, we specify the username (#1), password (#2), and URL (#3) for the database we are using. The username and password represent the user that has permission to connect to the database, and we specify these details in the database creation script (see Listing 13-2). The database connection URL is effectively specifying the server where the database is installed, as well as the type of the database. You can see that our database connection URL contains text “mysql” (as we’re using MySQL database), and specifies localhost as the database server, as we’re running this code on the same PC where the database is installed.
The next step is to load the MySQL driver class (#4). The driver class is vendor specific, and the jar library containing the driver class is distributed with the database itself. You have to make sure that the jar file containing this class is on your project classpath, and that it gets copied to the WEB-INF/lib directory of your WAR-packaged web application. The class name is different for each database, so consult the vendor documentation to find out the correct class name for your database. The fully qualified driver class name for MySQL database we use is com.mysql.jdbc.Driver.
Finally we create the connection using DriverManager factory class, which creates the Connection instance using the database connection URL, username, and password passed as method arguments (#5).
The database access code implemented like this will undoubtedly work. However, it has some flaws—it’s difficult to change the database configuration easily based on the runtime environment, and it doesn’t support scaling very well.
For example, if you want to connect to a different database server on a development, testing, and production environment, it’s not such an easy thing to do. In order to switch, you have to change the source code, specify a different URL, username, and password, recompile and repackage the web application for different environments—each time you want to deploy to a different environment. At the same time, if you want to change the database setting on a production server, you will have to go through the same steps, which means making any changes will be very time consuming, inefficient, and most important, error prone.
In addition, the code in Listing 13-4 will obtain a new JDBC connection every time it’s executed—for every request in case of web application. If you’re expecting multiple users to access your web application at the same time, this approach won’t scale; the more users access the database, the more connection objects get created, increasing memory usage and lowering performance. The solution to this problem is using connection pooling—a defined number of database connections that is managed by the application server, which is then reused by the application.
Considering all of this, it seems that database connection configuration naturally belongs to the deployment environment configuration, so you can have different database settings on different servers, and exactly the same web application code running on all of them. In addition, we could change the database configuration on the server directly, and apply any changes with simple server restart, without any web application code changes. All of that is available when using JNDI to configure database connectivity. Finally, production JNDI database configuration includes a connection pooling mechanism, so your application uses expensive database connection more efficiently, improving the scaling.
Configuring Data Source as a JNDI Resource
A JNDI resource for a database connection can be configured as part of the <Context> element in the Tomcat configuration, making the resource available only to the web application in the specified context. However, we are going to configure JNDI resource in the <GlobalNamingResources> section in the server.xml file. Resources configured in this way will be available to all web applications deployed on the Tomcat instance—very useful if multiple web applications share the same database for storing data.
Listing 13-5 shows the simple JNDI resource configuration for database connection.
Listing 13-5. JNDI Resource for MySQL Data Source
<Resource

   name="jdbc/testDataSource"                                   #1

   auth="Container"                                             #2

   type="javax.sql.DataSource"                                  #3

   driverClassName="com.mysql.jdbc.Driver"                      #4

   url="jdbc:mysql://localhost:3306/tomcatusers"                #5

   username="test" password="test"                              #6

   validationQuery="select count (*) from users"                #7

/>
The name of the resource will be used to reference the same resource in the web application later, and it must be unique in the server’s naming context (#1). The name specified is actually relative to the root naming context, which is defined as java:/comp/env, meaning that the full JNDI name of the resource will be java/comp/env/jdbc/testDataSource. The name specified can be selected freely, but by Java convention, it should start with the jdbc/ namespace in case of a JNDI data source.
The auth attribute specifies whether the signon to the resource manager to access the resource is done by the server container itself (in which case, it’s set to value “Container”), or by the application that uses the resource (in which case, it’s set to value “Application”). We are using container-managed authorization (#2).
The next step is to specify the type of resource created by the resource factory, which is set to javax.sql.DataSource (#3). DataSource is a JDBC API factory interface for creating physical connections to the database. It is somewhat similar to DriverManager, and it’s the preferred alternative to creating connections using the DriverManager, due to its richer API, and its support for naming lookup. A vendor-specific database driver implements the DataSource interface, and that concrete implementation is used to create Connection objects. The database vendor driver is specified using driverClassName attribute (#4). The jar library containing this class must be available to Tomcat’s class loader, which is achieved by copying it to the CATALINA_HOME/lib directory. We will discuss the classpath issue in a bit more detail in the “Classpath Dependencies” section later in this chapter.
To specify the actual database we want to connect to, we specify the database connection URL (#5), username and password (#6).
We also specify the attribute validationQuery (#7). The server executes this query each time just before it passes the Connection to the application, in order to check the accessibility of the database. Although it adds slight overhead to the process of obtaining Connection, it’s very useful to check the Connection for validity before it’s handed to the application—any problems are easier to diagnose that way. For example if we made a syntax error in the configuration, or if the database crashes during execution. The query specified should be quick to execute, and it must return exactly one row—counting SQL queries are therefore good candidates.
And that’s it. After Tomcat restarts, this DataSource JNDI resource will be available to all web applications to look up in the server’s naming context.
Using Connection Pool
To be in line with the J2EE specification for enterprise applications, Tomcat’s resource factory for JDBC JNDI resources is using connection pool for JDBC Connections.
The process of logging in to the database server and obtaining a Connection object is the most expensive part of Java JDBC code. It’s therefore very inefficient to create a new Connection object every time your application needs to access the database. That’s where connection pooling comes in. Connection pool creates and caches a number of database Connection objects. When an application requires database access, connection pool simply assigns one of the cached Connections to the applications. Once the application finishes with the database operation, it closes the Connection, and the Connection object is then returned to the connection pool to be reused again when another application thread requires it. Because there is a limited number of Connections that are created upfront, the process of obtaining Connection is very quick and memory efficient. And the database login is performed only on the initial Connection creation, so it doesn’t affect the performance of running application.
Tomcat uses Apache Commons DBCP for connection pooling. Apache Commons DBCP is an open source project hosted by the Apache foundation, which has a primary goal to provide vendor-independent, easy to use and high-performing connection pools. The subset of Apache DBCP library is distributed with Tomcat, and can be found in file CATALINA_HOME/lib/tomcat-dbcp.jar.
The JNDI resource configuration therefore provides a number of attributes to configure the connection pool properties. Listing 13-6 shows the typical JNDI DataSource configuration, using connection pooling.
Listing 13-6. JNDI DataSource Configuration with Connection Pooling
<Resource

   name="jdbc/testDataSource"

   auth="Container" type="javax.sql.DataSource"

   initialSize="5"                                      #1

   maxActive="20"                                       #2

   minIdle="2"                                          #3

   maxIdle="10"                                         #4

   maxWait="15000"                                      #5

   username="test" password="test"

   driverClassName="com.mysql.jdbc.Driver"

   url="jdbc:mysql://localhost:3306/tomcatusers"

   validationQuery="select count (*) from users"

/>
Let’s discuss the details of the connection pooling configuration.
The attribute initialSize specifies the number of Connection instances that will be created on server startup (#1). If you expect certain database activity on the server straight after startup, you should set this attribute to a reasonable value, to speed up the application’s data access from the start, at the expense of slower server startup time and a higher memory footprint. The default is 0, so the first Connection object will be created when it’s required. For example, if your web application has an initialization phase where data is loaded from the database on application startup, you should set initialSize value to match the number of connections you’re expecting. If you’d like to keep the memory footprint and startup of your application to a minimum, then set it to lower value, or zero.
Next, we configure the maximum number of active Connections (#2). The default value is 8, and you should set this value based on the number of concurrent database operations expected and available memory and number of processors on the server.
Attribute minIdle specifies the minimum number of idle Connections (#3). When the usage goes up, and there is less idle Connection then specified here, Tomcat would create more (until the maxActive value is exceeded). The default value is 0.
Similarly, you can specify the maxIdle attribute, setting the maximum number of Connections that can be idle (#4). If the number of idle Connection exceeds this value, some idle Connections will be destroyed. The default value is 8.
Finally, you can specify maxWait attribute, setting maximum amount of time to wait to get new Connection if none is available in the pool (#5). The default value is -1, which means indefinite time to wait. If the time waiting for the new Connection is exceeded, connection pool will throw an exception.
Classpath Dependencies
In order to use the JNDI configured DataSource, the driver class needs to be available to Tomcat’s class loader. As we mentioned before, the CATALINA_HOME/lib is by default on Tomcat’s classpath, so by simply copying the driver jar file to this directory the classes contained in the jar library will be available to Tomcat class loader.
In the first example of this chapter, we copied the MySQL driver jar file to the WEB-INF/lib directory so it can be found on the web application’s classpath. It is important to remove this jar dependency now, as having two copies of the same class on the classpath can have undesired consequences for the Tomcat’s class loader. In case you encounter ClassNotFoundException or ClassCastException errors when using JNDI configured DataSource, check if the driver library is available in the CATALINA_HOM/lib directory, and NOT in the web application’s WEB-INF/lib directory – as that is the common cause of such problems.
Accessing the JNDI DataSource
We have the JNDI DataSource resource available in Tomcat, what we need to do now is change our web application so it uses the configured resource.
The first step is to create reference to the configured JNDI resource in the web deployment descriptor file (web.xml). Listing 13-7 illustrates the XML code snipped that you should add to the web.xml file for your web application.
Listing 13-7. JNDI Resource Reference Configuration in the web.xml File
<resource-ref>

     <description>

        Sample JNDI DataSource resource reference

     </description>

     <res-ref-name>jdbc/testDataSource</res-ref-name>                   #1

     <res-type>java.sql.DatSource</res-type>                            #2

     <res-auth>Container</res-auth>                                     #3

</resource-ref>
The <res-ref-name> element specifies the name of the JNDI resource configured in Tomcat configuration files, which we illustrated in the previous sections (#1). Element <res-type> contains the type of the resource instance returned to the web application (#2). Finally, <res-auth> specifies the type of authentication configured for the resource, in our case container-managed (#3).
When a web application starts up, the resource reference verifies its configuration with the underlying resource. If the resource cannot be found, or the type/authentication does not match, an exception will be thrown, and the application will fail to start.
As for the servlet Java code, most of it will stay the same as in Listing 13-3. The only part that will change is the getDbConnection(..) method, which will use the JNDI naming context to obtain the Connection object. Listing 13-8 shows the code that obtains the Connection using the configured JNDI resource.
Listing 13-8. Obtaining Connection from JNDI DataSource in a Java Application
private Connection getDbConnection() throws NamingException {

        Context initialContext = new InitialContext();                 #1

        Context envContext =

          (Context) initialContext.lookup("java:/comp/env");           #2

        Connection connection =

          (Connection) envContext.lookup("jdbc/testDataSource");       #3

        return connection;

}
After instantiating InitialContext, which is the starting context for naming operation (#1), we lookup the root java environment context, stored under java:/comp/env name (#2). Once we have the root-naming context, we can look up the JNDI DataSource resource, using the configured resource name, jdbc/testDataSource (#3). Because the Context.lookup(...) method returns instances on java.lang.Object, we have to cast it to the java.sql.Connection class. However, this casting is safe at this point, as the type check has been performed on application start-up, based on the resource reference configuration in the web.xml file.
The returned Connection object is exactly the same as the Connection returned by DriverManager in the initial servlet implementation, so the rest of the code can remain the same.
The functionality application is therefore the same, but we have a more robust and portable database configuration. If we want to use different databases for test and production Tomcat servers, all we have to do is configure separate JNDI DataSources with required settings—the web application deployed on all server would be the same. At the same time, if we need to change the production database at any point in time, all we need to do is to change the production Tomcat JNDI configuration, and restart server—no code changes or redeployment of web application are necessary. The changes made this way will be available to all web application using the configured JNDI resource on server startup.
Configuring the Oracle JNDI DataSource
Oracle database is known for its high stability and performance, and it’s often chosen as the first choice for data-intensive and mission-critical applications. The JNDI resource for Oracle DataSource isn’t much different from the MySQL configuration we used earlier in the chapter, apart from different values for driver name, connection URL, username, and password. Listing 13-9 illustrates simple a Oracle DataSource JNDI resource configuration.
Listing 13-9. Oracle JNDI DataSource Configuration
<Resource

   name="jdbc/testDataSourceOracle"

   auth="Container" type="javax.sql.DataSource"
   initialSize="5"

   maxActive="20"

   minIdle="2"

   username="test" password="test"

   driverClassName="oracle.jdbc.OracleDriver"              #1

   url="jdbc:oracle:thin:@oracle.mydevserver.com/INTL"     #2

/>
The driver class name for Oracle database is oracle.jdbc.OracleDriver (#1). This class, along with other Oracle-specific JDBC classes, can be found in the Oracle JDBC library, distributed with Oracle database, or downloadable from Oracle web site. This library should be, just the same as MySQL driver jar file, and copied to CATALINA_HOME/lib directory in order to be available to Tomcat’s class loader.
One thing to note here, is that Tomcat only scans *.jar files in the CATALINA_HOME/lib directory, so the driver’s library file must have a .jar extension. Older Oracle drivers, for example (version 1.4 or older), are commonly distributed as zip archive, named classes14.zip (or classes12.zip, depending on the version). So if you simply copy the zip archive to the lib directory, the Tomcat wouldn’t be able to find the required driver class, and it would throw an exception. The simplest solution for this problem is renaming the library file from classes14.zip to classes14.jar. Because jar file format is exactly the same as zip, no other action is required, and a simple extension change will make the driver class discoverable to Tomcat class loader. The latest Oracle drivers are distributed, however, as jar files (ojdbc5.jar and ojdbc6.jar), so you won’t experience this issue if you’re using later versions.
This concludes the JNDI DataSource configuration. You can find all code samples in the code that accompanies this book.
Let’s now take a look at another typical usage on JNDI with Tomcat—configuring mail server for sending e-mail from your web application.
Configuring Mail Session
Whether it’s sending a registration confirmation e-mail, or a newsletter filled with useful content, sending e-mails is a common functionality requirement for most web applications nowadays. The JavaMail API provides an easy to configure and use framework for sending e-mails from Java applications. However, the JavaMail API only enables you to create and manipulate e-mail messages. The actual e-mail sending is the responsibility of an independent SMTP mail server. SMTP (which stands for Simple Mail Transfer Protocol) is the widely used protocol for outgoing mail traffic. The e-mail clients, such as Outlook and Java applications that send e-mail, use SMTP protocol for sending e-mail only. For receiving e-mail, other protocols are used, such as Post Office Protocol (POP), Internet Message Access Protocol (IMAP), or commercial products like Lotus Notes or Microsoft Exchange. In this section, we will demonstrate using SMTP server configured to send e-mail from a Java web application deployed on Tomcat. We will also see an example of accessing a mail inbox from a Java application.
Introducing JavaMail
JavaMail API defines javax.mail.Session class, which represents the mail session in Java code. Using Session instance, which is configured to communicate to the specific SMTP server, Java application can actually send e-mails.
![]() Note To use the JavaMail API in your web application, its library, the mail-api.jar file, must be on your project’s classpath. In addition, you will have to make sure activation.jar library is on the classpath, too. If you’re using Java 6 or later, activation.jar is already part of the Java classpath. For Java 5 and earlier, make sure to add activation.jar to your project’s classpath.
Note To use the JavaMail API in your web application, its library, the mail-api.jar file, must be on your project’s classpath. In addition, you will have to make sure activation.jar library is on the classpath, too. If you’re using Java 6 or later, activation.jar is already part of the Java classpath. For Java 5 and earlier, make sure to add activation.jar to your project’s classpath.
You can get the instance of the JavaMail Session programmatically, and use it to send e-mail. Let’s first demonstrate how you can use JavaMail API programmatically to send e-mail from your servlet code. Listing 13-10 shows the servlet that sends an e-mail to the recipient whose e-mail address is passed as a request parameter.
Listing 13-10. Servlet Implementation of E-mail Sending Using JavaMail API
@WebServlet(urlPatterns = {"/sendemail.html"})

public class MailSendingServlet extends HttpServlet {

  private Session session;


  public void init() throws ServletException {

     try {

         Properties props = System.getProperties();

         props.put("mail.smtp.host", "mailserver.mycompany.com");

         props.put("mail.smtp.user", "emailAdmin");

         props.put("password", "Sw4nLake!389");                            #1

         this.session = Session.getDefaultInstance(props, null);           #2

     }catch (Exception ex) {

         ex.printStackTrace();

     }

  }

  protected void doPost(HttpServletRequest request, HttpServletResponse response)

 throws ServletException, IOException {

     String emailRecipient = request.getParameter("sendTo");               #3

     try {

        Message msg = new MimeMessage(this.session);                       #4

        msg.setFrom(new InternetAddress("[email protected]"));   #5

        msg.setRecipients(Message.RecipientType.TO, InternetAddress.parse(emailRecipient,

 false));                                                                  #6

        msg.setSubject("Test email");                                      #7

        msg.setText("Hello and welcome to apress mailing list!");          #8

        msg.setSentDate(new Date());

        Transport.send(msg);                                               #9

        System.out.println("Message sent OK.");

     }catch (Exception ex) {

         ex.printStackTrace();

     }

  }

}
In order to configure the javax.mail.Session object, you have to prepare Properties with the details of the SMTP server to use. In this example, we set the host name of the SMTP mail server, and the username and password required to authenticate before sending any e-mail (#1). In the next step, we instantiate Session, using its factory method, passing the prepared properties as argument, and store it to the class field session (#2).
Now that we have mail session ready, we can create an e-mail message and send it.
We are going to send an e-mail to the recipient whose e-mail address has been entered in the web form, and is available in our servlet as a request parameter (#3).
We are using MimeMessage, which is part of the JavaMail API (#4). We set the From field to the standard no-reply e-mail address for our server (#5), and the recipient to whom we’re sending e-mail to the value received as request parameter before (#6). We also set other standard e-mail parameters, like subject line (#7) and the body of the message (#8).
Finally, we send message using JavaMail API’s standard Transport.send(..) static method (#9).
This example shows standard implementation e-mail sending code for Java application, and there is nothing wrong with it as such. However, let’s consider some pitfalls.
What would happen if you wanted to use different SMTP servers for development, testing, and in production? Or even just use a different account (username and password) for each environment? Our SMTP configuration (#1 and #2 in Listing 13-10) is part of the source code, and for any change we would need to recompile and repackage the application, which can easily become cumbersome to manage. Similarly, if you wanted to change your server, or login details, in production environment, you would have to recompile the code, build and redeploy application—which may take even few hours depending on the environment.
E-mail session configuration, similarly to JDBC Data Sources from previous sections, is naturally part of the deployment environment the application runs on. If the mail session properties are configured on the server, you can easily manage different settings on different environments, or change the configuration (server’s IP or login credentials) directly to the server—without any changes to the code or the deployed web applications. In addition, in case you have multiple web applications running on the same server, you can share the same configuration between them.
This is where JNDI configuration comes into place, promoting reusability and loose coupling between the code and the external services it uses, such as SMTP server.
Configuring Mail Session as a JNDI Resource
Let’s make the changes to our web application and configure JavaMail Session as a JNDI resource.
The first step is to add JNDI resource for mail session to the Tomcat’s configuration, using the <Resource> XML element. If you place the XML configuration within the web application's <Context> element, the configured JNDI resource will be available for that web application only. You can also configure JNDI resource in the server.xml file, within the <GlobalNamingResources> element, in which case the JNDI resource will be shared between all web applications deployed on the same Tomcat instance.
Listing 13-11 shows the typical JNDI resource configuration for a JavaMail Session.
Listing 13-11. JNDI Resources Configuration of a JavaMail Session
<Resource name="mail/testEmailSession"                  #1

                    auth="Container"                    #2

                    type="javax.mail.Session"           #3

                    mail.smtp.host="localhost"          #4

                    mail.smtp.user="emailAdmin"         #5
                    password="sw4nLake1389"             #6

                    mail.debug="true"                   #7

/>
We set the name of the resource to "mail/testEmailSession" (#1), and this is the name our web application will look for when loading the resource. You can use whatever name you want, but using "mail" sub-context is a convention for JavaMail Session JNDI resources, so it’s a good practice to keep to the convention for better code readability and easier maintenance. This name is relative to the standard root JNDI context java:/comp/env, so the full absolute name of this JNDI resource will be java:/comp/env/mail/testEmailSession.
We want Tomcat container to manage this resource for us and sign on to the resource manager, so we set authentication attribute to value “Container” (#2). The type attribute specifies the Java type that the instances created by the resource will have—for JavaMail session JNDI resource, we set this to fully qualified class name javax.mail.Session (#3). The SMTP server properties are set as attributes: host (#4), user (#5) and password (#6).
We are also setting optional attribute mail.debug to true (#7), so that all communication between Tomcat and SMTP server will be logged to the Tomcats log file (catalina.out). Setting mail debug output to true can be very useful during troubleshooting and diagnosing e-mail sending problems.
Tomcat is shipped with the resource factory that creates javax.mail.Session instances ready to be used, based on the configuration provided. When using JNDI for mail configuration, object factories configured and managed in Tomcat will be responsible for creating the Session objects, so we won’t have to worry about mail server configuration in the code anymore. If we want to change any part of the configuration (using different server, change login detail, or turn the debugging on or off), we can make the change directly on the server, and after restart, new settings will be applied, without any changes to the code.
Classpath Dependencies
Because Tomcat will be responsible for instantiating javax.mail.Session objects, the JavaMail API library must be available to the Tomcat’s mail class loader. So, if you are using JNDI mail configuration, you will have to move mail.jar and activation.jar to the Tomcat’s classpath (CATALINA_HOME/lib directory). We say move on purpose, because you will have to remove those libraries from your web application’s classpath. In case mail.jar and activation.jar are found in both Tomcat’s classpath (CATALINA_HOME/lib directory) and the web application’s classpath (WEB-INF/lib directory of your WAR file), class loading errors will occur as there is no guarantee which version of the class will be loaded at any time. If you are using Java 6 or later, you have to move only mail.jar library, as actication.jar will be already available on the global Java classpath.
Accessing JNDI Mail Session
So far, we have configured JNDI resource in Tomcat. Now we have to make changes to our web application to use the Session JNDI resource for sending e-mail.
First we need to set reference to the configured mail session resources in the web deployment descriptor (web.xml file). Listing 13-12 illustrates the references configuration, which you should add to your web.xml file.
Listing 13-12. JavaMail Session Resource Reference in web.xml
<resource-ref>

     <description>

        Sample JNDI javamail session resource reference

     </description>

     <res-ref-name>mail/testEmailSession</res-ref-name>       #1

     <res-type>javax.mail.Session</res-type>                  #2

     <res-auth>Container</res-auth>                           #3

</resource-ref>
The resource reference name must match the name of the configured JNDI resource mail/testEmailSession in our example (#1). The other properties must match the configured JNDI resource: type is set to javax.mail.Session (#2) and authentication mechanism is set to container (#3).
The resource reference has a role to verify that we are using the correct JNDI configuration, and also as a useful reference to the developer about JNDI resource available to be used. In a case in which the underlying JNDI resource type is not matching the class defined in the resource reference, or if the authentication attribute does not match the authentication of the configured resource, our application would fail to start with javax.naming.NamingException.
Next, we need to change the code of our MailSendingServlet – instead of configuring and instantiating Session programmatically (lines marked with #1 and #2 in Listing 13-10); we will look up the configured resource from JNDI. Listing 13-13 shows the improved implementation of the MailSendingServlet.
Listing 13-13. Sending E-mail Using Session Looked Up as a JNDI Resource
public class MailSendingServlet extends HttpServlet {

    private Session session;


    public void init() throws ServletException {

       try {

           Context initContext = new InitialContext();                #1

           Context envContext  =

               (Context)initContext.lookup("java:/comp/env");         #2

           this.session =

              (Session)envContext.lookup("mail/testEmailSession");    #3

       }catch (Exception ex) {

           ex.printStackTrace();

       }

    }


    protected void doPost(HttpServletRequest request, HttpServletResponse response)

 throws ServletException, IOException {

        String emailRecipient = request.getParameter("sendTo");

        try {

            Message msg = new MimeMessage(this.session);

            msg.setFrom(new InternetAddress("[email protected]"));

            msg.setRecipients(Message.RecipientType.TO, InternetAddress.parse

(emailRecipient, false));

            msg.setSubject("Test email");
            msg.setText("Hello and welcome to apress mailing list!");

            msg.setSentDate(new Date());

            Transport.send(msg);

            System.out.println("Message sent OK.");

        } catch (Exception ex) {

            ex.printStackTrace();

        }

    }

}
There are only three line changes to the code in Listing 13-10, and they are marked with #1, #2, and #3 in the previous sample. First, we instantiate initial JNDI context, using InitialContext class, which is available from standard Java SDK (#1). Next, we look up the root JNDI java environment context, using prefix java:/comp/env (#2). All JNDI resources configured in Tomcat are relative to the root context, and can be looked up using their configured name. Finally, we look up our JavaMail Session object from the root context, using the name we configured before (#3). Because Context.lookup(..) method returns Object instance, we need to cast the result to the javax.mail.Session here. But because we know the JNDI name belongs to the Session resource (as defined in the JNDI configuration and in the resource reference in the web.xml), and that type verification is made on application start-up, no problem is expected here.
The rest of the code looks exactly the same: we use Session object to create e-mail message and send it using JavaMail API’s Transport abstraction.
Using JNDI resource for e-mail configuration, we can now deploy our web application on any application server with the configured JNDI resource, and it will just work. We don’t need to make any changes to the code if we switch hosting provider, and start using different SMTP server—as long as the JavaMail Session is configured on the server (Tomcat, or any other), with the name we specified, the e-mails will be sent successfully.
Configuring Secure SMTP Server
The sample configuration we illustrated is usable in most scenarios. SMTP servers are usually configured so they are not publicly available, but only from a firewall-protected internal network. Such servers required only one property to the configured: server host. If the server requires username and password for authentication, they can be configured as server properties, as our examples show.
However, with popularity of cloud-based services, a lot of SMTP servers can be used as a service over the Internet. These servers, in addition to a username and password, require secure SSL protocol for communication. In addition, they are usually configured on a different port, then the default port 25, commonly used for mail servers. One typical example is Google’s SMTP server (Gmail), which you can use to send e-mail from your Gmail account.
Listing 13-14 shows the typical JNDI mail Session configuration if you want to use your Google’s SMTP server and your Gmail account to send e-mails from the web application.
Listing 13-14. Google SMTP Server JNDI Configuration
<Resource name="mail/gmailSession"

  auth="Container"

  type="javax.mail.Session"

  mail.smtp.host="smtp.gmail.com"                                     #1

  mail.smtp.port="465"                                                #2

  mail.smtp.auth="true"
  mail.smtp.user="[email protected]"                          #3

  password="mypassword"

  mail.smtp.starttls.enable="true"                                    #4

  mail.smtp.socketFactory.class="javax.net.ssl.SSLSocketFactory"      #5

/>
In order to send e-mails using our Gmail account, we have to specify Google’s SMTP server, smtp.gmail.com (#1), and port 465 (#2). The username and password we set for authentication are valid Gmail account credentials (#3).
Because the Gmail’s SMTP server is only accessible over SSL protocol, we need to enable STARTTLS command of the mail protocol, using mail.smtp.starttls.enable property (#4). If mail.smtp.starttls.enable is set to true, any communication with the mail server will start with STARTTLS command, which will switch the communication to secure SSL protocol before issuing any login or mail sending command to the server. Finally we configure the java class that should be used to create secure SMTP sockets (#5).
And that’s it—if you configure you web application to use this JNDI resource for JavaMail Session, you can easily send e-mail from your Gmail account.
Summary
In this chapter we introduced JNDI and how it is used to write portable Java applications. Next, we illustrated JNDI configuration of JDBC data sources with connection pooling. Examples include MySQL and Oracle databases. Finally, we demonstrated how you can use JavaMail API configured using JNDI to send e-mail from your web application deployed on Tomcat.