
Chapter 8
Integrate Multithreading and Efficient Memory Usage for Multitasking Apps Performance
In this chapter, you will learn about:
- What Apple means by multitasking.
- The multitasking life cycle and how to handle the benefits and costs
- Different background services, such as
- Audio
- VOIP
- Location
- Background processing
- What you should know to make your app multitask well.
In this chapter, you will learn how to take advantage of multitasking in iPhone so that the application can process data in background without the user’s notice. This must be balanced with using as little CPU processing time or memory as possible; otherwise, you may severely impact the battery life or worse—be killed by the iOS.
What is Multitasking in iPhone?
From the user’s perspective, multitasking means that she is using several applications at the same time and can switch from one to another at will. In iOS 3.2 and below, whenever a user quit an app, the app closed, and when user opened it again, the app needed to reload. This was a problem for two reasons: the wait was long and the app forgot whatever she just did (Figure 8–1).

Figure 8–1. How an app in older versions of iOS behaves when a user quits and reopens
Since iOS 4.0, the app is not loaded again from the start so it doesn’t take much time for the user to switch from one app to another. Apple hopes that the user will perceive the multitasking feature to be as powerful as that of a desktop app. From the developer’s side, the app is actually put into the background and all states are saved. As you can see in Figure 8–2, when the user opens the app again, the state and data are quickly loaded and restored to the previous position.

Figure 8–2. How an app in iOS 4.0 behaves when a user quits and reopens
Multitasking Life Cycle
It would be useful for you to know the process of the old iOS, which can help you to understand about the current mechanism of the iOS4 and above. I will firstexplain the previous mechanism where multitasking didn’t exist. The app is started by calling application:didFinishLaunchingWithOptions:, and then the event loop is run to catch all the events and to display the UI (see Figure 8–3). When the user quits the application, the whole app is closed and the method applicationWillTerminate is called. The next time the user opens the application, the method application:didFinishLaunchingWithOptions: is called again.

Figure 8–3. Application life cycle for the old iOS environment
iOS4 requires a more complicated implementation and it’s easy to misunderstand this whole process. As shown in Figure 8–4, when the user quits the app, it enters the background and method application:didEnterBackground is called. The application is in foreground state when users can see it running; users don’t see the applicationwhen it is in background. When it relaunches, many methods and notifications are involved and you have to understand different states of the application to respond properly to them. Here are the application states that you need to know about.
- Not running: Never opened, or opened and then terminated.
- Inactive: The app is in foreground but not receiving events, such as when the user locks the screen.
- Active: The app is in foreground and is receiving events.
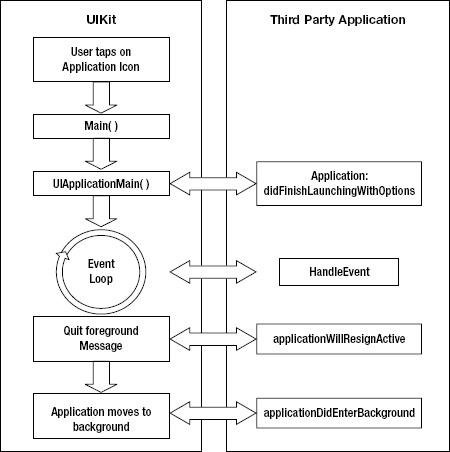
Figure 8–4. Application life cycle for iOS4
Developers often confuse these last two states: background and suspend. The background state happens before the suspend state. When the user quits the app or jumps to another app, the application is brought into the background state. It stays there for a short period of time, after which the application is suspended. The period of time depends on the application and what it wants to do in the background. I will explain in more detail what the application can do in this state.
There are two main situations for which the application life cycle will be different. The first situation is when user quits the app by answering a phone call or another interruption from the operating system. The second situation is when users press the Home button and the app goes into the background. Each situation has its own application life cycle.
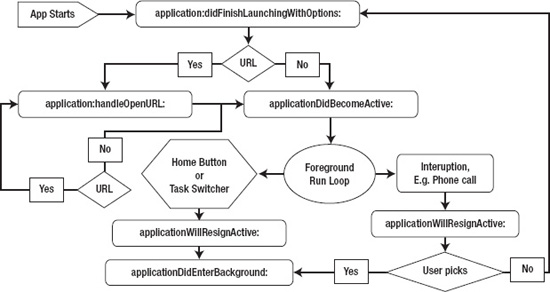
Figure 8–5. Diagram for two different cases: phone interruption and home button.
As you can see in Figure 8–5, in the first case, when the user receives a phone call or SMS message, the app is put into inactive mode with the applicationWillResignActive: method. If the user chooses No (doesn’t answer the phone) the method applicationDidBecomeActive is called; otherwise, applicationDidEnterBackground is called. So, in the applicationDidBecomeActive section, you may not need to reload all data and views again. You should be careful with this part when comparing it to clicking on the Home button.
When users press the Home button, the application goes directly into the background and the delegate method applicationDidEnterBackground: is called.
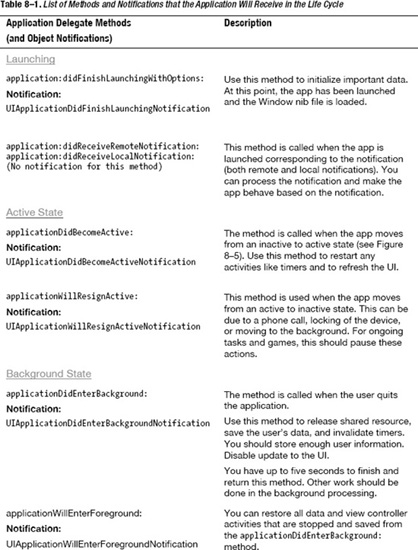
Multitasking Handler Methods
Figures 8–4 and 8–5 showed you when certain methods are called in the lifecycle. Table 8–1 provides a complete list of methods to handle in your application delegate and other view controller classes to respond properly to the life cycle events.

NOTE 1
To receive the notification for events, your view controller or object can register it as shown in the following code snippet:
[[NSNotificationCenter defaultCenter] addObserver:self selector:@selector(someMethod:)

name:UIApplicationDidBecomeActiveNotification object:nil];
Don't forget to clean up after yourself! In dealloc, remember to remove yourself as the observer, like so:
[[NSNotificationCenter defaultCenter] removeObserver:self];
The method someMethod: may (but is not required to) accept an NSNotification as a parameter. Inside this NSNotification, you may find more user information or data to process. You can work with this NSNotification as usual; there is nothing special here.
NOTE 2
- The method
applicationDidBecomeActive:will always be called, either when users first launch your application or launch it again from the background. - The method
applicationDidFinishLaunching:will always be called on the first launch, not on launches from background. - The method
applicationWillEnterForeground:will always be called when the application comes back from the background.
You can use these facts to integrate multitasking into your application so that you can respond properly to different states of the application.
Multitasking Benefits and Costs
What should you do if you don’t want to have multitasking in your application? What are the benefits and costs if you have to maintain all these different states and complex code in order to make sure your application works well?
There are many benefits of using multitasking. Here are two:
- Users can continue working with the existing state of your application without navigating back from the beginning any more.
- Your application can continue to work in parallel with background services like downloading data from the Internet, playing audio, or receiving GPS location notification.
As you already learned, over the whole life cycle of multitasking, there are couple of costs that you have to pay for:
- More complicated logic while walking through the application life cycle, as shown previously.
- Your app may be forced to quit in the background and leave the application data inconsistent. Due to this inconsistency, your app can crash when user reopens it.
So, in some cases, you may not want to use multitasking in your application. In these cases, you can configure your info.plist file to not use multitasking. Here are the steps to do so:
- Open your info.plist file.
- Add the key
UIApplicationExitsOnSuspendor selectApplication does not run in background. - Set the new key to
YESor tick in the tick box.
You can see this in Figure 8–6.

Figure 8–6. How to set up the no multitasking option
Background Services
As shown in the previous sections, there are many services that you can run in the background to process data and provide services to the user. Here is a list of things you can do in the background in iOS4:
- Audio: Your app can play audio while it is in the background.
- Privacy: Let the OS show a splash screen when your application is relaunched. This is useful if your app is showing some sensitive information.
- Location: Your app can receive significant changes in location while in background.
- VOIP: The user can make phone calls while your app is in background.
- Local notifications: Your application can ask the system to schedule a specific time to pop up a message to the user.
- Task completion: Your app can ask the system for extra time to complete a given task. This is an important feature that I will cover in more detail later in this chapter.
These are specific services that can help you speed up your program by utilizing the multitasking features of the iOS. Audio and VOIP don’t speed up your app but they help make the user feel better and make your application more usable. Location, task completion, and local notifications are good tools for your application’s performance when done properly. Considering that location is one of the most powerful features in mobile technology, many apps now want to incorporate it in order to serve the user better.
Audio Service
The most trivial way to enable your audio service in background is to include a key in the info.plist and then set up the audio settings properly to let the audio keep playing in the background after your application enters background.
You need to add a new key called UIBackgroundModes with the value audio, as shown in Figure 8–7. The result will show “Required background modes” in the array.
Figure 8–7. Set the audio to play in the background.
If you look at Apple’s documentation, it doesn’t say anything about configuring your audio setting so that it can keep playing. Many developers complain about this, so you should be aware of this issue. You need to add the following code snippet before you can play the audio:
[[AVAudioSession sharedInstance] setCategory:AVAudioSessionCategoryPlayback error:nil];

AVAudioPlayer *backgroundMusicPlayer = [[AVAudioPlayer alloc]

                                           initWithContentsOfURL:YOUR_AUDIO_URL

                                                           error:nil];

[backgroundMusicPlayer play];
NOTE: You need to add the AVFoundation framework and import it in your file to make this code compile.
The problem with this approach is that you can only play one song in the background. After that song ends, your application enters into background mode. To play a list of songs in the background, you have to write code to implement a long-running background job.
Sometimes you want to stop downloading/streaming audio/video in the background to save the traffic for the user. You can use the applicationDidEnterBackground method to stop all video/audio streaming, like so:
- (void)applicationDidEnterBackground:(UIApplication *)application {

  [backgroundMusicPlayer stop];

}
Show Splash Screen
When your application enters the background, the iOS environment will take a screenshot of its current view. When the user relaunches your application, the iOS environment will display this screenshot while your application is still loading. This creates a perception within the user’s mind that your application is loading really quickly, which boosts the user experience. However, in some cases, there is some sensitive information that you may want to hide until all the data is loaded. Here is a simple method to support this (you can also do this by directly manipulating your views in the applicationDidEnterBackground, but it’s a more complicated process):
- (void)applicationDidEnterBackground:(UIApplication *)application{

    if (appHasSecret) { // if your application has something to hide

        UIImageView *splashView = [[UIImageView alloc] initWithFrame:CGRectMake(0,0, 320, 480)];

        splashView.image = [UIImage imageNamed:@"YOUR_DEFAULT_PICTURE"];

        [window addSubview:splashView];

    }

}
Your Default.png can be anything that the user can view while he is waiting for your app to load its view and data. So, when the user relaunches your app, he sees this default image first and then your view.
Location Service
Location-based social networking is hot these days, and there are plenty of services that need the user’s location. The problem is that your user won’t want to keep your application open all the time to let your app knows her current location. Therefore, Apple provides you a mechanism so your application can find the latest location while staying in background.
To get the user’s current location, here are some ways your app can choose to implement:
- Use Standard Location Service: Your application can ask the iOS environment for the current user’s location whenever the app wants. This approach consumes a lot of battery power and takes time for the application to query data. Another problem is that the app can’t get a location using this service if it’s running in background.
- Register for significant location changes: Your application can also register for location events and notifications. Your application will be notified whenever the user changes his location significantly. This often gets called when the device moves from one cell tower to another. Using this approach is more passive but it saves battery life. Another benefit of this approach is the iOS notifies your application even if your application is in background.
- Continuous background location update: This approach is the best for your application but the worst for your user’s battery life. Your application can constantly get location updates from the iOS, whether in the background or foreground.
Standard Location Services
This is a common location service that most apps use because it was available in the old iOS. To use this service, you may want to set the accuracy and filter properties before calling startUpdatingLocation. If you don’t have a configuration set, the iOS will simply use these default configurations :
CLLocationManager *locationManager = [[CLLocationManager alloc] init];

locationManager.delegate = self;

[locationManager startUpdatingLocation];
NOTE: You need to add the CoreLocation framework and import CoreLocation in your file. The class represented by self object must implement the CLLocationManagerDelegate.
The code is really straightforward. You can set some configuration parameters to get better location data. These properties belong to CLLocationManager class:
@property(nonatomic, weak) CLLocationAccuracy desiredAccuracy
Set the accuracy level for the location detection. The default value is best; however, if your application accepts the lower accuracy level, you should go with that. The problem with the “best” configuration is that it takes more time and more battery energy to request the location. It offers the following accuracy levels (these names are self-explanatory):
- kCLLocationAccuracyBestForNavigation
- kCLLocationAccuracyBest (Default Value)
- kCLLocationAccuracyNearestTenMeters
- kCLLocationAccuracyHundredMeters
- kCLLocationAccuracyKilometer
- kCLLocationAccuracyThreeKilometers
Another property of class CLLocationManager that you can set is
@property(nonatomic, weak) CLLocationDistance distanceFilter
You can set either kCLDistanceFilterNone (default) or any double value that you want. The property specifies the distance (measured in meters) that your users have to move before your application receives notification about the new location. The kCLDistanceFilterNone means your application can receive all notifications whenever user has a movement.
This section only describes how you can ask the operating system for a location update. The details about the return value and what to do will be briefly described later.
Significant Location Changes
There are two different mechanisms to update based on certain conditions:
- When there are significant changes in the user’s location.
- When the user enters or quits a specific region.
The first mechanism is really like the Standard Location Update and happens by initializing the object and then setting up configurations. The only difference is that now you call startMonitoringSignificantLocationChanges.
One important note is that if you use this Significant Location Change mechanism, your application will be invoked or will wake up when new location data arrives. This will also happen if your application is already suspended or terminated. Because your app can be awakened with this mechanism, you don’t need to handle background processing code or worry about missing location data. However, your application is only given a small amount of time in background to process this location data. Your application may not have time to process very much network data but you can still do a lot of other useful stuff.
Before moving to the region mechanism, the following code will explain how to receive the location update and process this location data:
// Delegate method from the CLLocationManagerDelegate protocol.

- (void)locationManager:(CLLocationManager *)manager

    didUpdateToLocation:(CLLocation *)newLocation

    fromLocation:(CLLocation *)oldLocation {


    NSLog(@"latitude %f, longitude: %f
",

            newLocation.coordinate.latitude,

            newLocation.coordinate.longitude);


}
As you can see, all you need to do is to include a delegate method, (void)locationManager:didUpdateToLocation:fromLocation:. Inside the newLocation object, you have two important data points, latitude and longitude.
The Region-based mechanism is also similar to the Significant Location Change mechanism in that you register for a specific circular region by a center and its radius. The code block is as simple as the following:
  // Create the region and start monitoring it.

  // radius is measured in meters

   CLRegion* region = [[CLRegion alloc]

  initCircularRegionWithCenter:destinationLocation.coordinate

                        radius:radius identifier:@"YOUR_REGION_ID";


  [self.locationMananager startMonitoringForRegion:region

                   desiredAccuracy:kCLLocationAccuracyHundredMeters];
Usually, this mechanism is integrated with a MapKit so users can register for their destination and get notified when they are around that region.
You also need to implement the following two methods to receive events about the regions:
- (void)locationManager:(CLLocationManager *)manager didEnterRegion:(CLRegion *)region

- (void)locationManager:(CLLocationManager *)manager didExitRegion:(CLRegion *)region
Continuous Background Location Update
The last mechanism is for applications that require a continuous update from the iOS environment. This is a good mechanism for an application that requires every new location update even when the app is in background and not running. To do this, you need to add the key UIBackgroundModes with the value location, similar to the audio playing in background (covered in previous sections).

Figure 8–8. App registers for location updates
As you can see in Figure 8–8, your application now is registered with location updates. There are many advantages and disadvantages with this mechanism. Here are two.
Advantage:
- You can get updates to the location service frequently, even with small changes.
Disadvantages:
- It can consume lots of your user’s battery power.
Local Notification
This is a new feature of iOS4 that allows applications to set up notifications at a specific time. This feature is useful for time-based application like alarms or calendars. This can be helpful if the user needs to wait for a specific time for some specific events. The events can be based on user settings or server settings. This also helps to get the user’s attention to the application.
You need to have a new local notification object and set up the date and time properly, like so:
// Create a new notification.

UILocalNotification* alarm = [[UILocalNotification alloc] init];

if (alarm) {

   alarm.fireDate = theDate;

   alarm.timeZone = [NSTimeZone defaultTimeZone];

   alarm.repeatInterval = kCFCalendarUnitDay;

   alarm.alertBody = @"Time to wake up!";

   [[UIApplication sharedApplication] scheduleLocalNotification:alarm];

}
Voice Over IP (VOIP)
Voice Over IP is mainly used for voice chat applications like Skype. This is another feature of multitasking in the new iOS4; however, it’s beyond the scope of this chapter, so I won’t cover it here. Most applications don’t need to use VOIP at all.
Background Execution
Background execution is an important technique for iOS developers. This technique is new as of iOS4 and helps developers get more time to finish critical tasks, so the app can control its lifetime a little bit more.
For example, imagine that you are uploading an image/video to your server. In the middle of the uploading process, the user suddenly quits the app, leaving the image half uploaded. The next the user goes back to your app, she will have to wait again for the whole uploading process. The other option is to force the user to wait for the image to finish uploading before the app closes, but this is not a great user experience.
In another scenario, there are important posts or downloads from your server, which you definitely want to complete. Background execution is important to in helping developers with these tasks. You can wrap your uploading process within the background task and start that task, like so:
UIApplication* app = [UIApplication sharedApplication];

UIBackgroundTaskIdentifier bgTask = [app beginBackgroundTaskWithExpirationHandler:^{

  [self.imageUploadService uploadImage:image];

  [app endBackgroundTask:bgTask];

}];
// Start the long-running task and return immediately.

dispatch_async(dispatch_get_global_queue(DISPATCH_QUEUE_PRIORITY_DEFAULT, 0), ^{

  // Do the work associated with the task.

  [app endBackgroundTask:bgTask];

});
As shown in the code, to initiate a new background task, you will need to call method beginBackgroundTaskWithExpirationHandler:, which will return a background task identifier that you can use to end the background task later. With method beginBackgroundTaskWithExpirationHandler:, you tell iOS that your app would like this task to complete even if the app is moved into the background state, before the app becomes suspended. The endBackgroundTask: method tellsiOS that your app's task has completed, allowing it to move your app to the suspended state if necessary. If the app remains in the foreground the whole time then these calls have no effect, so it doesn't hurt to use them.
You need to be aware that background tasks don’t get an unlimited amount of time to run in the background; in other words, the application has to finish its tasks in a limited time (usually up to 10 minutes). Otherwise, the iOS will suspend the app without waiting for the task to finish. The expiration handler part of beginBackgroundTaskWithExpirationHandler: is a block (it’s just like a method without the name) specifying your cleanup code if the task outlives its lifetime. Code executing as a background task must not make any UI updates or openGL calls (as the app is offscreen).
You can use this beginBackgroundTaskWithExpirationHandler: method to initiate a new background task in any place in your code. I use it to wrap an upload image process that makes sure that, even if the user quits the app immediately, the uploading process is still successful. Many people also use this method along with applicationDidEnterBackground: to make the app run for a little longer in order to finish all the final calculations or networking processes.
As mentioned, you can also use background services to play audio. Using this background service, you can play a list of songs instead of only one. You can use the following code skeleton to implement this; note that you may need to fill in other necessary parts of the code to make it work. You should do this as an exercise to understand more about how the background task works.
UIBackgroundTaskIdentifier bgTaskId;

// AVAudioPlayer *backgroundMusicPlayer

if ([backgroundMusicPlayer play]) {

  bgTaskId = [[UIApplication sharedApplication] beginBackgroundTaskWithExpirationHandler:NULL];

}


- (void)audioPlayerDidFinishPlaying:(AVAudioPlayer *)player successfully:(BOOL)success

{

    UIBackgroundTaskIdentifier newTaskId = UIBackgroundTaskInvalid;


   if (self.haveMoreAudioToPlay) {

        newTaskId = [[UIApplication sharedApplication] beginBackgroundTaskWithExpirationHandler:NULL];

        [self playNextAudioFile];
    }


    if (bgTaskId != UIBackgroundTaskInvalid) {

        [[UIApplication sharedApplication] endBackgroundTask: bgTaskId];

    }


    bgTaskId = newTaskId;

}
As you can see in the code, by using background services you can register the delegate events; then inside that delegate method, you can simply play the next file. (Note that the total time your application can play audio is up to 10 minutes.) I hope this is a helpful demonstration of how to use background services efficiently.
What to Notice when Running in Background
The following is a small checklist from Apple to make sure that your application behaves and runs well in the background and doesn’t affect any other apps:
- Reduce your stored memory to the lowest level.
- Release all shared resources, such as Calendar.
- Respond properly to the application life cycle events.
- Don’t update your UI or call code that consumes CPU and battery excessively.
- Run in the background correctly.
- Respond to system changes in background.
If your application can strictly follow these guidelines, it will run well and it will get the most out of the multitasking feature. It also won’t get killed in the background. Keeping your application alive in the background so it relaunches quickly is an important part of a good user experience.
Memory
As mentioned, in iOS4, your application can run in background services and will still reside in the RAM while the application is in background. However, the RAM system has its limits and these are even worse in limitedenvironments like iOS, as you learned in Chapter 7. Therefore, Apple has a strict policy about the memory usage of an application when it is in background. Because there will be several apps residing in the background at the same time, these apps could eat a huge amount of memory quickly. When the device runs out of memory, iOS will find the application that consumed the most memory and kill that app first.
To reduce your memory usage, you need to clear your caches in memory, especially image caches. You may also need to remove unnecessary subviews because these subviews also are saved into memory when your application goes into background. Actually, you need to save your critical data and clear out all unnecessary data to avoid your application being suspended by the iOS.
Shared Resources
There are some applications that share data, such as the calendar database and the address book. If your application uses this resource while running, it has to stop while it enters the background. If your application is found to use or has not yet released these shared resources when the application enters the background, it is killed immediately. The reason is that all these shared resources belong to the foreground application.
Application Life Cycle Events
As mentioned, you are responsible for handling and responding correctly to the application life cycle events. If you don’t test to make sure that your life cycle is correct, you run the risk of data loss or improper behavior. For example, you need to save your application data before it goes to background and you need to pause the current flow when the application moves to inactive state.
You can’t depend too much on the memory storage in the background. Because the iOS can suspend your app whenever the it runs out of memory, and you may not have a chance to react to that event, you should always save all the necessary data before you go into background.
You may have a little bit time to run in background, but the iOS can also stop your background process whenever it runs out of memory or CPU cycles. So, in the background process, you need to act fast and use multithreading if possible. You are running against the iOS time.
At this point, when moving into the background, the iOS will take a snapshot of your view. The purpose of this is to briefly show that snapshot to the user while your view and data are loading, which improves the user experience. However, you should hide sensitive information that you don’t want to be captured as part of the screenshot, such as date of birth, a password, or your user’s private photos.
User Interface Update and Process in Background
A general rule when your application is in background is to avoid unnecessary processes. And UI update is one of those processes. If you need extra time or extra CPU processing while in background, you may need to explicitly request permission. Here is a short list of things that you should address if your application is in background:
- Don’t make OpenGL ES calls from your code.
- Cancel any Bonjour-related services.
- Handle any connection or networking failures while your application is in background. You can always resume these connections later when your application becomes active again.
- Avoid updating windows and views. Users can’t see your views, so there’s no reason to update them. Your application should not update windows and views in background because this consume CPU cycles and may affect foreground applications.
- Clean up any alerts or pop up messages before moving to background to avoid confusing the user. You should dismiss your alerts and show them again later if necessary.
- Do minimal work in background. Try your best to use services provided by Apple, such as audio in background or monitoring significant location changes.
System Changes Notification
While your application is in background, the system can experience many changes and it will notify you of these, so you should be prepared for changes. These changes include device orientation, time changes, battery changes, or locale changes while the application is in background. Table 8–2 shows a list of important notifications.

You will receive a queue of notifications when your app resumes from background. You may need to quickly deal with these notifications, especially the settings and locale changes, because the user always want to see these changes happen immediately.
Dealing with iOS Versions
It’s estimated that anywhere from 5 to 20% of devices are still using iOS3, including iPad 1, old iPod, and iPhone devices. So how do you make sure that nothing goes wrong with your application when it runs in iOS3?
You need to store all data and user information in applicationDidTerminate and correctly reinstruct all data in the method application:didFinishLaunchingWithOptions:. Because in iOS4, the method applicationWillTerminate: is called only when the application is terminated, you should be okay.
You won’t have support for background executions, so you can’t rely on this mechanism to save the user’s data. If you have any important data to save, upload, or download from server, you can do it in either the termination or launching methods.
In old devices, you can try to create the feeling of multitasking (or fast app switching) by using an archiving approach. In this approach, you save all the view controllers’ states when the application closes and restore all of them when the application relaunches. This is a complicated process and I don’t recommend you spend your valuable time and effort on it.
If your application was previously released for iOS3, you will need to support both iOS versions; otherwise, your users might react poorly and give you one star rating in the Apple App Store. If your application is newly released, you can go straight to iOS4 without worrying.
Summary
Multitasking is a new concept in iOS4. Most of the time, you will need to keep track of your states and life cycles to make sure that your application is responding correctly.
You can choose to remove the multitasking support from your application by changing some properties in the Info.plist file. You can also request special permissions for some background services by adding UIBackgroundModes key into the Info.plist file.
You can request an extra amount of time to process important calculations and services (up to 10 minutes). You need to clean up all resources and cache data to reduce the memory footprint; otherwise, iOS can kill your application in the background. This generally means you lost all the benefits of a multitasking application.
EXERCISES