
Chapter 7
Optimize Memory Usage for Better Performance
In this chapter, you will learn the following:
- Review the old manual memory management policies
- Object ownership policy
- The new Automatic Memory Management bases on the old manual memory management.
- What object copying is and how to use it.
- How to use
autoreleaseandreleasemethods properly. - A review of memory instruments.
iPhone is a constrained environment with a limited amount of memory. However, many developers either underestimate or overestimate that fact, so they don't take advantage of all the available memory in the iPhone to boost performance. Others are so scared of memory and performance in iPhone that they do lots of premature optimization, which harms the readability of the code and makes it hard to maintain the code base later.
To utilize the memory for better performance and better readability without making the application crash, you need to understand the memory structure of the iPhone environment. You need to learn how to avoid holding too many objects in memory, which can cause a memory warning and then a crash. You also need to learn when you should retain an object or release an object; if you hold too few objects in memory, it can make your calculation run slower because you need to reconstruct the object or load it from the file system.
A Little Review
This part gives you a good transition to the new automatic reference counting (ARC) mechanism. Some people got confused about the transition to a new learning experience. I hope that this part can help you to move smoothly without any problems to the new ARC mechanism.
Old Object Ownership Policy
This old concept relates to if your object A has a strong reference to another object B, your object A needs to manually release this object B. Object A has a strong reference to object B if object A alloc, copy, mutableCopy, new or retain object B. On the other hand, if your object A does not call those methods in object B, object A only has a weak reference to object B.
For the old memory management mechanism, if your object or method has a strong reference to another object B, it is responsible to release or autorelease that object B. Every strong reference to object B will increase its retain count by 1. If no object has a strong reference to object B anymore, in other words, the retain count is 0, object B is deallocated (Listing 7.1).
Listing 7.1. Release the Object if You Have a Strong Reference
- (void)doSomething {

  NSObject *obj = [[NSObject alloc] init];

  NSLog(@"obj: %@", obj);

  [obj release];

}
Autorelease
The autorelease method's job is to send the object to a pool and declare that this object will later be released. Using this method, you don't want to have a strong reference to the object anymore but you don't want it to be deallocated. Take a look at Listing 7.2.
Listing 7.2. Memory Issue
- (NSObject *)getObj {

  NSObject *obj = [[NSObject alloc] init];

  return obj;

}


- (void)anotherMethod {

  NSObject *myObj = [self getObj];

  // do something

  // Should I release the object here?

  [myObj release];

}
Now, after you have finished working with the object, you should ask yourself if you should release your myObj now or not. Basically, you will think you have to release it; otherwise, nobody will release that myObj and a memory leak will happen. However, because your anotherMethod does not have a strong reference to myObj, it cannot release myObj. The only way is to use autorelease as in Listing 7.3.
Listing 7.3. Use Autorelease to Solve the Problem
- (NSObject *)getObj {

  NSObject *obj = [[NSObject alloc] init];

  return [obj autorelease];

}


- (void)anotherMethod {

  NSObject *myObj = [self getObj];

  // do something

}
NOTE: The method anotherMethod does not have a strong reference
Autorelease Pool
I will give a quick overview of autoreleasepools and then explain the concept in depth so you can understand the differences between autorelease pool and release explicitly.
The autorelease pool is where all of your autoreleased objects are stored. When this autorelease pool is released, all the autoreleased objects will also be sent a release message. If the retain count of an object is 0, that object will be deallocated.
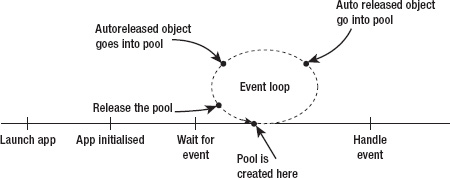
An autoreleasepool will be released at the end of the event life cycle. For example, when user taps into the UI, a new event life cycle is created to process the tap event, then it processes all the logic related to that tap event, and finally it displays the results back to user. This is one event life cycle. For that event life cycle, you will have an autorelease pool.
The main autorelease pool, which is created in the main method as the following code shows:
int main(int argc, char *argv[]) {


   @autoreleasepool {

      int retVal = UIApplicationMain(argc, argv, nil, nil);

   }

   return retVal;

}
As you can see in the code, at the beginning of the method, a new autorelease pool is created, then the main logic is executed using the UIApplicationMain; after that event loop, the pool is released. This cycle is shown in Figure 7–1.
Automatic Reference Counting
The problem with the above process is that it gets more complicated when you always need to remember the rules and when you need to put retain, release or autorelease in. So, in the new Xcode (Xcode 4.2), Apple released a new mechanism, which makes the process of retain, release and autorelease to be automatic. All policies above still apply to the code in the new version. But Xcode will append all the necessary code for you to manage the memory.
To give you a quick picture, I will write the code in Listing 7.1 and Listing 7.3 again.
Listing 7.4. Rewrite Code for the New ARC mechanism
For Listing 7.1:

- (void)doSomething {

         NSObject *obj = [[NSObject alloc] init];

        NSLog(@"obj: %@", obj);

}


For Listing 7.3:

- (NSObject *)getObj {

        NSObject *obj = [[NSObject alloc] init];

        return obj;

}
That's it! No more release or autorelease is necessary. When you compile the code, Xcode will automatically add all the necesary release/autorelease calls for you. After the compiler adds these calls, the code will be exactly the same as Listing 7.1 and Listing 7.3.
How to Set Up Your Project in Xcode?
Go into your project settings, find if the line Objective-C Automatic Reference Counting is set to YES or not. You can see Figure 7–2 for the position of the setting line:

Figure 7–2. Set up your project for ARC
If your project is an existing project with the old retain/release/autorelease call, you can use a migration tool of Xcode to remove those unnecessary calls for your project as shown in Figure 7–3.
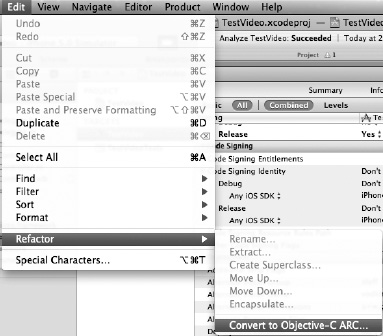
Figure 7–3. Convert the old code to Objective-C ARC
ARC Policy
You need to follow some new rules to make sure that your project is compatible with ARC:
- You cannot use or call the old memory management methods:
retain,release, autoreleaseandretainCount. You can override thedeallocmethod to do any clean up that you need, but you must not call anydeallocmethod, for example[super dealloc]is not allowed.This rule also enforces you when setting up your properties:
@property (nonatomic, retain) NSString *myName; // This is not allowed. - You cannot use object pointers in C, this may create some problems for you if you want to integrate C code into your project, as described in Chapter 9.
- You cannot use
NSAutoreleasePoolobjects, and you must use @autoreleasepool.Instead of using:
NSAutoreleasePool *myPool = [[NSAutoreleasePool alloc] init];

// your code here

[pool release];
You have to use:
@autoreleasepool {

   // your code here

}
New Qualifier for ARC
As the new ARC policy, you now need to include new lifetime qualifiers to enforce new rules of ARC into the codebase.
strong: This is to indicate that you want to keep a strong reference to this variable. As long as there is astrongreference to an object A, object A will not be deallocated.weak: This works like assign, if you just want a reference to the object, without explicitly own that object. Therefore, you do not need to manage the lifetime of that object. The good thing is that if object A has aweakreference to object B and object B is deallocated, the reference becomes nil. This makes it safer when you will not have a reference to a deallocated object.unsafe_unretained:This is similar toweak,the difference is that if the object B, which is referenced by object A, gets deallocated, the reference will point to a deallocated object, which can cause a crash for your application.autoreleasing:If you have a method that needs to have a pass-by-reference argument, you can consider using this qualifier. The method will be responsible to autorelease the argument when it returns.
Object Property
Now, you need to change the object property declaration. Instead of using old memory management mechanism: @property (retain) NSString *myString as in the previous version, you now have a new set of rules.
If you want to have an ownership to the object
// This is similar to @property (retain) NSString *myString

@property(strong) NSString *myString;
If you just want a reference to the object, without the ownership
// This is similar to @property (assign) UIViewController *myViewController;

//  except that if myViewController object is deallocated,

//  the reference becomes nil.

@property(weak) UIViewController*myString;
NOTE: If you want your application to run in iOS4, you cannot use weak, you need to use unsafe_unretained and set the reference to nil yourself.
Variable Declarations
To use the qualifier inside the methods, you need to add __ into the beginning of it. For example, you will have __strong or __weak. In methods, __strong qualifier is the default qualifier.
Using __strong qualifier guarantees that your object is still alive until the end of the method, and be careful with using __weak or __unsafe_unretained. If there is no strong reference to your object, your object will be deallocated immediately. For example:
NSString __weak *myString = @"hello world";

NSLog (@"myString: %@", myString);
Will print out (null) because at the time the myString object is printed, there is no strong reference to it.
The __autoreleasing qualifier is used for methods receiving a pass by reference argument.
- (BOOL)performTaskWithError:(NSError *__autoreleasing *)error;
You can call that method normally using:
NSError *error = nil;

[self performTaskWithError:&error];
By default, the error object is declared with strong qualifier, but the compiler will add code in to make the method call [self performTaskWithError:&error];
NOTE: For all methods that return an object, and the name does not contain new, alloc, or copy, the object will automatically be autoreleased on return.
Advanced Memory Issues
Now that you have learned the most basic memory techniques, I will introduce you to some advanced memory topics.
Retain/Relationship Cycles
In the old memory management world, if object A owns object B, then object A has to release object B when object A gets deallocated. However, what happens if object A owns object B and objects B also owns object A?
You want to release object A by calling release method on it and setting your reference to nil. However, because object B still owns object A, the retain count of object A is greater than 0. It's the same when you release object B; its retain count is still greater than 0 because object A still owns object B.
This sequence keeps going on like this without any object getting deallocated, as illustrated by Figure 7–4.

Figure 7–4. Retain cycle
This still holds true for the new ARC mechanism, if you have 2 objects having strong reference to each other, both objects get leaked.
So what do you need to do if you want both objects to own each other? You need weak references.
Weak References
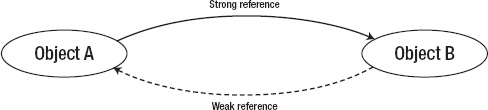
Figure 7–5. Weak reference cycle
So, to avoid a retain cycle, only object A holds a strong reference to object B and object B can only hold a weak reference to object A.
UIViewController
All iPhone apps require that you work with the UIViewController (how else can you have your UI?). Therefore, understanding the UIViewController life cycle will help you with many important things, such as:
- Utilizing your memory better.
- Avoiding any memory leaks.
- Improving responsiveness.
From my observation when teaching and conduct training for many developers, many of them make a serious mistake by not understanding the management life cycle of a view controller object. There are some main management processes in the iPhone environment to control the life cycle of a view controller object, such as:
- Loading the view.
- Unloading the view when the system needs to reclaim memory.
- Releasing the view.
- Displaying or hiding the view from the UI.
Load View Process
When a view controller is asked for its view, it checks if its view is loaded into the memory or not. If not, then it will load that view and then the method viewDidLoad is called. Figure 7–6 shows the process of loading the view.

Figure 7–6. Loading view process
There are some notes about performance that you should remember about this loading view process:
- If you override the
loadViewmethod, you need to create the view hierarchy to display to the UI. This can lead to slightly better performance because it doesn't need to load the view from a nib file. - If you don't override the
loadViewmethod, the iOS environment will automatically look for the nib file that you specify or a nib file that has the same name as the view controller file. Using a nib file is better for maintenance and is a drag and drop feature. - If nothing is matched, the iOS environment will create a new and empty view and return that empty view.
Unload View Process
This process is really important for memory and performance. The main reason is that this process is running when your application has a memory warning and needs to reclaim the memory resource. In this process, the didReceiveMemoryWarning method will be called first and then the viewDidUnload method is called. Views that are on the screen will not get unloaded. You can see the process in Figure 7–7.
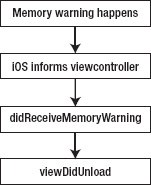
Figure 7–7. Unloading view process
In this unloading view process, there are a couple of performance and memory issues you need to remember:
- Make sure that when the method
didReceiveMemoryWarningis called, you clear the memory cache for your heavy objects, such as all image cache. If you don't do so, the iOS environment can force your app to close, which is a really bad user experience. - You shouldn't clear or release any view here because it may be unsafe to do so. Instead, you should call
[super didReceiveMemoryWarning]so the superclass can check if it is safe to release the subview or not. - If it is safe to release its view, the method
viewDidUnloadwill be called. You can choose to override this method to do any clean up required for your views and hierarchy.
NOTE: When you override loading methods such as init, loadView, and viewDidLoad, the call to the superclass must be at the beginning of the method. However, if you override cleaning methods, such as didReceiveMemoryWarning, viewDidUnload or dealloc, the call to the superclass has to be at the end of the method.
There are some key points in viewDidUnload that confuse many developers.
viewDidLoadandviewDidUnloaddo not correspond to each other. TheviewDidLoadmethod is called after the view controller object is initialized and a view is requested.viewDidUnloadis called after a memory warning is received. After callingviewDidUnload,there is no call to thedeallocmethod of the view controller object. The view that is unloaded will be deallocated.- In
viewDidUnload, you only clean up your views; all other objects will be cleaned up or released indidReceiveMemoryWarning.
Displaying and Hiding Views in the User Interface
The process of displaying and hiding views in UI has very little to do with memory. However, it is related to the performance and the user's experience of the performance of an iOS app.
There are four main methods in the view controller life cycle to represent the four different states of a view when it is being displayed and being hidden.
viewWillAppear: This method is called before your view is displayed. Only after this method finishes is your view displayed. To create a good experience of a fast application, all calculations here have to be really fast. Otherwise, what the user perceives about your navigation and animation is really weak. A good practice is to setup views' attributes (for example, background color or text color).viewDidAppear: This method is called right after your view is displayed, so you can put logic processing here. However, if your process changes the view quite a bit after it finishes, the user can get confused, which is not a positive experience.- For example, you have a sort algorithm to sort your table view. When user gets sees view A, the old table is still displayed. And then suddenly all rows change without any warning or an explanation as to why this just happened.
viewWillDisappear: This is called right before the view disappears from the UI. Anything belonging to the view that you want to show to your users should be put here. Note that you should not put too much logic processing code here. If you do put a lot of processing code here, it will take too much time for a new view to be displayed.viewDidDisappear: This is called right after your view disappears. You can't show any view or any UI effects to user.
There is no hard and fast rule as to where you should put your logic processing. I give you all basic concepts and you can use them to create the best user perception about your app's performance.
Object Copy
So why do you need to know about object copying and why do you need to it? Copying an object is useful if you don't want to change the old object because it could affect other parts of the program. In some cases, you can't change the object at all, so you copy the content of that object in order to modify it.
Shallow vs. Deep Copy
Shallow copying actually means the same as retaining in objective-C. Because shallow copying means copying the pointer of the object to a new variable, there is no difference between shallow copying and retaining.
Deep copying, on the other hand, means you actually create a new object, and copy all data and instance variables from the old object into the new object.
To illustrate the differences between shallow copy and deep copy in objective-C, consider these code examples for each case:
- (void)setMyObj:(NSObject *)newObj {

  if (newObj != myObj) {

    myObj = newObj;

  }

}
Deep copying:
- (void)setMyObj:(NSObject *)newObj {

  if (newObj != myObj) {

    myObj = [newObj copy];

  }

}
In the first case, you assign the variable to the new object and retain the object. In objective-C, this is a shallow copy. In the deep copy case, the code actually copies the value and instance variables inside the newObj into myObj.
Implementing a Deep Copy
If you want to do a truly deep copy, you have to follow the whole hierarchy of the object.
- You need to create a new object.
- You copy all instance variables of the old object into the new object.
- If the instance variable is a primitive data type like
float,int, ordouble, you just need to copy that value.Booleanis not a primitive data type but you also only copy the value of aBooleaninstance variable. - For each instance variable that is a pointer type, you will need to copy their instance variable as well.
- The process continues to the end.
This process can be long and hard to implement. Some built-in objects and libraries don't support deep copying. Therefore, you should always find a compromise between shallow and deep copying. For example, you won't want to deep copy a delegate, which can cause a retain cycle, discuss previously, where object A owns object B and object B also owns object A. Moreover, you usually don't want to copy your delegate because at the end you want to callback to that delegate, not the new delegate.
This is an example of a mixed approach between shallow and deep copy:
@interface Item : NSObject {

   NSString *itemName;

   CGFloat price;

   id delegate;

}


@property (nonatomic,  copy) NSString *itemName;

@property (nonatomic, weak) CGFloat price;

@property (nonatomic, weak) id delegate;


@end
In this example, you can see that there are three instance variables. The first one is itemName (which is a pointer object), the second one is a primitive data, and the last one is a delegate.
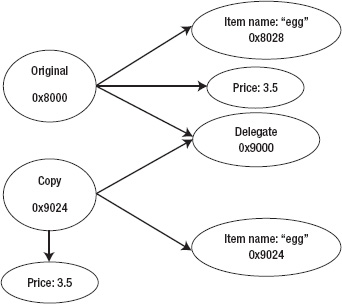
Figure 7–8. Deep copy of an object
As you can see in Figure 7–8, the delegate object will be kept the same and shared between the original item and new item. The itemName object will be copied and have a new memory address (0x9124 instead of 0x8028) but have the same value of “egg”. The primitive variables, such as price, will be copied over and have no memory address.
Integrating a Copy Method into an Object
To have a deep copy of an object, you will usually have to override the method copyWithZone:. When an object is sent a copy message, this method will be called. Here is some code for overriding this method. You will need to create a new object by alloc and init and then use the set method to set the value for instance variables.
- (id)copyWithZone:(NSZone *)zone {

   Item *copy = [[Item allocWithZone: zone] initWithName:self.itemName];

   copy.price = self.price;

   copy.delegate = self.delegate;

   return copy;

}
As stated previously, if there are other custom type instance variables inside your Item class, you need to implement the copy for those as well. In my example, for the sake of simplicity, the code doesn't create a new itemName object.
Advanced Autorelease Pool
You learned several basic techniques about memory in the previous sections of this chapter. This section will cover more advanced techniques for using the autorelease pool and show you where you should use it to have high performance in restricted cases.
In every thread, you must have an autorelease pool to collect and store all autoreleased objects. If you don't have an autorelease pool in every thread, all autoreleased objects will be leaked and you will have a big memory leak. The autorelease pool is organized inside stacks; this is explained in the following section.
Autorelease Pool and Stacks
Autoreleasepools are stored inside a stack and are commonly understood to be nested. Whenever you create a new autorelease pool, it will be pushed on the top of the stack. And all new objects that are autoreleased will be pushed into that new autorelease pool.
As you can see in the following code, the objects (such as myArray and myString) inside the method doSomething will be stored in myPool, not the main pool of the application:
- (void)doSomething {

  @autoreleasepool {

    NSArray *myArray = [NSArray array];

    NSString *myString = [NSString string];

  }

}
Here is the main pool is inside the main method, as usual:
int main(int argc, char *argv[])

{

  @autoreleasepool {

    int retVal = UIApplicationMain(argc, argv, nil, nil);

  }

  return retVal;

}
At the end of the @autoreleasepool block, all autoreleased objects are stored inside that pool will be released when the event life cycle ends.
Figure 7–9 demonstrates this concept. This is an important concept for good performance—knowing to release the object as soon as possible.

Figure 7–9. Autorelease pool in stacks
Autorelease Pools and Threads
When a new thread is created, you need to create a new autorelease pool object and associate that pool with the new thread. So when the thread stops, your autorelease pool gets deallocated and all the autoreleased objects are deallocated as well. I covered this topic in depth in Chapter 6, so please review it if you need some help understanding this concept.
Autorelease Pool's effectson Performance
The old rule of memory management still applies for code that is written with ARC If you call a method that does not have new, alloc and copy in its name, that object is already autoreleased. If you run a loop that creates too many autoreleased objects, you will soon run out of memory.
This code demonstrates the best way to do memory management in looping:
- (void)doSomethingWithAutoRelease {

      for (int i = 0; i < 1000; i++) {

         @autoreleasepool {

         Product *product = [Product productWithItemID:@""];

         // process and display the product here

         }

      }

}
After the loop finishes and at the end of the @autoreleasepool block, all of autoreleased objects are released. This way you can control and release all unused objects and take your memory back.
Instruments
Instruments were covered in Chapter 2 when I discussed benchmarking using devices and simulators. In this section, I will briefly discuss common problems plus some more advanced problems that can affect what memory management approach you should choose.
There are four main instruments that you need to use most of the time.
- Static Analyzer
- Leaks Instrument
- Zombie
- Object allocation
Static Analyzer
Static Analyzer is a good to quickly check for small and obvious memory leaks. For example, if you alloc a new object and you don't release it inside that method, as shown in Figure 7–10, the Static Analyzer can figure it out quickly.

Figure 7–10. Static Analyzer shows a memory leak
Leak Instrument
The Leaks Instrument is more complicated and takes some time to run and analyze but it gives you the best results according to your actions. It can detect most of memory leaks when it keeps track of all data in running time

Figure 7–11. Leak results from the instrument
The Leaks Instrument can give you detailed results of list of leaked objects, as shown in Figure 7–11.

Figure 7–12. Leak details shown by Leaks Instrument
It can also show the exact line of code that causes the leaks (Figure 7–12).
Zombie
Zombie helps you check for the part of the code that caused a crash, EXEC_BAD_ACCESS for your application. This is really useful if your application keeps crashing but you can't discover the problem through logging or verifying your code.
As shown in Figure 7–13, Zombie will show you a list of actions, including malloc, autorelease, retain, and release when the app crashes. You can track the autorelease and release methods using Zombie.

Figure 7–13. Results from a crash tracked by Zombie Instrument
Zombie can show you the place for each action, such as where the object is allocated and where the object is autoreleased or released.
Object Allocation
Object allocation is the last tool related to memory that I want to introduce here. It shows all the memory usage over time when your application is running. This tool is really helpful when the memory usage grows so much and you need to trace back to the group of lines that created so much memory.
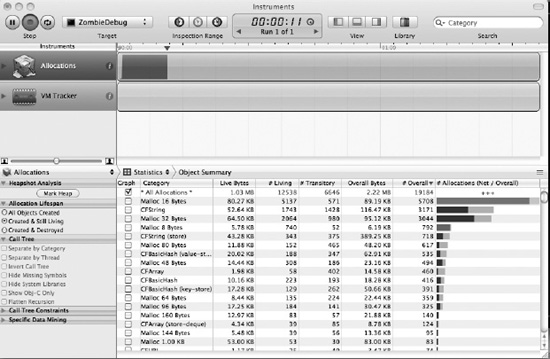
Figure 7–14. Results of memory usage from object allocations
Figure 7–14 shows you the line of code, time the object is created, and the caller that creates the object.
Memory Warning Levels
The last thing I want to discuss about memory is memory warnings. When your memory usage grows to a certain point, the iOS environment will try to tell you this by calling the didReceiveMemoryWarning method on view controller objects. You will have to react to this memory warning by freeing some memory.
NOTE: There are other ways to receive memory warnings from inside your application: the application delegate receives the memory warning and calls appropriate methods in other objects or your objects can register to receive memory warning via NSNotification.
The first memory warning (memory warning level 1) is the most important one: it means that your code has to reduce memory usage fast. Otherwise, your app will receive a memory warning level 2 and it will almost certainly crash.
Summary
Memory has a big effect on the performance of your app. It can also make your app crash if you don't use it properly. In this chapter, you learned important concepts about memory management in objective-C that will help you avoid memory leak issues and application crashes. The UIViewController life cycle is also important as it relates to managing and controlling memory usage. It also affects how users feel about the performance and experience of the application. Finally, you learned the differences between autorelease and release when dealing with memory and when you should use one instead of the other.
EXERCISES