Chapter 5
Rich Media
Remember the days when the Web was just a series of interlinking documents containing text and images? No? Well, don’t worry. We’re going to give you a short history lesson. In the mid-nineties most websites contained lots of text and a few images. Then something came along that was destined to change the playing field: the FutureSplash plug-in. Because it was a proprietary plug-in as opposed to a ratified open specification, the debate remains over whether it should have formed such a fundamental part of the Web’s architecture. FutureSplash wasn’t the only one, though; Real Player and QuickTime were among those wanting to join the proprietary plug-in party.
You may be aware of how the story continues—FutureSplash was bought by Macromedia, who renamed it Flash, and it became ubiquitous on the desktop. Its success was based on the fact that it provided a lot of functionality that open standards were missing, such as video and animation. Plug-ins, such as Flash, solved the problem of cross-browser compatibility. But how will the story end? What does the future hold for Flash and other proprietary formats? Will the rise of HTML5 and the Open Web spell the end for proprietary formats? In this chapter, we’ll discuss the direction we’re heading and introduce you to native video and audio along with a brief look at canvas and SVG (Scalable Vector Graphics), which may well hold the answer.
The case for Flash
Let us be clear: we’re not against Flash. In fact, very much the opposite is true. The rich authoring tool for the plug-in allows developers who are accustomed to writing HTML 4.01 to bring their sites to life with movement, audio, video, animation, and, crucially, out-of-the-box cross-browser compatibility. It enhances browser functionality far more than our basic web trifle ever could—until now, perhaps. Flash has also become the universally accepted method for adding video and audio to sites. It’s very much a front-runner when it comes to pushing the boundaries of what’s possible online.
While there was a time when you couldn’t visit a site and not be struck with a ghastly intro screen created in Flash, it has evolved into a sophisticated software package capable of creating highly complex applications. This holds especially true when built using Flash’s native authoring language, ActionScript, which, along with Adobe Flex and Adobe AIR, has encouraged skilled developers to flex their creative muscles and break new ground on the Web.
The problem with the Flash plug-in has been the barrier to entry caused by the fact that it’s a closed, proprietary format. Flash files can, in the main, be created only by using an expensive software package that remains in the hands of a single vendor—Adobe. The alternative to proprietary formats? Open standards.
Proprietary formats vs. open standards
Before we discuss how HTML5 is aiming to change the playing field, let’s take a brief detour into the differences between proprietary formats and open standards. Wikipedia describes proprietary formats as being
typically controlled by a private person or organization for the benefit of its applications, protected with patents or as trade secrets, and intended to give the license holder exclusive control of the technology to the (current or future) exclusion of others.
Openformats.org describes open standards as being
standards fixed by public authorities or international institutions whose aim is to establish norms for software interoperability.
Proprietary formats, including Flash, offer a challenge for accessibility, device independence, and data portability out of the box. In addition, they don’t always play nicely with open standards or native browser functionality. On the flip side of the coin, open standards promote interoperability across platforms and devices. Open standards provide a low barrier to entry; all you need to get started is a text editor coupled with a browser and you’re on your way to creating a website.
As you’ll see, even HTML5 isn’t quite free of proprietary formats (although they aren’t explicitly identified in the specification), but in the long run, open standards tend to win out due to their device and platform independence.
When it comes to the crunch, what would happen if Adobe or Apple were to go bankrupt tomorrow, next week, or next year? Flash wouldn’t suddenly disappear but, arguably, developers would have to think of another solution to deliver their project. In contrast, open standards can’t go bankrupt. The Web is all encompassing and shouldn’t—no, mustn’t—be held captive by several large companies touting their proprietary formats.
Enter HTML5 and friends
The Open Web is moving—fast. HTML5 is beginning to show us what can be achieved using only open standards. As you’ll see in this chapter, HTML5 provides video and audio native to the browser. It also provides us with canvas and the ability to directly embed SVG files into our pages. These technologies allow us to draw and manipulate dynamic pixel-based (canvas) and vector-based (SVG) images using simple scripting techniques.
These rich media elements combined with powerful APIs go a long way to providing interoperable, accessible, rich, compelling experiences using only Open Web standards. The question is, are proprietary plug-ins such as Flash willing to lie down and be overtaken by open standards?
Does HTML5 signal the end of Flash?
In a fantastic article on A List Apart, Dan Mall likens the HTML5 vs. Flash debate to the Cold War of the Web. He goes on to say that
Technologies aren’t inherently bad or good. They’re only appropriate or inappropriate for certain circumstances. They’re a means to an end, not solutions within themselves.
Dan’s approach is akin to our own, in that we believe developers should use the most appropriate technology in their armory. In fact, if you’re a Flash developer, you’ve got most of the skills you already need to create great things with canvas; just take a look at Seb Lee-Delisle’s 3D particles (http://j.mp/3dparticles1) to see how easy it is to convert from ActionScript to JavaScript. This is because both scripts are based on the ECMAScript language, meaning switching between one and the other is a relative breeze!
Flash will certainly continue to push the boundaries of what’s possible online in the coming years, the likelihood being that gaming will be at the forefront of that push (although its stranglehold is waning). However, even Adobe is running scared of HTML5, stating “HTML5 poses a threat to Adobe Flash” in a report carried out by Gartner on Adobe’s behalf. The decision by Apple to not support Flash on the iPhone or iPad certainly hasn’t helped either. Even Ricardo Cabello (who some of you will know as Mr. Doob) has removed all Flash projects from his portfolio because he has “no interest on doing Flash projects any more” (http://j.mp/doobnoflash2).
__________
In short, Flash isn’t going anywhere anytime soon, but the contents of this chapter will, hopefully, make you think about which technology you actually need to use on the next site you build.
Video the HTML5 way
Not a day passes without us being told that video (and we’re not just talking about YouTube) is the future of the Web. If that is to be the case, particularly for the average user, we surely need an easy, reliable way of including video content without having to invest in expensive proprietary software. HTML5 provides just that, directly in the browser with (at its minimum) a single line of markup.
Let’s take a look at how we’ve been adding video to our sites using the object tag in recent years. We’re sure you’ll all recognize YouTube’s embed code.
<object width="640" height="385">

  <param name="movie" value="http://www.youtube.com/v/24FNE60FRzw&hl=en_GB&fs=1&">

  </param>

  <param name="allowFullScreen" value="true"></param>

  <param name="allowscriptaccess" value="always"></param>

  <embed src="http://www.youtube.com/v/24FNE60FRzw&hl=en_GB&fs=1&"

         type="application/x-shockwave-flash" allowscriptaccess="always"

         allowfullscreen="true" width="640" height="385">

  </embed>

</object>
Pretty ugly, huh? Well, as you’ve probably already guessed, HTML5 not only helps us to be a little more semantic, but also makes adding video to our sites as easy as ABC (OK, almost as easy). The basic markup you need is
<video src="gordoinspace.webm"></video>
By default, the browser doesn’t show any play controls; the user needs to open a context menu (right click or cmd+click) to play the video using this markup, which is not very intuitive. You’ll also see a small glitch when loading the page if you don’t explicitly set the width and height of the video while the browser calculates the dimensions. Also, the user doesn’t get a sneak peek of what they’re going to be watching. To remedy the situation, we’ll add the poster and controls attributes along with the dimensions (we’ll explain these attributes in more detail in a bit).
<video src="gordoinspace.webm" width="720" height="405" poster="poster.jpg" controls>

</video>
In Chrome you should see something like Figure 5-1.

Figure 5-1. Basic video element in Chrome
The standard global attributes, along with poster and controls, aren’t the only attributes available, though.
The standard global attributes defined in HTML5 are:
accesskey              dropzone

class                  hidden

contenteditable        id

contextmenu            itemid

dir                    itemprop

draggable
Let’s take a look at each one in a little more detail.
autoplay: Tells the browser to start playing the video as soon as it is downloaded.controls: Displays built-in controls that are native to the browser. Basic controls tend to include a play/pause button, time counter, volume control, and time scrubber.crossorigin: Either allows or prohibits the sharing of a video across other domains using CORS (Cross-Origin Resource Sharing).height: Identifies the height of the video (if your height/width aren’t in the correct ratio, you will see black banding above and below the video; it will not distort).loop: Tells the browser to loop the video after playback has been completed.mediagroup: Allows multiple media elements to be linked together by creating a media controller. Therefore you can synchronize multiple videos or a video with audio.muted: Allows the author to specify if the video should be muted when it begins to play.poster: Identifies the location of a still image to use as a holding frame.preload: Allows the author to inform the browser to start (or not start) downloading the video as soon as the page is loaded.preloadhas replaced theautobufferattribute. Theautoplayattribute can override thepreloadattribute if present. The available states arenone: Tells the browser not to preload the file. The file will begin to load when the user clicks Play.metadata: Tells the browser to only preload the metadata (dimensions, first frame, duration, etc.). The rest of the file will begin to load when the user clicks Play.auto: Tells the browser to choose whether to download the entire file, nothing, or only the metadata. This is the default state ifpreloadisn’t specified.src: Identifies the location of the video file (note that this is not required if a childsourceelement is present, which we’ll cover later).width: Identifies the width of the video (if your height/width aren’t in the correct ratio, you will see black banding above and below the video; it will not distort).
loop, autoplay, preload, and controls are Boolean attributes, meaning that if the keyword exists in the code, the value is true. If you are writing XHTML, you should write controls as controls="controls".
Note: The mediagroup and crossorigin attributes have only been added to the specification recently and as such aren’t implemented in any browser.
As we’ll see, some browsers don’t yet support the video element (or specific codecs—more on those shortly). Using graceful degradation, though, we can cater to those browsers by providing fallback content in the form of a link to download the video. This works because browsers always display the content inside of HTML5 elements they don’t recognize.
<video src="gordoinspace.webm" width="720" height="405" poster="poster.jpg" controls>

Download <a href="gordoinspace.webm>Gordo in Space</a> the movie.

</video>
Note: We don’t believe that autoplaying videos is ever a good idea, predominantly from an accessibility (a11y) standpoint. The same goes for always including controls. In fact, Disney had a lawsuit brought against them for having video and audio that could not be turned off by blind users (http://j.mp/noaccessdisney3) and you don’t want to find yourself in that situation.
Easy so far, right? Unfortunately, nothing’s ever quite that simple, is it? Let’s talk about the elephant in the room.
__________
Video formats
The elephant—no, elephants—hiding at the rear are video formats and codecs. An early version of the HTML5 spec specified the Theora codec (see the following section) but Apple refused to implement it. The Theora codec was then removed from the spec because browser vendors couldn’t agree on a common codec. This means that a preferred codec is no longer documented.
Before we dive any deeper into which browsers support which codecs, let’s veer off the beaten track and briefly describe the difference between video containers and codecs.
Video containers and codecs
The file extensions .mp4, .avi, and .flv that we associate with video aren’t codecs themselves, but rather a container format. Think about how ZIP or RAR files can contain several types of files within them; video container formats do just the same thing. The container format should be thought of as the “how to store data” and the codec as the “how to understand and play the data.”
These containers tend to include multiple tracks, generally at least one for the video and one for the audio. The tracks are synchronized by markers contained in the audio track. There can be multiple audio tracks for different languages or tracks for subtitles (more on that later). Containers can also have associated metadata that might include the title of the video or chapter points.
You’re probably thinking, “But what has this got to do with HTML5 video?” The answer is that in order to implement HTML5 video cross browser, we need to be aware of three container formats.
- WebM: The newest container format to join the HTML5 party (
http://j.mp/webmproject4). It was announced at the Google I/O conference in 2010, following Google’s acquisition of On2 Technologies (http://j.mp/googleon25). Based on the Matroska container format, it is designed to be used with the open source VP8 video codec and Vorbis audio codec. YouTube supports the WebM format, provided that you have opted into its HTML5 experiment (http://j.mp/youtubehtml56) and are using a compatible browser. - Ogg: An open standard container format without any patent restrictions, it is maintained by the Xiph.Org Foundation (
http://j.mp/oggtheora7). Ogg’s video codec is called Theora and the audio equivalent is Vorbis. - MPEG-4: Based on Apple’s QuickTime container format MOV (
http://j.mp/mpeg4container8). It is associated with the file extensions.mp4and.m4v. The downside to MPEG 4 is that it is patent encumbered, which may mean the user will have to pay royalties starting in 2016. MPEG 4 uses the H.264 video codec.
__________
We’ve introduced the container formats that we’re interested in, but what about the specific codecs? Although the number of codecs is wide ranging (even for these three container formats), we’re only interested in the following three:
- VP8: An open video codec that isn’t encumbered by any known patents. It’s owned by Google, having been created by On2 Technologies, which Google acquired. Its quality is similar to H.264 and it is expected to be developed further in coming years.
- Theora: Also originally created by On2 Technology (a clever bunch, don’t you think?) but is now developed by the Xiph.Org Foundation. Like VP8, it is royalty free and not encumbered by any known patents. Theora is equivalent to VP3 and is generally used with the Ogg container, but its quality is far lower than that of VP8 or H.264
- H.264: Developed by the MPEG group and designed to create high-quality video at lower bit rates than previous standards. H.264 can be split into different profiles that cater to different devices, so a desktop device may require a higher profile than a mobile device, for example. It can be used with most container formats (usually MPEG-4) but has the downside that it is patent encumbered by MPEG-LA.
As we touched on earlier, because browser vendors couldn’t agree on a codec, there isn’t one detailed in the specification. You’re now aware that there are three to choose from, but which browsers support which?
Browser support
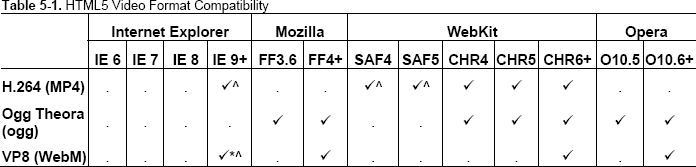
All five of the main browsers support (or will in upcoming releases) HTML5 video. Table 5-1 shows the current state of browser support for different codecs.
__________
Google did announce in January 2011 that they were going to drop support for H.264 (http://j.mp/chromeh2649) but at the time of writing this hasn’t happened and the browser still supports all three codecs. For the current state of HTML5 video, LongTail has produced a comprehensive report titled “The State of HTML5 Video” that is a must-read for anyone wanting to use native video (http://j.mp/h5longtail10).
To quote Mark Pilgrim on Dive Into HTML5,
There is no single combination of containers and codecs that works in all HTML5 browsers. This is not likely to change in the near future. To make your video watchable across all of these devices and platforms, you’re going to need to encode your video more than once.
With VP8 support being announced for Flash Player (http://j.mp/adobevp811), there is a workaround whereby you can use a Flash fallback for browsers that don’t support the VP8 codec but do support other HTML5 video formats (Safari).
The other option for achieving cross-browser compatibility is to encode your video more than once. There are a number of tools available to achieve this, one of which is Miro Video Converter (http://j.mp/miroconverter12), shown in Figure 5-2, which is available for PC and Mac. Converting videos with Miro is as easy as dragging a file, choosing the output format you require, and clicking Convert!
__________
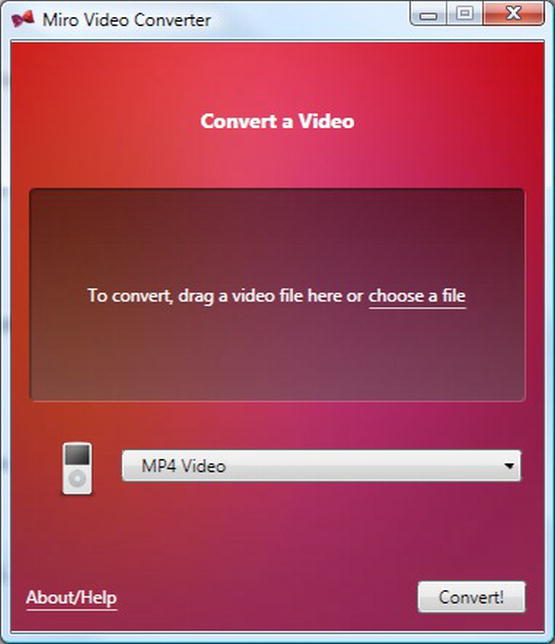
Figure 5-2. Miro Video Converter
For further encoding options, Mark Pilgrim offers a great tutorial on Dive Into HTML5 (http://j.mp/videopilgrim13).
Adding video source
We now have our video encoded three times, but so far we can only add one src attribute to our video element—Houston, we have a problem. We could detect support using JavaScript and serve the appropriate file to each browser. However, a more bulletproof way would be to use the source element.
source allows us to specify multiple alternative videos (or audio when using audio, which we’ll cover later) for our media elements, as shown next. It is an invisible element, which means that nothing is rendered by the browser to indicate its presence visually in the document.
<video poster="poster.jpg" controls width="720" height="405">

  <source src="gordoinspace.mp4" type="video/mp4">

  <source src="gordoinspace.webm" type="video/vp8">

  <source src="gordoinspace.ogv" type="video/ogg">

  Download <a href="gordoinspace.webm>Gordo in Space</a> the movie.

</video>
Notice how we’ve added three source elements with their appropriate type attributes to cater for all browsers (OK, not quite all, as you may have spotted earlier, but we’ll get to that).
__________
We’ve now removed the src attribute from the video element because we’re using the child element source. Note that the link to download the video remains—primarily for those users who may be viewing in text-only browsers or alternative devices.
If you don’t add the type attribute to the source element, the browser will download a small part of each file before realizing the codec is unsupported. Therefore, you should ensure that the type attribute is always included for each video source.
Caution: When using the type attribute with Ogg Theora–encoded videos, you must specify it as video/ogg, not video/ogv (last letter g, not v). This has caught us out a few times, the source of confusion being that the file type has an .ogv extension.
The browser will play the first video that is in a format it understands. For example, in the case of Chrome 6, which is able to play all formats, it will play the MP4 file. If a browser doesn’t understand the type of video, it will simply skip to the next source element until it finds one it does understand.
The order of the source elements is equally important: MP4 must come first because on older iPads it only looks at the first source element (now resolved). WebM is placed second due to that fact that its quality is higher than that of Ogg, thus ensuring Opera 10.6+ and Firefox 4+ will play the WebM file rather than the Ogg; Ogg is placed third to support Opera 10.5 and Firefox 3.5/3.6. As time passes (or perhaps even now if you’re so inclined), it’s likely we won’t have to encode our videos with Ogg, as newer versions of browsers that currently use it will also support the higher-quality WebM. Triple encoding our video and adding three source elements covers us for a number of browsers and platforms, but what about IE6, 7, and 8?
Note: Depending on your server configuration, the video may not play. If this is the case on Apache servers, you may need to specify the way your video is served. You can do this by adding the following lines to your .htaccess file:
AddType video/webm .webm

AddType video/ogg .ogg

AddType video/mp4 .mp4
Also note that you might need to do the same for audio.
AddType audio/webm .webm

AddType audio/ogg .oga

AddType audio/mp3 .mp3
Enter our old friend Flash
That’s right, folks: although we’ve discussed the benefits of open standards replacing proprietary technologies like Flash, in this instance our trusty old friend Mr. Flash helps us to support older versions of Internet Explorer. There are a number of Flash video players available, so which one you use is up to you. This example uses the non-commercial version of JW Player (http://j.mp/jwplayer14). The default code that it provides after linking the script follows:
<object id="player" classid="clsid:D27CDB6E-AE6D-11cf-96B8-444553540000" name="player"

width="720" height="429">

        <param name="movie" value="player.swf" />

        <param name="allowfullscreen" value="true" />

        <param name="allowscriptaccess" value="always" />

        <param name="flashvars" value="file=gordoinspace.mp4&image=poster.jpg" />

        <embed  type="application/x-shockwave-flash"  id="player2" name="player2"

src="player.swf"         width="720"  height="429"  allowscriptaccess="always"

allowfullscreen="true" flashvars="file=file= gordoinspace.mp4&image= poster.jpg" />

</object>
By combining the Flash object with our earlier example, we end up with an accessible, cross-browser, native solution. You’ll note that inside the object is an img element for users who don’t have the Flash plug-in installed, as you can see in this complete document example:
<!DOCTYPE HTML>

<html lang="en-UK">

<head>

        <meta charset="UTF-8">

        <title>Gordo in Space</title>

        <script src="js/jwplayer.js"></script>

        <script src="js/swfobject.js"></script>

</head>

<body>

<h1>Gordo in Space</h1>


<video poster=" poster.jpg" controls width="720" height="405">

  <source src="gordoinspace.webm" type="video/vp8" />

  <source src="gordoinspace.mp4" type="video/mp4" />

  <source src="gordoinspace.ogv" type="video/ogg" />

  <object id="player" classid="clsid:D27CDB6E-AE6D-11cf-96B8-444553540000" name="player"

width="720" height="429">

        <param name="movie" value="player.swf" />

        <param name="allowfullscreen" value="true" />

        <param name="allowscriptaccess" value="always" />

        <param name="flashvars" value="file=gordoinspace.mp4&image=poster.jpg" />

        <embed

        type="application/x-shockwave-flash"

        id="player2"

        name="player2"
        src="player.swf"

        width="720"

        height="429"

        allowscriptaccess="always"

        allowfullscreen="true"

        flashvars="file=file= gordoinspace.mp4&image= poster.jpg"

        />

        <img src="poster.jpg" title="No video playback capabilities, please download the video

below">

        <p>Your browser doesn't support video, please <a href="gordoinspace.webm">download

it</a>.</p>

        </object>

</video>


</body>

</html>
__________
The preceding technique is based on a solution by Kroc Camen of Camen Design. We recommend you read Kroc’s “Video for Everybody!” (http://j.mp/videoforeverybody15) article for updates on the latest browser support and gotchas. There is also a “Video for Everybody” generator available for automating the process a little (http://j.mp/vfegenerator16).
The track element
source isn’t the only element we can use with native video, though. A relative latecomer to the HTML5 spec, the track element (and its associated API, the Text Track API) is designed to allow authors to specify an external timed track or data for both video and audio. track is only to be used as a child of a video or audio media element. Its use is as follows (we’ve removed the source elements for simplicity):
<video src="gordoinspace.webm" width="720" height="405" poster="poster.jpg" controls>

  <track kind="subtitles" src="gordo_subtitles.vtt" />

</video>
track can take the following attributes:
default:Sets thetrackelement in which it is used as the default unless a user’s preferences indicate an alternativetrackwould be more appropriate.kind:Describes what type of information this track element provides. It can take the following values (if no value is specified,subtitlesis used by default):subtitles:A transcript or translation of the dialogue. The text will be displayed as an overlay on the video.captions:Similar tosubtitlesbut can also include sound effects or other relevant audio information. Suitable when audio is unavailable. The text will be displayed as an overlay on the video.descriptions:Provides a textual description of the media element for when the video is unavailable (e.g., when a user is using a screen reader).chapters:Defines chapter titles to navigate the contents of a media element.metadata:Includes information and content about the media element, which isn’t intended to be displayed to the user by default. You can, if you wish, expose this information using JavaScript.
label:Defines a user-readable title for the text track. Thelabelmust be unique for every track element with the samekindattribute within the same media element.src:The URL of the text track data.srclang:The language of the text track data
__________
Let’s now look at an example with subtitles in multiple languages (English, French, and German).
<video src="gordoinspace.webm" width="720" height="405" poster="poster.jpg" controls>

    <track kind="subtitles" src="gordo_subtitles_en.vtt" srclang="en" label="English"  />

    <track kind="subtitles" src="gordo_subtitles_de.vtt" srclang="de" label="Deutsch"  />

    <track kind="subtitles" src="gordo_subtitles_fr.vtt" srclang="fr" label=" Français"  />

</video>
track enables us to have built-in, interoperable accessibility for our videos, but because it’s so new, it isn’t yet supported by any browser (but they’re currently working on it). Until then, the best workaround is to use a JavaScript polyfill to provide support (we’ll look at these further later in the chapter, including some with track support).
WebVTT
The astute will have noticed the file extension “.vtt” in our previous two examples. This is a WebVTT (Web Video Text Tracks) (http://j.mp/w3cwebvtt17) file format that is used for marking up external text tracks. The format was previously called WebSRT (Web Subtitle Resource Tracks) (http://j.mp/videowebsrt18), about which there was been some debate (http://j.mp/annevkwebsrt19) due to the fact that it competes with more than 50 other timed text formats. All major browsers plan to support WebVTT, with Microsoft announcing that it will also support TTML (Timed Text Markup Language).
WebVTT is currently only specified in the WHATWG HTML specification, but a W3C Web Media Text Tracks Community Group has been formed to help smooth its passage into the W3C specification.
A WebVTT file is a very simple text file that contains a number of “cues.” These cues distinguish when text should appear and what text should be shown. Each cue has a unique ID and must be on its own line. A simple WebVTT file is as follows (note the first WEBVTT line is required for the file to be valid):
__________
WEBVTT


1

00:00:01.000 --> 00:00:10.000

The first lot of subtitles displays from 1 to 10 seconds


2

00:00:15.000 --> 00:00:20.000

The next line displays from 15 to 20 seconds

and can run onto two lines
You’ll notice that the time format used for each cue is hh:mm:ss:msmsms. You can also wrap timers inline around the text to make it appear sequentially in a karaoke style, as shown in here:
WEBVTT


1

00:00:01.000 --> 00:00:10.000

The first lot of subtitles <00:00:03.000> displays from <00:00:07.000>1 to 10 seconds
You can also optionally style your subtitles (well, style might be a bit of a strong word). Going against everything you learned in Chapter 4, you can use <b> for bold text, <i> for italic, <u> for underline, and <ruby> and <rt> for err, ruby text. You can also use <c.className> to define a class with which you can style the text. Finally, using <v> you can define a voice with which to associate the text. This uses the following format <v Speaker Name> and will render the speaker name as well as the caption on the subtitles. Let’s look at an example incorporating some of these tags.
WEBVTT


1

00:00:01.000 --> 00:00:05.000

<v James Misson Control>Gordo are you ready for takeoff?


2

00:00:05.000 --> 00:00:08.000

<v Gordo><i>Laughs uncontrollably</i>


3

00:00:08.000 --> 00:00:16.000

<v James Mission Control>Good, we’re ready for launch

in 3, 2, … 1 …

We are <c.launch>go</c>!


4

00:00:16.000 --> 00:00:20.000

<v James Mission Control>Good, we’re ready for launch

in 3, 2, … 1


5

00:00:20.000 --> 00:00:30.000

<v Gordo><b>Arrrghhhhhhhhhhh</b>
Finally, with WebVTT we can specify the position where we want the captions to appear by adding some cue settings after the timestamps. Table 5-2 shows which settings are available.

Let’s look at an example.
WEBVTT


1

00:00:01.000 --> 00:00:05.000 A:start T:0

<v James Misson Control>Gordo are you ready for takeoff?


2

00:00:05.000 --> 00:00:08.000 A:end L:10% D:vertical

<v Gordo><i>Laughs uncontrollably</i>
The first cue in the example places the text far left in the frame with the text aligned to the start of the line. The second cue is 10 percent from the top, vertical, and with the text aligned to the end. You can see this more clearly in Figure 5-3.

Figure 5-3. Example of where captions would appear on a video using WebVTT cue settings
That has been a gentle introduction to WebVTT. There is much more to research, explain, and learn as the specification and browser support develops, so be sure to keep your finger on the pulse.
Do more with video
There’ll come a time when you’ll need to do more with your video, whether it’s creating custom controls that are on brand or adding fast forward and rewind buttons. Some of these actions can be achieved using the HTML5 DOM media elements API (http://j.mp/dommediaelements20). Because complex JavaScript is outside the scope of this book, we’ll briefly introduce some of the methods and properties available to us, leaving you free to experiment some more. HTML5 Multimedia by Ian Devlin (http://j.mp/devlinbook21) and The Definitive Guide to HTML5 Video by Silvia Pfeiffer (http://j.mp/pfeifferbook22) explain this in greater detail.
Note: The DOM (Document Object Model) media elements API that we’re discussing here in relation to video also largely applies to audio, which we’ll cover later.
We’ll start by adding custom play and pause buttons to our video. In the example, we’ve removed the controls attribute from the video element, but we would suggest that in a production environment you remove these in your script to ensure that users without JavaScript can still see the native controls. Here is the simplified video code:
<video src="gordoinspace.webm">

  Download <a href="gordoinspace.webm>Gordo in Space</a> the movie.

</video>
Next we’ll assign a variable for the video.
__________
<video src="gordoinspace.webm">

  Download <a href="gordoinspace.webm>Gordo in Space</a> the movie.

</video>

<script>

  var gordovid = document.getElementsByTagName('video')[0];

</script>
Finally, we’ll add two buttons to play and pause our video.
<video src="gordoinspace.webm">

  Download <a href="gordoinspace.webm>Gordo in Space</a> the movie.

</video>

<script>

  var gordovid = document.getElementsByTagName('video')[0];

</script>

<input type="button" value="Play" onclick="gordovid.play()">

<input type="button" value="Pause" onclick="gordovid.pause()">
The controls can then be styled using CSS and positioned over the video. If required, you can style them to only show on hover, focus, or whatever else you want. That’s the beauty of native video in the browser working in tandem with other open standards. If you wanted to go one step further, you could use the following DOM events to create fully customizable controls:
volume: Used to change the volume of the audio; ranges from 0.0 to 1.0muted: Mutes the video regardless of the volume’s valuecurrentTime: Returns the current playback position, in seconds
Combine the preceding events with event listeners for loadeddata, play, pause, timeupdate, and ended and you have everything you need to build your own set of controls.
You can see the possibilities that begin to open up. Since video is now a block-level element in the DOM, we can use CSS to style it or we can add hover or focus effects. We’ll see some more exciting things that you can do with HTML5 video later in the chapter when we introduce canvas.
Extra homework?
For you eager beavers who want to do that little bit more, go ahead and create a set of your own custom-controlled subtitled videos. Let Google be your friend.
Take out the heavy lifting
If writing and remembering all that code for implementing cross-browser video seems like too much hard work, there are a number of tools available to help automate the process. These polyfills cover all the detection required and serve the appropriate file to each browser. The following are our top five tools, in no particular order. However, there are many more available with VideoSWS (Video, See What Sucks) maintaining a comparative list of HTML5 Video Players (http://j.mp/html5videochart23).
JW Player
JW Player, which we met earlier, is a fully configurable, skinnable player from LongTail Video, available to download from www.longtailvideo.com/players. It uses jQuery and provides a fallback to the standard JW player for Flash (see Figure 5-4). For the current state of HTML5 video, LongTail is also the producer of the State of HTML5 Video report mentioned earlier (http://j.mp/h5longtail24).

Figure 5-4. JW Player for HTML5
Playr
Playr is an extremely simple, stripped down video player (Figure 5-5) created by Julien ‘delphiki’ Villetorte. It doesn’t include a Flash fallback but does include fantastic support for the track element so it therefore offers captions. In addition, it is keyboard accessible. The code and documentation are available at www.delphiki.com/html5/playr.
__________

Figure 5-5. Playr with captions in action
MediaElement.js
MediaElement.js is a powerful script created by John Dyer that works cross browser (Figure 5-6). There are a series of plug-ins available to add a loop button, translations (using track), and backlight the video—and more are coming soon. You can download it from http://mediaelementjs.com.
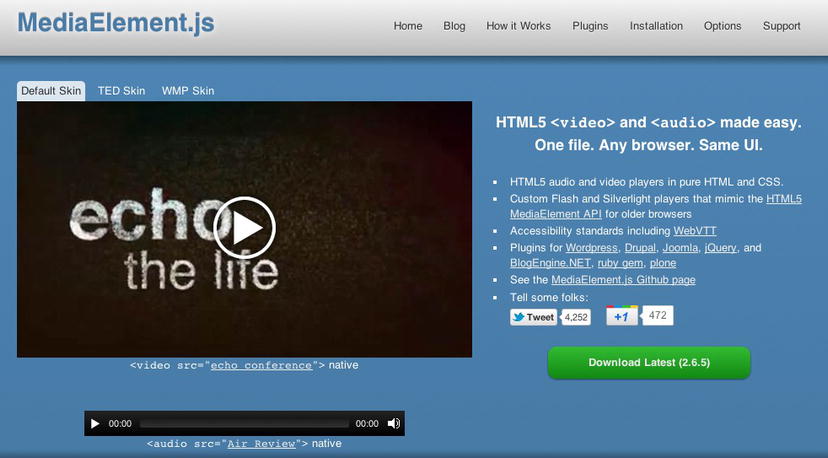
Figure 5-6. MediaElement.js by John Dyer
VideoJS
VideoJS (Figure 5-7) is a small, open source JavaScript library that works cross browser. Like the other players, it falls back to Flash for browsers that don’t support video. There is also a full-window mode. It’s available at http://videojs.com.

Figure 5-7. VideoJS by Steve Heffernan and Zencoder Inc
SublimeVideo
SublimeVideo Player (Figure 5-8) from Jilion is built using a stand-alone JavaScript library with Flash fallback for less advanced browsers. It has a full-window mode and a full-screen mode, playlist support, and more. You can download a trial from http://sublimevideo.net.

Figure 5-8. SublimeVideo from Jilion
Audio
We’ve already seen what’s possible with native video in the browser, so now it’s time to have a look at video’s younger sister, audio. While video might be the slightly sexier sibling, audio has more than its fair share of use cases, not least of which are online radio and services such as Last.fm and Spotify. Here’s the markup for adding audio to your page:
<audio src="gordo_interview.ogg" controls></audio>
As you can see, it works in much the same way as video and shares some of the same attributes and APIs. The attributes common to audio and video are
srccontrolsautoplaypreloadloopmutedcrossoriginmediagroup
Note: There’s no need to specify the width and height of the audio element in the HTML.
Like video, the controls are styled differently cross browser (see Opera’s styling in Figure 5-9), but you can create your own using JavaScript. The media API for audio is the same as that of video and uses the same methods.
Figure 5-9. Opera’s audio controls
There’s nothing complicated in what we’ve seen so far, but we need to talk about those elephants again—audio codecs.
Audio codecs
In the same vein as video, no audio codecs are specified in the HTML5 spec because browser vendors support different codecs. In essence, the audio codec decodes the stream into a format that it can play back through your speakers. There are dozens of audio codecs available, but we’re only interested in the following five:
- Vorbis: An open codec without any patent restrictions. It tends to be wrapped in an Ogg container, but it can also be wrapped in WebM or others.
- MP3: A patent-encumbered codec that was standardized in 1991.
- AAC: Short for Advanced Audio Coding, it is used in Apple’s iTunes Store. It is patent encumbered and differs from MP3 by defining multiple profiles.
- WAV: Short for Waveform Audio File Format, it is the standard for storing audio on a PC. WAV files are generally large in size, so they are not suited for streaming audio; we mention them here because there is browser support available.
- MP4: Mainly used for video but it can also be used for audio.
With these five codecs to choose from, we’re sure you’ve got an idea of which browsers support the different formats, but let’s clarify it in the next section.
Browser support
Support is spread cross browser between codecs, but most browsers (with the exception of IE8 and below) support more than one codec, as shown in Table 5-3.

As with video, there isn’t a single codec that works cross browser, which means you’ll have to encode your audio more than once. Thankfully, as we’ll see, we can again use the source element to support multiple browsers.
Adding audio source
Using the source element in the same way as we did with video, we can specify multiple audio files and allow the browser to play the first file it understands. To cater to those browsers that don’t support the audio element, we’ll add a link to download the audio file.
<audio controls>

  <source src="gordo_interview.mp3" type="audio/mp3">

  <source src="gordo_interview.aac" type="audio/aac">

  <source src="gordo_interview.ogg" type="audio/ogg">
  Download <a href="gordo_interview.ogg>Gordo interview</a>.

</audio>
You can use the same technique described earlier in the chapter for video to provide a Flash fallback for cross-browser compatibility. If you don’t want to do all that yourself, you can use a plug-in or library to help you out. Also, be sure to refer to the earlier sections on the track element and the DOM media elements API (“Do more with video”), which are both applicable to audio as well as video.
Using jPlayer
Developed by Happyworm, jPlayer (Figure 5-10) is a jQuery plug-in that provides HTML5 audio and video support for compatible browsers and falls back to Flash for those that don’t. You can download it from www.jplayer.org.

Figure 5-10. jPlayer demo by Happyworm
Video and audio summary
That wraps up our introduction to native audio and video in HTML5. With 24 hours’ worth of video being uploaded to YouTube every minute (http://j.mp/youtube2425), it’s probably time you started experimenting with it. In the second half of this chapter, we’re going to add some dynamic graphics elements to our arsenal and show some examples of how they can be combined with video and audio to stunning effect.
Canvas
If you’re a Mac user, you’ve likely come into contact with canvas without even knowing it. It was created by Apple to form part of its Dashboard widgets and Safari. This work continued with WebKit browsers, closely followed by Mozilla and Opera. canvas then became part of the WHATWG’s version of HTML5. Whereas Microsoft Internet Explorer up until version 8 supported only VML (a deprecated markup language for producing vector graphics), IE9 supports canvas. However, fear not if you think you can’t use it now; by using the ExplorerCanvas library (http://j.mp/excanvaslib26), we can get canvas to work on IE7 upward. That’s all very well, but what does it do?
__________
Pixel-based freedom
Put simply, canvas and its associated APIs offer the ability to write scripts for producing dynamic images and interactions on the fly. Unlike SVG, which we’ll see shortly, canvas is pixel (raster) based, allowing for quick rendering but poor scaling. It also means that changes require the whole canvas to be redrawn. canvas can be used to create games, diagrams, graphs, interactive graphics, and, in some cases, full applications; whether it’s the correct tool for the job is another matter entirely. You can even combine it with video and audio to create some really interesting experiments, as we’ll see later.
canvas includes both a 2D and 3D context for drawing and manipulating dynamic images. We’ll be concentrating on the 2D context here due to its range of browser implementation; however, experimental builds of Firefox and Opera include support for the 3D context.
While the canvas element remains in the HTML5 specification, the context APIs (methods for using canvas) have been broken off into their own independent specifications.
Adding/implementing canvas
In order to implement a canvas and start drawing in our document, we need to do two basic things.
- Add a
canvaselement to the document. - Get the context using JavaScript.
Adding canvas to your document is just like adding any other element.
<!DOCTYPE HTML>

<html lang="en_UK">

  <head>

    <meta charset="UTF-8">

    <title>Canvas</title>

  </head>

<body>

  <canvas width="640" height="480" id="outerspace"></canvas>

</body>

</html>
The width and height need to be explicitly set for the canvas within the HTML in order to define the available drawing area. If you don’t set the dimensions, the canvas defaults to 300 × 150 pixels. Giving it an id allows us to easily target that element in the script.
canvas works in exactly the same way as video and audio do and allows fallback content within the element for browsers that don’t support it. IE9 has added support for exposing the fallback content to assistive technologies even when canvas is supported. Steve Faulkner has written about this on the Paciello Group Blog (http://j.mp/canvasie927). This is an issue that is now being addressed by the working group. Here’s an example of a canvas with some fallback content:
<canvas width="640" height="480" id="outerspace">

  Sorry, your browser doesn't support canvas.

</canvas>
That’s it; we’ve added canvas to our markup. If you view the example in a browser, you’ll see, um, nothing—the reason being that canvas is transparent by default. We need to use JavaScript to really show off our drawing skills.
Note: When drawing or animating with canvas, nothing appears in the DOM, meaning that it isn’t very accessible—a black box, if you will. Thankfully, a task force has been set up by the W3C to address this issue.
The 2D context
Before we can draw, though, we need something to draw on: that’s the context. Think of it as a sketchpad or, more specifically, a page in a sketchpad. We can get the context like so:
<script>

var canvas = document.getElementById('outerspace'),

var ctx = canvas.getContext('2d'),

</script>
First, we declare a variable for our canvas and use the getElementById method to select our canvas (outerspace). We then declare a second variable (ctx) and use the getContext method to select the context (in this case, 2D).
We can take this a stage further in the interests of accessibility and use unobtrusive JavaScript (http://j.mp/gracefuljs28) to prevent errors across unsupported browsers. This is achieved by adding a simple if statement.
<script>

var canvas = document.getElementById('outerspace'),

if (canvas.getContext){

        var ctx = canvas.getContext('2d'),

} else {

        // canvas not supported do something

}

</script>
OK, boring stuff over, we promise. Now we’ll start drawing. To ease you in gently, we’ll start with a simple rectangle. For that we use the fillRect method and declare properties for the x axis start position, y axis start position, width, and height. When declaring coordinates, the grid (or coordinate) space for canvas starts in the top-left corner and increases to the right for the x axis and down for the y axis.
__________
<script>

var canvas = document.getElementById('outerspace'),

if (canvas.getContext){

  var ctx = canvas.getContext('2d'),

  //set the size and shape (x, y, width, height)

  ctx.fillRect(180, 180, 240, 120);

}

</script>
Finally, we add an onload function and add the script to a document. The results are shown in Figure 5-11.
<!DOCTYPE HTML>

<html lang="en_UK">

<head>

<meta charset="UTF-8">

<title>Canvas</title>

<script>

window.onload = function() {

var canvas = document.getElementById("outerspace"),

    ctx = canvas.getContext("2d");

// x = 10, y = 20, width = 200, height = 100

ctx.fillRect(180, 180, 240, 120);

};

</script>

</head>


<body>

<canvas width="640" height="480" id="outerspace">

    Sorry, your browser doesn't support canvas.

</canvas>

</body>

</html>

Figure 5-11. Simple rectangle drawn using canvas
We can change the rectangle’s color by using the fillStyle method. Note that it appears before fillRect. As Remy Sharp points out, “if you’re going to paint, you need to dip your brush in to the paint pot first” (http://j.mp/sharpcanvas29). fillStyle can use values provided by keyword (blue), hex code (#002654), or rgba (see Chapter 11), as shown in the following example:
<script>

window.onload = function() {

var canvas = document.getElementById('outerspace'),

if (canvas.getContext){

  var ctx = canvas.getContext('2d'),

  ctx.fillStyle="rgba(0,149,197,0.8)";

  ctx.fillRect(180, 180, 240, 120);

};

</script>
If we prefer that the rectangle has an outline instead of being filled, we can use the strokeRect method, shown next (see Figure 5-12 for the results). You can also use the clearRect method to make an area transparent.
<script>

window.onload = function() {

var canvas = document.getElementById('outerspace'),

if (canvas.getContext){

  var ctx = canvas.getContext('2d'),

  ctx.fillStyle="rgba(0,149,197,0.8)";

  ctx.strokeRect(180, 180, 240, 120);

};

</script>

Figure 5-12. Stroked rectangle drawn with canvas
Thankfully, we’re not stuck with rectangles; we can also draw lines, paths (for complex curves), gradients, and text. We can also work with images, transparencies, and transformations, all of which allow us to flex our creative muscles.
The next example shows a simple circle (see Figure 5-13). Hopefully you remember your math from school, as you’re going to need it.
__________
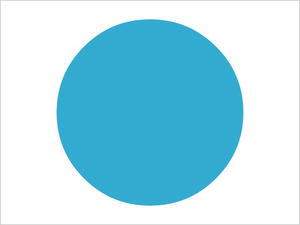
Figure 5-13. Circle drawn with canvas
Tip: In the Canvas API, angles are measured in radians, not degrees. Use the following JavaScript expression to convert from degrees to radians:
var radians = (Math.PI/180)*degrees.
To create the circle, we follow these steps:
- Start the path (
beginPath). - Draw an arc (
ctx.arc), with a center position of 320, 240 and a radius of 200. - Rotate it from an angle of 0 to 2*PI radians (360 degrees).
- Close the path using the
closePathmethod and apply the predefined fill.
This code example shows how to do it:
<script>

window.onload = function() {

var canvas = document.getElementById('outerspace'),

if (canvas.getContext){

  var ctx = canvas.getContext('2d'),

  ctx.fillStyle = "rgba(0,149,197,0.8)";

  ctx.beginPath();

  // begin the path

  ctx.arc(320,240,200,0,Math.PI*2,true);

  // draw an arc - (x, y, radius, startAngle, endAngle, anticlockwise)

  ctx.closePath();

  // close path

  ctx.fill();

};

</script>
If you’re having trouble following along, revisit the preceding steps until you understand them. We’ll now take our circle a step further and add a gradient. To do that, we first define a variable for the gradient (mygrad) and then apply the createLinearGradient method and specify the start (x1, y1) and end points (x2, y2) of the gradient, as follows:
var mygrad = ctx.createLinearGradient(300,100,640,480);

// varmygrad = ctx.createLinearGradient(x1,y1,x2,y2);
Now that we have an object in which to house our gradient, we will assign colors to it using the addColorStop method. The method takes two arguments: position and color. The position is a value between 0 (min) and 1 (max), which defines the position of the color relative to the size of its shape. For example, setting the position to 0.25 would place the color a quarter of the way along the gradient. The color argument is a CSS-based string and can use a keyword, hex value, or rgba.
mygrad.addColorStop(0, '#6c88ba'),

// mygrad.addColorStop(position, color);
To ensure the gradient is smooth and doesn’t take over the whole circle, add three color stops positioned at 0 (min), 0.9, and 1 (max) in the linear gradient example (see Figure 5-14 for the results).
<script>

window.onload = function() {

var canvas = document.getElementById('outerspace'),

if (canvas.getContext){

var ctx = canvas.getContext('2d'),


// Define the gradient

var mygrad = ctx.createLinearGradient(300,100,640,480);

mygrad.addColorStop(0, '#6c88ba'),

mygrad.addColorStop(0.9, 'rgba(0,0,0,0.5)'),

mygrad.addColorStop(1, 'rgba(0,0,0,1)'),


// Draw the circle

ctx.fillStyle = mygrad;

ctx.beginPath();

ctx.arc(320,240,200,0,Math.PI*2,true);

ctx.closePath();

ctx.fill();

};

</script>

Figure 5-14. Circle with a linear gradient drawn with canvas
Note that we haven’t used a radial gradient to achieve this effect. Using a radial gradient is a little more complicated, so let’s go through it.
Start by using the createRadialGradient method, which works like the createLinearGradient method with two additional arguments for the radius.
var radgrad = ctx.createRadialGradient(305,215,150,320,240,200);

// var radgrad = ctx.createRadialGradient(x0, y0, radius1, x1, y1, radius2)
We then define our color stops in the same way as we did in the linear example (this time we’re using four color stops).
radgrad.addColorStop(0, '#6c88ba'),

radgrad.addColorStop(0.8, 'rgba(61,71,89,0.7)'),

radgrad.addColorStop(0.9, 'rgba(61,71,89,0.8)'),

radgrad.addColorStop(1, 'rgba(255,255,255,1)'),
Finally, we draw a rectangle to house the radial gradient.
ctx.fillStyle = radgrad;

ctx.fillRect(0,0,640,480);

//rectangle that fills the whole canvas
Let’s combine the previous pieces of code to arrive at the complete example.
<script>

window.onload = function() {

var canvas = document.getElementById('outerspace'),

if (canvas.getContext){

var ctx = canvas.getContext('2d'),


// Create gradient and color stops

var radgrad = ctx.createRadialGradient(305,215,150,320,240,200);

radgrad.addColorStop(0, '#6c88ba'),

radgrad.addColorStop(0.8, 'rgba(61,71,89,0.7)'),

radgrad.addColorStop(0.9, 'rgba(61,71,89,0.8)'),

radgrad.addColorStop(1, 'rgba(255,255,255,1)'),


// draw shapes

ctx.fillStyle = radgrad;

ctx.fillRect(0,0,640,480); };

</script>
You should be able to see the difference between the two examples in Figures 5-14 and 5-15.
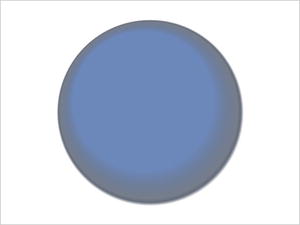
Figure 5-15. Circle with a radial gradient drawn with canvas
Reverting to the linear gradient example, we can add a shadow to the circle using the following four properties. They are inserted after defining the gradient but before drawing the circle.
// Create a drop shadow

ctx.shadowOffsetX = 5;

ctx.shadowOffsetY = 10;

ctx.shadowBlur = 20;

ctx.shadowColor = rgba(0,0,0,0.9);
It’s all very straightforward. Note that the offsets can be set to negative numbers, meaning that the shadow won’t always appear down and to the right of your shape. Combining this with our linear gradient from earlier, we end up with the following script:
<script>

window.onload = function() {

var canvas = document.getElementById('outerspace'),

if (canvas.getContext){

var ctx = canvas.getContext('2d'),


// Define the gradient

var mygrad = ctx.createLinearGradient(300,100,640,480);

mygrad.addColorStop(0, '#6c88ba'),

mygrad.addColorStop(0.9, 'rgba(0,0,0,0.5)'),

mygrad.addColorStop(1, 'rgba(0,0,0,1)'),


//Create a drop shadow

ctx.shadowOffsetX = 5;

ctx.shadowOffsetY = 10;

ctx.shadowBlur = 20;

ctx.shadowColor = "black";


// Draw the circle

ctx.fillStyle = mygrad;

ctx.beginPath();

ctx.arc(320,240,200,0,Math.PI*2,true);

ctx.closePath();

ctx.fill();

};

</script>
If you add the script to your HTML document complete with a canvas element and open it in a browser that supports canvas, you should end up with something like that shown in Figure 5-16.

Figure 5-16. Circle with gradient and shadow drawn with canvas
Looks nice, huh? We think so. We’ve been through some of the basic drawing methods for canvas, but there’s much more you can get from the API, such as incorporating images using createPattern and drawing lines, Bezier curves, and text. You can also use transformations, translations, and animation. If you really want to push the boat out, you can save your canvas as an image by calling the toDataURL method. We don’t have enough room to cover it all here, but there are books available that concentrate solely on canvas.
Canvas in IE
We’ll get to some amazing examples of demos people have created using canvas soon enough, but first we’re going to address that question you’re probably asking, “What about canvas in IE?”
When we first introduced canvas, we mentioned that you can support IE by using a JavaScript library called ExplorerCanvas (excanvas.js) (http://j.mp/excanvaslib30). It works by converting your script into Microsoft’s proprietary VML technology, which is not dissimilar to the canvas API we’ve been describing. It’s as simple as downloading the file and adding a link to it in the head of your page, as follows:
<!DOCTYPE html>

<html>

 <head>

  <meta charset="utf-8">

  <title>Gordo's Space Adventures</title>

  <!--[if lt IE 9]>

     <script src="excanvas.js"></script>

  <![endif]-->

  <script>

    // your canvas script

  </script>

 </head>

<body>

  <canvas id="outerspace" width="640" height="480"></canvas>

</body>

</html>
__________
You should be aware when using excanvas.js that it can be slow to execute and render depending on the complexity you’re trying to achieve. The following are a few more gotchas:
- Radial gradients aren’t supported.
- Patterns must repeat in the x axis and y axis.
- Clipping regions aren’t supported.
- Shadows aren’t implemented.
With IE9 including canvas support, we hope that excanvas.js will become a thing of the past.
The power and potential of canvas
We’ve talked about the potential of canvas, so now we’ll briefly look at a few examples of demos that people have created using canvas and its API.
Games
First up, we’ll look at a couple of game examples.
Cut the Rope
Cut the Rope (Figure 5-17) is an iPhone gamers favorite, and it’s been ported to HTML5 by Microsoft, ZeptoLab, and Pixel Lab. They’ve ported the game from Objective-C to JavaScript, specifically making use of canvas for the graphics. They even found that in some areas canvas offered more functionality than OpenGL that they had been using on the iPhone version. Find it at www.cuttherope.ie.

Figure 5-17. Cut the Rope was created using canvas.
Canvas Rider
Canvas Rider (Figure 5-18) allows users to control a rider along a course without falling off. The game allows users to submit their own levels, created using canvas. Visit http://canvasrider.com to play.

Figure 5-18. Canvas Rider, a game created with canvas
3D Tetris
Another gaming classic re-created in 3D using canvas, 3D Tetris (Figure 5-19) was created by Ben Joffe. Be sure to look at Ben’s site (www.benjoffe.com) for more examples of canvas games.

Figure 5-19. Pseudo 3D Tetris created with canvas
Applications
Now we’ll look at some application examples.
Darkroom
Created by MugTug, Darkroom (http://mugtug.com/darkroom) is an all-in-one image processing package built using canvas (see Figure 5-20). Darkroom has a wide-ranging feature set that allows designers to crop, mirror, and rotate images on the fly. As with Photoshop, users can change the levels of an image, up the brightness or contrast, or apply one of the default filters such as “black and white.” Once you’ve edited your image, you can save it to your desktop.

Figure 5-20. Darkroom from MugTug
Sketchpad
MugTug has also released another online tool, Sketchpad (http://mugtug.com/sketchpad). It’s a fully featured drawing package that runs in the browser and is built with canvas (see Figure 5-21).

Figure 5-21. Sketchpad by MugTug
Picozu Editor
Picozu Editor (Figure 5-22) is a drawing and photo re-touching application built with JavaScript, HTML5, and CSS3. The app uses canvas for applying image filters and the Drag and Drop API to allow users to add images from their desktop. You can have a play at www.picozu.com/editor.

Figure 5-22. Some of the options available In Picozu Editor
Combining video and audio with canvas
We talked earlier in the chapter about how the new native media elements (audio and video) are designed to work together with canvas to create rich, compelling experiences online. Here are some examples of that in action, giving you some ideas of how to truly add some sprinkles to your site.
9elements HTML canvas experiment
The guys at 9elements began to experiment with new HTML5 features, specifically audio and canvas. They combined this with the Twitter API (searching for the term “HTML5”) and Processing.js (http://processingjs.org) for particle rendering to create a beautiful animated visualization of tweets and particles that syncs to an audio track (see Figure 5-23). A write-up of the experiment is available on the 9 elements blog (http://j.mp/9elementsblog31).
__________

Figure 5-23. 9elements canvas experiment
Ambilight
If you’ve seen the Philips Ambilight TVs (http://j.mp/ambilighttv32) and were impressed, then this demo is for you. Created by Sergey Chikuyonok, Ambilight works by gathering pixel color data from each frame of the video and reflecting the ambient light onto two canvas elements on either side of the video. The effect, shown in Figure 5-24, is nothing short of sublime: http://j.mp/ambilightcanvas33 .
__________
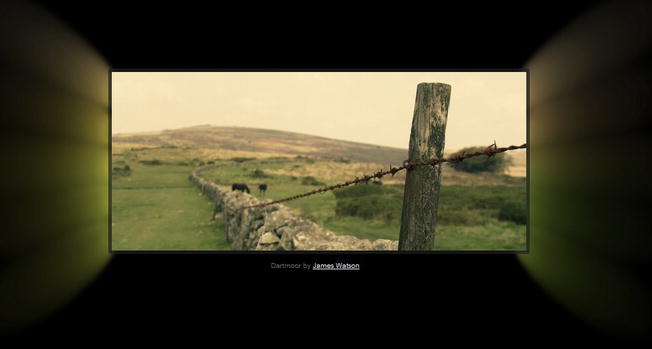
Figure 5-24. Ambilight by Sergey Chikuyonok
Video destruction
Sean Christmann of Crafty Mind created a demo that combines the video and canvas elements. The basic premise of the demonstration is to show how canvas can be used in conjunction with other elements (video) to create stunning effects. Clicking the video causes it to “explode,” as shown in Figure 5-25; the accompanying article (http://j.mp/blowupvideoarticle34) explains how it was achieved.
It also gives a sneak preview of some transforms and translations that can be carried out on these elements using CSS. Rest assured you’ll be learning all about those in Chapter 12.

Figure 5-25. Video destruction
__________
Further canvas resources
We’ve taken a whistle-stop tour through the power canvas has to offer. To cover it in more detail would require a book of its own, so for now we’ll introduce you to some further canvas resources and leave you to experiment:
- Dev.Opera: “HTML5 canvas — the basics” by Mihai Sucan (
http://dev.opera.com/articles/view/html-5-canvas-the-basics) - Mozilla Developer Center: Canvas tutorial (
https://developer.mozilla.org/En/Canvas_tutorial) - HTML5 Doctor: “An introduction to the canvas 2D API” by Remy Sharp (
http://html5doctor.com/an-introduction-to-the-canvas-2d-api) - HTML5 Doctor: “video + canvas = magic” by Tab Atkins Jr. (
http://html5doctor.com/video-canvas-magic) - Canvas Demos: Applications, games, tools, and tutorials that use the HTML 5 <canvas> element (
www.canvasdemos.com) - .net magazine: “Learning the basics of HTML5 canvas” by Rob Hawkes (
www.netmagazine.com/tutorials/learning-basics-html5-canvas)
SVG
Scalable Vector Graphics is a technology for creating vector graphics in the browser based on the XML file format. It is an open standard that has been actively developed by the W3C since 1999 (www.w3.org/TR/SVG). We must point out that SVG is not part of HTML5. Repeat after us—“SVG is not part of HTML5.” HTML5 does, however, allow the embedding of inline SVG, which is why we’re looking at it here.
Vector power
As you’ve no doubt gathered by the name, SVG files are vector based, meaning they can be scaled up or down without the loss of quality. This is in direct contrast to canvas, which is pixel (raster) based and doesn’t scale gracefully. Basic SVG is supported by all major browsers (with the exception IE8 and below). SVG embedded in HTML5, also known as “inline SVG” (which we’ll be concentrating on), is supported by Chrome 7+, Internet Explorer 9+, Firefox 4+, Opera 11.5+ and Safari 5.1+. It can achieve many of the same effects as canvas. A major difference is that every SVG element becomes part of the DOM (remember we said that canvas is always empty), allowing each object to be indexed and providing a more accessible solution. We’re now left with a dilemma of which to choose, canvas or SVG?
Choosing between canvas and SVG
We’ve already touched upon the fact that both canvas and SVG are scriptable images and both can create shapes, lines, arcs, curves, gradients, and much, much more, but how do you decide between the two?
SVG content can be static, animated, or interactive. You can style it with CSS or add behavior with the SVG DOM. Because each element becomes part of the DOM, this means that SVG is relatively accessible. It is also resolution independent and can scale to any screen size. It can, however, be slow to render with more complex shapes.
canvas, in contrast, uses a JavaScript API that allows us to draw programmatically. It has two context objects, 2D or 3D. There is no specific file format, and you can only draw using script. Because there are no DOM nodes (unlike SVG), you can concentrate on drawing (scripting) without taking a performance hit as the image complexity increases. You can also save the resulting images as a PNG or JPG.
Before deciding which technology is best suited for your project, consider some use case: SVG is good for data charts and resolution-independent graphics, interactive animated user interfaces, or vector image editing. canvas is suited for games, bitmap image manipulation (like the Darkroom example we saw earlier), generating raster graphics (data visualizations, fractals, etc.), and image analysis (histograms, etc.).
To summarize, use both—appropriately. On some occasions, the two will even complement each other (if you’re creating an image editor that can render both raster and vector images, for example).
If you’re still not clear about which to use, read these excellent articles on the pros and cons of both technologies:
- Dev.Opera: (
http://j.mp/canvasorsvg135) - SitePoint (
http://j.mp/canvasorsvg236) - The IE blog (
http://j.mp/iecanvassvg37)
Vectors unleashed with SVG
To produce SVG graphics, you can go down either of two routes: use a graphics package such as Adobe Illustrator or Inkscape (an open source SVG graphics editor) or write it yourself. Guess which one we’re going to show you.
Implementing basic SVG
The syntax for writing inline SVG is relatively straightforward; you start by adding an svg element into the body of your HTML. You then add an SVG XML namespace to the element along with dimensions. Remember, though, that because it’s XML, you have to ensure that you always quote your attributes and include those trailing slashes. First, we create the svg element in our page.
__________
<!doctype html>

<html lang="en_UK">

<head>

  <meta charset="UTF-8">

  <title>SVG</title>

</head>

<body>


<svg xmlns="http://www.w3.org/2000/svg" width="400px" height="400px">

  <!—SVG content will go here -->

</svg>


</body>

</html>
Next, we add the basic SVG shape element(s) inside the parent SVG element. There are several basic shapes available: rect, circle, ellipse, line, polyline, and polygon. We’ll start by creating a simple rectangle with a stroke. These examples will work in all the browsers mentioned previously.
<!doctype html>

<html lang="en_UK">

<head>

  <meta charset="UTF-8">

  <title>SVG</title>

</head>

<body>


<svg xmlns="http://www.w3.org/2000/svg" width="400px" height="400px">

  <rect fill="black" stroke="red" x="150" y="150" width="100" height="50"/>

</svg>


</body>

</html>
You should see something similar to Figure 5-26. The attributes are self-explanatory. The x and y values represent the starting coordinates (from the top left of SVG the element) for drawing. This means the rectangle will be drawn 150 pixels from the left edge of the SVG element and 150 pixels from the top. The stroke and fill values can be specified as hex codes, keywords, rgba, or rgba values.

Figure 5-26. Rectangle created with SVG
We’ll now create the same example as we did with canvas to allow you to compare the two. First, create a circle using the basic circle shape.
The cx and cy values represent the center point of the circle and r represents the radius. Replacing the rectangle from our earlier example with the circle shape should render as shown in Figure 5-27.

Figure 5-27. Circle created with SVG
We’ll now continue on and add a gradient. This is achieved by creating a set of definitions (defs) and specifying parameters such as the type of gradient (linearGradient), an id (id="MyGradient"), the angle (gradientTransform="rotate(45)"), and a series of color stops (<stop ... />).
<defs>

  <linearGradient id="MyGradient" gradientTransform="rotate(45)">

    <stop offset="0%" stop-color="#6c88ba" />

    <stop offset="90%" stop-color="#677794" />

    <stop offset="100%" stop-color="#6e747f" />

  </linearGradient>

</defs>
Now that we’ve defined the gradient, we need to apply it to the circle shape. This is achieved by referencing the gradient id value (MyGradient) of the fill property on the circle with the url delimiter. This creates the same effect we achieved earlier using canvas (see Figure 5-28).
<!DOCTYPE HTML>

<html lang="en_UK">

<head>

  <meta charset="UTF-8">

  <title>SVG</title>

</head>

<body>


<svg xmlns="http://www.w3.org/2000/svg" width="400px" height="400px">

  <defs>

    <linearGradient id="MyGradient" gradientTransform="rotate(45)">

      <stop offset="0%" stop-color="#6c88ba" />

      <stop offset="90%" stop-color="#677794" />

      <stop offset="100%" stop-color="#6e747f" />
    </linearGradient>

  </defs>


  <circle fill="url(#MyGradient)" cx="150" cy="150" r="150"/>

</svg>


</body>

</html>

Figure 5-28. Circle with gradient created with SVG
You can also create radial gradients with SVG, as well as much, much more. We’ve only scratched the surface of what’s possible with this powerful language when embedded in HTML5. We hope we’ve whetted your appetite and convinced you to investigate further as to what can be achieved with SVG.
SVG-related reading
If you’re interested in learning more about SVG, we highly recommend the following resources:
- Dev.Opera: SVG articles (
http://dev.opera.com/articles/svg) - Mozilla Developer Center: “SVG in HTML Introduction” (
https://developer.mozilla.org/en/svg_in_html_introduction) - Carto:net: Examples and papers on SVG (
www.carto.net/papers/svg) - Raphaël: A library for supporting SVG in IE (
http://raphaeljs.com) - A List Apart: “SVG with a little help from Raphaël,” by Brian Suda (
www.alistapart.com/articles/svg-with-a-little-help-from-raphael)
Summary
As you’ve seen throughout this chapter, the possibilities for using rich media in browsers are endless. By combining one or more of the technologies we’ve described, stunning effects can be created, the likes of which have only been achievable using Flash or other proprietary plug-ins up until now. The benefits of having this native multimedia content in our browsers means that plug-ins are no longer required; the browser provides native controls in which keyboard accessibility is built in. Finally, site performance will be improved because the plug-ins aren’t required.
By covering how to implement video, audio, canvas, and SVG into your HTML5 documents, we hope we’ve opened your eyes to a new wave of opportunity for using rich media online. It’s now up to you to break with convention and create truly compelling, open, and accessible interactive experiences.
As for Flash and those other plug-ins, the jury is still out on whether they’re dead, but one thing’s for sure—the competition is catching up.
Homework
We’ve split your homework into two parts. Start by encoding the files provided on the book website into enough formats to ensure cross-browser compatibility, and then display them on your sample site using video and audio elements. If you’re feeling keen, you can complete the extra homework we mentioned earlier and create your own custom play controls.
Secondly, choose either canvas or SVG to produce a simple diagram showing the earth, moon, and sun in orbit and add it to your site. Continue by animating the diagram, after carrying out some further research based on the links provided.