
Chapter 2
Your First Plunge into HTML5
In our first chapter we covered the background of HTML5, why we should start using it now, and some modern web standards development principles. In this chapter, we’ll get started with creating some actual HTML5 web pages.
We’ll begin this chapter with a look at how we marked up Chapter 1’s homework page. We’ll use it as the basis for an exploration of how some well-known elements have changed, especially the DOCTYPE, which is now considerably simpler and easier to remember.
Once we’ve covered that we undertake a time-honored tradition by embarking on a “Hello World!” journey, culminating in the creation of our first HTML5 page. Next, we introduce some workarounds that will help you deliver finely crafted HTML5 pages so that they work in current browsers (no prizes for guessing that our old friend IE gets a mention here). Finally, we’ll look at the pros and cons of HTML5 vs. XHTML5 and how validators and lint checkers handle HTML5.
That’s a lot of ground to cover, so, without further ado, let’s get started…
Homework review
At the end of Chapter 1, we asked you to mark up a typical web page using your current preferred flavour of markup, either XHTML1 or HTML4. As we embark on this chapter and the following chapter, we’ll show you how that very same web page might be marked up using HTML5. The aim here is to show you the relationship between the markup you’re currently using and HTML5 markup—and in the process highlight the new features of HTML5 and the advantages they offer.
Working with real content as opposed to latin or other filler text gives you an insight into how real content affects real markup. In short, the content drives the markup. This is why we’re not supplying meaningless lorem ipsum.
So, how did we mark up our web page?
We chose XHTML 1 and, as you’ll see in the example below, we looked at the content provided and marked it up using the most appropriate elements possible. To save paper (and trees) we’ve replaced some of the content with ellipses, but you should recognize the content (if you did the homework in Chapter 1). In addition to using good old semantic markup, we’ve also chosen id and class names to provide additional meaning.
Our page
The resulting page is as follows:
<!DOCTYPE html PUBLIC "-//W3C//DTD XHTML 1.0 Strict//EN"

        "http://www.w3.org/TR/xhtml1/DTD/xhtml1-strict.dtd">

<html xmlns="http://www.w3.org/1999/xhtml">

<head>

    <meta http-equiv="content-type" content="text/html; charset=UTF-8" />

    <title>Miss Baker | Space Pioneers | The Web Evolved, Chapter 2 Example File</title>

</head>

<body>

<div id="container">

    <div id="header">

        <h1>The Original Space Pioneers</h1>

        <h4>America's Unsung Heroes</h4>

    </div>

    <div id="article">

        <h2>Miss Baker</h2>

        <h4>First Lady of Space</h4>

        <div id="introduction">

            <p>Before humans were launched into space, many animals were propelled

 heavenwards…</p>

            …

        </div>

        <div class="section">

            <h3>Miss Baker's Historic Flight</h3>

            <p>Miss Baker and fellow female pioneer Able's historic flight…</p>

            …

        </div>

        <div class="section">

            <h3>The Mission</h3>


            <p>Miss Baker's flight was another milestone in the history of space flight…</p>

            …

        </div>

        <div class="aside">

            <h3>The US Space Programme</h3>
<p>A technological and ideological competition between the United States and
the Soviet Union…</p>
…
</div>
<div class="section">
<h3>Life in Retirement</h3>
<p>Miss Baker spent the latter part of her life at the US Space and Rocket
Centre…</p>
…
</div>
<p class="smallprint">Copyright 2010 · Christopher Murphy</p>
</div>
<div id="footer">
<p>The Space Pioneers web site is an example site, designed to accompany The Web
Evolved, published by Apress. Text: The Web Evolved; Design: Jonny Campbell.</p>
<p>HTML + CSS released under a Creative Commons Attribution 3.0 license.</p>
<p>Photography © iStockphoto</p>
</div>
</div>
</body>
</html>
This should be familiar territory for you. Your choice of markup might differ—you might have chosen HTML4 and you might have chosen different elements—but the bottom line is that you should have used semantic markup in an effort to craft the most meaningful page possible.
For the remainder of this chapter we’ll be making the transition to HTML5 so we can begin to embrace the opportunities it offers. Though some aspects of this will be new to you, have no fear—a lot of the ground we cover will be familiar, as you’ll soon see. On that note, we have some good news.
84.8% of your markup remains
While we can’t 100% guarantee that the figure of 84.8% is scientifically accurate (truth be told, we made that figure up), it’s accurate in spirit. As mentioned in Chapter 1, the guiding principles behind HTML5 include an emphasis on not reinventing the wheel, paving the cowpaths, and embracing a pragmatic spirit of evolution not revolution.
In short, the emphasis is on building upon what has gone before. As we progress through this chapter and throughout this book you’ll see these principles in action. So rest assured: as we embark on our journey toward HTML5 development, you won’t need to relearn everything. Yes, all that semantic goodness we’ve learned to use is still there. There are some new elements at our disposal (as we’ll see in the next chapter), but a great deal of what we’ve learned remains.
It’s all in the head
Before we get started on creating some good, old-fashioned “Hello World!” web pages (a tradition when embarking on any new programming venture), let’s take a look at some of the changes we’ll encounter, specifically changes we’ll be making in the <head> as we move toward HTML5. It’s a good idea to understand these fundamentals before getting into the practical details of the <body> markup.
In this section, we’ll introduce the new HTML5 DOCTYPE, explain how to declare languages in HTML5, and introduce a new, simpler meta charset attribute.
Before we embark on this journey, let’s take a look at what we have now. (Remember that we chose XHTML 1 for our Miss Baker page; your <head> might be different.) At present, the <head> on our Miss Baker page is as follows:
<!DOCTYPE html PUBLIC "-//W3C//DTD XHTML 1.0 Strict//EN"

        "http://www.w3.org/TR/xhtml1/DTD/xhtml1-strict.dtd">

<html xmlns="http://www.w3.org/1999/xhtml">

<head>

    <meta http-equiv="content-type" content="text/html; charset=UTF-8" />

    <title>Miss Baker | Space Pioneers | The Web Evolved, Chapter 2 Example File</title>

</head>
Now let’s take a look at it in HTML5.
<!DOCTYPE html>

<html lang="en">

    <head>

        <meta charset="UTF-8" />

        <title>Miss Baker | Space Pioneers | The Web Evolved, Chapter 2 Example File</title>
</head>
__________
As you can see, this is considerably simpler, which is no bad thing. Now let’s get started. We’ll begin with some welcome changes to the always-impossible-to-remember DOCTYPE.
A more perfect DOCTYPE
The dreaded DOCTYPE. Few—those with photographic memory excluded—can remember it. Until now, whether your flavor of choice has been XHTML 1 Strict or HTML 4 Strict (or any other of the multitude available), the DOCTYPE has been an all-but-unintelligible string of characters. If you’ve been writing markup using XHTML 1 Strict, you’re used to seeing the following DOCTYPE:
<!DOCTYPE html PUBLIC "-//W3C//DTD XHTML 1.0 Strict//EN"

        "http://www.w3.org/TR/xhtml1/DTD/xhtml1-strict.dtd">
If your markup flavor of choice has been HTML 4 Strict, then you’re more familiar with this DOCTYPE:
<!DOCTYPE HTML PUBLIC "-//W3C//DTD HTML 4.01//EN"

        "http://www.w3.org/TR/html4/strict.dtd">
There is no need for the DOCTYPE to be this complicated and unmemorable. The W3C probably had grand designs concerning purposes it might serve when they first created the markup specs, but in reality all it has ever done for us is tell the browser to render our pages in standards mode rather than quirks mode (http://j.mp/quirks-mode2). When writing the HTML5 spec, the WHATWG recognized this and changed the DOCTYPE to the shortest possible sequence of characters that constitute a valid DOCTYPE.
<!DOCTYPE html>
That’s it. Simpler and, dare we say it, even memorable.
Even if you do nothing else, you can start using the new HTML5 DOCTYPE now, safe in the knowledge that these 15 characters are all it takes to trigger standards mode. Try it now by changing the DOCTYPE on your Chapter 1 homework and revalidating your page. It will work just fine. Given that Google is already using the HTML5 DOCTYPE on its search pages, there’s no reason not to change your DOCTYPE.
Declaring languages in HTML5
Now let’s look at how to declare languages in HTML5. But why declare languages at all? The W3C answers this question as follows:
Specifying the language of content is useful for a wide number of applications, from linguistically-sensitive searching to applying language-specific display properties. In some cases the potential applications for language information are still waiting for implementations to catch up, whereas in others, such as detection of language by voice browsers, it is a necessity today.
__________
Adding markup for language information to content is something that can and should be done today. Without it, it will not be possible to take advantage of any future developments.
Declaring a default language is already important for applications such as accessibility and search engines, but other possible applications may emerge over time.
The easiest way to specify the language of an HTML document is to add a lang attribute to the root element of our HTML page. The root element of an HTML page is always <html>, so to specify a language, we do the following:
<html lang="en">
In this example, the value of the lang attribute is en, which specifies that the document is written in English. But what if your document contains elements written in a language other than the specified lang? No problem. The language attribute can also be used inline. The following example includes an inline <span> element containing a lang attribute with a value of fr, indicating that the content contained within is written in French:
<p>Miss Baker, on entering the capsule, declared to her fellow astronaut Able: <span>

 lang="fr">"Bon chance!"</span></p>
Trés bon.
And as you’d expect, two-letter primary codes exist for other languages—for example de (German), it (Italian), nl (Dutch), es (Spanish), ar (Arabic), ru (Russian), and zh (Chinese). If that’s not enough, there are over 8,000 language attribute values available; these are listed in full at the IANA Language Subtag Registry (http://j.mp/lang-subtag3).
It’s also possible to specify dialects within a language. These are generally represented with the base language code, for example en, followed by a hyphen and the dialect in question. The following examples show UK English and US English respectively:
en-US: US English

en-GB: UK English
Should you wish to embrace a more avant garde language, the inclusion of a primary tag x indicates an experimental language, as follows:
<p lang="x-klingon">nuqDaq 'oH puchpa''e'</p>
For the uninitiated, the Klingon phrase “nuqDaq 'oH puchpa''e'” translates as “Where is the bathroom?”You can hear it pronounced at the wonderfully old school web site for The Klingon Language Institute (http://j.mp/klingon-language4).
__________
Finally—and we only include this for the sake of completeness—should you wish to create your own language code, it’s entirely possible (though not recommended). Geoffrey Snedders, the author of the HTML5 Outliner (discussed in the next chapter), uses the following language code for his personal site:
<html lang="en-gb-x-sneddy">
If you’ve followed along, it should be clear that Mr Snedders’ lang attribute translates as follows:
English - Great British - Experimental - Sneddy
(Though why you might want to specify your own particular language is questionable.) Enough said.
THE XMLNS ATTRIBUTE
Character encoding
Let’s take a look at our Miss Baker page as it stood at the beginning of this chapter. We specified the character encoding as follows:
<meta http-equiv="content-type" content="text/html; charset=UTF-8" />
In HTML5, specifying your page’s character encoding is considerably simpler. Let’s take a look at the HTML5 version:
<meta charset="UTF-8" />
You don’t really need to know what character encoding is in detail, but basically, it defines the set of valid human language characters that can be used in the document. It is safest to stick to UTF-8, a universal character set that allows all characters from all languages, just about.
Mr. Memory
So there we have it: taking all of the above together, it’s easy to see how you might now astound your friends with memory feats. No more complicated boilerplates; the following should be easy enough for anyone to remember:
<!DOCTYPE html>

<html lang="en">

    <head>
        <meta charset="UTF-8" />

        <title>Miss Baker | Space Pioneers | The Web Evolved, Chapter 2 Example File</title>

    </head>
So let’s see everything working together on some actual pages. It’s time for a spot of “Hello World!” action.
A “Hello World!” journey
Tradition dictates that we introduce you to your first HTML5 page using the time-honored “Hello World!” page. As the wonderful Wikipedia puts it,
It is often considered to be a tradition among programmers for people attempting to learn a new programming language to write a “Hello World!” program as one of the first steps of learning that particular language.
Who are we to break with tradition?
To show you how markup differs depending upon the flavor of HTML you’ve been using, and to show you how the transition into HTML5 reflects previous practice (as in evolution, not revolution), we’re going to quickly run through a series of “Hello World!” web pages to demonstrate, among other things, that HTML5 offers a variety of markup style preferences. We’ll conclude by looking at the markup style we feel is best: merging the best aspects of XHTML (a stricter, easier-to-learn syntax) and HTML5 (a forward-looking, richer semantic palette).
Let’s get started.
“Hello World!” in XHTML1.0 style
Our first example is a very simple “Hello World!” web page, marked up using an XHTML 1 Strict DOCTYPE. It’s perfectly valid and, if you’ve been using XHTML for your markup, it should come as no surprise.
<!DOCTYPE html PUBLIC "-//W3C//DTD XHTML 1.0 Strict//EN"

        "http://www.w3.org/TR/xhtml1/DTD/xhtml1-strict.dtd">

<html xmlns="http://www.w3.org/1999/xhtml">

<head>

    <meta http-equiv="content-type" content="text/html; charset=UTF-8" />

    <title>Hello World! XHTML 1 Strict</title>

</head>

<body>

    <p>Hello World!</p>

</body>

</html>
No surprises here. This is a typical page, well-formed and perfectly valid, but what if your preference is HTML 4? Let’s take a look in the next example.
“Hello World!” in HTML4 style
The example that follows is identical to the previous example but marked up using HTML 4 Strict DOCTYPE and with a considerably simpler opening <html> tag (minus the XML namespace declaration in our XHTML 1 version).
Like the preceding example, it’s perfectly valid. Again, this should come as no surprise.
<!DOCTYPE HTML PUBLIC "-//W3C//DTD HTML 4.01//EN"

        "http://www.w3.org/TR/html4/strict.dtd">

<html>

<head>

    <meta http-equiv=content-type content="text/html; charset=UTF-8">

    <title>Hello World! HTML 4 Strict</title>

</head>

<body>

    <p>Hello World!</p>

</body>

</html>
So far, so…familiar. It’s time to take a look at an HTML5 example.
“Hello World!” in HTML5 “loose” style
The XHTML 1 and HTML 4 pages we’ve demonstrated previously should come as no surprise. Now let’s take a look at an HTML5 page in its simplest, most minimal form. The following page, though just a few lines long, is a 100% valid HTML5 “Hello World!” page:
<!DOCTYPE html>

    <meta charset=UTF-8>

    <title>Hello World!</title>

    <p>Hello World!
If you’ve been using XHTML syntax to date, this might come as a little bit of a shock. No opening and closing <html> tags? No <head> or <body> elements? Unquoted attributes? This is because HTML5 inherits many of the characteristics of HTML 4, which has a much less restrictive syntax than XHTML 1.
As we outlined in the previous chapter, HTML5’s development has been characterized by a pragmatic approach with the WHATWG allowing all general syntax variations, including the strict syntax of XHTML and the loose syntax of HTML 4. To underline this point and to see how HTML5 has evolved from what has gone before, let’s take a look at a slightly more minimal—but still perfectly valid—HTML 4 page.
<!DOCTYPE HTML PUBLIC "-//W3C//DTD HTML 4.01//EN"

        "http://www.w3.org/TR/html4/strict.dtd">

    <meta http-equiv=content-type content="text/html; charset=UTF-8">

    <title>Hello World! HTML 4.01 Strict</title>

    <p>Hello World!
Other than the more verbose HTML 4 DOCTYPE and the lengthier meta charset attribute, the two examples are identical. Neither has opening or closing <html> tags, or <head> or <body> elements.
The reason for this is simple and we touched on it in Chapter 1 when we looked at the HTML design principle of supporting existing content. For backward compatibility, HTML5 allows web pages to be marked up using either HTML 4 or XHTML 1 syntax. Regardless of your syntax preference, HTML5 embraces what’s gone before.
If you’ve been working with XHTML, you’ve been using lowercase for tag and attribute names, closing elements, quoting elements, and giving all attributes a value. Some find these rules restrictive; others appreciate the consistency they give to markup.
In summary, it’s possible to write your HTML5 pages using the syntax of your choice and you’re entirely free to do so; however, we recommend retaining the stricter syntax of XHTML.
Why? Rules are useful. They enable collaborative working, allowing everyone to conform to a standardized syntax. Rules also make it easier to learn markup. There are some other reasons why you should stick to XHTML; for example, accessibility best practices demand that you specify a language for the document using a lang attribute on the <html> tag. This isn’t possible if you don’t include it in the page!
With that in mind, let’s take a look at a final HTML5 page that embraces the rules and syntax of XHTML.
“Hello World!” in HTML5 “strict” style
If you’ve been writing your markup using the strict syntax and rules of XHTML, you’re used to lowercase elements, quoting attributes, and closing empty elements. As you saw from the last example, with HTML5, anything goes. Uppercase elements? No problem. Unquoted attributes? A-OK.
But what if you’d like to make the jump to HTML5 but you want to bring along all your XHTML habits? Have no fear; we can choose to markup our pages using XHTML syntax and get the best of both worlds. Let’s take a look at an example.
<!DOCTYPE html>

<html lang="en">

    <head>

        <meta charset="UTF-8" />

        <title>Hello World!</title>

    </head>

    <body>

        <p>Hello World!</p>

    </body>

</html>
It’s 100% valid. This page combines the benefits of HTML5 with the strictness of syntax of XHTML 1. In short: it’s the best of both worlds.
Supporting HTML5 cross-browser
Let’s continue by looking at techniques we can employ to get the new HTML5 semantic elements working across browsers, even older browsers like IE6. Then we’ll take the last, well-styled HTML5 “Hello World!” example page and add to it, providing you with a boilerplate you can use to get started using HTML5 now.
We’ll start by looking at how browsers deal with unknown elements.
How do browsers deal with unknown elements?
HTML is a forgiving language. For quite some time, most browsers have gracefully handled the inclusion of elements and attributes they didn’t recognize by treating them as anonymous inline elements and allowing us to style them.
Every browser has a list of elements it supports. For example, Firefox’s list is stored in a file called nsElementTable.cpp. This file tells the browser how to handle the elements it encounters, informing the browser how to style them and how they should be treated in the Document Object Model (DOM).
The best way to demonstrate this is to run through an example. The following, very basic page uses the new <time> element (which we’ll meet properly in Chapter 4). We’ve included a very simple style sheet with a rule targeting the new element. The question is, how will browsers style the <time> element?
<!DOCTYPE html>

<html lang="en">

  <head>

    <meta charset="UTF-8" />

    <title>Styling Unknown Elements - 1</title>

    <style>

      time

      {

      font-style: italic;

      }

    </style>

  </head>

  <body>

    <p>Miss Baker made her historic journey on <time datetime="1959-05-28">May 28,

 1959</time>.</p>

  </body>

</html>
First, the good news: Most modern browsers will see the <time> element fine and style the date “May 28, 1959” in italics. Our old friend IE, however, has different ideas. IE (up to and including version 8) doesn’t even see the <time> element and as a consequence this text is not styled.
Needless to say, this is something we need to resolve if we’re to make any further progress. The good news is that there is a solution to the problem: we can use a little JavaScript to explicitly declare the element for the benefit of IE. (Think of it as giving IE a mild slap in the face.)
The technique, credited to Sjoerd Visscher, involves creating a new DOM element (of the same name as the one being targeted) to trick IE into “seeing” the new element and, ta-da!, the style is applied (see http://j.mp/trick-ie5).
Let’s take a look. Here is a line of JavaScript using document.createElement to explicitly create an instance of the <time> element in the DOM:
<!DOCTYPE html>

<html lang="en">

  <head>

    <meta charset="UTF-8" />

    <title>Styling Unknown Elements - 2</title>

    <script>document.createElement('time'),</script>

    <style>

      time

      {

      font-style: italic;

      }

    </style>
  </head>

  <body>

    <p>Miss Baker made her historic journey on <time datetime="1959-05-28">May 28,

 1959</time>.</p>

  </body>

</html>
With this simple piece of JavaScript, IE is tricked into seeing the <time> element, allowing the italic style to bite. Clearly this only solves the problem for a single element (in this case the <time> element). The next example demonstrates how to solve the problem for all the new elements introduced in HTML5. Here we include all the elements we’d like to force IE to recognize:
<!DOCTYPE html>

<html lang="en">

  <head>

    <meta charset="UTF-8" />

    <title>Styling Unknown Elements - 3</title>

    <script>

      (function(){if(!/*@cc_on!@*/0)return;var e = "abbr,article,aside,audio,canvas,

 datalist,details,eventsource,figure,footer,header,hgroup,mark,menu,meter,nav,output,

 progress,section,time,video".split(','),i=e.length;while(i--)

{document.createElement(e[i])}})()

    </script>

    <style>

      time

      {

      font-style: italic;

      }

    </style>

  </head>

  <body>

    <p>Miss Baker made her historic journey on <time datetime="1959-05-28">May 28,

 1959</time>.</p>

  </body>

</html>
__________
Obviously, that’s quite lot of JavaScript to include on every page. What if, heaven forbid, any new HTML5 elements are added to the list of new elements? While it might be possible to work a little regular expression magic to do a spot of find-and-replace on any HTML5 pages you might have created, a far simpler option is at hand.
The solution is the shiv, which we meet next.
Meet the shiv
We promised an easier solution to the thorny problem of styling unknown elements in IE and, true to our word, here it is. Courtesy of Remy Sharp and christened the “HTML5 Enabling Script” (or more colloquially, “the shiv”), here it is:
<!DOCTYPE html>

<html lang="en">

  <head>

    <meta charset="UTF-8" />

    <title>Styling Unknown Elements - 4</title>

    <!--[if lt IE 9]>

      <script src="http://html5shiv.googlecode.com/svn/trunk/html5.js"></script>

    <![endif]-->

    <style>

      time

      {

      font-style: italic;

      }

    </style>

  </head>

  <body>

    <p>Miss Baker made her historic journey on <time datetime="1959-05-28">May 28,

 1959</time>.</p>

  </body>

</html>
Include this script in your page and it will take care of all the things we discussed previously and more. Remy has hosted it at Google Code, so you just need to link to it; you don’t need to worry about what’s inside the JavaScript or think about whether you’ve got the latest version.
By nesting the script in conditional comments, we can target it at versions of IE older than IE 9 (which has considerably better support for HTML5). This allows the browsers that don’t need it to treat it as a straightforward HTML comment and skip right past it. The result? Browsers that don’t need the script don’t download it, saving an HTTP request.
In closing, there a couple of points to stress. Firstly, the shiv needs to be placed in the <head> element so that IE knows about the new HTML5 elements before it comes to render them. Secondly, the shiv relies on JavaScript being enabled. If the majority of your audience is browsing the Web with JavaScript disabled, you need to consider an alternative, such as using semantic HTML5 class names in your markup. (We’ll revisit this idea in Chapter 3 when we introduce our very own specification, HTML4.5.)
IE print protector
As Columbo would say,”Just one more thing….”We promised that linking to the shiv at Google Code had the added benefit of offering you the latest version of the shiv. We weren’t lying.
Remy Sharp’s html5shiv now also includes Jonathan Neal’s IE Print Protector (http://j.mp/ie-print6), which solves a problem IE has when trying to print HTML5 pages (it doesn’t render the element properly on the printed page, either). IE Print Protector works by temporarily replacing HTML5 elements with supported fallback elements (like <div> and <span>) when you print, creating a special style sheet for these elements based on your existing styles.
This solves the problem with IE, but we also need to add a fragment of CSS for any browsers that don’t know how to render HTML5’s new semantic elements.
Declaring block-level elements
As mentioned, when it comes to styling, browsers treat unknown elements as anonymous inline elements. HTML5 introduces a number of new block level elements: if these elements aren’t included in the browser’s lookup table of known elements, they will be treated as inline. We therefore need to add a CSS rule declaring them as block-level elements.
<style>

article, aside, details, figcaption, figure, footer, header, hgroup, menu, nav, section {

  display: block;

}

</style>
This simple rule instructs browsers to treat the new HTML5 <article>, <aside>, <details>, <figcaption>, <figure>, <footer>, <header>, <hgroup>, <menu>, <nav> and <section> elements as block-level elements and display them accordingly.
Note: As the HTML5 spec changes and more features are added, you should update these Shiv techniques periodically to make sure they stay current.
__________
Also, for those of you who use CSS resets in your styling work, note that many of these will have been updated to include the HTML5 display: block declarations in them. Examples include Normalize and Eric Meyer’s Reset. CSS resets will be discussed in more detail in Chapter 7.
An HTML5 boilerplate page
So, we’ve discussed the importance of the shiv and of declaring HTML5 elements as block level so that browsers will know how to handle them. We’ve also introduced the new HTML5 DOCTYPE, looked at how to declare languages, and character encoding works with the simplified meta charset attribute. Let’s put everything together to create a simple HTML5 boilerplate page. The following HTML5 boilerplate includes everything covered in this chapter:
<!DOCTYPE html>

<html lang="en">

<head>

    <meta charset="UTF-8" />

    <title>Insert Your Title Here</title>

    <!--[if lt IE 9]>

      <script src="http://html5shiv.googlecode.com/svn/trunk/html5.js"></script>

    <![endif]-->

    <style>

      article, aside, details, figcaption, figure, footer, header, hgroup, menu, nav, section

      {

      display: block;

      }

    </style>

</head>

<body>

    <p>Insert your content here.</p>

</body>

</html>
We’ll provide a more advanced version of this boilerplate when we introduce CSS resets in the second half of this book. For now, you might want to experiment with this file as you prepare for the next chapter. You can download the HTML5 boilerplate from http://thewebevolved.com7.
The astute amongst you might notice one small thing missing from the previous example.
No more type attribute
We no longer need to include a type attribute when declaring JavaScript or CSS. In the past, we would have included a type attribute as follows:
__________
<!--[if lt IE 9]>

  <script type="text/javascript"

          src="http://html5shiv.googlecode.com/svn/trunk/html5.js"></script>

<![endif]-->

<style type="text/css">

  article, aside, details, figcaption, figure, footer, header, hgroup, menu, nav, section

  {

  display: block;

  }

</style>
The type attributes, type="text/javascript" and type="text/css", are no longer needed. You can now save a few bytes and drop them, as follows:
<!--[if lt IE 9]>

  <script  src="http://html5shiv.googlecode.com/svn/trunk/html5.js"></script>

<![endif]-->

<style>

  article, aside, details, figcaption, figure, footer, header, hgroup, menu, nav, section

  {

  display: block;

  }

</style>
This is because there aren’t any other styling and scripting languages that you want to use and therefore differentiate between—only CSS and JavaScript. (In the past, we used to use VBScript for scripting on some occasions, but VBScript has gone the way of the dodo.)
So that’s one less thing to remember. Good times!
Polyfills and alternatives
The HTML5 boilerplate we just showed you—and the wealth of support for HTML5 and CSS3 across modern browsers—has taken us a long way toward being all set for creating awesome modern web experiences, but in many situations they are not enough. You’ll often be called on to support older browsers (like IE 6-8) that don’t support the new features found in HTML5 and CSS3, and sometimes you’ll want to use cutting edge features that don’t have support across all modern browsers.
There are ways to handle these situations, and we’ll see many different techniques to do so throughout the book, but generally these techniques fall into one of three camps.
- Graceful degradation: We have already talked about the idea that many web features can be built so that they look great in modern browsers, and then in older browsers they degrade so that although they don’t look as nice, they are still accessible and usable.
- Progressive enhancement/alternatives: As we have already discussed, progressive enhancement is the opposite of graceful degradation. Here, we build up a base level of functionality that works across all browsers, and then we build stylistic and usability enhancements on top for browsers that support advanced features. Sometimes this can be done as a matter of course when you build up your markup and styles, and sometimes we need a little extra help.
- Polyfills: You’ll meet many polyfills throughout the book. These are programs usually built in JavaScript that add support for a web technology into a browser that doesn’t already support it natively. A good example is CSSPie, which adds support for CSS gradients, rounded corners, and other CSS3 features into older versions of IE.
Note: In Chapter 7, you’ll come across a feature detection library called Modernizr. It detects whether a browser supports various features of CSS3, HTML5, etc., and then allows you to serve different styles and script to suit. For example, if you have a web site that uses CSS animations for an interface feature, you could detect support for it using Modernizr and then serve a simpler set of styling to non-supporting browsers that still renders the content accessible and usable, albeit perhaps not in quite as exciting a way.
Validation
We’ve covered a lot in this chapter; by the end of it you’ll be able to update your Miss Baker page to HTML5. In Chapter 3 we’ll introduce a number of the new semantic elements added in HTML5 that you can use to further improve your Miss Baker page.
One thing that we haven’t covered, which we’ll remedy right now, is the topic of validating our shiny, new HTML5 pages.
Why validate? Validating your pages is often the first stage in picking up problems. Using a validator can help you to pick up simple, easy-to-overlook mistakes and learn more about how the markup works. Validation is a useful habit to get into, especially when learning, and one we hope you’re aware of, if not actively using. With that in mind, let’s take a look at validating our HTML5 pages.
HTML5 validator
The WHATWG maintains a list of currently known HTML5 validators, and other tools, at http://j.mp/whatwg-validator8.
There are several HTML5 validators available but we’ll focus on one created by Henri Sivonen: http://j.mp/nu-validator9
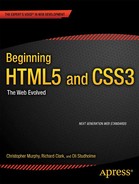
Let’s check the boilerplate to see if it’s valid HTML5 (Figure 2-1).
__________

Figure 2-1. Good news! The boilerplate HTML5 page is valid… subject to the utter previewness of the service.
The result? The validator returns the following: The document is valid HTML5 + ARIA + SVG 1.1 + MathML 2.0 (subject to the utter previewness of this service).”
What Henri Sivonen’s HTML5 Validator does not do is check against specific syntax settings (such as checking XHTML style syntax). Dan Cederholm remarked on the topic:
It’s important for the validator to simply and easily add an option for checking syntax that would help to foster good coding habits, avoid head-scratching rendering issues, etc. That’s why I choose to code XHTML today — it’s a personal preference that helps me maintain, optimize and troubleshoot code, and I’ll continue with that convention no matter the doctype.
That said, the absence of an option for checking syntax at the HTML5 Validator doesn’t mean we can’t check syntax elsewhere; it’s just a little less convenient. The next section covers HTML Lint, a tool you can use to ensure your markup is well-formed and perfectly crafted.
HTML Lint
In the absence of a validator that allows us to check against a preferred syntax, we recommend HTML Lint at http://j.mp/htmllint10.
Developed by MMM to ”make sure your code looks good,” HTML Lint (see Figure 2-2) is a lint checker that enables you to specify options to check against. (The term lint was derived from the name of the undesirable bits of fiber and fluff found in sheep’s wool.)

Figure 2-2. MMM’s HTML Lint enables you to ensure your markup is well formed by checking against a series of user-electable options.
__________
While XHTML was very strict with syntax, HTML5 is more lenient…which means keeping consistent code styles becomes more difficult.
Anyone who prefers the strict syntax of XHTML will appreciate the options HTML Lint offers, which include the ability to check for closing tags, closed empty elements, quoted attributes, and lowercase elements and attributes.
Until a validator is created that allows for both validation and syntax checking (and we hope one is created soon), you can use the HTML5 Validator and HTML Lint for validation and neat markup, respectively.
Revisiting Miss Baker
So now we’ve seen a few HTML5 pages in action. Our last exercise—to show you how simple the transition to HTML5 can be—is to revisit the Miss Baker page we introduced at the start of this chapter to give it a new DOCTYPE and make the changes to the <head> we introduced earlier.
<!DOCTYPE html>

<html lang="en">

<head>

    <meta charset="UTF-8" />

    <title>Miss Baker | Space Pioneers | The Web Evolved, Chapter 2 Example File</title>

    <!--[if lt IE 9]>

      <script  src="http://html5shiv.googlecode.com/svn/trunk/html5.js"></script>

    <![endif]-->

    <style>

      article, aside, details, figcaption, figure, footer, header, hgroup, menu, nav, section

      {

      display: block;

      }

    </style>

</head>

<body>

<div id="container">

    <div id="header">

        <h1>The Original Space Pioneers</h1>

        <h4>America's Unsung Heroes</h4>

    </div>


    <div id="article">

    …

    </div>


    <div id="footer">

        <p>The Space Pioneers web site is an example site, designed to accompany The Web

 Evolved, published by Apress. Text: The Web Evolved; Design: Jonny Campbell.</p>

        <p>HTML + CSS released under a Creative Commons Attribution 3.0 license.</p>
<p>Photography © iStockphoto</p>
</div>
</div>
</body>
</html>
http://thewebevolved.com/02/miss_baker_html_4.5.html
Testing this page in the HTML5 Validator results in Figure 2-3.
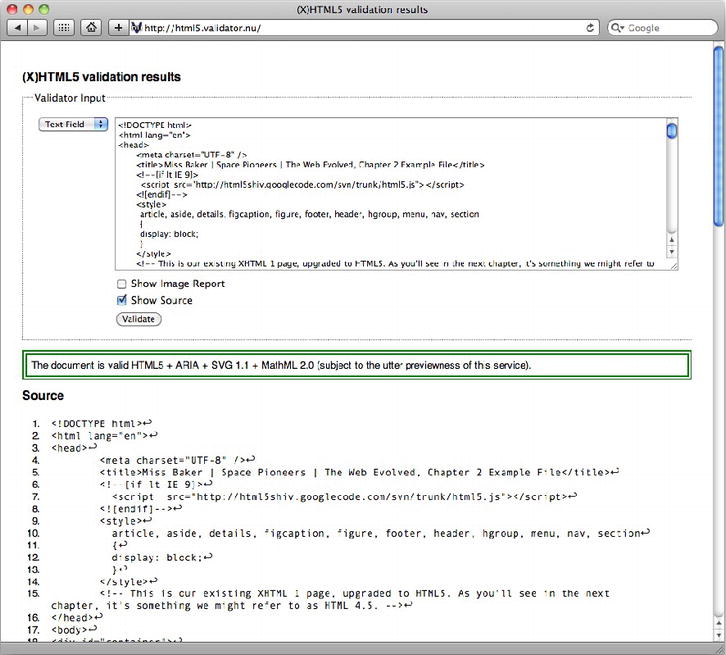
Figure 2-3. The updated Miss Baker page validates perfectly.
Testing it for syntax using HTML Lint results in Figure 2-4.
Figure 2-4. The updated Miss Baker page validates perfectly.
Simply changing the Miss Baker page’s <head> element, without altering the markup in the body, results in a valid HTML5 page. It’s that simple.
Summary
At this point we’ve gotten our hands dirty with HTML5 and learned the syntax differences between XHTML1, HTML4, “loose” HTML5 style, and stricter HTML5 with XHTML syntax (the latter is the one we recommend you use). We’ve also shown the new HTML5 DOCTYPE, the changes you need to make to the <head> of your documents to upgrade them to HTML5, and how to get HTML5 content working across all browsers, even older versions of IE. To round off, we presented an HTML5 boilerplate you can use as the starting point of all your HTML5 documents, and showed how best to validate your HTML5 markup. Easy, wasn’t it?!
Homework
- Create a “Hello World!” web page by referring to our examples in this chapter.
- Validate it.
- Revisiting your Gordo page, change it to HTML5 by following the examples in this chapter.