
In this chapter, you will learn how to use Spring Web Flow, a subproject of the Spring framework, to model and manage your web application's UI flows. Spring Web Flow's usage has changed significantly from version 1.0 to 2.0. Spring Web Flow 2.0 is simpler than 1.0 and makes a lot of convention-over-configuration improvements. This chapter will focus on Spring Web Flow 2.0 only. Note that Spring Web Flow 2.0 requires the Spring framework 2.5.4 or higher. Note also that Spring Web Flow 2.0.8 and later features slightly different configuration than in previous versions. For this chapter, we will work with Spring Web Flow 2.0.8 configuration.
In traditional web application development, developers often manage their UI flows programmatically, so these flows are hard to maintain and reuse. Spring Web Flow offers a flow definition language that can help separate UI flows from presentation logic in a highly configurable way, so the flows can be easily changed and reused. Spring Web Flow supports not just Spring Web MVC but also Spring Portlet MVC and other web application frameworks such as Struts and JSF.
After finishing this chapter, you will be able to develop basic Spring MVC–based and JSF–based web applications that use Spring Web Flow to manage their UI flows. This chapter only touches on the basic features and configurations of Spring Web Flow, so please consult the Spring Web Flow reference guide for further details.
Spring Web Flow allows you to model UI activities as flows. It supports defining a flow either by Java or by XML. XML–based flow definitions are widely used due to the power and popularity of XML. You can also easily modify your XML–based flow definitions without recompiling your code. Moreover, Spring IDE supports Spring Web Flow by offering a visual editor for you to edit XML-based flow definitions.
A flow definition consists of one or more states, each of which corresponds to a step in the flow. Spring Web Flow builds in several state types, including view state, action state, decision state, subflow state, and end state. Once a state has completed its tasks, it fires an event. An event contains a source and an event ID, and perhaps some attributes. Each state may contain zero or more transitions, each of which maps a returned event ID to the next state.
When a user triggers a new flow, Spring Web Flow can auto-detect the start state of that flow (i.e., the state without transitions from other states), so you don't need to specify the start state explicitly. A flow can terminate at one of its defined end states. This marks the flow as ended and releases resources held by the flow.
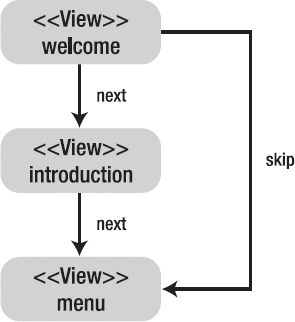
Suppose you are going to develop an online system for a library. The first page of this system is a welcome page. There are two links on this page. When a user clicks the Next link, the system will show the library introduction page. There's another Next link on this introduction page; clicking it will show the menu page. If a user clicks the Skip link on the welcome page, the system will skip the introduction page and show the menu page directly. This welcome UI flow is illustrated in Figure 7-1. This example will show you how to develop this application with Spring MVC and use Spring Web Flow to manage the flow.

In the library introduction page, you would like to show the public holidays on which this library will close. They are queried from a back-end service whose interface is defined as follows:
package com.apress.springwebrecipes.library.service;
...
public interface LibraryService {

    public List<Date> getHolidays();
}
For testing purposes, you can hard-code several holidays for this service implementation as follows:
package com.apress.springwebrecipes.library.service;
...
public class LibraryServiceImpl implements LibraryService {

    public List<Date> getHolidays() {
        List<Date> holidays = new ArrayList<Date>();
        holidays.add(new GregorianCalendar(2007, 11, 25).getTime());
        holidays.add(new GregorianCalendar(2008, 0, 1).getTime());
        return holidays;
    }
}To develop the library system using Spring MVC and Spring Web Flow, you first create the following directory structure for this web application.
Note
To manage your web UI flows with Spring Web Flow, you neeed the Spring Web Flow distribution (e.g., v2.0.8) on your CLASSPATH. If you are using Maven, add the following dependency to your Maven project:
<dependency>
     <groupId>org.springframework.webflow</groupId>
     <artifactId>spring-faces</artifactId>
     <version>2.0.8.RELEASE</version>
 </dependency>
library/
WEB-INF/
classes/
flows/
welcome/
introduction.jsp
menu.jsp
welcome.jsp
welcome.xml
lib/-*jar
library-service.xml
library-servlet.xml
library-webflow.xml
web.xmlSpring Web Flow supports using an expression language in flow definitions to access its data model and invoke back-end services. Spring Web Flow supports using Unified EL (used in JSF 1.2 and JSP 2.1) and Object-Graph Navigation Language (OGNL), which is used in Tapestry, WebWork, and other frameworks, as its expression language. These two languages have a very similar syntax. For basic expressions such as property access and method invocations, the syntax is identical. The expressions used in this chapter are valid for both Unified EL and OGNL, so you are free to choose either of them as your expression language. Unified EL is recommended in a JSF environment, because it allows you to use the same expression language in flow definitions as in JSF views. However, developers using Spring Web Flow 1.0 may prefer OGNL, because it is the only supported expression language for the 1.0 version.
Spring Web Flow is able to detect the libraries of JBoss EL (as the default Unified EL implementation) and OGNL from the classpath. You can enable either of them (but not both) by including the corresponding JAR file in your classpath.
Note
If you are going to use Unified EL as your Web Flow expression language, you can use JBoss EL (e.g., v2.0.0 GA) or OGNL (e.g., v2.6.9). If you are using Maven, add one of the following dependencies to your Maven project:
<dependency>
   <groupId>org.jboss.seam</groupId>
   <artifactId>jboss-el</artifactId>
   <version>2.0.0.GA</version>
 </dependency>

 or

 <dependency>
   <groupId>ognl</groupId>
   <artifactId>ognl</artifactId>
   <version>2.6.9</version>
 </dependency>
If you decide to use the JBoss EL, you will need to add a JBoss Maven repository to your Maven project:
<repositories>
 <repository>
   <url>http://repository.jboss.org/maven2/</url>
   <id>jboss</id>
   <name>JBoss Repository</name>
  </repository>
</repositories>
In the web deployment descriptor (i.e., web.xml), you register ContextLoaderListener to load the root application context at startup, and also Spring MVC's DispatcherServlet for dispatching requests. You can map the URL pattern /flow/* to this servlet so that all requests under the request path flow will be handled by it.
<web-app version="2.4" xmlns="http://java.sun.com/xml/ns/j2ee"
    xmlns:xsi="http://www.w3.org/2001/XMLSchema-instance"
    xsi:schemaLocation="http://java.sun.com/xml/ns/j2ee
        http://java.sun.com/xml/ns/j2ee/web-app_2_4.xsd">

        <context-param>
                <param-name>contextConfigLocation</param-name>
                <param-value>
                                /WEB-INF/library-service.xml
                                /WEB-INF/library-security.xml
                </param-value>
        </context-param>

  <listener>
        <listener-class>
            org.springframework.web.context.ContextLoaderListener
        </listener-class>
    </listener>

    <filter>
        <filter-name>springSecurityFilterChain</filter-name>
        <filter-class>org.springframework.web.filter.DelegatingFilterProxy</filter-class>
    </filter>
<filter-mapping>
<filter-name>springSecurityFilterChain</filter-name>
<url-pattern>/*</url-pattern>
</filter-mapping>
<servlet>
<servlet-name>library</servlet-name>
<servlet-class>org.springframework.web.servlet .DispatcherServlet</servlet-class>
</servlet>
<servlet-mapping>
<servlet-name>library</servlet-name>
<url-pattern>/flows/*</url-pattern>
</servlet-mapping>
</web-app>
.DispatcherServlet</servlet-class>
</servlet>
<servlet-mapping>
<servlet-name>library</servlet-name>
<url-pattern>/flows/*</url-pattern>
</servlet-mapping>
</web-app>ContextLoaderListener will load the root application context from the configuration file you specify in the contextConfigLocation context parameter (library-service.xml in this case). This configuration file declares beans in the service layer. For the welcome flow, you can declare the library service in this file for returning public holidays when queried.
<beans xmlns="http://www.springframework.org/schema/beans"
    xmlns:xsi="http://www.w3.org/2001/XMLSchema-instance"
    xsi:schemaLocation="http://www.springframework.org/schema/beans
        http://www.springframework.org/schema/beans/spring-beans-3.0.xsd">

    <bean name="libraryService"
        class="com.apress.springwebrecipes.library.service.LibraryServiceImpl" />
</beans>
As the DispatcherServlet instance in the web deployment descriptor has the name library, you create library-servlet.xml in the root of WEB-INF with the following content:
<beans xmlns="http://www.springframework.org/schema/beans"
    xmlns:xsi="http://www.w3.org/2001/XMLSchema-instance"
    xsi:schemaLocation="http://www.springframework.org/schema/beans
        http://www.springframework.org/schema/beans/spring-beans-3.0.xsd">

    <import resource="library-webflow.xml" />
</beans>
To separate the configurations of Spring MVC and Spring Web Flow, you can centralize Spring Web Flow's configurations in another file (e.g., library-webflow.xml) and import it into library-servlet.xml. Then, create this file with the following contents:
<beans xmlns="http://www.springframework.org/schema/beans"
    xmlns:xsi="http://www.w3.org/2001/XMLSchema-instance"
    xmlns:webflow="http://www.springframework.org/schema/webflow-config"
    xsi:schemaLocation="http://www.springframework.org/schema/beans
        http://www.springframework.org/schema/beans/spring-beans-3.0.xsd
        http://www.springframework.org/schema/webflow-config
        http://www.springframework.org/schema/webflow-config/~CCC
            spring-webflow-config-2.0.xsd">

        <webflow:flow-builder-services id="flowBuilderServices"
                development="true" view-factory-creator="flowResourceFlowViewResolver" />

        <bean id="flowResourceFlowViewResolver"
                class="org.springframework.webflow.mvc.builder.MvcViewFactoryCreator">
                        <property name="useSpringBeanBinding" value="true"  />

        </bean>

        <webflow:flow-executor id="flowExecutor">
                <webflow:flow-execution-listeners>
                </webflow:flow-execution-listeners>
        </webflow:flow-executor>

        <webflow:flow-registry flow-builder-services="flowBuilderServices"
                id="flowRegistry" base-path="/WEB-INF/flows/">
                <webflow:flow-location path="/welcome/welcome.xml" />
</webflow:flow-registry>

        <bean class="org.springframework.webflow.mvc.servlet.FlowHandlerAdapter">
                <property name="flowExecutor" ref="flowExecutor" />
        </bean>

        <bean class="org.springframework.webflow.mvc.servlet.FlowHandlerMapping">
                <property name="flowRegistry" ref="flowRegistry" />
                <property name="order" value="0" />
        </bean>
     ...

</beans>
The FlowHandlerMapping follows a convention to create URL path mappings from the ids of registered flow definitions. This returns a FlowHandler that invokes web flows defined in the flowRegistry. Then you have to register your flow definitions in a flow registry by specifying their locations. The file name of a flow definition (e.g., welcome.xml) will be used as the flow ID by default (e.g., welcome), but you can specify a custom ID with the id attribute.
Spring Web Flow offers an XML–based flow definition language that can be validated by Spring Web Flow's XSD and supported by Spring IDE or SpringSource Tool Suite (STS). Now, you can define your welcome flow in the definition file /WEB-INF/flows/welcome/welcome.xml:
<flow xmlns="http://www.springframework.org/schema/webflow"
    xmlns:xsi="http://www.w3.org/2001/XMLSchema-instance"
    xsi:schemaLocation="http://www.springframework.org/schema/webflow
        http://www.springframework.org/schema/webflow/spring-webflow-2.0.xsd">

    <view-state id="welcome">
        <transition on="next" to="introduction" />
        <transition on="skip" to="menu" />
    </view-state>

    <view-state id="introduction">
        <on-render>
            <evaluate expression="libraryService.getHolidays()"
                result="requestScope.holidays" />
        </on-render>
        <transition on="next" to="menu" />
    </view-state>

    <view-state id="menu" />
</flow>
In this welcome flow, you have defined three view states: welcome, introduction, and menu. As its name indicates, a view state will render a view to a user. Typically, in Spring MVC, a view is a JSP file. By default, a view state will render a JSP file with the state ID as the file name and .jsp as the file extension, located in the same path as this flow definition. If you want to render another view, you can specify its logical view name in the view attribute and define a corresponding Spring MVC view resolver to resolve it.
You can use the <on-render> element to trigger an action for a view state before its view renders. Spring Web Flow supports using an expression of Unified EL or OGNL to invoke a method. For more about Unified EL and OGNL, please refer to the article "Unified Expression Language," at http://java.sun.com/products/jsp/reference/techart/unifiedEL.html, and the OGNL language guide, at http://www.ognl.org/. The preceding expression is valid for both Unified EL and OGNL. It invokes the getHolidays() method on the libraryService bean and stores the result in the holidays variable in the request scope.
The flow diagram for this welcome flow is illustrated in Figure 7-2.
Now, you have to create the JSP files for the preceding three view states. You can create them at the same location as the flow definition and with the same name as the view states so that they can be loaded by default. First, you create welcome.jsp:
<html> <head> <title>Welcome</title> </head> <body> <h2>Welcome!</h2><a href="${flowExecutionUrl}&_eventId=next">Next</a><a href="${flowExecutionUrl}&_eventId=skip">Skip</a></body> </html>
In this JSP file, there are two links to fire events, with next and skip as the event IDs. In Spring Web Flow, an event ID can be specified either as the _eventId request parameter's value (e.g., _eventId=next), or in a request parameter's name, with _eventId_ as the prefix (e.g., _eventId_next), no matter what the parameter value is. Also, you have to start the URLs with the variable ${flowExecutionUrl} to trigger a flow execution. This variable will be evaluated by Spring Web Flow at runtime.
Next, you create introduction.jsp to display the library holidays, which are loaded by the action specified in <on-render> before this view renders:
<%@ taglib prefix="c" uri="http://java.sun.com/jsp/jstl/core" %>
<%@ taglib prefix="fmt" uri="http://java.sun.com/jsp/jstl/fmt" %>

<html>
<head>
<title>Introduction</title>
</head>

<body>
<h2>Library Holidays</h2>
<c:forEach items="${holidays}" var="holiday">
  <fmt:formatDate value="${holiday}" pattern="yyyy-MM-dd" /><br />
</c:forEach>
<a href="${flowExecutionUrl}&_eventId=next">Next</a>
</body>
</html>
Finally, you create menu.jsp. This view is very simple, as there's no transition from this state to others.
<html>
<head>
<title>Menu</title>
</head>

<body>
<h2>Menu</h2>
</body>
</html>
Now, you can deploy this web flow application to a web container (e.g., Apache Tomcat 6.0 or Jetty.). By default, Tomcat and Jetty (and the Maven Jetty plug-in configured for this code) listen on port 8080, so if you deploy your application to the mvc context path, you can access this welcome web flow with the following URL, since the URLs under the flows request path will be mapped to DispatcherServlet:
http://localhost:8080/mvc/flows/welcome
You would like to model various types of UI activities as web flows to execute in Spring Web Flow.
In Spring Web Flow, each step of a flow is denoted by a state. A state may contain zero or more transitions to the next states according to an event ID. Spring Web Flow provides several built-in state types for you to model web flows. It also allows you to define custom state types. Table 7-1 shows the built-in state types in Spring Web Flow.
Table 7.1. Built-In State Types in Spring Web Flow
State Type | Description |
|---|---|
View | Renders a view for a user to participate in the flow (e.g., by displaying information and gathering user input). The flow's execution pauses until an event is triggered to resume the flow (e.g., by a hyperlink click or a form submission). |
Action | Executes actions for the flow, such as updating a database and gathering information for displaying. |
Decision | Evaluates a Boolean expression to decide which state to transition to next. |
Subflow | Launches another flow as a subflow of the current flow. The subflow will return to the launching flow when it ends. |
End | Terminates the flow, after which all flow scope variables become invalid. |
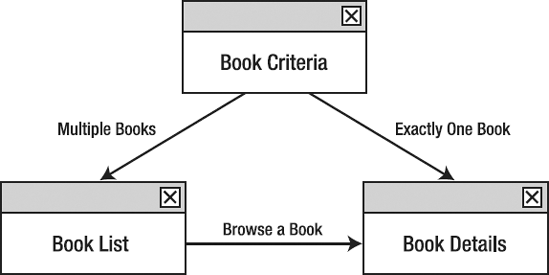
Suppose you are going to build a web flow for library users to search books. First, a user has to enter the book criteria in the criteria page. If there's more than one book matching the criteria, the books will be displayed in the list page. In this page, the user can select a book to browse its details in the details page. However, if there's exactly one book matching the criteria, its details will be shown directly in the details page, without going through the list page. This book search UI flow is illustrated in Figure 7-3.
First of all, let's create the domain class Book. It should implement the Serializable interface, as its instances may need to be persisted in sessions.
package com.apress.springwebrecipes.library.domain;
...
public class Book implements Serializable {

    private String isbn;
    private String name;
    private String author;
    private Date publishDate;

    // Constructors, Getters and Setters
    ...
}
Next, you create the BookCriteria class, whose instances will act as form command objects for binding form fields. It should also implement the Serializable interface for the same reason.
package com.apress.springwebrecipes.library.domain;
...
public class BookCriteria implements Serializable {

    private String keyword;
    private String author;

    // Getters and Setters
    ...
}
In the service layer, you design a service interface for providing book search services to the presentation layer:
package com.apress.springwebrecipes.library.service;
...
public interface BookService {

    public List<Book> search(BookCriteria criteria);
    public Book findByIsbn(String isbn);
}
For testing purposes, let's hard-code some books and implement the search() method by matching the books one by one:
package com.apress.springwebrecipes.library.service;
...
public class BookServiceImpl implements BookService {

    private Map<String, Book> books;

    public BookServiceImpl() {
        books = new HashMap<String, Book>();
        books.put("0001", new Book("0001", "Spring Framework", "Ray",
                new GregorianCalendar(2007, 0, 1).getTime()));
        books.put("0002", new Book("0002", "Spring Web MVC", "Paul",
                new GregorianCalendar(2007, 3, 1).getTime()));
        books.put("0003", new Book("0003", "Spring Web Flow", "Ray",
                new GregorianCalendar(2007, 6, 1).getTime()));
    }

    public List<Book> search(BookCriteria criteria) {
        List<Book> results = new ArrayList<Book>();
        for (Book book : books.values()) {
            String keyword = criteria.getKeyword().trim();
            String author = criteria.getAuthor().trim();
            boolean keywordMatches = keyword.length() > 0
                    && book.getName().contains(keyword);
            boolean authorMatches = book.getAuthor().equals(author);
            if (keywordMatches || authorMatches) {
                results.add(book);
            }
        }
        return results;
    }

    public Book findByIsbn(String isbn) {
        return books.get(isbn);
    }
}
To make this book service accessible to all the library web flows, you declare it in the service layer configuration file (i.e., library-service.xml), which will be loaded for the root application context:
<bean name="bookService"
    class="com.apress.springwebrecipes.library.service.BookServiceImpl" />
Now, you can start with your book search flow development. First, you add the flow definition's location to the flow registry in library-webflow.xml and create the flow definition XML file as well:
<webflow:flow-registry id="flowRegistry" ...>
    ...
    <webflow:flow-location path="/bookSearch/bookSearch.xml" />
</webflow:flow-registry>
Next, let's build this web flow incrementally with different types of states offered by Spring Web Flow.
According to the requirement of the book search flow, you first need a view state to show a form so that a user can enter the book criteria. In Spring Web Flow, you can create an action corresponding to a controller in Spring MVC to handle flow requests. Spring Web Flow provides a FormAction class to assist you in handling forms. For complicated form processing, you can extend this class and add your own processing logic. But for a simple form's needs, you can use this class directly by populating its properties (e.g., the form object class, property editors, and validators). Now, you can define a form action with this class to handle the book criteria form in library-webflow.xml:
<bean id="bookCriteriaAction"
    class="org.springframework.webflow.action.FormAction">
    <property name="formObjectClass"
        value="com.apress.springwebrecipes.library.domain.BookCriteria" />
    <property name="propertyEditorRegistrar">
        <bean class="com.apress.springwebrecipes.library.web.PropertyEditors" />
    </property>
</bean>
A form action can bind form fields to a form object's properties of the same name. But you first have to specify the form object class in the formObjectClass property for this action to instantiate form objects. To convert form field values into proper data types, you have to register custom property editors to this form action. You can create a property editor registrar to register your own editors, and specify it in the propertyEditorRegistrar property:
package com.apress.springwebrecipes.library.web;
...
import org.springframework.beans.PropertyEditorRegistrar;
import org.springframework.beans.PropertyEditorRegistry;
import org.springframework.beans.propertyeditors.CustomDateEditor;

public class PropertyEditors implements PropertyEditorRegistrar {
public void registerCustomEditors(PropertyEditorRegistry registry) {
SimpleDateFormat dateFormat = new SimpleDateFormat("yyyy-MM-dd");
dateFormat.setLenient(false);
registry.registerCustomEditor(Date.class, new CustomDateEditor(
dateFormat, true));
}
}With the form action ready, you can define the first view state for handling the book criteria form. To test your flow as soon as possible, you can directly display the search results in the list page, without considering the size of the results. You define the book search flow in the definition file /WEB-INF/flows/bookSearch/bookSearch.xml.
<flow xmlns="http://www.springframework.org/schema/webflow"
    xmlns:xsi="http://www.w3.org/2001/XMLSchema-instance"
    xsi:schemaLocation="http://www.springframework.org/schema/webflow
        http://www.springframework.org/schema/webflow/spring-webflow-2.0.xsd">

    <view-state id="bookCriteria">
        <on-render>
            <evaluate expression="bookCriteriaAction.setupForm" />
        </on-render>
        <transition on="search" to="bookList">
            <evaluate expression="bookCriteriaAction.bindAndValidate" />
            <evaluate expression="bookService.search(bookCriteria)"
                result="flowScope.books" />
        </transition>
    </view-state>
</flow>
Before this view state renders its view, it invokes the setupForm() method of the form action bookCriteriaAction defined previously. This method prepares the form object for this form by instantiating the form object class you specified. After a user submits the form with the event ID search, this state will transition to the bookList state, displaying all the search results.
Before the transition takes place, you have to invoke the bindAndValidate() method of the form action to bind the form field values to the form object's properties and then validate this object with the validators, if registered. Then, you call the back-end service to search books for the bound criteria object and store the results in the flow scope variable books so that it can be accessed by other states. Flow scope variables are stored in the session, so they must implement Serializable.
Next, you create the view for this view state in the JSP file with the same name as the view state and in the same location (i.e., /WEB-INF/flows/bookSearch/bookCriteria.jsp) so that it can be loaded by default.
<%@ taglib prefix="form" uri="http://www.springframework.org/tags/form" %>

<html>
<head>
<title>Book Criteria</title>
</head>
<body><form:form commandName="bookCriteria"><table> <tr> <td>Keyword</td> <td><form:input path="keyword" /></td> </tr> <tr> <td>Author</td> <td><form:input path="author" /></td> </tr> <tr> <td colspan="2"><input type="submit" name="_eventId_search" value="Search" /></td> </tr> </table> </form:form> </body> </html>
This JSP file contains a form defined with Spring's form tags. It's bound to the form object with the name bookCriteria, which is generated automatically according to the form object's class name, BookCriteria. There's a submit button in this form, clicking which will trigger an event with search as the ID.
The second view state in this book search flow is for displaying the search results. It will render a view listing all results in a table, with links for showing book details. When the user clicks one of these links, it will trigger a select event that will cause a transition to the bookDetails state showing the book's details.
<view-state id="bookList"><transition on="select" to="bookDetails"><evaluate expression="bookService.findByIsbn(requestParameters.isbn)" result="flowScope.book" /> </transition> </view-state>
The link should pass the book ISBN as a request parameter, so you can find the book from the back-end service and store it in the flow scope variable book.
The view for this state should be created in /WEB-INF/flows/bookSearch/bookList.jsp so that it will be loaded by default.
<%@ taglib prefix="c" uri="http://java.sun.com/jsp/jstl/core" %>
<%@ taglib prefix="fmt" uri="http://java.sun.com/jsp/jstl/fmt" %>

<html>
<head>
<title>Book List</title>
</head>
<body>
<table border="1">
  <tr>
    <th>ISBN</th>
    <th>Book Name</th>
    <th>Author</th>
    <th>Publish Date</th>
  </tr>
  <c:forEach items="${books}" var="book">
  <tr>
    <td>
      <a href="${flowExecutionUrl}&_eventId=select&isbn=${book.isbn}">
        ${book.isbn}
      </a>
    </td>
    <td>${book.name}</td>
    <td>${book.author}</td>
    <td><fmt:formatDate value="${book.publishDate}" pattern="yyyy-MM-dd" /></td>
  </tr>
  </c:forEach>
</table>
</body>
</html>
The ISBN column of each table row is a link that will trigger a select event with the book ISBN as a request parameter.
The last view state in this book search flow shows a selected book's details. It has no transition to other states at this moment.
<view-state id="bookDetails" />
You create the view for this state in /WEB-INF/flows/bookSearch/bookDetails.jsp so that it will be loaded by default.
<%@ taglib prefix="c" uri="http://java.sun.com/jsp/jstl/core" %>
<%@ taglib prefix="fmt" uri="http://java.sun.com/jsp/jstl/fmt" %>

<html>
<head>
<title>Book Details</title>
</head>

<body>
<table border="1">
  <tr>
    <td>ISBN</td>
    <td>${book.isbn}</td>
  </tr>
<tr>
<td>Book Name</td>
<td>${book.name}</td>
</tr>
<tr>
<td>Author</td>
<td>${book.author}</td>
</tr>
<tr>
<td>Publish Date</td>
<td><fmt:formatDate value="${book.publishDate}" pattern="yyyy-MM-dd" /></td>
</tr>
</table>
</body>
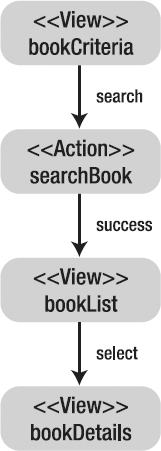
</html>Now, you can deploy this application and test this simplified book search flow with the URL http://localhost:8080/mvc/flows/bookSearch. The current flow diagram for this book search flow is illustrated in Figure 7-4.

Although you can include the search action in the bookCriteria view state, this action cannot be reused for other states that require book searching. The best practice is to extract reusable actions into stand-alone action states. An action state simply defines one or more actions to perform in a flow, and these actions will be performed in the declared order. If an action returns an Event object containing an ID that matches a transition, the transition will take place immediately without performing the subsequent actions. But if all of the actions have been performed without a matching transition, the success transition will take place.
For the purposes of reuse, you can extract the book search action in a searchBook state. Then modify the transition of the bookCriteria state to go through this state.
<flow ...>
    <view-state id="bookCriteria">
        <on-render>
            <evaluate expression="bookCriteriaAction.setupForm" />
        </on-render>
        <transition on="search" to="searchBook">
            <evaluate expression="bookCriteriaAction.bindAndValidate" />
        </transition>
    </view-state>

    <action-state id="searchBook">
        <evaluate expression="bookService.search(bookCriteria)"
            result="flowScope.books" />
        <transition on="success" to="bookList" />
    </action-state>
    ...
</flow>
The current flow diagram for this book search flow is illustrated in Figure 7-5.
Now, you are going to satisfy the book search flow's requirement: if there's more than one search result, display them in the list page; otherwise, show its details directly in the details page without going through the list page. For this purpose, you need a decision state that can evaluate a Boolean expression to determine the transition:
<flow ...>
...
<action-state id="searchBook">
<evaluate expression="bookService.search(bookCriteria)"
result="flowScope.books" />
<transition on="success" to="checkResultSize" />
</action-state>
<decision-state id="checkResultSize">
<if test="books.size() == 1" then="extractResult" else="bookList" />
</decision-state>
<action-state id="extractResult">
<set name="flowScope.book" value="books.get(0)" />
<transition on="success" to="bookDetails" />
</action-state>
...
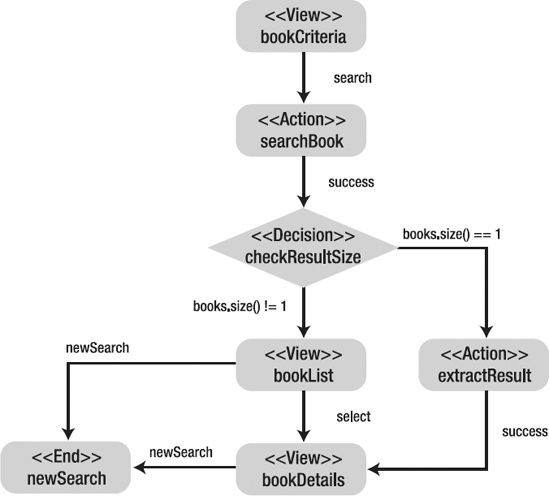
</flow>The success transition of the searchBook state has been changed to checkResultSize, a decision state that checks if there's exactly one search result. If true, it will transition to the extractResult action state to extract the first and only result into the flow scope variable book. Otherwise, it will transition to the bookList state to display all search results in the list page. The current flow diagram is illustrated in Figure 7-6.

The basic requirement of the book search flow has been finished. However, you might be asked to provide a New Search link in both the book list page and the book details page for starting a new search. You can simply add the following link to both pages:
<a href="${flowExecutionUrl}&_eventId=newSearch">New Search</a>As you can see, this link will trigger a newSearch event. Instead of transitioning to the first view state, bookCriteria, it's better to define an end state that restarts this flow. An end state will invalidate all flow scope variables to release their resources.
<flow ...>
    ...
    <view-state id="bookList">
        <transition on="select" to="bookDetails">
            <evaluate expression="bookService.findByIsbn(requestParameters.isbn)"
                result="flowScope.book" />
        </transition>
<transition on="newSearch" to="newSearch" /></view-state><view-state id="bookDetails"><transition on="newSearch" to="newSearch" /></view-state><end-state id="newSearch" /></flow>
By default, an end state restarts the current flow to the start state, but you can redirect to another flow by specifying the flow name with flowRedirect as the prefix in the end state's view attribute. The current flow diagram is illustrated in Figure 7-7.
Suppose you have another web flow that also requires showing a book's details. For reuse purposes, you extract the bookDetails state into a new web flow that can be called by other flows as a subflow. First of all, you have to add the flow definition's location to the flow registry in library-webflow.xml and create the flow definition XML file as well:
<webflow:flow-registry id="flowRegistry">
    ...
    <webflow:flow-location path="/WEB-INF/flows/bookDetails/bookDetails.xml" />
</webflow:flow-registry>
Then, you move the bookDetails view state to this flow and bookDetails.jsp to this directory. As the bookDetails state has a transition to the newSearch state, you also define it in this flow as an end state.
<flow xmlns="http://www.springframework.org/schema/webflow"
    xmlns:xsi="http://www.w3.org/2001/XMLSchema-instance"
    xsi:schemaLocation="http://www.springframework.org/schema/webflow
        http://www.springframework.org/schema/webflow/spring-webflow-2.0.xsd">

    <input name="book" value="flowScope.book" />

    <view-state id="bookDetails">
        <transition on="newSearch" to="newSearch" />
    </view-state>

    <end-state id="newSearch" />
</flow>
The book instance to be shown is passed as an input parameter to this flow with the name book, and it is stored in the flow scope variable book. Note that the flow scope is only visible to the current flow.
Next, you define a subflow state in the bookSearch flow that launches the bookDetails flow to show a book's details:
<subflow-state id="bookDetails" subflow="bookDetails">
    <input name="book" value="flowScope.book" />
    <transition on="newSearch" to="newSearch" />
</subflow-state>
In this subflow state definition, you pass the book variable in the flow scope of the bookSearch flow to the bookDetails subflow as an input parameter. When the bookDetails subflow ends in its newSearch state, it will transition to the newSearch state of the parent flow, which happens to be the newSearch end state of the bookSearch flow in this case. The current flow diagram is illustrated in Figure 7-8.

You would like to secure certain web flows in your application by allowing access to authorized users only.
Spring Web Flow offers integration for Spring Security so that you can easily secure your web flows with Spring Security. With Spring Security configured properly, you can simply secure a flow, a state, or a transition by embedding the <secured> element with required access attributes specified.
To secure web flows with Spring Security, you first have to configure a DelegatingFilterProxy filter in the web deployment descriptor (i.e., web.xml). This filter will delegate HTTP request filtering to a filter defined in Spring Security.
Note
To use Spring Security in your web flow application, you have to add Spring Security to your CLASSPATH. If you are using Maven, add the following dependency to your Maven project:
<dependency>
   <groupId>org.springframework.security</groupId>
   <artifactId>spring-security-core</artifactId>
   <version>3.0.2.RELEASE</version>
 </dependency>
<web-app ...>
    <context-param>
        <param-name>contextConfigLocation</param-name>
        <param-value>
            /WEB-INF/library-service.xml
            /WEB-INF/library-security.xml
        </param-value>
    </context-param>
    ...
    <filter>
        <filter-name>springSecurityFilterChain</filter-name>
        <filter-class>
            org.springframework.web.filter.DelegatingFilterProxy
        </filter-class>
    </filter>

    <filter-mapping>
        <filter-name>springSecurityFilterChain</filter-name>
        <url-pattern>/*</url-pattern>
    </filter-mapping>
    ...
</web-app>
As security configurations should be applied to the entire application, you centralize them in /WEB-INF/library-security.xml and load this file into the root application context. Then, you create this file with the following contents:
<beans:beans xmlns="http://www.springframework.org/schema/security"
    xmlns:beans="http://www.springframework.org/schema/beans"
    xmlns:xsi="http://www.w3.org/2001/XMLSchema-instance"
    xsi:schemaLocation="http://www.springframework.org/schema/beans
        http://www.springframework.org/schema/beans/spring-beans-3.0.xsd
        http://www.springframework.org/schema/security
        http://www.springframework.org/schema/security/spring-security-3.0.xsd">

    <http auto-config="true" />
<authentication-manager><authentication-provider>
        <user-service>
            <user name="user1" password="1111" authorities="ROLE_USER" />
            <user name="user2" password="2222" authorities="ROLE_USER" />
        </user-service>
    </authentication-provider>
</authentication-manager>
</beans:beans>
In the preceding security configurations, you enable Spring Security's HTTP auto-config, which provides a default form-based login service, an anonymous login service, and so on. You also define two user accounts for testing purposes.
In the web flow configuration file (i.e., library-webflow.xml), you have to register the flow execution listener SecurityFlowExecutionListener in the flow executor to enable Spring Security for web flows:
<beans ...>
    ...
    <webflow:flow-executor id="flowExecutor">
        <webflow:flow-execution-listeners>
            <webflow:listener ref="securityFlowExecutionListener" />
        </webflow:flow-execution-listeners>
    </webflow:flow-executor>

    <bean id="securityFlowExecutionListener" class="org.springframework.~CCC
        webflow.security.SecurityFlowExecutionListener" />
</beans>
Now, Spring Security has been configured for your web flow application. You can simply secure a web flow by embedding a <secured> element in a flow definition. For example, let's secure the bookSearch flow defined in /WEB-INF/flows/bookSearch/bookSearch.xml.
<flow xmlns="http://www.springframework.org/schema/webflow"
    xmlns:xsi="http://www.w3.org/2001/XMLSchema-instance"
    xsi:schemaLocation="http://www.springframework.org/schema/webflow
        http://www.springframework.org/schema/webflow/spring-webflow-2.0.xsd">
<secured attributes="ROLE_USER" />
...
</flow>You can specify multiple access attributes required for accessing this web flow in the attributes attribute, separated by commas. By default, a user who has any of the attributes can access this web flow, but you can allow access only to users with all the attributes by setting the match attribute of <secured> to all.
Now if you deploy this application and test the book search flow, you will have to log into the application before you can access this flow. Similarly, you can finely secure a particular state or transaction by embedding a <secured> element.
In many cases, you may have to create and update persistent objects in different states of a web flow. According to the nature of a web flow, the changes made to these persistent objects should not be flushed to the database until the final state of this web flow, which either commits all these changes in a transaction or ignores them if the flow fails or is cancelled. You can maintain a persistence context across different web flow states, but it's hardly an efficient way.
Spring Web Flow is able to manage a persistence context across different states of a web flow without your involvement. You can simply access the managed persistence context with a flow scope variable exposed by Spring Web Flow. Spring Web Flow 2.0 comes with support for JPA and Hibernate.
To have Spring Web Flow manage the persistence contexts for your web flows, you have to register a flow execution listener (e.g., JpaFlowExecutionListener for JPA and HibernateFlowExecutionListener for Hibernate, both of which belong to the org.springframework.webflow.persistence package) in the flow executor. When a new flow starts, this listener creates a new persistence context (e.g., a JPA entity manager or a Hibernate session) and binds it to the flow scope. Then, you can persist your objects with this persistence context in different web flow states. Finally, you can define an end state that either commits the changes or ignores them.
Suppose you are going to build a web flow for readers to borrow books from the library. You would like to store the borrowing records in a database managed by a database engine such as Apache Derby. You consider using JPA to persist the records, with Hibernate as the underlying PA engine. First of all, you define the BorrowingRecord entity class with JPA annotations.
Note
To use Hibernate as the JPA engine, you have to add Hibernate 3, the Hibernate 3 EntityManager, the JPA API, and ehcache. As Hibernate EntityManager depends on Javassist, you also have to include it in your classpath. To use Apache Derby as the database engine, you also have to add a dependency on the Derby client jar. If you are using Maven, add the following declarations to your POM:
<dependency>
  <groupId>javax.persistence</groupId>
  <artifactId>persistence-api</artifactId>
  <version>1.0</version>
 </dependency>

 <dependency>
  <groupId>org.hibernate</groupId>
  <artifactId>hibernate-entitymanager</artifactId>
  <version>3.4.0.GA</version>
  <exclusions>
   <exclusion>
     <groupId>net.sf.ehcache</groupId>
     <artifactId>ehcache</artifactId>
   </exclusion>
  <exclusion>
     <groupId>javax.transaction</groupId>
     <artifactId>jta</artifactId>
   </exclusion>
  </exclusions>
 </dependency>

 <dependency>
   <groupId>org.apache.derby</groupId>
   <artifactId>derbyclient</artifactId>
   <version>10.4.2.0</version>
 </dependency>
package com.apress.springwebrecipes.library.domain; ... import javax.persistence.Entity; import javax.persistence.GeneratedValue; import javax.persistence.GenerationType; import javax.persistence.Id;@Entitypublic class BorrowingRecord implements Serializable {@Id@GeneratedValue(strategy = GenerationType.IDENTITY)private Long id; private String isbn; private Date borrowDate; private Date returnDate; private String reader; // Getters and Setters ... }
Next, you create the JPA configuration file persistence.xml in the META-INF directory of the classpath root:
<persistence xmlns="http://java.sun.com/xml/ns/persistence"
    xmlns:xsi="http://www.w3.org/2001/XMLSchema-instance"
    xsi:schemaLocation="http://java.sun.com/xml/ns/persistence
        http://java.sun.com/xml/ns/persistence/persistence_1_0.xsd"
    version="1.0">

    <persistence-unit name="library" />
</persistence>
In this configuration file, you only define the persistence unit library. The JPA provider information will be configured in Spring's application context.
In the service layer configuration file (i.e., library-service.xml), you can configure a JPA entity manager factory by providing a data source and a JPA vendor adaptor, where you can configure JPA vendor-specific information. In addition, you have to configure a JPA transaction manager for managing JPA transactions. For details about configuring JPA, please see Chapter 17.
<beans ...>
    ...
    <bean id="dataSource"
        class="org.springframework.jdbc.datasource.DriverManagerDataSource">
        <property name="driverClassName"
            value="org.apache.derby.jdbc.ClientDriver" />
        <property name="url"
            value="jdbc:derby://localhost:1527/library;create=true" />
        <property name="username" value="app" />
        <property name="password" value="app" />
    </bean>

    <bean id="entityManagerFactory" class="org.springframework.orm.jpa.~CCC
        LocalContainerEntityManagerFactoryBean">
        <property name="dataSource" ref="dataSource" />
        <property name="jpaVendorAdapter">
            <bean class="org.springframework.orm.jpa.vendor.~CCC
                HibernateJpaVendorAdapter">
                <property name="databasePlatform"
                    value="org.hibernate.dialect.DerbyDialect" />
                <property name="showSql" value="true" />
                <property name="generateDdl" value="true" />
            </bean>
        </property>
    </bean>

    <bean id="transactionManager"
        class="org.springframework.orm.jpa.JpaTransactionManager">
        <property name="entityManagerFactory" ref="entityManagerFactory" />
    </bean>
</beans>To have Spring Web Flow manage the persistence contexts for your web flows, you have to register a flow execution listener in the flow executor. As you are using JPA, you have to register JpaFlowExecutionListener in library-webflow.xml.
<beans ...>
    ...
    <webflow:flow-executor id="flowExecutor">
        <webflow:flow-execution-listeners>
            ...
            <webflow:listener ref="jpaFlowExecutionListener" />
        </webflow:flow-execution-listeners>
    </webflow:flow-executor>
<bean id="jpaFlowExecutionListener"
class="org.springframework.webflow.persistence.JpaFlowExecutionListener">
<constructor-arg ref="entityManagerFactory" />
<constructor-arg ref="transactionManager" />
</bean>
</beans>JpaFlowExecutionListener requires a JPA entity manager factory and a transaction manager as its constructor arguments, which you have configured in the service layer. You can filter the names of the flows to listen for in the criteria attribute, with commas as separators or an asterisk for all flows, which is the default value.
Now, let's define the flow for borrowing books from the library. First, you register a new flow definition in the flow registry:
<webflow:flow-registry flow-builder-services="flowBuilderServices" ~CCC
id="flowRegistry" base-path="/WEB-INF/flows/">
    ...
    <webflow:flow-location path="/borrowBook/borrowBook.xml" />
</webflow:flow-registry>
This flow's first state will show a form for library users to input the borrowing details, which will be bound to a form object of type BorrowingRecord. You can define a form action in library-webflow.xml to handle this borrowing form.
<bean id="borrowBookAction"
    class="org.springframework.webflow.action.FormAction">
    <property name="formObjectClass"
        value="com.apress.springwebrecipes.library.domain.BorrowingRecord" />
    <property name="propertyEditorRegistrar">
        <bean class="com.apress.springwebrecipes.library.web.PropertyEditors" />
    </property>
</bean>
In the flow definition file, /WEB-INF/flows/borrowBook/borrowBook.xml, you have to define a <persistence-context> element to ask Spring Web Flow to manage a persistence context for each flow instance:
<flow xmlns="http://www.springframework.org/schema/webflow"
    xmlns:xsi="http://www.w3.org/2001/XMLSchema-instance"
    xsi:schemaLocation="http://www.springframework.org/schema/webflow
        http://www.springframework.org/schema/webflow/spring-webflow-2.0.xsd">

    <persistence-context />
<view-state id="borrowForm">
<on-render>
<evaluate expression="borrowBookAction.setupForm" />
</on-render>
<transition on="proceed" to="borrowReview">
<evaluate expression="borrowBookAction.bindAndValidate" />
</transition>
<transition on="cancel" to="cancel" />
</view-state>
<view-state id="borrowReview">
<on-render>
<evaluate expression="borrowBookAction.setupForm" />
</on-render>
<transition on="confirm" to="confirm">
<evaluate expression="persistenceContext.persist(borrowingRecord)" />
</transition>
<transition on="revise" to="borrowForm" />
<transition on="cancel" to="cancel" />
</view-state>
<end-state id="confirm" commit="true" />
<end-state id="cancel" />
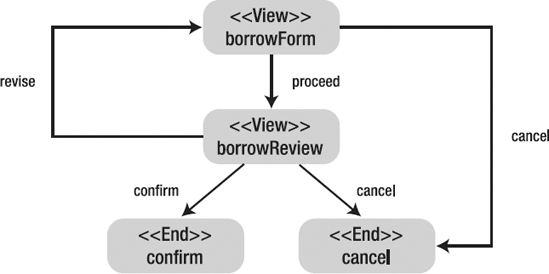
</flow>This flow includes two view states and two end states. The borrowForm state shows a form for a user to input the borrowing details, which will be bound to a flow scope object with the name borrowingRecord, derived from the form object's class name BorrowingRecord. If the user proceeds with the borrowing form, this state will transition to the borrowReview state, which shows the borrowing details for confirmation. If the user confirms the borrowing details, the form object in the flow scope will be persisted with the managed persistence context, and this state will transition to the end state confirm. As this state has its commit attribute set to true, it will commit the changes to the database. However, in either view state, the user can choose to cancel the borrowing form that will cause a transition to the end state cancel, which ignores the changes. The flow diagram for this book-borrowing flow is illustrated in Figure 7-9.
The final step is to create the views for the two view states. For the borrowForm state, you create borrowForm.jsp in /WEB-INF/flows/borrowBook/ so that it will be loaded by default:
<%@ taglib prefix="form" uri="http://www.springframework.org/tags/form" %>

<html>
<head>
<title>Borrow Form</title>
</head>

<body>
<form:form commandName="borrowingRecord">
<table>
  <tr>
    <td>ISBN</td>
    <td><form:input path="isbn" /></td>
  </tr>
  <tr>
    <td>Borrow Date</td>
    <td><form:input path="borrowDate" /></td>
  </tr>
  <tr>
    <td>Return Date</td>
    <td><form:input path="returnDate" /></td>
  </tr>
  <tr>
    <td>Reader</td>
    <td><form:input path="reader" /></td>
  </tr>
<tr>
<td colspan="2">
<input type="submit" name="_eventId_proceed" value="Proceed" />
<input type="submit" name="_eventId_cancel" value="Cancel" />
</td>
</tr>
</table>
</form:form>
</body>
</html>For the borrowReview state, you create borrowReview.jsp in the same location for confirming the borrowing details:
<%@ taglib prefix="fmt" uri="http://java.sun.com/jsp/jstl/fmt" %>

<html>
<head>
<title>Borrow Review</title>
</head>

<body>
<form method="POST">
<table>
  <tr>
    <td>ISBN</td>
    <td>${borrowingRecord.isbn}</td>
  </tr>
  <tr>
    <td>Borrow Date</td>
    <td>
      <fmt:formatDate value="${borrowingRecord.borrowDate}" pattern="yyyy-MM-dd" />
    </td>
  </tr>
  <tr>
    <td>Return Date</td>
    <td>
      <fmt:formatDate value="${borrowingRecord.returnDate}" pattern="yyyy-MM-dd" />
    </td>
  </tr>
  <tr>
    <td>Reader</td>
    <td>${borrowingRecord.reader}</td>
  </tr>
<tr>
<td colspan="2">
<input type="submit" name="_eventId_confirm" value="Confirm" />
<input type="submit" name="_eventId_revise" value="Revise" />
<input type="submit" name="_eventId_cancel" value="Cancel" />
</td>
</tr>
</table>
</form>
</body>
</html>Now, you can deploy the application and test this book-borrowing flow with the URL http://localhost:8080/library/flows/borrowBook.
By default, Spring Web Flow relies on Spring MVC's view technologies (e.g., JSP and Tiles) to render its views. However, you might wish to use JSF's rich set of UI components in your web flow's views or manage the UI flows of your existing JSF applications with Spring Web Flow. In either case, you have to integrate Spring Web Flow with JSF.
Spring Web Flow provides two submodules, Spring Faces and Spring JavaScript, to simplify using JSF and JavaScript in Spring. Spring Faces integrates Spring with JSF 1.2 or higher by allowing you to use JSF's UI components with Spring MVC and Spring Web Flow. Spring Faces supports rendering JSF views in Spring Web Flow and offers a number of JSF integration features for Spring Web Flow.
Spring JavaScript is a JavaScript abstraction framework that integrates the Dojo JavaScript toolkit (http://www.dojotoolkit.org/) as the underlying UI toolkit. Spring Faces provides a set of client-side validation components for standard JSF input components, building on top of Spring JavaScript. These components are provided as Facelets tags, so you have to use Facelets as your JSF view technology to use them.
Now, let's consider reimplementing the book-borrowing flow's views with JSF. In To use the JSF validation components provided by Spring Faces, you have to use Facelets to create your JSF views. First, configure JSF's FacesServlet in web.xml.
Note
To integrate JSF and Facelets with Spring Web Flow, you have to add Spring Faces to your CLASSPATH. You will also need a JSF implementation, Facelets, and an Expression Language implementation. If you are using Maven, add the following dependencies to your Maven project:
<dependency>
  <groupId>org.springframework.webflow</groupId>
  <artifactId>spring-faces</artifactId>
  <version>2.0.8.RELEASE</version>
 </dependency>
 <dependency>
  <groupId>com.sun.facelets</groupId>
  <artifactId>jsf-facelets</artifactId>
  <version>1.1.15.B1</version>
 </dependency>
 <dependency>
  <groupId>org.apache.myfaces.core</groupId>
  <artifactId>myfaces-impl</artifactId>
  <version>1.2.7</version>
 </dependency>

 <dependency>
  <groupId>javax.servlet</groupId>
  <artifactId>jstl</artifactId>
  <version>1.2</version>
 </dependency>
 <dependency>
  <groupId>javax.servlet.jsp</groupId>
  <artifactId>jsp-api</artifactId>
  <version>2.1</version>
 </dependency>

 <dependency>
  <groupId>org.jboss.seam</groupId>
  <artifactId>jboss-el</artifactId>
  <version>2.0.0.GA</version>
<exclusions>
    <exclusion>
     <groupId>javax.el</groupId>
     <artifactId>el-api</artifactId>
    </exclusion>
   </exclusions>
 </dependency>
<web-app ...>
...
<servlet>
<servlet-name>faces</servlet-name>
<servlet-class>javax.faces.webapp.FacesServlet</servlet-class>
</servlet>
</web-app>Note that this servlet is only registered for initializing a web application that uses JSF. It won't be used to handle web flow requests, so you needn't specify a <servlet-mapping> definition for it. However, if you are going to use the legacy JSF request handling at the same time, you will have to specify that.
In the JSF configuration file (i.e., faces-config.xml in the root of WEB-INF), you have to configure FaceletViewHandler as the JSF view handler to enable Facelets and a SpringBeanFacesELResolver to be able to access Spring beans through JSF's expression language.
<?xml version="1.0" encoding="UTF-8"?>
<faces-config version="1.2" xmlns="http://java.sun.com/xml/ns/javaee"
        xmlns:xi="http://www.w3.org/2001/XInclude"
 xmlns:xsi="http://www.w3.org/2001/XMLSchema-instance"
        xsi:schemaLocation="http://java.sun.com/xml/ns/javaee
 http://java.sun.com/xml/ns/javaee/web-facesconfig_1_2.xsd">
        <application>
                <view-handler>com.sun.facelets.FaceletViewHandler</view-handler>
                <el-resolver>org.springframework.web.jsf.el
.SpringBeanFacesELResolver</el-resolver>
        </application>
</faces-config>
In library-webflow.xml, you have to specify the JSF flow builder services for your flow registry, instead of the default Spring MVC flow builder services in use. This way, the JSF flow builder services can render JSF views for web flows. Additionally, we configure a ViewResolver to resolve Facelets views by conventions we dictate. This heuristic is what determines which Facelets view is used when a view state is encountered.
<beans xmlns="http://www.springframework.org/schema/beans"
        xmlns:xsi="http://www.w3.org/2001/XMLSchema-instance"
        xmlns:webflow="http://www.springframework.org/schema/webflow-config"
        xmlns:faces="http://www.springframework.org/schema/faces"
        xsi:schemaLocation="http://www.springframework.org/schema/beans
http://www.springframework.org/schema/beans/spring-beans-3.0.xsd
http://www.springframework.org/schema/webflow-config
http://www.springframework.org/schema/webflow-config/spring-webflow-config-2.0.xsd
http://www.springframework.org/schema/faces
http://www.springframework.org/schema/faces/spring-faces-2.0.xsd">
<webflow:flow-executor id="flowExecutor"
flow-registry="flowRegistry">
<webflow:flow-execution-listeners>
<webflow:listener ref="jpaFlowExecutionListener" />
<webflow:listener ref="securityFlowExecutionListener" />
</webflow:flow-execution-listeners>
</webflow:flow-executor>
<webflow:flow-registry id="flowRegistry"
flow-builder-services="facesFlowBuilderServices" base-path="/WEB-INF/flows">
<webflow:flow-location-pattern value="/**/*.xml" />
</webflow:flow-registry>
<faces:flow-builder-services id="facesFlowBuilderServices"
enable-managed-beans="true" development="true" />
<bean
class="org.springframework.web.servlet.mvc
.SimpleControllerHandlerAdapter" />
<bean class="org.springframework.webflow.mvc.servlet.FlowHandlerAdapter">
<property name="flowExecutor" ref="flowExecutor" />
</bean>
<bean class="org.springframework.webflow.mvc.servlet.FlowHandlerMapping">
<property name="flowRegistry" ref="flowRegistry" />
<property name="defaultHandler">
<bean class="org.springframework.web.servlet.mvc
.UrlFilenameViewController" />
</property>
</bean>
<bean id="faceletsViewResolver"
class="org.springframework.web.servlet.view.UrlBasedViewResolver">
<property name="viewClass" value="org.springframework.faces.mvc.JsfView" />
<property name="prefix" value="/WEB-INF/flows/" />
<property name="suffix" value=".xhtml" />
</bean>
...
</beans>The JSF flow builder services internally use a JSF view factory, which will, by default, load a Facelets page using a view state's name and .xhtml as the file extension. Before you create the Facelets pages for the borrowForm and borrowReview states, you can define a page template to unify your web application's layout (e.g., in /WEB-INF/template.xhtml):
<!DOCTYPE html PUBLIC "-//W3C//DTD XHTML 1.0 Transitional//EN"
    "http://www.w3.org/TR/xhtml1/DTD/xhtml1-transitional.dtd">

<html xmlns="http://www.w3.org/1999/xhtml"
xmlns:ui="http://java.sun.com/jsf/facelets"><head><title><ui:insert name="title">Library</ui:insert></title></head> <body><ui:insert name="content" /></body> </html>
The preceding template defines two areas, with the names title and content. The pages that use this template will insert their own contents into these two areas.
Now, let's create /WEB-INF/flows/borrowBook/borrowForm.xhtml for the borrowForm state so that it will be loaded by default:
<!DOCTYPE html PUBLIC "-//W3C//DTD XHTML 1.0 Transitional//EN"
    "http://www.w3.org/TR/xhtml1/DTD/xhtml1-transitional.dtd">

<ui:composition xmlns="http://www.w3.org/1999/xhtml"
                xmlns:f="http://java.sun.com/jsf/core"
                xmlns:h="http://java.sun.com/jsf/html"
                xmlns:ui="http://java.sun.com/jsf/facelets"
                template="/WEB-INF/template.xhtml">

  <ui:define name="title">Borrow Form</ui:define>

  <ui:define name="content">
    <h:form>
      <h:panelGrid columns="2">
        <h:outputLabel for="isbn">ISBN</h:outputLabel>
        <h:inputText id="isbn" value="#{borrowingRecord.isbn}" />

        <h:outputLabel for="borrowDate">Borrow Date</h:outputLabel>
        <h:inputText id="borrowDate" value="#{borrowingRecord.borrowDate}">
          <f:convertDateTime pattern="yyyy-MM-dd" />
        </h:inputText>

        <h:outputLabel for="returnDate">Return Date</h:outputLabel>
        <h:inputText id="returnDate" value="#{borrowingRecord.returnDate}">
          <f:convertDateTime pattern="yyyy-MM-dd" />
        </h:inputText>

        <h:outputLabel for="reader">Reader</h:outputLabel>
        <h:inputText id="reader" value="#{borrowingRecord.reader}" />
      </h:panelGrid>

      <h:commandButton value="Proceed" action="proceed" />
      <h:commandButton value="Cancel" action="cancel" />
    </h:form>
  </ui:define>
</ui:composition>
In this page, you use standard JSF components like form, outputLabel, inputText, and commandButton to create a form that binds the field values to a form object. The action triggered by a command button will be mapped to a Spring Web Flow event ID that will cause a transition.
Next, create /WEB-INF/flows/borrowBook/borrowReview. xhtml for the borrowReview state:
<!DOCTYPE html PUBLIC "-//W3C//DTD XHTML 1.0 Transitional//EN"
    "http://www.w3.org/TR/xhtml1/DTD/xhtml1-transitional.dtd">

<ui:composition xmlns="http://www.w3.org/1999/xhtml"
                xmlns:f="http://java.sun.com/jsf/core"
                xmlns:h="http://java.sun.com/jsf/html"
                xmlns:ui="http://java.sun.com/jsf/facelets"
                template="/WEB-INF/template.xhtml">

  <ui:define name="title">Borrow Review</ui:define>

  <ui:define name="content">
    <h:form>
      <h:panelGrid columns="2">
        <h:outputLabel for="isbn">ISBN</h:outputLabel>
        <h:outputText id="isbn" value="#{borrowingRecord.isbn}" />

        <h:outputLabel for="borrowDate">Borrow Date</h:outputLabel>
        <h:outputText id="borrowDate" value="#{borrowingRecord.borrowDate}">
          <f:convertDateTime pattern="yyyy-MM-dd" />
        </h:outputText>

        <h:outputLabel for="returnDate">Return Date</h:outputLabel>
        <h:outputText id="returnDate" value="#{borrowingRecord.returnDate}">
          <f:convertDateTime pattern="yyyy-MM-dd" />
        </h:outputText>

        <h:outputLabel for="reader">Reader</h:outputLabel>
        <h:outputText id="reader" value="#{borrowingRecord.reader}" />
      </h:panelGrid>

      <h:commandButton value="Confirm" action="confirm" />
      <h:commandButton value="Revise" action="revise" />
      <h:commandButton value="Cancel" action="cancel" />
    </h:form>
  </ui:define>
</ui:composition>Navigation in traditional JSF applications is handled by linking directly linking to a resource or by invoking an action (for example, on a commandLink). The action is a method on a backing bean that does some sort of processing (perhaps at the end of a form submission) and then returns a String. The String is mapped to a navigation outcome in faces-config.xml. When you use Spring Web Flow, it handles the mapping of the Strings to navigation outcomes for you, instead of faces-config.xml. This is true even when returning Strings from actions.
There are several reasons this is important to bear in mind. With Spring Web Flow, you can use the name of the transition in those action (or actionListener) parameters. Thus, if you click a button and want to cause an action to occur, you can use an event ID to start a flow. There, you might have an evaluate expression which calls Java functionality. This will work most of the time, but from those methods, the FacesContext is not available to you. There are many reasons to want to use the FacesContext from the action. If you have cross field validation, or perhaps even some sort of barrier to ensure state before you start a flow, then you should use the old, standard style of invoking a method and, from that method, return a String (which is an outcome) or null (which will let you stop procession of the navigation). Thus, you haven't lost your Spring Web Flow navigation, you're just using the action as a chance to invoke a method and perform some logic. If, from there, you decide you want to proceed with the navigation, do so as normal.
Thus, a commandButton whose action is mapped to a Spring Web Flow transition, like this
<h:commandButton value="Cancel" action="proceed" />
might become
<h:commandButton value="Cancel" action="#{backingBean.formSubmitted}" />The code for formSubmitted is standard:
public String formSubmitted (){

        FacesContext fc = FacesContext.getCurrentInstance(); // won't be null
        // ... do any kind of logic you want, or perhaps setup state
        return "proceed" ;
}Before you can use the Spring Faces components, you have to register ResourceServlet, which is provided by Spring JavaScript for accessing static resources in JAR files, in the web deployment descriptor. These components will retrieve static JavaScript and CSS resources from Spring JavaScript through this servlet.
<web-app ...>
    ...
    <servlet>
        <servlet-name>resources</servlet-name>
        <servlet-class>
            org.springframework.js.resource.ResourceServlet
        </servlet-class>
    </servlet>

    <servlet-mapping>
        <servlet-name>resources</servlet-name>
        <url-pattern>/resources/*</url-pattern>
    </servlet-mapping>
</web-app>
Spring Faces provides a set of validation components to perform client-side validation for standard JSF input components. These components are provided as Facelets tags defined in the Spring Faces tag library, so you have to include this tag library in the root element beforehand. For example, you can enable client-side validation for the borrow form components in /WEB-INF/flows/borrowBook/borrowForm.xhtml as follows:
<ui:composition xmlns="http://www.w3.org/1999/xhtml"
                xmlns:f="http://java.sun.com/jsf/core"
                xmlns:h="http://java.sun.com/jsf/html"
                xmlns:ui="http://java.sun.com/jsf/facelets"
                xmlns:sf="http://www.springframework.org/tags/faces"
                template="/WEB-INF/template.xhtml">

  <ui:define name="title">Borrow Form</ui:define>

  <ui:define name="content">
    <h:form>
      <h:panelGrid columns="2">
        <h:outputLabel for="isbn">ISBN</h:outputLabel>
        <sf:clientTextValidator required="true" regExp="[0-9]{10}">
          <h:inputText id="isbn" value="#{borrowingRecord.isbn}" />
        </sf:clientTextValidator>

        <h:outputLabel for="borrowDate">Borrow Date</h:outputLabel>
        <sf:clientDateValidator required="true">
          <h:inputText id="borrowDate" value="#{borrowingRecord.borrowDate}">
            <f:convertDateTime pattern="yyyy-MM-dd" />
          </h:inputText>
        </sf:clientDateValidator>

        <h:outputLabel for="returnDate">Return Date</h:outputLabel>
        <sf:clientDateValidator required="true">
          <h:inputText id="returnDate" value="#{borrowingRecord.returnDate}">
            <f:convertDateTime pattern="yyyy-MM-dd" />
          </h:inputText>
        </sf:clientDateValidator>

        <h:outputLabel for="reader">Reader</h:outputLabel>
        <sf:clientTextValidator required="true">
          <h:inputText id="reader" value="#{borrowingRecord.reader}" />
        </sf:clientTextValidator>
      </h:panelGrid>

      <sf:validateAllOnClick>
        <h:commandButton value="Proceed" action="proceed" />
      </sf:validateAllOnClick>

      <h:commandButton value="Cancel" action="cancel" />
    </h:form>
  </ui:define>
</ui:composition>
The validation components enable client-side validation for the inputText components. You will see that the clientDateValidator component additionally provides a pop-up date picker control for its enclosed input field. Finally, when a command button enclosed by a validateAllInClick component is clicked, it will trigger all validators in the same page to validate their fields.
Finally, you have to choose a Dojo theme for rendering these components. For example, you can specify using the tundra theme in the <body> element of the page template in template.xhtml:
<html xmlns="http://www.w3.org/1999/xhtml"
      xmlns:ui="http://java.sun.com/jsf/facelets">
<head>
<title><ui:insert name="title">Library</ui:insert></title>
</head>

<body class="tundra">
<ui:insert name="content"/>
</body>
</html>In the previous recipe, we leveraged some of the advanced components that ship with Spring Faces, most of which are based on the Dojo JavaScript framework. These components are a great start, but sometimes, you're going to want something slightly more powerful, like RichFaces.
There is integration support for using Spring Web Flow with RichFaces. RichFaces actually provides two libraries that each serve very different purposes. One, called Ajax4JSF, provides the ability to augment existing components and page elements with Ajax functionality. The other, RichFaces, provides an advanced component set with Ajax functionality baked into the core.
Because you can do things like return redirects and rerender partial pages using Ajax, it's important that the functionality is well integrated with Spring Web Flow. In our setup, we delegate all navigation to Spring Web Flow and let it manage the state of objects associated with those flows. Thus, for libraries wishing to integrate with Spring Web Flow, there are API hooks. One, for RichFaces, is provided out of the box.
To setup RichFaces, you'll need to make a few changes to your web.xml, regardless of whether you're using Spring Web Flow. Most of the following web.xml should be familiar to you, as the code is repeated to provide a whole, working example. This example demonstrates setting up Spring Web Flow, RichFaces, and Facelets and the JSF framework using Apache's MyFaces.
<?xml version="1.0"  encoding="UTF-8"?>
<web-app xmlns:xsi="http://www.w3.org/2001/XMLSchema-instance"
        xmlns="http://java.sun.com/xml/ns/javaee"
 xmlns:web="http://java.sun.com/xml/ns/javaee/web-app_2_5.xsd"
        xsi:schemaLocation="http://java.sun.com/xml/ns/javaee
 http://java.sun.com/xml/ns/javaee/web-app_2_5.xsd"
        version="2.5">
        <display-name>richfaces-swf-application</display-name>

        <listener>
                <listener-class>org.springframework.web.context
.ContextLoaderListener</listener-class>
        </listener>
        <listener>
                <listener-class>org.springframework.web.context
.request.RequestContextListener</listener-class>
        </listener>
        <context-param>
                <param-name>contextConfigLocation</param-name>
                <param-value>/WEB-INF/spring/web-application-context.xml</param-value>
        </context-param>
        <context-param>
                <param-name>org.ajax4jsf.VIEW_HANDLERS</param-name>
                <param-value>com.sun.facelets.FaceletViewHandler</param-value>
        </context-param>
        <listener>
                <listener-class>org.apache.myfaces.webapp
.StartupServletContextListener</listener-class>
        </listener>
        <filter>
                <display-name>RichFaces Filter</display-name>
                <filter-name>richfaces</filter-name>
                <filter-class>org.ajax4jsf.Filter</filter-class>
        </filter>
        <filter-mapping>
                <filter-name>richfaces</filter-name>
                <servlet-name>faces</servlet-name>
                <dispatcher>REQUEST</dispatcher>
                <dispatcher>FORWARD</dispatcher>
                <dispatcher>INCLUDE</dispatcher>
        </filter-mapping>
        <filter-mapping>
                <filter-name>richfaces</filter-name>
                <servlet-name>SwfServlet</servlet-name>
                <dispatcher>REQUEST</dispatcher>
                <dispatcher>FORWARD</dispatcher>
                <dispatcher>INCLUDE</dispatcher>
        </filter-mapping>
<servlet>
<servlet-name>faces</servlet-name>
<servlet-class>javax.faces.webapp.FacesServlet</servlet-class>
<load-on-startup>1</load-on-startup>
</servlet>
<servlet>
<servlet-name>SwfServlet</servlet-name>
<servlet-class>org.springframework.web.servlet
.DispatcherServlet</servlet-class>
<init-param>
<param-name>contextConfigLocation</param-name>
<param-value></param-value>
</init-param>
<load-on-startup>2</load-on-startup>
</servlet>
<servlet>
<servlet-name>Resource Servlet</servlet-name>
<servlet-class>org.springframework.js.resource
.ResourceServlet</servlet-class>
<load-on-startup>0</load-on-startup>
</servlet>
<servlet-mapping>
<servlet-name>Resource Servlet</servlet-name>
<url-pattern>/resources/*</url-pattern>
</servlet-mapping>
<servlet-mapping>
<servlet-name>SwfServlet</servlet-name>
<url-pattern>/swf/*</url-pattern>
</servlet-mapping>
<servlet-mapping>
<servlet-name>faces</servlet-name>
<url-pattern>*.xhtml</url-pattern>
<url-pattern>/faces/*</url-pattern>
</servlet-mapping>
</web-app>Here, we have definitions for both the Spring Web Flow servlet and the JavaServer Faces (JSF) servlet. In addition, we've configured the RichFaces filter to handle requests destined for both servlets. The next step is to configure Spring Web Flow to be aware of the library. Everything remains as it was before, except that you need to tell Spring Web Flow about how to handle Ajax requests. You do this by configuring an instance of FlowHandlerAdapter in library-webflow.xml. Add the following toward the end, right before the closing beans element:
<bean class="org.springframework.webflow.mvc.servlet.FlowHandlerAdapter">
        <property name="flowExecutor" ref="flowExecutor" />
        <property name="ajaxHandler">
                <bean class="org.springframework.faces.richfaces.RichFacesAjaxHandler" />
        </property>
</bean>
At this point, almost everything's ready. The final nuance is in the application of Ajax partial page updates. When you use the RichFaces and Ajax4JSF libraries, there is the notion that actions that might affect server side state should also be able to rerender parts of the client. Let's examine the use case of updating a counter using Ajax. You click a button, and a number is incremented. In your flow, you'll simply return the user to the original view, re-rendering the updated value. In RichFaces, this looks like so:
<ui:composition template="/WEB-INF/template/default.xhtml"
        xmlns="http://www.w3.org/1999/xhtml"
        xmlns:ui="http://java.sun.com/jsf/facelets"
        xmlns:f="http://java.sun.com/jsf/core"
        xmlns:h="http://java.sun.com/jsf/html"
        xmlns:jawr="https://jawr.dev.java.net/jsf/facelets"
        xmlns:a4j="http://richfaces.org/a4j"
        xmlns:rich="http://richfaces.org/rich">
        <ui:define name="title"> Update Count  </ui:define>
        <ui:define name="content">
                <f:view>
                        <h:form id="counter">
                                <a4j:outputPanel id="countFragment">
                                        <h:outputText value = "#{counterBean.count}" />
                                </a4j:outputPanel>
                                <br />
                                <a4j:commandLink id="update" value="Update Count"
 action="updateCount" reRender="#{flowRenderFragments}" />
                        </h:form>
                </f:view>
        </ui:define>
</ui:composition>
When the link is clicked, method flow state is sent to the server (as the commandLink's action value) which triggers the advancement of the web flow. In this case, the state has a transition element, and a render element. When the transition is reached the expression is evaluated (triggering the logic that updates the counter) and the fragment to be rerendered is sent back to the client, where RichFaces rerenders components whose IDs are enumerated. Additionally, RichFaces will rerender a4j:outputPanel components whose ajaxRendered attribute is true, unless the limitToList attribute is specified. This is somewhat counterintuitive to the way Spring Web Flow's SpringFaces works, where you explicitly enumerate what to rerender on navigation.
<?xml version="1.0" encoding="UTF-8"?>
<flow xmlns="http://www.springframework.org/schema/webflow"
        xmlns:xsi="http://www.w3.org/2001/XMLSchema-instance"
        xsi:schemaLocation="http://www.springframework.org/schema/webflow
                          http://www.springframework.org/schema/webflow
/spring-webflow-2.0.xsd">
<view-state id="counter">
<transition on="updateCount">
<evaluate expression="counterBean.updateCount()" />
<render fragments="counter:countFragment" />
</transition>
</view-state>
</flow>Spring Web Flow provides the flowRenderFragments context variable that Ajax4JSF can observe, which lets it rerender the fragments specified by the transition and thus avoid stepping on Spring Web Flow's toes. The preceding commandLink is rewritten to take advantage of this new transition. The result is not generic and moves any sort of transition and navigation logic into Spring Web Flow's control, where it belongs.
<a4j:commandLink id="update" value="Update Count" action="updateCount" reRender="#{flowRenderFragments}" />In this chapter, you learned how to manage a web application's UI flows using Spring Web Flow.
You started by building a flow definition using Spring Web Flow. A flow definition in Spring Web Flow consists of one or more states, which can include view, action, decision, subflow, and end states. Once a state has completed its tasks, it fires an event. An event contains a source and an event ID, and perhaps some attributes. Each state can also contain transitions, each of which maps a returned event ID to the next state.
Next, you learned how to secure a Spring Web Flow. Spring Web Flow offers integration for Spring Security. This allows you to easily secure your web flows using this Spring-related security project, thoroughly discussed in Chapter 7. With Spring Security configured properly, you can secure a flow, a state, or a transition by embedding the <secured> element with required access attributes specified.
You also explored how Spring Web Flow deals with persistence. Since Spring Web Flow 2.0 comes with support for JPA and Hibernate, you can easily access a persistence context across different states of a web flow. You just access the managed persistence context with a flow scope variable exposed by Spring Web Flow.
Finally, you learned that not only does Spring Web Flow work with Spring MVC's view technologies (e.g., JSP and Tiles) to render its views but it can also be configured to use JSF or RichFaces UI components in your web flow's views.