
In this chapter, you will be given a crash course introduction (or refresher!) to Spring, the core container, as well as some of the globally available facilities provided by the container. You will also become acquainted with the Spring XML configuration format as well as the annotation-driven support.
This chapter will give you the knowledge you need to deal with the concepts introduced in the rest of the book. You will learn basic component configuration in the Spring IoC container. At the heart of the Spring framework, the IoC container is designed to be highly adaptive and configurable. It provides a set of facilities to make your component configuration as simple as possible. You can easily configure your components to run in the Spring IoC container.
In Spring, components are also called "beans." Note that this is a different concept from the JavaBeans specification defined by Sun. The beans declared in the Spring IoC container are not necessarily required to be JavaBeans. They can be any POJOs (Plain Old Java Objects). The term POJO means an ordinary Java object without any specific requirements, such as to implement a specific interface or to extend a specific base class. This term is used to distinguish lightweight Java components from heavyweight components in other complex component models (e.g., EJB components prior to version 3.1 of the EJB specification).
Upon finishing this chapter, you will be able to build a complete Java application using the Spring IoC container. Additionally, if you review your old Java applications, you may find that you can significantly simplify and improve them by using the Spring IoC container.
You have to instantiate the Spring IoC container for it to create bean instances by reading their configurations. Then, you can get the bean instances from the IoC container to use.
Spring provides two types of IoC container implementation. The basic one is called bean factory. The more advanced one is called application context, which is a compatible extension to the bean factory. Note that the bean configuration files for these two types of IoC containers are identical.
The application context provides more advanced features than the bean factory while keeping the basic features compatible. So we strongly recommend using the application context for every application unless the resources of this application are restricted, such as when running in an applet or a mobile device.
The interfaces for the bean factory and the application context are BeanFactory and ApplicationContext, respectively. The interface ApplicationContext is a subinterface of BeanFactory for maintaining compatibility.
Note
In order to compile and run the Spring code presented in this chapter and all subsequent chapters, you'll need to have the dependencies for the Spring framework on your classpath. The recommended way to do this is using a build management solution like Apache Maven or Apache Ant and Ivy. If you are using Maven, add the dependencies listed below to your Maven project. Here, as elsewhere, we use the notation ${spring.version} to refer to the version. Replace this with the version that is most relevant to you. This book was written and compiled against the version 3.0.2.RELEASE.
<dependency>
   <groupId>org.springframework</groupId>
   <artifactId>spring-aop</artifactId>
   <version>${spring.version}</version>
</dependency>


<dependency>
   <groupId>org.springframework</groupId>
   <artifactId>spring-web</artifactId>
   <version>${spring.version}</version>
</dependency>


<dependency>
   <groupId>org.springframework</groupId>
   <artifactId>spring-context-support</artifactId>
   <version>${spring.version}</version>
</dependency>
<dependency>
<groupId>org.springframework</groupId>
<artifactId>spring-beans</artifactId>
<version>${spring.version}</version>
</dependency>
<dependency>
<groupId>org.springframework</groupId>
<artifactId>spring-context</artifactId>
<version>${spring.version}</version>
</dependency>
<dependency>
<groupId>org.springframework</groupId>
<artifactId>spring-core</artifactId>
<version>${spring.version}</version>
</dependency>ApplicationContext is an interface only. You have to instantiate an implementation of it. The ClassPathXmlApplicationContext implementation builds an application context by loading an XML configuration file from the classpath. You can also specify multiple configuration files for it.
ApplicationContext context = new ClassPathXmlApplicationContext("beans.xml");Besides ClassPathXmlApplicationContext, several other ApplicationContext implementations are provided by Spring. FileSystemXmlApplicationContext is used to load XML configuration files from the file system or from URLs, while XmlWebApplicationContext and XmlPortletApplicationContext can be used in web and portal applications only.
To get a declared bean from a bean factory or an application context, you just make a call to the getBean() method and pass in the unique bean name. The return type of the getBean() method is java.lang.Object, so you have to cast it to its actual type before using it.
SequenceGenerator generator =
    (SequenceGenerator) context.getBean("sequenceGenerator");
Up to this step, you are free to use the bean just like any object you created using a constructor. The complete source code for running the sequence generator application is given in the following Main class:
package com.apress.springrecipes.sequence;

import org.springframework.context.ApplicationContext;
import org.springframework.context.support.ClassPathXmlApplicationContext;

public class Main {

    public static void main(String[] args) {
        ApplicationContext context =
            new ClassPathXmlApplicationContext("beans.xml");

        SequenceGenerator generator =
            (SequenceGenerator) context.getBean("sequenceGenerator");

        System.out.println(generator.getSequence());
        System.out.println(generator.getSequence());
    }
}
If everything is fine, you should see the following sequence numbers output, along with some logging messages that you might not be interested in:
30100000A

30100001A
Spring offers a powerful IoC container to manage the beans that make up an application. To utilize the container services, you have to configure your beans to run in the Spring IoC container.
You can configure your beans in the Spring IoC container through XML files, properties files, annotations, or even APIs.
Spring allows you to configure your beans in one or more bean configuration files. For a simple application, you can just centralize your beans in a single configuration file. But for a large application with a lot of beans, you should separate them in multiple configuration files according to their functionalities (e.g., controllers, DAO, and JMS). One useful division is by the architectural layer that a given context services.
Suppose that you are going to develop an application for generating sequence numbers. In this application, there may be many series of sequence numbers to generate for different purposes. Each one of them will have its own prefix, suffix, and initial value. So you have to create and maintain multiple generator instances in your application.
In accordance with the requirements, you create the SequenceGenerator class that has three properties prefix, suffix, and initial—that can be injected via setter methods or a constructor. The private field counter is for storing the current numeric value of this generator. Each time you call the getSequence() method on a generator instance, you will get the last sequence number with the prefix and suffix joined. You declare this method as synchronized to make it thread-safe.
package com.apress.springrecipes.sequence;

public class SequenceGenerator {

    private String prefix;
    private String suffix;
    private int initial;
    private int counter;

    public SequenceGenerator() {}

    public SequenceGenerator(String prefix, String suffix, int initial) {
        this.prefix = prefix;
        this.suffix = suffix;
        this.initial = initial;
    }

    public void setPrefix(String prefix) {
        this.prefix = prefix;
    }

    public void setSuffix(String suffix) {
        this.suffix = suffix;
    }

    public void setInitial(int initial) {
        this.initial = initial;
    }
public synchronized String getSequence() {
StringBuffer buffer = new StringBuffer();
buffer.append(prefix);
buffer.append(initial + counter++);
buffer.append(suffix);
return buffer.toString();
}
}As you see, this SequenceGenerator class can be configured by getters/setters or by the constructor. When configuring them with the container, this is called constructor injection and setter injection.
To declare beans in the Spring IoC container via XML, you first have to create an XML bean configuration file with an appropriate name, such as beans.xml. You can put this file in the root of the classpath for easier testing within an IDE.
The Spring configuration XML allows you to use custom tags from different schemas (tx, jndi, jee, and so on) to make the bean configuration simpler and clearer. Here's an example of the simplest XML configuration possible.
<beans xmlns="http://www.springframework.org/schema/beans"
    xmlns:xsi="http://www.w3.org/2001/XMLSchema-instance"
    xsi:schemaLocation="http://www.springframework.org/schema/beans
        http://www.springframework.org/schema/beans/spring-beans-3.0.xsd">
    ...
</beans>Each bean should provide a unique name or id and a fully qualified class name for the Spring IoC container to instantiate it. For each bean property of simple type (e.g., String and other primitive types), you can specify a <value> element for it. Spring will attempt to convert your value into the declaring type of this property. To configure a property via setter injection, you use the <property> element and specify the property name in its name attribute. A <property> requires that the bean contain a corresponding setter method.
<bean name="sequenceGenerator"class="com.apress.springrecipes.sequence.SequenceGenerator"><property name="prefix"><value>30</value> </property><property name="suffix"><value>A</value> </property> <property name="initial"> <value>100000</value> </property> </bean>
You can also configure bean properties via constructor injection by declaring them in the <constructor-arg> elements. There's not a name attribute in <constructor-arg>, because constructor arguments are position-based.
<bean name="sequenceGenerator"
    class="com.apress.springrecipes.sequence.SequenceGenerator">
    <constructor-arg>
        <value>30</value>
    </constructor-arg>
    <constructor-arg>
        <value>A</value>
    </constructor-arg>
    <constructor-arg>
        <value>100000</value>
    </constructor-arg>
</bean>
In the Spring IoC container, each bean's name should be unique, although duplicate names are allowed for overriding bean declaration if more than one context is loaded. A bean's name can be defined by the name attribute of the <bean> element. Actually, there's a preferred way of identifying a bean: through the standard XML id attribute, whose purpose is to identify an element within an XML document. In this way, if your text editor is XML-aware, it can help to validate each bean's uniqueness at design time.
<bean id="sequenceGenerator"
    class="com.apress.springrecipes.sequence.SequenceGenerator">
    ...
</bean>
However, XML has restrictions on the characters that can appear in the XML id attribute. But usually, you won't use those special characters in a bean name. Moreover, Spring allows you to specify multiple names, separated by commas, for a bean in the name attribute. But you can't do so in the id attribute because commas are not allowed there.
In fact, neither the bean name nor the bean ID is required for a bean. A bean that has no name defined is called an anonymous bean. You will usually create beans like this that serve only to interact with the Spring container itself, that you are sure you will only inject by type later on, or that you will nest, inline, in the declaration of an outer bean.
Spring supports a shortcut for specifying the value of a simple type property. You can present a value attribute in the <property> element instead of enclosing a <value> element inside.
<bean id="sequenceGenerator"
    class="com.apress.springrecipes.sequence.SequenceGenerator">
    <property name="prefix" value="30" />
    <property name="suffix" value="A" />
    <property name="initial" value="100000" />
</bean>
This shortcut also works for constructor arguments.
<bean name="sequenceGenerator"
    class="com.apress.springrecipes.sequence.SequenceGenerator">
    <constructor-arg value="30" />
    <constructor-arg value="A" />
    <constructor-arg value="100000" />
</bean>
Since Spring 2.0 another convenient shortcut to define properties was added. It consists of using the p schema to define bean properties as attributes of the <bean> element. This can shorten the lines of XML configuration.
<beans xmlns="http://www.springframework.org/schema/beans"
    xmlns:xsi="http://www.w3.org/2001/XMLSchema-instance"
    xmlns:p="http://www.springframework.org/schema/p"
    xsi:schemaLocation="http://www.springframework.org/schema/beans
        http://www.springframework.org/schema/beans/spring-beans-3.0.xsd">

    <bean id="sequenceGenerator"
        class="com.apress.springrecipes.sequence.SequenceGenerator"
        p:prefix="30" p:suffix="A" p:initial="100000" />
</beans>List, Set, and Map are the core interfaces representing the three main types of collections in the Java SDK, part of a framework called the Java Collections framework. For each collection type, Java provides several implementations with different functions and characteristics from which you can choose. In Spring, these types of collections can be easily configured with a group of built-in XML tags, such as <list>, <set>, and <map>.
Suppose you are going to allow more than one suffix for your sequence generator. The suffixes will be appended to the sequence numbers with hyphens as the separators. You may consider accepting suffixes of arbitrary data types and converting them into strings when appending to the sequence numbers.
First, let's use a java.util.List collection to contain your suffixes. A list is an ordered and indexed collection whose elements can be accessed either by index or with a for-each loop.
package com.apress.springrecipes.sequence;
...
public class SequenceGenerator {
    ...
    private List<Object> suffixes;
public void setSuffixes(List<Object> suffixes) {this.suffixes = suffixes; } public synchronized String getSequence() { StringBuffer buffer = new StringBuffer(); ...for (Object suffix : suffixes) {buffer.append("-");buffer.append(suffix);}return buffer.toString(); } }
To define a property of the interface java.util.List in the bean configuration, you specify a <list> tag that contains the elements. The elements allowed inside the <list> tag can be a simple constant value specified by <value>, a bean reference by <ref>, an inner bean definition by <bean>, an ID reference definition by <idref>, or a null element by <null>. You can even embed other collections in a collection.
<bean id="sequenceGenerator"
    class="com.apress.springrecipes.sequence.SequenceGenerator">

    <property name="initial" value="100000" />
    <property name="suffixes">
        <list>
            <value>A</value>
            <bean class="java.net.URL">
                <constructor-arg value="http" />
                <constructor-arg value="www.apress.com" />
                <constructor-arg value="/" />
            </bean>
            <null />
        </list>
    </property>
</bean>
Conceptually, an array is very similar to a list in that it's also an ordered and indexed collection that can be accessed by index. The main difference is that the length of an array is fixed and cannot be extended dynamically. In the Java Collections framework, an array and a list can be converted to each other through the Arrays.asList() and List.toArray() methods. For your sequence generator, you can use an Object[] array to contain the suffixes and access them either by index or with a for-each loop.
package com.apress.springrecipes.sequence;
...
public class SequenceGenerator {
    ...
    private Object[] suffixes;
public void setSuffixes(Object[] suffixes) {
this.suffixes = suffixes;
}
...
}The definition of an array in the bean configuration file is identical to a list denoted by the <list> tag.
Another common collection type is a set. Both the java.util.List interface and the java.util.Set interface extend the same interface: java.util.Collection. A set differs from a list in that it is neither ordered nor indexed, and it can store unique objects only. That means no duplicate element can be contained in a set. When the same element is added to a set for the second time, it will replace the old one. The equality of elements is determined by the equals() method.
package com.apress.springrecipes.sequence;
...
public class SequenceGenerator {
    ...
    private Set<Object> suffixes;

    public void setSuffixes(Set<Object> suffixes) {
        this.suffixes = suffixes;
    }
    ...
}
To define a property of java.util.Set type, use the <set> tag to define the elements in the same way as a list.
<bean id="sequenceGenerator"
    class="com.apress.springrecipes.sequence.SequenceGenerator">
    ...
    <property name="suffixes">
        <set>
            <value>A</value>
            <bean class="java.net.URL">
                <constructor-arg value="http" />
                <constructor-arg value="www.apress.com" />
                <constructor-arg value="/" />
            </bean>
            <null />
        </set>
    </property>
</bean>
Although there's no order concept in the original set semantics, Spring preserves the order of your elements by using java.util.LinkedHashSet, an implementation of the java.util.Set interface that does preserve element order.
A map interface is a table that stores its entries in key/value pairs. You can get a particular value from a map by its key, and also iterate the map entries with a for-each loop. Both the keys and values of a map can be of arbitrary type. Equality between keys is also determined by the equals() method. For example, you can modify your sequence generator to accept a java.util.Map collection that contains suffixes with keys.
package com.apress.springrecipes.sequence;
...
public class SequenceGenerator {
    ...
    private Map<Object, Object> suffixes;

    public void setSuffixes(Map<Object, Object> suffixes) {
        this.suffixes = suffixes;
    }

    public synchronized String getSequence() {
        StringBuffer buffer = new StringBuffer();
        ...
        for (Map.Entry entry : suffixes.entrySet()) {
            buffer.append("-");
            buffer.append(entry.getKey());
            buffer.append("@");
            buffer.append(entry.getValue());
        }
        return buffer.toString();
    }
}
In Spring, a map is defined by the <map> tag, with multiple <entry> tags as children. Each entry contains a key and a value. The key must be defined inside the <key> tag. There is no restriction on the type of the key and value, so you are free to specify a <value>, <ref>, <bean>, <idref>, or <null> element for them. Spring will also preserve the order of the map entries by using java.util.LinkedHashMap.
<bean id="sequenceGenerator"
    class="com.apress.springrecipes.sequence.SequenceGenerator">
    ...
    <property name="suffixes">
        <map>
            <entry>
                <key>
                    <value>type</value>
                </key>
                <value>A</value>
            </entry>
            <entry>
                <key>
                    <value>url</value>
                </key>
<bean class="java.net.URL">
<constructor-arg value="http" />
<constructor-arg value="www.apress.com" />
<constructor-arg value="/" />
</bean>
</entry>
</map>
</property>
</bean>There are shortcuts to defining map keys and values as attributes of the <entry> tag. If they are simple constant values, you can define them by key and value. If they are bean references, you can define them by key-ref and value-ref.
<bean id="sequenceGenerator"
class="com.apress.springrecipes.sequence.SequenceGenerator">
...
<property name="suffixes">
<map>
<entry key="type" value="A" />
<entry key="url">
<bean class="java.net.URL">
                    <constructor-arg value="http" />
                    <constructor-arg value="www.apress.com" />
                    <constructor-arg value="/" />
                </bean>
            </entry>
        </map>
    </property>
</bean>In all the collection classes seen thus far, you used values to set the properties. Sometimes, the desired goal is to configure a null value using a Map instance. Spring's XML configuration schema includes explicit support for this. Here is a map with null values for the value of an entry:
<property name="nulledMapValue">
        <map>
            <entry>
                <key> <value>null</value> </key>
            </entry>
        </map>
    </property>
A java.util.Properties collection is very similar to a map. It also implements the java.util.Map interface and stores entries in key/value pairs. The only difference is that the keys and values of a Properties collection are always strings.
package com.apress.springrecipes.sequence;
...
public class SequenceGenerator {
    ...
    private Properties suffixes;

    public void setSuffixes(Properties suffixes) {
        this.suffixes = suffixes;
    }
    ...
}
To define a java.util.Properties collection in Spring, use the <props> tag with multiple <prop> tags as children. Each <prop> tag must have a key attribute defined and the corresponding value enclosed.
<bean id="sequenceGenerator"
    class="com.apress.springrecipes.sequence.SequenceGenerator">
    ...
    <property name="suffixes">
        <props>
            <prop key="type">A</prop>
            <prop key="url">http://www.apress.com/</prop>
            <prop key="null">null</prop>
        </props>
    </property>
</bean>If you define your beans with inheritance, a child bean's collection can be merged with that of its parent by setting the merge attribute to true. For a <list> collection, the child elements will be appended after the parent's to preserve the order. So, the following sequence generator will have four suffixes: A, B, A, and C.
<beans ...>
    <bean id="baseSequenceGenerator"
        class="com.apress.springrecipes.sequence.SequenceGenerator">
        <property name="prefixGenerator" ref="datePrefixGenerator" />
        <property name="initial" value="100000" />
        <property name="suffixes">
            <list>
                <value>A</value>
                <value>B</value>
            </list>
        </property>
    </bean>
<bean id="sequenceGenerator" parent="baseSequenceGenerator">
<property name="suffixes">
<list merge="true">
<value>A</value>
<value>C</value>
</list>
</property>
</bean>
...
</beans>For a <set> or <map> collection, the child elements will overwrite the parent's if they have the same value. So, the following sequence generator will have three suffixes: A, B, and C.
<beans ...>
    <bean id="baseSequenceGenerator"
        class="com.apress.springrecipes.sequence.SequenceGenerator">
        <property name="prefixGenerator" ref="datePrefixGenerator" />
        <property name="initial" value="100000" />
        <property name="suffixes">
            <set>
                <value>A</value>
                <value>B</value>
            </set>
        </property>
    </bean>

    <bean id="sequenceGenerator" parent="baseSequenceGenerator">
        <property name="suffixes">
            <set merge="true">
                <value>A</value>
                <value>C</value>
            </set>
        </property>
    </bean>
    ...
</beans>You would like to create a bean in the Spring IoC container by invoking its constructor, which is the most common and direct way of creating beans. It is equivalent to using the new operator to create objects in Java.
Normally, when you specify the class attribute for a bean, you are asking the Spring IoC container to create the bean instance by invoking its constructor.
Suppose you are going to develop a shop application to sell products online. First of all, you create the Product class, which has several properties, such as the product name and price. As there are many types of products in your shop, you make the Product class abstract for different product subclasses to extend.
package com.apress.springrecipes.shop;

public abstract class Product {

    private String name;
    private double price;

    public Product() {}

    public Product(String name, double price) {
        this.name = name;
        this.price = price;
    }

    // Getters and Setters
    ...

    public String toString() {
        return name + " " + price;
    }
}
Then you create two product subclasses, Battery and Disc. Each of them has its own properties.
package com.apress.springrecipes.shop;

public class Battery extends Product {

    private boolean rechargeable;

    public Battery() {
        super();
    }

    public Battery(String name, double price) {
        super(name, price);
    }
// Getters and Setters
...
}
package com.apress.springrecipes.shop;
public class Disc extends Product {
private int capacity;
public Disc() {
super();
}
public Disc(String name, double price) {
super(name, price);
}
// Getters and Setters
...
}To define some products in the Spring IoC container, you create the following bean configuration file:
<beans xmlns="http://www.springframework.org/schema/beans"
    xmlns:xsi="http://www.w3.org/2001/XMLSchema-instance"
    xsi:schemaLocation="http://www.springframework.org/schema/beans
        http://www.springframework.org/schema/beans/spring-beans-3.0.xsd">

    <bean id="aaa" class="com.apress.springrecipes.shop.Battery">
        <property name="name" value="AAA" />
        <property name="price" value="2.5" />
        <property name="rechargeable" value="true" />
    </bean>

    <bean id="cdrw" class="com.apress.springrecipes.shop.Disc">
        <property name="name" value="CD-RW" />
        <property name="price" value="1.5" />
        <property name="capacity" value="700" />
    </bean>
</beans>
If there's no <constructor-arg> element specified, the default constructor with no argument will be invoked. Then for each <property> element, Spring will inject the value through the setter method. The preceding bean configuration is equivalent to the following code snippet:
Product aaa = new Battery();
aaa.setName("AAA");
aaa.setPrice(2.5);
aaa.setRechargeable(true);

Product cdrw = new Disc();
cdrw.setName("CD-RW");
cdrw.setPrice(1.5);
cdrw.setCapacity(700);
Otherwise, if there are one or more <constructor-arg> elements specified, Spring will invoke the most appropriate constructor that matches your arguments.
<beans ...>
    <bean id="aaa" class="com.apress.springrecipes.shop.Battery">
        <constructor-arg value="AAA" />
        <constructor-arg value="2.5" />
        <property name="rechargeable" value="true" />
    </bean>

    <bean id="cdrw" class="com.apress.springrecipes.shop.Disc">
        <constructor-arg value="CD-RW" />
        <constructor-arg value="1.5" />
        <property name="capacity" value="700" />
    </bean>
</beans>
As there is no constructor ambiguity for the Product class and subclasses, the preceding bean configuration is equivalent to the following code snippet:
Product aaa = new Battery("AAA", 2.5);
aaa.setRechargeable(true);

Product cdrw = new Disc("CD-RW", 1.5);
cdrw.setCapacity(700);
You can write the following Main class to test your products by retrieving them from the Spring IoC container:
package com.apress.springrecipes.shop;

import org.springframework.context.ApplicationContext;
import org.springframework.context.support.ClassPathXmlApplicationContext;

public class Main {

    public static void main(String[] args) throws Exception {
        ApplicationContext context =
            new ClassPathXmlApplicationContext("beans.xml");
Product aaa = (Product) context.getBean("aaa");
Product cdrw = (Product) context.getBean("cdrw");
System.out.println(aaa);
System.out.println(cdrw);
}
}When you specify one or more constructor arguments for a bean, Spring will attempt to find an appropriate constructor in the bean class and pass in your arguments for bean instantiation. However, if your arguments can be applied to more than one constructor, it may cause ambiguity in constructor matching. In this case, Spring may not be able to invoke your expected constructor.
You can specify the attributes type and index for the <constructor-arg> element to assist Spring in finding your expected constructor.
Now let's add a new constructor to the SequenceGenerator class with prefix and suffix as arguments.
package com.apress.springrecipes.sequence;

public class SequenceGenerator {
    ...
    public SequenceGenerator(String prefix, String suffix) {
        this.prefix = prefix;
        this.suffix = suffix;
    }
}
In its bean declaration, you can specify one or more constructor arguments through the <constructor-arg> elements. Spring will attempt to find an appropriate constructor for that class and pass in your arguments for bean instantiation. Recall that there's not a name attribute in <constructor-arg>, as constructor arguments are position-based.
<bean id="sequenceGenerator"
    class="com.apress.springrecipes.sequence.SequenceGenerator">
    <constructor-arg value="30" />
    <constructor-arg value="A" />
    <property name="initial" value="100000" />
</bean>
It's easy for Spring to find a constructor for these two arguments, as there is only one constructor that requires two arguments. Suppose you have to add another constructor to SequenceGenerator with prefix and initial as arguments.
package com.apress.springrecipes.sequence;

public class SequenceGenerator {
    ...
    public SequenceGenerator(String prefix, String suffix) {
        this.prefix = prefix;
        this.suffix = suffix;
    }

    public SequenceGenerator(String prefix, int initial) {
        this.prefix = prefix;
        this.initial = initial;
    }
}
To invoke this constructor, you make the following bean declaration to pass a prefix and an initial value. The remaining suffix is injected through the setter method.
<bean id="sequenceGenerator"
    class="com.apress.springrecipes.sequence.SequenceGenerator">
    <constructor-arg value="30" />
    <constructor-arg value="100000" />
    <property name="suffix" value="A" />
</bean>
However, if you run the application now, you will get the following result:
300A

301A
The cause of this unexpected result is that the first constructor, with prefix and suffix as arguments, has been invoked, but not the second. This is because Spring resolved both of your arguments as String type by default and considered that the first constructor was most suitable, as no type conversion was required. To specify the expected type of your arguments, you have to set it in the type attribute in <constructor-arg>.
<bean id="sequenceGenerator"
    class="com.apress.springrecipes.sequence.SequenceGenerator">
    <constructor-arg type="java.lang.String" value="30" />
    <constructor-arg type="int" value="100000" />
    <property name="suffix" value="A" />
</bean>
Now add one more constructor to SequenceGenerator with initial and suffix as arguments, and modify your bean declaration for it accordingly.
package com.apress.springrecipes.sequence;

public class SequenceGenerator {
    ...
    public SequenceGenerator(String prefix, String suffix) {
        this.prefix = prefix;
        this.suffix = suffix;
    }

    public SequenceGenerator(String prefix, int initial) {
        this.prefix = prefix;
        this.initial = initial;
    }

    public SequenceGenerator(int initial, String suffix) {
        this.initial = initial;
        this.suffix = suffix;
    }
}

<bean id="sequenceGenerator"
    class="com.apress.springrecipes.sequence.SequenceGenerator">
    <constructor-arg type="int" value="100000" />
    <constructor-arg type="java.lang.String" value="A" />
    <property name="prefix" value="30" />
</bean>
If you run the application again, you may get the right result or the following unexpected result:
30100000null

30100001null
The reason for this uncertainty is that Spring internally scores each constructor for compatibility with your arguments. But during the scoring process, the order in which your arguments appear in the XML is not considered. This means that from the view of Spring, the second and the third constructors will get the same score. Which one to pick depends on which one is matched first. According to the Java Reflection API, or more accurately the Class.getDeclaredConstructors() method, the constructors returned will be in an arbitrary order that may differ from the declaration order. All these factors, acting together, cause ambiguity in constructor matching.
To avoid this problem, you have to indicate the indexes of your arguments explicitly through the index attribute of <constructor-arg>. With both the type and index attributes set, Spring will be able to find the expected constructor for a bean accurately.
<bean id="sequenceGenerator"
    class="com.apress.springrecipes.sequence.SequenceGenerator">
    <constructor-arg type="int" index="0" value="100000" />
    <constructor-arg type="java.lang.String" index="1" value="A" />
    <property name="prefix" value="30" />
</bean>
However, if you are quite sure that your constructors won't cause ambiguity, you can skip the type and index attributes.
The beans that make up your application often need to collaborate with each other to complete the application's functions. For beans to access each other, you have to specify bean references in the bean configuration file.
In the bean configuration file, you can specify a bean reference for a bean property or a constructor argument by the <ref> element. It's as easy as specifying a simple value by the <value> element. You can also enclose a bean declaration in a property or a constructor argument directly as an inner bean.
Accepting a string value as the prefix of your sequence generator is not flexible enough to adapt to future requirements. It would be better if the prefix generation could be customized with some kind of programming logic. You can create the PrefixGenerator interface to define the prefix generation operation.
package com.apress.springrecipes.sequence;

public interface PrefixGenerator {

    public String getPrefix();
}
One prefix generation strategy is to use a particular pattern to format the current system date. Let's create the DatePrefixGenerator class that implements the PrefixGenerator interface.
package com.apress.springrecipes.sequence;
...
public class DatePrefixGenerator implements PrefixGenerator {
private DateFormat formatter;
public void setPattern(String pattern) {
this.formatter = new SimpleDateFormat(pattern);
}
public String getPrefix() {
return formatter.format(new Date());
}
}The pattern of this generator will be injected through the setter method setPattern() and then used to create a java.text.DateFormat object to format the date. As the pattern string will not be used any more once the DateFormat object is created, it's not necessary to store it in a private field.
Now you can declare a bean of type DatePrefixGenerator with an arbitrary pattern string for date formatting.
<bean id="datePrefixGenerator"
    class="com.apress.springrecipes.sequence.DatePrefixGenerator">
    <property name="pattern" value="yyyyMMdd" />
</bean>To apply this prefix generator approach, the SequenceGenerator class should accept an object of type PrefixGenerator instead of a simple prefix string. You may choose setter injection to accept this prefix generator. You have to delete the prefix property, and its setter methods and constructors that cause compile errors.
package com.apress.springrecipes.sequence;

public class SequenceGenerator {
    ...
    private PrefixGenerator prefixGenerator;

    public void setPrefixGenerator(PrefixGenerator prefixGenerator) {
        this.prefixGenerator = prefixGenerator;
    }

    public synchronized String getSequence() {
        StringBuffer buffer = new StringBuffer();
        buffer.append(prefixGenerator.getPrefix());
        buffer.append(initial + counter++);
        buffer.append(suffix);
        return buffer.toString();
    }
}
Then a SequenceGenerator bean can refer to the datePrefixGenerator bean as its prefixGenerator property by enclosing a <ref> element inside.
<bean id="sequenceGenerator"
    class="com.apress.springrecipes.sequence.SequenceGenerator">
    <property name="initial" value="100000" />
    <property name="suffix" value="A" />
    <property name="prefixGenerator">
        <ref bean="datePrefixGenerator" />
    </property>
</bean>
The bean name in the <ref> element's bean attribute can be a reference to any bean in the IoC container, even if it's not defined in the same XML configuration file. If you are referring to a bean in the same XML file, you should use the local attribute, as it is an XML ID reference. Your XML editor can help to validate whether a bean with that ID exists in the same XML file (i.e., the reference integrity).
<bean id="sequenceGenerator"
    class="com.apress.springrecipes.sequence.SequenceGenerator">
    ...
    <property name="prefixGenerator">
        <ref local="datePrefixGenerator" />
    </property>
</bean>
There is also a convenient shortcut to specify a bean reference in the ref attribute of the <property> element.
<bean id="sequenceGenerator"
    class="com.apress.springrecipes.sequence.SequenceGenerator">
    ...
    <property name="prefixGenerator" ref="datePrefixGenerator" />
</bean>
But in this way, your XML editor will not be able to validate the reference integrity. Actually, it has the same effect as specifying the <ref> element's bean attribute.
Spring 2.x provides another convenient shortcut for you to specify bean references. It's by using the p schema to specify bean references as attributes of the <bean> element. This can shorten the lines of XML configuration.
<beans xmlns="http://www.springframework.org/schema/beans"
    xmlns:xsi="http://www.w3.org/2001/XMLSchema-instance"
    xmlns:p="http://www.springframework.org/schema/p"
    xsi:schemaLocation="http://www.springframework.org/schema/beans
        http://www.springframework.org/schema/beans/spring-beans-3.0.xsd">

    <bean id="sequenceGenerator"
        class="com.apress.springrecipes.sequence.SequenceGenerator"
        p:suffix="A" p:initial="1000000"
        p:prefixGenerator-ref="datePrefixGenerator" />
</beans>
To distinguish a bean reference from a simple property value, you have to add the -ref suffix to the property name.
Bean references can also be applied to constructor injection. For example, you can add a constructor that accepts a PrefixGenerator object as an argument.
package com.apress.springrecipes.sequence;

public class SequenceGenerator {
    ...
    private PrefixGenerator prefixGenerator;

    public SequenceGenerator(PrefixGenerator prefixGenerator) {
        this.prefixGenerator = prefixGenerator;
    }
}
In the <constructor-arg> element, you can enclose a bean reference by <ref> just like in the <property> element.
<bean id="sequenceGenerator"
    class="com.apress.springrecipes.sequence.SequenceGenerator">
    <constructor-arg>
        <ref local="datePrefixGenerator" />
    </constructor-arg>
    <property name="initial" value="100000" />
    <property name="suffix" value="A" />
</bean>
The shortcut for specifying a bean reference also works for <constructor-arg>.
<bean id="sequenceGenerator"
    class="com.apress.springrecipes.sequence.SequenceGenerator">
    <constructor-arg ref="datePrefixGenerator" />
    ...
</bean>Whenever a bean instance is used for one particular property only, it can be declared as an inner bean. An inner bean declaration is enclosed in <property> or <constructor-arg> directly, without any id or name attribute set. In this way, the bean will be anonymous so that you can't use it anywhere else. In fact, even if you define an id or a name attribute for an inner bean, it will be ignored.
<bean id="sequenceGenerator"
    class="com.apress.springrecipes.sequence.SequenceGenerator">
    <property name="initial" value="100000" />
    <property name="suffix" value="A" />
<property name="prefixGenerator"><bean class="com.apress.springrecipes.sequence.DatePrefixGenerator"><property name="pattern" value="yyyyMMdd" /></bean></property></bean>
An inner bean can also be declared in a constructor argument.
<bean id="sequenceGenerator"
    class="com.apress.springrecipes.sequence.SequenceGenerator">
    <constructor-arg>
        <bean class="com.apress.springrecipes.sequence.DatePrefixGenerator">
            <property name="pattern" value="yyyyMMdd" />
        </bean>
    </constructor-arg>
    <property name="initial" value="100000" />
    <property name="suffix" value="A" />
</bean>By default, Spring treats every element in a collection as a string. You have to specify the data type for your collection elements if you are not going to use them as strings.
You can either specify the data type for each collection element by the type attribute of the <value> tag, or specify the data type for all elements by the value-type attribute of the collection tag. If you are using Java 1.5 or higher, you can define a type-safe collection so that Spring will read your collection's type information.
Now suppose you are going to accept a list of integer numbers as the suffixes of your sequence generator. Each number will be formatted into four digits by an instance of java.text.DecimalFormat.
package com.apress.springrecipes.sequence;
...
public class SequenceGenerator {
    ...
    private List<Object> suffixes;
public void setSuffixes(List<Object> suffixes) {
this.suffixes = suffixes;
}
public synchronized String getSequence() {
StringBuffer buffer = new StringBuffer();
...
DecimalFormat formatter = new DecimalFormat("0000");
for (Object suffix : suffixes) {
buffer.append("-");
buffer.append(formatter.format((Integer) suffix));
}
return buffer.toString();
}
}Then define several suffixes for your sequence generator in the bean configuration file as usual.
<bean id="sequenceGenerator"
    class="com.apress.springrecipes.sequence.SequenceGenerator">
    <property name="prefixGenerator" ref="datePrefixGenerator" />
    <property name="initial" value="100000" />
    <property name="suffixes">
        <list>
            <value>5</value>
            <value>10</value>
            <value>20</value>
        </list>
    </property>
</bean>
However, when you run this application, you will encounter a ClassCastException, indicating that the suffixes cannot be cast into integers because their type is String. Spring treats every element in a collection as a string by default. You have to set the type attribute of the <value> tag to specify the element type.
<bean id="sequenceGenerator"
    class="com.apress.springrecipes.sequence.SequenceGenerator">
    ...
    <property name="suffixes">
        <list>
            <value type="int">5</value>
            <value type="int">10</value>
            <value type="int">20</value>
        </list>
    </property>
</bean>
Or you may set the value-type attribute of the collection tag to specify the type for all elements in this collection.
<bean id="sequenceGenerator"
    class="com.apress.springrecipes.sequence.SequenceGenerator">
    ...
    <property name="suffixes">
        <list value-type="int">
            <value>5</value>
            <value>10</value>
            <value>20</value>
        </list>
    </property>
</bean>
In Java 1.5 or higher, you can define your suffixes list with a type-safe collection that stores integers.
package com.apress.springrecipes.sequence;
...
public class SequenceGenerator {
    ...
    private List<Integer> suffixes;

    public void setSuffixes(List<Integer> suffixes) {
        this.suffixes = suffixes;
    }

    public synchronized String getSequence() {
        StringBuffer buffer = new StringBuffer();
        ...
        DecimalFormat formatter = new DecimalFormat("0000");
        for (int suffix : suffixes) {
            buffer.append("-");
            buffer.append(formatter.format(suffix));
        }
        return buffer.toString();
    }
}
Once you have defined your collections in a type-safe way, Spring will be able to read the collection's type information through reflection. In this way, you no longer need to specify the value-type attribute of <list>.
<bean id="sequenceGenerator"
    class="com.apress.springrecipes.sequence.SequenceGenerator">
    ...
    <property name="suffixes">
        <list>
            <value>5</value>
            <value>10</value>
            <value>20</value>
        </list>
    </property>
</bean>You would like to create a bean in the Spring IoC container using Spring's factory bean. A factory bean is a bean that serves as a factory for creating other beans within the IoC container. Conceptually, a factory bean is very similar to a factory method, but it is a Spring-specific bean that can be identified by the Spring IoC container during bean construction.
The basic requirement of a factory bean is to implement the FactoryBean interface. For your convenience, Spring provides an abstract template class, AbstractFactoryBean, for you to extend. Factory beans are mostly used to implement framework facilities. Here are some examples:
When looking up an object (such as a data source) from JNDI, you can use
JndiObjectFactoryBean.When using classic Spring AOP to create a proxy for a bean, you can use
ProxyFactoryBean.When creating a Hibernate session factory in the IoC container, you can use
LocalSessionFactoryBean.
However, as a framework user, you seldom have to write custom factory beans, because they are framework-specific and cannot be used outside the scope of the Spring IoC container. Actually, you are always able to implement an equivalent factory method for a factory bean.
Although you'll seldom have to write custom factory beans, you may find it helpful to understand their internal mechanisms through an example. For example, you can write a factory bean for creating a product with a discount applied to the price. It accepts a product property and a discount property to apply the discount to the product and return it as a new bean.
package com.apress.springrecipes.shop;

import org.springframework.beans.factory.config.AbstractFactoryBean;

public class DiscountFactoryBean extends AbstractFactoryBean {

    private Product product;
    private double discount;

    public void setProduct(Product product) {
        this.product = product;
    }
public void setDiscount(double discount) {
this.discount = discount;
}
public Class getObjectType() {
return product.getClass();
}
protected Object createInstance() throws Exception {
product.setPrice(product.getPrice() * (1 - discount));
return product;
}
}By extending the AbstractFactoryBean class, your factory bean can simply override the createInstance() method to create the target bean instance. In addition, you have to return the target bean's type in the getObjectType() method for the auto-wiring feature to work properly.
Next, you can declare your product instances with DiscountFactoryBean. Each time you request a bean that implements the FactoryBean interface, the Spring IoC container will use this factory bean to create the target bean and return it to you. If you are sure that you want to get the factory bean instance itself, you can use the bean name preceded by &.
<beans ...>
    <bean id="aaa"
        class="com.apress.springrecipes.shop.DiscountFactoryBean">
        <property name="product">
            <bean class="com.apress.springrecipes.shop.Battery">
                <constructor-arg value="AAA" />
                <constructor-arg value="2.5" />
            </bean>
        </property>
        <property name="discount" value="0.2" />
    </bean>

    <bean id="cdrw"
        class="com.apress.springrecipes.shop.DiscountFactoryBean">
        <property name="product">
            <bean class="com.apress.springrecipes.shop.Disc">
                <constructor-arg value="CD-RW" />
                <constructor-arg value="1.5" />
            </bean>
        </property>
        <property name="discount" value="0.1" />
    </bean>
</beans>
The preceding factory bean configuration works in a similar way to the following code snippet:
DiscountFactoryBean aaa = new DiscountFactoryBean();
aaa.setProduct(new Battery("AAA", 2.5));
aaa.setDiscount(0.2);
Product aaa = (Product) aaa.createInstance();

DiscountFactoryBean cdrw = new DiscountFactoryBean();
cdrw.setProduct(new Disc("CD-RW", 1.5));
cdrw.setDiscount(0.1);
Product cdrw = (Product) cdrw.createInstance();When using the basic collection tags to define collections, you can't specify the concrete class of a collection, such as LinkedList, TreeSet, or TreeMap. Moreover, you cannot share a collection among different beans by defining it as a stand-alone bean for other beans to refer to.
Spring provides a couple of options to overcome the shortcomings of the basic collection tags. One option is to use corresponding collection factory beans like ListFactoryBean, SetFactoryBean, and MapFactoryBean. A factory bean is a special kind of Spring bean that is used for creating another bean. The second option is to use collection tags such as <util:list>, <util:set>, and <util:map> in the util schema introduced in Spring 2.x.
You can use a collection factory bean to define a collection and specify its target class. For example, you can specify the targetSetClass property for SetFactoryBean. Then Spring will instantiate the specified class for this collection.
<bean id="sequenceGenerator"
    class="com.apress.springrecipes.sequence.SequenceGenerator">
    <property name="prefixGenerator" ref="datePrefixGenerator" />
    <property name="initial" value="100000" />
    <property name="suffixes">
        <bean class="org.springframework.beans.factory.config.SetFactoryBean">
            <property name="targetSetClass">
                <value>java.util.TreeSet</value>
            </property>
<property name="sourceSet">
<set>
<value>5</value>
<value>10</value>
<value>20</value>
</set>
</property>
</bean>
</property>
</bean>Or you can use a collection tag in the util schema to define a collection and set its target class (e.g., by the set-class attribute of <util:set>). But you must remember to add the util schema definition to your <beans> root element.
<beans xmlns="http://www.springframework.org/schema/beans"
    xmlns:xsi="http://www.w3.org/2001/XMLSchema-instance"
    xmlns:util="http://www.springframework.org/schema/util"
    xsi:schemaLocation="http://www.springframework.org/schema/beans
        http://www.springframework.org/schema/beans/spring-beans-3.0.xsd
        http://www.springframework.org/schema/util
        http://www.springframework.org/schema/util/spring-util-3.0.xsd">

    <bean id="sequenceGenerator"
        class="com.apress.springrecipes.sequence.SequenceGenerator">
        ...
        <property name="suffixes">
            <util:set set-class="java.util.TreeSet">
                <value>5</value>
                <value>10</value>
                <value>20</value>
            </util:set>
        </property>
    </bean>
    ...
</beans>Another advantage of collection factory beans is that you can define a collection as a stand-alone bean for other beans to refer to. For example, you can define a stand-alone set by using SetFactoryBean.
<beans ...>
    <bean id="sequenceGenerator"
        class="com.apress.springrecipes.sequence.SequenceGenerator">
        ...
        <property name="suffixes">
            <ref local="suffixes" />
        </property>
    </bean>
<bean id="suffixes"
class="org.springframework.beans.factory.config.SetFactoryBean">
<property name="sourceSet">
<set>
<value>5</value>
<value>10</value>
<value>20</value>
</set>
</property>
</bean>
...
</beans>Or you can define a stand-alone set by using the <util:set> tag in the util schema.
<beans ...>
    <bean id="sequenceGenerator"
        class="com.apress.springrecipes.sequence.SequenceGenerator">
        ...
        <property name="suffixes">
            <ref local="suffixes" />
        </property>
    </bean>

    <util:set id="suffixes">
        <value>5</value>
        <value>10</value>
        <value>20</value>
    </util:set>
    ...
</beans>In a production-scale application, there may be hundreds or thousands of beans declared in the IoC container, and the dependencies between them are often very complicated. One of the shortcomings of setter injection is that you cannot make sure a property will be injected. It's very hard for you to check if all required properties have been set.
Spring's dependency checking feature can help you to check if all properties of certain types have been set on a bean. You simply have to specify the dependency checking mode in the dependency-check attribute of <bean>. Note that the dependency checking feature can only check if the properties have been set, but can't check if their value is not null. Table 1-1 lists all the dependency checking modes supported by Spring.
Table 1.1. Dependency Checking Modes Supported by Spring
Mode | Description |
|---|---|
| No dependency checking will be performed. Any properties can be left unset. |
| If any properties of the simple types (the primitive and collection types) have not been set, an |
| If any properties of the object types (other than the simple types) have not been set, an |
| If any properties of any type have not been set, an |
[a] The default mode is | |
Suppose the suffix property was not set for the sequence generator. Then the generator would generate sequence numbers whose suffix was the string null. This kind of issue is often very hard to debug, especially in a complicated bean. Fortunately, Spring is able to check if all properties of certain types have been set. To ask Spring to check properties of the simple types (i.e., the primitive and collection types), set the dependency-check attribute of <bean> to simple.
<bean id="sequenceGenerator"
    class="com.apress.springrecipes.sequence.SequenceGenerator"
    dependency-check="simple">
    <property name="initial" value="100000" />
    <property name="prefixGenerator" ref="datePrefixGenerator" />
</bean>
If any properties of such types have not been set, an UnsatisfiedDependencyException will be thrown, indicating the unset property.
Exception in thread "main"
org.springframework.beans.factory.UnsatisfiedDependencyException: Error creating
bean with name 'sequenceGenerator' defined in class path resource [beans.xml]:
Unsatisfied dependency expressed through bean property 'suffix': Set this property
value or disable dependency checking for this bean.
If the prefix generator is not set, then the evil NullPointerException will be thrown when prefix generation is requested. To enable dependency checking for bean properties of object types, (i.e., other than simple types), change the dependency-check attribute to objects.
<bean id="sequenceGenerator"
    class="com.apress.springrecipes.sequence.SequenceGenerator"
    dependency-check="objects">
    <property name="initial" value="100000" />
    <property name="suffix" value="A" />
</bean>
Then when you run the application, Spring will notify you that the prefixGenerator property has not been set.
Exception in thread "main"

org.springframework.beans.factory.UnsatisfiedDependencyException: Error creating

bean with name 'sequenceGenerator' defined in class path resource [beans.xml]:

Unsatisfied dependency expressed through bean property 'prefixGenerator': Set this

property value or disable dependency checking for this bean.
If you would like to check all bean properties whatever the type is, you can change the dependency-check attribute to all.
<bean id="sequenceGenerator"
    class="com.apress.springrecipes.sequence.SequenceGenerator"
    dependency-check="all">
    <property name="initial" value="100000" />
</bean>Spring's dependency checking feature will check only if a property has been injected via the setter method. So, even if you have injected the prefix generator via a constructor, an UnsatisfiedDependencyException will still be thrown.
<bean id="sequenceGenerator"
    class="com.apress.springrecipes.sequence.SequenceGenerator"
    dependency-check="all">
    <constructor-arg ref="datePrefixGenerator" />
    <property name="initial" value="100000" />
    <property name="suffix" value="A" />
</bean>Spring's dependency checking feature can check only for all properties of certain types. It's not flexible enough to check for particular properties only. In most cases, you would like to check if particular properties have been set, but not all properties of certain types.
RequiredAnnotationBeanPostProcessor is a Spring bean post processor that checks if all the bean properties with the @Required annotation have been set. A bean post processor is a special kind of Spring bean that is able to perform additional tasks on each bean before its initialization. To enable this bean post processor for property checking, you must register it in the Spring IoC container. Note that this processor can check only if the properties have been set, but can't check if their value is not null.
Suppose that both the prefixGenerator and suffix properties are required for a sequence generator. You can annotate their setter methods with @Required.
package com.apress.springrecipes.sequence;

import org.springframework.beans.factory.annotation.Required;
public class SequenceGenerator {

    private PrefixGenerator prefixGenerator;
    private String suffix;
    ...
    @Required
    public void setPrefixGenerator(PrefixGenerator prefixGenerator) {
        this.prefixGenerator = prefixGenerator;
    }

    @Required
    public void setSuffix(String suffix) {
        this.suffix = suffix;
    }
    ...
}
To ask Spring to check if these properties have been set on all sequence generator instances, you have to register a RequiredAnnotationBeanPostProcessor instance in the IoC container. If you are using a bean factory, you have to register this bean post processor through the API. Otherwise, you can just declare an instance of this bean post processor in your application context.
<bean class="org.springframework.beans.factory.annotation.RequiredAnnotationBeanPostProcessor" />
If you are using Spring 2.5 or later, you can simply include the <context:annotation-config> element in your bean configuration file, and a RequiredAnnotationBeanPostProcessor instance will automatically get registered.
<beans xmlns="http://www.springframework.org/schema/beans"
    xmlns:xsi="http://www.w3.org/2001/XMLSchema-instance"
    xmlns:context="http://www.springframework.org/schema/context"
    xsi:schemaLocation="http://www.springframework.org/schema/beans
        http://www.springframework.org/schema/beans/spring-beans-3.0.xsd
        http://www.springframework.org/schema/context
        http://www.springframework.org/schema/context/spring-context-3.0.xsd">

    <context:annotation-config />
    ...
</beans>
If any properties with @Required have not been set, a BeanInitializationException will be thrown by this bean post processor.
Exception in thread "main" org.springframework.beans.factory.BeanCreationException:
Error creating bean with name 'sequenceGenerator' defined in class path resource [beans.xml]:
Initialization of bean failed; nested exception is org.springframework.beans.factory.
BeanInitializationException: Property 'prefixGenerator' is required for bean
'sequenceGenerator'
In addition to the @Required annotation, RequiredAnnotationBeanPostProcessor can also check the properties with your custom annotation. For example, you can create the following annotation type:
package com.apress.springrecipes.sequence;
...
@Retention(RetentionPolicy.RUNTIME)
@Target(ElementType.METHOD)
public @interface Mandatory {
}
And then you can apply this annotation to the setter methods of the required properties.
package com.apress.springrecipes.sequence;

public class SequenceGenerator {

    private PrefixGenerator prefixGenerator;
    private String suffix;
    ...
    @Mandatory
    public void setPrefixGenerator(PrefixGenerator prefixGenerator) {
        this.prefixGenerator = prefixGenerator;
    }

    @Mandatory
    public void setSuffix(String suffix) {
        this.suffix = suffix;
    }
    ...
}
To check for the properties with this annotation type, you have to specify it in the requiredAnnotationType property of RequiredAnnotationBeanPostProcessor.
<bean class="org.springframework.beans.factory.annotation.RequiredAnnotationBeanPostProcessor"> <property name="requiredAnnotationType"> <value>com.apress.springrecipes.sequence.Mandatory</value> </property> </bean>
When a bean requires access to another bean, you can wire it by specifying the reference explicitly. However, if your container can wire your beans automatically, it can save you the trouble of configuring the wirings manually.
The Spring IoC container can help you to wire your beans automatically. You only have to specify the auto-wiring mode in the autowire attribute of <bean>. Table 1-2 lists the auto-wiring modes supported by Spring.
Table 1.2. Auto-Wiring Modes Supported by Spring
Mode | Description |
|---|---|
| No auto-wiring will be performed. You must wire the dependencies explicitly. |
| For each bean property, wire a bean with the same name as the property. |
| For each bean property, wire a bean whose type is compatible with that of the property. If more than one bean is found, an |
| For each argument of each constructor, first find a bean whose type is compatible with the argument's. Then, pick the constructor with the most matching arguments. In case of any ambiguity, an |
| If a default constructor with no argument is found, the dependencies will be auto-wired by type. Otherwise, they will be auto-wired by constructor. |
[a] The default mode is | |
Although the auto-wiring feature is very powerful, the cost is that it will reduce the readability of your bean configurations. Because auto-wiring is performed by Spring at runtime, you cannot derive how your beans are wired from the bean configuration file. In practice, we recommend applying auto-wiring only in applications whose component dependencies are not complicated.
You can set the autowire attribute of the sequenceGenerator bean to byType and leave the prefixGenerator property unset. Then, Spring will attempt to wire a bean whose type is compatible with PrefixGenerator. In this case, the datePrefixGenerator bean will be wired automatically.
<beans ...>
    <bean id="sequenceGenerator"
        class="com.apress.springrecipes.sequence.SequenceGenerator"
        autowire="byType">
        <property name="initial" value="100000" />
        <property name="suffix" value="A" />
    </bean>

    <bean id="datePrefixGenerator"
        class="com.apress.springrecipes.sequence.DatePrefixGenerator">
        <property name="pattern" value="yyyyMMdd" />
    </bean>
</beans>
The main problem of auto-wiring by type is that sometimes there will be more than one bean in the IoC container compatible with the target type. In this case, Spring will not be able to decide which bean is most suitable for the property, and hence cannot perform auto-wiring. For example, if you have another prefix generator generating the current year as the prefix, auto-wiring by type will be broken immediately.
<beans ...>
    <bean id="sequenceGenerator"
        class="com.apress.springrecipes.sequence.SequenceGenerator"
        autowire="byType">
        <property name="initial" value="100000" />
        <property name="suffix" value="A" />
    </bean>

    <bean id="datePrefixGenerator"
        class="com.apress.springrecipes.sequence.DatePrefixGenerator">
        <property name="pattern" value="yyyyMMdd" />
    </bean>

    <bean id="yearPrefixGenerator"
        class="com.apress.springrecipes.sequence.DatePrefixGenerator">
        <property name="pattern" value="yyyy" />
    </bean>
</beans>
Spring will throw an UnsatisfiedDependencyException if more than one bean is found for auto-wiring.
Exception in thread "main"
org.springframework.beans.factory.UnsatisfiedDependencyException: Error creating
bean with name 'sequenceGenerator' defined in class path resource [beans.xml]:
Unsatisfied dependency expressed through bean property 'prefixGenerator': No unique
bean of type [com.apress.springrecipes.sequence.PrefixGenerator]
is defined: expected single matching bean but found 2: [datePrefixGenerator,
yearPrefixGenerator]
Another mode of auto-wiring is byName, which can sometimes resolve the problems of auto-wiring by type. It works very similarly to byType, but in this case, Spring will attempt to wire a bean whose class name is the same as the property name, rather than with the compatible type. As the bean name is unique within a container, auto-wiring by name will not cause ambiguity.
<beans ...>
    <bean id="sequenceGenerator"
        class="com.apress.springrecipes.sequence.SequenceGenerator"
        autowire="byName">
        <property name="initial" value="100000" />
        <property name="suffix" value="A" />
    </bean>

    <bean id="prefixGenerator"
        class="com.apress.springrecipes.sequence.DatePrefixGenerator">
        <property name="pattern" value="yyyyMMdd" />
    </bean>
</beans>
However, auto-wiring by name will not work in all cases. Sometimes, it's not possible for you to make the name of the target bean the same as your property. In practice, you often need to specify ambiguous dependencies explicitly while keeping others auto-wired. That means you employ a mixture of explicit wiring and auto-wiring.
The auto-wiring mode constructor works like byType, but it's rather more complicated. For a bean with a single constructor, Spring will attempt to wire a bean with a compatible type for each constructor argument. But for a bean with multiple constructors, the process is more complicated. Spring will first attempt to find a bean with a compatible type for each argument of each constructor. Then, it will pick the constructor with the most matching arguments.
Suppose that SequenceGenerator has one default constructor and one constructor with an argument PrefixGenerator.
package com.apress.springenterpriserecipes.sequence;

public class SequenceGenerator {

    public SequenceGenerator() {}

    public SequenceGenerator(PrefixGenerator prefixGenerator) {
        this.prefixGenerator = prefixGenerator;
    }
    ...
}
In this case, the second constructor will be matched and picked because Spring can find a bean whose type is compatible with PrefixGenerator.
<beans ...>
    <bean id="sequenceGenerator"
        class="com.apress.springrecipes.sequence.SequenceGenerator"
        autowire="constructor">
        <property name="initial" value="100000" />
        <property name="suffix" value="A" />
    </bean>

    <bean id="datePrefixGenerator"
        class="com.apress.springrecipes.sequence.DatePrefixGenerator">
        <property name="pattern" value="yyyyMMdd" />
    </bean>
</beans>
However, multiple constructors in a class may cause ambiguity in constructor argument matching. The situation may be further complicated if you ask Spring to determine a constructor for you. So, if you use this auto-wiring mode, take great care to avoid ambiguity.
The auto-wiring mode autodetect asks Spring to decide the auto-wiring mode between byType and constructor. If at least a default constructor with no argument is found for that bean, byType will be chosen. Otherwise, constructor will be chosen. Because the SequenceGenerator class has a default constructor defined, byType will be chosen. That means the prefix generator will be injected via the setter method.
<beans ...>
    <bean id="sequenceGenerator"
        class="com.apress.springrecipes.sequence.SequenceGenerator"
        autowire="autodetect">
        <property name="initial" value="100000" />
        <property name="suffix" value="A" />
    </bean>

    <bean id="datePrefixGenerator"
        class="com.apress.springrecipes.sequence.DatePrefixGenerator">
        <property name="pattern" value="yyyyMMdd" />
    </bean>
</beans>As you have seen, if Spring finds more than one candidate bean for auto-wiring, it will throw an UnsatisfiedDependencyException. On the other hand, if the auto-wiring mode is set to byName or byType, and Spring cannot find a matching bean to wire, it will leave the property unset, which may cause a NullPointerException or a value that has not been initialized. However, if you want to be notified when auto-wiring cannot wire your beans, you should set the dependency-check attribute to objects or all.
In that case, an UnsatisfiedDependencyException will be thrown whenever auto-wiring doesn't work. objects tells Spring to raise an error when a collaborating bean can't be found in the same bean factory. all tells the container to raise an error when any simple property types (a String or a primitive) expressed as dependencies on a bean haven't been set, in addition to the functionality of objects.
<bean id="sequenceGenerator"
    class="com.apress.springrecipes.sequence.SequenceGenerator"
    autowire="byName" dependency-check="objects">
    <property name="initial" value="100000" />
    <property name="suffix" value="A" />
</bean>Auto-wiring by setting the autowire attribute in the bean configuration file will wire all properties of a bean. It's not flexible enough to wire particular properties only. Moreover, you can auto-wire beans only by either type or name. If neither strategy satisfies your requirements, you must wire your beans explicitly.
Since Spring 2.5, several enhancements have been made to the auto-wiring feature. You can auto-wire a particular property by annotating a setter method, a constructor, a field, or even an arbitrary method with the @Autowired annotation or the @Resource annotation defined in JSR-250: Common Annotations for the Java Platform. That means you have one more option besides setting the autowire attribute to satisfy your requirements. However, this annotation-based option requires you to be using Java 1.5 or higher.
To ask Spring to auto-wire the bean properties with @Autowired or @Resource, you have to register an AutowiredAnnotationBeanPostProcessor instance in the IoC container. If you are using a bean factory, you have to register this bean post processor through the API. Otherwise, you can just declare an instance of it in your application context.
<bean class="org.springframework.beans.factory.annotation.AutowiredAnnotationBeanPostProcessor" />
Or you can simply include the <context:annotation-config> element in your bean configuration file, and an AutowiredAnnotationBeanPostProcessor instance will automatically get registered.
<beans xmlns="http://www.springframework.org/schema/beans"
    xmlns:xsi="http://www.w3.org/2001/XMLSchema-instance"
    xmlns:context="http://www.springframework.org/schema/context"
    xsi:schemaLocation="http://www.springframework.org/schema/beans
        http://www.springframework.org/schema/beans/spring-beans-3.0.xsd
        http://www.springframework.org/schema/context
        http://www.springframework.org/schema/context/spring-context-3.0.xsd">

    <context:annotation-config />
    ...
</beans>The @Autowired annotation can be applied to a particular property for Spring to auto-wire it. As an example, you can annotate the setter method of the prefixGenerator property with @Autowired. Then, Spring will attempt to wire a bean whose type is compatible with PrefixGenerator.
package com.apress.springrecipes.sequence;

import org.springframework.beans.factory.annotation.Autowired;

public class SequenceGenerator {
    ...
    @Autowired
    public void setPrefixGenerator(PrefixGenerator prefixGenerator) {
        this.prefixGenerator = prefixGenerator;
    }
}
If you have a bean whose type is compatible with PrefixGenerator defined in the IoC container, it will be set to the prefixGenerator property automatically.
<beans ...>
    ...
    <bean id="sequenceGenerator"
        class="com.apress.springrecipes.sequence.SequenceGenerator">
        <property name="initial" value="100000" />
        <property name="suffix" value="A" />
    </bean>

    <bean id="datePrefixGenerator"
        class="com.apress.springrecipes.sequence.DatePrefixGenerator">
        <property name="pattern" value="yyyyMMdd" />
    </bean>
</beans>
By default, all the properties with @Autowired are required. When Spring can't find a matching bean to wire, it will throw an exception. If you want a certain property to be optional, set the required attribute of @Autowired to false. Then, when Spring can't find a matching bean, it will leave this property unset.
package com.apress.springrecipes.sequence;

import org.springframework.beans.factory.annotation.Autowired;

public class SequenceGenerator {
    ...
    @Autowired(required = false)
    public void setPrefixGenerator(PrefixGenerator prefixGenerator) {
        this.prefixGenerator = prefixGenerator;
    }
}
In addition to the setter method, the @Autowired annotation can also be applied to a constructor, and Spring will attempt to find a bean with the compatible type for each of the constructor arguments.
package com.apress.springrecipes.sequence;

import org.springframework.beans.factory.annotation.Autowired;

public class SequenceGenerator {
    ...
    @Autowired
    public SequenceGenerator(PrefixGenerator prefixGenerator) {
        this.prefixGenerator = prefixGenerator;
    }
}
The @Autowired annotation can also be applied to a field, even if it is not declared as public. In this way, you can omit the need of declaring a setter method or a constructor for this field. Spring will inject the matched bean into this field via reflection. However, annotating a nonpublic field with @Autowired will reduce code testability, because the code will be difficult to unit test (there's no way black-box testing can manipulate that state, such as with mock objects).
package com.apress.springrecipes.sequence;

import org.springframework.beans.factory.annotation.Autowired;

public class SequenceGenerator {

    @Autowired
    private PrefixGenerator prefixGenerator;
    ...
}
You may even apply the @Autowired annotation to a method with an arbitrary name and an arbitrary number of arguments, and, in that case, Spring will attempt to wire a bean with the compatible type for each of the method arguments.
package com.apress.springrecipes.sequence;

import org.springframework.beans.factory.annotation.Autowired;

public class SequenceGenerator {
    ...
    @Autowired
    public void inject(PrefixGenerator prefixGenerator) {
        this.prefixGenerator = prefixGenerator;
    }
}The @Autowired annotation can also be applied to a property of array type to have Spring auto-wire all the matching beans. For example, you can annotate a PrefixGenerator[] property with @Autowired. Then, Spring will auto-wire all the beans whose type is compatible with PrefixGenerator at one time.
package com.apress.springrecipes.sequence;

import org.springframework.beans.factory.annotation.Autowired;

public class SequenceGenerator {

    @Autowired
    private PrefixGenerator[] prefixGenerators;
    ...
}
If you have multiple beans whose type is compatible with the PrefixGenerator defined in the IoC container, they will be added to the prefixGenerators array automatically.
<beans ...>
    ...
    <bean id="datePrefixGenerator"
        class="com.apress.springrecipes.sequence.DatePrefixGenerator">
        <property name="pattern" value="yyyyMMdd" />
    </bean>

    <bean id="yearPrefixGenerator"
        class="com.apress.springrecipes.sequence.DatePrefixGenerator">
        <property name="pattern" value="yyyy" />
    </bean>
</beans>
In a similar way, you can apply the @Autowired annotation to a type-safe collection. Spring can read the type information of this collection and auto-wire all the beans whose type is compatible.
package com.apress.springrecipes.sequence;

import org.springframework.beans.factory.annotation.Autowired;

public class SequenceGenerator {

    @Autowired
    private List<PrefixGenerator> prefixGenerators;
    ...
}
If Spring notices that the @Autowired annotation is applied to a type-safe java.util.Map with strings as the keys, it will add all the beans of the compatible type, with the bean names as the keys, to this map.
package com.apress.springrecipes.sequence;

import org.springframework.beans.factory.annotation.Autowired;

public class SequenceGenerator {

    @Autowired
    private Map<String, PrefixGenerator> prefixGenerators;
    ...
}By default, auto-wiring by type will not work when there is more than one bean with the compatible type in the IoC container. However, Spring allows you to specify a candidate bean by providing its name in the @Qualifier annotation.
package com.apress.springrecipes.sequence;

import org.springframework.beans.factory.annotation.Autowired;
import org.springframework.beans.factory.annotation.Qualifier;

public class SequenceGenerator {

    @Autowired
    @Qualifier("datePrefixGenerator")
    private PrefixGenerator prefixGenerator;
    ...
}
Once you've done so, Spring will attempt to find a bean with that name in the IoC container and wire it into the property.
<bean id="datePrefixGenerator"
class="com.apress.springrecipes.sequence.DatePrefixGenerator">
    <property name="pattern" value="yyyyMMdd" />
</bean>
The @Qualifier annotation can also be applied to a method argument for auto-wiring.
package com.apress.springrecipes.sequence;

import org.springframework.beans.factory.annotation.Autowired;
import org.springframework.beans.factory.annotation.Qualifier;

public class SequenceGenerator {
    ...
    @Autowired
    public void inject(
            @Qualifier("datePrefixGenerator") PrefixGenerator prefixGenerator) {
        this.prefixGenerator = prefixGenerator;
    }
}
You can create a custom qualifier annotation type for the auto-wiring purpose. This annotation type must be annotated with @Qualifier itself. This is useful if you want a specific type of bean and configuration injected wherever an annotation decorates a field or setter method.
package com.apress.springrecipes.sequence;
import java.lang.annotation.Target;
import java.lang.annotation.Retention;
import java.lang.annotation.ElementType;
import java.lang.annotation.RetentionPolicy;import
org.springframework.beans.factory.annotation.Qualifier;

@Retention(RetentionPolicy.RUNTIME)
@Target({ElementType.FIELD, ElementType.PARAMETER })
@Qualifier
public @interface Generator {
String value();
}Then, you can apply this annotation to an @Autowired bean property. It will ask Spring to auto-wire the bean with this qualifier annotation and the specified value.
package com.apress.springrecipes.sequence;

import org.springframework.beans.factory.annotation.Autowired;

public class SequenceGenerator {

    @Autowired
    @Generator("prefix")
    private PrefixGenerator prefixGenerator;
    ...
}
You have to provide this qualifier to the target bean that you want to be auto-wired into the preceding property. The qualifier is added by the <qualifier> element with the type attribute. The qualifier value is specified in the value attribute. The value attribute is mapped to the String value() attribute of the annotation.
<bean id="datePrefixGenerator"
    class="com.apress.springrecipes.sequence.DatePrefixGenerator">
    <qualifier type="Generator" value="prefix" />
    <property name="pattern" value="yyyyMMdd" />
</bean>If you want to auto-wire bean properties by name, you can annotate a setter method, a constructor, or a field with the JSR-250 @Resource annotation. By default, Spring will attempt to find a bean with the same name as this property. But you can specify the bean name explicitly in its name attribute.
Note
To use the JSR-250 annotations, you have to include the JSR 250 dependency. If you are using Maven, add:
<dependency>
   <groupId>javax.annotation</groupId>
   <artifactId>jsr250-api</artifactId>
   <version>1.0</version>
</dependency>
package com.apress.springrecipes.sequence;

import javax.annotation.Resource;

public class SequenceGenerator {

    @Resource(name = "datePrefixGenerator")
    private PrefixGenerator prefixGenerator;
    ...
}When configuring beans in the Spring IoC container, you may have more than one bean sharing some common configurations, such as bean properties and attributes in the <bean> element. You often have to repeat these configurations for multiple beans.
Spring allows you to extract the common bean configurations to form a parent bean. The beans that inherit from this parent bean are called child beans. The child beans will inherit the bean configurations, including bean properties and attributes in the <bean> element, from the parent bean to avoid duplicate configurations. The child beans can also override the inherited configurations when necessary.
The parent bean can act as a configuration template and also as a bean instance at the same time. However, if you want the parent bean to act only as a template that cannot be retrieved, you must set the abstract attribute to true, asking Spring not to instantiate this bean.
You must note that not all attributes defined in the parent <bean> element will be inherited. For example, the autowire and dependency-check attributes will not be inherited from the parent. To find out more about which attributes will be inherited from the parent and which won't, please refer to the Spring documentation about bean inheritance.
Suppose you need to add a new sequence generator instance whose initial value and suffix are the same as the existing ones.
<beans ...>
    <bean id="sequenceGenerator"
        class="com.apress.springrecipes.sequence.SequenceGenerator">
        <property name="initial" value="100000" />
        <property name="suffix" value="A" />
        <property name="prefixGenerator" ref="datePrefixGenerator" />
    </bean>

    <bean id="sequenceGenerator1"
        class="com.apress.springrecipes.sequence.SequenceGenerator">
        <property name="initial" value="100000" />
        <property name="suffix" value="A" />
        <property name="prefixGenerator" ref="datePrefixGenerator" />
    </bean>

    <bean id="datePrefixGenerator"
        class="com.apress.springrecipes.sequence.DatePrefixGenerator">
        <property name="pattern" value="yyyyMMdd" />
    </bean>
</beans>
To avoid duplicating the same properties, you can declare a base sequence generator bean with those properties set. Then the two sequence generators can inherit this base generator so that they also have those properties set automatically. You needn't specify the class attributes of the child beans if they are the same as the parent's.
<beans ...>
    <bean id="baseSequenceGenerator"
        class="com.apress.springrecipes.sequence.SequenceGenerator">
        <property name="initial" value="100000" />
        <property name="suffix" value="A" />
        <property name="prefixGenerator" ref="datePrefixGenerator" />
    </bean>

    <bean id="sequenceGenerator" parent="baseSequenceGenerator" />

    <bean id="sequenceGenerator1" parent="baseSequenceGenerator" />
    ...
</beans>
The inherited properties can be overridden by the child beans. For example, you can add a child sequence generator with a different initial value.
<beans ...>
    <bean id="baseSequenceGenerator"
        class="com.apress.springrecipes.sequence.SequenceGenerator">
        <property name="initial" value="100000" />
<property name="suffix" value="A" />
<property name="prefixGenerator" ref="datePrefixGenerator" />
</bean>
<bean id="sequenceGenerator2" parent="baseSequenceGenerator">
<property name="initial" value="200000" />
</bean>
...
</beans>The base sequence generator bean can now be retrieved as a bean instance to use. If you want it to act as a template only, you have to set the abstract attribute to true. Then Spring will not instantiate this bean.
<bean id="baseSequenceGenerator" abstract="true"
    class="com.apress.springrecipes.sequence.SequenceGenerator">
    ...
</bean>
You can also omit the class of the parent bean and let the child beans specify their own, especially when the parent bean and child beans are not in the same class hierarchy, but share some properties of the same name. In this case, the parent bean's abstract attribute must be set to true, as the parent bean can't be instantiated. For example, let's add another ReverseGenerator class that has an initial property also.
package com.apress.springrecipes.sequence;

public class ReverseGenerator {

    private int initial;

    public void setInitial(int initial) {
        this.initial = initial;
    }
}
Now SequenceGenerator and ReverseGenerator don't extend the same base class—that is, they're not in the same class hierarchy, but they have a property of the same name: initial. To extract this common initial property, you need a baseGenerator parent bean with no class attribute defined.
<beans ...>
    <bean id="baseGenerator" abstract="true">
        <property name="initial" value="100000" />
    </bean>

    <bean id="baseSequenceGenerator" abstract="true" parent="baseGenerator"
        class="com.apress.springrecipes.sequence.SequenceGenerator">
        <property name="suffix" value="A" />
        <property name="prefixGenerator" ref="datePrefixGenerator" />
    </bean>

    <bean id="reverseGenerator" parent="baseGenerator"
        class="com.apress.springrecipes.sequence.ReverseGenerator" />

    <bean id="sequenceGenerator" parent="baseSequenceGenerator" />

    <bean id="sequenceGenerator1" parent="baseSequenceGenerator" />

    <bean id="sequenceGenerator2" parent="baseSequenceGenerator"/>
    ...
</beans>
Figure 1-1 shows the object diagram for this generator bean hierarchy.
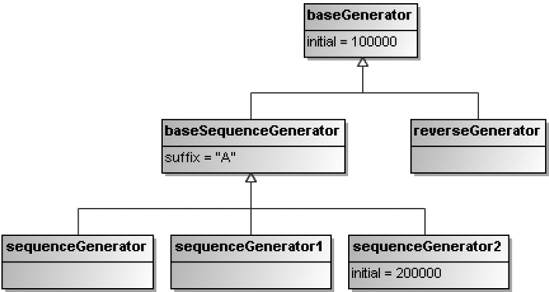
In order for the Spring IoC container to manage your components, you declare them one by one in the bean configuration file. However, it can save you a lot of work if Spring can automatically detect your components without manual configuration.
Spring provides a powerful feature called component scanning. It can automatically scan, detect, and instantiate your components with particular stereotype annotations from the classpath. The basic annotation denoting a Spring-managed component is @Component. Other more particular stereotypes include @Repository, @Service, and @Controller. They denote components in the persistence, service, and presentation layers, respectively.
Suppose you are asked to develop your sequence generator application using database sequences and store the prefix and suffix of each sequence in a table. First, you create the domain class Sequence containing the id, prefix, and suffix properties.
package com.apress.springrecipes.sequence;

public class Sequence {

    private String id;
    private String prefix;
    private String suffix;

    // Constructors, Getters, and Setters
    ...
}
Then, you create an interface for the Data Access Object (DAO), which is responsible for accessing data from the database. The getSequence() method loads a Sequence object from the table by its ID, while the getNextValue() method retrieves the next value of a particular database sequence.
package com.apress.springrecipes.sequence;

public interface SequenceDao {

    public Sequence getSequence(String sequenceId);
    public int getNextValue(String sequenceId);
}
In a production application, you should implement this DAO interface using a data-access technology such as JDBC or object/relational mapping. But for testing purposes, let's use maps to store the sequence instances and values.
package com.apress.springrecipes.sequence;
...
public class SequenceDaoImpl implements SequenceDao {

    private Map<String, Sequence> sequences;
    private Map<String, Integer> values;

    public SequenceDaoImpl() {
        sequences = new HashMap<String, Sequence>();
        sequences.put("IT", new Sequence("IT", "30", "A"));
        values = new HashMap<String, Integer>();
        values.put("IT", 100000);
    }

    public Sequence getSequence(String sequenceId) {
        return sequences.get(sequenceId);
    }

    public synchronized int getNextValue(String sequenceId) {
        int value = values.get(sequenceId);
        values.put(sequenceId, value + 1);
        return value;
    }
}
You also need a service object, acting as a façade, to provide the sequence generation service. Internally, this service object will interact with the DAO to handle the sequence generation requests. So it requires a reference to the DAO.
package com.apress.springrecipes.sequence;

public class SequenceService {

    private SequenceDao sequenceDao;

    public void setSequenceDao(SequenceDao sequenceDao) {
        this.sequenceDao = sequenceDao;
    }

    public String generate(String sequenceId) {
        Sequence sequence = sequenceDao.getSequence(sequenceId);
        int value = sequenceDao.getNextValue(sequenceId);
        return sequence.getPrefix() + value + sequence.getSuffix();
    }
}
Finally, you have to configure these components in the bean configuration file to make the sequence generator application work. You can auto-wire your components to reduce the amount of configurations.
<beans ...>
    <bean id="sequenceService"
        class="com.apress.springrecipes.sequence.SequenceService"
        autowire="byType" />

    <bean id="sequenceDao"
        class="com.apress.springrecipes.sequence.SequenceDaoImpl" />
</beans>
Then, you can test the preceding components with the following Main class:
package com.apress.springrecipes.sequence;

import org.springframework.context.ApplicationContext;
import org.springframework.context.support.ClassPathXmlApplicationContext;

public class Main {

    public static void main(String[] args) {
        ApplicationContext context =
            new ClassPathXmlApplicationContext("beans.xml");

        SequenceService sequenceService =
            (SequenceService) context.getBean("sequenceService");

        System.out.println(sequenceService.generate("IT"));
        System.out.println(sequenceService.generate("IT"));
    }
}The component scanning feature provided by Spring since version 2.5 can automatically scan, detect, and instantiate your components from the classpath. By default, Spring can detect all components with a stereotype annotation. The basic annotation type that denotes a Spring-managed component is @Component. You can apply it to your SequenceDaoImpl class.
package com.apress.springrecipes.sequence;

import org.springframework.stereotype.Component;
import java.util.Map;

@Component
public class SequenceDaoImpl implements SequenceDao {
    ...
}
Also, you apply this stereotype annotation to the SequenceService class for Spring to detect it. In addition, you apply the @Autowired annotation to the DAO field for Spring to auto-wire it by type. Note that because you're using the annotation on a field, you don't need a setter method here.
package com.apress.springrecipes.sequence; import org.springframework.beans.factory.annotation.Autowired; import org.springframework.stereotype.Component;@Componentpublic class SequenceService {@Autowiredprivate SequenceDao sequenceDao; ... }
With the stereotype annotations applied to your component classes, you can ask Spring to scan them by declaring a single XML element: <context:component-scan>. In this element, you need to specify the package for scanning your components. Then the specified package and all its subpackages will be scanned. You can use commas to separate multiple packages for scanning.
The previous stereotype is enough to be able to use the bean. Spring will give the bean a name created by lowercasing the first character of the class and using the rest of the camel-cased name for the bean name. Thus, the following works (assuming that you've instantiated an application context containing the <context:component-scan> element).
SequenceService sequenceService = (SequenceService) context.getBean("sequenceService");Note that this element will also register an AutowiredAnnotationBeanPostProcessor instance that can auto-wire properties with the @Autowired annotation.
<beans xmlns="http://www.springframework.org/schema/beans"
    xmlns:xsi="http://www.w3.org/2001/XMLSchema-instance"
    xmlns:context="http://www.springframework.org/schema/context"
    xsi:schemaLocation="http://www.springframework.org/schema/beans
        http://www.springframework.org/schema/beans/spring-beans-3.0.xsd
        http://www.springframework.org/schema/context
        http://www.springframework.org/schema/context/spring-context-3.0.xsd">

    <context:component-scan base-package="com.apress.springrecipes.sequence" />
</beans>
The @Component annotation is the basic stereotype for denoting components of general purposes. Actually, there are other specific stereotypes denoting components in different layers. First, the @Repository stereotype denotes a DAO component in the persistence layer.
package com.apress.springrecipes.sequence;

import org.springframework.stereotype.Repository;

@Repository
public class SequenceDaoImpl implements SequenceDao {
    ...
}
Then, the @Service stereotype denotes a service component in the service layer.
package com.apress.springrecipes.sequence; import org.springframework.beans.factory.annotation.Autowired; import org.springframework.stereotype.Service;@Servicepublic class SequenceService {@Autowiredprivate SequenceDao sequenceDao; ... }
There's another component stereotype, @Controller, denoting a controller component in the presentation layer. It will be introduced in Chapter 8, "Spring @MVC."
By default, Spring will detect all classes annotated with @Component, @Repository, @Service, @Controller, or your custom annotation type that is itself annotated with @Component. You can customize the scan by applying one or more include/exclude filters.
Spring supports four types of filter expressions. The annotation and assignable types are for you to specify an annotation type and a class/interface for filtering. The regex and aspectj types allow you to specify a regular expression and an AspectJ pointcut expression for matching the classes. You can also disable the default filters with the use-default-filters attribute.
For example, the following component scan includes all classes whose name contains the word Dao or Service, and excludes the classes with the @Controller annotation:
<beans ...>
    <context:component-scan base-package="com.apress.springrecipes.sequence">
        <context:include-filter type="regex"
            expression="com.apress.springrecipes.sequence..*Dao.*" />
        <context:include-filter type="regex"
            expression="com.apress.springrecipes.sequence..*Service.*" />
<context:exclude-filter type="annotation"
expression="org.springframework.stereotype.Controller" />
</context:component-scan>
</beans>Because you have applied include filters to detect all classes whose name contains the word Dao or Service, the SequenceDaoImpl and SequenceService components can be auto-detected even without a stereotype annotation.
By default, Spring will name the detected components by lowercasing the first character of the nonqualified class name. For example, the SequenceService class will be named as sequenceService. You can define the name for a component explicitly by specifying it in the stereotype annotation's value.
package com.apress.springrecipes.sequence;
...
import org.springframework.stereotype.Service;

@Service("sequenceService")
public class SequenceService {
    ...
}

package com.apress.springrecipes.sequence;

import org.springframework.stereotype.Repository;

@Repository("sequenceDao")
public class SequenceDaoImpl implements SequenceDao {
    ...
}
You can develop your own naming strategy by implementing the BeanNameGenerator interface and specifying it in the name-generator attribute of the <context:component-scan> element.
In this chapter, you have learned the basic bean configuration in the Spring IoC container. Spring supports several types of bean configuration. Among them, XML is simplest and most mature. Spring provides two types of IoC container implementation. The basic one is the bean factory, while the advanced one is the application context. If possible, you should use the application context unless resources are restricted. Spring supports both setter injection and constructor injection for defining bean properties, which can be simple values, collections, or bean references.
Dependency checking and auto-wiring are two valuable container features provided by Spring. Dependency checking helps to check if all required properties are set, while auto-wiring can wire your beans automatically either by type, name, or annotation. The old style of configuring these two features is by XML attributes, while the new style is by annotations and bean post processors, which allow greater flexibility.
Spring provides support for bean inheritance by extracting the common bean configurations to form a parent bean. The parent bean can act as a configuration template, a bean instance, or both at the same time.
As collections are essential programming elements of Java, Spring provides various collection tags for you to configure collections in the bean configuration file easily. You can use the collection factory beans or the collection tags in the utility schema to specify more details for a collection, and also define collections as stand-alone beans to share between multiple beans.
Finally, Spring can auto-detect your components from the classpath. By default, it can detect all components with particular stereotype annotations. But you can further include or exclude your components with filters. Component scanning is a powerful feature that can reduce the amount of configurations.