Java has a long history and has become very popular. The language itself is still considered fairly simple when compared to languages like C, C++, COBOL, Pascal, or even C#. The tooling support for Java is second to none, and nothing offers a larger compliment of compelling libraries for more use cases than the rich ecosystem surrounding Java. Indeed, there are also many virtues attached to Java, not the least of which is its widespread use and employment. You already know this, or you wouldn't be looking to simplifying, enabling frameworks like Spring to help you build applications.
That is not to say that there aren't compelling alternatives. Java has some warts, of course. Many languages, and frameworks evolved in those languages, have emerged in the last decade. These platforms are often built on top of the JVM and promise unparalleled integration ease with existing Java libraries. These platforms are furthered by the strength of their frameworks—"killer apps" that hit a sweet spot, enabling developers with a unique blend of runtime libraries, APIs, domain-specific languages, and code generation. Some of these frameworks, like JRuby on Rails and SpringSource's Grails, offer a compelling story for developers on the JVM who want to build a web application that babysits a database, which, if we're honest, represents a very significant percentage of the new applications being developed today. Grails users also benefit from the robustness of open source frameworks in the Java space, like the Spring framework and Hibernate, because these also underpin much of the Grails stack.
However, these underlying frameworks are still hidden for the most part. The developer deals with high-level APIs that sit between the lower Java frameworks and the developer, often at the cost of a runtime performance penalty. When something breaks, the levels of indirection between Java, Groovy, and Grails, for example, can be dizzying, and the stack traces even more so! There are other concerns, too. Some of the biggest complaints against JRuby or Grails concern their relatively poor performance and their reliance on reflection-intensive APIs and brittle code generation. That's all assuming you've mastered the Ruby or Groovy languages. They are simple languages, and Groovy can feel very familiar to Java developers, but that doesn't mean there's no cost associated with learning them. Ruby, with its use of domain-specific languages, can become very difficult to decipher, relying on magic APIs.
Clearly, there's a middle ground to be had: what's needed is a way of breaking through the ceremony associated with Java development (good tools do help, but the fact remains that generating accessor/mutator pairs is an extra step to somebody coming from languages with real property support like C#, Ruby, Delphi, Scala, Visual Basic, or Python!) and optimizing for certain classes of applications; enterprise web applications are a good place to start. What's needed is something that will feel familiar to users of existing Java frameworks and libraries—like the Spring framework, JMS, Hibernate, JPA, Spring MVC, or Spring Web Flow—while freeing the developer of the burden of integrating them.
Enter Spring Roo. Spring Roo, created by Ben Alex of Spring Security fame, is both an evolution of and a radical departure from all the existing attempts at enhancing Java developer productivity. The objective of Spring Roo, as enumerated in the mission statement (http://static.springsource.org/spring-roo/reference/html/background.html#background-mission) is to "fundamentally and sustainably improve Java developer productivity without compromising engineering integrity or flexibility." This has a lot of implications. Applications built in Roo are Java applications that benefit from the mature Java language and platform. Roo applications are easier to develop at every level, owing to a pervasive adherence to convention-over-configuration.
You can always go home again. Using Roo doesn't mean you cede any control over your application. Roo is a development-time only framework and imposes no runtime model on your application. Ultimately, Roo applications are just plain old Java and Spring applications. There's no Roo library to deploy; it delegates all the runtime handling to Spring and other frameworks you were already using. Roo applications are ultimately the code you would write if you were writing it by hand; the framework espouses best-practice–oriented code. If you disagree with the implementation, the code is ultimately yours to change and is fully malleable. If you choose to override Roo, it will stand down, never overwriting or interfering with your changes. If you don't want Roo in your application, it takes all of five minutes to remove it completely without sacrificing any functionality. If you want to continue using to evolve the application, even after considerable customizations to the generated code, it'll adapt—happily helping in any way it can. So it fully supports round-tripping of generated Roo artifacts through updates by the developer.
Spring Roo is powerful and has support out of the box for many of the libraries and frameworks you're likely to need, including JPA or Hibernate, JMS, Spring MVC, Spring Web Flow, and GWT. For scenarios that aren't supported, Roo ships with a powerful plug-in model, enabling third parties to ship integrations that play well with Spring Roo. Examples of this include a Flex add-on for Flex-based RIA clients and a Surf add-on to enable content-management–centric applications using the Spring Surf framework. If something is not available, developing a Roo add-on is very simple.
With the sales pitch out of the way, let's talk about what Roo is in practice. Spring Roo provides a shell, which sits in the background and monitors your code. You interact with the shell and, when you want a helping hand building something, ask it to act on your behalf. If you've asked it to write something brand new, it'll simply generate the required artifacts and then silently monitor them for interesting changes where it might lend a hand. It tends to stay out of your Java code after it has initially generated it, unless you ask it to intercede.
It will often generate code in response to your changes, however, and put those changes in AspectJ inter-type declarations (ITD), which take the form of files adjacent to your Java code ending in the .aj extension. So, for example, suppose you've introduced a variable. You're going to need an accessor/mutator pair, right? It'll generate that accessor/mutator and store it in an ITD. These files—AspectJ aspects—are merged at build time with Java code you've written. The result at runtime is the same as if you had written the Java class with the accessor/mutators pair by hand. There is no reflection or magic.
Spring Roo is not merely a code-generation tool, however. The same shell that was kind enough to generate the accessor/mutators pair for you on the introduction of a private variable in an entity will also remove the accessor/mutators pair upon removal of the variable. Similarly, if you explicitly code the accessor or mutators in your Java code, Roo drops the generated one, favoring the one you've written, all transparent to you.
If your tool understands these ITDs, it can let you code against their synthetic interface. Eclipse, through the AspectJ Development Toolkit, does understand them, so their use in your code is transparent in that environment. Additionally, because the generated Roo project uses Maven, you may build a working version of your application at any time, regardless of whether or not you use Eclipse. At the time of this writing, IntelliJ IDEA 9.0.2 supports compilation (using the AspectJ weaver) and code-completion of ITDs through a plug-in (see: http://plugins.intellij.net/plugin/?idea&id=4679), which makes coding Spring Roo projects pleasant. There is no particular support for Roo specifically however, so for this chapter, we will, where relevant, assume you are using the SpringSource Tool Suite. At the time of this writing, we are unaware of any support for ITDs or for Roo for Netbeans. Even if your IDE doesn't support ITDs, Spring Roo might still be compelling as a way to bootstrap the development process, because as we'll discuss later, Spring Roo (and AspectJ) can be completely removed, leaving a standard Java and Spring application with its full functionality intact that can be edited using IntelliJ or Netbeans.
This chapter is a short one, which speaks to the power of Spring Roo. Once you've gotten started, there's very little that's unfamiliar or unintuitive. If ever you feel out on a lurch, you can simply ask Roo for help! Your resulting project is Spring-based, but if you've read this book, you'll have no problem there!
You want to use Roo, but don't know where to start. After all, Roo is not a library, and it's not a framework. It's a lightweight developer tool. You want to know what tools are required to get the best development experience and, more precisely, how to set start using those tools.
Setting up Spring Roo is fairly painless, but there are some caveats. Theoretically, there's nothing stopping you from using Spring Roo, a JDK, and Vim by themselves. Practically, however, you need to set up an appropriate version of Eclipse, Java 6 Spring Roo itself, and Maven.
To achieve its promise of increasing developer productivity, Spring Roo relies on many standard tools—tools with which you're certainly at least somewhat familiar. Even in this book, we've worked through examples using Spring, of course, and you're no doubt aware of Maven, the ubiquitous project comprehension and build tool. If you've set up Maven, Ant, or the JDK, you've likely added something to your operating system's PATH variable before, too. Similarly, if you've worked with Java, you've more than likely used an IDE, like IntelliJ IDEA or Eclipse. So none of what we're about to enumerate should be unfamiliar to you. There are very specific things that need to happen, so please review all the steps, even if you feel like you've already taken care of these before.
It is also worth noting that while most features work on all platforms, Spring Roo makes heavy use of the command line shell. The shell is quite smart, featuring tab completion, line history, and much more. These features are surfaced pretty consistently on all platforms, thanks to the excellent JLine library (http://jline.sourceforge.net). JLine handles some features inconsistently, however, on Windows—nothing fundamentally irresolvable, mind you, just nuisances like shell color differences and line history glitches. Proceed full speed ahead, but if you're not using a Unix-like operating system, be aware of the (ever diminishing) possibility of issues.
Let's get started!
You need Apache Maven, version 2.0.9 or greater. Maven isn't strictly necessary if you've already got an existing Spring Roo project, but it's definitely convenient and is required to do things like use Roo's commands for dependency management, builds, project bootstrapping, and so on.
To obtain Maven, visit
http://maven.apache.org/download.html, and download it.Unzip the archive into a directory of your choosing. At this point, you might create an environment variable to record its location;
MAVEN_HOMEis a pretty standard (but not required) name.Add the
binfolder under the directory to your system'sPATHvariable. If you gave the folder an environment variable likeMAVEN_HOME, you can simply modify thePATHto referenceMAVEN_HOME/bin. On a Unix-like environment, you would modify a system shell script (like/etc/profile, or~/.profile, or~/.bashrc) to have an entry likeexport PATH=$PATH:$MAVEN_HOME/bin.Start a new shell session and confirm that you can issue the following command without error, in any directory on your system:
mvn --version
Eclipse is an ideal environment, because it has support for the AspectJ Development Tools (AJDT). This support lets you code in Eclipse with aspects as a first class member of the language; aspects are transparently woven in and everything compiles. All mechanisms—refactoring, class inspection and IDE pop ups—work as you'd expect. Unfortunately, this support is limited to Eclipse, at the moment. If you're a Spring user, and in particular if you want a guaranteed stable integration for development with Roo, no Eclipse distribution can offer you more than the SpringSource Tool Suite.
You can download the IDE from http://www.springsource.com/products/sts. It is not open-source, but it is free of cost ("as in beer"). The SpringSource Tool Suite integrates all the Eclipse plug-ins you would typically download and set up manually if you were to download the stock install of the Java EE edition of Eclipse. So, from that perspective, this is a compelling download all by itself, regardless of whether or not you plan on using Spring Roo: it's got Maven, Subversion, unmatched Spring support, enterprise OSGi, support for all of SpringSource's deployment targets (above and beyond stock adapters like Tomcat and JBoss) and much, much more.
To obtain the SpringSource Tool Suite, visit
http://www.springsource.com/products/sts, and click Download STS.Once STS is downloaded, extract the distribution to the directory of your choosing. If you navigate the directory structure, you'll note that these are in the directory:
A directory for a bundled version of SpringSource's tc Server (in my installation, version 6.0.20)—a world-class, developer-friendly, and operations-enabled web server
A directory for SpringSource Tool Suite itself (in my installation, version 2.3.2)
A directory for Spring Roo (in my installation, version 1.0.2)
You need Spring Roo itself. If you've downloaded the SpringSource Tool Suite, then you already have Spring Roo in the folder adjacent to the folder in which the IDE lives. If you simply wish to upgrade Roo independent of SpringSource Tool Suite or wish to use Roo with another tooling option, proceed reading this.
Visit http://www.springsource.org/roo for a plethora of information, helpful tutorials, and, of course, the distribution. While all the SpringSource projects are easy to get into—owing in large part to their excellent, world-class documentation—Spring Roo particularly excels at providing a compelling out-of-the-box developer experience. If, by chance, there is any question about how to do something even after reading this chapter (perish the thought!), you'll find ample resources on this site. To set up Roo, follow these steps:
To obtain Spring Roo, visit
http://www.springsource.org/roo/start, and download it by clicking the Download link on the page.Once you have the distribution on your system, unzip it to a directory of your choosing. At this point, create an environment variable called
ROO_HOMEto record its location.Add the
binfolder under the directory to your system'sPATHvariable. If you gave the folder of an environment variable likeROO_HOME, you can simply modify thePATHto referenceROO_HOME/bin. For example, in a Unix-like environment, you would modify a system shell script (like/etc/profileor~/.profileor~/.bashrc) to have an entry likeexport PATH=$PATH:$ROO_HOME/bin.On the command line, type the following sequence. If you are running on Windows, issue
roo.batinstead ofroo.sh:mkdir first_flight ; cd first_flight ; roo.sh quit; rm first_flight ;
Confirm that you saw output. On my system, the output looked like this:
$ roo.sh quit
    ____  ____  ____
   / __ / __ / __
  / /_/ / / / / / / /
 / _, _/ /_/ / /_/ /
/_/ |_|\____/\____/    1.0.2.RELEASE [rev 638]
Welcome to Spring Roo. For assistance press TAB or type "hint" then hit ENTER.
Now, you're ready to get to the business of building your application! Launch a shell instance and then launch the SpringSource Tool Suite by executing the STS binary in the SpringSource Tool Suite folder.
There are at least a couple of good ways to start a Spring Roo project, but none are obvious if you haven't used it before. This isn't a library, of course, so you don't just add the relevant .jar files to your classpath like you might the Spring framework. How do you begin?
As was famously uttered in no science-fiction movie, ever, the answer is, "Use the shell, Luke." The Spring Roo shell provides everything you need to get started. An alternative approach is to use STS's wizard, which may be familiar to users accustomed to tooling-based support.
The first option—using the shell—is the most obvious, worthwhile, and potentially powerful. Let's start there.
The Spring Roo shell is a blank slate. It represents the ultimate user interface for Spring Roo to facilitate development. The Spring Roo team did a lot of research before building Roo on how to advance the Java developer experience, best expose the tool to the developers, and avoid being overly coupled to any single technology. The team came up with a custom command line shell to facilitate the developer. This shell can be intimidating to the uninitiated.
The shell is initially empty and replete with untapped potential; to make the shell intuitive, the Spring Roo team gave it lots of smarts. It supports tab completion, which will enable you to tab your way to a completely specified command. You can ask it questions using the hint command, and it does its best to direct you in response.
Additionally, the shell keeps context. It knows that a command run to modify an entity, or to add a field to an entity, must affect an entity and that it's likely you, the developer, intended to update the last entity you created earlier in the shell session. After a while, the shell starts to feel like an extra arm; you might find yourself feeling disappointed when the shell can't solve a problem for you!
First, let's create a new Spring Roo project using the Spring shell. First, create an empty directory in which to work and then, on the command line, change your current directory to the directory you just created. Then launch Roo (much as we did in the first recipe):
$ roo.sh
At this point, you'll be greeted by a welcome message:
Welcome to Spring Roo. For assistance press TAB or type "hint" then hit ENTER.
Type hint, and press the Enter key.
roo> hint
Welcome to Roo! We hope you enjoy your stay!

Before you can use many features of Roo, you need to start a new project.

To do this, type 'project' (without the quotes) and then hit TAB.

Enter a --topLevelPackage like 'com.mycompany.projectname' (no quotes).
When you've finished completing your --topLevelPackage, press ENTER.
Your new project will then be created in the current working directory.

Note that Roo frequently allows the use of TAB, so press TAB regularly.
Once your project is created, type 'hint' and ENTER for the next suggestion.
You're also welcome to visit http://forum.springframework.org for Roo help.
roo>
And we're off! It's done all but lay out a welcome mat for us! Let's oblige it: enter the project command as follows and then press Enter:
$ project –topLevelPackage com.apress.springrecipes.roo.test1
Output will flash across your screen. In the preceding example, you could have just typed project and pressed Tab. Tab signals to the Roo shell that you want suggestions, just as Ctrl + space bar does in your IDE for auto-completion. If you had pressed Tab in this case, Roo would have simply filled in the required (and unique) argument to the project command, the --topLevelPackage argument, and you could have then simply typed your package. Here's what it looked like on my shell:
Created /home/jlong/Documents/code/roo/t1/pom.xml
Created SRC_MAIN_JAVA
Created SRC_MAIN_RESOURCES
Created SRC_TEST_JAVA
Created SRC_TEST_RESOURCES
Created SRC_MAIN_WEBAPP
Created SRC_MAIN_RESOURCES/META-INF/spring
Created SRC_MAIN_RESOURCES/META-INF/spring/applicationContext.xml
Created SRC_MAIN_RESOURCES/META-INF/spring/log4j.properties
At this point, you've got a skeletal installation all set up and ready to use. If you attempt to type project again, it won't auto-complete or provide any suggestions or feedback, because it knows that the command is inappropriate for this project, at this point.
Quit the Roo shell, and inspect the output. You've got a directory with a Maven 2 (or greater) project preconfigured already with Spring and more. Here's what is in my directory structure:
jlong@studio:~/Documents/code/roo/t1$ find
.
./log.roo
./src
./src/main
./src/main/webapp
./src/main/java
./src/main/resources
./src/main/resources/META-INF
./src/main/resources/META-INF/spring
./src/main/resources/META-INF/spring/log4j.properties
./src/main/resources/META-INF/spring/applicationContext.xml
./src/test
./src/test/java
./src/test/resources
./pom.xml
jlong@studio:~/Documents/code/roo/t1$
This is a Maven project.
If you've used Maven before, you will know that the directory structure is consistent for all Maven projects, and it's shown in Table 12-1.
Table 12.1. Maven Directories
Directory | Use |
|---|---|
| A directory to hold the non–unit-test Java files for your application. |
| Holds classpath resources that aren't Java class files. You can see in the previous output that it's appropriate to put the |
| This directory is used to hold the rest of a web application's structure. If you were going to develop a web application, put everything except what you would put in |
| This directory holds artifacts intended to test the Java classes under the |
| This directory holds resources needed by your test classes at test time, in the same way that |
Maven projects are described by the pom.xml file in the root of the project. They store metadata about the dependencies required in the application, as well as their scope: .jar files that are required only for unit testing are not included in the final build intended for deployment. Similarly, .jar files that provide interfaces needed only at compile time, such as the Spring Roo aspects (since the Spring Roo annotations are source-level only) and the various standard interfaces (you need to compile against javax.servlet.*, for example, but your deployment server already has those libraries on its path and there's no need to furnish them.)
Maven builds, much like Roo, work on the notion of convention-over-configuration. You only need to modify the Maven pom.xml file when you want to augment or change some existing behavior in the build. A minimal pom.xml is fully functional, however.
Maven already knows how to compile, deploy, document, run tests for, and share your project artifacts for you. It exposes life cycle hooks like compile, test, and so on. Plug-ins can be written to hook into those life cycle phases for different types of projects. There are defaults, however. For a standard .jar file, you don't need to specify any of these plug-ins. If you invoke a plug-in that exists in a specific phase, Maven will run all earlier phases and then invoke that plug-in. Thus, to build a working .jar of your Maven application, run the following command in the same folder as the pom.xml file lives for your project:
mvn package
This will invoke the compiler phase, the test phase, and so on, and finally the package plug-in. The package plug-in will generate a .jar file that lives in the target folder of your project (all outputs, including code generation, will live somewhere in this folder). Spring Roo also lets you perform certain operations using Maven from within the Roo shell. To package the project using the Roo shell, launch it again (using roo.sh), and invoke the following command:
$ roo> perform package
When you are using Spring Roo, there's almost no reason to directly modify the Maven pom.xml file if you don't wish to. However, it doesn't hurt to understand what Spring Roo has done for us. Open up the pom.xml file in your favorite text editor. You'll note that it has imported standard .jar files like JUnit 4.x, Apache Commons Logging, AspectJ, and the Java Servlet APIs. It has also declared a dependency on many Spring framework libraries like the core, AOP support, transaction support and test support. More than likely, you would have added most of these to your own Spring project, whether you're using Spring Roo or not. In addition, you'll note a solitary Spring Roo–specific dependency:
<dependency>
                <groupId>org.springframework.roo</groupId>
                <artifactId>org.springframework.roo.annotations</artifactId>
                <version>1.0.2.RELEASE</version>
                <scope>provided</scope>
        </dependency>
The scope is provided, which simply means it won't exist at runtime and is there only for the compiler. Spring Roo has no runtime footprint at all.
We've created our project using the shell. STS also provides a fast and convenient way to bootstrap a new Spring Roo project.
To start, open up SpringSource Tool Suite.
Go to File

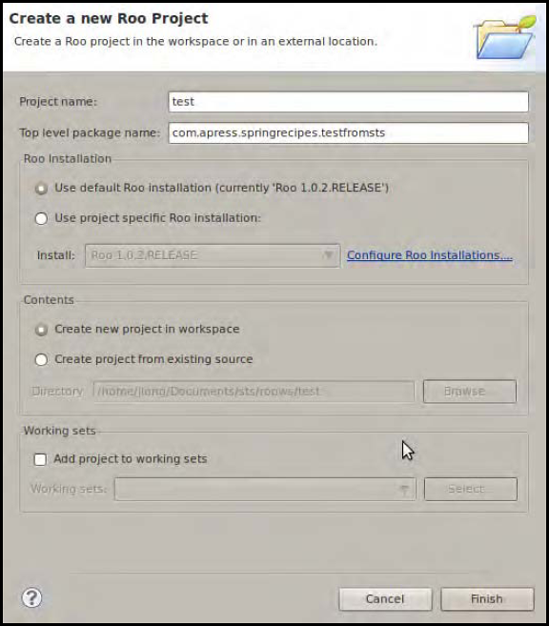
You will be greeted with the dialog box shown in Figure 12-1. Note the field for the project name, as well as the "Top level package name" field. This wizard establishes the same setup as you did by creating a directory and then using the Roo shell to create a project and requires virtually identical inputs. You need only specify the project and top-level package names; everything else may remain as specified by default.
You should have a new project. Go to the Eclipse Project Explorer. Your project should be very similar to the project you created on the command line.
SpringSource Tool Suite provides a shell to let you interact with Roo from within the IDE environment. To use it, go to Window
Here, you may enter the same commands as you did on the command line to proceed. Note that when entering commands in the STS shell, use Ctrl + space bar, not Tab, to get auto-completion and suggestions. Ctrl + space bar is used because it's more consistent with a developer's expectations for auto-completion when in Eclipse, whereas Tab is more consistent within a terminal (Bash provides tab completion, for example).
You've walked through the two approaches to creating a Spring Roo project, but what happens if you want to import the project created on the command line into SpringSource Tool Suite?
The m2eclipse plug-in, which provides Maven support to Eclipse (and thus to SpringSource Tool Suite), can do all the heavy lifting of importing your project, since it is just a stock-standard Maven project. Then, simply use SpringSource Tool Suite to add the Roo nature to your project.
SpringSource Tool Suite bundles the m2eclipse plug-in (http://m2eclipse.sonatype.org/), which provides a convenient integration between Maven and Eclipse. You can import an existing Maven project, and the plug-in takes care of mapping the dependencies specified in the Maven project to Eclipse classpath libraries, specifying which folders are source folders, which Java compiler to use, and more. The plug-in also provides a convenient way of working with Maven projects and updating them.
Here's how to import an existing Spring Roo into SpringSource Tool Suite (or any Eclipse variant with the m2eclipse plug-in already installed).
Go to File
Browse to select the folder where you created the Spring Roo project. It should list the projects available under the folder selected by showing you the
pom.xmlit wants to import. Confirm the selection by choosing Finish (see Figure 12-4).At this point, you have a working Eclipse project, but it will complain of compiler errors if you've introduced any AspectJ ITDs. The project hasn't been configured to know what to do with them, yet. In SpringSource Tool Suite, you need only right click on the project in the Eclipse Project Explorer. Choose Spring Tools
If you're using IntelliJ IDEA Ultimate Edition (it should work with Community Edition, too) version 9.0.2 or better, and already have the aforementioned AspectJ support plug-in installed, you can simply open the project just as you would any IntelliJ project, selecting the
pom.xmlinstead of a standard IntelliJ IDEA project file.


You have Roo set up and now want to see the storied productivity gains had by using Spring Roo. For starters, how do you build a web application using our existing Spring Roo project as a base? How do you add entities, controllers, services, messaging, and any of a myriad of other concerns?
Use the shell, of course! Spring Roo provides very powerful support to bootstrap most solutions, and if it doesn't, it's entirely possible there's a plug-in that will do the job for you. Failing that, it is just a stock-standard Spring project, after all, so you can simply add it as you would normally. At no point will you (or could you) code yourself into a corner where the Spring Roo way is impeding you from solving a problem!
Spring Roo provides intuitive support for building applications. In this recipe, we'll explore the rhythm of Spring Roo development. This recipe is not so much about picking apart the nuances of the technologies we're using to build this application as about understanding the Roo development life cycle. As you'll see, once you embrace the Roo shell, you may see the finish line approach with startling suddenness.
Let's build a simple customer relationship management (CRM) application. We want to store, update, view, and (hopefully very rarely!) delete customers. We shall work using a sort of domain-driven design approach to generate useful components in the higher view tier from the data present in the model and services tiers.
You should have a freshly created Spring Roo application to follow along. If you haven't already done so, in either STS or on the command line, start the Roo shell (if it wasn't already running) for the project you wish to edit and update.
I think that, before we can build any kind of web application or UI layer, we need to build some sort of entity to model our records. There are many ways to do that, but for the very large majority of applications, it will involve a database and some sort of object/relational mapping (ORM) solution. That can get tedious very quickly.
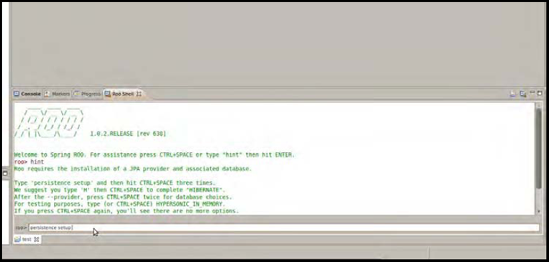
If Spring Roo's so smart, let's ask it! In the Roo shell, type hint to see what to do next before we can get started. On my console, it responded:
roo> hint
Roo requires the installation of a JPA provider and associated database.

Type 'persistence setup' and then hit CTRL+SPACE three times.
We suggest you type 'H' then CTRL+SPACE to complete "HIBERNATE".
After the --provider, press CTRL+SPACE twice for database choices.
For testing purposes, type (or CTRL+SPACE) HYPERSONIC_IN_MEMORY.
If you press CTRL+SPACE again, you'll see there are no more options.
As such, you're ready to press ENTER to execute the command.

Once JPA is installed, type 'hint' and ENTER for the next suggestion.
Geez! It's a step ahead of us! It already knows we need a database and some sort of persistence mechanism. If this sort of thing carries on too long, it might give us Spring book authors a complex! Fine, enter persistence setup as it suggests. On my console, I ended up entering the following command:
roo> persistence setup --database HYPERSONIC_IN_MEMORY --provider HIBERNATE
In my project, the command created two new files (src/main/resources/META-INF/persistence.xml and src/main/resources/META-INF/spring/database.properties), and it updated two files (src/main/resources/META-INF/spring/applicationContext.xml and pom.xml).
The file src/main/resources/META-INF/spring/database.properties contains useful configuration to facilitate connection to the Hypersonic in-memory database. The pom.mxl file has been updated to contain dependencies for Hibernate and for JPA, as well as the Hypersonic embedded database .jar files. The file src/main/resources/META-INF/persistence.xml is the standard JPA configuration file to enable the Hibernate-based JPA implementation to do its work. Finally, the Spring application context, src/main/resources/META-INF/spring/applicationContext.xml, has been updated to have a data source, a JPA transaction manager, and a JPA entity manager factory.
That wasn't so bad after all! Now, we need only code a Customer entity, write a DAO and maybe a service, set up Spring MVC, add a controller, and design the UI. This should be easy. We could have a first draft up in no time—in a day or two, maximum, if we start now. Right?
I, for one, think it's fantastic that Spring Roo got us this far. It might be worth it to see if it can, by some infinitesimally small chance, get us further along and perhaps spare us the next few days' worth of development.
In the Spring Roo shell, type hint again. Here's what it said in my shell:
roo> hint
You can create entities either via Roo or your IDE.
Using the Roo shell is fast and easy, especially thanks
 to the CTRL+SPACE completion.

Start by typing 'ent' and then hitting CTRL+SPACE twice.
Enter the --class in the form '~.domain.MyEntityClassName'
In Roo, '~' means the --topLevelPackage you specified via 'create project'.

After specify a --class argument, press SPACE then CTRL+SPACE. Note nothing appears.
Because nothing appears, it means you've entered all mandatory arguments.
However, optional arguments do exist for this command (and most others in Roo).
To see the optional arguments, type '--' and then hit CTRL+SPACE. Mostly you won't
need any optional arguments, but let's select the --testAutomatically option
and hit ENTER. You can always use this approach to view optional arguments.

After creating an entity, use 'hint' for the next suggestion.
roo>
Huh! Why, Will wonders never cease?
It can help us with the entities! Right then, let's oblige it again: type ent, and press Ctrl + space bar twice. Roo should prompt you to specify a class name. Typically, the entity class should be in a subpackage of the root package. Spring Roo has a special convention, which it announces in the console message, to avoid having to retype the entire base package when specifying a class in a sub package of the application: simply use ~ in place of the entire package. If your root project was com.apress.springrecipes.test.t3, then ~ will resolve to that, and ~.domain.Customer would resolve to com.apress.springrecipes.test.t3.domain.Customer. So, the full mandatory command to generate a Customer entity, is as follows:
roo> ent --class ~.domain.Customer
However, we should also take advantage of the fact that Spring Roo can generate unit tests and integration tests for us. Let's suffix the command with the optional –testAutomatically argument. In the Spring Roo shell, to see all the optional arguments, simply type -- and then press Ctrl + space bar or Tab (for STS or the regular old Spring Roo shell, respectively) to see all the options. The command now looks like this, instead:
roo> ent --class ~.domain.Customer --testAutomatically
On my console, I can see that it added a Customer class, as expected, complete with the base JPA annotations as well as three Roo-specific annotations.
package com.apress.springrecipes.test.t3.domain;

import javax.persistence.Entity;
import org.springframework.roo.addon.javabean.RooJavaBean;
import org.springframework.roo.addon.tostring.RooToString;
import org.springframework.roo.addon.entity.RooEntity;

@Entity
@RooJavaBean
@RooToString
@RooEntity
public class Customer {
}
These annotations tell the Roo shell what services to provide to the Customer class while you're developing. Yes, you read that correctly—while you are developing! These annotations never make it past the compiler. They are there for the benefit of the Spring Roo shell, so that it knows what things you want it to help you with.
You'll note that Spring Roo also created three other files in the same package, Customer_Roo_Configurable.aj, Customer_Roo_Entity.aj, and Customer_Roo_ToString.aj. These are AspectJ ITDs. They are where Spring Roo does its magic to help you. You should not modify them. Spring Roo modifies them, and only in response to changes you make on the Customer entity. The annotations tell Spring Roo that you would like its help.
Open the Customer_Roo_ToString.aj file. In my application, the file looks like this:
package com.apress.springrecipes.test.t3.domain;

import java.lang.String;

privileged aspect Customer_Roo_ToString {

    public String Customer.toString() {
        StringBuilder sb = new StringBuilder();
        sb.append("Id: ").append(getId()).append(", ");
        sb.append("Version: ").append(getVersion());
        return sb.toString();
    }
}
It's pretty clear that this is intended to be the toString method for our Customer class, even if it is a bit strange looking. If the syntax is off-putting or confusing, don't worry. You don't need to edit these files yourself; Spring Roo modifies them for you, as you make changes to the Customer java class.
To see this effect in action, open Customer.java, and comment out the @RooToString annotation. Instantly, the Customer_Roo_ToString.aj file disappears! Uncomment the annotation, and observe that the ITD reappears instantly. Alright, I'm sure you're impressed. What happens if you write your own toString method on the Customer class? Who wins? You do, of course! Try it, and observe the ITD again disappear, deferring to your custom toString implementation first.
Remove the overridden toString implementation, for now.
If you open Customer_Roo_Entity.aj, you'll observe that Roo has already created an ID and a version field for your entity, and that it has created methods to facilitate persisting, finding, updating, and removing the entity.
Let's introduce a field. The first way we'll do so is by simply adding the filed into the Customer java class. Modify the file to look like this:
package com.apress.springrecipes.test.t3.domain;

import javax.persistence.Entity;
import org.springframework.roo.addon.javabean.RooJavaBean;
import org.springframework.roo.addon.tostring.RooToString;
import org.springframework.roo.addon.entity.RooEntity;

@Entity
@RooJavaBean
@RooToString
@RooEntity
public class Customer {
     private String name;
}
As soon as you do, you can confirm that the toString method has been updated to include the new field, and that a new ITD, called Customer_Roo_JavaBean.aj, has been introduced. This new ITD should contain the declaration of an accessor/mutator pair for the field. Convenient!
Remove the field. Let's get back to the business of letting Spring Roo do things for us. We need a few fields: a first name, a last name, and an e-mail at least. We should probably try to record the date they first bought the product and whether or not the Customer is considered still active for revenue-recognition purposes.
Spring Roo provides a command just for this scenario: the field command. Here are the commands to generate our fields. We won't hash out the gory specifics of the invocations, as they're pretty self-explanatory.
field string --fieldName firstName --notNull
field string --fieldName lastName --notNull
field string --fieldName email --notNull
field date --fieldName signupDate --type java.util.Date
field boolean --fieldName active
As you enter these, Spring Roo adds the fields to the Customer java class, complete with JSR-303 (the JSR specifying validation in the tradition of frameworks like the Hibernate Validation framework) validations, accessor/mutators, and an updated toString method. It's important to note that we aren't specifying to which entity the fields changes be applied. Spring Roo remembers what entity you last created and applies the changes to that. It has context. If you want to explicitly spell it out, use the -- entity parameter.
At this point, we have everything we need in the backend (and then some!). Let's turn our focus to building the front-end—a web application.
The goal here is to generate some simple support code that we can tune and tweak later. We'd just like to get a proof-of-concept example working. We want to build a web application that can manipulate Customer entities. We know that this would take the form of a controller in Spring MVC, so let's take a stab in the dark. Type hint controllers at the Spring Roo shell. You can see that there is indeed support for generating scaffolding controllers. Type the following command to create a Spring MVC controller that provides a UI to manipulate Customer entities (and stand back!):
controller scaff --class ~.web.CustomerController --entity ~.domain.Customer
That command packs a wallop! Our pedestrian application was just transformed from a simple service tier to a full-blown Spring MVC application with a very sane Spring MVC setup; controller support for RESTful endpoints to create, update, retrieve or delete entities; URL rewriting logic; and much more. Let's test out the application!
Let's deploy the application to a web container. If you're on the standard command line, you have a couple of options.
If you're in an IDE, you can use your IDE's support for deploying web applications. In SpringSource Tool Suite, two preconfigured servers are already available to you. Let's use the tcServer instance (which is ultimately based on Tomcat, so it should perform similarly). To do so, go to Window
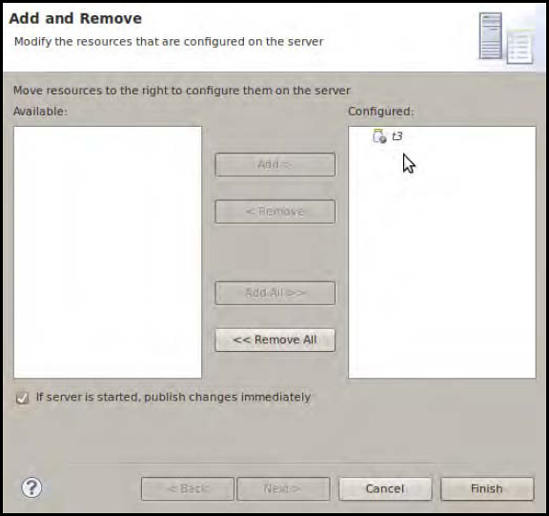
Figure 12.5. This is the "Add and Remove" dialog inside of STS (or almost any Eclipse distribution with WTP support). Here, t3 is the name of my Spring Roo project.
Finally, just launch the instance by clicking on the icon with the white arrow inside a green circle; see Figure 12-6.
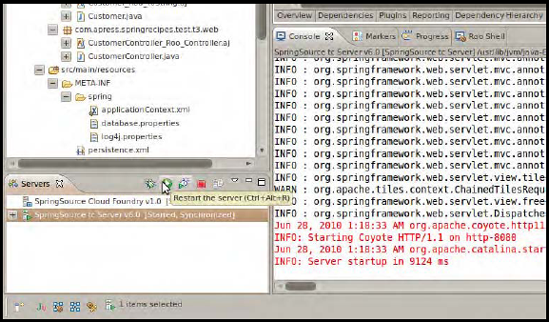
When the server comes up, launch your browser and point it to http://localhost:8080/t3. Replace t3 with your application's project name.
In Figure 12-7, you can see the default welcome page for our CRM. If you click around, you'll find there is a page to create a new customer record and another to list them all. Click the "Create new Customer" link, and fill out the form to create a new Customer record. Then, click the "List all Customers" link on the left-hand side of the page to see that very record. On this page, you have the ability to update or delete the record. Paging of the results is already provided out of the box, too.
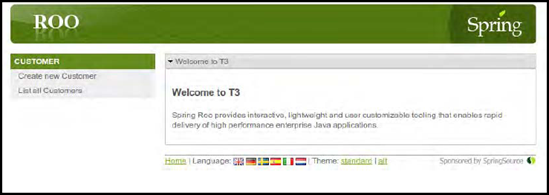
If you're astute, you will notice that the application also supports themes and is internationalized already. The application is leveraging Spring MVC's integration with Apache Tiles to support the themes and modularization, and it's leveraging Spring MVC's excellent internationalization and localization capabilities to support the various languages.
Finally, you'll note that there are RESTful endpoints that support manipulating the Customer entity.
Not bad for a minute of work!
This may not be finished enough for you, but it's definitely a good start. The project is familiar Spring MVC and Spring. There are many options from here. You can continue using Roo to add Spring Security, Spring Web Flow, and even GWT support, for example. Or you can tune the pages by hand and update the themes yourself; that's also a good option.
Your application is working like a charm, and you got home in time for dinner. Now, you're ready to deploy to production (hard to believe you just started this project only a few pages ago!), but you're getting pushback against having Spring Roo in your build (even though it won't get deployed, since it's not retained beyond the compiler anyway). Or, perhaps you just want to shed the training wheels and get a non-Rooified project.
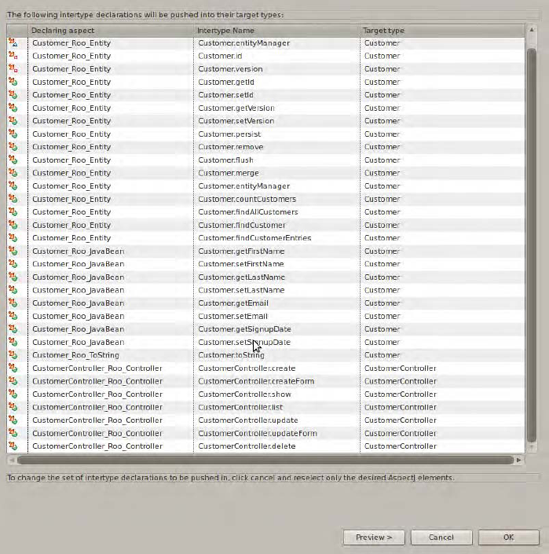
It takes about five minutes to remove Spring Roo from your entire project. You need only remove the annotations, remove the solitary dependency on the Spring Roo annotations .jar, and use the Eclipse-based AspectJ Development Toolkit's support for push-in refactoring.
Let's start with the single largest change: the removal of the AspectJ ITDs. To achieve this, you need to use AJDT's push-in refactoring. This refactor will merge the Aspects with their owning class. Note that this capability isn't available in the IntelliJ IDEA AspectJ support, at the time of this writing.
Right-click the root folder (or any of the source packages, e.g., src/main/java, src/main/resources, src/test/java, or src/test/resources) in Eclipse under the Java Resources tab in the Project Explorer. Choose Refactor
Once this is done, 99 percent of the remnants of Spring Roo are already gone. As it is, your application is already 100 percent editable in Netbeans, IntelliJ, or any other editor that doesn't support AspectJ. However, technically, Spring Roo is still a part of your application. You need to remove the annotations from your build. Open up your pom.xml file, and search for the comment that reads
<!-- ROO dependencies -->
Right below it, you should see the following:
<dependency>
        <groupId>org.springframework.roo</groupId>
        <artifactId>org.springframework.roo.annotations</artifactId>
        <version>1.0.2.RELEASE</version>
        <scope>provided</scope>
</dependency>
Delete that dependency, and save the file. At this point, your application will not build because the compiler cannot resolve which library contains the Spring Roo annotations left on classes that were formerly managed by Spring Roo. You can simply remove the annotations from the Customer class and the CustomerController class. Alternatively, you might use the Find and Replace feature of your favorite text editor or IDE and find and remove all texts starting with @Roo.
Your application is now 100 percent Roo-free. This is obviously not desirable, since you lose Roo's support. However, if one day you decide that you want to bring Roo back, you simply need to add the annotations again and declare the Maven dependency once more. If you want to leave the existing classes as they are but want Spring Roo's help adding new components, simply start up the Spring Roo shell as usual and issue invocations as usual. It can even work with projects that were never Spring Roo projects, so long as they follow the directory layout conventions of a Maven project. Spring Roo takes inventory of what's happened and which beans have annotations on it when it starts up. So, if you add the annotations to a bean it had nothing to do with creating, Spring Roo will catch up; it will generate the AspectJ ITDs, just as if it had generated the class in the first place.
In this chapter, we worked through Spring Roo, an excellent framework on which to build best-of-breed Spring applications with hitherto unmatched productivity for Java developers. You learned how to get started, set up a project, and take that project all the way to the point where you could use start playing around with the web pages. Then, once we were satisfied we'd gotten enough mileage out of Spring Roo, we removed it from the Spring project.