
Chapter Six
Transitions and Edit Categories
• The Cut
• The Dissolve
• The Wipe
• The Fade
• The Action Edit
• The Screen Position Edit
• The Form Edit
• The Concept Edit
• The Combined Edit
Now that you are familiar with basic shot types, sound assets, and some factors that lead to selecting useful clips and making a solid edit, we should really shed some light on the most common types of transitions that you will use at those edit points. We will be discussing the cut, the dissolve, the wipe, and the fade. Each one of these four transitions carries with it its own meaning when viewed within a motion media project. Audiences understand these transitions and have certain expectations around their traditional use. We will break down each one and analyze how they play into the six elements of information, motivation, composition, camera angle, continuity, and sound.
Transition and Edit Terms
Before we start examining each picture track transition, we should establish a few terms and discuss how video-editing software applications think about them. As you may know, your video master clips (or full-duration video source files) live as references inside a bin or folder within your video-editing project. You typically mark an IN and an OUT to demarcate your usable footage from that master clip and you edit that shorter duration (IN to OUT region) into your sequence. We will call this first clip in your timeline Shot A. The start frame of this shorter video clip (A) is called the head frame. The end frame of this clip is referred to as the tail frame. So the beginning of any clip (master or otherwise) is called the head, and the end is called the tail.
Now let’s edit another short clip into your timeline. You find a different source master clip, mark the IN/OUT, and edit this new, short clip (B) into your sequence (Figure 6.1). So now, the head frame of Shot B is edited (joined, spliced, etc.) onto the tail frame of Shot A. This type of edit is a straight cut. This cut is the transition between Shot A and Shot B. Shot A is considered the outgoing clip: its information is ending at the cut. Shot B is considered the incoming clip: its information is just beginning at the cut. It may seem overly simplistic, but any frames to the left of the cut point live on the A-side of the edit, and any frames to the right live on the B-side.

FIGURE 6.1 A straight cut joins the head of Shot B with the tail of Shot A. In video-editing software timeline windows, sequences progress in time and information from left to right. Shot A is the outgoing shot on the A-side of the cut point and Shot B is the incoming shot on the B-side of the cut point.
As a technical note, all transitions except for the cut and some fades require that extra frames of media be available from the outgoing shot and the incoming shot so that they may overlap and create the transition effect. To help to explain how dissolves and wipes are formed, we will have to revisit the master clips for our Shot A and Shot B. The unused frames of your master clips still exist, and are hidden from view awaiting use in the bin or folder. These unused frames are called handles. Any frames of the master clip prior to your clip segment’s IN mark are called the head handle and any frames coming after the OUT mark are called the tail handle (Figure 6.2).
In order for a dissolve or wipe to occur at the cut point between Shot A and Shot B, you must apply the effect. But in order for the effect to work, there must be more frames of video in the original master clip’s tail handle that come after the last visible tail frame of Shot A in the sequence. The same will hold true for Shot B. Its first visible frame after the cut, or the head frame of that clip segment, must have video frames that precede it in its master clip’s head handle. These extra frames of video (and maybe audio) that are accessed from the unused master clip’s handles are borrowed by the editing software to make the dissolving or wiping transition effect visible in your sequence (Figure 6.3). If your original media source does not have these extra frames in the “hidden” handles, then you will not be able to create that transition effect of that duration with that positioning across the cut. The required extra media is simply nonexistent.
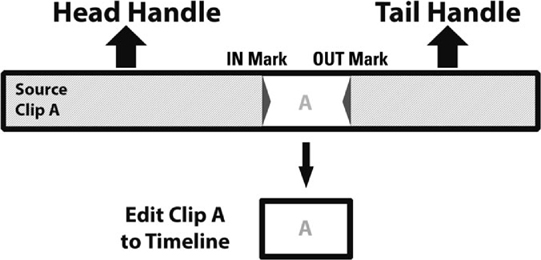
FIGURE 6.2 Here, the IN/OUT portion of the master clip is going to edit down into the timeline sequence. What remains unused in the master clip content are the head and tail handles.
As an example, if you are editing a 1080p/30fps video sequence and you wish to add a default one-second, centered-on-cut dissolve at an edit point in your timeline, then the software will “borrow” 15 frames from the tail handle of Shot A (for after the cut) and 15 frames from the head handle of Shot B (for just prior to the cut). In total, 30 frames of outgoing and incoming video will be dissolved across the edit point. Those 30 extra frames, 15 from each side’s master clip, that were once hidden in the handles when the transition was a straight cut, are now visible inside the transition effect.

FIGURE 6.3 Video-editing applications must borrow frames from the related master clips’ head and tail handles in order to visually display the dissolve or wipe transition effect.
The Four Major Categories of Transition Types
The Cut
The cut is the most frequently used transition in any kind of motion media product. It can be defined as an instantaneous change from one image to another. If you are working in the continuity style of “invisible” editing, then the viewing audience should not consciously notice the cut transition. When it is made at the correct moment, following as many of the positive edit elements as possible, it will seem transparent within the flow of space, time, and action. Creatively, however, cuts do not have to be invisible. A hard and abrupt jump from one screen image to another can represent the mood of your story perfectly. Hidden or not, straight cuts instantly change picture or sound (or both) for the audience experiencing the video.
As a brief reminder, the term “cut” stems from the very beginnings of emulsion film motion picture production. The actual strip of flexible plastic that contained the images in individual frames was physically cut, either with scissors or with a guillotine-type razor blade splicer. Joining two shorter strips of film together, with either tape or glue, was the easiest, fastest, and cheapest way to make a transition. Hence, it was used a great deal. The people who cut filmstrips were called cutters before they were called editors. The expression still holds today even though most people who carry out film and video editing use computer software. In fact, several video-editing apps use a “razor” tool to make “cuts” or “edits” in the virtual media clips in the timeline. An editor can still be called a cutter and the act of editing a film can still be called cutting. Over the 100 years since the origins of cinema, the cut has not changed at all.
The cut is most often used where:
• the action is continuous;
• there needs to be a sudden change for visual or aural “impact;”
• there is a change in information or location.
It is possible to make good cuts and not-so-good cuts. If you consider all six of the following elements when you are making the cut, you are much more likely to help yourself to make a good edit (Figure 6.4).

FIGURE 6.4 A–B – a cut can unite two shots that represent continuous action; C–D – a cut can punch in along the same lens axis to lead the viewer into a closer shot of the subject; E–F – a cut can end a sequence and lead the viewer into a new location. (Photo credits: C & D – Anthony Martel)
1. Information – Ideally, every shot in a motion media piece should offer some form of new information. When the shot currently playing on screen, Shot A, has exhausted all of its visual and aural information, the editor needs to cut to Shot B to provide the audience with something new to see or hear. Depending on the genre, content, and purpose of the video being edited, the new shot that is cut to may be an establishing view of a location, a close-up detail of machinery, a clip highlighting the sound of rain falling or a baby crying, etc.
2. Motivation – There should always be a reason to make the cut. There may be a physical action or visual element within a video clip that motivates the editor to cut to the next shot. It might also be a sound element on the audio tracks that motivates the cut to the next clip. Something within Shot A leads to the need to display Shot B.
For example, a character, seen in a medium shot, suddenly whips his head around and stares, wide-eyed, off screen – CUT TO – the monster emerging from the forest. Shot B, of the monster, is called a reveal. The action within Shot A and the expression of the talent engages the audience and compels them to want to know what is being seen. The editor obliges and reveals the monster clip after the cut. In non-fiction programming, you may be watching a talking-head interview where the subject is speaking about her training for an extreme sport – CUT TO – the athlete, at dawn, running up some rugged hill terrain. The content of her words motivates the cut.
The nature of the program being edited and the content of the footage help to determine why and when a motivated cut can occur. An editor may simply determine that pacing, alone, is a good enough reason to motivate the cut. The timing of shots, clip durations, and frequency of cuts play an important role in motivating edits. These durations of time are generally not marked down in seconds or frames but take on more of a “gut feeling” unit of time known as a beat. They create the rhythm of the scene and add to the overall pacing of the entire story. Rather than a visible or auditory cause, the motivation for the cut’s timing could be based on this intangible yet somehow instinctually knowable beat or feeling that it is now time to cut to something different.
3. Composition – If the frames of the two shots at the cut point are too similar in their compositions, even though they may be of totally different subject matter, it can appear as a visual jump cut to the audience. If visual objects on the incoming frames of Shot B appear in similar places on screen as objects that had been on screen in Shot A, the glitch may cause the audience a moment of confusion.
Of course, the compositions may be similar enough to create what is known as a form edit or graphic edit where the shapes, forms, colors, and/or contrasts of each shot at the cut point are matched on purpose (see more on this later in this chapter). Traditionally, the start frames of Shot B should present a different composition from the end frames of Shot A.
Using differences in composition at cut points forces the audience to immediately engage their eyes and brains and search for the new visual information in the new shot. As long as they are not confused by an overly busy composition in the new shot, they do not even notice the actual cut as they get engrossed in experiencing the visual elements of the new images on the screen.
4. Camera Angle – During the editing of a fictional narrative scene, each successive shot cut into a sequence should show a different camera angle from the previous shot. A clean single or an over-the-shoulder shot recorded somewhere else along the 180-degree arc could immediately follow a medium long shot of two people talking in profile. Focal length changes, in addition to the changes in the horizontal angle on action, will be most effective.
There are rare occasions where a filmmaker wishes to cut together two coverage shots of the same subject along the exact same lens axis. This editorial practice is often referred to as a punch-in. It is also called a cut-in or an axial edit. To create this scenario, the production team must have recorded two coverage shots, say an MLS and an MCU of a stationary subject, without altering the horizontal angle on action – either by physically moving the camera between shots, or with a change in focal length. Punching in can be very dramatic or comedic in its use. Space and time are cut out and the viewer is immediately transported up to or away from the subject (along the same line of view or axis). The lack of significant difference in the angle on action between the two coverage shots does cause a jump cut, but it is done for visual storytelling purposes.
5. Continuity – The continuous movement or action should be both evident and well matched in the two shots to be cut together. The cut is instantaneous, so the fluid movement should be maintained across the cut. Viewers are extremely attuned to discontinuities in action across cuts and these differences of speed or object placement are easily detected and disliked.
6. Sound – There should ideally be some form of sound continuity or sound development across the cut point. If a cut happens within footage from the same scene and location, then the ambience should carry over across the cut. Audio levels should match the visuals’ perspective on the screen for each shot at the cut point. Editing dialogue scenes can be especially tricky because of the precision required in finding that moment to cut just prior to or just after a word or syllable. The levels, intensity, and pacing of the word flow across the cut should also match.
If you cut dramatically from one location or time to another, then immediate differences in sound type and volume can be useful to highlight the shift in space, time, or feeling. These are sometimes called smash cuts (and could also apply to abrupt visual changes at the cut, such as a very dark image cutting to a very bright one). Otherwise, a gradual shift might be preferred where L-cuts or J-cuts help to smooth over the changes in sound at the audio transitions. (See Chapter Seven for additional information on L-cuts and J-cuts.)
In a perfect world, you should give consideration to each of the above elements, but that may not always be achievable. Your goal should be to watch for these elements in all of your footage, train your eyes and ears to pick up on them, and use them as appropriate during your editing process. You should always use cuts when creating your assembly edit (what some people call the slop edit due to how quickly you are able to just slop the selected coverage shots together). The cut is the default edit tool of editing software and it is the fastest way to work. When trimmed as necessary, each cut in your final sequence should be unnoticed by anyone who watches the show if you are using an “invisible” continuity style of editing. Straight cuts are widely accepted when they work and wildly distracting when they do not (did somebody say jump cuts?). Develop your editing skill set around solid cuts and you will never go wrong. Play too much with the grammar of the cut and you may run into too many visual problems with your work.
The Dissolve
This is the second most common transition used in motion pictures, and, unlike most straight cuts, it attracts attention to itself on purpose. A dissolve is described as a gradual and momentary blending together of the ending picture frames of Shot A with the beginning picture frames of Shot B. This is traditionally achieved via a superimposition of both shots with a simultaneous downward and upward ramping of opacity (visibility) over a particular period of time. As the end of Shot A “dissolves” away, the beginning of Shot B emerges onto the screen underneath it at the same time. You get to briefly see the images overlapping.
A dissolve may also be referred to as a “lap dissolve,” a “lap,” and sometimes a video “mix.” The standard default duration of dissolves in editing software is one second, but this can be easily changed to the length required by the given variables at that particular dissolving point in the story – provided you have those extra available frames in the master clip, called handles.
The dissolve is most often used where:
• there is a change in time;
• there is a change in location;
• time or actions need to be slowed down or condensed;
• there is a somber or emotionally quiet component to the subject in the story;
• there is a strong visual relationship between the outgoing and the incoming images.
A good dissolve may be achieved when the following elements are considered at the point of transition:
1. Information – Much like a straight cut, the new shot should contain new information for the viewer to digest. Whether the dissolve is condensing time over a long, continuous event, changing time periods or locations, or joining disparate concepts through matching imagery, the second shot into which you are dissolving should offer something new to both the viewer and the story of the motion media piece.
2. Motivation – As with all transitions, there should be a precise motivating action or narrative need to apply a dissolve. This could be moving backward or forward through time, or into or out of states of consciousness. The visual content, story, and genre of the video project play a large role in determining the motivation for the use of the dissolve. Because dissolves happen across certain durations, they are usually associated with slowing the rhythm of a scene.
3. Composition – The two shots dissolving together should each have compositions that overlap easily and avoid a visual “mess” – particularly at the midpoint when both images are, typically, at 50% opacity. You may dissolve opposing compositional frames (in Figure 6.5, Shot A has its subject frame left while Shot B has its subject frame right) to unify the images in one momentary yet well-balanced blended frame.
You may also create a match dissolve where the compositions of the two shots are very similar but they have different subject matter. Consider the following example of a scene that involves a man who is a werewolf. As he begins to twitch and snarl, you cut to an XCU of his bloodshot eyeball with pupil dilating rapidly, then dissolve to a CU of the full moon. The two round objects, the pupil and the moon, match in composition and shape as the dissolve momentarily joins these images for the audience. Their visual union underscores their thematic connection as well (see the form edit section later in this chapter).
4. Camera Angle – Whether you are working on a short narrative film or a non-fiction program, you will generally dissolve between two shots that present differing camera angles on the action, either from coverage within the same scene or from two adjacent segments in the story. It is as if the audience are able to “move about” the film space and observe different actions or locations from a variety of camera angles at different times.

FIGURE 6.5 Frames that represent a dissolve from one shot to another. The man is thinking of his long-lost love.
Sometimes you may need to collapse time for one long, continuous event recorded from the same angle. Consider the following example of a bank robber who is “trapped” in his hideout waiting for his partner to arrive. The scene encompasses time from late afternoon to late evening with appropriate lighting changes throughout. It is all shot from only one stationary camera angle: backed into the corner of the small room facing outward. To compress time and quickly show the escalating agitation of the man, the editor dissolves between short portions of footage. From daylight through drawn shades to dim desk lamp, the audience get to watch the character move around the room, sit down, lie down, check his phone, peek out the window, etc. – all over elapsed film time via these multiple, slow dissolves.
5. Sound – It is customary to also mix together the audio tracks of the two shots being dissolved in what is often called an audio cross-fade. As the picture for Shot A is dissolving away gradually under the incoming image of Shot B, the audio tracks for Shot A are also fading down (growing quieter) while the audio tracks for Shot B are fading up (growing louder). As discussed in Chapter Five, sound bridges (audio tracks spanning across the cut point) may require long, slow audio dissolves to properly blend the incoming audio element.
6. Time – An important element in the efficacy of the dissolve is its duration, or how long it lingers on screen. One second is usually the default duration for dissolves in video-editing software, but a dissolve can last for as long as there is visual material in each shot involved in the transition (also known as the handle). In general, the dissolve should last as long as is required for its purpose in the motion picture. A quick dissolve of just a few overlapping frames, sometimes referred to as a soft cut, might be preferable to an instantaneous straight cut – but beware that this can imitate a jump cut. A long dissolve can be on screen for several seconds and may, along the midpoint of this longer duration, appear more like a superimposition of the two shots rather than a dissolve. If the story calls for such a visual treatment of these two images uniting for this longer period, then so be it.
The dissolve allows the editor to play with time differently than the straight cut. If you are editing a story that involves a flashback, you could dissolve from the last shot of the present time to the first shot of the events from the past. The audience are softly escorted through story time with the blending of these images and scenes. The dissolve is also often used to create a montage of many different images of events over time. For example, a full day at an amusement park can be condensed down into ten different shots that dissolve from one to the next. The final sequence lasts only 30 seconds of screen time. Usually, such special treatments of visual material are planned by the filmmakers from the outset of the project, but editors should feel free to experiment with dissolving time if they find certain scenes to be too long.
It is important to note that dissolves can also slow down time and manipulate the emotions of the audience when accompanied by slow-motion imagery. This technique is often used in motion media commercial advertising of products, as a means of trying to make them seem sexy, alluring, or grandiose. In fiction filmmaking, you often see this treatment of slowing down fast action to reveal the true efforts, emotions, and pain of the subjects, such as in a boxing movie or in battle scenes. A romantic or maybe an emotionally sad sequence can also use dissolves rather effectively to slow down events and give the audience time to view and digest the meaning of the material. The gradual transition from image to image softens the experience. It is said that the dissolve is the “tear jerker” transition. Dissolves allow the viewer time to think and feel, and are associated with more languid, somber, dreamy, or “thoughtful” emotional responses to the visual story elements.
As a technical aside, you should be aware that most video-editing software applications must “borrow” frames from the full source clip in order to generate the dissolve of the requested duration at the cut point in the sequence. Sometimes, the “hidden” frames of the handle (the tail of Shot A and the head of Shot B) reveal visual or aural information that is not desired. A clap slate is in the shot, or you hear the director call out, “Action” (Figure 6.6). There are methods present in the software to address this, such as trimming the transition point earlier or later, altering the dissolve duration, or adding a freeze frame for just a few frames at the transition. It should be noted that all transition types, except the cut, require the use of these handle frames, and the presence of unwanted picture and sound elements should be closely monitored.

FIGURE 6.6 The two shots work well as a straight cut, but when a dissolve is added, the clap slate is revealed in the frames borrowed from Shot B’s head handle.
Dissolves can be used in any time-based motion media piece such as fictional narrative movies, television shows, music videos, documentaries, animated cartoons, how-to and wedding videos, etc.There was a time when you would have been hard pressed to find dissolves in the daily news, but even factual reporting has incorporated the “manipulative” transition – an indication of how the rules of visual grammar are changing with our never-ending 24-hour mobile access to motion media.
The Wipe
The wipe may be thought of as a cross between a cut and a dissolve. It happens across time like a dissolve but it tends to be performed very quickly. You get to see both images on the screen at once, as in a dissolve, but there is usually no superimposition involved. Wipes are meant to be noticed by the audience and often appear as shapes, or with other graphic elements associated with them. Wipes can zigzag, iris, or spiral, and move diagonally, horizontally, or vertically across the screen, replacing the previous shot with a new shot.
The wipe is most often used where:
• there is a change in time;
• there is a change in location;
• there is no strong visual relationship between the outgoing and the incoming images;
• projects call for more visually graphical and engaging treatments at transitions;
• there is an ending to a scene, act, or program (as an “iris out to black” in silent cinema).
A good wipe, often a highly stylized transition effect, does not always demand consideration of the standard elements that lead to good edits.
1. Information – Certainly, the shot wiping onto the screen will provide the viewing audience with new information, but it need not be related to the existing shot that is being wiped off. It is also possible to use a graphic (like a team logo) or large-font text to wipe across the screen. This additional visual wiping element provides even more information to the viewer – and can often “mask” the otherwise awkward wiping motion as the shots transition on screen.

FIGURE 6.7 The wipe literally wipes one image off the screen and replaces it with a new one. Wipes may be used as fast and fun transitions from any shot to any other shot.
2. Motivation – The simple need for an editor to leave one location or one segment of a program can be enough motivation for the use of a wipe. The movement of an object in the outgoing shot may also provide motivation for a certain shape, timing, or direction for a wipe effect. Sometimes, if you have no purposeful way of getting from one place, time, or topic to another, you can use a creative wipe to “entertain” the audience across the duration of the transition and lead them to a totally new place, time, or topic.
Within the grammar of editing transitions, the wipe is the most fanciful way of moving around time and space. If the motivation for the edit transition is to quicken the pace, then fast wipes are a fun and stylized way to achieve this speed of changing the visual elements of the motion picture.
3. Composition – With careful planning, a clever filmmaker may conceive of strong vertical or horizontal movements within the shot composition, and a clever editor will turn these visual elements into what are called natural wipes (see Chapter Eight). Objects found within the action of the outgoing picture frames (such as doorways, wall corners, or a bus passing across the foreground) appear to push, pull, or in some way wipe across the screen. This allows for a cut or a wipe to the next incoming shot.
Because there will be portions of two different shots on screen, it can be beneficial to have the compositions match, mirror, or balance one another in some way during the wiping process. You may also find that the style or shape of the wiping element is an interesting graphical composition in itself, and the shots just ending and just beginning around the wipe do not require any special visual connection.
4. Camera Angle – Much like the freedom offered by the images’ compositions around the wipe, there is no real need to adhere to the differing camera angle rules here. The wipe serves to literally wipe the slate clean from the previous shot and introduce new visual content; camera angles are beside the point, although you should still feel free to creatively explore your options.
5. Sound – Depending on the type or style of wipe you choose to use, sound can be treated as a straight cut, an L-cut, a J-cut, or a cross-fade at the transition. Sound may lead the wiping shot or follow after it. You have a great deal of freedom in playing with how the audio behaves during the wipe. Depending on the type of program being edited, it is often appropriate to give the wipe action its own sound effect, such as a swoosh.
6. Time – Just as dissolves happen across time, wipes need to have durations as well. Fast wipes can transition quickly from one shot to the next when the tempo of the edited piece necessitates moving the story along rapidly. If the edited show calls for slower, more lingering wipes, then they could last for a second or more, although this may get tedious for a viewer. Fast and fun is generally the way to go.
The graphical wipe often acts as an energy enhancer, a fun distraction, or a visually stimulating way to bridge two disparate and otherwise not easily joined segments of a program. In classic Hollywood films of the 1930s, wipes were a fanciful, graphically pleasing way to transition from one place or time to another. In recent history, the Star Wars movies have used wipes rather effectively. They take the place of the more mundane dissolves and have more pep. Within today’s motion media landscape, wipes can take on any shape or form and are appropriate to use in most genres, such as non-fiction pieces, comedy, fantasy, sci-fi, children’s programming, and even “fluff” news segments. They are less common in dramatic, feature-length fiction filmmaking these days.
The Fade
If you have ever gone to the theater to see a stage play, you know that at the start of Act I, the house lights dim down, the curtain opens, and the stage lights fade up to reveal the setting and the actors. At the end of the scene, act, or play, the stage lights fade down to darkness. Motion pictures and some sequences from television programs also traditionally begin and end with a fade. If you have ever read a screenplay, you probably saw that the first line was FADE IN and the last line was FADE OUT. This is like the fade up and fade down lighting cue in the theater. The movie screen starts out entirely black and then the black gradually fades away to reveal a fully visible image signaling that the story has begun. As a fade-out, the frames of the images at the end of your show gradually fade into a fully opaque black screen signaling that the story has ended. Fades can take on any color in your video-editing software (with the default color usually being black), but most often you will see black and occasionally white used professionally.
The fade-in is most often used:
• at the beginning of a program;
• at the beginning of a chapter, scene, sequence, or act;
• where there is a change in time;
• where there is a change in location.
The fade-out is most often used:
• at the end of a program;
• at the end of a chapter, scene, sequence, or act;
• where there is a change in time;
• where there is a change in location.
For a fade to be most effective, the following elements should be considered:
1. Motivation – The fact that the motion picture is beginning motivates the use of a fade-in, and when you have reached the end of a segment or act, it is acceptable to fade out. That is motivation enough for the fade. A fade-out followed immediately by a fade-in at the cut point is often called a dip to black or kissing black and serves as a means of slowing the pacing between segments – like a long, slow blink of your eyes (Figure 6.8).
2. Composition – It can be very helpful in achieving a clean fade-in or fade-out to use shots that will either begin or end (or both) with a low-contrast image. Compositionally speaking, you would not wish to have prominent areas of dark and light within the frame, because as the opacity gradually fills in the image or takes it away toward black, the discrepancy between the heavy light and dark areas of the frame will create an imbalance in brightness and make the fading action appear uneven or poorly timed.
3. Sound – It is traditional to have the sound levels rise up under the brightening picture of the fade-in. The audio should also fade down as the picture exhibits the fade-to-black or fade-out at the end. If a fade-out from one scene lingers on the all-black screen, it is often acceptable to fade up the new audio of the yet-to-be-seen next segment before the fade-in occurs. This is an example of sound leading picture.
4. Time – Like the dissolve and the wipe, the fade requires an appropriate duration. Depending on the project, it could last anywhere from half a second to several seconds. Usually, you will just feel what the right amount of time is because staring at an all-black screen for too long, without any new information on the audio track, will feel off-putting. This is a good example of when you should listen to your gut and feel the appropriate beats to establish contextually appropriate timing.
The default duration for fade effects in most video-editing software is one second. This is obviously a good starting point for the duration but you may wish to go longer depending on the purpose of the fade at that point in the motion media piece and the type or genre of show that you are editing. Typically, a fade does not require access to the master clip’s handle frames, but is applied to and manipulates those frames already cut into the timeline at the tail or head of the selected shot.
Fade-ins and fade-outs have long been part of film language and standard tools of the editor when starting or ending any motion picture project. They act as transitions into and out of the dream-like state that is motion picture viewing.

FIGURE 6.8 The fade-out ends one segment and leads the viewer to new visual material as it transitions through a fade-in at the head of the first shot in the next segment. (Photo credit: G – Mike Neilan)
The Five Major Categories of Edit Types
So far, we have explored three categories of shot types, 11 kinds of basic shots, six elements that help to make a good edit possible, and four major categories of transitions. Now, we are going to examine five categories of edit types that touch on most of the major kinds of edits that can be performed with most material. Granted, the type of project that you are editing will help you to decide which kinds of edits you will be able to execute. Certain genres call for certain editorial treatments, but most programs could be completed using one or more of these edit categories.
Our five categories for the different types of edit are:
• the action edit
• the screen position edit
• the form edit
• the concept edit
• the combined edit.
In Chapter Five, six elements were outlined, consideration of which helps to make edits stronger. The five categories listed above are all different types of edits; therefore, it would hold that consideration of the same six elements should also benefit each type of edit. Let us examine each one and provide some examples.
The Action Edit
The action edit is nearly always a straight cut. As its name implies, this category encompasses edits between shots that depict continuous action or movement of subjects or objects. As a result, this type of edit may also be called a movement edit or a continuity edit. A general action edit scenario could be: Shot A showing a subject performing an action – CUT TO – Shot B depicting a continuation of that action as seen from a different angle around the subject and with a different shot type. Movements appear to be smooth and continuous across the cut. Time is unbroken.
To demonstrate the action edit in a simple film narrative, let’s say we see (in a long shot) a woman sitting at a cafe table pick up a book and open it. She lifts the book closer to her face to read it. Then there is a cut to a new shot. After the cut, we are shown the woman in close-up (seen from a different horizontal angle) holding the book so that we can see the title on the cover and watch her eyes scan the pages rapidly (Figure 6.9).
The long shot provides the audience with important information about the location, the subject, and the time of day, how the woman is dressed, and what her actions are like: slow, quick, normal, or abnormal. The new CU shot shows the book title and her eye movement indicates that she may be reading.

FIGURE 6.9 In this action edit, the lifting of the book up to the face motivates the cut. The book raise will begin in the wide shot. This movement motivates the cut to the close-up, which shows the action complete.
In the long shot, the woman will pick the book up from the cafe table and raise it closer to her face. The action of lifting the book will be a good place to make the cut. The action is the motivator, using the raising of the book to initiate a cut into the closer shot that reveals the book’s title and the woman’s eyes.
Regarding the composition of the shots, we find the arrangements of subject, objects, and set dressing within the frame of the long shot create a strong diagonal exterior space. There are foreground, middle ground, and background layers. The close-up shot offers a centrally weighted frame with the details of the book taking up most of the space. Although framing the woman toward the right may have been more in line with her placement in the wider shot, the title of the book and the appearance of the woman’s eyes are the most important things in this new shot. Their just-right-of-center framing is working better for the “showing” of narrative information in this case.
In the long shot, the camera angle is on a 3/4 profile of the woman’s left cheek. In the close-up, the camera has moved around the arc and approaches her face with a more frontal framing. The change in shot type helps, and the difference between the horizontal camera angles of these two shots is more than adequate for the cut to appear natural.
The most important aspect of the action edit is the continuity, and the continuity of movement really should match at this cut point – hence the use of related terms “match cut” and “matching action.” The coverage in the long shot of our current example does provide the action of the woman raising the book from the table and opening it in front of her face. The close-up repeats that same overlapping action of the book raising and opening, plus it continues along with the woman’s eye movements across the pages.
As the editor of this action edit, you would be free to cut and match the movement of the book at any point during the action. It may be advised to show only the initial movements of the action in Shot A and then have the remaining action complete itself in Shot B. Furthermore, some suggest starting the second (continuing) shot three to five frames before the actual frame of “best match” for continuity. The theory is that those fractions of a second of screen action are “lost” as the viewer reorients her or his vision to the different locations of objects continuing the movement on the screen. Because you cut on action, the audience are less likely to perceive the edit, and merely register the presentation of new information about the book and about the woman’s eyes.
Finally, because this is a street scene, the ambient sounds could be rather varied. There should probably be some sounds associated with the background of the location: perhaps a bus driving by or a car horn honking here and there, plus the chirping of birds, etc. You could even address the sound of the book being picked up or the pages turning by adding some Foley effects of these actions once you move into the close-up shot. The sound bed should match across the cut.
The action edit is quite common and can be used in very elaborate action hero chase scenes or in very quiet, slow-moving melodramas. As long as there is a continuous action or movement in the frame, the editor can use that to match the same action from another coverage shot from the scene. Some recommend a one-third/two-thirds approach, where you cut away from Shot A at a point where the action is one-third complete and cut into Shot B when the matching action has two-thirds remaining. In practice, you are free to cut anywhere along the action that makes the edit work. If you have adequately considered the six elements listed above, then the action edit should be smooth and unobtrusive, and allow an uninterrupted visual flow for the story unfolding on the screen.
The Screen Position Edit
The screen position edit is sometimes called a directional edit or a placement edit – “directional” because it helps to direct the viewer’s eyes around the screen, and “placement” because it is the unique placement of subjects or objects in the two shots cut together that makes the viewer’s eyes move around the frame. This type of edit can be a cut, a dissolve, or even a wipe, but it is usually a cut if there is no passage of time implied by the edit.
The way that the shots of a scene are originally conceived (through storyboards or script notes), composed, and recorded will help an editor to construct a screen position edit. Two shots in the coverage were designed to lead the audience’s eyes around the screen. Usually, one strong visual element occupies one side of the frame and casts its attention, movement, or line toward the opposite side of the frame. Cutting to the new shot, the object of attention is usually shown on the opposite side, fulfilling the viewer’s need to see something occupy that visual space. The goal is to engage the audience physically (eye movement around the screen image), mentally (seeking and finding new visual information about characters and the plot), and emotionally (what you draw their eye to in the new shot may be cute, horrific, breathtaking, etc.).
A basic example of a screen position edit is the traditional two-person dialogue scene shot with master scene technique. Beginning with a medium long shot, two people, in profile to camera, face one another and have a conversation. The standard coverage would call for solo medium shots and maybe medium close-ups of each of the two characters. When it is time to edit, you could go from the wider two-shot into the solo medium close-up shot of Character A, who is shown frame left. While speaking, his gaze is directed toward frame right. You cut to a medium close-up shot of Character B, who is shown frame right looking frame left (Figure 6.10).
The new, close-up shot of Character B yields new information for the audience, in the look on her face or in her eyes or in the words she chooses to say or not say. Any gesture by Character A, or even the line of dialogue being uttered, would be a motivator for the cut. The mirrored screen position satisfies the composition category. The audience had their eyes over on frame left for Character A and then had to move them across the screen at the cut point to observe Character B in the new shot. The camera angles around the shooting arc are significantly different. Continuity of dialogue delivery is achieved with the cut, which also means that the sound is continuous as well. Not every screen position edit will take into account all six of the edit elements, but this simple example does.

FIGURE 6.10 The screen position edit in its most basic form. One subject is frame left while the other occupies space over on frame right in the next shot. The eyes of the audience are directed across the screen at the edit point following the sight lines.
The Form Edit
The form edit is best described as a transition from a shot that has a pronounced shape, color, or dimensional composition, to another shot that has a similar shape, color, or dimensional composition. These types of edits are usually preconceived during the writing or pre-production phase because the visual elements that will match require the correct treatment of composition and, sometimes, screen direction. Rarely is the form edit just blind luck on the part of the editor but it can happen, so watch for the opportunity in the visual material. Form edits are sometimes called graphic edits.
If using sound as the motivation, the form edit can be a straight cut, but in most cases, the transition will be a dissolve. This is particularly true when there is a change of location and/or perhaps a change in time from one shot to the next. The term “match dissolve” is often used to describe this type of form edit. Our werewolf eye-pupil/full-moon dissolve mentioned earlier is a good example.
A simple scenario will serve to demonstrate a form edit. In a story about a man returning to his small rural village after finding success in the big city, we experience a series of close-up shots of a jet plane tire, a car tire, a bicycle tire, and a wagon wheel. The objects are also spinning counterclockwise as they travel over the ground. The four circular shapes are roughly the same size and occupy the center of the film frame in each shot. Essentially, they all match. As the editor, if your goal is to condense the man’s travel time, you could dissolve from one wheel shot into the next until you end up with the close-up of the wagon wheel (Figure 6.11). You could then cut to a shot of the man sitting among some goats and dried corn stalks in the back of a mule-drawn wagon.

FIGURE 6.11 The form edit of the wheels dissolving into one another quickly takes the audience to new, and increasingly rural, locations.
The audience will understand that the dissolve transitions are condensing time. The technological de-evolution of the wheel shapes will show the audience that the man is moving further into the rural area of his home village. The consistency of shape and composition helps to keep the viewer’s eye trained on the center of the screen and allows the viewer the focus needed to comprehend the meaning. The sound elements will also change from very loud to rather quiet as they cross-fade into one another under the corresponding dissolving pictures, supporting the audience’s sense of location change. Music under this mini-montage could also be appropriate.
Form edits are also often used in advertising and television commercials. It can be difficult to deliver your message concisely in 30 seconds, so most often advertisers try to show their message in easily understood graphical ways and with visual metaphors. Take, for instance, a public service announcement (PSA) for an anti-smoking campaign. The spot calls for a studio shot of several cigarette packs standing up on end in a field of endless white. One pack is the most prominent, standing up in front of all others. During the spot, this shot dissolves into a shot of headstones at a cemetery. Each cigarette pack was standing in the exact spot where a grave marker is now standing in the second shot (Figure 6.12).

FIGURE 6.12 The form edit of the packs dissolving into the headstones generates a new meaning in the mind of the viewer.
The audience can draw a conclusion from this form edit: that smoking cigarettes may lead to an early death. Whatever the perceived message of this PSA, the use of the form edit (match dissolve) is what helps the audience to interpret meaning. The shapes are simple rectangles. The compositions match exactly. The juxtaposition of these “charged objects” and their “union” during the dissolve generates a rather clear meaning and also conveys the message smoothly and succinctly. Provided the duration of the dissolve for this form edit is long enough, and the audio tracks work together, the audience would be carried easily from one shot into the next thanks to the matching forms. This form edit may even work well as a straight cut, or a very quick series of back-and-forth cuts flickering on the screen very rapidly, generating a “lightning” flash effect.
The Concept Edit
The concept edit may stand alone as a purely mental suggestion. This type of edit is sometimes called a dynamic edit, an idea edit, an intellectual edit, or intellectual montage. The concept edit can take two shots of different content and, through the juxtaposition of these visual elements at one particular time in a story, can generate implied meaning not explicitly told in the story. This type of edit can cover changes in place, time, people, and even the story itself, and it can do so without any obvious visual break for the viewer.
Most often, the concept edit is planned by the filmmaker from an early stage of picture development. He or she already knows that the two separate shots, when joined together in the narrative at a certain point, will convey a mood, make some dramatic emphasis, or even create an abstract idea in the mind of the viewer. It is rare, but not impossible, for an editor to create a concept edit from footage that was not intended to form a concept edit. Be forewarned, though, that these types of edits can be tricky, and if the intended meaning is not clear to the viewer, then you may just contribute to an unwanted interruption of the flow of visual information and cause confusion.
The previous example of the cigarette packs and the gravestones is very much like a concept edit. The idea that smoking may be bad for you stems from the picture of the packs dissolving into the picture of the gravestones. Their blending on screen joins them together in the mind of the viewer – formulating the concept that smoking can lead to death.
Another example of a concept edit would be the following scenario. Two couples are out on a date and one woman announces to the group that she and her boyfriend are now engaged to be married. The male friend turns to the newly engaged man and asks, “So how does it feel to be getting married?” – CUT TO – A close-up of a television screen; an old black-and-white prison movie is playing and the inmate wears shackles around his ankles – CUT TO – A wide shot of the engaged man and woman, sitting on a couch watching the movie (Figure 6.13).
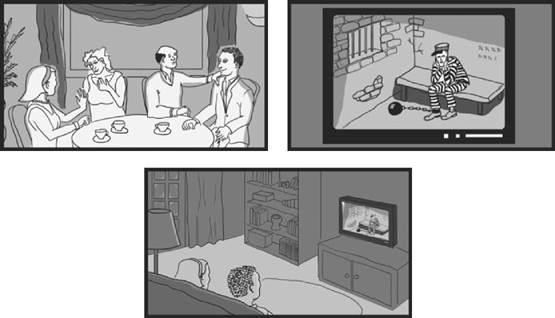
FIGURE 6.13 The concept edit conjures an idea in the mind of the viewer through the juxtaposition of seemingly unrelated shots. Does the newly engaged man feel that marriage may be like a prison sentence?
Neither shot has anything to do with the other. The group shot of the couples at the restaurant is in no way connected to the close-up shot of the old prison movie. The insert shot of the prison movie is only contextually related to the third shot of the living room because that movie is playing on the TV in that physical space. The six elements need not be considered here, for it is not the elements in the shots that make the concept edit, but the effect of what happens in the viewer’s mind when these shots are joined together at that time. Clearly, the engaged man is having some second thoughts about the concept of marriage.
Almost 100 years ago, filmmakers from Soviet Russia became entirely enamored of the power that editing possesses over an audience’s reaction. They found that the juxtaposition of the clip content created a new meaning that the content alone could not necessarily bear out. Lev Kuleshov is famous for conducting a film-editing experiment where he took the same close-up clip of a man’s expressionless face and intercut it with shots of a bowl of soup, an apparently dead child in a coffin, and an attractive woman reclining on a sofa. When he showed this mini-sequence of unrelated clips to audiences and asked them what they thought, the audiences overwhelmingly assigned different emotions to the actor’s neutral facial expression: hunger, sadness, and desire. Thus was born the Kuleshov effect and the idea behind our concept edit is based partly on this psychological reaction within an audience when they view juxtaposed images (Figure 6.14).

FIGURE 6.14 Our version of the Kuleshov effect. When these images are edited in motion across time, the audience are likely to assign an emotional response to the otherwise neutral facial expression of the actor. The mere juxtaposition of the images generates a new concept in the mind of the viewer. (Photo credits: Anthony Martel)
The filmmaker Sergei Eisenstein helped to popularize the Soviet montage style of story showing. He favored discontinuous action and often juxtaposed disconnected imagery back to back to back in his sequences in order to get the audience to formulate new meanings and new feelings in their own minds. Intellectual montage explored this thought-inducing technique to the fullest. Some edits could generate clear and common reactions within the audience, but others may have been more open to interpretation or even too difficult or confusing to draw a real conclusion about the intended meaning. Some argued that this ambiguity was also part of the process and anything that made a viewer think was a good outcome. Today, common examples of the concept edit are not nearly as esoteric to decipher – for better or for worse.
The Combined Edit
The combined edit can be a difficult edit to come by in edited programming because it requires a good deal of pre-production planning on the part of the filmmaker. It would be rare that two unplanned shots could be cut into a combined edit by the editor alone. The combined edit combines two or more of the four other types of edits. One transition may contain an action edit combined with a screen position edit, and there may be a form edit and a concept edit all in one.
Consider a children’s fantasy story where young brothers, dressed in their pajamas, are playing together just before bedtime. They are pretending to fight off some goblins with a flashlight and a pillow. One brother tosses the flashlight to the other – CUT TO – A sword landing in the hand of the second brother, now clad in battle armor, standing on a narrow ledge in a cave fighting off real goblins (Figure 6.15).
If planned well and shot properly, this scenario has many elements that will make it a good candidate for a combined edit. First, the action of tossing the flashlight across the room makes this an action edit. Second, the screen position of the flashlight and sword is similar. Third, the forms of the two objects are similar: the flashlight and the handle of the sword. And lastly, the concept of the power of imagination may be gleaned from this edit. The boys at play actually transform into the heroes of their fantasy.

FIGURE 6.15 The combined edit takes on multiple attributes of several other edit categories. Action, screen position, form, and concept edit elements are present in this cut from the boy playing to the boy fantasizing about actual heroic deeds.
Chapter Six – Final Thoughts: Does Everything Always Apply?
The job of the editor is not to memorize the six elements to consider when creating an edit or the five types of edit categories as presented in this book, but to use the reasoning behind these concepts to inform his or her choices while making the edits. Knowing that cuts, dissolves, wipes, and fades are made in different ways, have different meanings, and can convey different experiences to the viewing audience is very important. Joining shots together at a certain time, in a certain way, for those certain reasons is really what your goal should be. Remember that the editor has an obligation to create an informative, engaging, and, hopefully, entertaining experience for the target audience. How you assemble the video and sound clips helps to guide the audience and manipulate them (in a good way). Knowing the grammar of the edit will help you to better execute the edit. This, and practice over time, will enable your skills to develop even more.
Related Material Found in Chapter Eight – Working Practices
#23, 24, 25, 26, 27, 28, 29, 30, 31, 34, 35, 37, 38, 39, 40, 41, 42
Chapter Six – Review
1. Straight cuts are great for continuous action, when there needs to be a sudden change for visual impact, and when there is a change in plot point or location.
2. Dissolves are used to help to change time or location, to draw out an emotion, or where there is a strong visual and/or thematic relationship between the outgoing and incoming imagery.
3. The wipe can be used to jump in time, to jump in location, to unite two totally unrelated shots simply to move the story along, or just because the project calls for a more upbeat, graphically engaging transition.
4. The fade-in begins a program, scene, or sequence. The fade-out ends a program, scene, or sequence. Fade-ins and fade-outs are also used often on audio clips for smooth entrance/exit.
5. Action edits join shots that cover continuous, uninterrupted action or movement.
6. Screen position edits, through well-planned shot composition, purposefully draw the audience’s attention from one section of the screen to another at the cut point.
7. The form edit unites two shots with two similarly framed objects that have similar shapes or movements. This is usually executed with a dissolve to show the audience how the objects look alike.
8. The concept edit unites two seemingly unrelated visual shots at a certain point in the story and the result is an idea, concept, or relationship in the minds of the viewers. It hits them on an intellectual level and makes them think. It is based on Soviet montage theory.
9. The combined edit is still just a cut, a dissolve, or a wipe at one transition, but it combines elements of several of the edit types, often matching actions, positions, and forms, and generating ideas. These make for rather powerful storytelling moments.
Chapter Six – Exercises
1. Either record your own or acquire the media for a simple dialogue scene. Assemble it with straight cuts, fine-tune the rhythm through trimming the tails and heads of the shots, and watch your sequence. Then add dissolves at every cut point and watch the sequence again. How does it feel? Which way do you prefer and why? Have the dissolves caused any technical or aesthetic problems with the pacing, mood, or visual elements of the scene?
2. Create any kind of wipe across an edit point for any two video clips in a sequence. Copy and paste those same two clips again in this mini-sequence and keep the same wipe effect. On the second instance of the wipe, add some sort of swoosh or other sound effect so the timings and duration feel right. Watch both versions (without added sound effects and with). Which do you prefer and why?
3. Record a variety of shots (LS, MS, MCU, CU) of a friend juggling, bouncing a ball, or doing something that shows controlled and repeated subtle movements. Edit a brief sequence of these coverage shots with action edits, timing their continuity of action and movement as smoothly as possible. Practice using your trim tools at the cut points to really fine-tune the illusion of uninterrupted action.
4. Take the action edit sequence from Exercise 3 and add one-second dissolves to each cut. Is the illusion of continuity maintained? If not, can you tweak the head and tail timings of the clips to smooth it out? What happens if you replace all of these dissolves with some kind of wipe effect? Does it change the continuity of action? Does it alter the pacing or change the “energy” of the piece?
Chapter Six – Quiz Yourself
1. Name the four basic transitions discussed in this chapter. For what editorial purposes might you use each one in a sequence?
2. What is a “jump cut?” What can cause it? When might you choose to use one?
3. What is the key component required of footage for you to create a “punch-in”/“cut-in”/“axial edit?”
4. What are head and tail “handles” and when might you need to access them?
5. In order to create a “form” or “graphic” edit, what kinds of images are required?
6. What kind of edit unites two matching shapes or compositions from two different shots across the transition?
7. What kind of edit places two unrelated images in sequence, but generates an implied meaning, thought, or feeling in the mind of the viewer?
8. In video-editing jargon, what is a “beat?”
9. You have joined the head of Clip B to the tail of Clip A as part of a montage sequence in your assembly edit timeline. As a straight cut, everything looks great, but when you add a one-second dissolve centered on the cut, you suddenly see a few blip frames of the camera slate on screen. Why might this be happening and how might you be able to fix it?
10. What is a “flashback” and how might you creatively transition into that show segment and out of that show segment?