| Sampling and Sample-Based Synthesis | 2 |
Synthesizers changed music forever, and even though they are capable of a wide variety of sounds, designers have continuously sought to emulate acoustic instruments. Yamaha’s DX-7 was one of the first synths that came close, and it did what no other instrument had done before; offer an affordable instrument that realistically mimicked other instruments. Once that door was slammed open, developers sought to do a better job of emulating traditional instruments with improving technology, and sample-based instruments started to take over.
Another draw to sampling is live performance where the efficiency of resources and access to a variety of instruments is paramount. Instead of bringing every single individual instrument on tour, a sampling setup allows you to have all of the sounds you want to use in a single place. There is something magical about using your actual vintage synthesizers on the road until something goes wrong or until you try to make quick patch changes between songs.
Sampling has its own history separate from synthesis and it is big enough to fill an entire book all by itself. Some of the history is explored later, but the bulk of this chapter is a look at the point where synthesis and sampling overlap. In spite of having substantially different sound engines, both synthesizers and samplers have similar modulation, envelope, and effects sections. These similarities mean that a sampler can easily be used in the same way you would use many types of synthesizers, with very similar results.

Figure 2.1 Sampling goes mobile on iOS with Garageband.
Sampling is a tedious art form because it can take hours and hours to create a sampled instrument, but there is still an element of art and you have to become a craftsperson with a special attention to detail. The caution that you should keep in the forefront of your mind throughout this entire chapter is that you shouldn’t get lost in the technical aspects of sampling. During the process of creating a sampled instrument, you should always ask yourself if the decisions you are making will make a more expressive instrument or just one that is accurate. Embrace the art over the science when it comes to sampling!
Basics of Sampling
The process of sampling has the following phases:
- Source capture
- Editing
- Mapping
- Tweaking
After covering the basics of sampling, there are several specific projects which are described in detail to showcase the power of collaboration between sampling and synthesis. The examples in this chapter are DIY instruments that take advantage of envelopes, filters, and other synthesis modules. Projects that you could do could also include nontraditional sound sources, which create synthesizers out of sounds from everyday things such as wind, shutting doors, or just about anything you can record.
Sampling Overview
Sampling is the process of mapping audio files to MIDI notes so they can be triggered for playback. The only real difference between sampling and synthesis is that sampling uses audio files as the sound source instead of generated sounds from oscillators or other tone generators. Digital synths such as the DX-7 mimicked instruments, such as brass or pianos, but a sampler uses actual sound files recorded from these instruments, and that means they will sound exactly like the actual instruments.
As computing technology improved and became more affordable, samplers and ROMplers (with no recording capabilities and only sample playback functionality) became more popular and overtook synths such as the DX-7. Samplers are as popular now as they have ever been and are a common production tool due to the power and flexibility of software offerings.

Figure 2.2 Editing samples in Logic’s EXS24.
Every major, digital audio workstation has its own sampler, which can be used to create complex instruments, but there are couple samplers such as MachFive and Kontakt that have even more features and can be used with any DAW. MachFive in particular is a sampler that is of interest to synthesizer users because it has a series of synth engines that work with recorded samples to create amazing sounds. Examples of this include a four-operator FM synth, a granular synth, and a wavetable synth. In many ways, MachFive is the only instrument you’d ever need, but we all know that one is never going to be enough to satisfy our creative juices.
Another new trend in sampling involves mobile devices that can record, edit, and trigger samples using intuitive touch interfaces in a portable package. Very few mobile samplers are capable of complex instruments, but that is going to change and improve as mobile devices improve. For the purposes of this chapter, we are going to use the EXS24 for illustrations, due to the popularity of using Logic Pro X for this type of musical creation.
Source Capture
Capturing good sound sources is the most important part of sampling because nothing you do afterwards will be able to significantly change the original source material. Sampled instruments are created from the recordings made during the capture phase, and so it is critical that the sounds are recorded at the highest quality possible. There are three typical ways to record the source, which include using microphones, direct connections, and internal connections.
Sample Recording Considerations
Using a microphone in the sampling process is the traditional method for capturing acoustic instruments, but when it comes to synthesizers, microphones should only be used when no other option is available. Some instruments do not have output ports, but they do have built-in speakers that can be recorded with microphones. Using microphones also creates a more complex situation because there are many different types of microphones, and preamps/converters are required.

Figure 2.3 USB microphone from sE Electronics.
If you decide to use a microphone in the sampling process, then you’ll want to make sure to check a few things to maximize the quality of the audio recordings. The first is that you should listen to the output of the synth speaker to make sure there isn’t too much noise. If the instrument has two speakers, then make sure that you are recording the one that sounds better and has less noise. You also want to make sure that there isn’t any mechanical noise from the keys or from pedals. Many issues you can fix, but you should try to minimize the ones you can’t.
The other consideration you need to think about is the acoustic space of the room where you are recording. This needs to be a quiet room and a room that sounds good because everything that is in the space will be recorded by the microphone. If you have to record in a nonrecording studio space, then make sure that you listen carefully before recording to see if there are any soft buzzes, hums, or other sounds coming from inside/outside the room. Don’t compromise in making sure there are no noises because if there are, then it will affect your sounds in a negative way that will be very difficult to fix later.
The best way to check for audio quality while sampling is to put on a nice pair of headphones, and then listen critically to each sample. If you have access to a professional, quality studio, then using their speakers to monitor the sound is likely acceptable: but if there is any doubt, then use high quality headphones which can act as a microscope for a sonic analysis to ensure low noise and great sound.
While it is possible to use an inexpensive microphone and equipment set-up, this should be avoided because you will not be capturing the best possible version of the sound. The cheapest microphones have the potential to add noise into the signal at the very earliest stages, which might make your sampled instrument unusable.
Even though you don’t need to worry about the acoustics of the room, you still need to listen for buzz and hum and other noises in the signal. Some vintage instruments are likely to have more noise than others and we will talk about some things you can do when we get to the section on editing.
Sample Recording Tools
As stated above, describing an entire microphone setup is outside the scope of this chapter, but here are some examples of equipment options to give you an idea of the possibilities. The three scenarios are a USB microphone, an all-in-one interface with a separate microphone, and a setup with all individual components.
USB Microphone
I use a sE Electronics 2200a USB microphone, which connects to a laptop or iPad and is an excellent choice because it is low noise and sounds great. The microphone has a built-in headphone jack, which means you can listen to what you are recording directly on the microphone. Plus you can use the microphone with other audio interfaces since it has a traditional XLR connector in addition to the USB port. This option is literally a complete studio that can be used for sampling.

Figure 2.4 USB connection and headphone port.
Audio Interface
There are many different audio interfaces available in the marketplace, and they come in a variety of configurations at a wide variety of prices. Assuming you are planning on sampling synthesizers, then you won’t need an audio interface with a lot of inputs and can likely manage with one or two. Most interfaces connect with your computer via USB, Firewire, or ThunderBolt. After verifying compatibility with your computer and choosing the number of inputs, you’ll want to verify it has microphone preamps and XLR inputs.
The choice of microphone is complex because there are many different types and brands, and, honestly, you may really want to use different microphones for different recording projects. The three primary types are dynamic, ribbon, and condenser. All three convert acoustic energy to electrical energy but do it in different ways that result in different sound characteristics. Dynamic microphones rely on a moving diaphragm in a magnetic field, which results in a less detailed sound with less clarity in the upper frequency range. The character of these is often great for electric guitars, live performance, or other percussive sources. Ribbon microphones rely on a delicate strip of metal in a magnetic field, which makes them among the most sensitive, but also the most expensive and prone to damage from rough handling and voltage from phantom power. The condenser type relies on the difference in distance between two charged metal plates and is very sensitive to small differences in acoustic energy, which translates to higher clarity in frequencies and sensitivity for sound at softer levels.
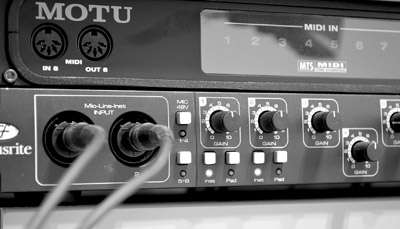
Figure 2.5 Focusrite Saffire Pro 40 Firewire interface.
A condenser microphone is recommended for most synthesizer sampling, but any of the types could work. In addition to a microphone, you’ll also need a microphone cable, which is typically a three-pin XLR cable. Condenser microphones also require power in the form of phantom power, which is available on most interfaces. This 48-volt power option is required for the microphone to work. Buying an interface and microphone can cost as little as $500–1,000 or be as expensive as $1,000–10,000.
Individual Components
This option is essentially the same as the one previous, but breaks the audio interface into its individual pieces. These include a microphone preamp, an analog to digital converter, and a computer interface. This chain has the potential to be the very highest quality, but is definitely the most expensive and most complex. If you are sampling synthesizers for your own use and for live performance, then the individual component option is likely overkill because the quality of the first two options are both acceptable, but if you want to sell sampled instrument banks, then a higher quality option is important.
Microphone Guidelines
It is possible to set your input levels too high so they distort or too low so additional noise is introduced, and so you want to set it at the highest level possible without distorting. If the source synth sounds best when turned up very loudly, then adjust the microphone preamp appropriately. In some cases, you’ll have to use a pad on either the microphone or on the interface, which turns down the input by a set amount.
Direct Connections
Recording a synthesizer with the direct connection is the ideal way because it removes acoustics and room considerations from the process. While you still need an audio interface for your computer, you’ll connect the instrument with cables instead of using microphones. While this is the optimal method for recording from a synthesizer instrument, it is just as complicated as any of the other methods and so there are a few things we need to cover to help you be prepared.
Matching Outputs
The first step in recording samples using direct connections is to match the number of outputs on your instrument with the number inputs on your audio interface. In most cases, you’ll be dealing with mono or stereo outputs, but in some cases, you’ll have four, six, or eight outputs. If you want to be able to record all outputs simultaneously, then you need to have an audio interface that matches. It is unlikely that you’ll need multiple outputs, but some synths have alternate outputs for layering patches and a few instruments have surround outputs, which can all be sampled into a single patch.
In addition to matching the right number of outputs, you also have to match the type of output. If the instrument uses 1/4” unbalanced cables, then you’ll need to make sure the interface can accept an input with that type. If the instrument has a digital audio output, then having an interface that can accept that format is critical. Typical connections include the following:
- 1/4”—Balanced (TRS) and unbalanced (TS)
- 1/8”—Balanced (TRS)
- XLR
- Optical
- Coaxial / RCA
Some audio interfaces have combination connectors which accept both 1/4” and XLR cables, but you’ll still need to choose between a mic level input and a line level input. One important troubleshooting tip is to make sure the synth is working and sounding like it should in your audio interface by plugging in headphones into the headphone jack of the instrument to make sure that the sound of the synth is there and matches what you are expecting.
Once everything is connected, the next part of the recording process is to set the levels appropriately. Nearly every interface has level adjustments that make it possible to turn up or down the input levels. If these are set too low, then there is a chance that there will be too much noise in comparison to the signal in the recording; but if they are set too high, then you will face distortion. Distortion is worse, but both are a problem when creating high-quality sampled instruments.
Recording Notes and Layers
To create realistic-sounding instruments, you need to record as many notes as possible and, when appropriate, at different velocities. Some synthesizers don’t have velocity-sensitive capabilities and so it makes sampling of them very easy, but when a synthesizer has variable velocity or any modulation controlled by key velocity, then sampling becomes a more intricate process. If the synthesizer sounds different when you play the keys with more or less velocity, then recording at multiple levels is important. Listen closely to the synthesizer when you play it at different levels because if the loud sounds are just turned up, but are no different than the soft ones, then you don’t need to record alternate velocities. Samplers can easily play recorded samples at different levels, but it’s the change in sound across the velocity spectrum that can’t be replicated without recording additional samples. If the instrument has MIDI or C.V. input, then sequencing the notes for sampling can often help ensure an even velocity spread for samples.

Figure 2.6 Velocity layers example.
Editing
The editing process of your source material involves removing empty space, making sure the levels are correct, removing noise, and anything else needed to make sure the samples sound good. If you recorded all of the notes for one set of the instruments into a single file, then start by processing the audio with everything that needs be done to all of the notes at once. This includes adjusting the level globally, performing noise reduction if necessary, and adding any additional audio effects if desired.
Once you’re satisfied with the entire file, then you begin to split all of the notes into individual regions. Most digital audio workstations have a feature called Strip Silence, which removes parts of the audio file that fall below a certain threshold, and this is very useful when working with this type of file because it will save time by splitting the files up automatically. It is important to look at the beginning and end of every file while zoomed in to make sure the start point is at the very beginning of the audio portion of the file and at a zero crossing point, which means that the waveform starts at the exact point where the audio is crossing the axes instead of partway through a wave (this is to prevent a popping sound). Use fades to smooth the start or end of each file if needed.

Figure 2.7 Editing individual files in the Logic File Editor.
The next step is to have each sample converted to its own file, which is important for the sake of organization and to keep things simple for the sampler. Audio software references the original long audio file, and even when it looks like they are separate files, there is a good chance that they are still all one big file. Converting clips to new files is especially important if you are using a sampler that is a part of your editor, such as the sampler in Logic Pro X, because you can drag the sample files into the sampler and it still won’t use individual files. The best option is to export all of the samples as individual files into a folder with descriptive filenames that are numbered sequentially and then import them into your sampler. While you can use any naming convention you want, it is easiest when you use a name that includes the note name, note octave, and some indication of the patch from the original instrument. Double check each file by opening them to make sure they are the appropriate length and the correct note.
Mapping
The mapping process takes each individual sample and assigns them to MIDI notes. Sample files are loaded into zones, which tell the sampler the root note, the key range, and the velocity level. If you recorded a sample for each note, then each zone will cover a single note, but if you recorded a sample with the goal of covering multiple notes, then you’ll need to adjust the zone range to match the desired range. All zones require a root note setting, which tells the sampler what transposition to use for the sample. The root note should correspond to the pitch of the sample and many samplers will set this automatically based on the sample name or analyzed pitch upon import.

Figure 2.8 Mapped zones.
Figure 2.9 Zone settings.
The next task in mapping is to set the velocity layers, but only on instruments where you originally recorded multiple levels of velocity. Due to the limitations of MIDI, there are only 128 steps of velocity, but there are no guidelines on where to set the velocity ranges for the samples you’ve recorded. The process for setting velocity ranges is part common sense and part trial and error, and the only way to confirm that it is set correctly is by testing it out to see if it sounds right. In addition to playing the instrument using a controller keyboard, you could also use a MIDI test file, which plays through all notes and ranges so you can hear how consistent it is in each of them.
Loops
Looping is another important task that takes place inside the sampler and unless your sampler has an auto loop function, this is something that can potentially take a very long time. Not all instruments require looping, but when working with synthesizers, looping often makes the most sense. The best approach when setting loop points is to be very methodical and pay close attention to the details. Following are a few steps to follow in the looping process.
Find an Optimal Loop Section
A looped section is repeated over and over for the purpose of sustain and so it has to be a section where the beginning and end are similar in level and timbre, otherwise there will be a bump in the sound when the note is sustained. If you are sampling using the waveform option, then the entire file is typically looped, which makes this very easy, but you’ll still need to check each zone. Instruments that change over time with either envelopes or filters may be more difficult to loop, but as long as you can find even a short section to loop, then it will work. Some loop points will be short and some will be long, and this depends on the type of sound of the samples. Instruments with a very consistent sound will often work well with short loop points while some instruments benefit from longer loop points.

Figure 2.10 Looping at the zero crossing point.
Choose the Loop Direction
Typical options for loop direction include forward, backward, and forward/backward. Forward is the most common and, after it plays the loop section once, it goes back to the beginning and plays it over and over while the note is sustained. Forward/backward is a good option when you aren’t able to make the forward loop work, because there is never a transition bump in level since the loop playback bounces forward and backward over and over. The main issue with that is that the bouncing back and forth is often quite audible.

Figure 2.11 Typical looping options.
Set Crossfades
In addition to setting your loop points at zero crossings, it is an option to use fades that cross over the loop point. Crossfades create overlap so that, as one sound ends, the level goes down just as the level comes up from the beginning of the loop. If you aren’t able to create a loop that sounds smooth as it continuously loops, then try a crossfade to smooth it out. The length of the crossfade is less important than making it sound good, so start with a short one and increase it until it sounds just right. The best crossfade is one that you can’t hear.
Adjust the Release
Samplers handle the release section in a variety of ways, which include fading out in the loop section or continuing in the sample after the loop section. Sometimes this is called a release and other times it is called a note-off trigger. It is unlikely that you’ll have that much control over this, but you will want to test it to make sure that the release settings work for your instrument.
Advanced Features
The rest of the mapping process involves using the advanced features of your sampler. Many samplers let you use key- switching, which means that you’ll map all of the zones as previously discussed, but each key-switch layer needs a trigger. You can either use a note lower on the keyboard to trigger different players or something like the mod wheel.
Another advanced feature is round-robin, which uses multiple zones in the same key range and velocity range, which are cycled through each time the same note is played. This mimics the way that many instruments make different sounds, even when the exact same note is played over and over. If you want to use this technique, then it easily means two or three times the amount of recording.
Scripting is perhaps the most advanced feature and only exists in the most advanced samplers, such as Kontakt from Native Instruments. Scripting relies on computer-style programming to create additional parameters for mapping and performance. An example is a script that recognizes a played chord and then offsets the timing of each note to mimic the strum of a guitar. It could also translate the MIDI input performance of a piano-style keyboard so that it sounds more like a nonkeyboard instrument, such as a violin or trumpet. This could affect timing and sample selection so that it sounds and feels like the real instrument. Scripting is the most advanced feature and is complicated enough that most mere mortals aren’t able to program much, but these same samplers almost always come with sampled instruments that take advantage of this amazing technology.
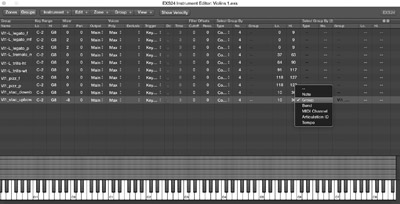
Figure 2.12 The advanced features of Logic’s EXS24 are just as powerful as any other, but perhaps the hardest to use because the interface is difficult to understand and use.

Figure 2.13 A MIDI test file triggers the samples at different velocities across the entire range. Adjust the tempo to try them at different speeds.
Tweaking
Once you have created your instrument by recording the source, editing the samples, and mapping them across the keyboard, then it’s time to put it through its paces and begin the tweaking process. It is unlikely that you will create the perfect instrument in your first try and it is more likely that you’ll start with something fairly close and then spend a substantial amount of time adjusting velocities, zone ranges, and other parameters. Every instrument is different and you will need to make yours work through a lot of experimentation.
The process of testing the completed instruments involves playing them with MIDI controllers, using any MIDI files you have to test them out, and having a bunch of other people test them out too. While tweaking the instruments is one of the most rewarding parts of the process because it all comes together as a useable instrument, it is important to pay attention to the smallest details and not lose sight of the goal of creating a realistic instrument that sounds great and is very playable.
Sampling Examples
The following three scenarios showcase typical situations that you face when sampling synthesizers.
- Waveform sampling
- Basic instrument
- Advanced instrument
Waveform Sampling Example
Recording the waveforms of a synthesizer is the most basic way to create a sampled synthesizer, even though it isn’t usually the oscillators that give a synthesizer its distinctive sound. Most samplers, however, have built-in filters and modulators, so you can use the basic waveforms from an instrument and then use the rest of the sampler to create a synthesis experience. When sampling the basic waveforms, you can use as little as one cycle of the oscillator or much longer segments in the cases of the analog synthesizer that may have pitch drift. When there is drift present, it can add to the authentic sound of the sampled instrument. You’ll have to use your best judgment when deciding between the two, but both will work.
The first step is to set the synthesizer so that the oscillator is reaching the outputs unprocessed, which means turning off all filters, envelopes, modulators, or other effects. Listen to the synthesizer in different ranges to see how consistent the oscillator plays across the entire range and this will help to determine if you need to record the oscillator on every note or if you can record it once every three or four notes. Samplers use a time function to transpose notes when using a limited number of samples, which means you can have a single root note be triggered for multiple notes on the keyboard and each note that isn’t the same pitch as the root note will be transposed up or down.
When recording the waveforms, you can either start a new recording for each note or you can record all of the notes with pauses in between them into a single file. Some tasks like noise reduction or adjusting gain can more easily be accomplished when all of the waveforms are in the same file, but it comes down to a personal preference and choosing a workflow that makes sense to you.

Figure 2.14 Single cycle of a sine wave.
Basic Instrument Example
In this scenario, you’ll create a patch on your synthesizer that has the oscillators active, but also runs through filters and other modulators. The basic sound can include motion with filters and envelopes, but should not involve more advanced motion, which relies on the modulation wheel or after-touch. Even though some of the most interesting parts of using synthesizers live are real-time control of filters and other modulation effects, for this scenario, you want to create a complete patch, but still keep it simpler than the full potential of a synthesizer.
When creating a sampled instrument using simple waveforms, the sampler has to loop each waveform to create sustained sound. In this scenario, if you are using a patch with any motion in the filters or with the envelope, then you’ll have to record the entire length of the sound until it reaches a sustain point or until it dies out. Using the loop feature allows you to sustain a note even if it isn’t recorded at the full length, but if the patch you use doesn’t have a suitable looping point, then you have to record the full length of the patch during the sampling process.
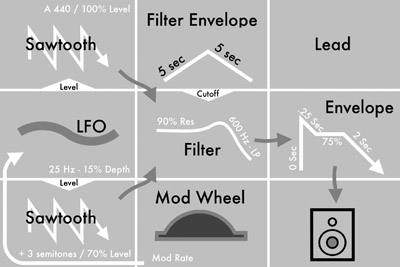
Figure 2.15 Basic instrument example recipe.
A finished instrument of this type sounds exactly like the original synthesizer patch, but you won’t have any control over the sound in the same way that you would when using the original synthesizer.
Advanced Instrument Example
The first two scenarios are relatively easy to create, but with the third scenario, there are a lot more elements to manage and the final instrument can be quite unwieldy. The goal with this instrument is to capture the same performance ability that you have with the actual synthesizer. This is possible by using advanced sampler capabilities that aren’t available with every sampler, but if you are serious about sampling, then you should invest in any one of the most powerful samplers.

Figure 2.16 Key-switching with EastWest. Different shade of gray on keyboard represent notes that switch between sample sets.
The primary feature that you can use to create more performance control is called key-switching; this allows you to create multiple versions of the same instrument, which are selected by using an additional controller such as the mod wheel or a lower key on the keyboard. Several samplers allow you to crossfade between these instruments as you adjust the mod wheel, which creates a similar effect to the actual instrument as you move its mod wheel.
The recording process for this scenario involves recording all of the notes and velocities for each of the settings you want to be involved with the key-switch. An example of this would be recording a variety of sounds with a filter cutoff frequency at different settings or with different attack times in the primary envelope. The amount of work required in the recording process in this scenario is substantially more than with the two previous scenarios because of the sheer amount of audio you have to record. Keep things organized because in the editing and mapping process, things become more complicated.
Synthification
Samplers fit as a single piece of a much bigger ecosystem of digital audio tools, processors, and effects. It is possible to use the default filters and effects in your sampler of choice and while they may be excellent, it is possible to use external effects as a part of the sound. Combining elements in your DAW creates a modular synth type experience that creates a more powerful experience than a sampler is capable of by itself.
There are several tools that allow you to emulate individual synth modules, such as filters and effects, and these can be powerful additions to the realism provided in the sampling process. The primary option is any Convolution Reverb, which has the ability to create impulses. Impulse response (IR) technology is able to send a sweeping sine wave through a component and then extract spectrum information from the result. The resulting IR can be applied to other audio signals to change their spectral content to match the same effect as if it was being processed by the original module. The primary limitation is that the IR is a snapshot of the spectral content and isn’t able to dynamically change based on the input signal. If the input has a loud bass component that is slightly distorting, the IR process will not react in the same way and will not have the same results.
Auto-Samplers
Auto-samplers are capable of creating fully finished sampled instruments without needing to manually edit, loop, or anything. The process works by sending MIDI data to a destination instrument, recording the audio output, and then syncing the MIDI information with the audio material. The parameters of the instrument are established before beginning the sampling process, and the application does all of the rest. Auto-samplers can save an enormous amount of time by finding and optimizing loop points, setting velocity layers, creating multiple layers for key-switching, and even tuning out of tune notes.

Figure 2.17 Ever since Apple closed Redmatica, Sample Robot has been one of the few companies interested in auto-sampling.
All instruments with MIDI inputs and audio outputs can be auto-sampled, but also instruments with C.V. inputs will work if you have a MIDI-to-C.V. converter. The best auto-sampler, called Keymap Pro, was bought by Apple in 2010 and closed down permanently. Another company has stepped up to the plate with Sample Robot, and it is capable of creating very functional instruments. An example with Sample Robot is included here to showcase the power of the process and, afterwards, you will likely wonder why anyone would ever take the time to manually sample these types of instruments. The simple answer is they shouldn’t, but the art of sampling lives on with acoustic instruments that can’t be triggered by MIDI.
Sample Robot Example with Vermona Analog Drum Synthesizer
The following images highlight an auto-sampling project with an analog drum synth from Vermona. The reason that this is an excellent instrument to sample is because, as an instrument, it doesn’t have presets; so if you create a set of percussion instruments that you like, then you have to either make detailed notes or use a camera to remember the settings. The sampling process lets you create a digital version of the synth patches that you can use any time you want without having to adjust all of the knobs. The actual instrument is far more fun to use, but there are many times I am glad to have the sampled version.
Figure 2.18 Analog drum synthesizer.
The DRM1 MKIII is an amazing drum synth that is made in Erlbach, Germany. There are eight different sounds that are manipulated by a series of knobs on the front of the unit.
The back panel of the DRM1 MKIII has two audio outputs and a MIDI In/MIDI Through. There is an expansion pack that adds individual trigger inputs for each sound, but the MIDI is most important for sampling. There are also individual outputs for each channel on the front panel. The silver button on the left side of each sound is a trigger, which means you can manually trigger sounds without a MIDI input.
Sample robot is designed to create new instruments with very little effort. Its wizard walks you through all of the settings and then you simply start the process. Afterwards, the instrument can be exported to a file type that is compatible with the EXS24 for use in music production.

Figure 2.19 Inputs and outputs.

Figure 2.20 Sample Robot Wizard.

Figure 2.21 Final instrument.
Nontraditional Sound Sources
One possible scenario when creating synthesizer-type instruments is to record nontraditional sound sources in the capture phase and then process them with traditional synth modules. The sources can be either everyday objects around your house or exotic, out-of-this-world-type sounds. Once you catch the sampling bug, you’ll find yourself walking around listening to sounds and wondering if they would make good sound sources.
Examples
1. Metal Bowl
Metal bowls are capable of making very interesting sounds when spun on counters, scraped with utensils, and filled with various liquids. Experiment with different techniques to find a sound that is both interesting and has the potential to be a good synthesis source.
Equipment
A USB microphone is fed into Logic Pro X and different sounds are recorded. The most interesting sounds are edited and imported into the EXS24.
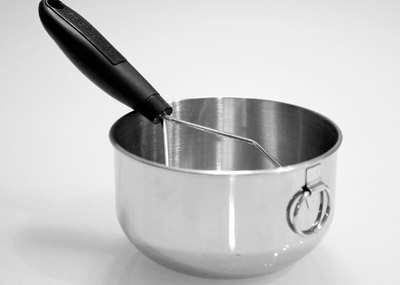
Figure 2.22 Kitchen bowl.
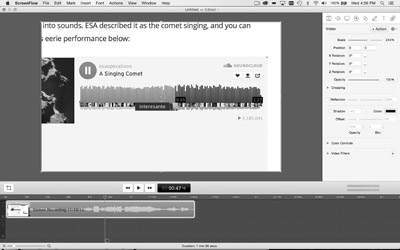
Figure 2.23 Screenflow capture sound samples online.
2. Comet Landing
The Philae lander made history by landing on a comet and, before stopping communication, it sent a recording of what it sounds like on the comet. This is a perfect example of a unique sound source that can be used as an instrument.
Equipment
The sound of the comet is available online as a video, so you won’t need a microphone. Audio can either be looped from an available output on your computer to a different input, or you can use a screen capture program such as Screenflow to record the sound. In the example, we use Screenflow and then import the sound into Logic for editing and preparation for the sampler.
3. Vocalization
Perhaps the most flexible sound source is the human voice, which can be twisted and morphed into many different sounds. This example requires you to record sounds using your voice, and the editing and mapping forces you to decide if you want to make a percussive or melodic instrument and if you want to manipulate the recordings to fit across the range in Logic or use your voice to create them all.
Equipment
A USB microphone is perfect for this and it is often a good idea to use a pop-filter to prevent the vocalizations from puffing on the mic. The EXS24 is also used in this example.

Figure 2.24 Never discount your body as an excellent source for sampling.
Sample-Based Synthesis
Some digital synthesizers use sampled waveforms instead of oscillator models, which are perhaps the easiest way to create sound sources, but means that you won’t have any elements of unpredictability. Instruments that do this are often less interesting, but in the case of a vintage instrument, you can “borrow” a little bit of its sound for a new instrument.
It can be hard to tell if a digital synth uses a recording of a single waveform of a different analog synth’s oscillator unless it is published information, and even if a recording is used, it doesn’t meant it is a good or bad instrument. Synth sources come in all shapes and sizes and a recorded waveform can be an excellent starting place for synthesis. It may be worth adding both analog and digital synths to your collection so that you can have a plethora of options in your sonic tool kit.
Historical Perspective on Sampling
In the quest to make music using technology, there has been a division between those who use these innovations to enhance popular musical production techniques and those that have sought to redefine what music is by breaking away from traditional conventions. The effort to reproduce the sounds of acoustic instruments in a workstation environment is one of the issues at the core of the division, but even though sampling has enjoyed widespread adoption, even newer options such as modeling are able to overcome its limitations.
At the time when electronic music was still in its infancy, inventors such as Harry Chamberlin and the Bradley brothers in the UK used analog tape to record individual notes of instruments and then created a mechanism attached to a piano-style keyboard to play them back. The most popular version of this sampler is called the Mellotron and it can be heard on a wide range of records starting in the era of the Beatles up to the present day. Accurate representations are now available in your favorite DAW and even on iOS for your iPad.
As digital technology evolved and improved, instruments such as the Fairlight CMI computer improved sampling, but remained expensive and impractical. Even though the original models had low resolution digital specs, it could reproduce incredible sounds that were used by artists such as Stevie Wonder and Peter Gabriel.1 This line of sampling and music production tools has survived a rocky road and is still being developed. You can install and use an accurate replication on your iPad, with all of the quirks and limitations that came along with the popularity.
Computer-based sampling and hardware-based sampling have been in competition ever since, starting with the DX-1 from Decillionix that worked with both the Apple II in the early 1980s and the frontrunner hardware developer AKAI. Early AKAI samplers and then subsequent MPC workstations have set the standard for hardware, but software options have been able to leverage modern processing power to create sonically detailed instruments that are very realistic.
Gigasampler and Gigastudio from Nemesys, and later Tascam, proved that software sampling could work and provide full-length, high-quality samples for music production, but in a sad turn of events, it was discontinued after sample developers withdrew their support and moved towards Native Instrument’s Kontakt sampler. The core issues were copyright protection and poor product management, leaving composers and producers to find other solutions.2
Samplers in the software realm have changed the music world forever, giving access to any instrument you can think of at your fingertips, with the ability to produce an entire orchestra on a single computer. It wasn’t easy at first because of limitations in drive speeds, RAM amounts, and overall processing power. Every instrument had to be optimized very carefully to be playable, and so in the 1990s, a number of hardware developers used sampling technology to create sample playback units that allowed musicians to be able to have access to instruments without requiring a significant drain on computing processes. E-MU created a popular line of modules under the label Proteus, and Roland also had a long line of devices.
A MIDI studio would have a computer sequencer at the center and multiple external devices for sound creation all feeding into a mixing console. This type of studio could overcome the limitations of poor processing by compartmentalizing the roles of each part with hardware/software that matches in capability. As computing power increased, developers made consistent efforts to transition the sampling experience into software, and eventually external samplers and sample playback devices began to disappear. At first, you would have to use multiple computers to handle the large projects of orchestrators and composers, but the latest computers are able to handle almost everything by themselves.
Software samplers are now almost all universal in their ability to play back sample libraries in various formats. For example, the EXS24 in Logic Pro X can still import Giga libraries from the now discontinued Gigastudio. This makes the choice of sampler or DAW less important because each one can do similar things; however, sample libraries are still highly individual and varied in what they offer.

Figure 2.25 Gigastudio import option.
For a period of time, musicians were likely worried that samples might reduce the amount of work they could get in the studio because a single MIDI programmer can play piano, bass, drums, and nearly everything else. While this is true and in fact a number of projects use sampled and synthesized sounds exclusively, samplers haven’t been able to reproduce the subtle nuances of performance to match skilled musicians. Even in cases with detailed sample libraries that have the potential to sound as good as the real thing, it often requires more time and effort to do the same thing that a group of live musicians could do in a short amount of time.
So it is the list of limitations in sampling that defines its current place in music production because some say it has reached the peak of what it is able to do. Instruments can be sampled on every note, at many velocities layers, and with complex round-robin/key-switching implementation. A few samplers even offer advanced scripting features that mimic human performance. In spite of all of the advances over the years, sampled instruments have not completely replaced live, human performances. While new sample libraries are being consistently released, the future of virtual technology is modeling and nothing is likely to ever fully replace live musicians.
The one task that remains an important resource with sampling is creating patches of synthesizers for use on the stage and even in the studio. Instead of dragging every big synth with you on the road, you can sample the patches and play them on your laptop. Some functionality is lost because performing with a synth involves actively manipulating filters and effects, but these can also be emulated using effects in your software. An example of this is an iPad app created by Jordan Rudess of Dream Theater: it is a set of 57 instruments that he has used on albums and on tour. The app is called Jordantron and is an intimate look into the sounds that Jordan has sculpted over the years.
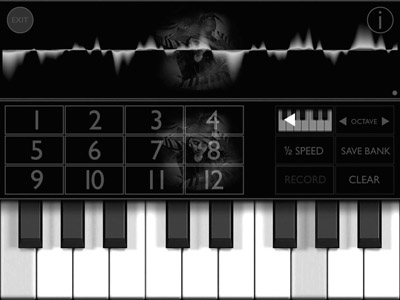
Figure 2.26 Jordantron on iOS.
The Future?
Where is sampling going to go next? The basic technology hasn’t changed in some time, and yet there is so much potential to improve what could be done. The promise of sampling has always been that the home studio enthusiast could create instruments without needing to know how to use computer programming languages. Modeling is the next step in evolution for the needs of musicians, but sampling still has value if only someone would invent a fully automated system for created instruments. The problem is that the money required for development would never be recouped because it isn’t something that people are banging down the doors to buy.
This chapter is near the beginning of this book because sampling and synthesis have been intertwined for a long time and many of the same modulation and effects apply to both types of instruments. Perhaps this is an overgeneralization, but most synth geeks have also dabbled in sampling, and understanding both processes help form a more well-rounded musician.
Notes
1.“History (and future),” November 19, 2014. Retrieved from http://petervogelinstruments.com.au/history/
2.“Are Composers to Blame for GigaStudio’s Demise? Some Observations,” November 19, 2014. Retrieved from http://www.filmmusicmag.com/?p=1770