| Vector Synthesis | 7 |
In 1986, Sequential Circuits released their final synthesizer called the Prophet VS, and in doing so, they invented one of the most expressive and powerful performance synthesis types, called Vector Synthesis (VS). The concept is simple with four different sound sources that are mixed together with a joystick on a two-dimensional plane. There are several reasons why VS caught on and is still an important type of synthesis, all of which are related to musicality in performance and efficiency in programming.
The Prophet VS is a digital synth that has a tragic history because it had so much promise, but it came at a time when Sequential Circuits was about to close. It is hard to fix, and parts are rare, which makes it difficult to invest in. However, if you can find one in good condition, then you will certainly enjoy its unique sound. With its extended envelopes and its customized waveforms, you won’t be able to treat it like any old synth and will have to learn its nuances.
The key elements in the original VS instrument are four sound sources that can be set to basic waveforms or to more complex sounds. These sources are then combined together at various levels using a joystick or other modulator. Even though the mix process could have easily been developed as a square with four corners, it was designed as a diamond shape, which purportedly led to the Prophet VS nearly being called the Prophet Diamond.
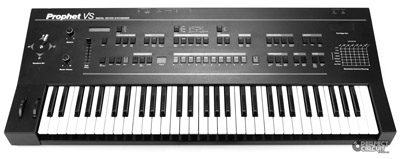
Figure 7.1 The original vector synthesizer from Sequential Circuits—Prophet VS.
Each stage of the VS is controlled by envelopes that have more detailed stages than the traditional ADSR and can help craft very interesting sounds. The modulation matrix is also very powerful and can be used to synthesize sounds that are exciting and full of complexity. Here are the modulation parameters available on the original Prophet VS:
Sources
- LFO 1
- LFO 2
- Pressure
- Velocity
- Keyboard
- Filter Envelope
- Mod Wheel

Figure 7.2 Close-up on the Prophet Diamond.
Destinations
- Frequency
- Filter
- Mix
- LFO 1
- LFO 2
- Amplitude
- Pan
- Chorus
An example of a modulation patch that demonstrates the power of VS is the mix destination, which lets the mix (joystick) be controlled between A–C and B–D. Attach LFO 1 to the mix between A and C, and then modulate the rate of LFO 1 by the modulation wheel. The sounds created in this situation are unlike anything else and are difficult to create using any other synthesis types. Shifting the mix between sounds using LFOs is an incredible way to make new sounds that can be as harsh as desired or rich and mellow.
The envelopes, which can be assigned to a variety of parameters, are also slightly nontraditional because they have four stages and each has a level and a rate. Many envelopes use a single level for the sustain and rates for the rest, but the VS has a rate and level for each stage, which offers the ultimate in flexibility.
The Prophet VS has never been an easy instrument to program because of its single data slider, but it is quite flexible if you have the patience. Even VS instruments that came after the original almost all use similarly difficult programming methods and haven’t done any favors for musicians. VS synthesis is a very powerful tool for live performance, but patches typically have to be completely prepared in advance.
Once Sequential Circuits closed, Yamaha continued work on VS and eventually Korg also released several instruments. Each new iteration brought new features that enhanced the VS process and make each new generation unique and valuable. The Yamaha instruments introduced joystick tracking that could record mix automation and also added integration with FM synthesis. Korg introduced multisampled sources and wave sequencing that added sample playback for mixing full music loops in as one or more of the four sound sources.
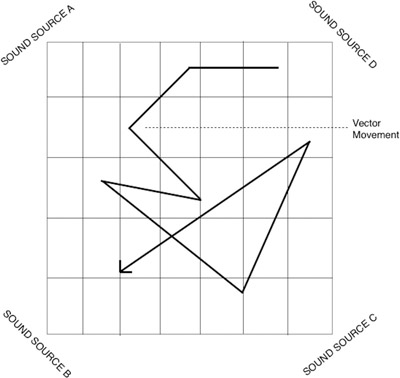
Figure 7.3 Wavestation vector motion.
VS has relied on digital technology since its beginnings, and, with the proliferation of software synths, VS has continued as a popular technique. Virtual instruments have given it new life and DAWs can be used with non-VS instruments to achieve the same general effect. Logic Pro X has two instruments with vector capabilities: the ES2 and Sculpture.
ES2
The ES2 has a semitraditional vector option with an X-Y pad that mixes various parameters, but it can also be programmed using a sequencer to create vector-controlled patterns. In addition to the vector module, the three oscillators are also mapped into a mix “triangle” used for combining the sources. Thus, the ES2 has two levels of VS combined with subtractive synthesis and FM synthesis to create one of the most powerful software synths available.
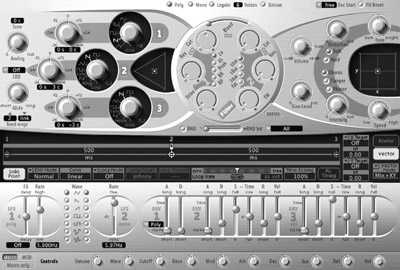
Figure 7.4 Logic Pro X—ES2.
The ES2 is made even more powerful because it exists inside of Logic Pro X, with access to complex arpeggiators and other MIDI/audio effects. This system allows devices such as the Leap Motion to connect through Logic to the ES2 and uses hand motions to generate MIDI CC data. Instead of needing a joystick, it is possible to wave your hand in three dimensions to morph between the different parameters.
Sculpture
Another instrument in Logic Pro X is Sculpture, which is a much different type of instrument and relies on a modeled string as a sound source. It has a five-node, vector-like mod section, which gives the user the ability to mix between five different sounds. Instead of simply using five different sounds or wave shapes, each of the five nodes represents full instrument presets that include effects, filters, string settings, and so much more. Sculpture is just as much of a synth as it is a modeled instrument, and it demonstrates the power of vector synthesis in working with old and new musical technologies in creating very useable sound textures. The Leap Motion can also control the morph pad in Sculpture, which means it can not only create very interesting sounds, but can also be performed in a very expressive manner.
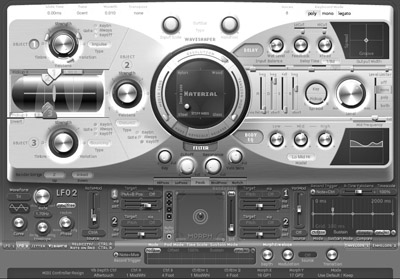
Figure 7.5 Logic Pro X— Sculpture.

Figure 7.6 Sculpture’s morph tool.
There is very little doubt that Sculpture’s morph features are based on the concepts introduced with the Prophet VS, and, due to a complex interface with too much clutter, Sculpture is almost as difficult to program. Unfortunately, time hasn’t made a difference in our ability to create easy–to-use instruments that are also complex, but if mastered, both the Prophet VS and Sculpture are capable of incredibly complex sounds that can be very expressive.
Creative DAW Control
It is possible with many digital audio workstations to create a vector synth-like experience by controlling faders from multiple sound sources. While this is perhaps an oversimplification of vector synthesis, there is very little difference from the original instruments. Pro Tools is one of the few DAWs that is still restricting custom control surfaces and it still isn’t possible to use their surfaces in nontraditional ways, but systems like Logic Pro and Ableton Live are very flexible in the ways you can use MIDI controllers and OSC.
A default instrument in Pro Tools called Xpand 2 has four sound sources that can be loaded with different sampled instruments. Each sound has its own mix level and can easily be assigned to incoming MIDI control data using Xpand’s MIDI mapping feature. This is an easy way to create a vector synthesis-style environment. By using creative MIDI techniques, it is possible to create a map that even lets a joystick control the various levels.

Figure 7.7 Sounds sources in Pro Tool’s Xpand 2.
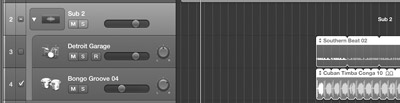
Figure 7.8 Track Stacks in Logic Pro X.
An example of a powerful way to work with Logic Pro X and a VS type of experience uses Track Stacks, which let you combine multiple instruments into a single “track” that responds to a single MIDI input, and yet you can still modulate each instrument separately. In Logic, you can control volume levels of individual instruments using MIDI control data and so it is relatively easy to attach an external device such as an iPad or Leap Motion to mix the different instruments.
iPad Control
It’s hard to beat a joystick in terms of performability when it comes to controlling the vector, but a multitouch interface does something special because it can create multiple X-Y controls that can be used at the same time. An app such as Touch OSC or Lemur can be programmed to create performance data for more than just volume/mix relationships, and you are only limited by the number of fingers you have and by your imagination.
If the app permits you to create a custom interface, then think about what you could do with 6 or 12 X-Y pads all attached to parameters on different instruments. You can play the instrument using a keyboard in one hand and then control an incredible amount of parameters using the other hand. In a recording studio setting, you can record the MIDI track with both hands and then use both hands to perform an additional layer of modulation.

Figure 7.9 iPad Running Lemur.
Programming Vector Synths
This next section explores programming using many of the instruments discussed above. The primary objective is to give you an idea of how each actually works so that you can decide if one of these belongs in your instrument collection, or perhaps you’ll feel like avoiding them completely. The best news is that a virtual replica of the Prophet VS is now available as an iOS iPad app, which means that the iPad collection is continuously growing and you should consider buying one. This app’s OS X version is used below to demonstrate programming the original VS instrument.
Prophet V
The Prophet V instrument from Arturia improves on two Sequential Circuit originals in all of the right places and creates a massive, new instrument that uses both. The Prophet V combines the first and last synths made by Sequential, the Prophet 5, and the Prophet VS. You can use the instrument in either mode, or as a combination of them to create a very powerful, new instrument. For this example, only the Prophet VS portion is used to demonstrate the programming techniques of the original VS instrument.
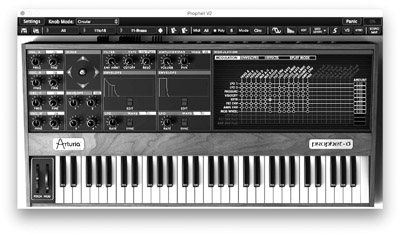
Figure 7.10 Arturia’s Prophet V.
The first step is to choose the waveforms and tuning of the four sound sources. The first time you do this, you’ll likely feel a little lost in knowing what to do—but after you go through the entire process, it will become more clear how to set the initial sounds. It is important to get used to sweeping through with the joystick, because if you don’t, then you’ll miss the core elements of the sound. Make small adjustments and then move the joystick to see how the new settings play with the other sounds.
For this example, four basic wave shapes are used, even though other more complex sounds are also available. Once the sounds are selected, then the tuning, envelopes, and filters are set. This portion of the process is very similar to creating in subtractive synthesis. After that, modulators are available to further change your performance experience. For this example, an LFO is used to modulate the mix parameter along just one axis. The sources are tuned together but an octave apart so that the LFO rhythmically switches between them and creates a sequence-like pattern. The other axis doesn’t have this same pattern, so it is possible to turn it on or off by moving the joystick to a different quadrant.

Figure 7.11 Close-up of oscillators.

Figure 7.12 Digital waveforms.
This sample patch demonstrates the ability of vector synthesis to take existing sound creation tools and make an instrument that is more expressive, flexible, and complex. It is possible to use other synths to create all of the same sounds, but there is something easy about the way vector tools work in combing certain sounds together that makes it unique and a certifiably different type of synthesis.
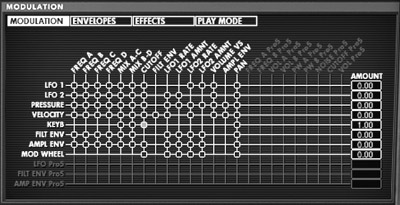
Figure 7.13 The Prophet V modulation matrix.

Figure 7.14 Prophet V LFOs.
If you use the same LFO example above and apply it to each individual axis and create rhythms in both directions, but use different tempos for the LFOs, then you’ll begin to see the complexity of using vectors in situations that result in unexpected sounds that are unpredictable. Each axis can be treated as completely different patches that are subsequently mixed between, just as a DJ might mix together two completely unrelated LPs. The key is to be creative and willing to explore new sounds as you search for the perfect mix of various elements.
Korg Wavestation
The original Wavestation was released in 1990 and picked up with vector synthesis where the Prophet VS had left off. At the time, it represented a bridge between traditional synthesis and an ever-expanding sonic experience. You have all heard the Wavestation in both pop music tracks and in an unlikely place when you hear an Apple computer turn on. Jim Reekes claims he used the Wavestation to create the startup sound used first in the Quadra 700 (1991) and has been used ever since. If you own a Wavestation, then try the Sandman factory preset as it apparently is a slightly modified version of the sound, played as a stretched, C major chord.
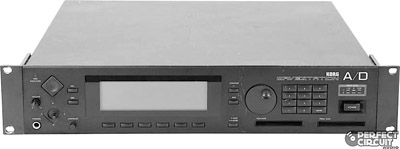
Figure 7.15 Korg Wavestation A/D.
The Wavestation SR came after several other Wavestation releases and is one of the most powerful vector synthesizers ever made, but also one of the most difficult to program. It is an example of a device that clearly wants to be a preset playback instrument while still maintaining all of the power of what the original Prophet VS and other in-between instruments could do. For this example, let’s look at a performance patch that has a maximum part limit of eight different sounds. In addition to the four-source mix vector, the eight parts in the performance patch can be split across the keyboard or by velocity range. This means that you could have a patch that has bass in the lower keys, a piano in the middle keys, and a lead synth on the high keys, and when you play harder/at a higher velocity, then all of the sounds switch to something different.
The Korg SR uses PCM waves as the sound source for each patch. It has 484 individual internal waveforms and more can be loaded with expansion cards. Each voice has access to effects, envelopes, and modulation. The hardest part about programming the SR is that you have a tiny screen and very few buttons, and yet there are so many pages of editable data. There is even a vocoder, which is something Korg is known for on many of their instruments.
For this example, we are using very similar sounds to the example above with the Prophet VS and you can see how difficult it can be using the buttons on the front face. The first step is to initialize a patch so we can start from scratch. We can experiment by switching out the oscillators with various waveforms, but because there are 484, we have an incredibly large pile to search through. The SR can also place these together into a wave sequence and can create a whole different world of sounds and combinations.

Figure 7.16 Korg Wavestation SR LCD screen.
The SR does not have a joystick, but you can attach a MIDI joystick or another MIDI source with adjustable controller data. By default, the SR is set to CC 16 and CC 17 for this control and so you can set your MIDI controller’s faders to these or change the settings on the SR to whatever your equipment is set to. Once again, the Leap Motion or iOS apps can also easily be set to these and are able to control the vector mix. It may be best to use a DAW to manage the MIDI data because it can combine different inputs into a single output to control the SR. In Pro Tools, you can use a MIDI track with the input set to “All” and the output sending to the SR. The same is true for Logic Pro or nearly every other DAW.
Korg Wave Sequencing
Vector synthesis and several other types of synthesis have crossed paths in several specific ways, and so the lines are gray concerning what type of synthesis is actually taking place. Wave sequencing on the Wavestation uses a series of wave files that play in order as any of the four “oscillator” sources. This is very similar to wavetable synthesis, which also has access to a series of sounds that can be manipulated in a very similar fashion. Wave sequencing has not expanded outside of Korg instruments, but it has continued to be available in more recent Korg releases, such as their OASYS instrument and the amazing Korg Kronos. The one place where wave sequencing hasn’t appeared yet is in the wildly popular Korg Gadgets app for iOS.
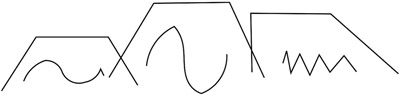
Figure 7.17 Illustration of a three-step wave sequence based on drawings in the original Wavestation manual.
Wave sequencing is a technique that Korg introduced with the Wavestation, but it is not integral to the vector synthesis engine. The performance manual describes the wave sequencing process in enough detail that it seems they are making sure no one confuses it with wavetable synthesis, but the similarities are remarkable. Here are the basic specifications of wave sequencing, which you can compare to wavetables in the wavetable synthesis chapter.
- Memory banks have 32 wave sequences (0–31).
- Each sequence has up to 255 individual steps.
- Banks have a maximum of 500 steps.
- Steps and step ranges can be looped.
- The initial step and step motion can be modulated.
- Layering patches in performance mode means that up to 32 wave sequences can be triggered simultaneously.
- Wave sequences can be populated into each of the four sound sources, for full vector synthesis mixing.

Figure 7.18 Korg Gadget for iOS.
Prophet VS Patches in the Wavestation
The sound of the original Prophet VS is unique, partially because of the wave shapes included, but also because of the limitations and quirks of the early digital audio capabilities. If you want to explore the waveforms of the original Prophet VS, then all you need is a Wavestation, which has them in its memory as stored waves. These original waves are reproduced and used in patches and performances. They are labeled VSxxx, with the xxx being an associated number for each wave.
If for no other reason, it is worth buying a Wavestation or Wavestation SR just to have the experience of working with these original waves in a hardware-based system that is both difficult to program and yet full of rewarding results. The biggest difference is that the Wavestation instruments have no analog components and different filters/effects. This means that even if you program them as closely as possible, there will still be some significant differences in sound color.
Effects and Multisets
Another consideration to think about with the Wavestation is that it has the ability to perform using performance settings and multiset patches. The performance option lets individual patches to be mixed together to create an all-inclusive instrument. The multisets allow 16 patches to be accessed independently on each of the 16 standard MIDI channels. This sounds like it is a powerful way to work because it essentially gives you 16 Wavestations for programming, but the primary limitation is that there are still only two global effects that cannot be accessed individually by each of the 16 patches. Even in performance mode, you lose access to the effects for each layered sound, but performances are often designed with this in mind and so the effects work within this framework. Either way, it is recommended that you use the Wavestation as a single patch/performance tool, and avoid trying to get 16 patches working simultaneously.
ES2
The ES2 is both easier to program and more difficult at the same time. The advantage list includes a graphical interface and the ability to look at all of the parameters at once. The disadvantage list includes a difficult-to-understand interface with few labels and poor instructions. Instead of having four clear sources, the X-Y matrix is attached to various parameters and/or the oscillator level mixer. This means you can modulate filter frequencies and oscillator mix parameters simultaneously using timing nodes on the interface.
In this example, we are creating a simple pattern that affects the cut-off frequency and a mix between oscillator one and white noise. Instead of a joystick, we are using the matrix timing line to set when the X-Y parameters will change. We could use milliseconds or a subdivision of the project tempo grid, and so we are using 1/8 note variations.
When a node is selected, you can alter the settings for the cut-off and the oscillator mix amount before moving on to the next one and changing its settings. Turn off solo mode before testing the patch to see if you are happy. There are so many additional parameters available for tweaking, such as loop settings and X-Y mode settings. While there is no joystick and only three oscillators, this is clearly based on the original VS instruments.
Here’s an example of connecting an iPad to control the X-Y parameters in real-time instead of using a defined sequence/tempo.

Figure 7.19 Vector view in Logic Pro’s ES2.
Figure 7.20 Setting the grid resolution.

Figure 7.21 X-Y assignments.
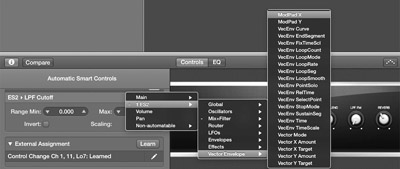
Figure 7.22 Smart control routing to X-Y.
Sculpture and Leap Motion
The primary part of this example is to demonstrate how to hook up the Leap Motion controller to modulate between the five nodes in Sculpture. You’ll need the basic drivers installed, the GecoMIDI app for converting Leap data to MIDI (or equivalent software), and information about which MIDI data Logic Pro is expecting when it comes to controlling Sculpture. This last part always seems to be the hardest to figure out for each DAW, but all it takes is knowing where to look in Logic: this is highlighted in the accompanying image.
In GecoMIDI, it is easiest to use the “Up & Down Position” along with the “Left & Right Position” to control the modulation. Looking at the GecoMIDI interface, you’ll see much more than that available, but in most cases, it is important to keep it as simple as possible because the technology is still imperfect, and complex hand motions are not always interpreted correctly by the software. One of the easiest ways to decide which hand motions are the best for you is to wave your hand around and see what GecoMIDI sees the most clearly. Down below, you can set the MIDI CC data and that will be sent to your DAW by default when the GecoMIDI app is running. If Logic Pro isn’t receiving the data, then check the preferences in GecoMIDI and troubleshoot online in the user forums. The GecoMIDI data will be recorded into your track if you engage recording mode on the initial pass, or you can record keyboard information first and then record a pass of Leap Motion second. There is an option in Logic to automatically combine MIDI regions when recorded on top of one another or if put in loop mode, so it won’t be an issue to record everything separately.

Figure 7.23 GecoMIDI.
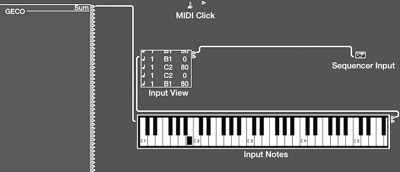
Figure 7.24 Logic’s environment window with MIDI viewer.
In the case of Sculpture, the parameters that control the morph pad are MorphX and MorphY, which are controlled by CC 322 and CC 323. The MIDI specification doesn’t technically extend beyond the default 128 controllers, and so calling them CCs is a stretch but this is how Logic deals with instruments having many more than 128 different parameters. GecoMIDI only works with the traditional 128 controllers, so you have to use the Smart Control system to map the output of GecoMIDI to the morph controls. The Smart Controls are a very easy way to route MIDI data from external sources to internal destinations.
Once the Leap Motion is configured, then there is a learning curve to performing because it unlike anything you’ve ever “played” before. There isn’t any physical feedback, so you have to learn to move your hand around with imaginary boundaries. The parameters in GecoMIDI can be adjusted for sensitivity and boundaries, but the default settings are satisfactory for most situations. Expect, however, to spend a number of hours getting used to it before using it live or in a pressure situation.

Figure 7.25 Sculpture’s smart control assignments.

Figure 7.26 Leap Motion in action.
Vector Synthesis “Evolved”
Most synth types are becoming less independent in modern software implementations. A full-featured subtractive synth is likely to have FM, additive options, and even vector synthesis-style oscillator mixing. When Dave Smith began producing his own instruments again under the name Dave Smith Instruments, he released a hybrid digital/analog synth called the Evolver. This little beast has two analog oscillators and two digital oscillators … which should sound very familiar in the context of this chapter. Since its release, we have seen a number of instruments from Dave Smith, and most of them have embraced digital technology in ways many people did not expect.
The Evolver is a lesson on mixing sounds from different worlds into a single instrument that can speak both languages. This is what vector synthesis is all about and Dave Smith Instruments continues that tradition by continuously expanding the definition of what a synthesizer is in a modern context. It honestly doesn’t seem like he is interested in calling a synth digital or analog, but by using the best of both worlds, he can create an instrument that is capable of more than either by themselves.
Korg Gadget iOS App
Once again, Korg is pushing the boundaries of music creation by developing and releasing a series of iOS music apps. At first they were most interested in creating mobile versions of classic hardware instruments, but, more recently, they have started to move into releasing new instruments that have been designed with new ways of doing things. Korg Gadget is a perfect example of this with a newly developed sequencer that follows in the tradition of Ableton Live and includes a large number of sound-source modules.
Among these modules is a newly designed vector synth called Kiev. Even though it is called a spatial digital synthesizer, it is in fact a vector synthesizer and it demonstrates the key elements in vector synthesis in a very streamlined design. For this next section, Kiev is explored as perhaps the most recently designed vector synthesis available and released in a multitouch experience.

Figure 7.27 Kiev module in Korg Gadget.
Kiev Interface
The bright yellow face is designed to look like an old piece of submarine sonar equipment or something similar. Almost immediately noticeable are the orange lights that move back and forth/up and down along the OSC MORPHER in the center of the device. In the top left corner is a menu to select between various presets, called Sound Programs. There are 41 provided and a place to save user presets.
There are four oscillators, each with basic pitch and tuning settings. Each oscillator can be assigned to one of 92 waveforms, some of which resemble traditional, simple waveforms, while others are substantially more complex.
Kiev Modulation
The Morpher is exactly what you would expect in a vector synth and it mixes between the four oscillators, labeled A–D. There are modulators hardwired to A/B and C/D, which affect the mix between them using an LFO model. You can adjust the depth and speed of the modulation, but not the waveform or other parameters. The lights on the edge of the Morpher represent the modulation speed between the oscillators.
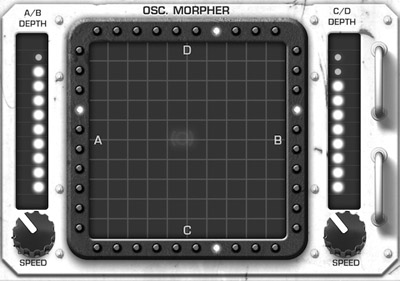
Figure 7.28 Morpher Interface.
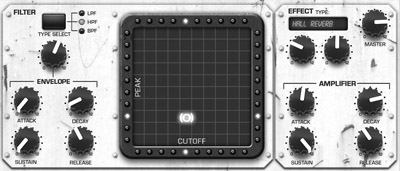
Figure 7.29 Filter and amp settings.
Kiev Filter/Amp
Press the button at the top of the instrument and it switches into the Filter/Amp mode. The filter can be switched between low pass, high pass, and band pass modes. There is a four-stage envelope, which is activated by adjusting the depth knob and is fairly straightforward. The Morpher pad switches from controlling the oscillator mix to controlling the peak and cutoff frequencies. This is a very intuitive way to adjust the filter settings and can even be used during a live performance.
The effects section provides access to a single effect engine, which can be assigned to any one of 25 different effects. These range from reverbs to delays, compressors, distortion units, and equalizers. Each effect is customizable using two knobs, which unfortunately are not labeled as to what they do. This results in a little trial and error, but that is also something that can be fun.
The interface also includes a master volume and an amplitude envelope. The keyboard below is barely playable, but at least you can assign a custom scale to make up for the small size and you can change the available octave.
Kiev MIDI Mapping
One of the best parts about Korg Gadget is that you can create a custom MIDI map for controlling all parameters. This means you can connect an external controller and easily manipulate all of the instrument functions. There are multiple ways to connect a controller to Gadget and not all of them are created equal.
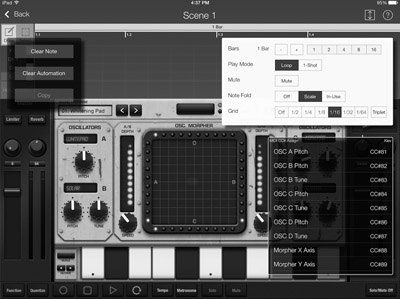
Figure 7.30 Gadget MIDI mapping options.
- Camera Kit—The camera connection kit is a pretty reliable way to connect a MIDI controller to the iPad as it uses a USB cable and if the controller is class compliant, then it should automatically be recognized and work. Class compliancy is a standard that has been agreed to by developers that lets hardware and software work together without any additional drivers being required. Essentially, the needed drivers and software are already made available. The primary limitations include low power availability and it ties up the only port on the iPad, which would no longer be available for charging the iPad. A solution for powering a MIDI keyboard is to connect a powered USB hub to the camera kit and then the keyboard to the hub.
- Wi-Fi Connection—If you are on the same wireless network, then you can connect using MIDI over the network, but the reliability of this system is based on network traffic and is prone to poor latency response times.
- Bluetooth MIDI—iOS 8 and OS X Yosemite include a new option to communicate with MIDI over Bluetooth. The initial implementation has not been trouble free and it often takes a fair amount of time to set it up in a working state. Once it is configured and working, it is very solid and very responsive. Hopefully, Apple continues to develop this and further enhance its reliability.

Figure 7.31 Apple iPad camera kit.
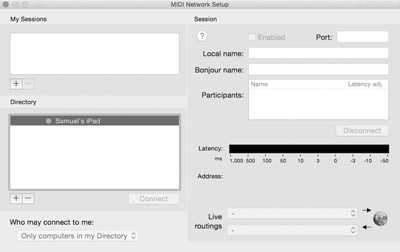
Figure 7.32 OSX audio MIDI setup utility.
Figure 7.33 Bluetooth MIDI.
Using a DAW such as Logic Pro X in conjunction with Gadget, it is once again possible to attach other external controllers such as the Leap Motion for X-Y control. You might wonder why someone would want to use Gadget if they already have Logic Pro X and that might be a legitimate point, but there is something very captivating about having a full production studio in a tablet thinner than a pencil that you can take with you everywhere you go. It is also nice that you can still plug it into a bigger production studio and use the larger controllers and MIDI tools available in a full-featured DAW. The only missing piece is getting full quality audio in/out of the iPad and into your DAW. It is certainly going to arrive at some point in the near future.
Kiev Summary
This is an incredibly limited vector synthesizer, but it shows a refreshing trend away from the past 15 years, where every new instrument had to have everything possible under the sun. Korg, with all of their experience in vector synthesis, decided that four sound sources, two hardwired modulation LFOs, a filter, a single effects bank, and an output envelope are everything needed at the core of this instrument. Even wave sequencing has been omitted from this latest iteration—not because of the iOS format, but because it is clear from some of the other modules in Gadget that it could have been accomplished. How does Kiev sound? It is capable of creating very complex sounds that are exciting because they are never stagnate and remain very intuitive for live performance. The main thing I wish Kiev had is the ability to import custom waveforms for creating your own patches.
Vector Synthesis Summary
Of all of the types of synthesis covered in this book, it often feels like vector synthesis is the least innovative or the one that is least able to stand on its own. Even at its creation, it was as much of an experiment with digital synthesis as it was an exploration of vectors. It is extremely easy to accomplish the same end results of mixing sources together using a number of other techniques.
At the time it was packaged, it made a big enough impact that it has remained a contributing synthesis tool all of these years. Very few companies are currently releasing new instruments with an exact replica of vector synthesis as it was originally designed, and I wonder if it is because the rights to doing so are still covered by patents. Arturia has released Prophet VS clones, and Korg continues to work with vectors, but exciting new releases from MOTU (MachFive) and others have left it off as a primary synthesis type.
The current state of instruments leads us to believe that vector synthesis is less a type of actual synthesis and more of a vehicle for synth engines to accomplish certain modulation tasks. You won’t see a diamond grid on every instrument, but you will often have the ability to mix between two patches or automate mix levels for various sounds. The original Prophet VS taught us a different way to think about programming sounds that has evolved over time and morph into new timbres.