| Additive Synthesis | 4 |
Additive synthesis can be considered the holy grail of synthesizer formats. Additive supplies the user with the greatest amount of options and sonic possibilities when creating sound. In theory, any sound imaginable is able to be re-created with the utmost precision and accuracy when using an additive synthesizer. No other synthesis formats come close to its gargantuan nature. That being said, additive synthesis is one of the more complex synthesizer formats and therefore requires a deeper understanding and sharper learning curve in order to master it. Once mastered however, the possibilities are literally endless in sound creation and re-creation. In simple terms, additive synthesis is the ultimate sound-creation tool.
Additive Synthesis Theory
As briefly mentioned in the subtractive synthesis chapter, any sound, be it a trumpet, a voice, or an explosion, is made up of a series of harmonics. In essence, these harmonics are all individual sine waves that are multiples of the fundamental frequency of the sound. These harmonics differ in amplitude and also change amplitude over time, resulting in the complex sound that we hear. Additive synthesis utilizes this by allowing the users to combine a set amount of sine waves, as well as designate their amplitudes, in order to create sound.
Additive synthesis has its roots in the Fourier series. Jean- Baptiste Joseph Fourier is credited with conducting research that led to and inspired the Fourier series. A Fourier series is basically a way in which to represent a waveform as a combination of its various, individual harmonics in their most simple state—sine waves. Any wave analyzed via the Fourier series is subsequently broken down to its key elements. In practice, the Fourier series is often used as a way of displaying the various or even infinite independent sine waves that make up a sound. For this reason, additive synthesis is sometimes referred to as Fourier synthesis.
The Fourier series is often used in FFT (Fast Fourier Transform) units as well as a vast array of software devices, such as phase vocoders and resynthesis engines. Engineers theorized that if sound was made up of individual sine waves, each at different frequencies and amplitude as the Fourier series determines, any sound could hypothetically be resynthesized simply by adding in these same sine waves to their exact proportions. The theory behind additive synthesis is actually quite old and even predates subtractive synthesis.
By using additive synthesis, the user is free to adjust each harmonic and its amplitude, resulting in an extreme level of control. An additive synthesizer has a number of sine wave generators that are able to be set to any frequency or amplitude. These sine wave generators are used in order to create the various harmonics needed to build a sound. Early additive synthesizers were capable of producing only a few harmonics, while the first commercial additive synthesizers could produce up to around 64 individual harmonics. The advent of software additive synthesis has brought that number up to the many hundreds. In additive synthesis, the more harmonics you are able to produce, the better.
When building a sound, the user will tune each sine wave generator to correspond to various harmonics. By allowing the user to control every single harmonic in a sound, not only are incredibly accurate sound re-creations possible, but extremely complex and new sounds seem to seep from an additive synthesizer. Because sound is constantly changing and rarely remains stagnant, various types of amplitude modulation are employed on an additive synthesizer in order to bring life to a patch. In fact, if one were to simply set the amplitudes of the individual harmonics and leave them, the resulting sound would be stagnant and be reminiscent of an organ. For this reason, many additive synthesizers will feature independent envelope generators and LFOs for each harmonic, or set of harmonics, so the user can create extremely complex patches. By incorporating envelope generators and LFOs, the user can designate specific harmonics to rise or fall in amplitude before, during, or after the fundamental frequency is heard. By manipulating harmonic amplitude over time, incredibly complex filter sweep-type sounds can be produced that cannot be replicated on a subtractive synthesizer.
Chances are that many of you have used some form of additive synthesis without knowing it. In fact, just combing waveforms in the mixer section of a subtractive synthesizer can be thought of as a very basic form of additive synthesis. When combining various waveforms, say a sawtooth wave and a square wave, you are effectively creating a new complex wave via additive synthesis. In addition to this, many vintage analog subtractive synthesizers were capable of performing a small amount of additive synthesis. The Roland SH-3A, for example, allowed the user to combine various octaves and wave shapes on its single oscillator as a means to create more complex waves. The Oxford Synthesizer Company’s Oscar synth featured a more advanced form of additive synthesis. When using the synth in “harmonic creation mode,” the upper register of the keyboard allows users to manually add in up to 24 harmonics. The user was able to hear the additional harmonics added in real time as the sound became richer. The newer Arturia MiniBrute analog subtractive synthesizer features similar additive capabilities to the Roland SH-3A in that the user can combine various wave shapes on the single oscillator. Although these basic forms of additive synthesis pale in comparison to what stand-alone additive synthesizers can do, they feature a form of additive synthesis none the less.
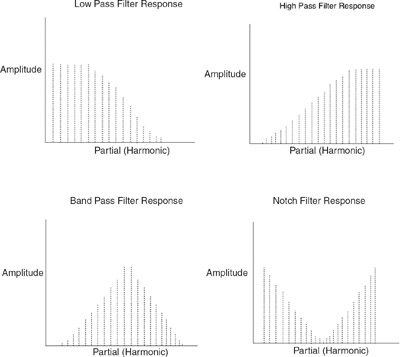
Figure 4.1 Creating filter responses through additive synthesis.
Additive synthesis is most often employed on digital or software-based instruments. By utilizing digital signal processing, a degree of precision is inherent that would not be available if one were to use analog circuitry. In an analog synthesizer, for example, temperature fluctuations can lead to pitch drifting in an oscillator. Although pitch drift is acceptable or even sometimes desired on a subtractive synthesizer, it can wreak havoc on an additive synth. Because additive synthesis incorporates so many individual sine waves in order to designate the timbre of the overall sound, the slightest unwanted pitch variation in any of the harmonics can cause dramatic changes to the sound as a whole. Digital signal processing allows for extreme pitch stability resulting in much more stable timbres.
Figure 4.2 The Oxford Synthesizer Company Oscar synth featured limited amounts of additive synthesis. Photo courtesy of www.perfectcircuitaudio.com.
Problems with Analog Additive Synthesis
In order to understand the inherent difficulties in having an analog additive synthesizer, let’s go through what is needed in order to build an analog additive synthesizer. The first, most important thing needed for an additive synthesizer is a tone generation source. In the analog world, tone production, even sine wave production, is easy enough via an oscillator. For an additive synth, we would need a number of individual oscillators: the more, the better. Let’s imagine a synthesizer capable of producing 20 harmonics—which is much greater than the earliest analog incarnations of additive synthesizers, but when compared to digital additive synthesizers that contain anywhere from 64 individual sine wave generators up to a few hundred, 20 is a rather conservative figure. In order to produce 20 individual harmonics, our synthesizer would need 20 individual analog oscillators. When one takes into consideration that the famous MiniMoog synthesizer only has three oscillators, it quickly becomes apparent how big a 20-oscillator system would be. Tone generation however, is only the beginning. The next thing we would need in our synthesizer is amplifiers, 20 of them to be exact. In order to be able to control each harmonic individually, a dedicated amplifier for each oscillator will be required.
Now we have a synthesizer able to create up to 20 individual harmonics, each with an individual amplitude. As was discussed earlier, just setting the amplitude of individual harmonics and leaving them results in stagnant, often boring sounds. So now, in order to add amplitude control over time to our individual harmonics, we will need 20, separate envelope generators. As great as envelope generator control is however, more means of modulation are necessary to create the interesting sounds that additive synthesis is capable of. In order to add another dimension of control to our synth, we will have to add 20 individual LFOs to our system so we can really manipulate each harmonic amplitude in a suitable way.
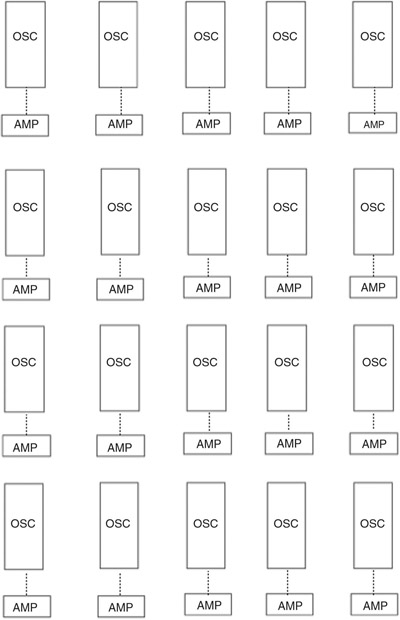
Figure 4.3 Our analog 20-oscillator system.
So now we’re at a synthesizer capable of creating 20 harmonics, each with envelope and LFO manipulation. So far, our synthesizer contains 80 individual modules—that is no small number not even taking into consideration the costs. Despite this large number of modules, we are still not done building our additive synthesizer. All natural sound contains some sort of noise, such as the user’s breath when using a woodwind instrument. Although noise is certainly able to be broken down to its individual sine waves using the Fourier series, the sheer amount of sine wave generators necessary to re-create noise would be unattainable. In order to add noise to our system, we will add a few noise generators capable of producing different noise shapes.

Figure 4.4 Our analog 20-oscillator system with 20 envelope generators and LFOs.
Finally, we will have to add some sort of summing bus to mix all our 20 harmonics together into a single output as well as a means to route our keyboard’s pitch and gate information to the various oscillators and envelope generators. Although not exactly necessary, it might be desirable to add one final envelope generator and LFO in order to control the entire sound as a whole.
So now we have a respectable, 20-harmonic additive synthesis with all the bells and whistles one would expect. The sheer size, weight, power consumption, and cost are extreme, but we are free to make the sounds of our dreams. We are forgetting one thing though, because our synthesizer uses analog circuitry, every single circuit is susceptible to temperature and pressure changes, movement, power inconsistencies and a variety of other maladies. All these little problems that become amplified through these circuits cause our oscillators to drift in and out of tune as well as wreak havoc on our envelope generators, amplifiers, and LFOs. In all likelihood, our additive synthesizer we just built won’t be very useful for re-creating sounds with exact precision or maintaining a sound we create for very long. It is quite apparent that additive synthesis and analog circuitry were simply not meant for each other. It would take the digital synthesis revolution to bring additive synthesis out of the universities and laboratories and into the hands of musicians and sound designers.

Figure 4.5 Our analog 20 partial additive synthesizer.
Early digital synthesizers that included additive synthesis, although powerful, were not very practical. Instruments such as the Fairlight CMI had advanced computational powers for the time, but lacked the ability to make changes to an additive synthesis sound in real time. The problem with not being able to make changes in real time was that the synth effectively acted as a sample-based synthesizer when played. In fact, the Fairlight CMI would load newly synthesized sounds into its onboard RAM, or random access memory, once the user pressed “compute.” Therefore, these early digital additive synthesizers were oftentimes less than useful when one considers the full potential of an additive synth.
The first, successful digital additive synthesizer that allowed users a number of available harmonics with real time control and computing while remaining somewhat affordable came out of Japan—the Kawai K5. The Kawai K5 was revolutionary in that it offered 64 independent harmonics with a whopping eight notes of polyphony!1 Eight notes of polyphony might seem laughable today, but at its inception, only the Yamaha DX series offered more. When using the K5, a user could sacrifice polyphony by half in order to have 128 individual harmonics. Having this many harmonics was completely unheard of at the time, especially when taking into consideration that the K5 was somewhat affordable. In fact, the K5 and its 64 or 128 harmonics still stands today as a quite respectable additive synthesizer.
Arguably, one of the biggest drawbacks to additive synthesis is the amount of time it takes to program a sound. Each harmonic needs to be tuned and set at a specific amplitude and then amplitude modulation via envelope generators and LFOs need to be set. When working with an instrument that is capable of producing 64 or 128 individual harmonics, this is no easy or quick task. The Kawai K5 had some fairly unique tricks in order to speed up the sound-creation process. Firstly, the K5 displayed each harmonic with a bar representing its amplitude (similar in look to a bar graph). By showing all of the harmonics and their individual levels visually, the user was able to quickly visualize what was happening with the sound. Next, the K5 allowed the user to group harmonics together in order to adjust them simultaneously. The K5 allowed users to select groups consisting of even harmonics, odd harmonics, octaves, fifth intervals, or custom groupings. The user was also free to manually adjust individual harmonics so that no customization was hindered by creating these groups—it just allowed for quicker adjustments. Allowing users to group various harmonics together was a completely new feature in the additive synthesis world. Once a bank of harmonics was selected, they could be raised or lowered in amplitude while maintaining their proportions with one another in order to maintain their harmonic hierarchy. The K5 was the first additive synthesizer to utilize this type of control.2
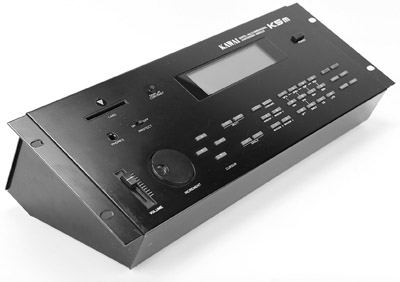
Figure 4.6 Kawai K5. Photo courtesy of www.perfectcircuitaudio.com.
The Kawai K5 offered a wide variety of envelope generators in order to further shape the resulting synth patch. Like with the individual harmonics, the K5’s envelope generators were easy to adjust as well. The K5 featured envelope generator short cuts for effectively copying and pasting envelope generator responses to higher harmonics so that the user didn’t have to start from scratch every time.3 The Kawai line of additive synthesizers has gained monumental status in the additive world similarly to the Moog and Arp synths of the subtractive world. Kawai has remained a leader in additive synthesis. Kawai updated their famous K5 synthesizer in 1996 with the K5000 line, which modernized and reintroduced the world to hardware additive synthesizers. The K5000 and subsequent models not only offered the users more harmonics, but higher levels of controls than the K5. Firstly, the K5000 worked by having multiple “sources” that can be assigned and played. Each “source” could be an additive synthesis engine or a sample playback engine. When used as additive synthesis engines, each “source” can contain up to 64 individual harmonics. When combining multiple additive synthesis “sources,” a large number of harmonics are able to be combined. Next, each harmonic was paired with an individual amplitude envelope generator, allowing for much more control than was offered on the K5. Finally, virtually every additive synthesis parameter offered on the K5000 was assignable to various performance control features. For example, key velocity, or the pressure applied to keys, key tracking, or playing up and down the keyboard, as well as onboard knobs, sliders, and wheels can all be set to control various additive synthesis parameters. The Kawai K5000, although perhaps not as successful as its older sibling, helped bring additive synthesis back into the mainstream. The K5 and K5000’s innovations have influenced virtually all modern software additive synthesizers.
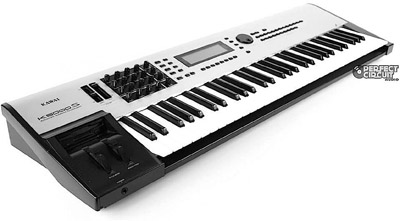
Figure 4.7 Kawai K5000. Photo courtesy of www.perfectcircuitaudio.com.
Types of Sounds Possible with Additive Synthesis
Describing the types of sounds that additive synthesis excels at is quite difficult. In theory, any sound imaginable is able to be created on an additive synthesizer as long as you have a sufficient number of sine wave generators, envelopes, and LFOs, as well as a deep understanding of additive synthesis. For this reason, it is nearly impossible to say which types of sounds additive synthesis are best at creating. That being said, certain types of sound are more often created on additive synthesizers than other synthesis formats. The first, and most common, sound type additive synthesis is used for is sound resynthesis. Because additive synthesis is capable of rebuilding any sound using the Fourier series, it is frequently used in this way. Although modern sampling synthesizers have oftentimes made sound re-creation obsolete using additive synthesis, the degree to which sound can be re-created accurately, as well as the amount of customization one can add to the re-created sound, is unique to additive synthesis. Therefore, many people still prefer using additive synthesis to re-create sounds rather than using a sample-based synthesizer. Rich, evolving pads are also frequently produced on additive synthesizers. Sonic soundscapes and complex, evolving drones reminiscent of Vangelis’s Blade Runner score are also among the most popular patches designed on additive synthesizers. By controlling the envelope for each harmonic, pads are able to evolve in timbre in a way that is mostly unachievable using other synthesis formats that only have envelope control over amplitude or filter responses. When using an additive synthesizer, the user can create a pad that starts out dark and warm and then slowly evolves to feature shimmering high-end harmonics while the lower harmonics slowly begin to become frequency modulated and darker as midrange frequencies become prominent, all through the means of envelope control over individual harmonics. The possibilities are literally endless for creating evolving pads when using an additive synthesizer.
Additive synthesis can also theoretically be used in order to emulate classic analog synthesizers. Oftentimes, digital synthesizers, which utilize virtual analog emulation, can impart digital artifacts such as aliasing and stepping onto the sound itself, causing these synthesizers to not sound accurate. Many engineers have toyed with utilizing additive synthesis in order to re-create various analog sounds. Although using additive synthesis in this way has rarely been used on commercial instruments, many studies have been conducted that have shown that additive synthesis can in fact be used to emulate subtractive synthesis sounds.4 It is possible that as the analog subtractive resurgence grows, software synthesizer companies may begin to implement additive synthesis into their instruments in order to create more accurate-sounding analog emulations.
Additive Synthesis in Practice
So now that we have covered a brief outline of additive synthesis, let’s go more in depth on additive synthesis theory as well as all of the parameters one might expect to find in an additive synthesizer in an attempt to learn how to use it successfully.
Tone Generation
As stated earlier, additive synthesis uses a number of sine wave generators in order to build sound. Many instruments will call these sine waves either harmonics or partials. Some users might be asking themselves why additive synthesis is limited to sine waves. Why not have sawtooth, square, and triangle wave generators in addition to sine wave generators in order to create more complex tones? As we discussed, all sound can be broken down using the Fourier series. The Fourier series breaks sounds down into their most basic elements: sine waves, or harmonics. Therefore, if the additive synthesist wanted to have a screaming sawtooth lead sound, all he or she would have to do is build a few sawtooth waves. Because a sawtooth wave contains both even and odd harmonics, all the user would have to do is add in both even and odd harmonics to his or her sound, as well as set the amplitude of each harmonic in correspondence to the inversely proportionate relationship they hold with the fundamental frequency and presto—a sawtooth wave is created.
Although additive synthesis is capable of so much more than the basic wave shapes, it is a helpful exercise to build the basic wave shapes using an additive synthesizer. So let’s go through each of the common wave shapes and deconstruct them to their basic elements and then build them back up using additive synthesis.
Triangle Waves
Because a triangle wave only contains odd harmonics (third, fifth, seventh, etc.), we would have to add in harmonic sine waves at each of these intervals. Thankfully, most modern additive synthesizers do the math for us and display harmonics via their harmonic number rather than making a user calculate what frequency each harmonic would be. However, if using an older model or making an analog modular additive synthesizer, one can figure out the harmonic number’s frequency simply by multiplying the fundamental frequency by the harmonic number. For example, if taking “A” 440, one would multiply 440 by the desired harmonic number (let’s say the third harmonic). We would then multiply 440 by three and get 1320Hz, which is “A” 440’s third harmonic. It must be remembered that a triangle wave’s upper harmonics are proportional to the inverse square of the fundamental frequency; meaning, the third harmonic is 1/9th the amplitude of the fundamental while the fifth harmonic is 1/25th the amplitude. Using this inverse square proportion, we must lower the amplitude of each subsequent harmonic accordingly while also inverting the phase of every other sounding harmonic (i.e. third, seventh, eleventh). If this inverse square proportion and phase inversion is followed exactly, a perfect triangle wave will result. But additive synthesis is magical in the fact that we do not have to be confined to re-creating perfect wave shapes. In fact, one could be free to add in a few extra harmonics at a higher amplitude, resulting in something that is in between a triangle wave and a square wave. The possibilities are literally endless.

Figure 4.8 Harmonic content of a triangle wave.
Sawtooth Waves
As stated above, a sawtooth wave contains both even and odd harmonics. Unlike a triangle, however, the upper harmonics of a sawtooth wave are just inversely proportional to the fundamental frequency. This means that the second harmonic is 1/2 the amplitude of the fundamental while the third and fourth harmonic are 1/3 and 1/4 the amplitude respectively. When programming a simple sawtooth wave on an additive synthesizer, the user is free to follow these guidelines exactly, but again, due to the extreme customizable nature of additive synthesis, the user is free to experiment and make the second harmonic louder than the fundamental and each harmonic thereafter louder still. An interesting experiment to perform is to raise and lower the amplitudes of the upper harmonics once a sawtooth wave is created. The resultant sound will be reminiscent of a filter being opened and closed. This happens because all a filter does is effectively lower the amplitude of upper harmonics. Many classic analog subtractive synthesizers can be emulated this way. Emulating a filter response is only one of an endless amount of things one can do with an additive synthesizer.
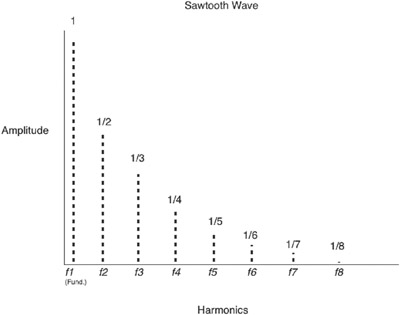
Figure 4.9 Harmonic content of a sawtooth wave.
Square Waves
Like a triangle wave, a square wave contains only odd harmonics. In order to create a square wave on an additive synthesizer, one must add in each odd harmonic. The rate at which these upper harmonics diminish in amplitude, though, is much less than with a triangle wave. A square wave’s upper harmonics will drop in amplitude at a rate that is inversely proportionate to the fundamental frequency or, in other words, the same as with the sawtooth wave mentioned above. Again, the additive synthesist is free to adjust these harmonics however they see fit, but producing these standard wave shapes provides a learning experience that is quite helpful to the beginner as well as the experienced additive synthesist. It should also be remembered that additive synthesis is capable of so much more than producing traditional wave shapes, so creating the standard waveforms should be used as a jumping-off point to the wonderful world of additive synthesis.
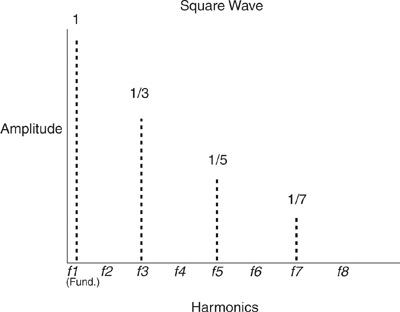
Figure 4.10 Harmonic content of a square wave.
Envelope Generators
As stated in the subtractive synthesis chapter, an envelope generator affects various parameters of the circuit it is routed to. Typically, an envelope generator will contain attack, decay, sustain, and release parameters. In additive synthesis, envelope generators are usually routed to amplifiers for both individual harmonics or for the sound as a whole. Either way, an envelope generator will affect how the sound’s amplitude changes over time while a key is being depressed and once it is released. Envelope generators are key when it comes to additive synthesis in order to make the resulting timbre sound interesting and not stagnant. Early additive synthesizers did not have the functionality of envelope generators, which made them sound like novelty instruments in the lens of modern additive synthesis. When programming an additive synthesizer, if one only sets the frequencies and initial amplitudes of the upper harmonics, the resulting sound will be, well, like an organ. That is because this is exactly how organs work. So in order to make additive synths sounds more interesting, one must use envelope generators. The possibilities are endless when using envelope generators. If one sets the envelope generators of all the upper harmonics to fall shortly after a key is pressed, the resulting sound will be reminiscent of a filter closing on the sound. If the envelope generators are set to rise once a key is depressed, the resulting sound will be reminiscent of a filter opening. One might ask—if envelope generators re-create filter responses, why not just add a filter to an additive synthesizer? The answer to that valid question is that creating filter responses is only one small aspect of the power of envelope generators when used by the additive synthesist.
When using envelope generators, one can set certain higher harmonics to rise in amplitude once the fundamental and lower harmonics die out in order to create interesting evolving pads. Likewise, one can set just the higher harmonics to be heard when a key is pressed and then have those die away while the fundamental and lower harmonics rise in amplitude. The types of sounds that can be created using the envelope generators of an additive synthesizer cannot be created using any other type of synthesis format. That last statement is very important to note. In theory, all sounds created by any of the synthesis formats can be re-created using additive synthesis but an additive synthesis sound can rarely be created using a different format. It is also important to note that most modern additive synthesizers will feature an additional envelope generator that can be used to affect the sound as a whole. By using this overall envelope generator, the entire sound can be swept up, swept down, held, muted, and anything in between.
Envelope generators are not just limited to amplitude control. Certain additive synthesizers will also allow envelope control over pitch for individual or groups of harmonics. Being able to designate how a harmonic changes pitch over time can greatly influence the overall timbre of the sound. For example, when setting the envelope to change the pitch of many harmonics drastically as the sound evolves, the resulting sound will start off very uniform and slowly become more and more mangled as time goes on. Another routing many additive synthesizers offer for envelope generators is the panning of individual harmonics. Newer additive synthesizers are typically stereo instruments, meaning they have a left and right output. By using envelope generators to adjust the pan function of individual harmonics, certain aspects of the sound can shift from one speaker to another, creating extremely immersive synth sounds. A world of opportunity opens when one incorporates envelope generators into an additive synthesis patch.
LFOs
LFOs, or low frequency oscillators, are a must when it comes to additive synthesis. Many modern additive synthesizers will feature independent LFOs for each and every harmonic. LFOs are typically used as another source of amplitude modulation similar to envelope generators. However, LFOs can be used as a means of frequency modulation for individual harmonics as well. Using LFOs to modulate the pitch of various harmonics will yield small, tonal variations at more modest levels while creating intense sonic warping at more extreme levels. As stated in the subtractive synthesis chapter, LFOs are oscillators that produce frequencies at lower than audible ranges. Because of this, LFOs are capable of producing the range of standard waveforms, which can then be used as a means of control. Due to the cyclical nature of wave shapes, LFOs are able to produce repeating modulation, which can impart new and creative effects when programming an additive synthesizer. Many modern additive synthesizers will also feature one or more overall LFOs that will be able to affect the sound as a whole. These overall LFOs can be used to create vibrato and tremolo effects as well as a wealth of interesting and unique effects that are only limited by the user’s imagination.
Borrowed Synthesis
Although many additive synthesis purists might scoff at this next statement, many additive synthesizers feature parameters borrowed from other synthesis formats in order to make the instrument more beneficial to the user. The inclusion of these various parameters not only makes the instrument more user-friendly, but can also be used as a marketing tool to not only differentiate the instrument from other additive synthesizers, but make it more appealing to the user that is thinking about getting into additive synthesis. Although often overlooked, having an overall envelope generator or LFO on an additive synthesizer is technically a means of incorporating borrowed synthesis because the resulting sounds could technically be achieved by only using additive synthesis rather than incorporating an overall envelope or LFO.
Filters
Many additive synthesizers, including many of the Kawai instruments, contain filters. Filters, especially resonant, low pass filters, have become synonymous with synthesis. Being able to perform a filter sweep in real time is practically a must on most synthesizers. Therefore, it was only a matter of time before additive synthesizer designers began including filters into their instruments. Any type of filter response can be achieved on an additive synthesizer by manipulating the amplitudes of the individual harmonics. For example, a low pass filter sweep can be achieved by setting the higher harmonics to fade out prior to the lower harmonics. Likewise, a high pass filter sweep can be achieved by setting the lower harmonics to fade out prior to the higher harmonics. Even more complex filter responses such as band pass sweeps and notch sweeps can be achieved. By including a filter into the instrument, however, these sounds can be achieved much faster without having to go back into submenus and designate each harmonic to change amplitude. Having a filter on an additive synthesizer comes in handy when playing live or improvising in the studio. If staying true to additive synthesis is what your heart desires, the filter can typically be switched off or just left unused.
Formant Filters
Formant filters are a type of filter that can be used to impart human speech-type effects onto a sound such as vowel sounds. Formant filters are typically found on formant synthesizers (a type of physical modeling synthesis). Formant filters are oftentimes found on modern additive synthesizers, although they are not additive in nature. Incorporating a formant filter into an additive synthesizer effectively opens up more possibilities for sound creation.
Sample Playback
Another feature many additive synthesizers will include is the ability to utilize sample playback in conjunction with the main additive synthesis engine. This functionality is more common on the workstation type of synthesizers that have many different synthesis formats, but many standalone additive synthesizers will feature some sort of sample playback. Having the ability to start with a sampled sound and then add additional harmonic content onto it is greatly beneficial to the novice or even expert synthesist. Including sample playback features on an additive synthesizer is just another way companies are making their synthesizers remain relevant in an age where any type of synth sound can be recalled with the click of a mouse.
Waveform Generators
Although all of the basic waveforms can be re-created on an additive synthesizer, many additive synthesizers will allow users the option to start with premade wave shapes, which can then be altered and expanded upon. This type of functionality helps synthesists arrive at the sound they are trying to create faster and can often be extremely beneficial to the beginner.
Noise Sources
As mentioned above, most, if not all, sound contains some form of noise that plays a role in the timbre of the overall sound. This noise can be the sound of a bow scratching on a string, a woodwind or horn player’s breath, or just atmospheric noise that influences the way in which the harmonics are heard. Using the Fourier series, one, in theory, could deconstruct noise down to individual sine waves, but it would take up far too many of an additive synthesizer’s sine wave generators to re-create. For this reason, many additive synthesizers will feature an onboard noise generator that allows for noise shaping through filtering. By adding in noise at small amounts, the user can more faithfully re-create sound. When used to more extreme degrees, noise will impart sonic attributes to a sound much like when it is used in subtractive synthesis.
The filter used to shape noise will typically have some sort of contour control, such as an envelope generator. By using an envelope generator for the noise-shaping filter, the user is free to designate how the noise is shaped over time. An additional envelope generator for the noise’s amplitude is also typically found on an additive synthesizer in order to control how the noise rises and falls in amplitude over time. By incorporating noise into an additive synthesizer patch, sounds can be convincingly re-created.
Performance Control
Now that we have covered how sounds are created using additive synthesis, let’s examine how sounds are controlled. Like with most forms of synthesis today, additive synthesizers utilize keyboards in order to trigger sound. Because most additive synthesis exists in the digital world, additive synthesizer keyboards trigger sound digitally rather than with control voltage like on analog subtractive synthesizers.
Pitch and Mod Wheels
Most additive synthesizers will feature separate pitch and modulation wheels. Similar to subtractive synthesizer keyboards, the pitch wheel will shift the overall pitch up or down while the modulation wheel will control the depth of the overall LFO. Since additive synthesis is typically digital, the modulation wheel (and sometimes pitch wheel) can be routed to a variety of different parameters. For example, one could control an onboard filter cutoff or the envelope amount of a bank of harmonics.
Data Sliders
Due to the sheer amount of controls that can be tweaked on an additive synthesizer, having an individual potentiometer or slider for each and every parameter would result in a huge, heavy, and cumbersome instrument. For this reason, most additive synthesizers will require the user to scroll through various menus and submenus on an LCD screen in order to tweak parameters. Once a parameter is selected, it will typically be altered via a data slider or bank of data sliders on the instrument’s surface. A data slider typically looks and functions like a fader on a mixing console. Utilizing menus and data sliders not only allows the synthesizer to be contained in a manageably sized instrument, but allows the user to have a number of parameters routed to the data sliders at any given time in order to perform functions in real time while performing.

Figure 4.11 Data slider.
Sequencers/Arpeggiators
Similar to subtractive synthesizers, most additive synthesizers will feature onboard sequencers and arpeggiators. An additive synthesizer’s sequencer and arpeggiators will function much the same as their subtractive synthesis counterparts, only they will almost always be controlled via digital means such as software or MIDI data.
DSP Effects
Although DSP, or digital signal processing, has nothing to do with synthesis itself, most modern synthesizers, especially digital and software synths, will feature DSP effects in order to further modify a sound. DSP effects are wide ranging and can include delay, reverb, phase shifting, chorus, and flange effects. Due to the popularity of including DSP effects on a synthesizer, most new additive synthesizers will feature at least a few DSP effects. Adding a delay or a rich reverb onto a synth patch will impart a new dimension of animated sound that, in most cases, is extremely desirable.
Resurgence of Additive Synthesis
Additive synthesis has always been more of an esoteric synthesis format. Although it is one of the earliest theorized synthesis formats as well as an extremely powerful one, additive synthesis has never had the wide acclaim that has been granted to subtractive, sampling, or even FM synthesis. This is perhaps due to the amount of time it takes not only to build a patch but to alter it on the fly. Having one of the steepest learning curves also hasn’t helped additive synthesis. Sampling synthesizers single-handedly made sound re-creation via additive synthesis obsolete since any sound could be recorded and then played on a sampling synth rather than painstakingly re-created on an additive device. Once accurate sound re-creation was cast aside, many users felt that using subtractive or FM synthesis to create new sounds was sufficient enough, leaving additive synthesis behind. Although additive synthesis has never died away in the eyes of additive enthusiasts, sound designers, and academic institutions, it seemed all but dead before it came into its own for the average synthesist.
With the advent of software synthesizers and the ever- increasing amount of CPU in today’s computers, however, additive synthesis is finally having its long-awaited day. Additive synthesis has finally found a platform in software synthesizers that allows it to be realized to its utmost potential.
Native-Instrument’s Razor software synth is an additive synthesizer that is capable of producing up to 320 harmonics. Take into consideration that the Kawai K5, arguably the most famous hardware additive synthesizer of all time, could only create 64 harmonics or 128 if one was ok with losing four notes of polyphony. The fact that Razor can produce 320 harmonics while maintaining full polyphony is nothing short of amazing.
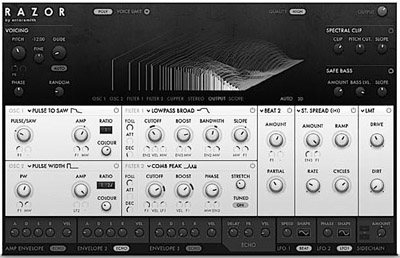
Figure 4.12 Native-Instrument’s Razor synthesizer.
Many software synth manufacturers are including additive synthesizers or at least elements of additive synthesis into their new products. It is an exciting time in the additive synthesis world. As CPU power increases, the limits of additive synthesis will continue to expand resulting in capabilities much beyond our current understandings.
It is appropriate to say that software is the perfect additive synthesis format. Not only will a software additive synth be much cheaper in cost than its hardware counterpart, but it will also be much more powerful. In fact, software additive synthesizers are free to be expanded and built on with subsequent updates keeping them relevant and state of the art so long as the software company stays in business. This is an extremely important note because it means that once a user buys a software additive synth, it can potentially be kept up to date with every advancement in technology for the small cost of updating the software. Updating a synthesizer as technology improves can really only be possible through the means of software synths.
Like Native-Instrument’s Razor synthesizer, AIR has its own software additive synthesizer called Loom. Loom can be considered even more powerful than Razor because it offers the user 512 individual harmonics. The trend in software additive synthesis to feature as many harmonics as possible with average CPU power is both exciting and amazing. Comparing the power of Razor or Loom to the likes of the Kawai K5 show that software is the next logical evolution for additive synthesis thanks to the sheer power it affords.

Figure 4.13 AIR Loom synthesizer.
Utilizing software for additive synthesis not only allows for huge numbers of harmonic generators, but allows for huge numbers of individual amplitude control as well. Returning back to the Kawai K5, only a select number of envelope generators were available. Users would have to assign individual envelope generators to a group of harmonics. Although certain hardware additive synthesizers featured independent envelope generators for each harmonic, it was not the norm. Software additive synthesizers, on the other hand, almost exclusively offer individual envelope generators for each harmonic. Many software additive synths go as far as to add more parameters than the standard attack, decay, sustain, and release into their envelope generators. Some software synthesizers even include multiple envelope generators per harmonic. For example, Camel Audio’s Alchemy Synthesizer features 600 individual harmonics and includes three envelope generators for each harmonic. When using Alchemy, the user has a designated envelope for each harmonic’s amplitude, pitch, and panning. Alchemy is an additive synth that can only exist in the software world due to its sheer power. Camel Audio’s Alchemy is a great example of the new era of additive synthesis. Not only does Alchemy sport one of the most powerful additive synthesis engines available, but it also has a designated subtractive synthesizer and fully featured sample-based and granular synthesizers as well. Alchemy, like many other modern software synthesizers, is taking advantage of CPU power in order to give the user the most sonic possibilities available for sound creation.
Recipes
No two additive synthesizers are exactly alike. The number of available tone generators, the way in which partials or harmonics are laid out, and the ways in which they can be manipulated will be unique to each instrument. Because of this, simply drawing out recipes for various patches will not work because, chances are, an additive synthesizer that you are using to re-create these patches will not have the same features as the additive synth we are using to create these patches. Instead, we have created ten patches that we feel show the capabilities of additive synthesis with an emphasis on patches that stray away from the stereotypical additive pad type sounds. We will then demonstrate how we created each of these patches on our given soft synth with plenty of descriptions and figures.
Each of these ten patches were created using the soft synth Loom by AIR. Loom was chosen for not only its popularity as an additive synthesizer, but for its capabilities as well. In the following pages, we will walk you through the creation of each of these patches in an attempt to help demystify some of the functions of additive synthesis. Before we delve into the patches themselves, let’s go over the various parameters of Loom and what each function does.
Loom
Loom is a software additive synthesizer that is laid out in a modular manner. In the edit page of the synth, there are ten spaces where users can select which function module they would like to put. Each subsequent module will affect the sound that is coming from the previous module. In addition to the function module, there are some overall attributes that can be affected as well as a fairly cool Morph page which allows for point-and-click sound morphing. Let’s start with exploring the edit page and the various function modules.
Once Loom is launched, we click the edit tab in the upper left corner and then we can load the main sound creation page. In the upper part of the screen, we have the ability to select the number of partials present per voice. Loom has the ability to produce up to 512 partials per voice. Moving down the page, we see ten blank spaces, which we can load sound and function modules into. As stated before, each module is fed into the next, so it’s important to think about where in the chain each sound module should be placed. By clicking the bar at the top of each module space, we can select which function module we would like to insert. Let’s look at each of the modules to know what they do.
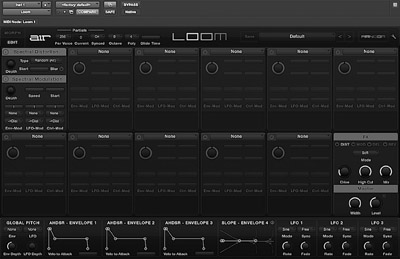
Figure 4.14 Loom’s default blank screen.
Gain
The Gain module acts like an amplifier in that it controls the volume of all the partials together. A Gain module is needed at some point in the chain in order to designate partial volume.
Odd/Even
The Odd/Even module is one of the most crucial modules in Loom. The module controls the level of the fundamental frequency and all partials. The Odd/Even module also allows you to change the level relationship between the odd and even harmonics in order to change the timbre of the overall sound. Finally, a damping control is available that dampens higher harmonics, giving the user just one more avenue of sonic manipulation.
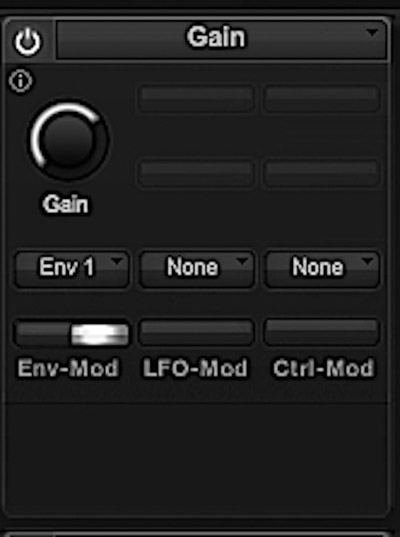
Figure 4.15 Loom Gain module.

Figure 4.16 Loom Odd/Even module.
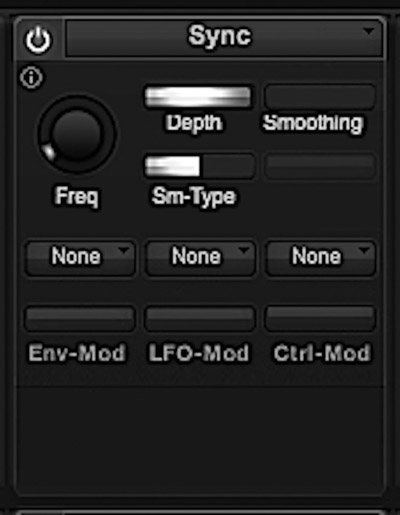
Figure 4.17 Loom Sync module.
Sync
The Sync module changes the partial relationships in a way that attempts to mimic an oscillator sync type sound on a subtractive synthesizer. The user has the ability to change the frequency of the imaginary second oscillator as well as the depth of the effect. Finally, the ability to smooth the effect as a whole is present. It’s important to note that this module is not truly adding a second oscillator and then syncing it; the module is simply changing the tuning and levels of individual harmonics in order to mimic a synced sound.
Second Tone
The Second Tone module is another module that changes the relationship of harmonics. The module is described as one that attempts to mimic the sonic changes inherent in a subtractive synthesizer when another oscillator is added into the mix. However, in practice, the module sounds more like it is putting more focus onto another fundamental frequency, which allows the sound to change drastically. By detuning the Second Tone module, extremely interesting harmonics begin to become present.
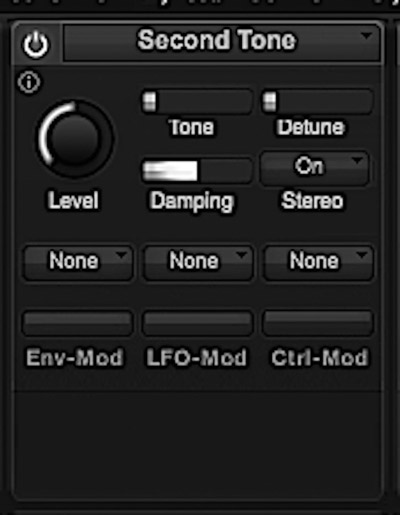
Figure 4.18 Loom Second Tone module.
Octaver
The Octaver module is a fairly simple module which creates copies of the original sound spectrum and shifts their octave. The user has the ability to control the depth of the effect as well as the number of copies and octaves that are made. Finally, a damping control is available with which to lessen the effect.
Organ I and II
The organ modules are simple modules that just remove certain harmonics in an attempt to create a sound which is akin to an organ. The difference between Organ I and Organ II is simply the harmonics they remove.
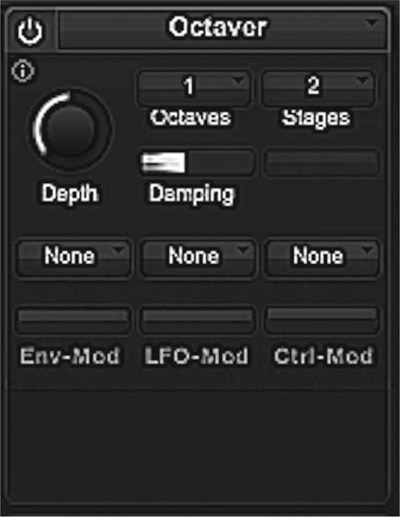
Figure 4.19 Loom Octaver module.

Figure 4.20 Loom Organ I and II modules.
Discrete
The Discrete module is similar to the organ modules in that it removes certain harmonics in an attempt to mimic certain sounds. In the case of the Discrete module, harmonics are removed in order to mimic the spectrum of a bell or drum.

Figure 4.21 Loom Discrete module.
Filtering Modules
Loom features a series of “filtering” modules that attempt to mimic the sound of various filter shapes. Although many of you may be screaming that filtering is not an additive synthesis trait, Loom’s filtering modules are not exactly filters in and of themselves. The filtering modules in Loom mimic traditional filter shapes through additive synthesis by removing harmonics, changing the relationships of harmonics, and adding harmonics in the case of mimicking resonance.
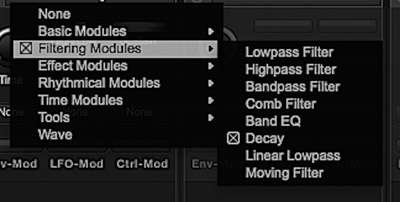
Figure 4.22 Loom filtering modules.
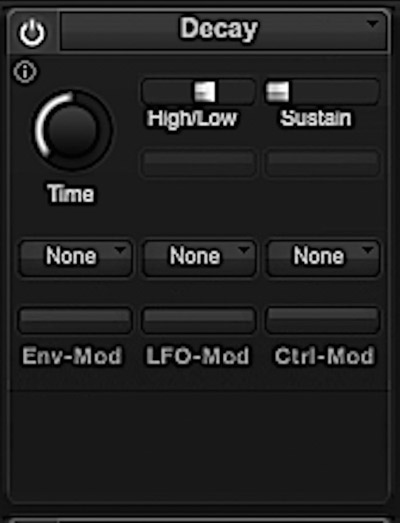
Figure 4.23 Loom decay module.
Decay
Located under the filtering tab, Decay is a pretty handy module that should not be overlooked. The decay module allows users to determine how individual partials will fade out. There’s a control that determines the amount of time it takes for the entire sound spectrum to fade out as well as a control to designate whether higher or lower partials will fade out first.
Effect Modules
Loom features a series of effect modules that each have specific tasks. In the lineup, is a Detune module, which changes the levels of partials in an attempt to mimic the way a subtractive synthesizer sounds when a number of oscillators are detuned from each other. Next is a Modulator that modulates the levels of various partials in a random manner. Finally there are Phaser, Stereo, Pan, and Blur modules. The Phaseradds a phaser-type sound, whereas the Stereo and Pan modules allow users to designate how the sound will fit in the stereo field. Finally, the Blur module affects individual harmonic volumes randomly at various degrees in an attempt to blur the sound.

Figure 4.24 Loom effect modules.
Phrase and Random Drops
The Phrase module increases the level of individual harmonics using predefined patterns inside the software. Users can scroll the many rhythmic patterns inside the software. The Random Drops module effectively does the same thing as the Phrase module, but in a random manner rather than set to a rhythmic pattern.

Figure 4.25 Loom Phrase and Random Drops modules.

Figure 4.26 Loom time modules.
Time Modules
The two time modules—Tail and Repeater—are designed to mimic specific effects using additive synthesis. Tail adjusts partial levels to create reverb like effects while Repeater does the same thing to create a delay type effect.
Tool Modules
There are a variety of modules in the tool category. Each of them has a small, but specific purpose. The Adder module adds a constant level to specific harmonic even after it might have been filtered out while the Constant module does the same thing to a set of harmonics. The Enhancer module adjusts the overall sound much like a sonic enhancer would. The Clip module adds a pseudo-distortion type effect. The Threshold module can act like a compressor or limiter and, finally, the Noise module adjusts harmonic levels to create what sounds like noise.
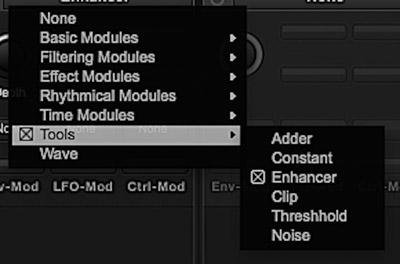
Figure 4.27 Loom tool modules.

Figure 4.28 Loom Wave module.
Wave
The Wave module is actually a really cool module. It’s not specifically an additive synthesis module, but it’s a great addition. Using the Wave module, users can import audio clips of their choosing, which can then affect the levels of all partials like a vocoder. There are a bunch of controls to customize the sound, but some really interesting effects can be generated using this module.
Globals
Now that we have finished discussing individual modules, let’s take a look at some of the global parameters which can be assigned to affect each module. At the bottom of Loom’s edit screen, we are greeted with a variety of parameters, such as envelope generators, LFOs, and pitch control. The envelopes and LFOs can all be routed to individual parameters of the aforementioned modules in order to add modulation to each module while the global pitch parameter allows us to have the envelopes and LFOs affect the pitch of the synthesizer as a whole. Loom features three AHDSR (attack, hold, decay, sustain, release) envelope generators as well as a fourth slope envelope generator. The three LFOs have a wide variety of waveforms including sine, square, saw up, saw down, and sample and hold. Two additional LFO responses are available, pump and drift, which create weird modulation shapes that are quite fun to play with.
Figure 4.29 Loom globals.
FX and Master
Directly above and to the right of the global parameters are two small sections entitled FX and Master. As can be guessed, the FX section allows the user to add an overall effect to the sound, such as distortion or reverb, while the Master section acts as an overall level and stereo width control.
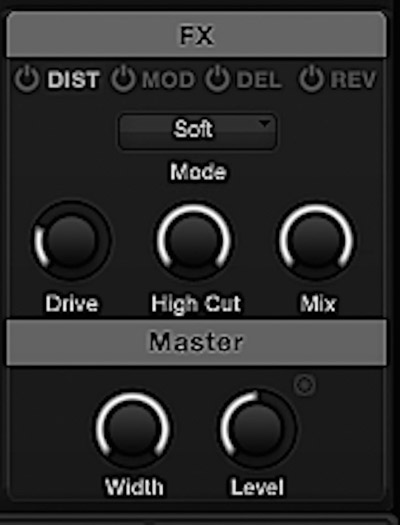
Figure 4.30 Loom FX and Master sections.

Figure 4.31 Loom Spectral Modulation/Distortion sections.
Spectral Modulation/Distortion
In the top left corner of the edit screen are two sections entitled Spectral Distortion and Spectral Modulation. The Spectral Distortion section adjusts algorithms inside the software to affect the frequencies of the partials. The Spectral Modulation section allows for modulation of the partial frequencies via LFO or envelopes. Both these controls are unlike the individual modules previously discussed. These two sections both affect harmonic frequency rather than harmonic level.
Morph Screen
The morph pad in the morph screen acts sort of like a vector plane on a vector synthesizer. Users can place four variations of the sound at each quadrant and draw paths for the sound to move through at set speeds and directions. The morph screen is quite cool and allows for some really extraordinary movement and modulation options. The morph control is pretty deep and is out of the scope of additive synthesis, so we won’t go into it in depth. Just imagine it as a glorified vector plane and control.
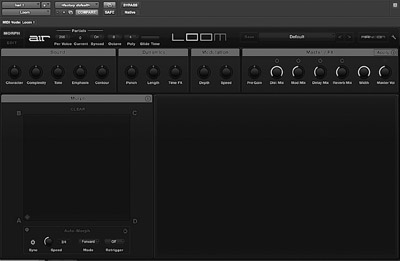
Figure 4.32 Loom morph screen.
We have now covered the various parameters in AIR’s Loom additive synthesizer. Now that you have a brief understanding of how the synthesizer works as well as what it can do, let’s examine each of the additive patches we have created and hopefully they will serve as jumping-off points for you to explore the wonderful world of additive synthesis.
Recipe 1: Ambient Bass
The first patch we created is a take on the synth bass sounds heard in electronic ambient music. The patch features 192 partials and begins with an Odd/Even module with the fundamental fully cranked and a slight amount of damping on the harmonics. The Odd/Even knob is turned so more even harmonics are heard than odd harmonics. Next in the chain is a Discrete module, which has its depth turned fairly high. The brightness, fundamental, random, and spectrum controls are also turned fairly high allowing for some weird sonic attributes. After the Discrete module, a Second Tone module is placed with full detune to add more complexity to the sound. After that, a small amount of Blur and Decay are added to smooth out the sound as well as let the low harmonics ring out longer rather than the high. Finally, a Tail and Gain module are placed to add some reverb type sound as well as control the level of the sound as a whole. The overall pitch of the patch is being slightly affected by LFO one, which is set to a sine wave and beat-synced. A slightly driven distortion is placed on the sound as well as a 50% reverb setting. This patch at first sounds like a weird natural distorted bass and then gets more and more mangled as the sound fades out.
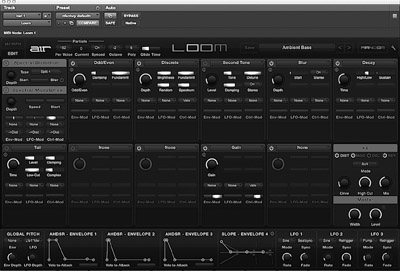
Figure 4.33 Screenshot of Ambient Bass patch.
Recipe 2: Cool Repeater
The second recipe in our list plays on the use of additive synthesis in creating a delay-type effect. The sound features 256 partials and starts with an Odd/Even module with only a slight amount of the fundamental frequency added in. The harmonics are fairly damped and mixed in order for both odd and even harmonics to be heard at the same level. Next, a Detune module is placed in the chain with two stages of detuning and only a slight detune. After the Detune module, a Low Pass Filter module is placed fully “open” with a bit of resonance and a large amount of envelope modulation. Next, an Enhancer module is placed with just a slight amount of the effect being heard. Finally, a Gain and Tail modules are placed at the end of the chain. An important note is that the Tail module is placed after the Gain module in order to make the reverb effect still ring out once the sound has ceased. Finally, distortion, reverb, and delay are added in the Master section of the synth.

Figure 4.34 Screenshot of Cool Repeater patch.
Recipe 3: Distorted Bells
The “Distorted Bells” patch we created was designed so that when a note is first played, the bell tone is fairly clear. Once the notes start ringing out and overlapping, however, the distortion begins to emerge and change the sound drastically. The patch contains 256 partials and is made up of an Odd/Even module with a bit more emphasis on the odd harmonics. A bit of damping is added while the fundamental is turned about half way up. Next, a Discrete module is added in order to achieve the bell sound that we were going for. A Band EQ filter module is placed with a small amount of gain and a bit of key tracking just to smooth out the sound and let it evolve. Next, Blur, Decay, and Tail modules are added not only to smooth the sound, but to add a fairly long ring out that becomes darker as it progresses. Finally, a Gain module is added for level control. In the Master section, distortion and delay are added as well as the overall pitch being modulated by envelope four.

Figure 4.35 Screenshot of Distorted Bells patch.
Recipe 4: Distorted Movement
The “Distorted Movement” patch we created was designed to fully utilize the type of digital grit that can be achieved using an additive synthesizer. The sound features 192 partials and starts with an Odd/Even module with a small amount of damping and hardly any fundamental present. Again, more emphasis is placed on the odd harmonics. Next, a Decay module is added in order to let the sound ring out. A Gain module is placed directly after these to allow for level control over just this aspect of the sound. After the Gain module is a Sync module, which adds a lot of the digital grit we were looking for. A Stereo module is then added with max depth to influence the sound’s presence in the stereo field. Directly after the Stereo module is a Low Pass Filter module with heavy influence from its respective envelope and LFO. The frequency control is slightly rolled back on the Low Pass Filter module as well. Finally, the sound chain ends with another Gain module in order to control the level of the sound as a whole. Distortion, delay, and reverb are all added in the Master section as well as a slight amount of envelope four modulating the overall pitch.

Figure 4.36 Screenshot of Distorted Movement patch.
Recipe 5: Electric Guitar Lead
This next patch was not originally created with an electric guitar sound in mind, but as it progressed, it was evident that an electric guitar is what sprang to mind. The patch features 256 partials and begins with an Odd/Even module with a fair amount of the fundamental added in as well as a good amount of harmonic damping. The Odd/Even knob is left in the middle with equal levels for both odd and even harmonics. Directly after the Odd/Even module are Low Pass Filter and High Pass Filter modules. The Low Pass Filter module’s frequency is left fairly high with a large amount of key tracking, while the High Pass Filter module’s frequency is rolled further back and an extreme amount of resonance added. After the two filter modules, Decay and Tail modules are added to affect how the sound rings out. Next, an Enhancer module is added with a large amount of depth followed by a Gain module to control the overall level of the sound. Finally, distortion and reverb are added in the Master section. The patch itself is fairly straightforward and sounds menacing.

Figure 4.37 Screenshot of Electric Guitar Lead patch.
Recipe 6: Low String Repeat
The “Low String Repeat” patch we created is pretty interesting. The initial sound is akin to natural strings played in a pizzicato manner, but then LFO-caused repeats are heard from select harmonics making for a strange delay-type of sound that almost appears to be a completely different instrument. This patch features 192 partials and begins with an Odd/Even module with full emphasis on the odd harmonics. The fundamental is almost entirely left out and a bit of harmonic damping is added. Next a Discrete module with a heavy depth and a good amount of brightness is added, which plays heavily in the repeating aspect of the sound. Next in the chain is a Second Tone module with full level and a bit of damping, which helps not only the pizzicato string aspect of the sound, but the repeating aspect as well. Next there are Blur, Decay, and Tail modules, which will heavily affect the repeating aspect of the sound due to the sharp decline of the pizzicato sound. Finally, a Gain module is added for overall harmonic level control. Distortion and reverb are added in the Master section as well as a slight pitch modulation from envelope four. LFO three is set to a square wave with retrigger initiated: it is controlling the Spectral Modulation section of the synthesizer that is causing the repeated sound.

Figure 4.38 Screenshot of Low String Repeat patch.

Figure 4.39 Screenshot of Natural Low Strings patch.
Recipe 7: Natural Low Strings
The “Natural Low Strings” patch we created was designed to sound like a heavily affected recording of some type of stringed instrument. The patch features 128 partials and begins with an Odd/Even module. The fundamental is fully cranked with about half damping and equal representation of odd and even harmonics. Next, a Band EQ module is added with a midrange frequency. A small amount of key tracking is enabled as well as slight envelope modulation. Next, a Low Pass Filter module is added with the frequency knob turned up about 75%. Pan, Blur, and Decay modules are then added to affect the sound’s tail as well as presence in the stereo field. Finally, Moving Filter and Gain modules are added. The Moving Filter module is set to “stop” but can be initiated as desired. Delay and reverb are then added at the Master stage.
Recipe 8: Metallic Sequencer
The “Metallic Sequencer” patch is designed as a digital-heavy patch that lends itself well to a step sequencer. The patch features 256 partials and begins with an Odd/Even module with little damping and fundamental present. Heavy emphasis is placed on the odd harmonics. Next, a Gain module is added in order to have control over just the sound coming from the Odd/Even module. Next, a Repeater module is added with a low level. Directly after the Repeater is a Low Pass Filter module with its frequency turned all the way up and a bit of resonance as well as heavy emphasis width. Next, Stereo and Blur modules are placed in order to affect the sound as a whole as well as its place in the stereo field. Another Low Pass Filter module is added to darken the sound a bit as it is quite harsh at this stage. The Low Pass Filter module is placed after the Stereo and Blur modules to ensure it is darkening the sound emitting from these modules. Finally, a Gain module is added to control the level of the entire sound. Reverb is then added in the Master section.

Figure 4.40 Screenshot of Metallic Sequencer patch.
Recipe 9: Moving Bell
The “Moving Bell” patch is a cool, sonically evolving bell sound that sounds quite different from any bell sound we had heard. The patch contains 128 partials and begins with an Organ I module with a heavy amount of depth and damping. Directly after the Organ I module, a Discrete module is placed, which aids in getting the bell sound required for this patch. Next, two Low Pass Filter modules are added with different cutoffs in order to give the sound two stages of filtering. Next, a Gain module is added in order to have control over the sound at this point. An Adder module is then added with a fairly high frequency in order to add some high harmonic artifacts back into the sound. Next, Stereo and Tail modules are added in order to allow the sound to fit nicely in the stereo field and ring out. A Phrase module is then added with the “oct-1” pattern. Finally, a Gain module is added for overall control. Delay and reverb are both added in the Master section as well as slight pitch modulation from envelope four. Envelope one is set in a trapezoid type shape and is slightly modulating the Spectral Modulation section of the synth.

Figure 4.41 Screenshot of Moving Bell patch.
Recipe 10: Synth Bass
The Synth Bass patch we created was designed to mimic old, acid-style synth basses with a bit of additive flair. The sound features 192 partials and begins with an Odd/Even module with heavy emphasis on odd harmonics as well as a strong fundamental. The sound moves on to feature both Discreteand Second Tone modules, which help achieve some of the piercing “squeakiness” present in acid bass sounds. Next, Blur, Decay, and Tail modules are added to affect how the sound rings out. A Gain module is then added for level control. Distortion and reverb are then added in the master stage.
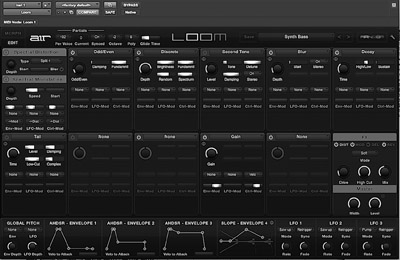
Figure 4.42 Screenshot of Synth Bass patch.
Historical Perspective on Additive Synthesis
One of the earliest instruments to incorporate additive synthesis into its sound creation was the Teleharmonium.5 The Teleharmonium was invented by Thaddeus Cahill in 1897. Cahill, who studied physics of music at Oberlin Conservatory in Ohio, was consumed with the idea that music could be made via electronic means. While working on the designs for an electronic typewriter, Cahill began work on the Teleharmonium. The Teleharmonium was originally designed as a device that could play music over telephone lines. Cahill was hoping to market the Teleharmonium to hotels and restaurants in order to have one instrument feeding music to a variety of places at the same time. Cahill hoped the Teleharmonium would convince hotel and restaurant owners to stop paying pianists and small string ensembles and instead pay him a lower cost to produce music at their venue via telephone lines. During the time Cahill was working on the Teleharmonium, however, there was no way in which to amplify sound coming from a telephone’s headset. Cahill surmised that if his device created enough electricity, it would create a loud enough signal that could then be fed from a telephone’s earpiece into an elongated cone, much like a gramophone cone, causing the signal to be heard by an audience. Cahill’s early work on sound amplification also helped pave the way for loudspeaker design.6
The Teleharmonium was an extremely large contraption that took up at least two rooms and, in some instances, weighed upwards of two hundred tons. The first Teleharmonium Cahill built was a scaled-down version of his original plan and incorporated 35 elongated cylinders that contained a number of tone wheels each. The tone wheels on the Teleharmonium were a series of wheels that had several raised bumps on their surface. The tone wheel cylinder would then spin while a magnetic coil was placed close to the bumps. When a bump passed by the magnetic coil, electricity was generated. The space between the bumps generated little or no electricity. This alternating current, caused by the bumps on the tone wheel, is what produced sound. The cylinder was divided into a number of sections that had a different number of raised bumps, causing different pitches to be created. The sections of the cylinder were capable of rotating at a various speeds, resulting in a wide range of frequencies. The various tone wheels could then be combined in order to produce rich, pleasing tones.7
The second Teleharmonium that Cahill built was much larger and contained 145 tone wheel cylinders, resulting in much more complex tones that could be generated. Cahill built a final, third Teleharmonium and displayed it in 1910. This final Teleharmonium was again larger than its two predecessors, but the novelty of the instrument had worn off and the public had grown tired of it. The diminished interest as well as the sheer weight and size of the Teleharmonium caused its ultimate downfall.8 However, the Teleharmonium secured its place in history not only as the first machine to use additive synthesis, but the first synthetic instrument.
Hammond Tone Wheel Organ
Following in the footsteps of Thaddeus Cahill, Laurens Hammond and John M. Hanert manufactured the Hammond tone wheel organ. Like the Teleharmonium, the Hammond organ utilized tone wheels. The tone wheels on the Hammond, however, were small discs that had designated electronic pickups in close proximity to the disc. Alternating Current (AC) motors were responsible for spinning the discs at exact speeds. The speed at which the tone wheels spun, as well as the number of physical bumps on their surface, determined the frequency that would be produced.9
The Hammond organ was unique in that it had a series of controls called drawbars that the user could engage in order to produce higher harmonics. If only one draw bar was engaged, the organ would produce a close proximity of a sine wave. The sine wave would produce a frequency corresponding to the note being held down on the keyboard. This first draw bar represented the first harmonic, or fundamental frequency. Engaging subsequent drawbars would introduce higher harmonics into the sound with each draw bar representing the next harmonic. The user was able to control the amplitude of the various harmonics by physically pulling the drawbar out further or pushing it back in, resulting in louder and softer harmonics respectively.10
Being able to incorporate individual harmonics into a sound, as well as their amplitude, is the fundamental concept of additive synthesis. However, the Hammond organ, as well as the Teleharmonium before it, was incapable of changing the amplitude of these higher harmonics overtime, which is another key element of successful additive synthesis.
Early Electronic Additive Synthesizers
Although the Hammond organ and the Teleharmonium used additive synthesis in order to generate sound, they did so via mechanical means. Both instruments incorporated tone wheels that physically spun in order to create sound. Additive synthesis produced through electronic means would be the next evolution for this synthesis format. One of the earliest all-electronic additive synthesizers was produced by E. L. Kent in 1942, an experimental machine that helped drive early research into electronic additive synthesis.11
Building on the research of E. L. Kent, James Beauchamp, working out of the University of Illinois, invented and built the first practical electronic additive synthesizer in 1964, known as the Harmonic Tone Generator. The Harmonic Tone Generator was a relatively small (compared to the monstrous Teleharmonium) electronic instrument that was capable of producing up to six exact harmonics with a varying frequency range up to 2,000Hz.12 The unique thing about the Harmonic Tone Generator, besides its all-electronic construction, was the fact that the individual harmonic’s amplitude and phase relationships could be controlled. The Harmonic Tone Generator used control voltage (the same technology referred to in the subtractive synthesis chapter) in order to control the various harmonic attributes. The ability to control the amplitude of individual harmonics was no small matter. By simply incorporating harmonic amplitude control in the time realm, additive synthesis could finally become recognized as the powerful synthesis technique that it is.
Prior to the Harmonic Tone Generator, instruments that incorporated additive synthesis only allowed the initial amplitude of individual harmonics to be set. This means that the tone produced, although often interesting and pleasing, was stagnant. Natural sounds, as you may know, are rarely stagnant; they have a movement to them that allows them to evolve and remain interesting. The fact that harmonic amplitudes could be controlled via control voltage in the Harmonic Tone Generator meant that, finally, interesting and moving sounds could be produced.
The Harmonic Tone Generator used LFOs and envelope generators as a source of control for the individual harmonics.13 By setting a slow attack on individual, higher order harmonics, the sound produced would grow more complex as time went on and as richer sonorities of harmonics became audible. Using LFOs would result in ever-changing sonorities of harmonics. Although the Harmonic Tone Generator was revolutionary, it was limited to the fact that it could only produce up to six harmonics. Being that the Harmonic Tone Generator used analog circuitry, it was also susceptible to the common problems of analog in that the pitches were unstable and tended to drift, which proved more troublesome in an additive synthesizer than a subtractive one.
The next evolution of additive synthesis would come once the digital revolution took over synthesizers. Although a few analog subtractive synthesizers incorporated some additive elements into their design, a practical, full-fledged additive synthesizer was still not available to the masses.
Arguably the first commercially successful additive synthesizer was the New England Digital Synclavier II. The Synclavier II was a state-of-the-art sampler/workstation that was released in 1980. Although typically thought of solely as a sampler, the Synclavier II featured an advanced additive resynthesis engine. The Synclavier II was extremely expensive, often costing upwards of 50 thousand dollars, and therefore was not adopted by the average musician and synthesist. The first steps into producing an affordable, fully featured additive synthesizer would be in the form of the DK Synergy and Kurzweil K150 synthesizers. Both of these synthesizers offered the user extremely powerful additive synthesis engines with the Kurzweil K150 boasting an impressive 240 oscillators!
Although the K150 and Synergy synthesizers were powerful and much less expensive than the New England Digital Synclavier II, they never caught on to the degree as other synthesizers utilizing different formats that were released around the same time. This is due in part because of the amount of time it took to program a patch as well as the steeper learning curve that came along with additive synthesis. As stated above, it would not be until the Kawai K5 was released that additive synthesis would finally fall into the hands of the average synthesist.
Additive synthesis, although old in theory, is still evolving every day. The limits of additive synthesis are yet to be explored. Beginning with the Teleharmonium and Hammond organ, additive synthesis evolved to utilize electronic sound generation in the Harmonic Tone Generator. As the digital age dawned, additive synthesis was on the forefront of the technology with instruments like the Kawai K5. As digital hardware synths moved into virtual software synths, additive synthesis followed and became even more powerful. It seems that every new additive synthesizer released has more features and harmonics available to the user. Additive synthesis will continue to grow and become even more powerful. Although additive synthesis might never become a widely adopted synthesis format like subtractive or FM synthesis, it has made its mark and continues to do so amongst the most die-hard of synthesis enthusiasts. I urge you to experiment with an additive synthesizer and see the extreme potential this synthesis format is capable of.
Notes
1.Paul Wiffen, “Synth School, Part 4: Additive Synthesis,” Sound on Sound (October 1997). Retrieved from https://www.soundonsound.com/sos/1997_articles/oct97/synthschool4.html
2.Paul Wiffen, “Synth School, Part 4: Additive Synthesis.”
3.Paul Wiffen, “Synth School, Part 4: Additive Synthesis.”
4.Amar Chaudhary, “Band-Limited Simulation of Analog Synthesizer Modules by Additive Synthesis.” Paper presented at the annual Audio Engineering Society Convention. September 26–29, 1998, San Francisco, California.
5.Robert A. Moog, “Electronic Music,” Journal of the Audio Engineering Society vol. 25, no. 10/11 (November 1, 1997), pp. 855–861.
6.Jay Williston, “Thaddeus Cahill’s Teleharmonium.” Retrieved from http://www.synthmuseum.com/magazine/0102jw.html
7.Jay Williston, “Thaddeus Cahill’s Teleharmonium.”
8.Jay Williston, “Thaddeus Cahill’s Teleharmonium.”
9.J. W. Beauchamp, “Additive Synthesis of Harmonic Musical Tones,” Journal of the Audio Engineering Society vol. 14, no. 4 (October 1966), pp. 332–342.
10.Robert A. Moog, “Electronic Music.”
11.J. W. Beauchamp, “Additive Synthesis of Harmonic Musical Tones.”
12.J. W. Beauchamp, “Additive Synthesis of Harmonic Musical Tones.”
13.J. W. Beauchamp, “Additive Synthesis of Harmonic Musical Tones.”