
| 3 | Activities and Intents |
Chapter Objectives
In this chapter you will:
Explore an Activity’s lifecycle.
Learn about saving and restoring an Activity.
Understand Intents and how they are used with multiple Activities.
Become familiar with passing data between Activities.
Implement applications that require basic animation Activity transitions.
Study Scene transitions.
■ 3.1 Activity Lifecycle
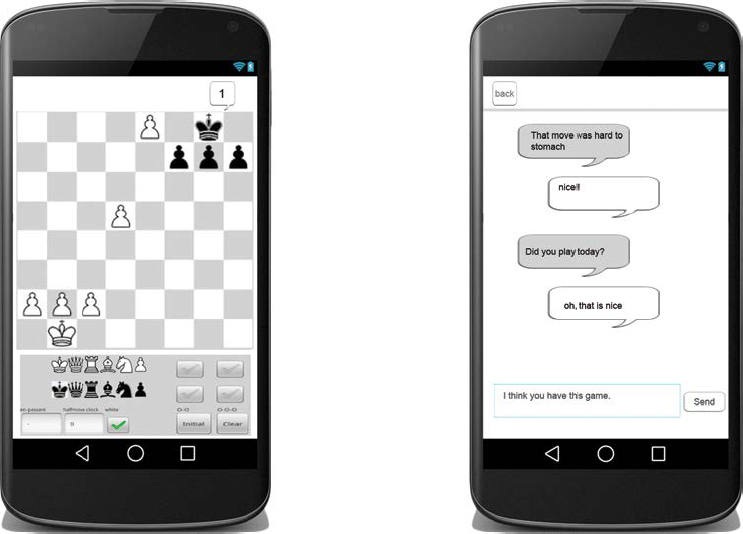
All Android applications comprise at least one Activity class. In most cases, applications will require the use of several activities. Consider a chess game application that allows opponents to play a game and chat during the game. Such an application, as shown in Figure 3-1, might utilize one activity for chess play and a separate activity for reading and sending chat messages. During chess play, a player might be notified of sent messages from an opponent, which informally connects these two activities. Although the activities may work together to form a complete user experience, each one is independent of the other. The application can start and end any one of its activities.
Activities in an application are often loosely connected to each other. Information can be passed from one activity to another, but the activities remain distinct and separate in every other way.
Every application has one activity class that serves as the main activity, which is presented to the user when the application is launched for the first time. For example, in a banking application, users must first log into their accounts before they are given access to their account information and app tools, such as paying bills and transferring money. Each activity can then start another activity in order to perform different actions. Each time a new activity starts, the previous activity is paused and the Android system preserves its status.
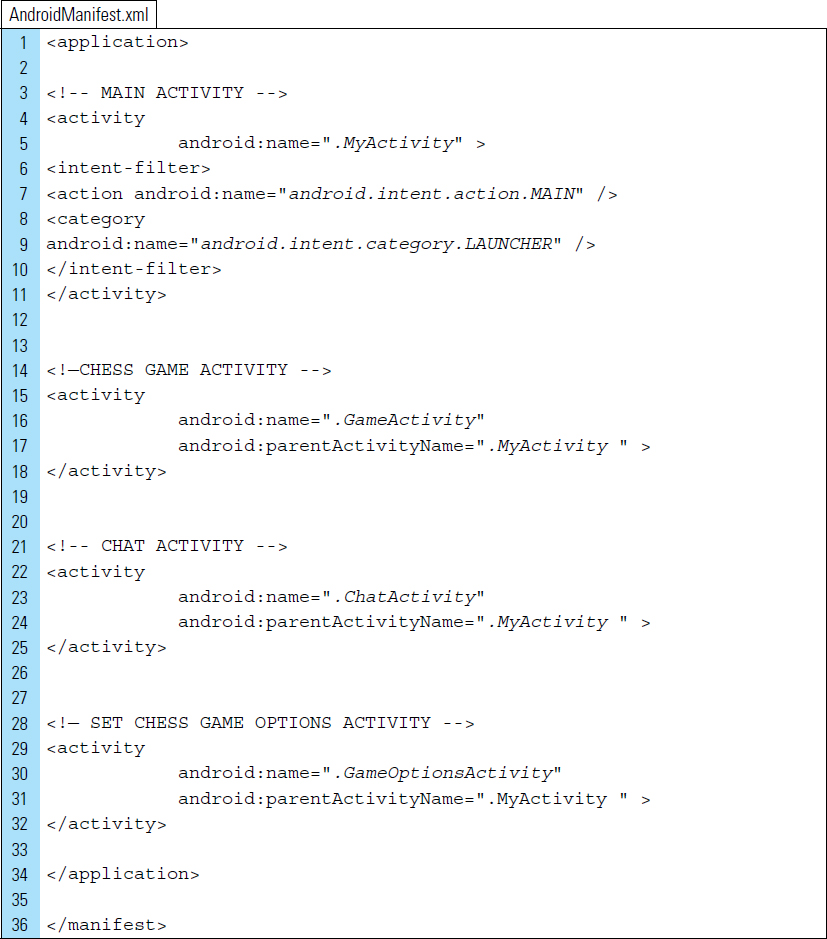
Activities must be declared in the AndroidManifest.xml file in order to be accessible to the system. As illustrated in the following AndroidManifest.xml code, Activities are defined using the <activity> tag. An <activity> must be added as a child to the <application> element. The XML code in the following example defines an application constructed with four activities, all declared within the opening and closing <application> tag.
Lines 3–11: |
The main activity of the application is defined. |
Line 5: |
The first activity defined in the |
Line 7: |
The action intent of this activity, referred to by the constant |
Lines 8–9: |
The category of the main activity is specified as the top-level launcher. |
Lines 14–32: |
Three child activities within the application are defined: |
The activities in an application are implemented as a subclass of Activity. The Activity class is an important part of every application’s overall lifecycle. The manner in which activities are launched and created is a fundamental part of the platform’s application model.
When an application is first loaded, its main activity, specified within the AndroidManifest, is immediately created. Once the main activity is started, it is given a window in which to draw its layout. Its layout is its associated user interface screen.
A main activity of the application can start another activity in order to perform different actions. Each activity can start another activity. An Activity stack manages the Activities in an application. When a new activity is started, it is pushed onto the top of the stack and becomes the running activity.
When an activity is running, it takes user focus. The previous activity remains just below the running activity in the stack, using the Last-In, First-Out mechanism. The previous activity will not come to the foreground again until the top activity above it exits. Each time a new activity starts, the previous activity is stopped and preserved in the stack.
Each activity in an Android application goes through its own lifecycle, illustrated in Figure 3-2. It relies on the implementation of a series of callback methods that the system calls when the activity transitions between various stages of its lifecycle.
The Activity class defines the following seven callback methods, beginning with the creation of the Activity and ending with its destruction:
onCreate()
onStart()
onResume()
onPause()
onStop()
onRestart()
onDestroy()
As shown in Figure 3-2, onCreate () is automatically called when an activity is first created. The onDestroy () callback is called when a running activity exits and needs to be destroyed by the system.
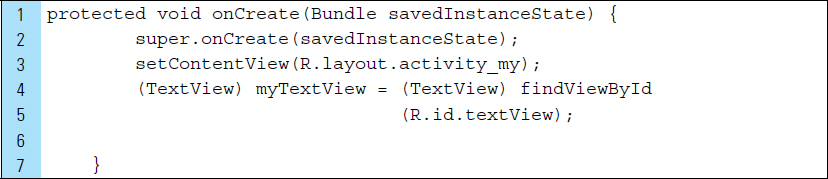
The onCreate () method can be used to initialize the activity, such as inflating the layout for the user interface of the activity.
Line 3: |
An activity can inflate its user interface layout by calling |
Line 4: |
The user interface controls used in an activity are defined by the specific layout associated with the running activity. |
When an activity has been created and becomes visible to the user, the onStart () callback method is called. For the user to begin interacting with the application activity, onResume() is called. Both the onStart() and onResume () callback methods are performed in sequence automatically after onCreate(). Actions such as transition animations, and access to required devices, such as the camera, are often initiated within the onResume() method.
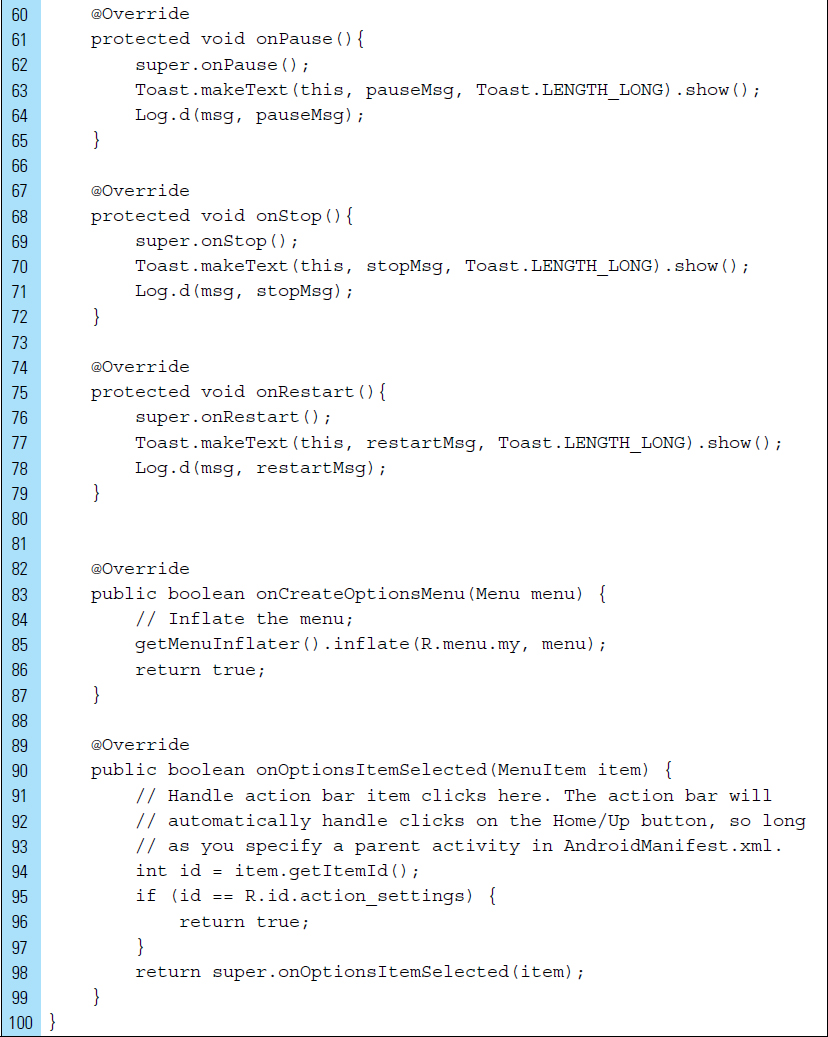
When an activity has been paused because a previous activity was resumed, the onPause() callback method is called. A paused state is the first indication that the user is exiting the activity. A paused activity does not receive user input and cannot execute any code. onPause() is called as part of the activity lifecycle when an activity is going into the background, but it has not been destroyed.
The onPause() callback is most often used for saving a persistent state the activity might be editing. This is useful for presenting an edit-in-place model to the user. An edit-in-place model means maintaining the state so that nothing will be lost, even in the event that not enough resources are available when starting a new activity. onPause() is a good place to stop actions that consume a noticeable amount of CPU in order to make the switch to the next activity as fast as possible. It is also used to close resources that require exclusive access, such as the camera. Once an activity has been paused and a new activity comes into focus, the onStop() method is called.
Android devices have a limited amount of memory. In some situations, the system may require more memory while an application is currently running. In this circumstance, which is not uncommon, the system may kill processes that are on pause in order to reclaim resources. As a precaution, it is useful to design activities to save their current state using onSaveInstanceState(Bundle). For example, if an activity has been shut down, its current state can be stored in a Bundle object. Once the activity is re-initialized after being previously shut down, the Bundle object can be used to resupply the activity with its most recent data. Issues concerning the onSaveInstanceState() method are discussed further in the next section.
If an activity has not been destroyed, it can be restarted once it has been stopped or paused. For example, when the user navigates back to an activity that has been stopped, the activity can be started again by the callback method onRestart() and followed by onStart(). The paused activity can resume interactions using the callback onResume().
If a paused or stopped activity requires destruction due to a system need for more memory, the activity must be recreated. This can be done by calling onCreate().
onStart() should always be called after onRestart(). onRestart() is triggered when an activity has been stopped and then restarted when the user navigates back to the activity.
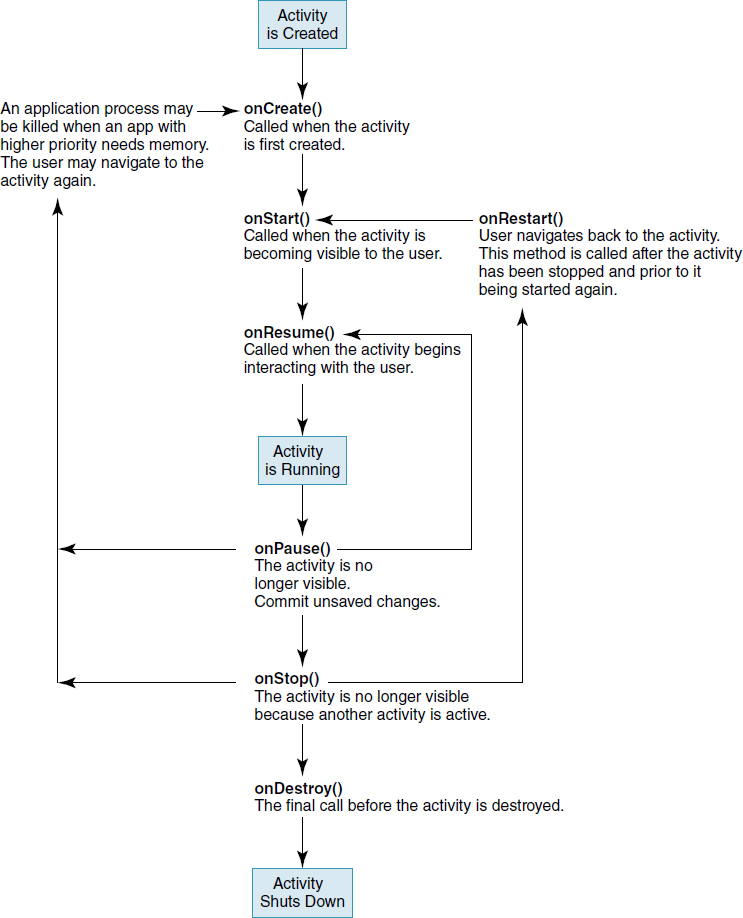
onStop() is called when the activity is no longer visible to the user. The next callbacks in the sequence are usually onRestart() and onDestroy().
onDestroy() performs final cleanup prior to an activity’s destruction. OnDestroy() can be triggered in two ways: (1) when the app has ended the activity naturally, and (2) when the system is temporarily destroying this instance of the activity to save space.
When an activity is destroyed, it is always prudent to ensure that it is not leaving unintended resources behind. Remaining activity resources can sometimes cause unexpected interruptions, thereby creating a poor user experience. When an activity is done and needs to be closed, the method finish() can be called. This is usually performed in onDestroy() to free resources, such as Threads, that are linked to the activity.
■ 3.2 Starting, Saving, and Restoring an Activity
When an activity is paused or stopped, the state of the activity is retained. This means that an Activity object is still held in memory, along with all of its information about its data objects. This makes a good user experience. For example, any changes the user has made within the activity will be retained so that when the activity returns to the foreground and resumes running, the user will see the changes intact.
When the system destroys an activity in order to recover memory, the memory for that activity object is also destroyed. This can be a problem because once this memory has been erased, the system cannot simply resume the activity with its state intact.
To safeguard important information about the activity, the state can be preserved by calling the onSaveInstanceState() callback method. This method allows the system to recreate the Activity object so the user can navigate back to an intact Activity state. The system issues a call to onSaveInstanceState() before making the activity vulnerable to destruction.
A Bundle is a container for the activity state information that can be saved. More specifically, a Bundle can save state information about the activity using name-value pairs. A collection of put methods can be used to insert data into the Bundle. The following is an incomplete list of these methods:
putChar()
putString()
putBoolean()
putByte()
putFloat()
putLong()
putShort()
putParcelable() (used for objects that implement Parcelable)
If the system needs to kill an application process and the user navigates back to the activity that was destroyed, the system recreates the activity and passes the Bundle to both onCreate() and onRestoreInstanceState(). Using either of these methods, we can extract a saved state from the Bundle and restore the activity state. If there is no state information to restore, the Bundle will contain a null value indicating that the activity is being created for the first time.
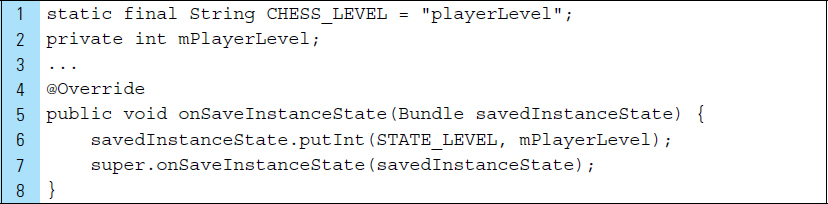
Consider the Chess Game application described at the beginning of this chapter. A good user experience may require the app to keep track of the user’s playing level. The player’s level may be defined as an integer from 1 through 10, where 1 is a beginner level and 10 describes a most advanced player. The following segment of code illustrates how this information can be added to a Bundle object:
Line 1: |
The |
Lines 4–8: |
The implementation of |
Line 6: |
The value in the key-value pair is |
Line 7: |
The superclass is called to save the view hierarchy state. |
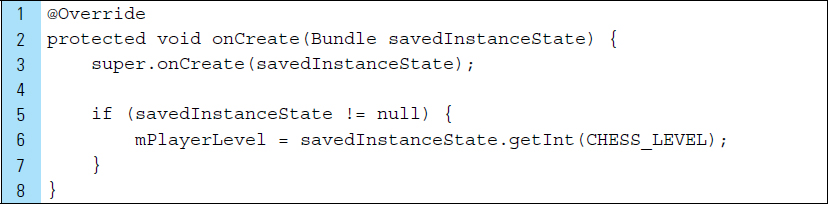
When an activity is recreated after it was previously destroyed, you can recover the saved state from the Bundle that the system passes to the activity. Both the onCreate() and onRestoreInstanceState() callback methods receive the same Bundle object that contains the instance state information.
Because the onCreate() method is called whether the system is creating a new instance of your activity or recreating a previous one, you must check whether the activity’s state (stored in the Bundle object) is null before you attempt to read it. If it is null, then the system is creating a new instance of the Activity class instead of restoring a previous one that was destroyed.
For example, here’s how you can restore some state data in onCreate ():
Line 3: |
The |
Lines 4–8: |
Before restoring values, check whether the activity is being launched for the first time, which is indicated when the value of |
|
If |
Line 6: |
Restore the value of |
Device configurations can change during the execution of an application. For example, during runtime, the user may alter the screen orientation.
When a configuration change occurs, the system will automatically recreate the currently running activity by calling onDestroy(), and then immediately calling onCreate(). This behavior is designed to help your application adapt to new configurations by automatically reloading your application with alternative resources, such as adaptive layouts for different screen size and orientation.
Properly designed activities are able to handle a restart due to a screen orientation change and restore the activity state as described above. It is always a good idea to test an application’s adaptability and resilience when dealing with unexpected events in an Activity lifecycle.
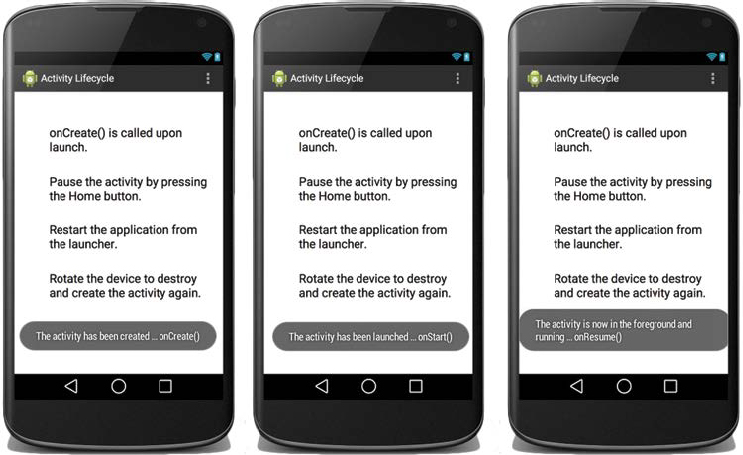
■ Lab Example 3-1: Activity Lifecycle Exploration Application
This lab is used for the purpose of exploring Android activities. The main objective of the app for this example is to experience callback methods firsthand. The app will allow you to perform four experiments that illustrate when callbacks occur for the following actions:
1. The system creation of an Activity
2. The system launching of an Activity
3. An Activity running in the foreground
4. An Activity paused by another Activity running in front of it
5. The Activity is no longer visible on the screen
6. An Activity is restarted
At the end of this lab, you will be given a set of experiments to try.
Part 1: Design Features
As an aid to understanding the Activity lifecycle and its callback methods, this application is designed as a basic logging tool for performing experiments on the Activity. As a logging tool, it will track callback events that happen as a set of tasks is performed. To indicate the state of the Activity and that certain Activity events have occurred, a descriptive message will appear in the form of a Toast. A Toast is particularly useful when performing the set of experiments on a physical device. However, Toasts cannot leave a trail of messages to scroll through and they can be slow when a series of messages needs to be displayed in rapid sequence. Therefore, in addition to Toasts, this application will also display messages to the LogCat using Log.d.
It is ideal to test this app using a real device. Several of the experiments can be done on an emulator, such as the one shown in Figure 3-3.
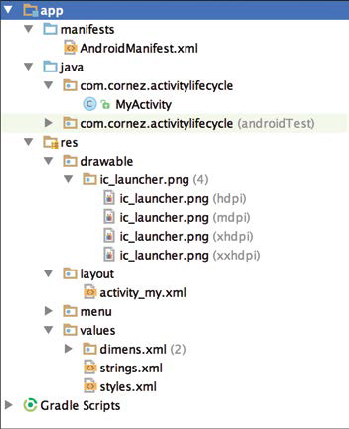
Part 2: Application Structure and Setup
The settings for the application are as follows:
• Application Name: |
Activity Lifecycle |
• Project Name: |
ActivityLifecycle |
• Package Name: |
|
• Android Form: |
Phone and Tablet |
• Minimum SDK: |
API 18: Android 4.3 (Jelly Bean) |
• Target SDK: |
API 21: Android 5.0 (Lollipop) |
• Compile with: |
API 21: Android 5.0 (Lollipop) |
• Activity Name: |
|
• Layout Name: |
|
The launcher is set to the Android default ic_launcher.png file. The final structure for this app is shown in Figure 3-4. The three files that will be altered are:
1. MyActivity.java
2. activity_my.xml
3. strings.xml
Part 3: External Value Resources
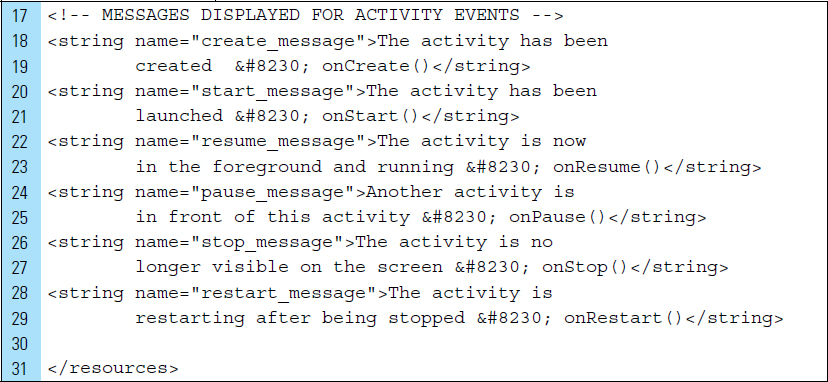
All the resource files in the application, with the exception of strings.xml, will be left unaltered and will contain their default build content. The strings.xml resource file will primarily be used as a message repository. It will store all possible strings pertaining to the actions and callback methods that occur during the lifecycle of the activity.
The first lines of XML code within strings.xml list the requisite application name and action settings. These should be left unaltered.
Lines 9–16: |
Four experiments are designed to be used with this app. The results of each experiment will appear in a |
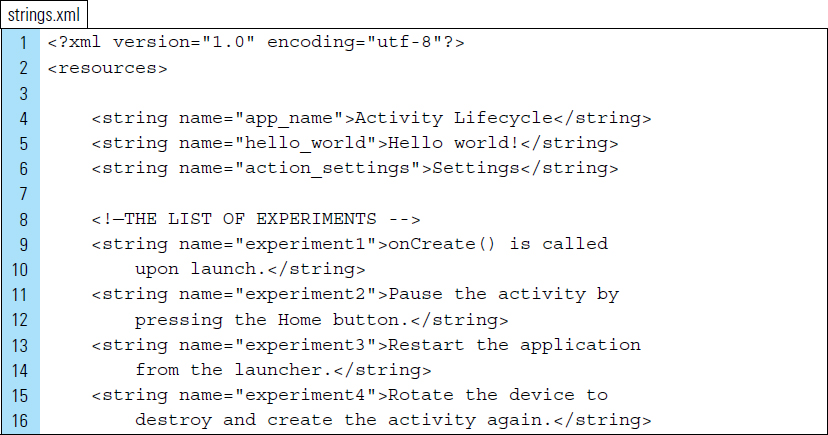
Lines 17–29: |
String description for all possible activity states. |
Line 19: |
Several of the strings in this file contain a |
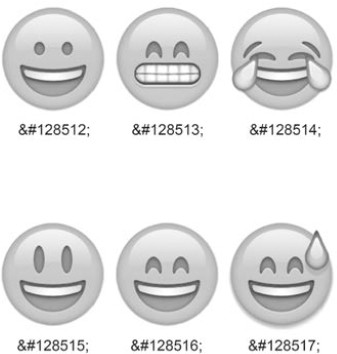
There are more than 100,000 graphic characters in Unicode, which includes the keyboard characters of many languages. Common Unicode characters are emoticons. The Unicode for a small set of these is shown in Figure 3-5.
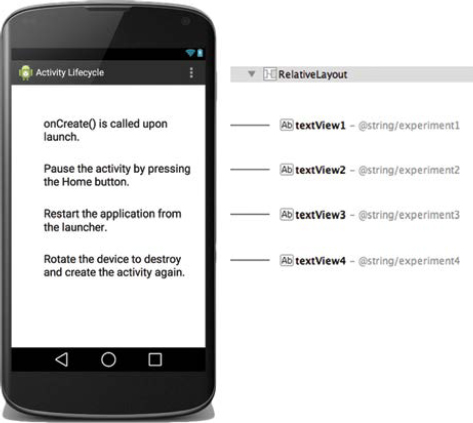
Part 4: The User Interface
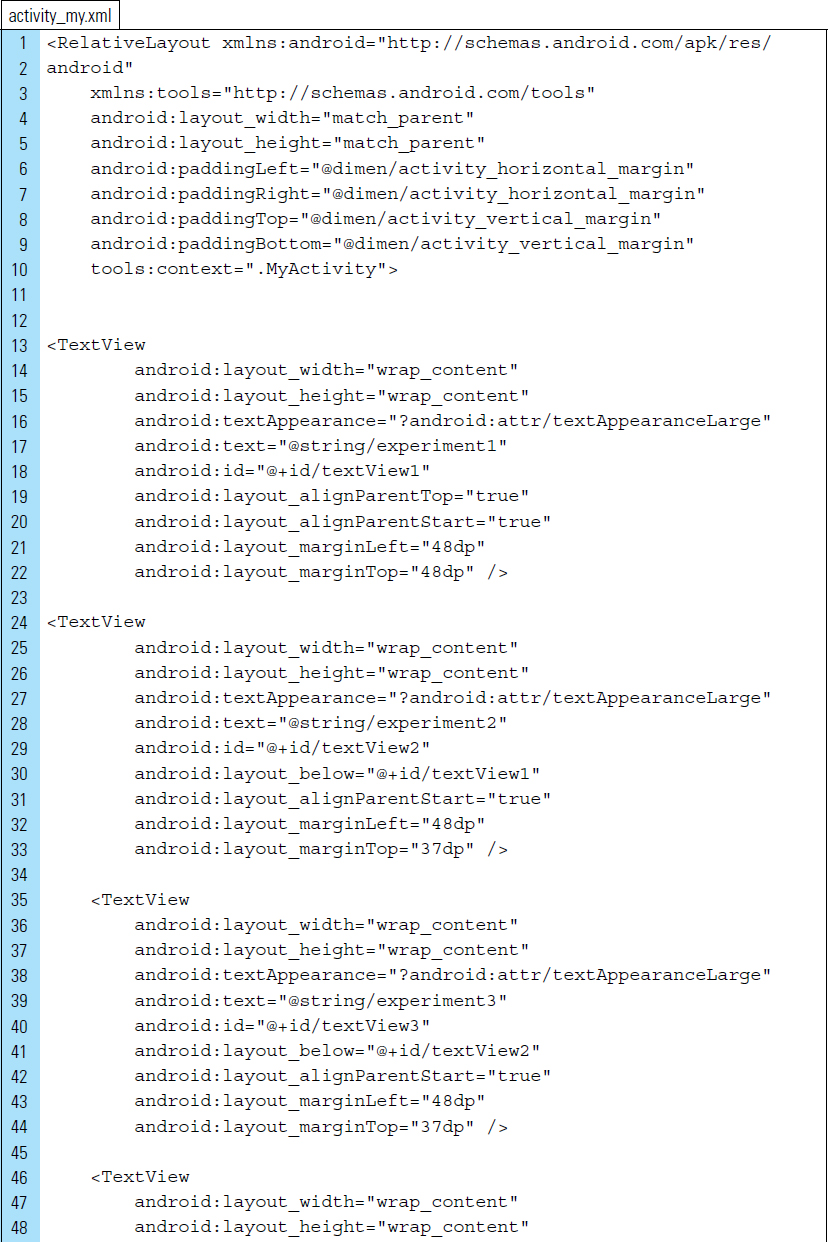
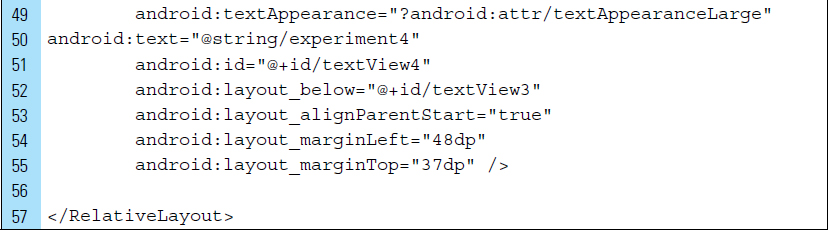
The screen layout for the application, defined by activity_my.xml and shown in Figure 3-6, uses a RelativeLayout root holding four TextViews. The TextViews contain the description of the activity experiments. A small amount of room is vacated at the bottom of the layout so that Toasts can appear without obscuring the visibility of other elements on the screen.
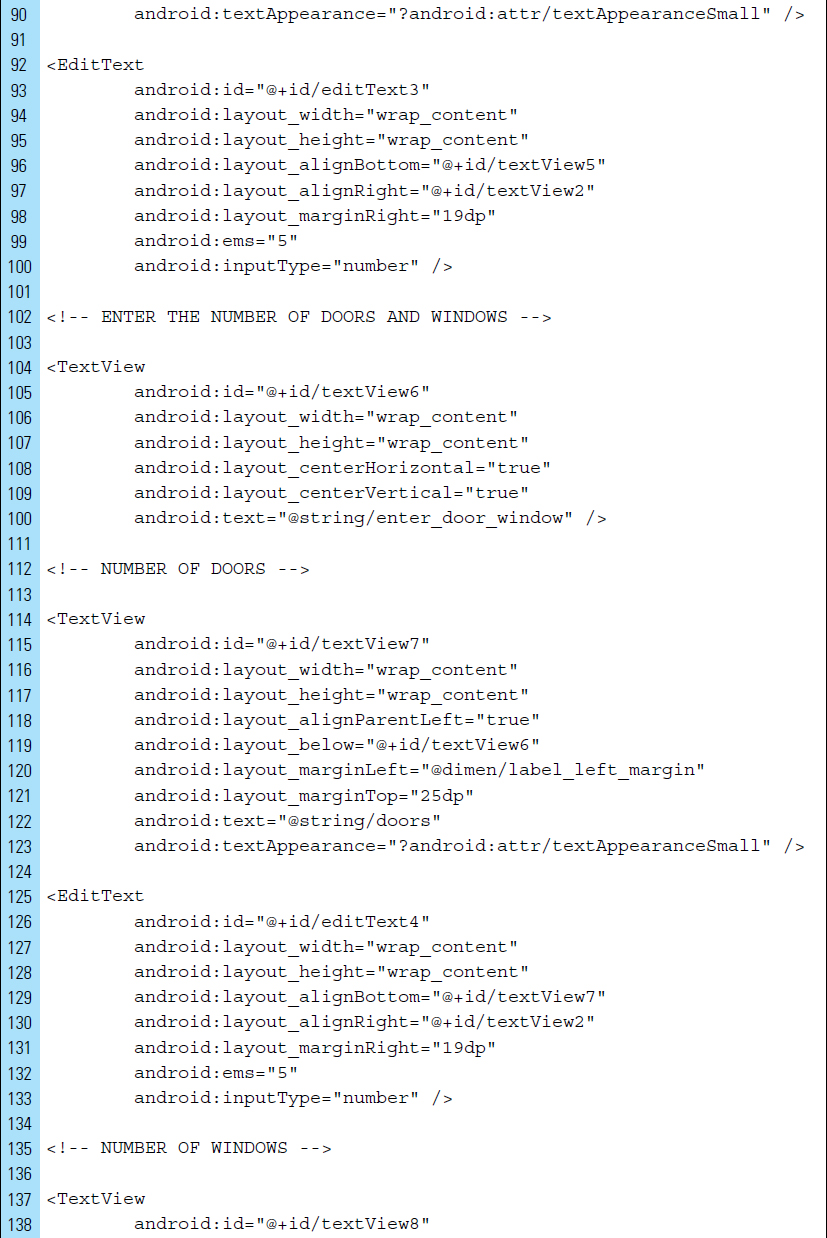
The XML code for this file appears as follows:
Part 5: Source Code for Application
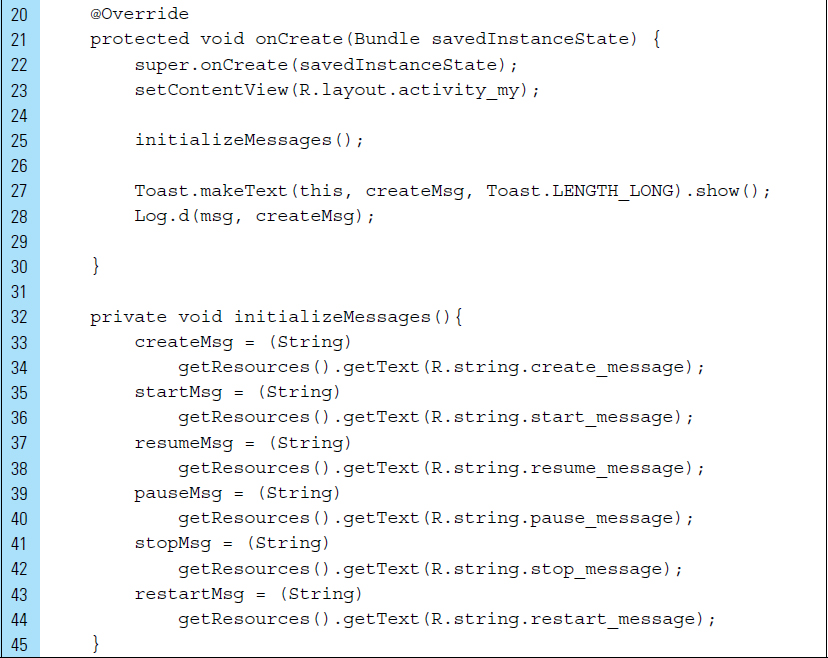
The source code for this application is the MyActivity class.
Line 3: |
The class begins with the required imports, including |
Line 11: |
As with all application activities, this class is modified to extend the abstract |
Lines 13–18: |
Variables are declared to store preloaded experiment messages. |
Lines 32–45: |
Messages are preloaded into the appropriate string variables and will be displayed when a callback method occurs. Strings for these message variables are found in the |
Lines 27–28: |
The first |

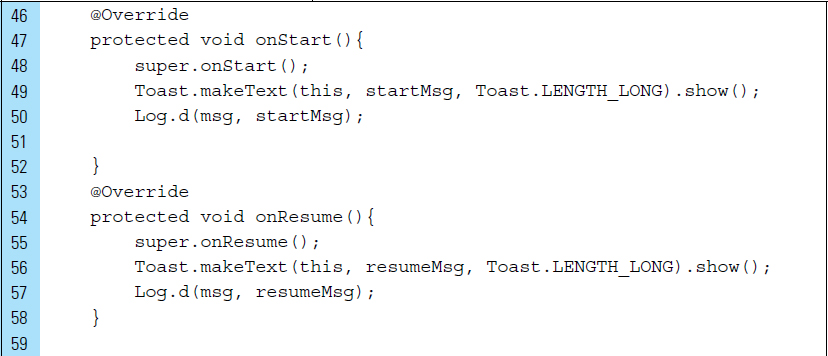
Each of the Activity callback methods is overridden so that the appropriate Toast and Log.d can be displayed.
Line 48: |
The superclass of the callback is called to perform its own explicit tasks. |
Line 49: |
An activity is displayed with a long delay. |
Execute the following actions to initiate the creation, pausing, stopping, and other stages of the activity for this app.
Experiment 1: |
|
|
Launch the application from a physical device or the emulator. The first experiment tests the beginning of the |
Experiment 2: |
|
|
Pause the activity by pressing the Home button. This can be done in the emulator or on a physical device. The callback methods you should see are |
Experiment 3: |
|
|
Restart the application from the launcher. Both the emulator and the physical device can be used for this test. The callback methods you will see are |
Experiment 4: |
|
|
This last experiment must be done using a physical device. An activity is destroyed when the screen of a device, not fixed to a particular orientation, is rotated. Once the activity is destroyed, it is created again. The callback methods you will see are |
■ 3.3 Multiple Activities and the Intent Class
Applications that are built with multiple activities need to utilize the Intent class. This class provides the framework for the navigation from one screen to another. In simple terms, an Intent object is a message from one component to another component, either within the application or outside the application. For example, consider ActivityA, which needs to start another activity, ActivityB. ActivityA can communicate this intention to ActivityB, using an Intent object. Hence, an Intent is an object carrying an intention to perform a specific action.
Intents are designed to communicate messages between three application core components of Android.
There are separate mechanisms for delivering Intents to these types of component.
Activities: |
|
Broadcast receivers: |
|
|
A broadcast receiver can be implemented to listen for a specific |
Service: |
A |
The Intent object is a passive data structure. It holds an abstract description of an operation to be performed. This abstract description involves a collection of data components, some of which are not required. The following is a list of the required components. Optional information about an Intent object will be discussed elsewhere in the chapter.
Action: |
This component describes the action to take upon receiving the |
|
|
|
An activity will be the target component. The intended action is to initiate a phone call. |
|
|
The target component for this action constant is an activity. The intended action is to handle an incoming phone call. |
|
|
|
|
|
The target component for this constant is a |
|
|
|
|
|
The target for this constant is a |
Data: |
Identifies the data resource. More specifically, it contains the |
|
Category: |
An |
|
Intents are broadly grouped into two categories: explicit and implicit.
3.3.1 Explicit Intents
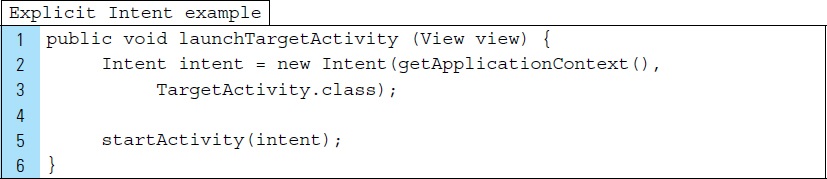
Explicit Intents use a specific name when starting a component. This name will be the full Java class name of the activity or service. The most common use of an explicit Intent is the launching of a target component with a known name within the currently running application.
The code segment below shows the start of a new activity in response to a user action, such as tapping a button. The launchTargetActivity() method is an onclick handler.
Lines 2–3: |
An explicit |
Line 5: |
The target activity is started. When you create an explicit |
3.3.2 Implicit Intents
Unlike an explicit Intent, an implicit Intent does not name a specific component; instead, it declares a general action to perform, which allows a component from another app to handle it. When an implicit Intent is created, the system locates the appropriate target component by comparing the contents of the Intent to an Intent filter. Intent filters are declared in the manifest file of other apps located on a given device. When the Intent has found a match with the Intent filter, the system starts that component and delivers it to the Intent object.
In some situations, many matches can be found when comparing the contents of a given Intent to the application’s Intent filters. When this happens, the system will display a dialog box to the user so that they may pick the app they want.
The code segment below shows the start of a new activity in response to a user action, such as tapping a button. The launchTargetActivity() method is an onclick handler.
Lines 1–2: |
An implicit |
Line 4: |
Starts the implicit activity. |

■ 3.4 Handling Keyboard Visibility in an Activity
Android shows or hides the soft keyboard when input focus moves into or out of an editable text field. The system also makes decisions about how your UI and the text field appear above the keyboard. For example, when the vertical space on the screen is constrained, the text field might fill all space above the keyboard. For most applications, these default behaviors are satisfactory.
In certain situations, more control over the visibility of the soft keyboard is needed. It is possible to specify how you want your layout to appear when the keyboard is visible. Android gives focus to the first EditText element in the layout launched by a running activity. It does not immediately display the keyboard. This behavior is appropriate because entering text might not be the primary task in the activity. Sometimes apps require text to be input at the start of an activity. For example, a login screen needs the input of a login or user name followed by a password prior to allowing the user to do anything else.
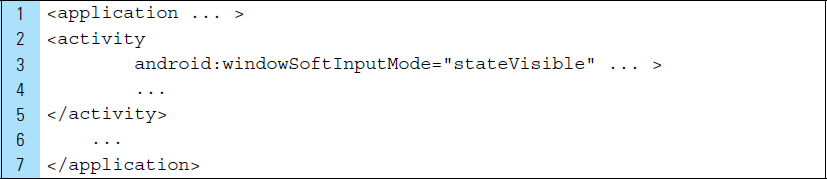
When text input is required at the start of an activity, it would be a good idea for the keyboard to appear by default. This can be accomplished by adding an input mode property to the AndroidManifest.xml file.
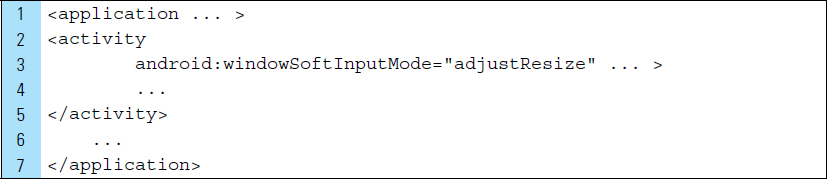
In the example below, the sole activity defined in the application contains the android:windowSoftInputMode attribute. This attribute must be located in the <activity> element. Its value is set to stateVisible.
This attribute can be used to configure the keyboards for multiple activities in an application.
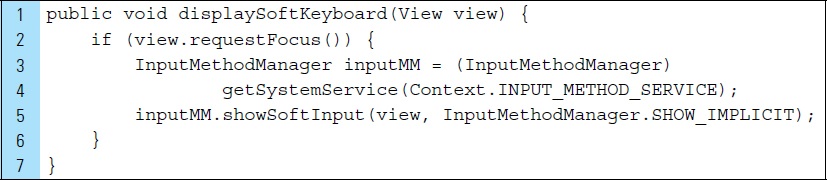
It is also possible to request the focus of a View programmatically. The method requestFocus can be called to give focus to a specific View or to one of its descendants. This can be useful in cases when you want to ensure that the keyboard is visible. A View will not actually take focus if it is not focusable.
In the following code segment, the displaySoftKeyboard() method receives a View in which the user should type something. If the View is focusable, an InputMethodManager object is used to give it focus. The InputMethodManager arbitrates interaction between applications and the current input method.
showSoftInput () will explicitly request that the current input method’s soft input area be shown to the user.
Once the keyboard is visible, it should not be programmatically hidden. The system hides the keyboard when the user finishes the task in the editable text field. The user can also hide the keyboard with a system control, such as with the Back button.
As we have seen in previous apps created in this textbook, when a keyboard appears on the screen it takes up valuable screen space. The system determines how best to adjust the visible portion of your user interface for a given activity. It is possible to specify the display attributes of your activity.
The following code segment specifies a resize adjustment, adjustResize, to ensure that the system resizes your layout to the available space. The result is that all of the layout content will accessible. In some cases, screen content will require scrolling. This attribute must be defined within the <activity> element.
■ Lab Example 3-2: Navigating Multiple Screens—Paint Calculator App
This lab is a first look at an application that uses multiple screens. The objective for building the Paint Calculator app is to explore the use of multiple activities in an application and to illustrate navigation between them.
Part 1: The Design
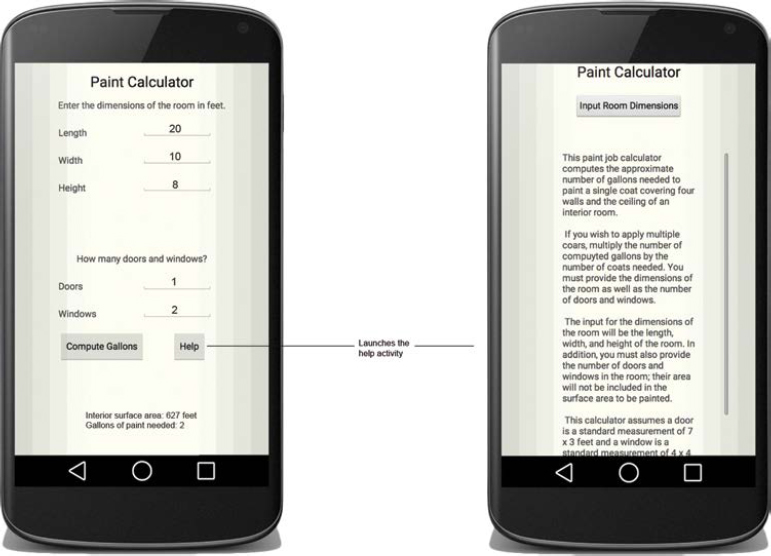
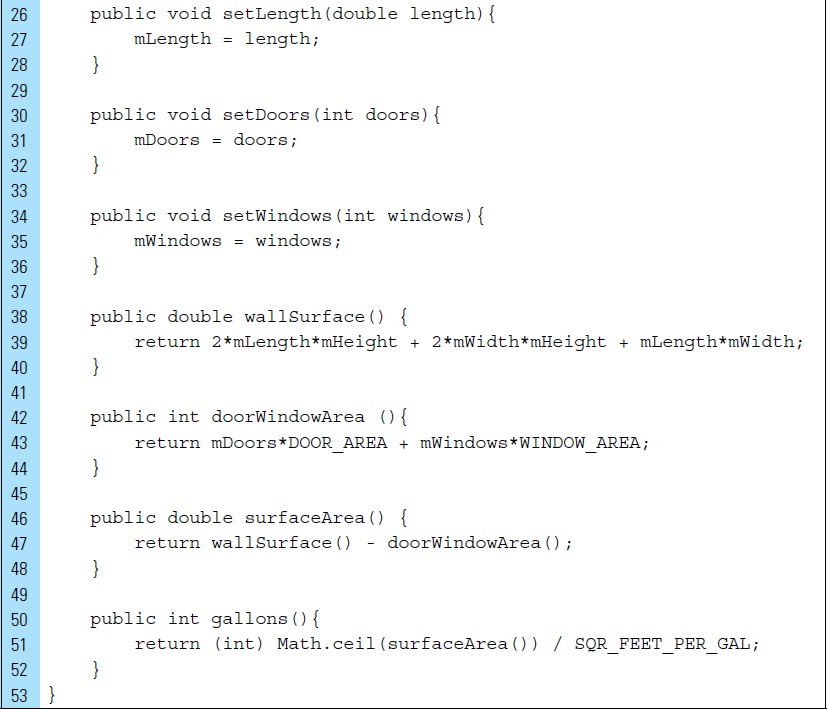
The Paint Job Calculator allows a user to calculate how many gallons of paint are required to paint a single room. The number of gallons is based on a single coat of paint covering four walls and the ceiling. The user must provide the dimensions of the room, as well as the number of doors and windows. The input for the dimensions of the room is the length, width, and height of the room. In addition, the user must provide the number of doors and windows in the room; the area of the doors and windows will not be included in the area to be painted. A door has a standard measurement of 7 × 3 feet. All windows have a standard measurement of 4 × 4 feet.
The app assumes one gallon of paint covers approximately 275 square feet. The output consists of the number of gallons needed and the computed surface area to be painted. This app includes the following general features:
1. Provide EditText widgets for the input of the dimensions of the room and the number of windows and doors.
2. Provide a help button that explains the input requirements and how the number of gallons will be computed.
3. Provide a compute button that performs the calculation and displays the results.
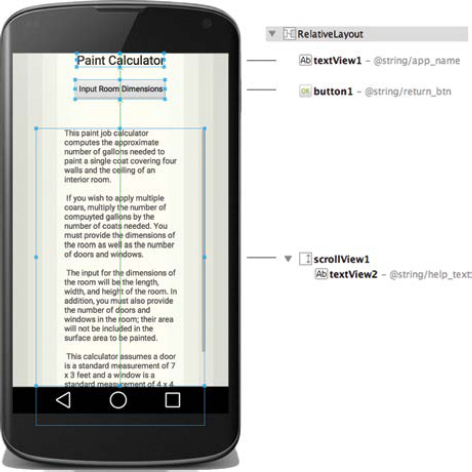
The main activity, the left-hand image screen shown in Figure 3-7, is the input screen for the dimensions of the room and the number of doors and windows. The secondary activity, the right-hand image screen shown in Figure 3-7, is a help screen providing details on how the calculator computes surface area and the number of gallons needed to paint a given room. When the secondary activity is launched, the main activity will pause.
Part 2: Application Structure and Setup
The settings for the application are as follows:
• Application Name: |
Paint Calculator |
• Project Name: |
PaintCalculator |
• Package Name: |
|
• Android Form: |
Phone and Tablet |
• Minimum SDK: |
API 18: Android 4.3 (Jelly Bean) |
• Target SDK: |
API 21: Android 5.0 (Lollipop) |
• Compile with: |
API 21: Android 5.0 (Lollipop) |
• Activity Name: |
|
• Layout Name: |
|
The launcher is set to the Android default ic_launcher.png file. To make the application visually more interesting, a background image has been added to the drawable folder.
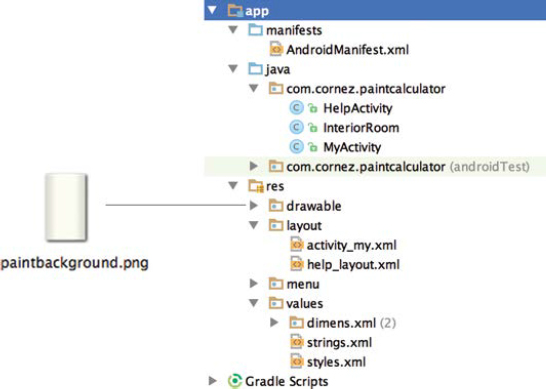
The final project structure, shown in Figure 3-8, contains three source files and two layout files. The two activity classes are named MyActivity and HelpActivity. MyActivity, the main activity of the application, sets the screen content to input_layout.xml, and HelpActivity displays the input_layout screen content. There is only one drawable resource, paintbackground.png, which adds visual context to the application. This file can be found in the textbook resources.
The theme for this application has been set in the AndroidManifest file.
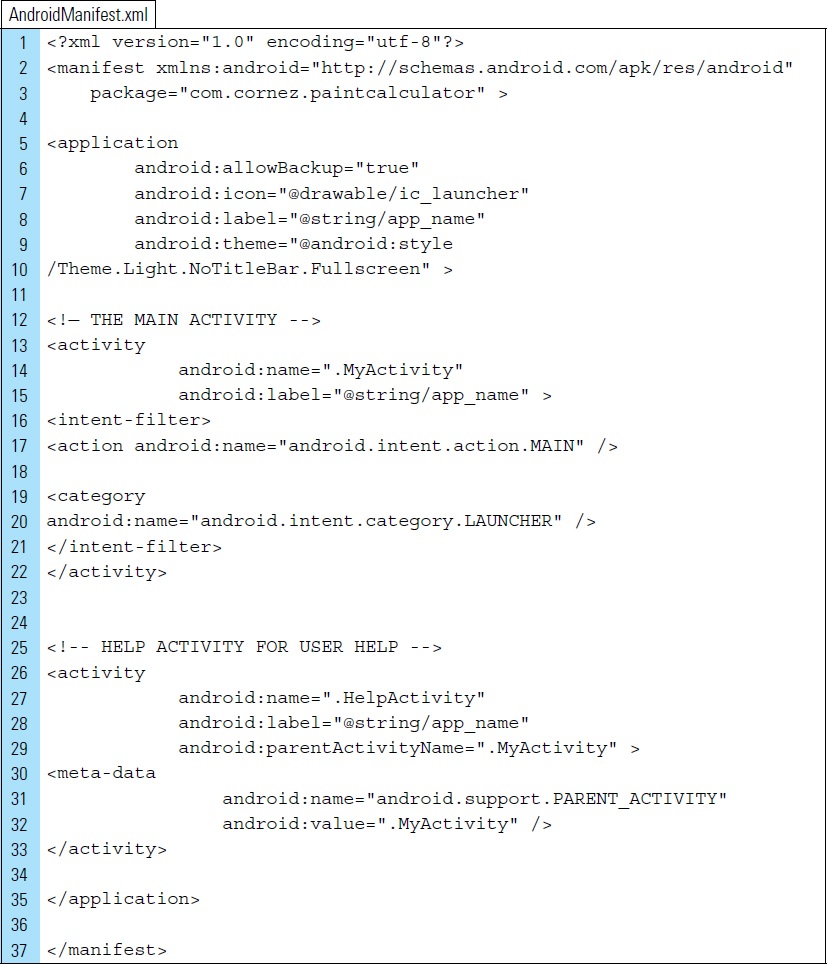
A critical component of the Intent/Activity model is the manifest file. For the above code to work properly, we need to specify the Activities of this application in the manifest file (see AndroidManifest.xml for details of how Activities are defined). A common error when one is new to the Android framework is to forget to add the activity details in the manifest file.
Lines 12–22: |
The main activity of the application is declared and named |
Line 25–33: |
The secondary activity of the application is declared and named |
Part 3: External Value Resources
The Paint Calculator application uses values from both the strings.xml file and the dimens.xml file. The strings.xml file contains static labels shown on the layout screens. In addition, strings.xml also stores the help text displayed in the help screen. The XML code for this file is as follows:
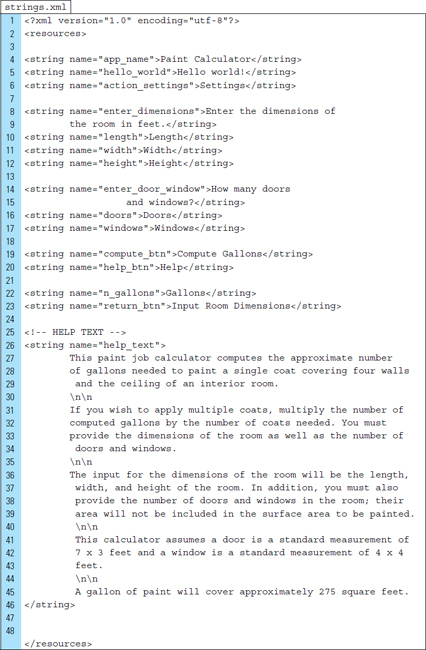
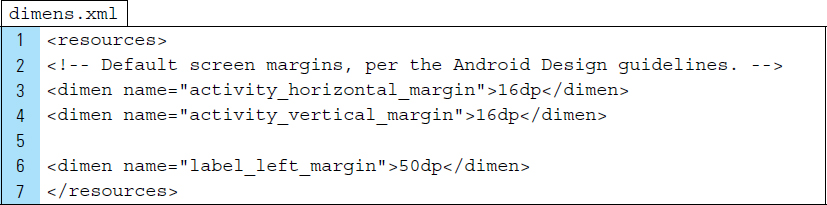
The dimens.xml file is used to store one value, a left margin setting that will be used many times in the layout to align label elements. The XML code for the dimensions is as follows:
Part 4: The User Interface
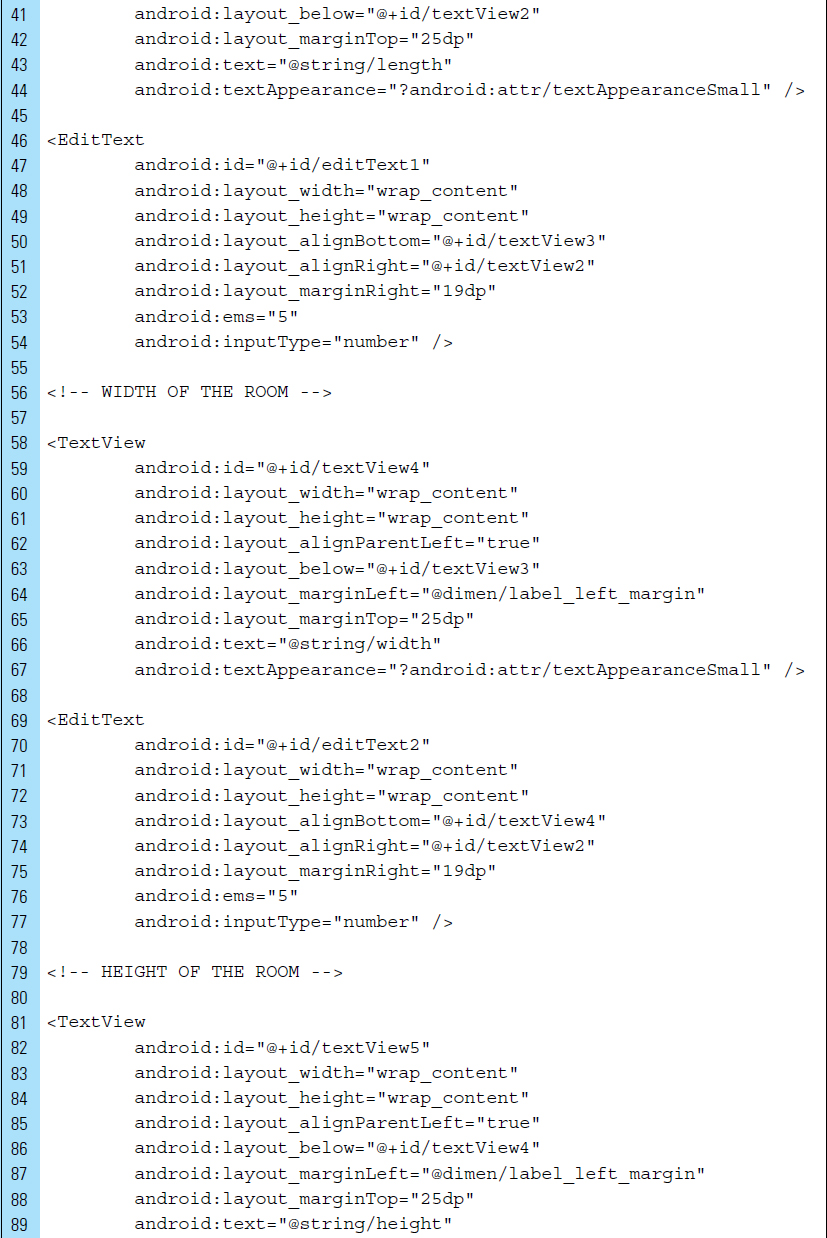
There are two activity screen layouts for this application: input_layout.xml and help_layout.xml. The application uses the background image for both of these activity screens. The input screen is the layout associated with the main activity. This screen layout will appear when the application is first launched. The layout design, shown in Figure 3-9, uses a RelativeLayout as the root View, with the background property set to paintbackground.png.
TextView widgets are used for all static labels and titles, and EditTexts are used for all input fields. The last TextView, textView9, is used as a placeholder for the results of the computation to be displayed.
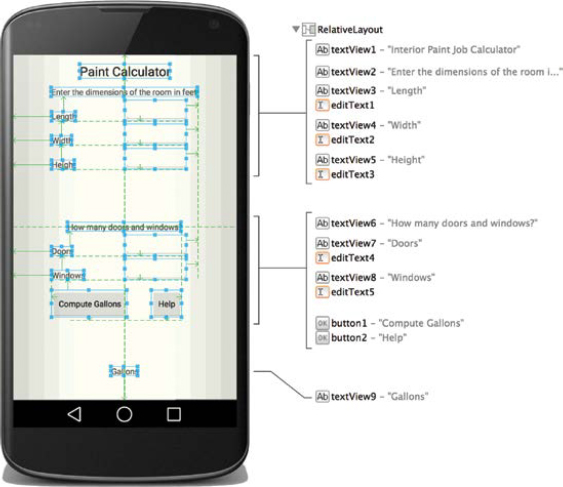
The Compute Gallons button is used to compute the number of gallons needed. The Help button accesses the help screen, via a secondary activity. Both buttons will be assigned onClick methods rather than using listener events in the source code files. The onClick() method assigned to compute the number of gallons is computeGallons(), and the onClick method assigned to display help is gotoHelp().

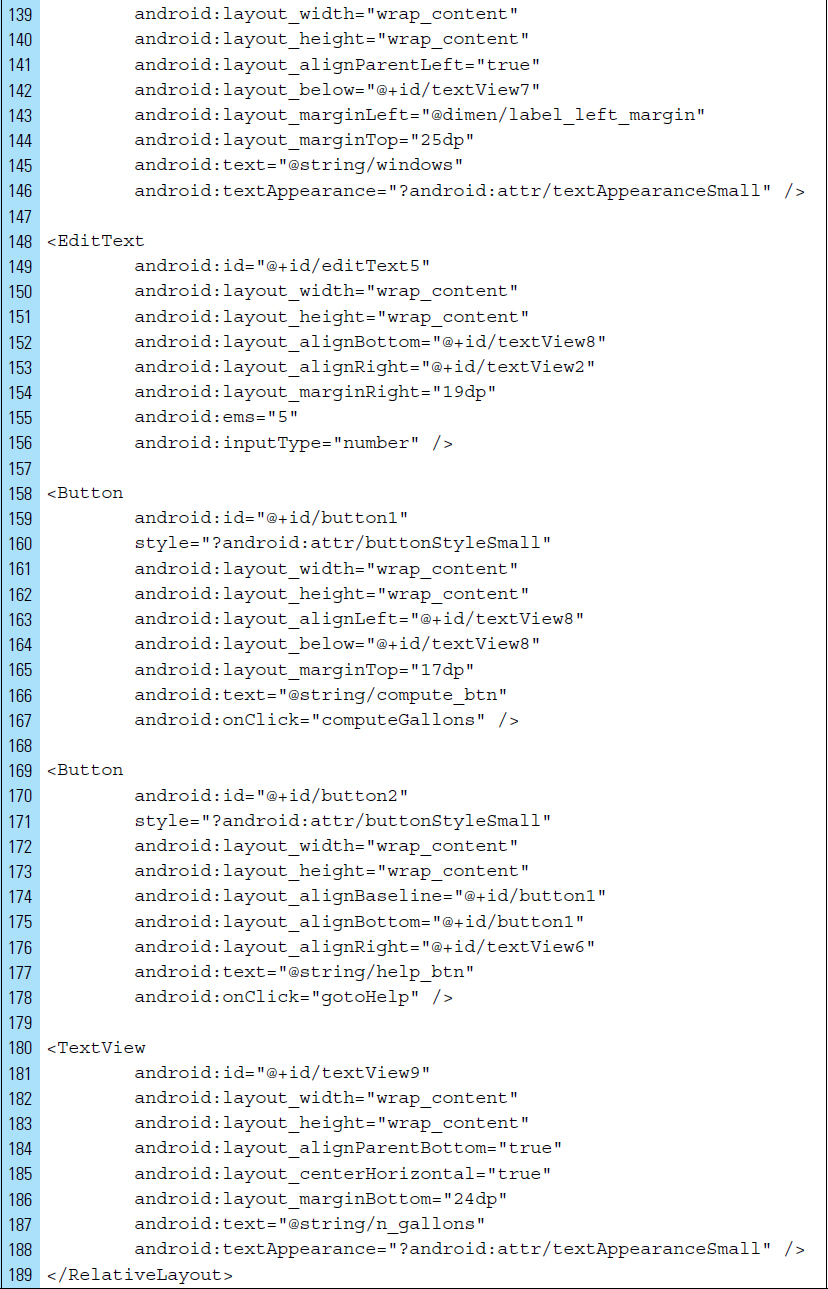
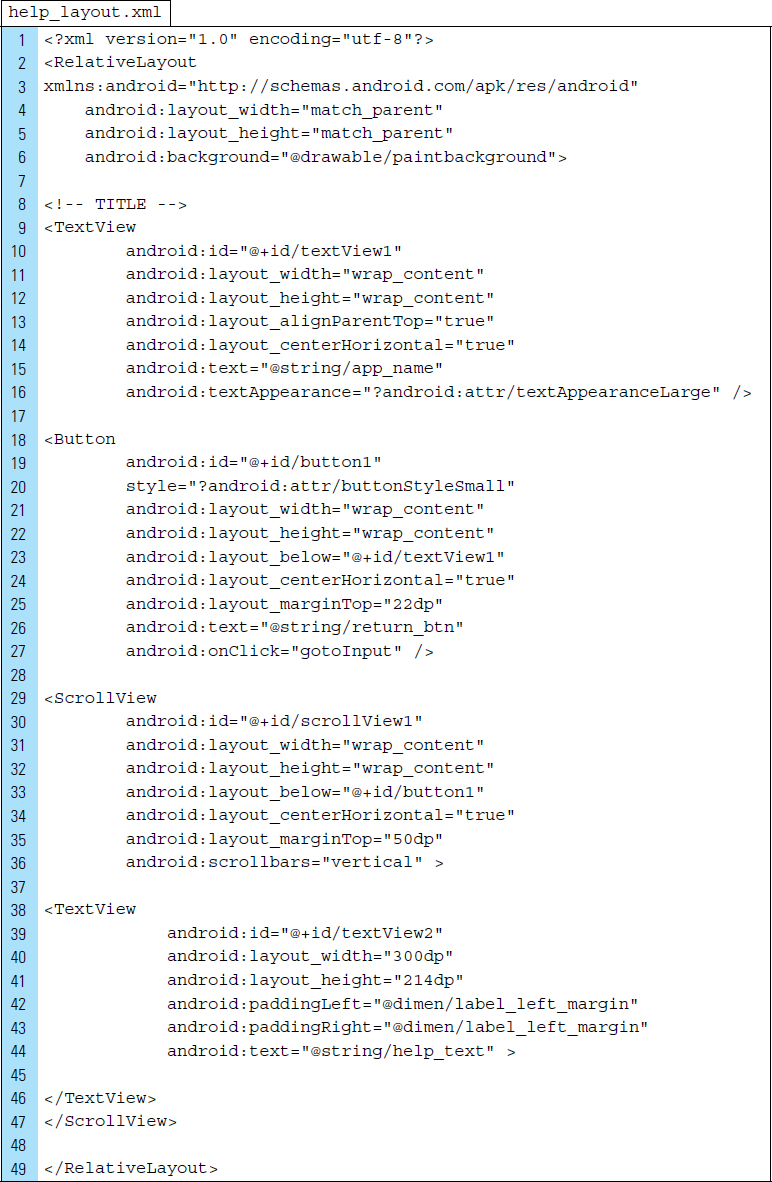
The secondary activity layout file for this application is help_layout.xml. This help screen is associated with the HelpActivity. The screen layout for HelpActivity appears when the user clicks the help button. The layout design, shown in Figure 3-10, uses a RelativeLayout as the root View, with the background property set to paintbackground.png, just as for the input screen.
A TextView widget is used to display the static title for the application, and a Button widget is used to return to the input layout screen. Help information can often be very long and may not always fit on a small screen. When this happens, the text gets truncated. In this layout, a ScrollView, the ViewGroup container named scrollView1, is used to hold a TextView. This allows the text to scroll when the screen cannot accommodate the full text.
TextViews are used for all static labels and titles, and EditTexts are used for all input fields. The last TextView, textView9, is used as a placeholder for the results of the computation to be displayed.
Lines 18–27: |
|
Lines 29–47: |
Scrollable text can be built in several ways. For this app, a vertical |
Part 5: Source Code for Application
Line 4: |
Navigating between activities requires an |
Lines 72-74: |
An |
To start another activity, the Intent needs to know the sender, as well as a receiver. The sender can be specified using getApplicationContext(). The sender can also be accessed by the context of the activity, as shown in Line 72. The receiver is the class name HelpActivity. Once the Intent is created, we dispatch it via the startActivity() method. The startActivity() method is provided by the Android framework and will handle the starting of the activity specified in the Intent message.
As illustrated in this example, an Intent object is a task request that matches the Intent action with the appropriate activity.
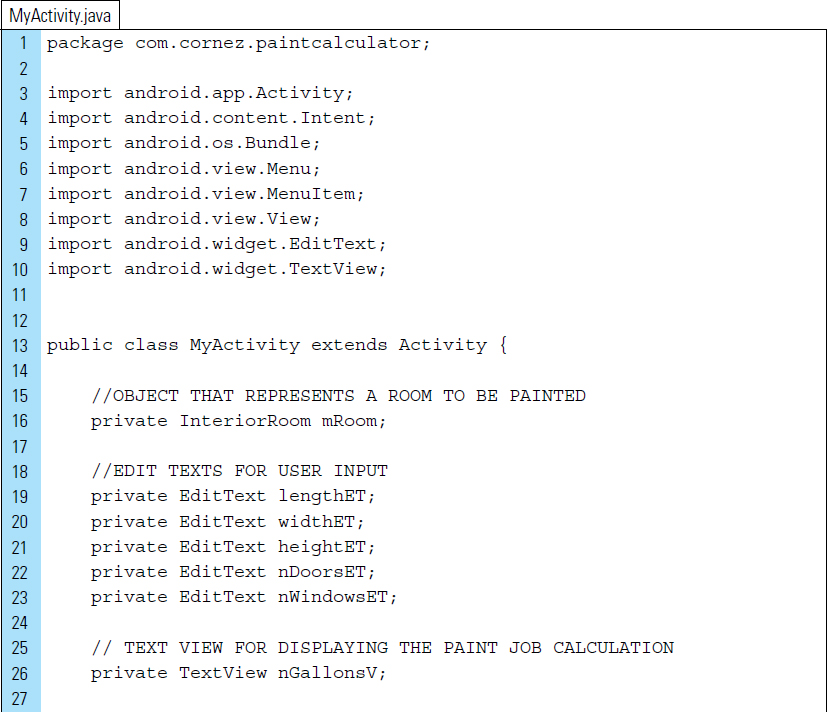
The InteriorRoom.java class is the model for a room to be painted.
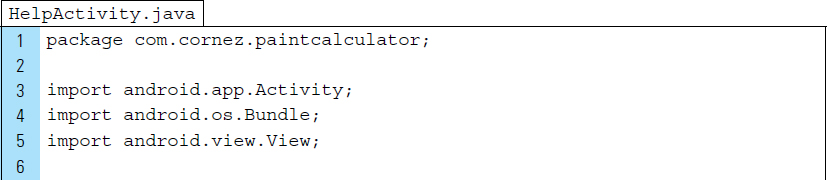
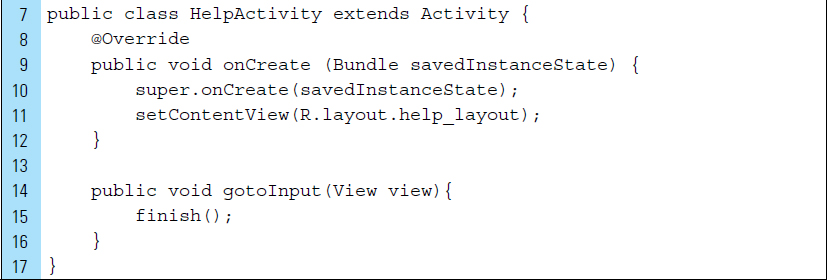
HelpActivity.java is the activity associated with the help screen for the Paint Calculator app.
Line 7: |
|
Line 11: |
The user interface for |
Lines 14–16: |
The method |
Line 15: |
The method |
■ 3.5 Passing Data between Activities
Although multiple screens allow for the construction of complex applications, they often require carefully planned data management. In many cases, various data entities must be sent from one activity to another.
The Android framework provides a simple and flexible approach to working with multiple activities. Android also offers an efficient model for passing information between various activities.
Data can be passed as a message object to an activity implemented within the application or outside the applications. For example, a value computed by one activity can be attached to a message and passed to another activity within the application. This message can also be passed on to an activity outside of the application boundary. Because of the potential dangers involved in transferring data between applications, the designers of Android have built a robust security model to ensure that this flexibility and power do not compromise data safety.
When an Intent object is constructed, its action is specified. This represents the action we want the Intent to trigger. For example, the action ACTION_SEND indicates that the Intent will be sending data from one activity to another. This action will also send data across process boundaries. Sending and receiving data between applications is most commonly used for social sharing of content.
It is possible to add extended data to a given Intent. This is done using the putExtra() method. putExtra() requires two parameters: a name for the data and a String data value. The data name must include a package prefix. For example an application named com.android.contacts might use a name such as “com.android.contacts.ShowAll”. The String data value is the literal data element that will be attached to the Intent.
The code segment shown below illustrates a simple Intent with attached data:
Line 2: |
The action of the created |
Line 3: |
The first argument of |

A common use of the ACTION_SEND action is the distribution of text content from one activity to another activity outside the application. For example, a user viewing a webpage from the Android built-in browser app may want to share the URL, as text, with another application. This action is useful for sharing an article or website with friends via email or social networking.
The code segment shown below illustrates a basic Intent with this purpose:
Lines 1–2: |
The |
Line 3: |
The first element of extended data is the subject line of a message. “ |
Line 5: |
When the activity is launched using the target |

The manifest file would be modified to include the <Intent-filter> attribute. If, using the filter, an installed application is located that matches ACTION_SEND, the Android system will launch it.


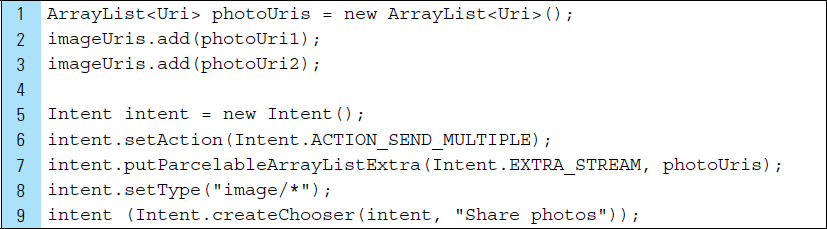
To send multiple elements, the action ACTION_SEND_MULTIPLE can be used with a list of URIs that reference to the data content. The receiving application is required to parse and process the data it receives.
Lines 1–3: |
An |
Line 6: |
The action for the |
Line 7: |
|
Line 9: |
|
■ Lab Example 3-3: Automotive Calculator App
In this lab, we will build an app that illustrates how data are passed between activities within the same application.
Part 1: The Design
Tom’s Cars is a small car dealership that sells and finances the cars on its lot. Consumers typically want to be informed about the costs involved when purchasing a car. Computing a monthly car loan payment can be a little complicated for many people because it depends on a number of factors, such as the sales tax and interest rates. This app is designed to simplify the process. In addition, it allows users to experiment with a down payment amount and the term agreement before arriving at the dealership, giving them a better understanding of costs prior to making their purchase.
This app makes several assumptions. The sales tax rate in California, where Tom has his dealership, is fixed at 7%. In addition, we assume that Tom charges an interest rate of 9% for all cars purchased from his lot. The input requirements are the cost of the car, the down payment, and the length of the term. The length of the term can be set to one, two, or three years. No more, no less.
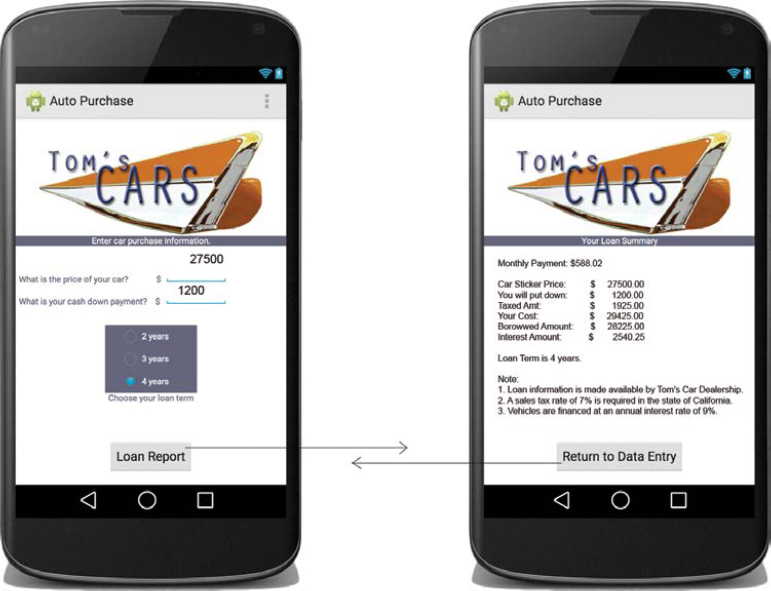
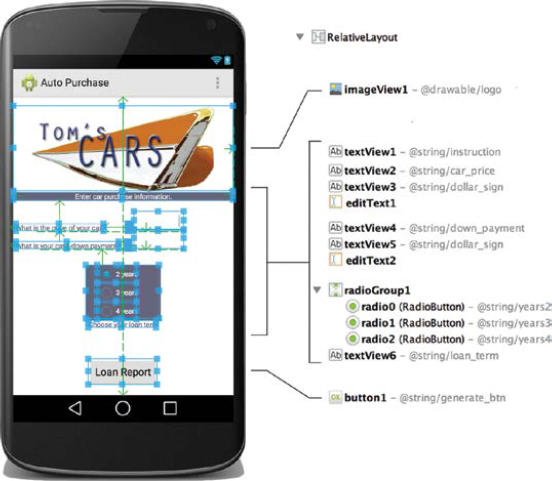
The loan calculator app uses two user interface screens. Figure 3-11 shows the completed screens. After entering the car purchase information into the data entry screen, as shown on the left, the user can then generate a loan report to outline the costs. The loan report is displayed in the screen on the right. The user can return to the input screen to enter another set of car purchase values.
Part 2: Application Structure and Setup
The settings for the application are as follows:
• Application Name: |
Auto Purchase |
• Project Name: |
AutoPurchase |
• Package Name: |
|
• Android Form: |
Phone and Tablet |
• Minimum SDK: |
API 18: Android 4.3 (Jelly Bean) |
• Target SDK: |
API 21: Android 5.0 (Lollipop) |
• Compile with: |
API 21: Android 5.0 (Lollipop) |
• Activity Name: |
|
• Layout Name: |
|
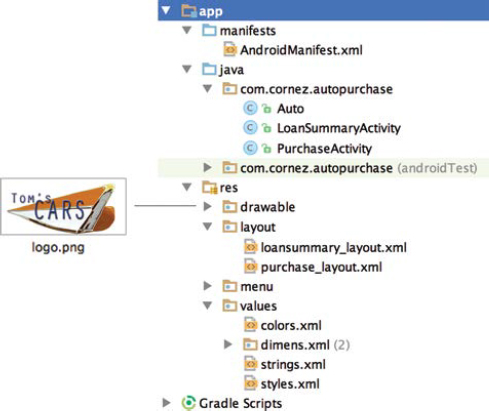
The final project structure can be seen in Figure 3-12. The launcher icon remains set to the Android default ic_launcher.png file. In addition to this Android graphic, a logo graphic for Tom’s Dealership has been added to the drawable folder.
Three source files are shown in the Java folder. Auto.java represents the data model for an automobile. PurchaseActivity is the main activity of the application. PurchaseActivity is launched when the application is launched for the first time. LoanSummaryActivity is a secondary activity and is used to display the generated loan report. When the secondary LoanSummaryActivity begins, PurchaseActivity will pause while LoanSummaryActivity is active.
Two layouts correspond to the two activities of the application. The main activity, PurchaseActivity, is visually represented by the layout named purchase_layout.xml. This layout displays a screen for the input of car purchase values, such as the price of the car, the down payment, and the terms of the loan. The secondary LoanSummaryActivity is visually represented by the layout named loansummary_layout.xml.
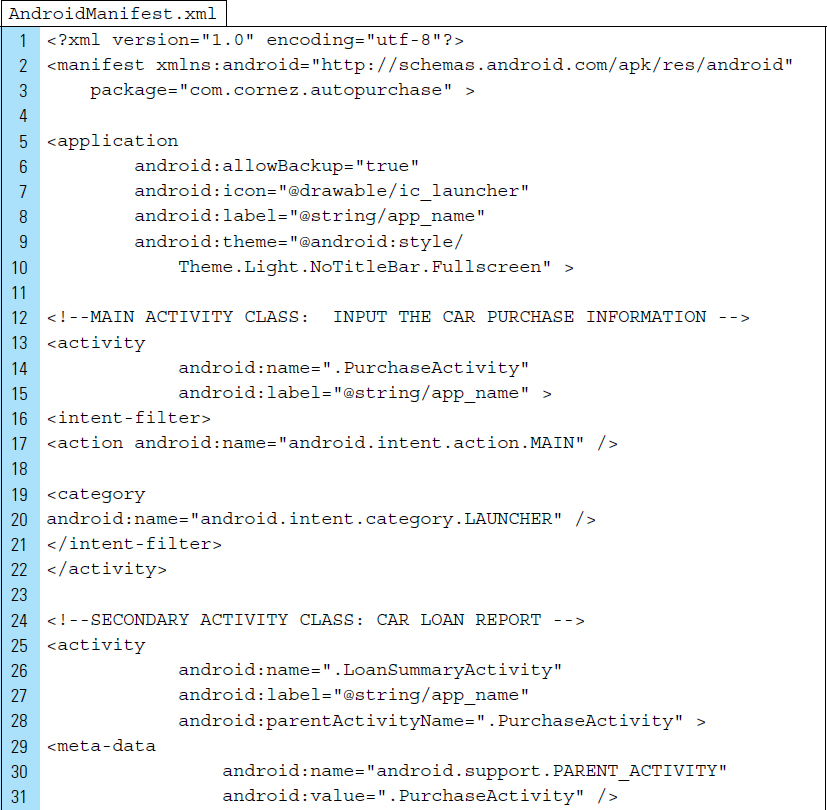
The AndroidManifest.xml file declares the activities used by this application and sets additional attributes.
Lines 9–10: |
The theme for the application, governing all of its activities, is set to use a fullscreen with no titlebar. |
Lines 12–22: |
The main activity of the application is declared. The class name is |
Lines 24–32: |
The secondary |

Part 3: Value Resources
Colors and strings play an important role in this application. The colors are used to provide contrast for input fields, making them easier to see and, thus, navigate for the user. The color resources are defined in the XML file shown below:

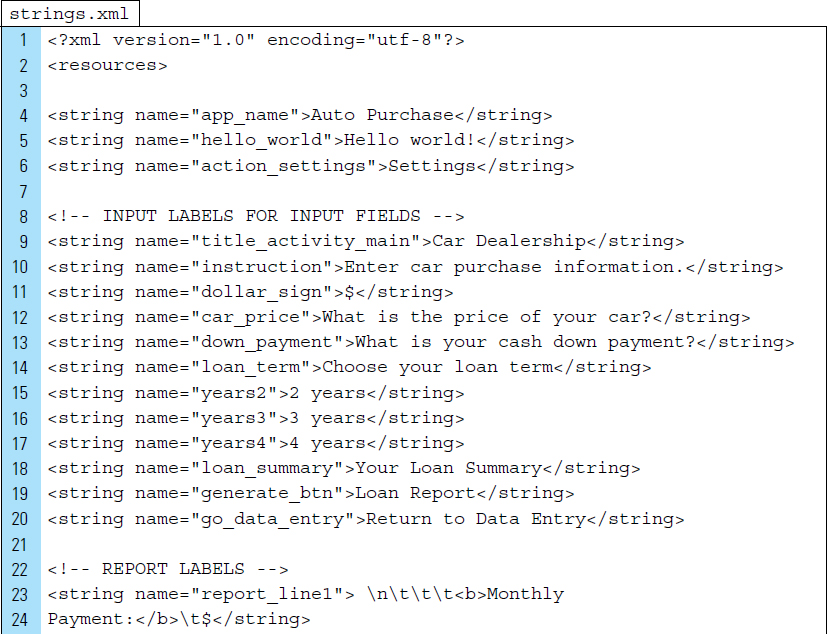
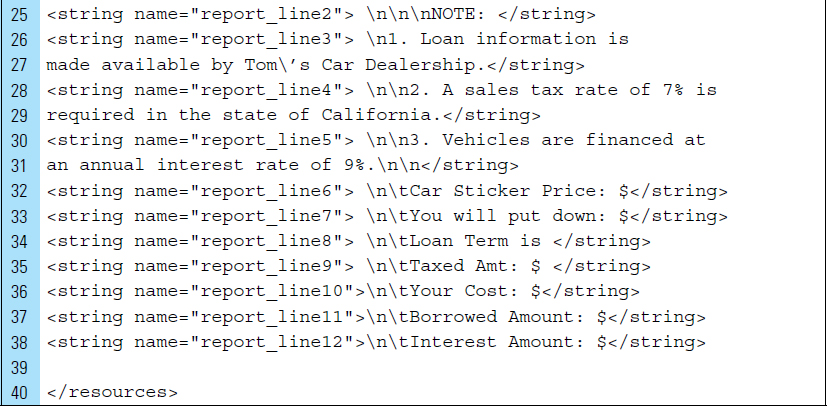
The static string values have been grouped into categories: input labels and report labels.
Part 4: The User Interface
Based on the design of the application, the two layout structures will be simple. Because all visual objects need to be placed relative to each other, a RelativeLayout ViewGroup is used as the root element. TextViews is used for the static labels of all input text fields.
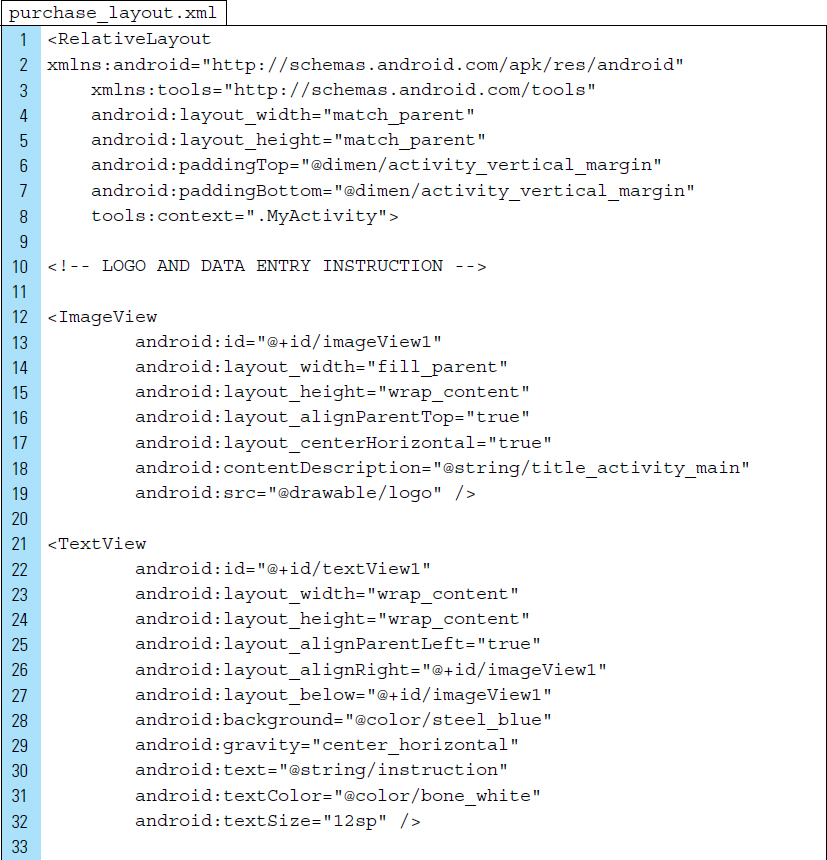
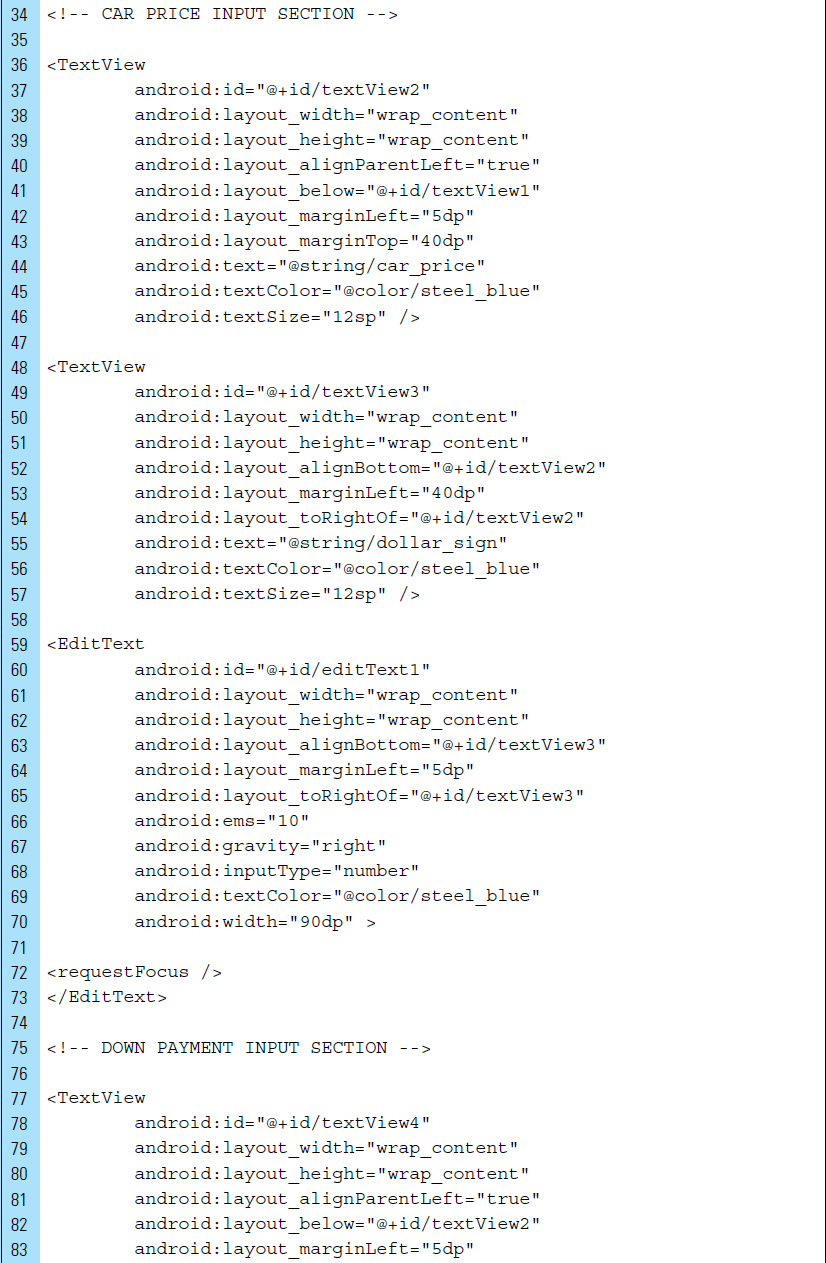
The design and hierarchy outline for the main layout, purchase_layout.xml, is shown in Figure 3-13.
The XML code for purchase_layout.xml is shown below:
Lines 59–73: |
An |
Lines 114–151: |
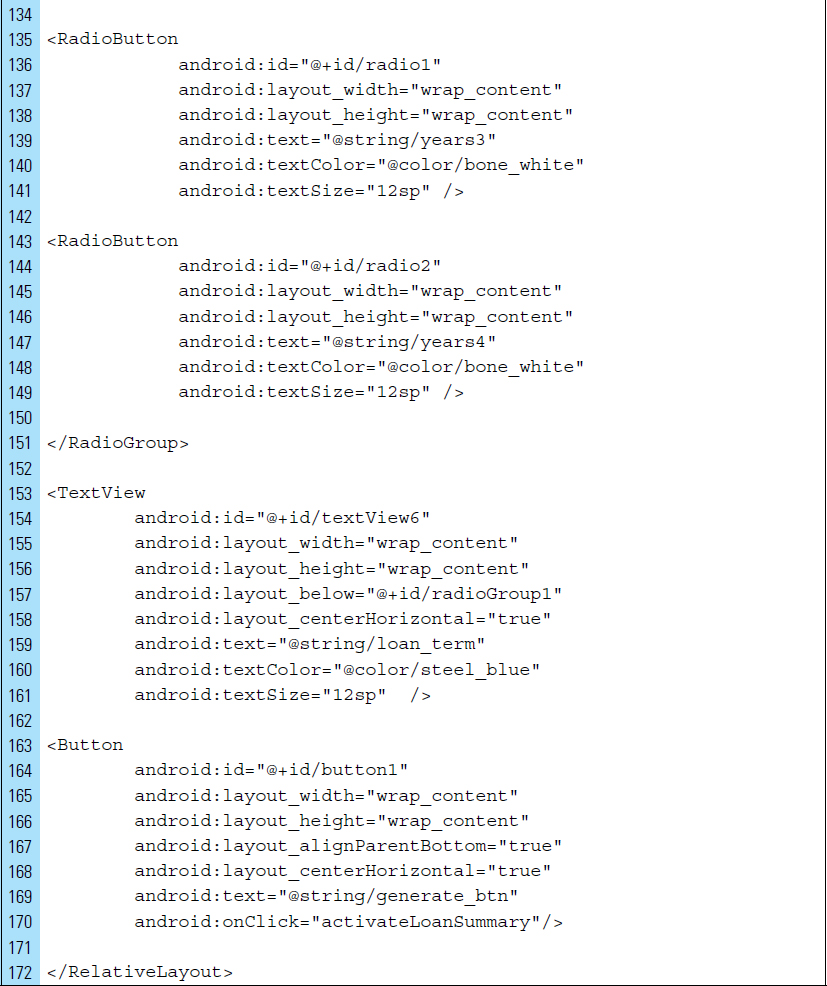
The term of the loan has fixed options: one, two, or three years. The input control for selecting the appropriate loan term is a |
Line 170: |
The |

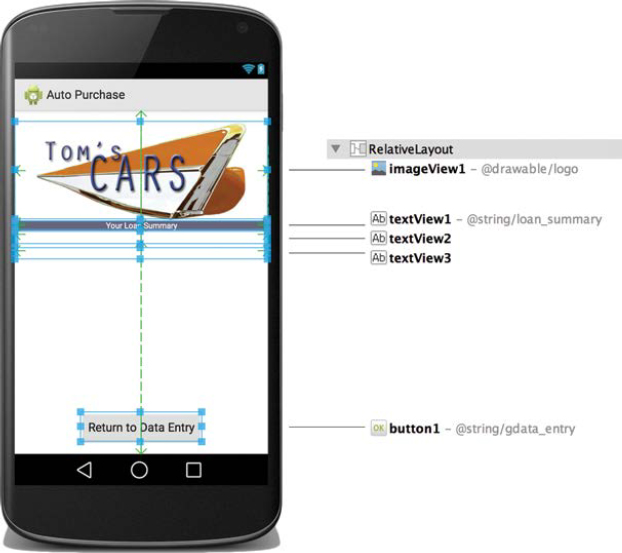
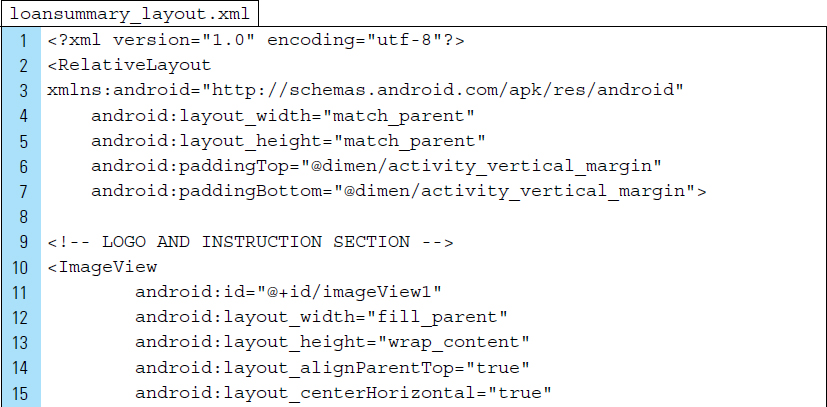
The second layout screen, loansummary_layout.xml, appears when the activity named LoanSummaryActivity is running in the foreground. This layout is used to display a loan summary of the calculated costs for a car purchased from Tom’s car lot. The graphic layout design is shown in Figure 3-14.
A set of three TextViews is also used for the display of the generated loan report. The XML code for loansummary_layout.xml appears below:
Line 68: |
A button is declared to return the user to the input screen for entry of new car purchase information. The |

Part 5: Source Code for Application
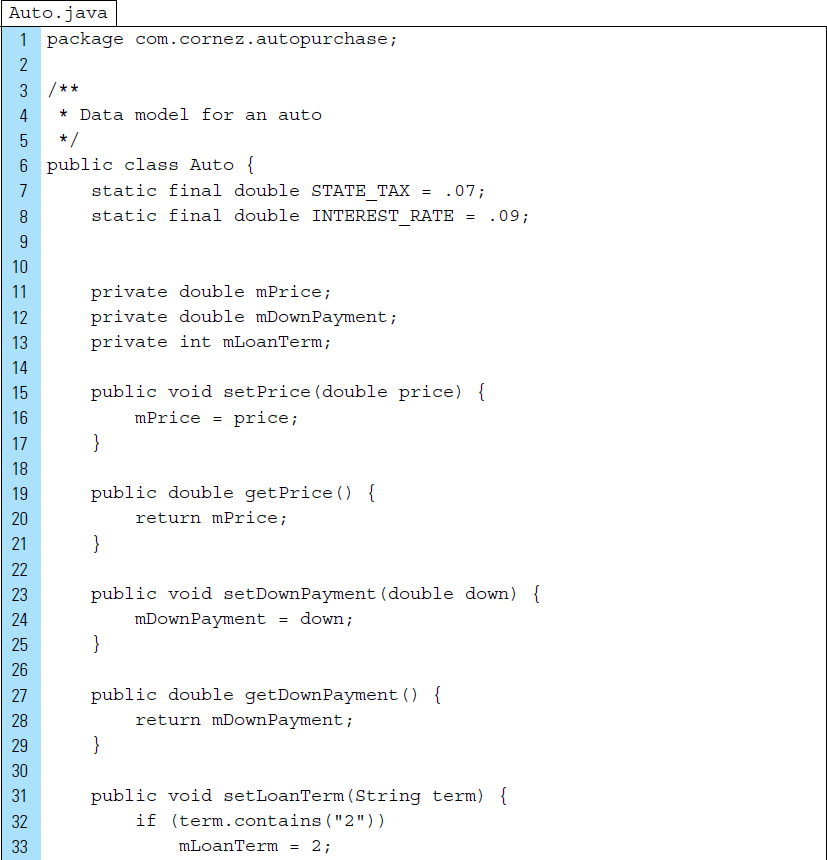
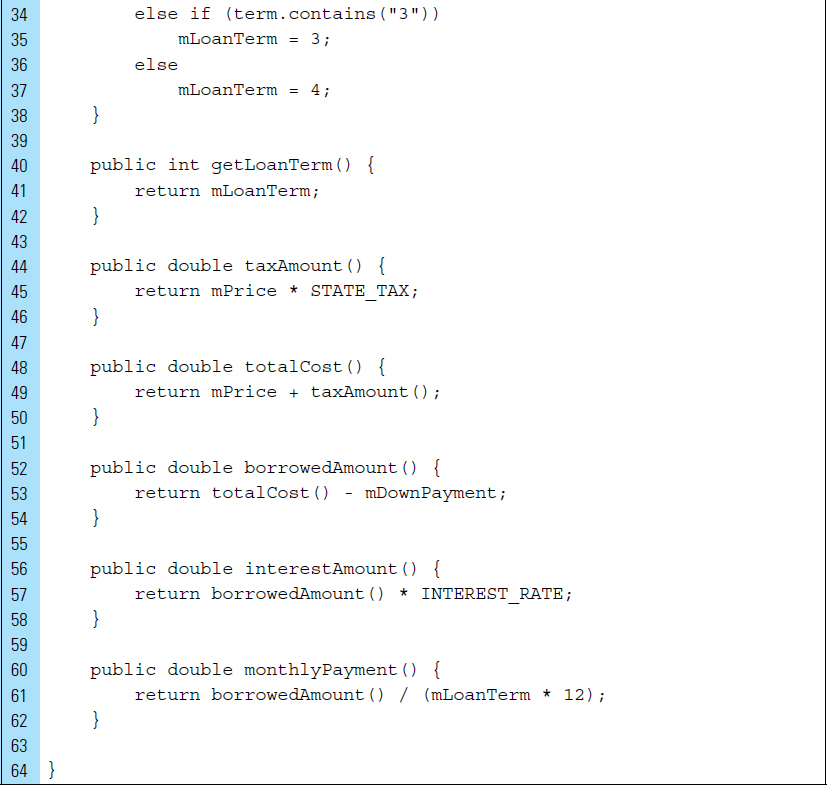
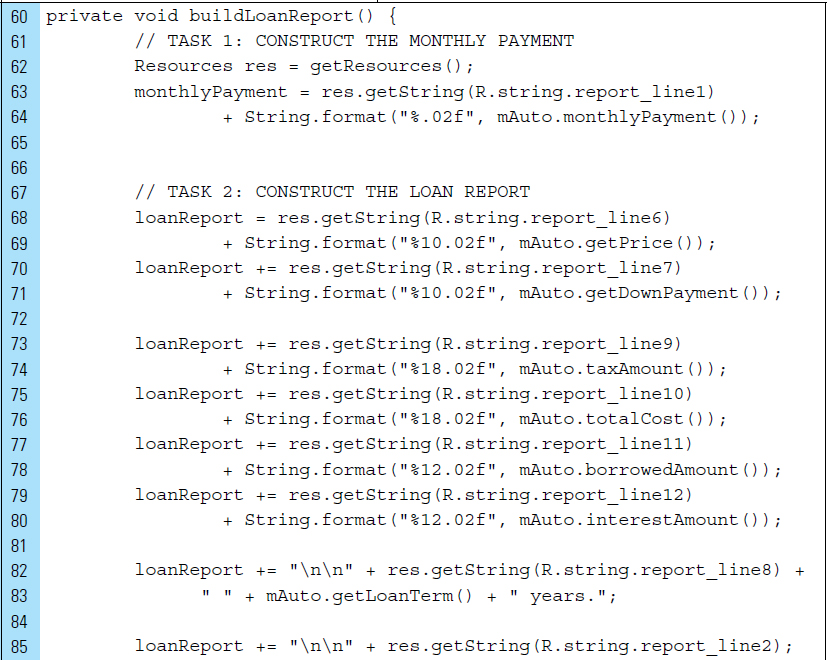
The Auto.java source file is the data model for an abstract automobile purchase. The data members for this class are the price, down payment, and the loan term in years. The state tax is fixed at the rate of 7%. The interest rate for a loan is fixed at 9%.
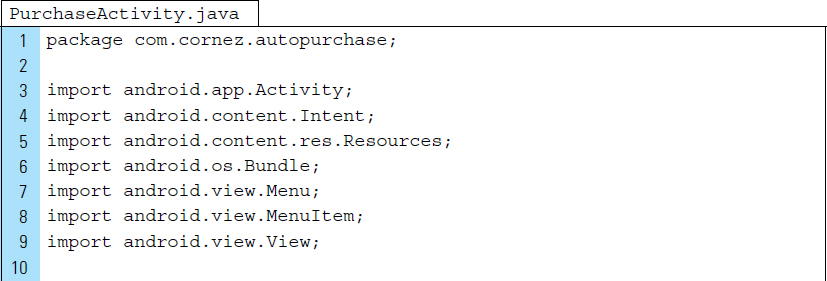
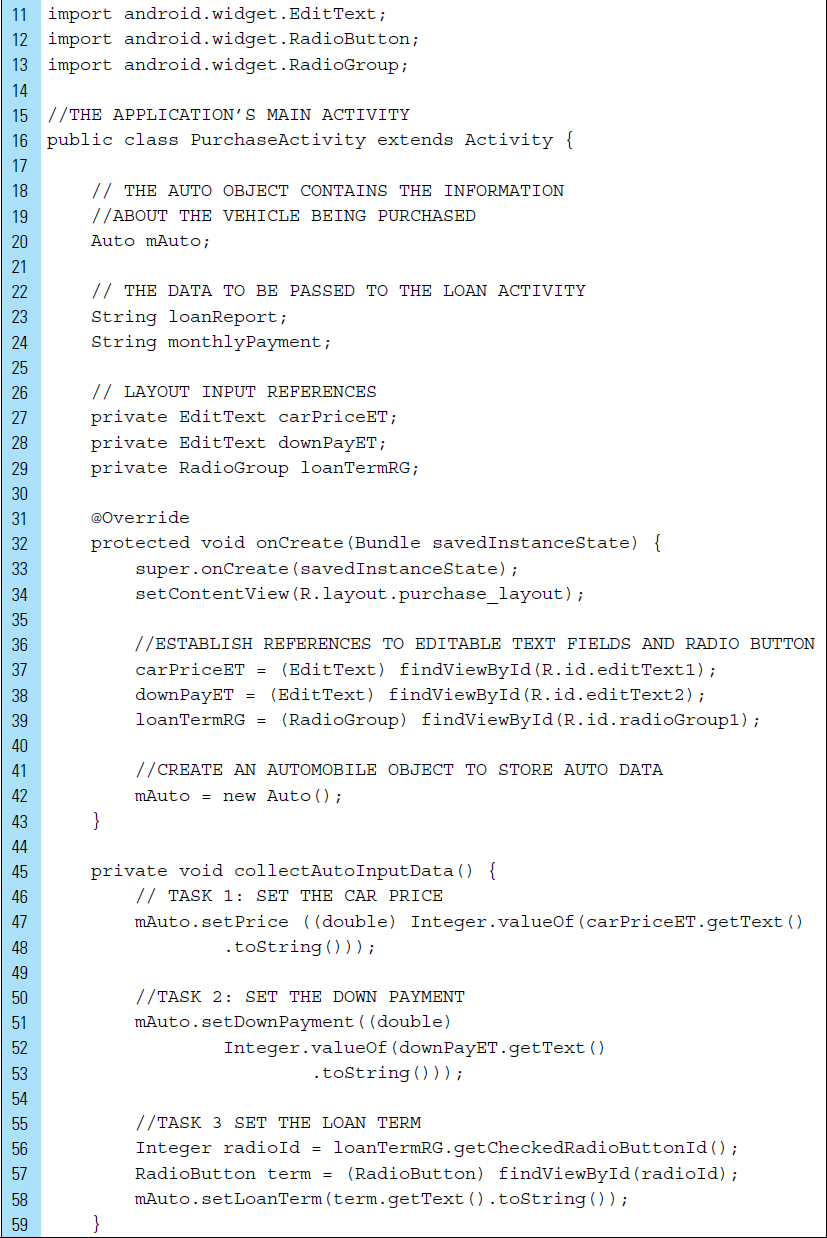
The Java code for PurchaseActivity is shown below:
Lines 23–24: |
The two data elements to be attached to an |
Line 91–108: |
|
Lines 97–98: |
An |
Lines 103–104: |
The
|
Line 107: |
The new activity is launched with the |

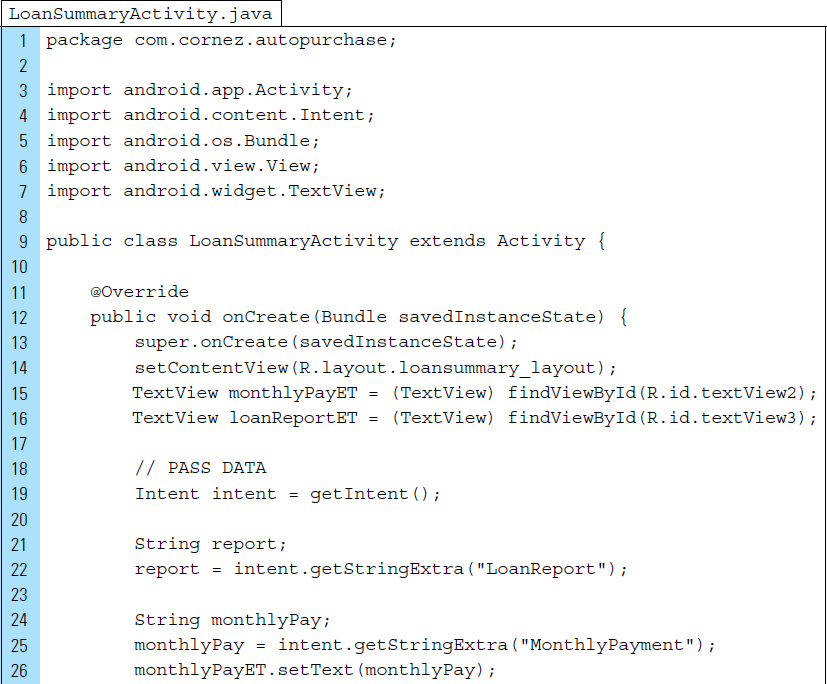
The secondary activity for the Car Purchase app is implemented as LoanSummaryActivity, as shown below:
Line 19: |
|
Lines 21–22: |
The
It should be noted that the method |
Lines 30–32: |
|
■ 3.6 Basic Transitions between Activities
The quality of an application can depend on several characteristics, such as its content, usability, and design features. Enhancements made to interaction design, through the use of animation, can make a fundamental difference in the usability of an application. Users’ experiences and their impression of an app are shaped by a combination of factors, with interaction playing a very large role. There is more to design than simple functionality. The primary reason for this is that user interfaces are not static designs, but rather engaging and dynamic design patterns.
When users fling their fingers across the touchscreen, the result can cause a large change; for example, the current layout can be replaced by an entirely different layout. On the other hand, the change could be so small that it might go unnoticed, such as when elements are rearranged on an existing layout. Users may sometimes find it difficult to know where to focus their attention or even to understand how the screen content got from point A to point B. Transitions in a user interface have been effective in supporting user focus and guiding attention during navigation of an application.
When a new layout appears on the screen featuring different content, the result can be a loss of context for the user. As the screen moves from layout to layout, we can assume that the user expects a linear experience, with each screen building upon the other in context. By enhancing the screen changes with an animated transition, the application can provide a better understanding about the subsequent new screen. Animated transitions primarily serve a functional purpose, but they may also improve the overall beauty of a user experience.
It should be noted that overusing animation transitions or using them at inappropriate moments might detract from the quality of the experience. During the design phase of an application, animation transitions should be analyzed carefully to ensure they will not cause unnecessary delays; they should then be applied judiciously.
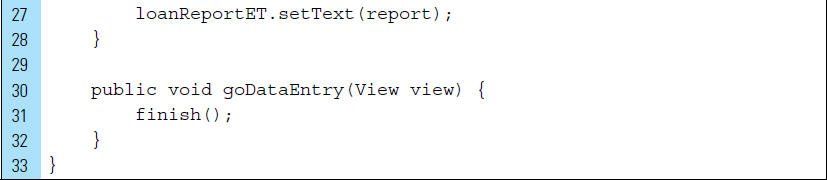
Custom transition animations are resources that can be built by methods in XML code. By using the method overridePendingTransition(), the custom-built transitions can be explicitly applied to the entering and exiting activities. overridePendingTransition() requires two arguments: an enter animation implementation and an exit animation implementation. The enter animation resource will be used for an incoming activity, and the exit animation resource will be used for an exiting activity.
The code segment shown below illustrates overridePendingTransition():
Line 1: |
|

Line 2: |
|
Lines 4–5: |
|
Notice that arguments for overridePendingTransition () use R class identifications for both of the two transition animations. The dynamically generated R.class contains numeric constants that uniquely identify all animation transition XML files, such as those shown on Lines 3 and 4 in the code below. These Android resources are available for usage in Java classes within the app.
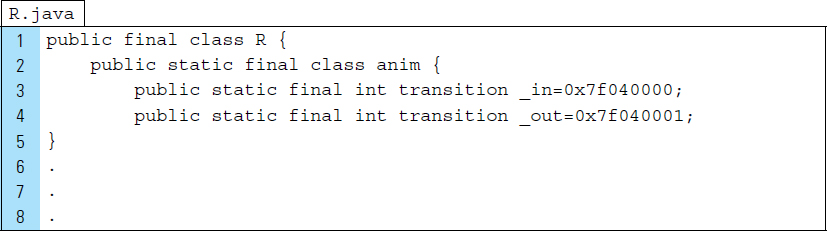
Animation resource files are defined using XML code. They are stored in an animation folder, typically named anim, within the res directory of the project.
Animation resources can be defined in one of two ways: property animation and View animation. Property animations involve the modification of a View’s properties, using an animator, over a set period of time.
A View animation uses tweens and frames. For example, a tween animation uses an image, such as a shape drawable, placed on stage as an ImageView. Its x and y position on the screen is altered in a looping structure. The result is that the object moves on the screen. Chapter 6 devotes a considerable amount of discussion to this topic.
Property animations are typically defined in XML files. Specific properties of the target object are modified over a set period of time. Examples of these properties are:
rotation
rotationX
rotationY
scaleX
scaleY
pivotX
pivotY
x
y
alpha
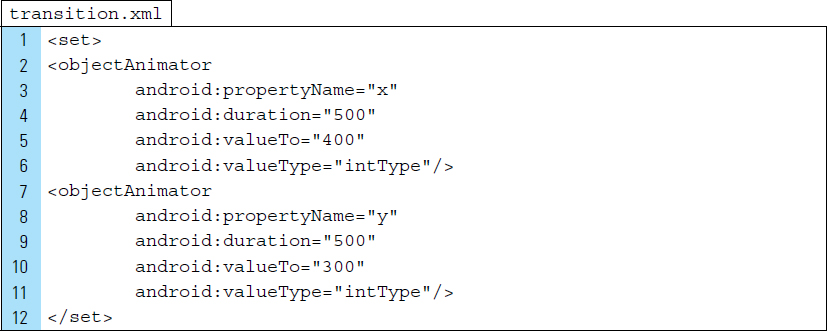
A common XML tag found in an animation XML file is <set>. This serves as a container that holds other animation elements (<objectAnimator>, <valueAnimator>, or other <set> elements).
<set> tags can be nested to further group animations together.
In the sample XML code shown below, an animated transition is implemented using an objectAnimator. The x and y properties are set to values 400 and 300, respectively. The animation will play over a duration of 500 milliseconds.
■ Lab Example 3-4: Flip Cards with Animated Activity Transitions
The following lab example illustrates how an animated transition can be used when navigating between activities.
Part 1: The Application Design
Students often prepare for tests and quizzes by scribbling notes on notecards. A flashcard is similar to this concept. It has two sides, such as a question on one side and the answer to the question on the other side.
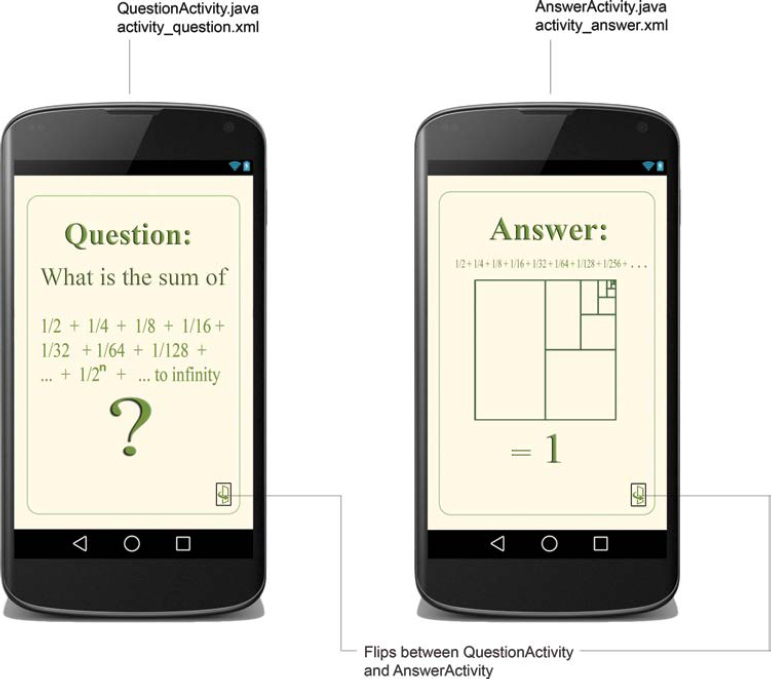
The goal of this lab is not to create a complete stack of flashcards. That would be very useful to many people, but also time-consuming. Rather, the objective of this lab is to explore the use of animated transitions when navigating between activities. For example, consider a question card, such as the one shown in Figure 3-15, displayed on the screen in the form of a visual layout. When the user turns the card over, tapping the flip button located on the screen results in a customized animated transition that gives the user the sensory experience of the card being flipped.
To create a fully functioning Flashcard application, we would need to create many cards in a deck that could be shuffled. A deck would perhaps require a database of information. These topics will be discussed in the next chapters.
Part 2: Application Structure and Setup
The settings for the application are as follows:
• Application Name: |
Flip Card |
• Project Name: |
FlipCard |
• Package Name: |
|
• Android Form: |
Phone and Tablet |
• Minimum SDK: |
API 18: Android 4.3 (Jelly Bean) |
• Target SDK: |
API 21: Android 5.0 (Lollipop) |
• Compile with: |
API 21: Android 5.0 (Lollipop) |
• Activity Name: |
|
• Layout Name: |
|
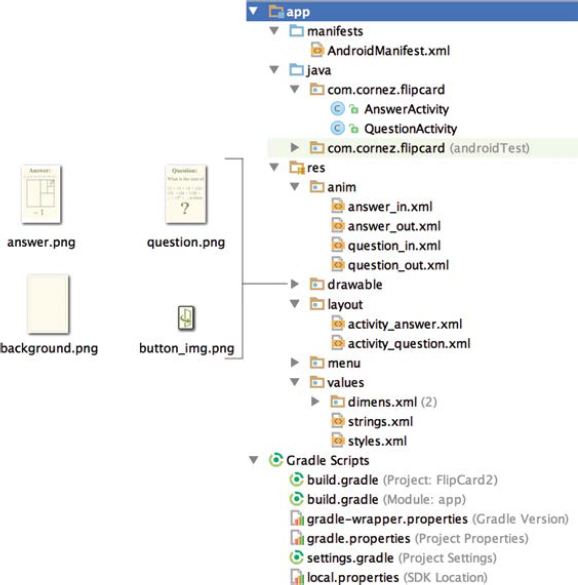
The launcher icon for the application is set to the Android default ic_launcher.pg file. In addition to this graphic file, the drawable folder contains a background, a front card image, a back card image, and a flip button for the user to alternate between the two sides of the card. Figure 3-16 shows the complete project structure for this app.
The two activity files are representative of the two sides of the flashcard. The animation XML files are for transitioning cards in and out. This requires four animation files. Finally, the two layouts used in the application correspond with the two activities.
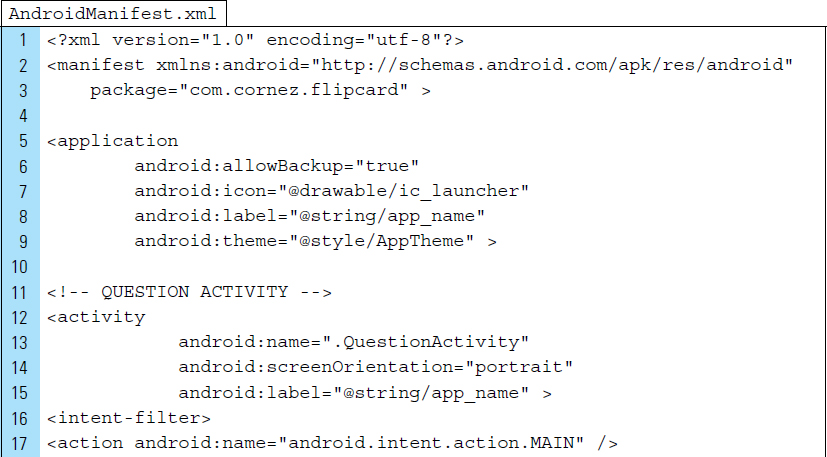
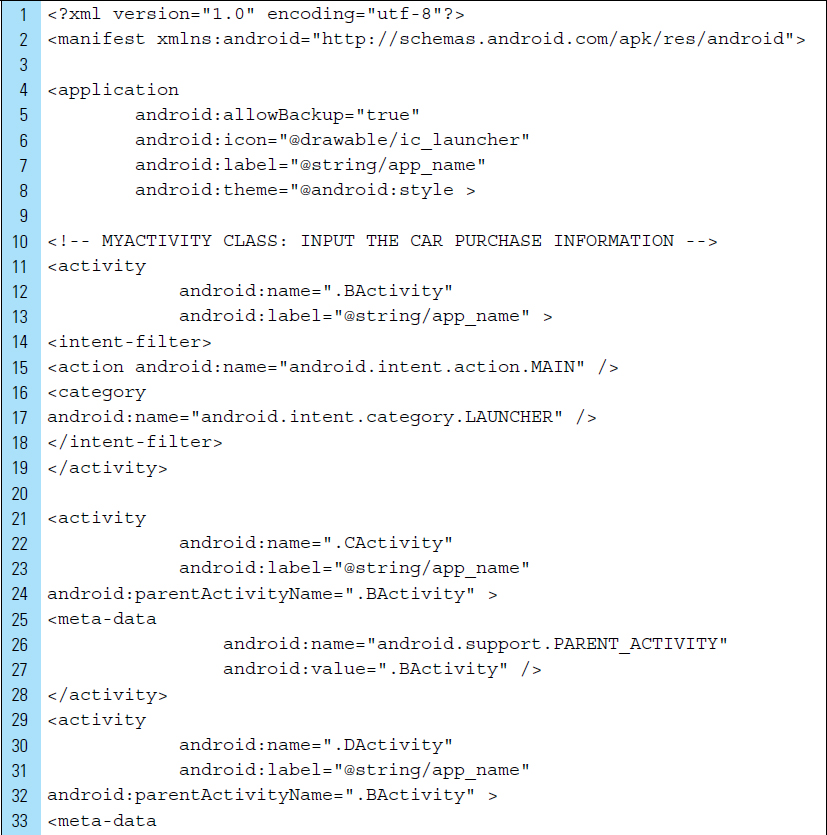
The orientation of the screen is locked into portrait mode, which is done in the AndroidManifest.xml file. In addition, a full screen is used and the titlebar is removed. Finally, since we have two activities, both are listed in the AndroidManifest file. The launch default activity is QuestionActivity, as shown in Lines 11–21 of the Android manifest file.
Lines 11–22: |
The main activity of the application is defined as |
Line 14: |
|
Lines 23–29: |
The secondary activity of the application is defined as |
Part 3: External Value Resources
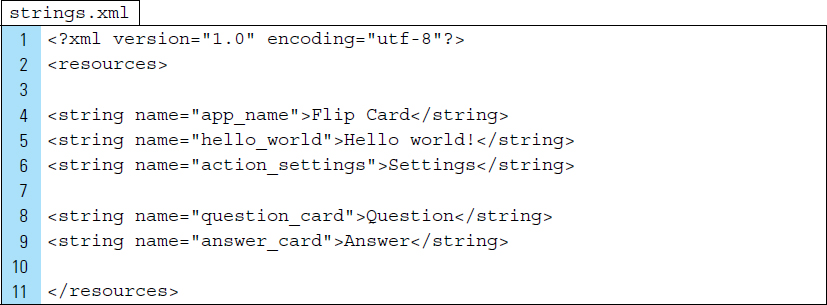
There are no external resources for the Flashcard app other than strings.xml, which contains text strings for the ImageView to be added to the layouts. As shown below, strings.xml has been edited to contain content descriptions.
Part 4: The User Interface
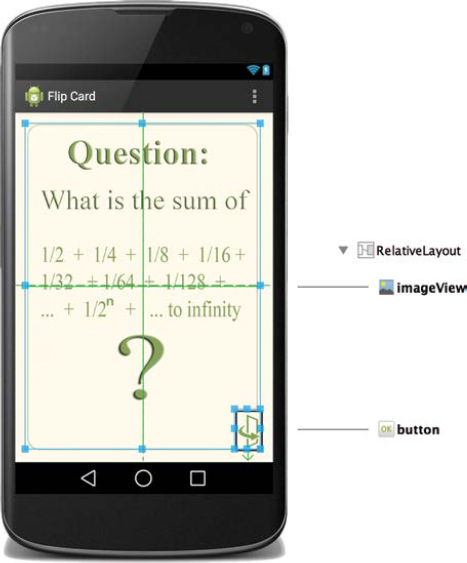
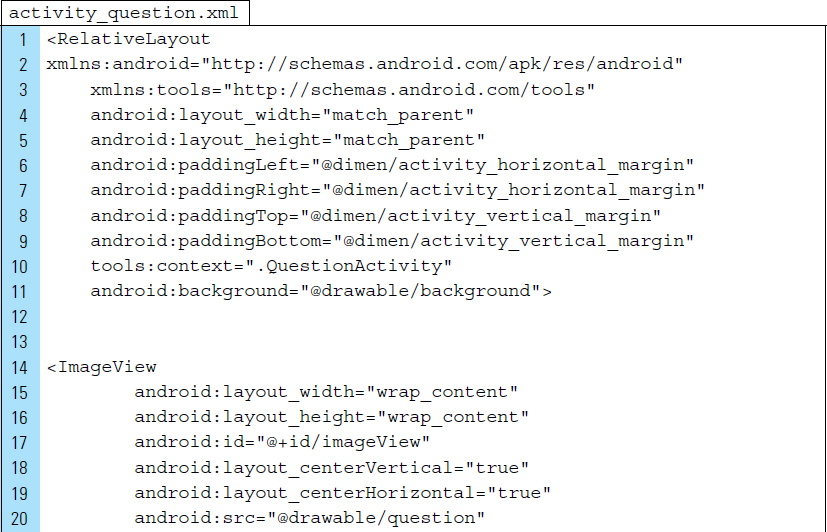
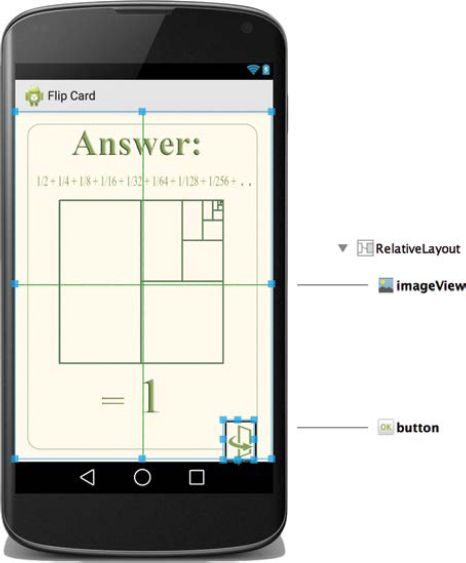
This is a trivial app, because it contains exactly one card. The card question (card front) is visually implemented by activity_question.xml. The root element is a RelativeLayout containing a card background. These two elements, as seen in Figure 3-17, are the question image and the flip button.
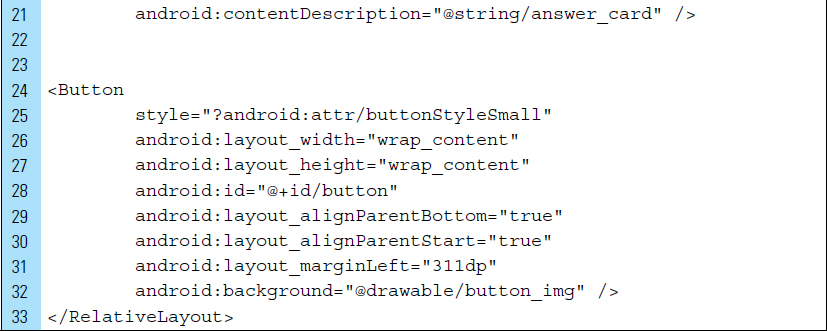
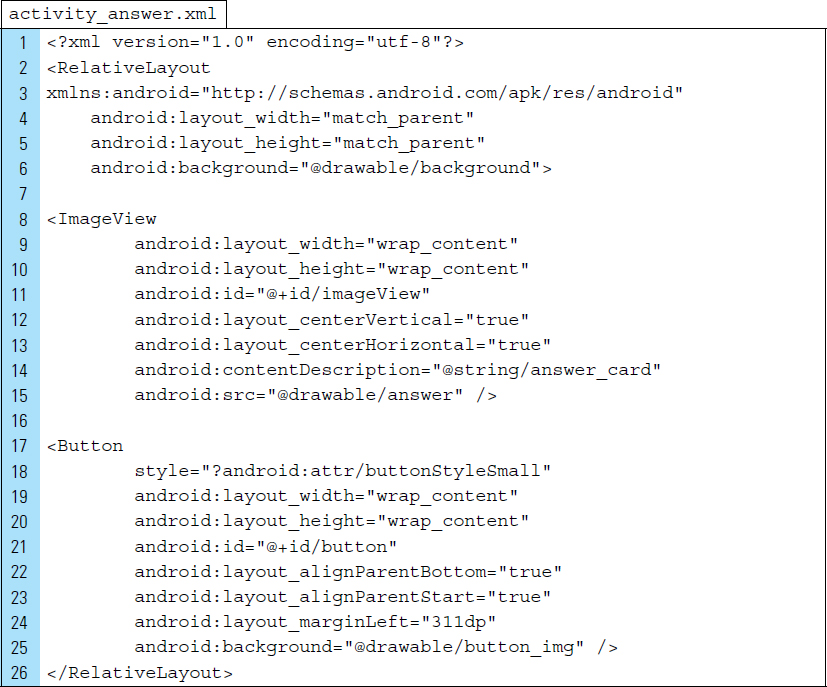
The XML file activity_answer.xml is constructed similarly to the front side of the card. A consistent background is applied to the root element of each of the layouts. The XML file that implements activity_answer seen in Figure 3-18 is shown below.
Part 5: Animated Transitions
The four transitions for this application are controlled, using XML code, to specify the animation properties and their values.
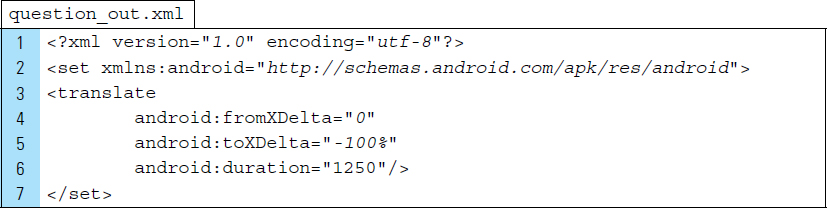
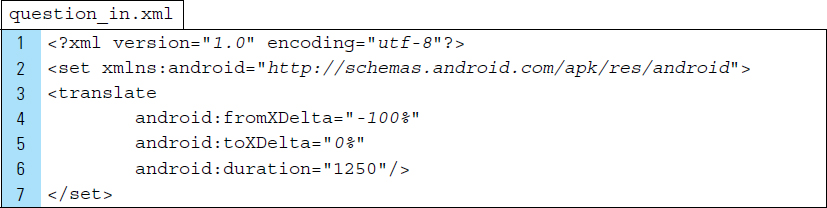
The first XML transition file is question_out.xml. This file describes the animation shown in Figure 3-19. The activity_question layout is initially displayed on the screen when the application is launched. The layout has a start position of 0. As it moves out of the screen, it will appear to move to the left until it is no longer visible on the screen. Its ending position is 100% of the screen.
Line 3: |
Movement is constructed within a tag called The tag |
Line 4: |
The attribute |
Line 5: |
The attribute |
Line 6: |
The attribute |

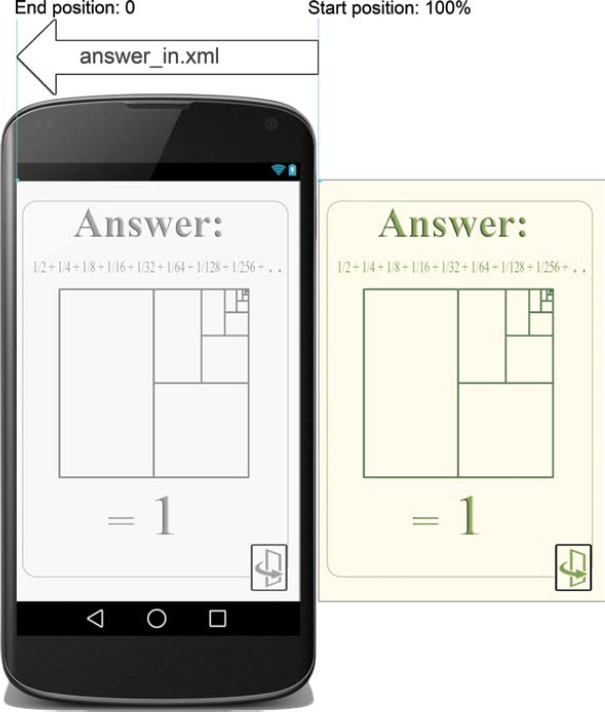
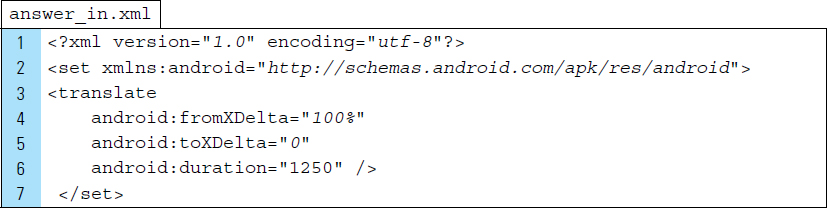
The second XML transition file describes the details, as depicted in Figure 3-20, for how the answer_in.xml layout will be moved from a position off the screen to its final location occupying the entire screen. The code is similar to the previous transition XML file, with only the values for the to/from properties altered. The XML code for answer_in.xml is shown below.
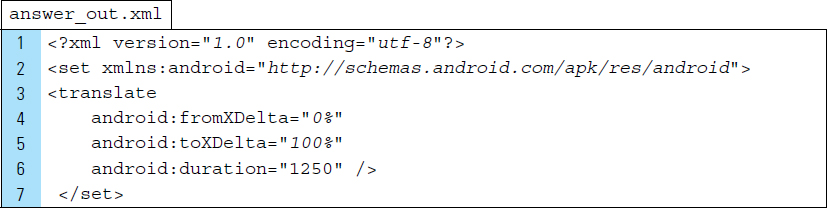
The animation XML file is used for the transitioning of the backside of the card; the answer, as it leaves the screen, is shown below in answer_out.xml.
The animation XML file is used for the transitioning of the frontside of the card; the question, as it moves back into the screen, is shown below in question_in.xml.
Part 6: Source Code for Application
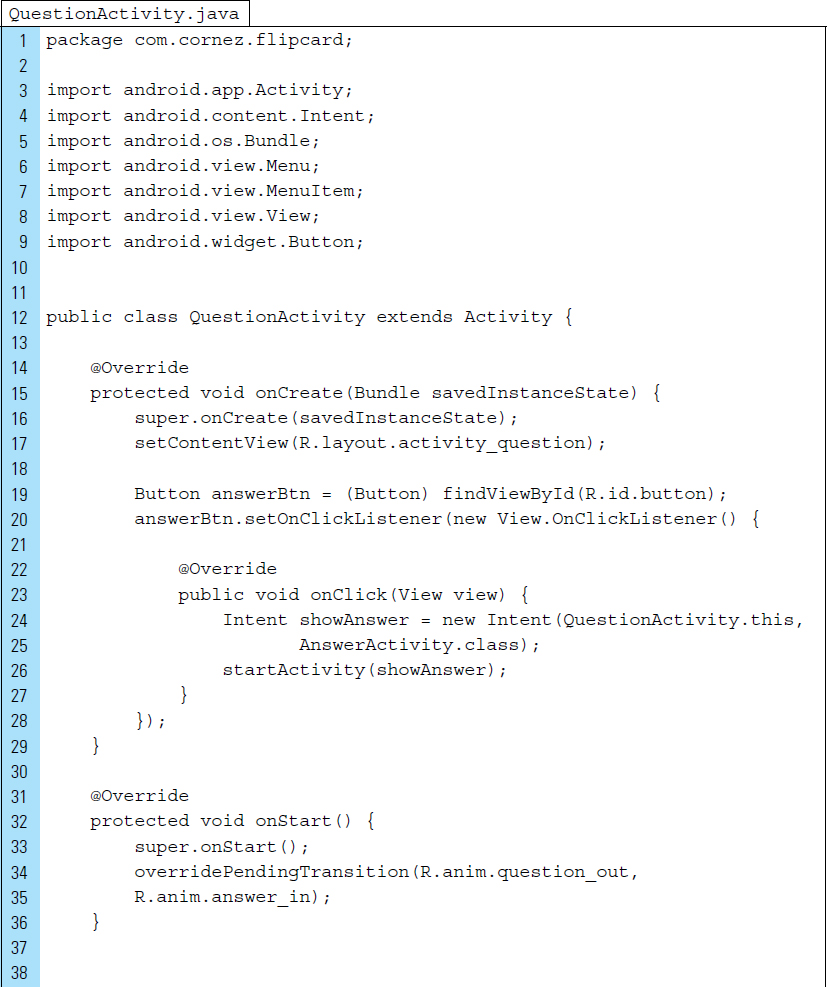
As a simple application, this lab example requires only two activities: the question side of the flashcard, and the answer side of the flashcard. QuestionActivity is the main activity of the application and will be launched when the application is launched for the first time. The Java code for QuestionActivity is shown below.
Line 17: |
The visual content for the
|
Line 19: |
|
Lines 20–28: |
A listener event is registered to |
Lines 24–25: |
An |
Lines 32–36: |
A transition animation will be initiated in the |
AnswerActivity is the secondary activity of the application and will be launched when the user decides to flip the card to view the answer. The Java code for AnswerActivity is shown below:
Line 14: |
The visual content for the activity is set to the layout named |
Line 16: |
|
Lines 17–25: |
A listener event is registered to |
Lines 21–22: |
An |
Lines 28–33: |
A transition animation is initiated in the |


■ 3.7 Scene Transitions
With the release of KitKat, Android 4.4, a transitions framework was introduced that supports the definition of scene transitions.
Unlike frames, which will be discussed in Chapter 4, scenes are used specifically for transition animations. For example, scenes can be created as a View hierarchy, much like a layout. As a View hierarchy, scenes can be merged or transitioned into a defined View within an activity.
A scene contains values of various properties in the View hierarchy. As scenes enter or exit a View hierarchy, they will be animated based on these properties. In this manner, a scene defines a given state of the UI, whereas a transition defines the change from one scene to another.
Consider the following segment of code that illustrates how a scene is used in an activity:
Line 1: |
The layout for the activity is established as |
Line 2: |
The root element of |
Lines 5–9: |
The method |
A View defined in the activity layout. Animated transitions take place in this View. In the code example below, rootElement is identified as the View object that displays the transition animation.
A scene layout resource file that contains the transition changes that occur. The two-scene layout resource files used in the code example are identified as scene1_layout and scene2_layout.
The context used in the process of inflating a scene layout resource. The context for this example is the current activity.
Line 11: |
|
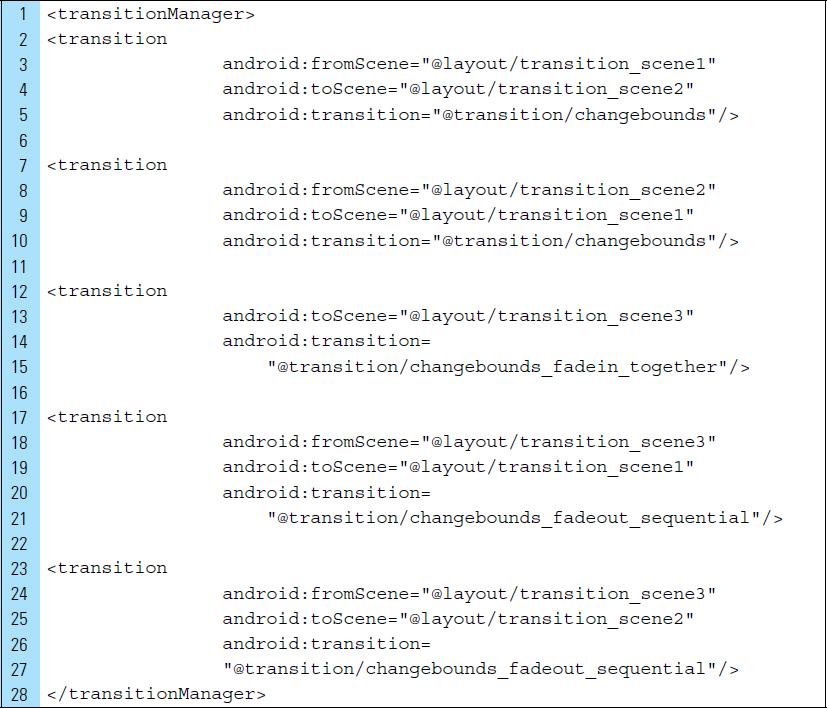
Transitions and Scenes produce animations based on specific properties, such as visibility. A Transition holds information about animations that are run on its targets during a Scene change. Every Transition object has two functions: (1) to capture property values and (2) to play animations based on changes to the captured property values. For example, consider a Transition animation that requires an object to fade into view. A Transition tracks changes using visibility properties and then constructs and plays the animation based on the changes to those properties.
Android developers can use the TransitionManager to coordinate Scene with Transition objects. More specifically, the TransitionManager manages the set of transitions that fire when there is a change of Scene. TransitionManagers can be declared in XML resource files inside the res/transition directory.
The following XML code example illustrates the delaration of scene transitions. Tag names are used to describe the relationship of a given transition to the from/to Scene information in that tag.
■ Lab Example 3-5: Pieces of a Painting–The Painting Scene App
The objective of the Painting Scene application is to explore the use of the TransitionManager and the construction of Scenes and Transitions.
Part 1: The Design
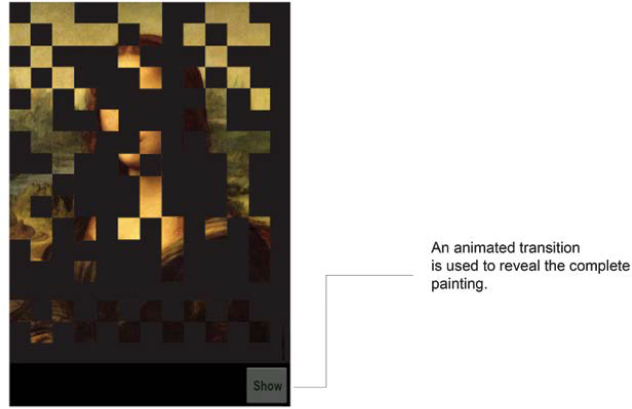
When the Painting Pieces application is launched for the first time, the user is presented with a famous Renaissance painting; however, the painting is not fully visible. Much of the painting has been blocked out in small rectangular objects, as shown in Figure 3-21.
The idea of the app is similar to a flip card. The user can attempt to identify the famous painting and then tap the “show” button, located at the lower right corner of the screen, to reveal the complete painting and confirm the answer.
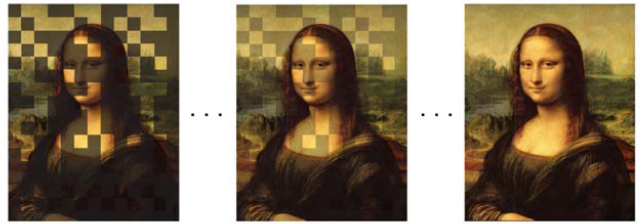
Unlike the flashcard lab example, which performed a uniform Transition of a ViewGroup, the button in this lab triggers a complex animation. As shown in Figure 3-22, individual elements are animated to alter the scene in an interesting way.
Part 2: Application Structure and Setup
The settings for the application are as follows:
• Application Name: |
Paint Scene |
• Project Name: |
PaintScene |
• Package Name: |
|
• Android Form: |
Phone and Tablet |
• Minimum SDK: |
API 18: Android 4.3 (Jelly Bean) |
• Target SDK: |
API 21: Android 5.0 (Lollipop) |
• Compile with: |
API 21: Android 5.0 (Lollipop) |
• Activity Name: |
|
• Layout Name: |
|
The application launcher icon remains set to the Android default ic_launcher. png file. Figure 3-23 shows the final project structure for the completed application.
The painting is composed of multiple rectangular graphic objects. Similar to a jigsaw puzzle, these graphic elements are combined and arranged to build a complete painting. Each of these graphic elements must be added to the project. They are placed in the default drawable folder.

Three new XML code files have been added to the application. The Transition XML file, used to govern the animations, is placed in its own resource directory, anim. This directory must be created and placed within the res directory. Two scene resource files are placed in the layout directory, along with the activity layout.
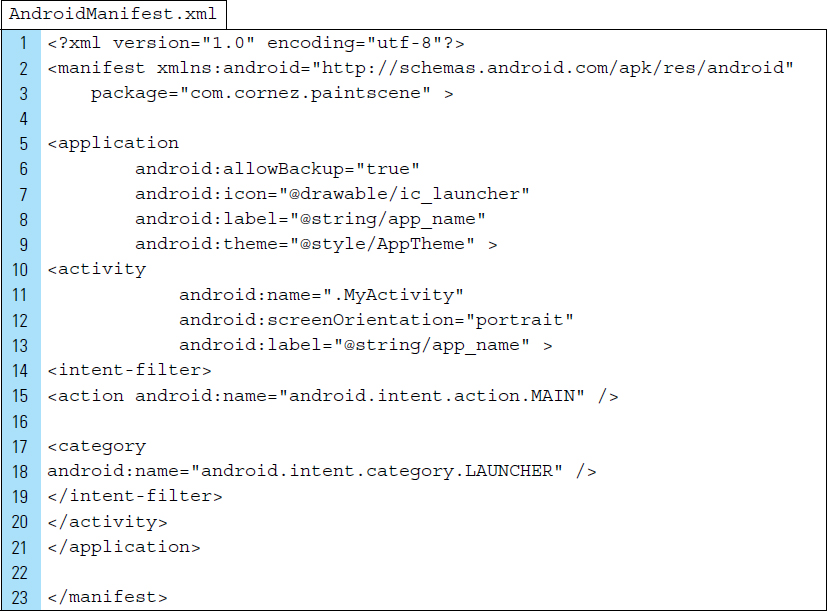
Applications that require multiple activities must rely on the AndroidManifest file to declare them. When using scenes and a single activity, the manifest file needs only to declare the activity.
For the Paint Scene application, the orientation of the screen will be locked into portrait mode. The code for the manifest file is shown as follows:
Part 3: External Value Resources
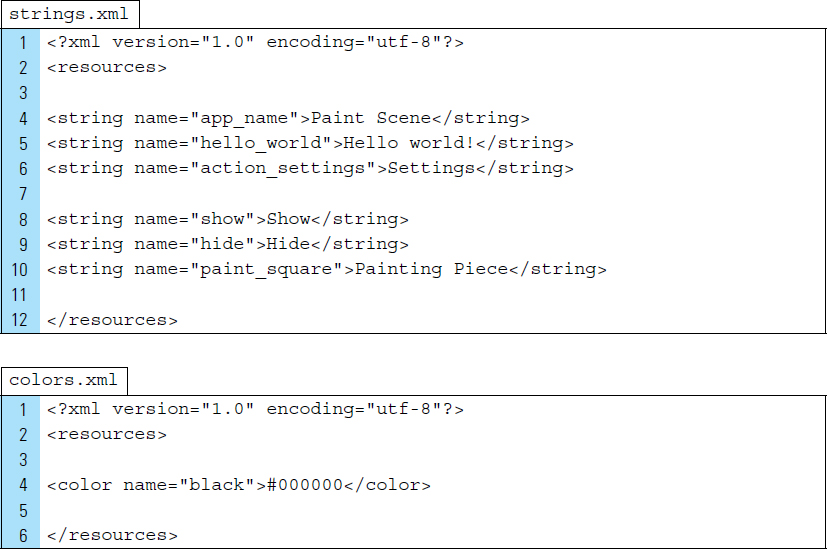
The two value resource files used by the Paint Scene application are strings.xml and colors.xml. strings.xml will hold the labels for the two buttons. One button shows the complete painting, and one button returns it to its partially hidden View. A third string has been added to the content description for the pieces of the painting.
colors.xml stores one resource, the color black. This will provide a backdrop for the painting. When a piece of the painting has been removed or made invisible, the black backdrop appears.
The XML code for both these files is shown as follows:
Part 4: The User Interface and Scene Definitions
The user interface for the Paint Scene application consists of three files that will be grouped together.
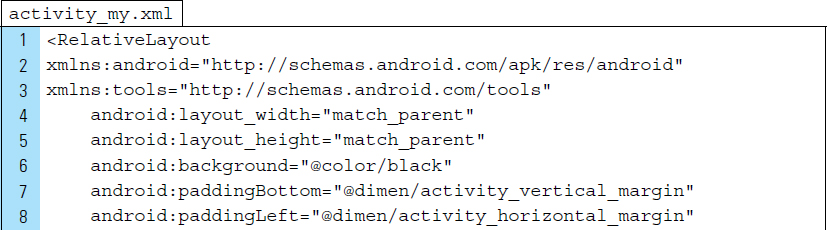
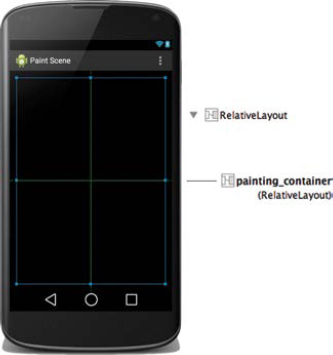
activity_my.xml is the layout file that automatically launches the first time the application is launched. Its visual design is shown in Figure 3-24. The activity_my.xml layout contains a ViewGroup element for scenes to enter and exit.
Lines 14–20: |
The |
Line 15: |
The id name of the |
Line 20: |
A black background is applied to the |
The XML code for the activity_my.xml file is listed as follows:
The scene layouts for the application hold the painting elements. There are 15 rectangular pieces that form a complete painting.
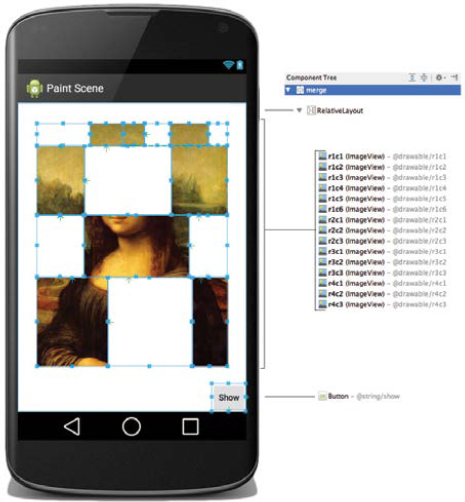
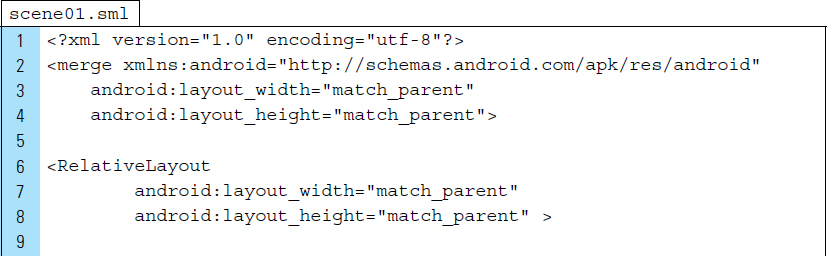
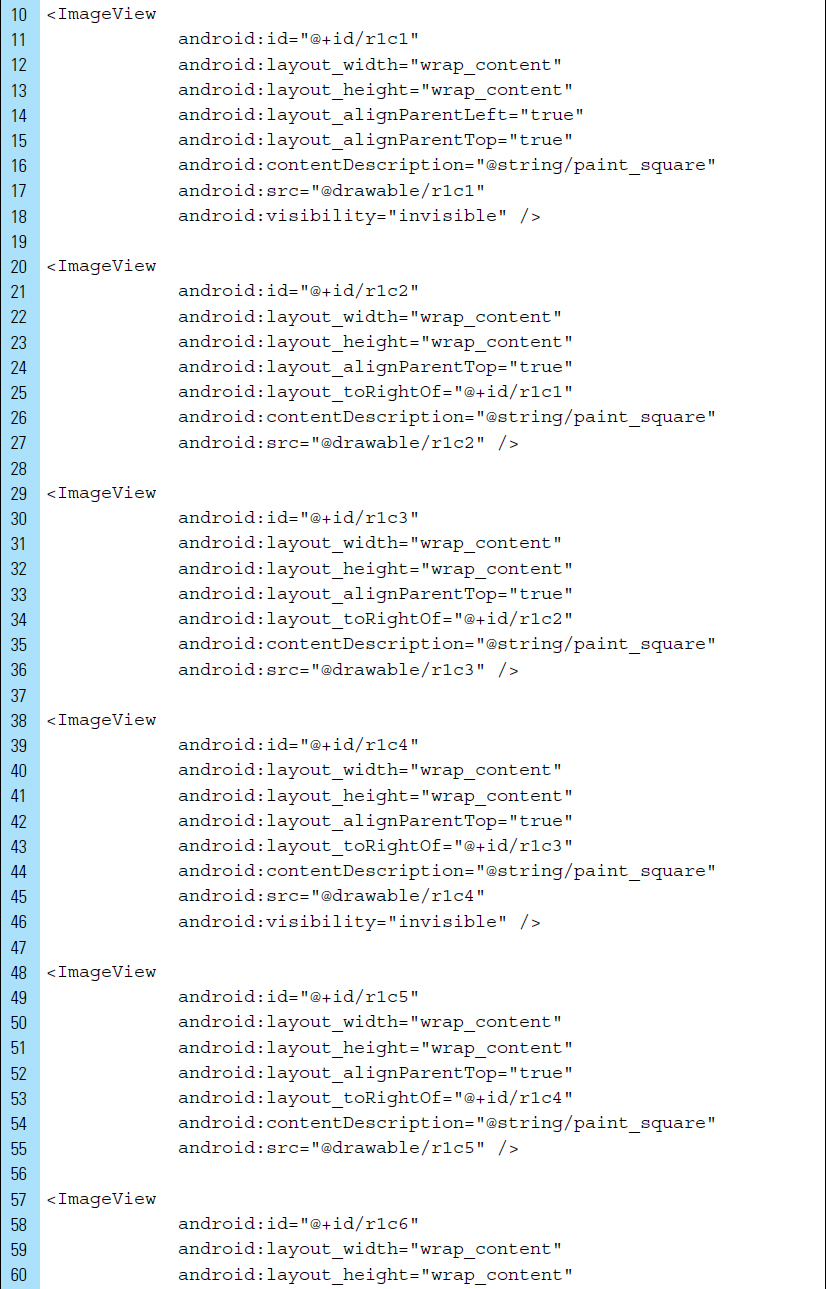
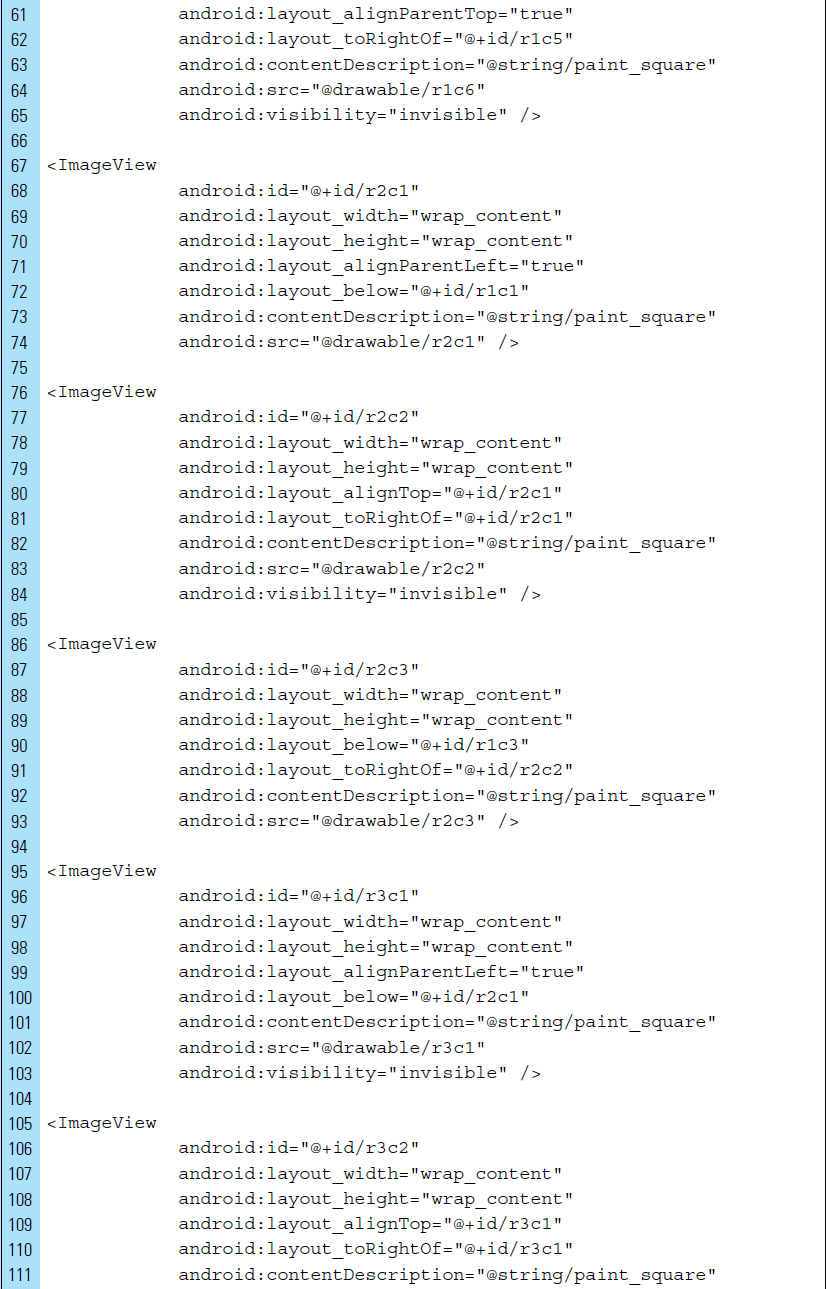
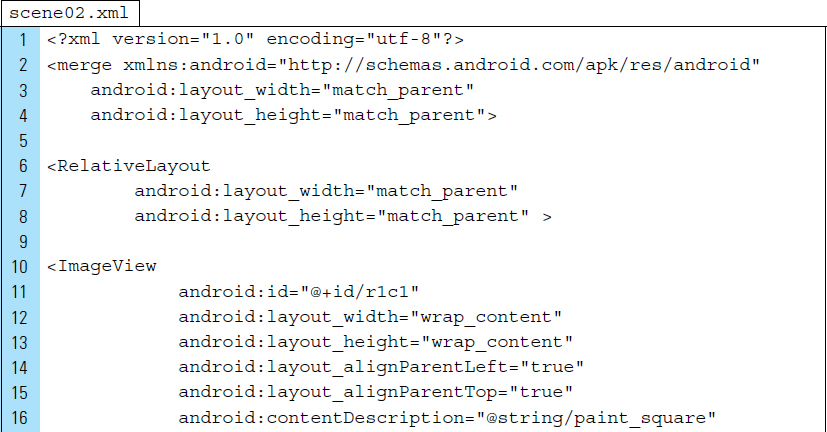
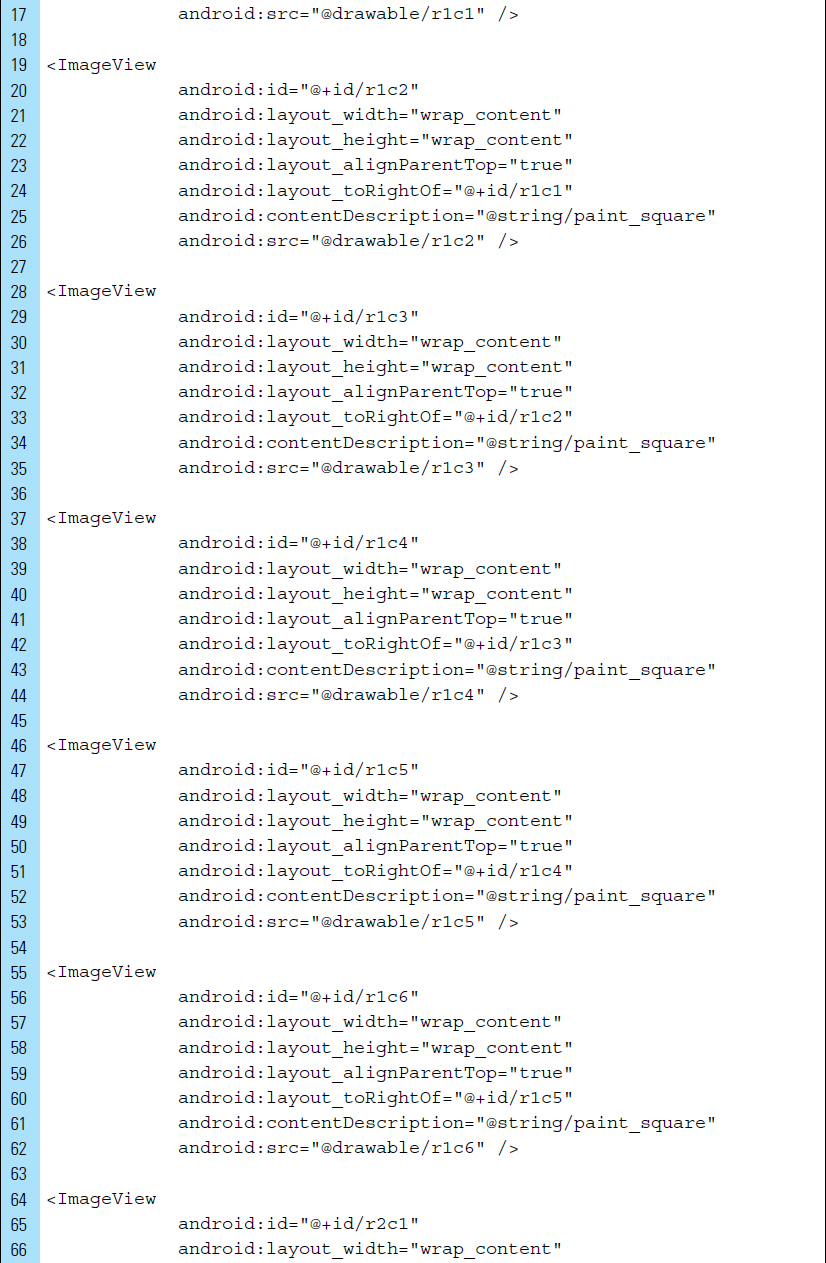
scene01.xml holds all of the painting elements, but it adjusts the visibility property for seven of them so they will not be visible to the user. The visual design for scene01.xml is shown in Figure 3-25. This layout contains ImageViews placed inside a RelativeLayout container.
The code listing for this layout appears as follows:
Line 11: |
Each painting piece has a name that corresponds to its location on a grid. For example, the first painting piece is located on row 1, column 1; hence, its unique id is |
Line 16: |
A generic content description is assigned to each painting piece. |
Line 17: |
Note that the name of the drawable matches the assigned id. |
Line 18: |
The |
Lines 152–159: |
A |
The XML code for scene01.xml is shown as follows:
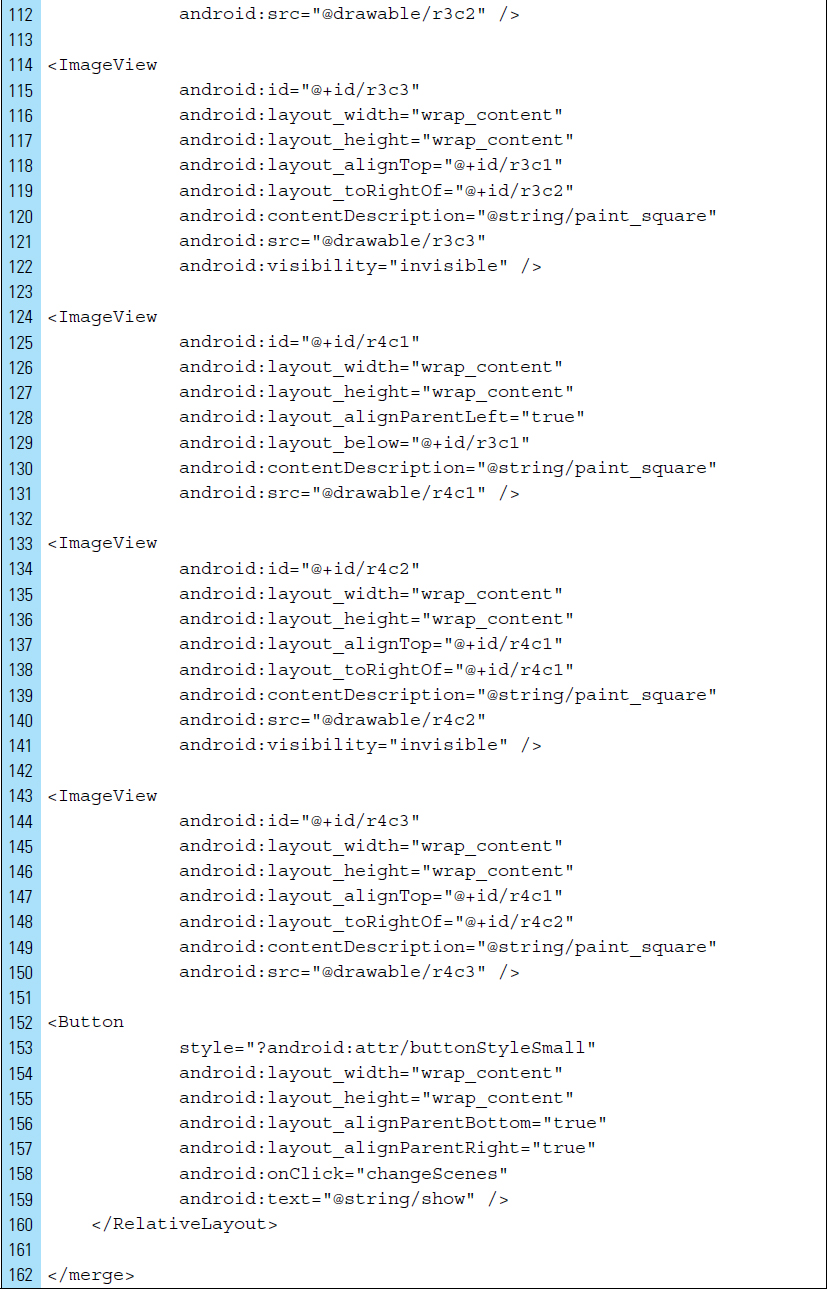

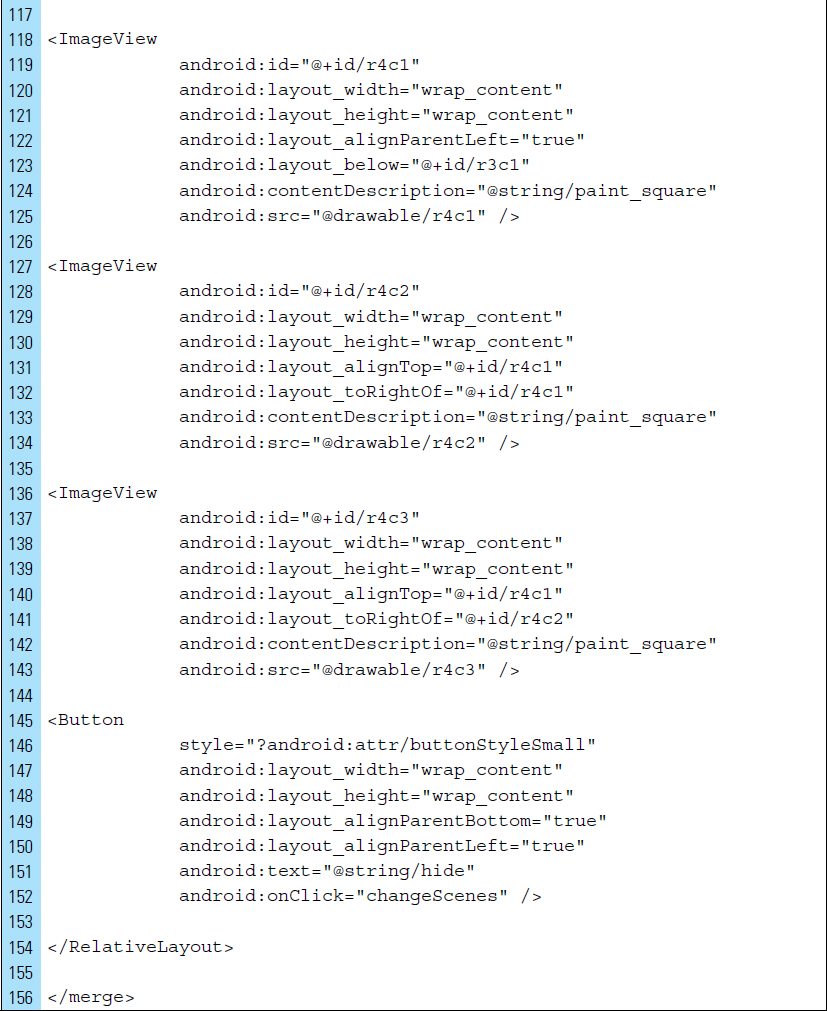
The scene02.xml layout, shown in Figure 3-26, is similar to scene01.xml, with two main differences between these files: (1) scene02.xml contains all “visible” ImageViews, and (2) scene02.xml contains a “Previous” button that triggers a return to the first scene. The XML code for scene02.xml is as follows:

Part 5: Building the Animated Transitions between Scenes
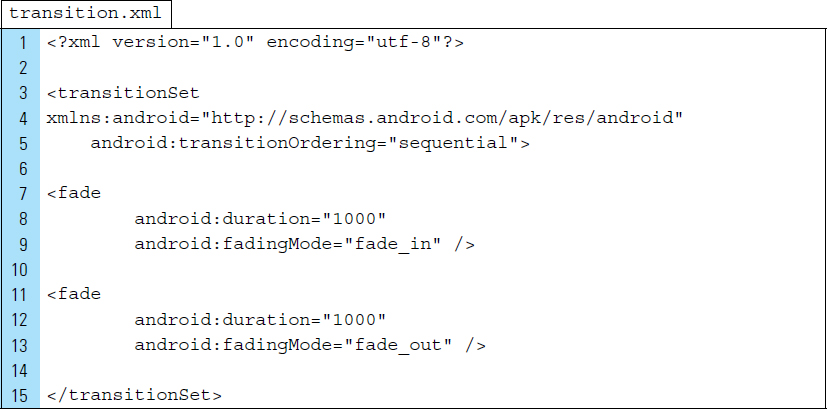
The animated Transitions for this application is controlled using XML code to create animation specifications. The file that contains the animation properties is transition.xml. The XML code listing is as follows:
Line 3: |
A |
Line 5: |
The ordering sequence for the animation of painting elements is set to occur in sequence. |
Lines 7–9: |
A |
Line 11–13: |
The |
The XML code listing for transition.xml appears as follows:
Part 6: Source Code for Application
The application’s activity is implemented in MyActivity.java. The code listing appears as follows:
Lines 20–21: |
Two |
Lines 28–29: |
The |
Lines 30–31: |
A |
Lines 33–34: |
When the application is first launched, |
Lines 35–36: |
Because |
Line 37: |
The |
Lines 40–48: |
The |


■ EXERCISES
Name the seven callback methods defined by the Activity class.
Explain the difference between onResume() and onStart().
Describe how an activity can be recreated after it has been destroyed.
Indicate the type of intent launched by the following segment of code. Explain.

Write a short segment of Java code to launch a webpage.
Describe how data can be passed as a message object to an activity.
What is a common use of the ACTION_SEND action?
Given the following XML code, name the Activities within the application and the activity that launches when the application first launches.
Name five property animations that can be applied to activities.
What is the purpose of <objectAnimator>?
Briefly explain the concept of a scene transition.
Briefly describe the purpose of a TransitionManager.