
| 6 | Threads, Handlers, and Programmatic Movement |
Chapter Objectives
In this chapter you will:
Understand the benefits of multithreading on Android.
Understand multithreading fundamentals.
Know the Thread class and the Runnable interface.
Understand an AsyncTask.
Learn to implement canvas movement using surface views.
Learn to communicate between threads.
■ 6.1 Multithreading and Multicore Processing
Since the early days of Cupcake, Android-powered devices have grown enormously in multitasking capability. Even fairly recent mobile devices have more resource constraints (such as CPU, memory, and battery power) than a desktop computer; this makes multitasking more difficult on a mobile device. Nevertheless, Android users have always expected their devices—even those running on a single-core processor—to be able to perform or appear to perform multiple tasks at the same time. A simple example is that Android users have never had to actively manage whether an application is open or closed, as a result of its multitasking capability.
One of the biggest challenges chip designers face is a CPU’s heat emission. CPUs with a single core produce excess heat, which makes them inefficient in terms of power consumption. To solve this problem, chip designers created a multicore processor. Today, the processing on a mobile device is divided between multiple cores, which reduces heat emissions and consequently reduces power consumption.
Most of the mobile devices available today use multicore application processors with dual-core and quad-core power. This feature is essential to run the large collection of sensor components embedded on the mobile device. At a minimum, a typical smartphone comes equipped with an accelerometer, magnetic sensor, and GPS. These sensors make devices intuitive and are often required for use with applications. For example, a proximity sensor is helpful during phone calls, as it turns off the screen when a user’s face remains out of range for a given period of time. The accelerometer senses movement and orientation, which is useful for interesting game play and for intuitively flipping the screen into landscape mode and back again. These sensors constantly gather large amounts of data and need continuous processing. As an application developer, it is advisable to understand how to achieve performance gains and to write code specifically to take advantage of multiple cores for additional optimization.
Android is a Linux-based operating system; therefore, it uses processes and thread management models to manage running applications, services, and the other elements of the system. In fact, the most rudimentary of all applications is one that runs on a single processor with a single thread of execution.
One of Android Java’s most impressive features is its built-in support for multithread programming. When an application does several things at once, it is called multithreading. Other terms are used for multithreading, such as parallelism and concurrency. Such an application can do several things seemingly at once: perform computations, display an animation, play sounds, and allow the user to interact. Each of these tasks can be performed on a separate thread of execution. A multithreaded Android application contains two or more threads. A principal advantage of multithreading is that it enables programmers to write very efficient applications because it allows the use of any idle time that may accrue while other segments of code are being processed. Each thread runs as a separate path of execution that is managed by its own stack, the call stack. The call stack is used to manage method calling, parameter passing, and storage for a called method’s local variables.
Multitasking can be subdivided into two categories: process-based multitasking and thread-based multitasking. Process-based multitasking is the feature that allows a device to execute two or more programs concurrently. For example, it is process-based multitasking that allows users to run the device calculator and browse the Internet at the same time. In process-based multitasking, an app is the smallest unit of code that can be dispatched by the scheduler.
In a thread-based multitasking environment, the thread is the smallest unit of dispatchable code. This means that a single program can perform two or more tasks at once. Although Android Apps make use of process-based multitasking environments, process-based multitasking is not under the control of Java. Each virtual machine instance has at least one main thread. In Android, the main thread is the UI thread. This single thread is responsible for handling all the UI events. Even a simple single-threaded application can benefit from parallel processing on different cores. For example, if an application uses a media server, then the media processing and the UI rendering logic can run on different cores at the same time.
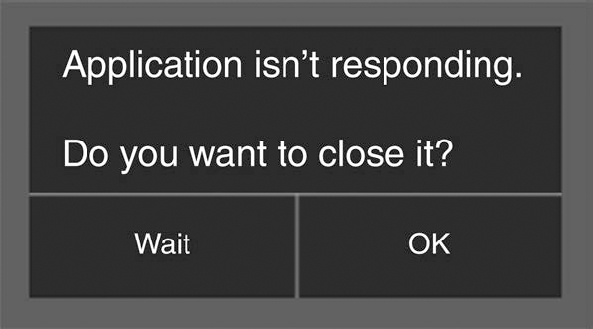
In Android, the system guards against applications that are insufficiently responsive for a period of time by displaying a dialogue that says an app has stopped responding. If an application has been unresponsive for a considerable period of time, the system will offer the user an option to quit the application, as shown in Figure 6-1. This is called “Application Not Responding,” or ANR. An ANR dialog, which appears only when an application is unresponsive, should always be avoided.
The use of multiple threads is the best solution to a poorly performing application, or even worse, an unresponsive application. Threads have been an essential part of computer science and a versatile tool for programmers for decades. Most modern operating systems support threads, and Android is no exception. Android support for threads enables programmers to split their programs into multiple units that execute commands and instructions in parallel.
A thread is the smallest unit of processing that can be scheduled by an operating system. An app’s processing tasks can be broken into threads, which can then be scheduled simultaneously by the operating system. This method helps the programmer take care of longer processes in a separate thread, so that the main thread (in which the UI is running) remains quick and responsive to the user.
Programmers often perform complex and time-consuming tasks within Android apps. If these tasks are not segmented in separate threads, they might cause applications to crash or just be slow and inefficient. The benefits of using separate threads outweigh the drawbacks, so you should use them often to make snappy, responsive, crash-proof Android apps.
To utilize the maximum potential of the available processing power on multicore devices, applications should be written with concurrency in mind. Android applications should be designed to allow separate threads to process tasks that can be executed in parallel. Categories of operations that can be carried out on separate background threads are as follows:
Heavy calculations
An Object’s long initialization
Networking
Database operations
■ 6.2 Main Thread and Background Thread
Android UI threads are distinct from background threads. When an activity is created, it runs by default in the UI thread of the application. All of the commands issued by the Android operating system, such as onClick and onCreate, are sent to and processed by this UI thread.
When a substantial amount of processing is performed on the UI thread, the application may be too busy to respond to messages sent by the Android operating system. For example, if an application frequently computes an elaborate game move on the UI thread, the I/O operations of the system, such as processing incoming user input events, may perform sluggishly or can be blocked. Computations should always be written efficiently, but even the most efficient code requires time to run. To improve performance, it is good practice to execute tasks that might take a long time in a separate background thread rather than in the UI thread. The UI thread, which drives the user interface, must remain unblocked and responsive to user input sent by the Android operating system.
When writing multithreaded applications in Android, it is a good idea to keep several things in mind about the UI thread:
The UI thread should not perform tasks that take longer than a few seconds.
The user interface cannot be updated from a background thread. Only the UI thread should update the user interface. Background threads in the application should return data back to the UI thread for changes to UI elements.
An Android application has no single point of entry; it can be entered from an Activity, Service, or a Broadcast Receiver, all of which run on the UI thread.
Java’s multithreading system is built on the Thread class and its companion interface, Runnable. Both are packaged in java.lang. The java.lang. Thread class, available in the Java JDK, provides methods to start and manage multiple threads running concurrently.
■ 6.3 Thread Approaches
From the main UI thread, programmers can create other threads by instantiating an object of type Thread. The Thread class encapsulates an object that is runnable. Two ways in which a runnable object can be created are:
Implement the Runnable interface.
Extend the Thread class.
Both implementation approaches use the Thread class to instantiate, access, and control the thread. The only difference between these two approaches is how a thread-enabled class is created. The start() method must be called to execute a new Thread, regardless of the approach.
6.3.1 Implementing a Runnable Interface
The Runnable interface abstracts a unit of executable code. For example, you can construct a thread on any object that implements the Runnable interface. Runnable defines only one method called run(). This approach is illustrated in the code segment shown below. It is assumed a class exists that implements Runnable.
On Line 8, an object of type Thread is instantiated on an object of the Runnable class. On Line 9, the new thread, t1, will not begin execution until the start() method is called.
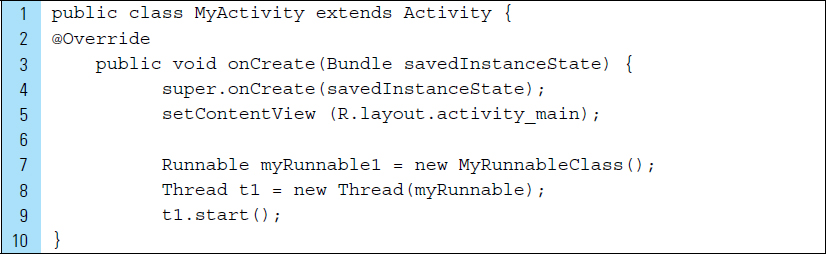
An application that creates an instance of Thread must provide the code that will run in that thread. The Runnable interface defines a single method, run (), as shown on Lines 14 and 15, which contains the code to be executed in the thread. This Runnable object is instantiated on Line 7. The Runnable object is passed to the Thread constructor when the Thread object is instantiated on Line 8. When start() is called by the Thread object (Line 9), the run() method will be executed in that thread.
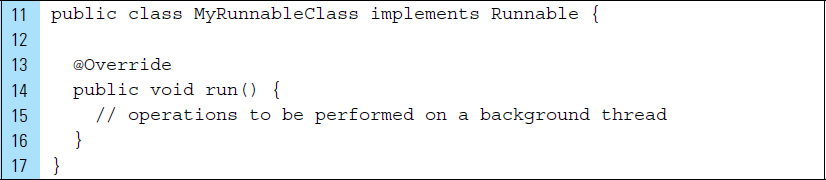
The code below shows the MyRunnableClass that implements the Runnable interface:
6.3.2 Extend the Thread Class
A Thread class can also be constructed that implements the Runnable interface. This approach is illustrated in the two code segments shown below. On Line 7 an object of a Thread subclass is instantiated. This thread will not begin its execution until the start() method is called.
The Thread class itself implements Runnable through its run() method. An application can subclass Thread, providing its own implementation of a run, as shown on Lines 13–15.

■ 6.4 UI Modification and the Handler Class
The UI thread is the main thread of execution for a given Android application. Every application has its own UI thread that runs UI objects. All of the application components, including activities, services, and intent receivers, are created in this thread. In addition, system calls to these components are performed on this thread.
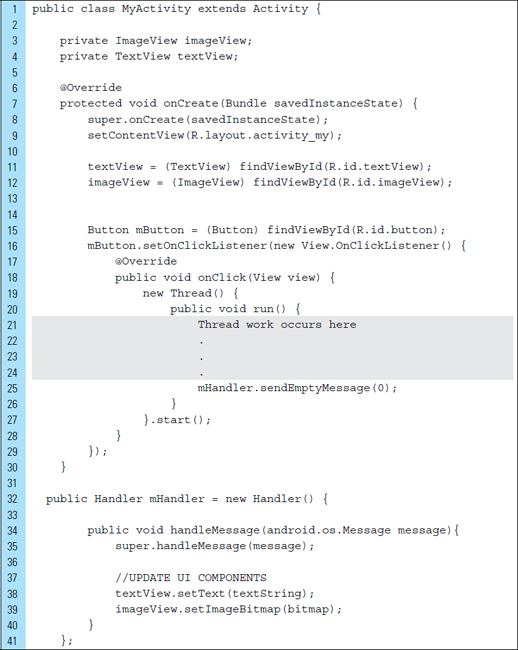
Only the UI thread can modify the user interface. Modification to the UI cannot be directly performed from a background thread. Consider the following code for MyActivity. The layout associated with this activity contains a TextView and a Button. The TextView, referenced by mTextview, requires an update to its content when the user clicks the button. The button onClick() event is handled by the method updateText(), as shown on Lines 18–25. A background thread is created to handle the update operation.
The instruction on Line 22 is designed to set the text content within the TextView component to a new value. However, since the TextView is updated by a call from a background thread, it will end in an application crash.

A stack trace, such as the one shown below, will appear in the Logcat console when an uncaught thread exception has been attempted. The exception that caused the crash has occurred because the specified TextView can be modified only from the UI thread. A solution to this problem is to communicate to the UI thread that an update to the TextView needs to be performed. The UI thread can then act on that request.

A Handler is part of the Android system’s framework for managing threads and is designed for interthread communication. It combines features from a BlockingQueue and a message listener.
Interaction between an Android thread and the UI thread is accomplished using a UI thread Handler object and posting Messages and Runnable objects to a message queue.
A Handler object created on the UI thread exposes a thread-safe message queue on which background threads can asynchronously add either messages or requests for foreground runnables to act on their behalf.
When a Handler is created for a new thread, it is bound to the message queue of the thread in which it is created. The Handler delivers messages and runnables to this message queue and executes them as they are retrieved off the queue.
In the following example, the main UI thread establishes a Handler to get messages from the background threads. On Lines 19–22, a background thread is implemented when the user clicks a button. The Handler, named mHandler, will provide communication between the UI thread and the background thread.
The method call sendEmptyMessage(), on Line 25, is used to add a message to the UI MessageQueue. This particular message is categorized as an empty message containing an integer value of zero. This integer value is referred to as a “what” value and is used to attach a code to the empty message, which will be added to the MessageQueue. A “true” is returned by the method call if the message was successfully placed into the message queue. If the message failed to be added to the queue, a “false” is returned.
Each background thread can also define its own Handler. A Handler processes messages and Runnable objects associated with the current thread message queue. A Handler defined by a background thread creates a local message queue, which can be used to receive messages from other threads, including the UI thread.
A Handler can send and process messages and Runnable objects associated with a thread’s MessageQueue. Each Handler instance is associated with a single thread. When a new Handler is created, it is bound to the thread and the message queue of the thread that is creating it.
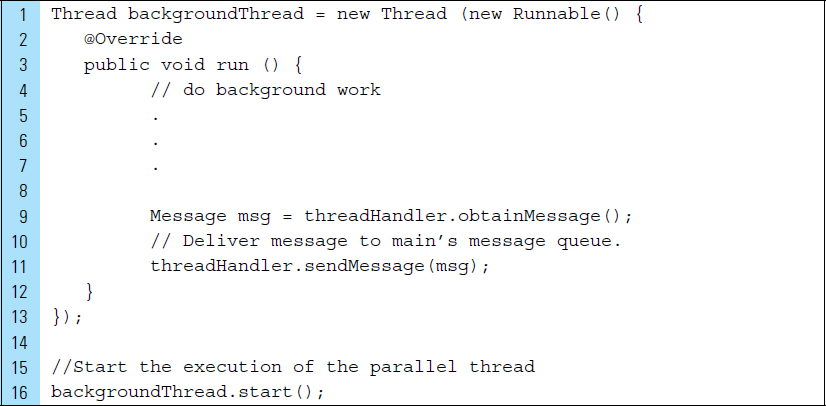
A handler’s message queue uses the obtainMessage() method to control communication. Consider the following example. A background thread that wants to communicate with the main UI thread must request a message token using the obtainMessage() method, as shown on Line 9. Once obtained, the background thread can fill data into the message token and attach it to the handler’s message queue using the sendMessage() method, as shown on Line 11.
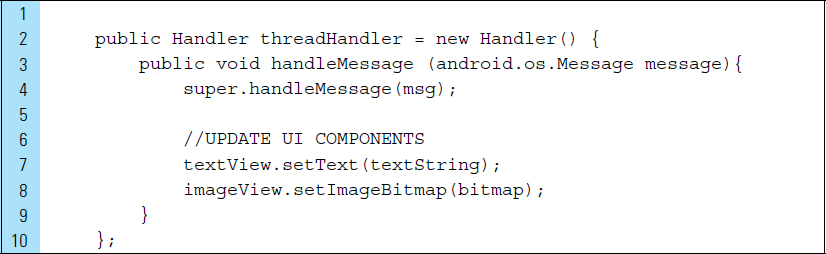
The Handler for this thread, named threadHandler, will need to use the handleMessage() method to attend continuously to new messages delivered from the main thread.
The segment of code shown below is the Handler definition that is bound to the background thread in the above example. Lines 3–9 show the handleMessage() method. The UI components named textView and imageView are updated within this method.
This lab provides a first look at creating a background thread and handler for updating a UI element. The background thread for this simple example does not require a message; rather, it uses an empty message.
Part 1: The Design
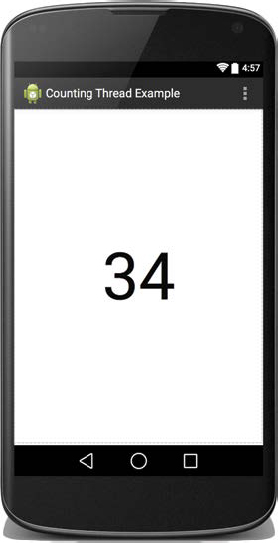
The application, Counting Thread Example, features a TextView element that is updated every second. Figure 6-2 shows the application 34 seconds after the application has launched. The number zero appears in the TextView when the application first launches. After every second, the number is incremented.
Part 2: Application Structure and Setup
The settings for the application are as follows:
Application Name: |
Counting Thread Example |
Project Name: |
CountingThreadExample |
Package Name: |
|
Android Form: |
Phone and Tablet |
Minimum SDK: |
API 18: Android 4.3 (Jelly Bean) |
Target SDK: |
API 21: Android 5.0 (Lollipop) |
Compile with: |
API 21: Android 5.0 (Lollipop) |
Activity Name: |
|
Layout Name: |
|
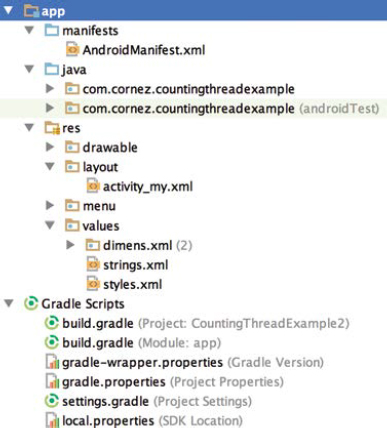
The structure for the final application is shown in Figure 6-3. The Java source file, MyActivity, will define the single activity of the application, along with the background thread and its associated handler. The layout for MyActivity is activity_my.xml.
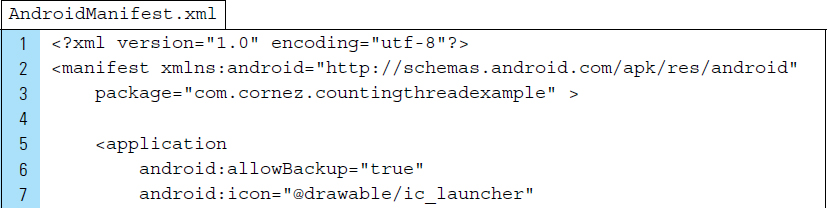
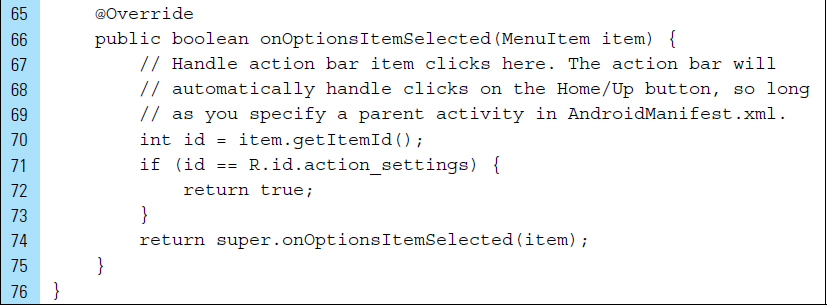
A portrait orientation of the screen is specified in AndroidManifest.xml. The single activity of the application is specified on Lines 10–20. The complete XML for AndroidManifest.xml is shown as follows:
Part 3: The User Interface
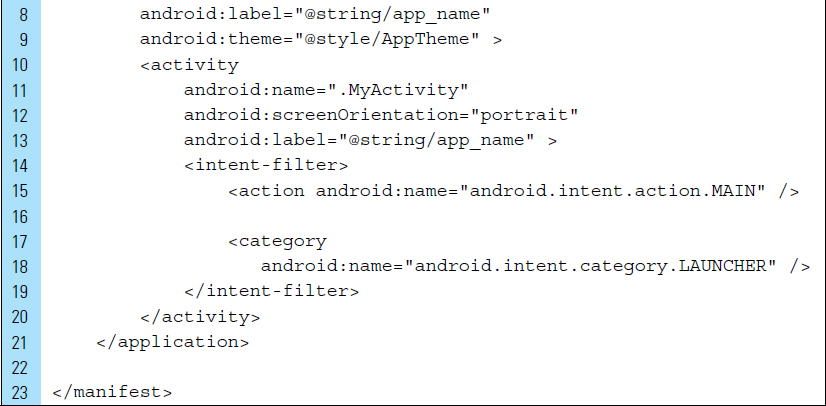
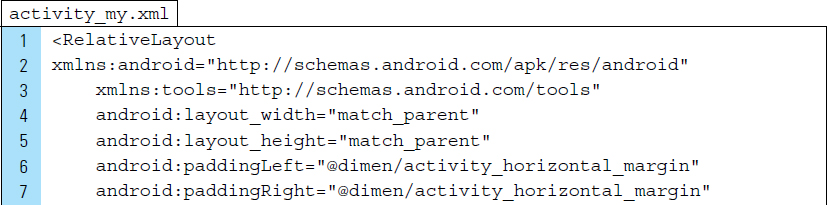
As an exploration of a simple background thread with a handler, the layout design for this application is minimized to include a single UI element: a TextView. The complete XML code for the layout, activity_my.xml, is shown below. The TextView, defined on Lines 12–20, is used to display a counting integer that begins with zero when the application launches and is incremented at every second. The layout design is illustrated in Figure 6-4.

Part 4: Source Code for Application
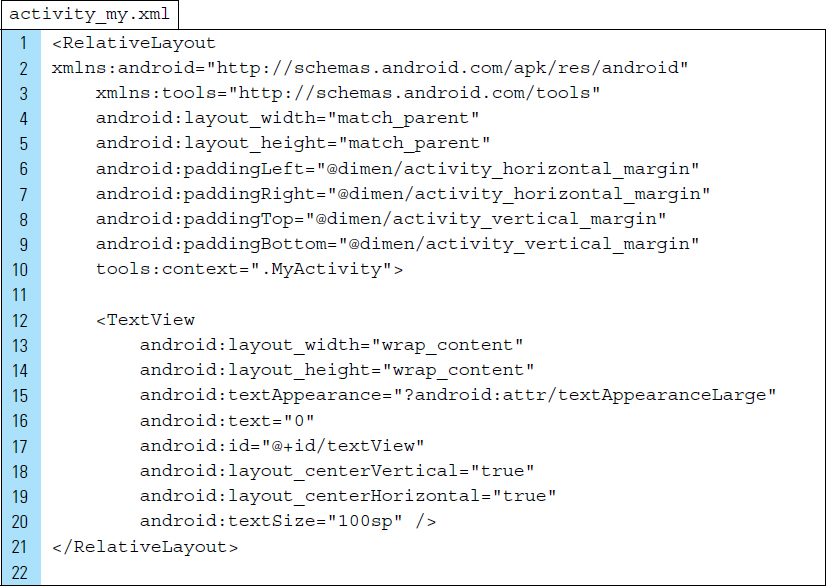
A single Activity for the application, MyActivity, is used to host the Runnable object that will be used to run code in the background thread. The Java code for MyActivity is as follows:
Line 15: |
An |
Line 30: |
A new |
Line 31: |
The The method call |
Lines 38–41: |
The |
Lines 44–57: |
The The There are two advantages to making a runnable class into an inner class. (1) If the |
Lines 49: |
The |
Line 50: |
|
Line 51: |
A message, containing a zero value, is sent to the The |
Lines 60–64: |
The |


■ 6.5 Loopers
Looper is a class within the Android user interface that can be used in tandem with the Handler class to provide a framework for implementing a concurrency pattern.
The following is an example of a basic concurrency pattern in which the UI thread accesses the MessageQueue, which holds units of work that can be executed or processed. Units of work are Messages or Runnables.
Background threads can push new units of work onto the MessageQueue at any time.
The UI thread processes the queued units of work one after another.
If there are no work units on the MessageQueue, it waits until one appears in the queue.
Processing the MessageQueue can be quit at any time, and units of work can be removed from the queue.
A Looper is the mechanism that allows these units of work to be executed or processed sequentially on a single thread. A Handler is used to schedule those units of work for execution by pushing them onto a MessageQueue.
By default, an application has at least one Looper. This Looper is implicitly attached to the UI Thread.
A default Looper exists as a message-handling loop that reads and processes items from the UI MessageQueue. A Handler can be created and associated with the UI thread. Once a Runnable is attached to it, its UI updates can be implemented via the default Looper. It is also possible to implement Loopers and perform message processing on a background thread.
The Looper class provides a MessageQueue when a Looper object is instantiated. This MessageQueue will automatically be associated with the thread from which it is created. This association cannot be altered. In addition, the Looper cannot be reattached to another thread. Handlers are attached to Loopers and their associated threads. A Handler sends Messages and Runnables to the MessageQueue associated with a thread. When a Looper processes a message, it routes the message back to the Handler, thus allowing the event to be processed on the appropriate thread.
When you instantiate a Handler based on a particular Looper instance, the Handler runs on the same thread as the Looper.
Consider the following segment of code that implements a background thread.
Line 5: |
|
Line 7: |
When a When creating a |
Line 13: |
By calling |

Messages and Runnables are added to a MessageQueue through the Handler object associated with the Looper. Access to the MessageQueue is provided by a set of Post- and Send-type methods in the Handler class.
Post-type methods are used to add Runnable objects to the MessageQueue. For example, at its most basic, the method post() will simply add a Runnable object to the MessageQueue. To schedule a time of execution for a Runnable object, the method postAtTime() can be used to supply a specific time. When a runnable object requires a delay in execution, the method postdelayed() will add the Runnable object, along with a delay time in milliseconds.
The Handler class provides Send-type methods for adding Message objects to the MessageQueue. As illustrated in Lab Example 6-1, the simplest of these methods is sendEmptyMessage(), which passes an integer value that can be used to specify a message operation. To add a specific Message object to the MessageQueue, the method sendMessage() can be used. Similar to Runnable objects that require execution at specific times or delay times, Message objects can be time-stamped for delivery at a specific time. These methods are sendMessageAtTime() and sendMessageDelayed(). An empty message delivery can also be time-stamped using sendEmptyMessageAtTime() and sendEmptyMessageDelayed().
In the following segment of code, three Runnable objects and three Message objects are pushed onto a single MessageQueue. In the final statement, the Handler clears the mRunnable objects from the MessageQueue.


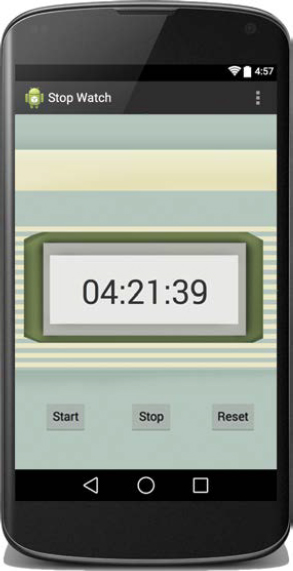
■ Lab Example 6-2: Digital StopWatch
This lab example explores the creation of a digital stopwatch. The stopwatch application, shown in Figure 6-5, requires continual updates to the UI timer display once the stopwatch is started. Updates at regular intervals allow us to explore the implementation of a concurrency pattern.
Part 1: The Design
This lab illustrates the coordination between the UI thread, a handler, and the default UI Looper. More specifically, the Stopwatch application demonstrates the versatility of Handlers and Loopers for creating repetition that continually updates UI elements in the UI Thread.
Part 2: Application Structure and Setup
The settings for the application are as follows:
Application Name: |
Stop Watch |
Project Name: |
Stopwatch |
Package Name: |
|
Android Form: |
Phone and Tablet |
Minimum SDK: |
API 18: Android 4.3 (Jelly Bean) |
Target SDK: |
API 21: Android 5.0 (Lollipop) |
Compile with: |
API 21: Android 5.0 (Lollipop) |
Activity Name: |
|
Layout Name: |
|
The launcher is set to the Android default ic_launcher.png file.
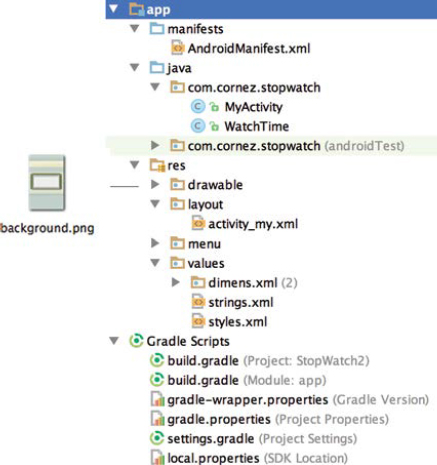
The project structure, shown in Figure 6-6, contains two Java source files and a single layout file. The MyActivity will set the screen content to activity_my.xml, and WatchTime is the class that will model the digital stopwatch time displayed on the screen. The drawable resource, background.png, adds visual context to the application. This file can be found in the textbook resources.
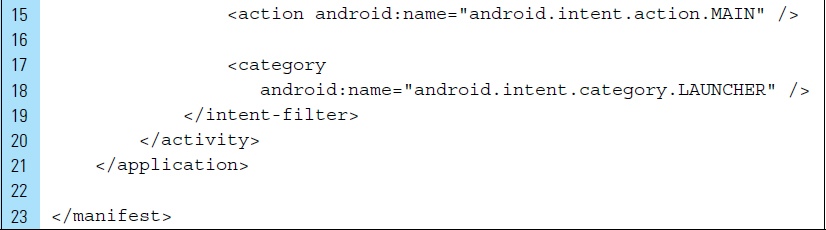
The single critical component in the manifest file is the specification of MyActivity as the main activity. No other activities are started by this activity or will be used by the application. The orientation for the main activity is set to portrait. The complete XML code for AndroidManifest.xml is shown as follows:

Part 3: The User Interface
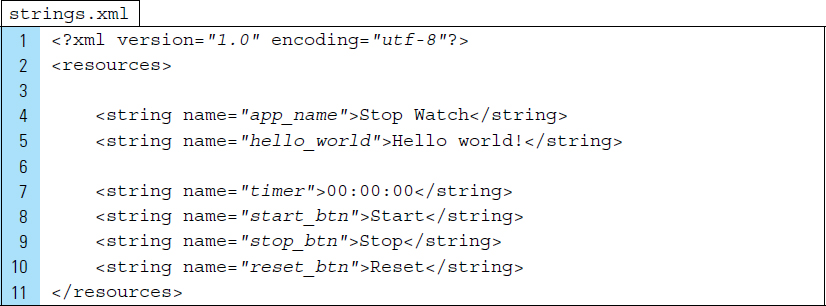
The StopWatch application uses values from the strings.xml file to store static button labels used in the layout associated with MyActivity. The XML code for this file is as follows:
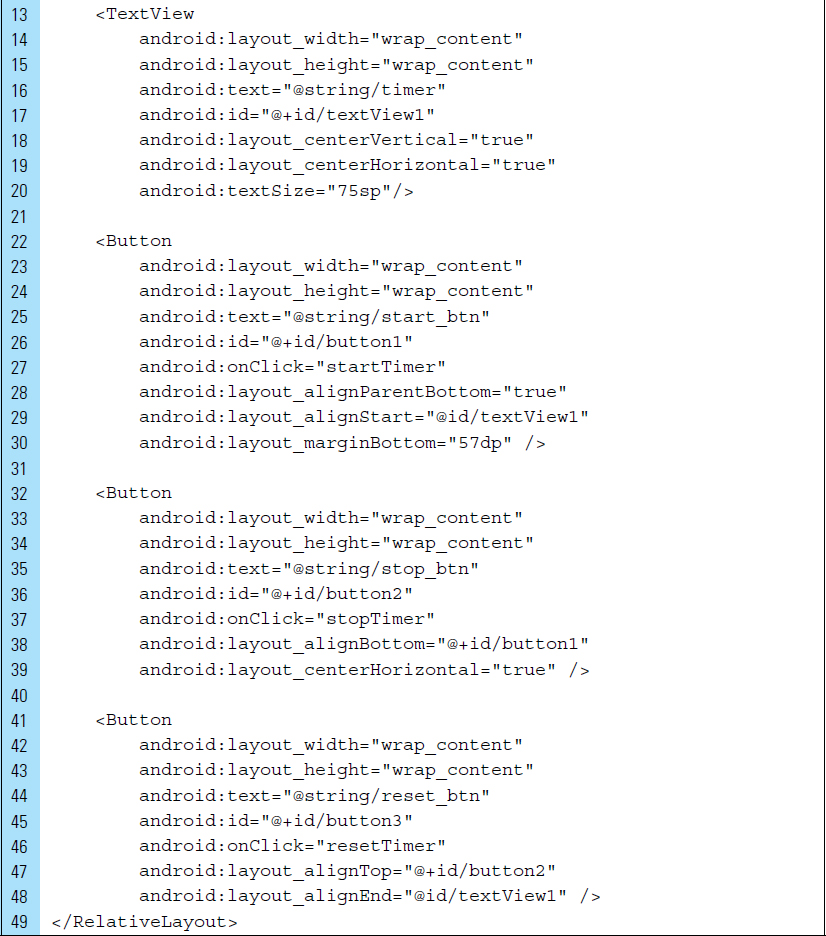
The user interface for the application is activity_my.xml. This layout file places UI objects relative to each other on the screen within a RelativeLayout root element. To provide appeal, this root element contains a background set to a drawable-background.png.
The digits on display is updated as the stopwatch counts down. A TextView is used for the dynamic display of the stopwatch timer digits, 00:00:00, as shown in the completed layout in Figure 6-7. The textSize for this TextView is increased to 50dp so that the digits are easily visible to the user.

The complete XML code for activity_my.xml is shown as follows. The three buttons—Start, Stop, and Reset—are registered to onClick() events.

Part 4: The Time Data Model for StopWatch
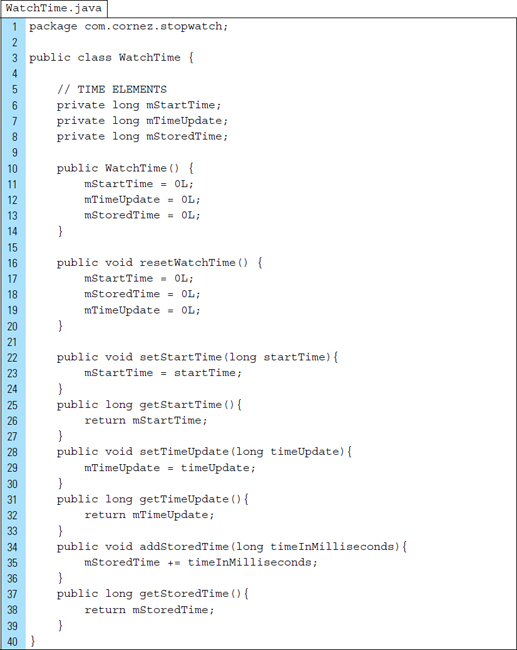
The WatchTime class is used to model the watch time data for the stopwatch. This class requires three data elements for time: start time, update time, and a stored time for when the stopwatch has been stopped but not reset. The complete Java code for the WatchTime class appears as follows:
Line 6: |
|
Line 7: |
|
Line 8: |
|
Lines 16–20: |
All time components are reset to their initial value of zero. |
Part 5: The Controller for the Application
As the single activity for the application, MyActivity is the controller element of the application. It enables and disables the buttons on the stopwatch, displays the stopwatch time, and responds to starts, stops, and resets.
The activity relies on the default UI Looper, which manages the Message-Queue processing. More specifically, this activity uses the Looper to perform updates on the UI thread.
The Java code for MyActivity is shown below:
Lines 23–24: |
The |
Line 27: |
The Note that the default |
Lines 30–51: |
The These buttons are logically unusable until the user starts timing on the stopwatch. |
Line 50: |
By instantiating the |


When the user clicks the Start button, the method startTimer() is executed.
Lines 55–57: |
When the application is launched for the first time, the Stop button is made available to user, while the Start and Reset buttons are disabled. |
Line 60: |
The start time of the stopwatch is set to the system clock. |
Line 61: |
The |
Lines 65–88: |
A |
Line 86: |
|

Once the user clicks the Stop button, the method stopTimer() is executed.
Lines 92–94: |
The Stop button is appropriately disabled and the Start and Reset buttons are reenabled. |
Line 98: |
The method call |
Lines 103–109: |
Once the user clicks the Reset button, the method |


■ 6.6 Canvas Movement and Views
Animation means change, such as motion. Chapter 5 explored animation in the form of frames: a series of still images shown very rapidly to simulate motion or change. Frame-by-frame animation goes back to the earliest days of cartoon animation, where the individual pictures were drawn on sheets of cellophane and became known as cels. This type of animation is static, in the sense that it is predictable. In this chapter, we explore programmatic animation, or dynamic animation, which can be generated by user or program influence. It should be noted that programmatic animation is often combined with frame-by-frame animation.
The connection of programmatic animation to time is an important one. When using a canvas, programmatic animation can be achieved by continually redrawing graphic elements to a canvas at specified time intervals. For example, a ball moving across the screen doesn’t move from spot to spot. It disappears and reappears in another location in the next time interval.
Programatic animation can be achieved through the use of a Canvas. As demonstrated in Chapter 5, a canvas is provided by View.onDraw(). This means that to build movement, a custom View can be constructed that contains an implementation of the onDraw() callback method. The most convenient aspect of this feature is the provision of the predefined Canvas, which is automatically supplied by the Android framework. This means that onDraw() callbacks can be performed again and again at scheduled time intervals.
Consider the code segment below. MyView is implemented as a View class with an onDraw() and a reDraw() method. Typically, onDraw() is called by the Android framework to request that MyView draw itself. In this example, if onDraw() is called at regular intervals, the canvas will fill with red circles at various locations. Animation can be achieved when the canvas is wiped with white paint (Line 10) before redrawing the circles (Line 11).

Keep in mind that the onDraw() method is called only when necessary by the Android framework. When a drawing component needs to be rendered, a request must be submitted to the View to be invalidated. This was performed by the method reDraw() in the code segment above. The method call invalidate() simply indicates that the View needs to be redrawn.
When an invalidate() request is submitted, precision is not guaranteed when time delays are specified in a thread Runnable. It is possible that a resulting animation may not be entirely smooth because callbacks are not always instantaneous.
■ Lab Example 6-3: Animated Dial Using a Simple View
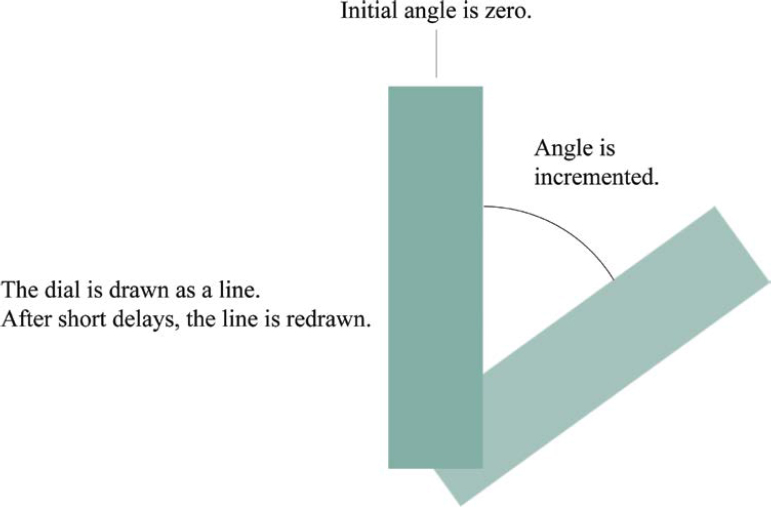
This lab example demonstrates animation using a custom View. As shown in Figure 6-8, a rotating dial will be animated, with the dial moving rapidly in a clockwise direction.
Part 1: The Design
The image of the dial can be drawn at any given time by simply specifying its computed angle. It moves in increments of that angle at each time interval. The invalidate() method will request a redraw when the system finds time to perform the task. This will create a continuous rendering.

Part 2: Application Structure and Setup
The settings for the application are as follows:
Application Name: |
Animated Dial |
Project Name: |
AnimatedDial |
Package Name: |
|
Android Form: |
Phone and Tablet |
Minimum SDK: |
API 18: Android 4.3 (Jelly Bean) |
Target SDK: |
API 21: Android 5.0 (Lollipop) |
Compile with: |
API 21: Android 5.0 (Lollipop) |
Activity Name: |
|
The project structure, shown in Figure 6-9, contains two source files and the manifest file. DialView is the custom View containing a Canvas. The MyActivity.java is the controller of the application and will set the screen content to the custom View. No other files will be edited for the application.

The theme for this application has been set. The action bar has been eliminated from the screen, and fullscreen usage has been specified. The XML code for AndroidManifest.xml is shown as follows:

Part 3: A Custom View Containing a Canvas
By using the canvas and an onDraw() callback method, movement is made possible by first deleting the dial graphic and then drawing it again at a new angle after a brief pause. In this manner, the human eye will see continuous spinning movement.
The Canvas works as an interface to the actual surface upon which the dial will be drawn; it will hold all of the “draw” calls. Using the Canvas, the dial drawing is actually created on an underlying Bitmap, which is placed into the window. By performing frequent and regular calls to the onDraw() callback method, a continuous rendering will be produced within the UI thread. Movement will be perceived after each rendering.
The Java source code for DialView is shown below:
Line 10: |
|
Lines 12–13: |
Changes in the graphic image of the dial will be based on the angle of the dial line. This line angle will be incremented by one at each time interval, creating the appearance of clockwise movement. The |
Lines 23–24: |
The style and stroke width are set for the dial graphic. In addition, all draw operations will use antialiasing, ensuring smooth graphics when possible. |
Lines 28–65: |
The |
Line 68: |
The call to |


Part 4: The Application Activity
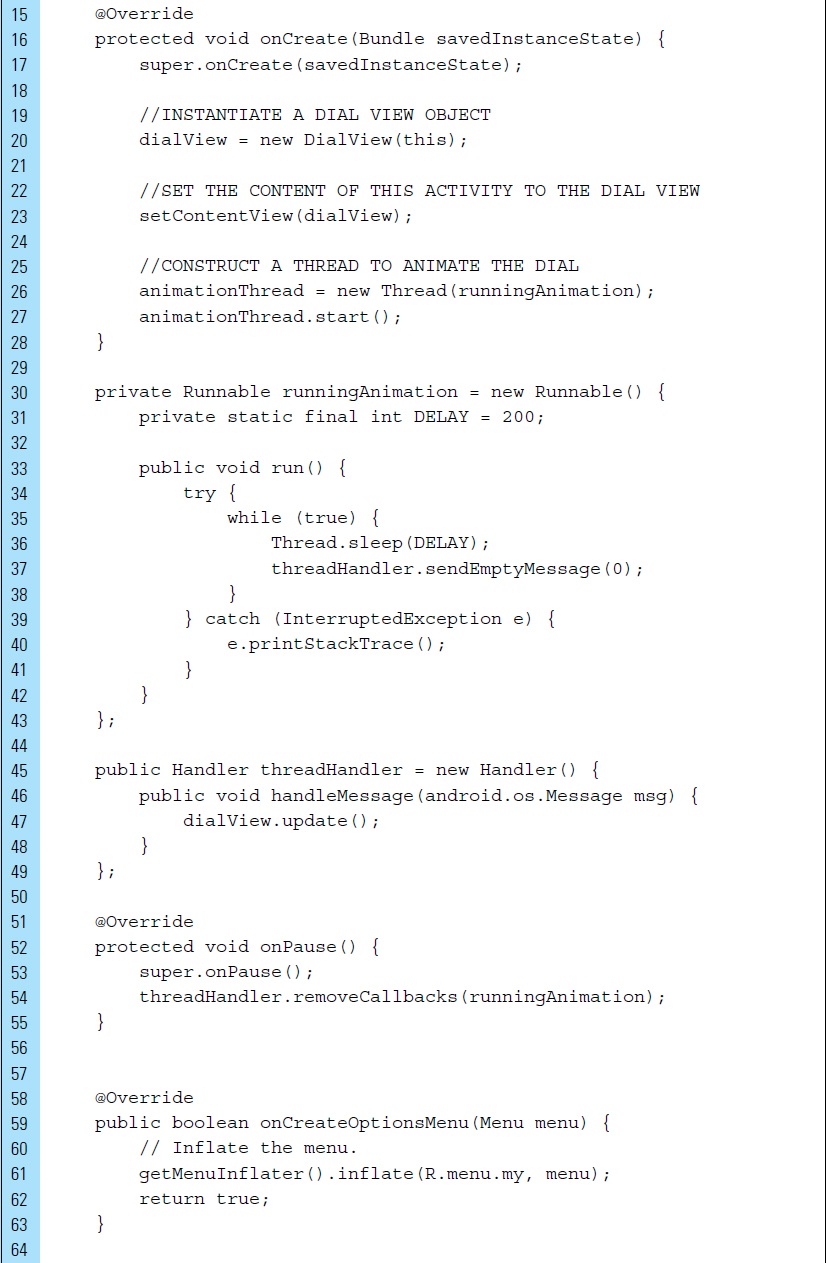
MyActivity is the controller for the application. It instantiates the background thread and uses the Handler to control the UI updates. The complete code for MyActivity is shown as follows:
Line 12: |
The |
Line 13: |
|
Line 20: |
The |
Lines 26–27: |
The background thread, |
Lines 30–43: |
An inner |
Lines 45–49: |
An inner |
Lines 52–55: |
All posts sent to the |

■ 6.7 SurfaceViews
A View object cannot be updated on a background thread; however, Android provides a SurfaceView class to construct objects with a dedicated drawing surface that can be updated on a background thread. SurfaceViews contain a rendering mechanism that allows threads to update the surface’s content without the use of a Handler. This means that drawing to a SurfaceView object can be rendered quickly, without having to wait until the System’s View hierarchy is ready to draw.
A SurfaceView is derived from the View class. It provides more resources than Views and was created with the objective of delivering a drawing surface for a background thread. This drawing surface can be rendered at anytime, which makes it ideal for use in video playback, camera previews, and two-dimensional games.
The dedicated drawing surface provided by a SurfaceView is a collection of pixels. These pixels are composited onto the display. Every window on the display, such as a fullscreen activity and the status bar, has its own surface that it draws to. No matter what type of rendering API developers use, everything is rendered onto a surface. Every window that is created on the Android platform is backed by a surface. All of the visible surfaces rendered are composited onto the display.
When a SurfaceView object is instantiated in an Activity, its dedicated drawing surface can be formatted for size. As shown in Figure 6-11, the SurfaceView object sits behind the window of the application. Its drawing surface can be viewed through a hole punched into the window. The view hierarchy will take care of correctly compositing with the Surface any siblings of the SurfaceView that would normally appear on top of it. This allows UI components, such as interactive buttons and text fields, to be placed on top of the SurfaceView.
Access to the dedicated drawing surface is provided by a SurfaceHolder. A SurfaceHolder is an interface that can be retrieved by calling getHolder(). The drawing surface will be created and rendered while the SurfaceView window is visible. The SurfaceHolder interface requires the implementation of surface Created(SurfaceHolder) and surface Destroyed (SurfaceHolder). These two callback methods signal when the surface is created and destroyed, which corresponds with the window being shown and hidden.

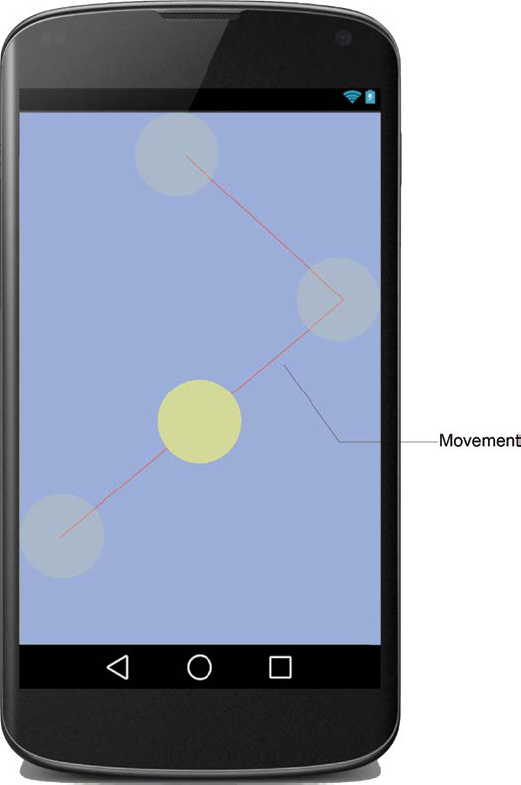
■ Lab Example 6-4: Ball Animation Using a SurfaceHolder
This lab example explores the use of a SurfaceView to implement movement. As shown in Figure 6-12, a ball is made to bounce around the screen at a constant velocity. The application will rely on a SurfaceView object, which will be added to the root element of the layout XML file associated with the activity of the application. The ball graphic element, drawn directly onto the SurfaceView object, will be continuously relocated and rendered in a dedicated thread.
Part 1: The Design
When an application requires the use of a SurfaceView, the architecture of the application is typically more complex than when a simple canvas is used. In this application, we will keep the structure as simple as possible by using a single Activity. The goal of this application is to create a ball that moves in two dimensions, bouncing off the ceiling, floor, left wall, and right wall of the window. To ensure that the process required for the bouncing ball does not monopolize the resources for the device, the application will be structured with two threads running at once: the UI thread and a background thread. The background thread will be bound to a SurfaceView that is continually rendered. This background thread will control the ball movement.
Part 2: Application Structure and Setup
The settings for the application are as follows:
Application Name: |
Bouncing Ball |
Project Name: |
BouncingBall |
Package Name: |
|
Android Form: |
Phone and Tablet |
Minimum SDK: |
API 18: Android 4.3 (Jelly Bean) |
Target SDK: |
API 21: Android 5.0 (Lollipop) |
Compile with: |
API 21: Android 5.0 (Lollipop) |
Activity Name: |
|
Layout Name: |
|
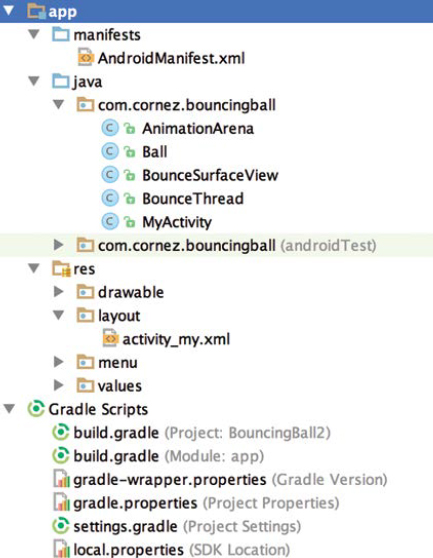
The final project structure for this application is shown in Figure 6-13.
The relationship between the Java source code components is illustrated in Figure 6-14.
In addition to the SurfaceView, BounceSurfaceView, and the background thread-BounceThread, the application uses two models: Ball and AnimationArena.
The Ball class models a spherical graphic in motion. The AnimationArena class is used to model the game world where the ball can move. In a more complicated game application, AnimationArena would be used to group together all of the game objects, such as game obstacles and enemies, into a single world. In this application, the game world is very basic: a single Ball object. Updates and rendering of the game world will be delegated to AnimationArena.

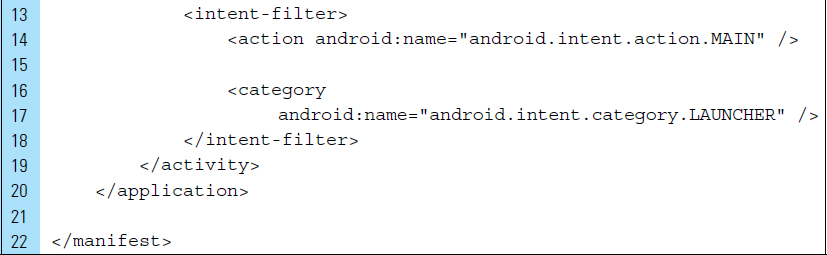
The XML code for AndroidManifest.xml is shown as follows:

Part 3: Activity Layout Setup
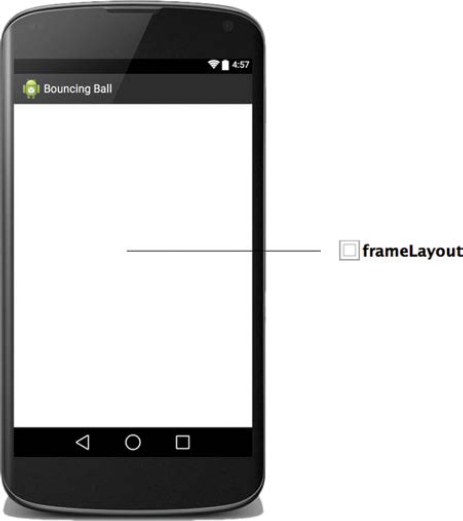
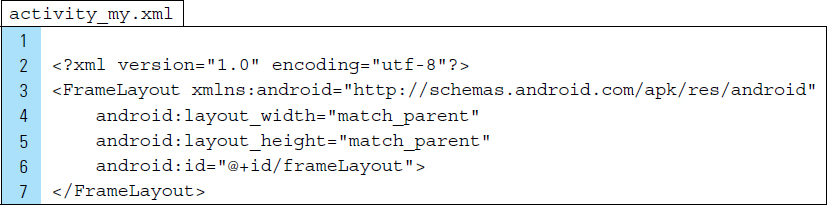
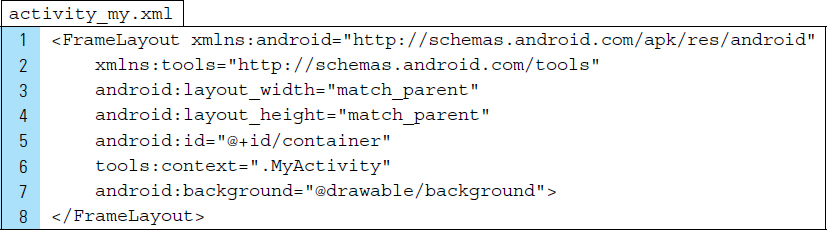
The layout for the activity of this application, activity_my.xml, contains a FrameLayout root element. A FrameLayout is a container view designed to block out an area on the screen. In general, it holds a single view, which means we can use it as a canvas. The FrameLayout will eventually hold an instance of BounceSurfaceView, which is the dedicated drawing surface, SurfaceView, for this animation. The layout design for activity_my.xml is illustrated in Figure 6-15 and its related XML code is shown below.
Part 4: Ball Class
Ball class provides the blueprint for the ball in motion. It is characterized by location, size, velocity, and collision detection. The details of the collisions have been established directly in the Ball class. As shown in Figure 6-16, this application will require four boundary limits of the viewable drawing surface. These limits represent the topmost, bottommost, leftmost, and rightmost boundaries of where the ball can move in the game area.

It is necessary to detect collisions because the ball’s velocity will be reversed once it collides with wall boundaries. To establish boundaries and collisions, we consider that a ball’s origin is located at its center. The ball collides with the top boundary when its y position is less than or equal to zero (the topmost edge of the drawing surface) plus the ball’s radius.
The Java code for the Ball class is shown as follows:
Lines 22–46: |
|
Lines 48–53: |
The |


Part 5: The Drawing Surface
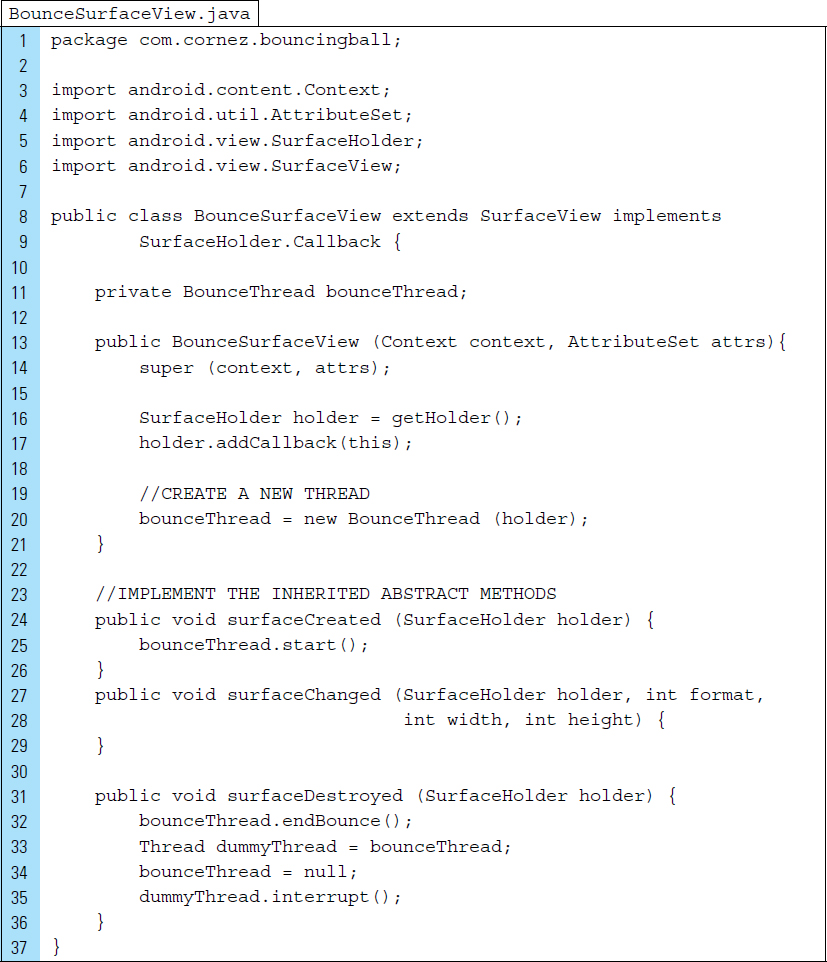
The BounceSurfaceView class is created by extending the SurfaceView class. This class will allow us to create a View that can be rendered within a background thread. The surface content for this View will be updated quickly and without the use of a Handler. An instance of BounceSurfaceView will eventually be added to the layout associated with the application’s activity.
Lines 8–9: |
The |
Line 11: |
The background thread for this application will be associated with the drawing surface. All rendering tasks will occur on this thread. |
Lines 16–17: |
|
Line 20: |
A background thread is created, |
Lines 24–36: |
The |
Part 6: The Activity of the Application
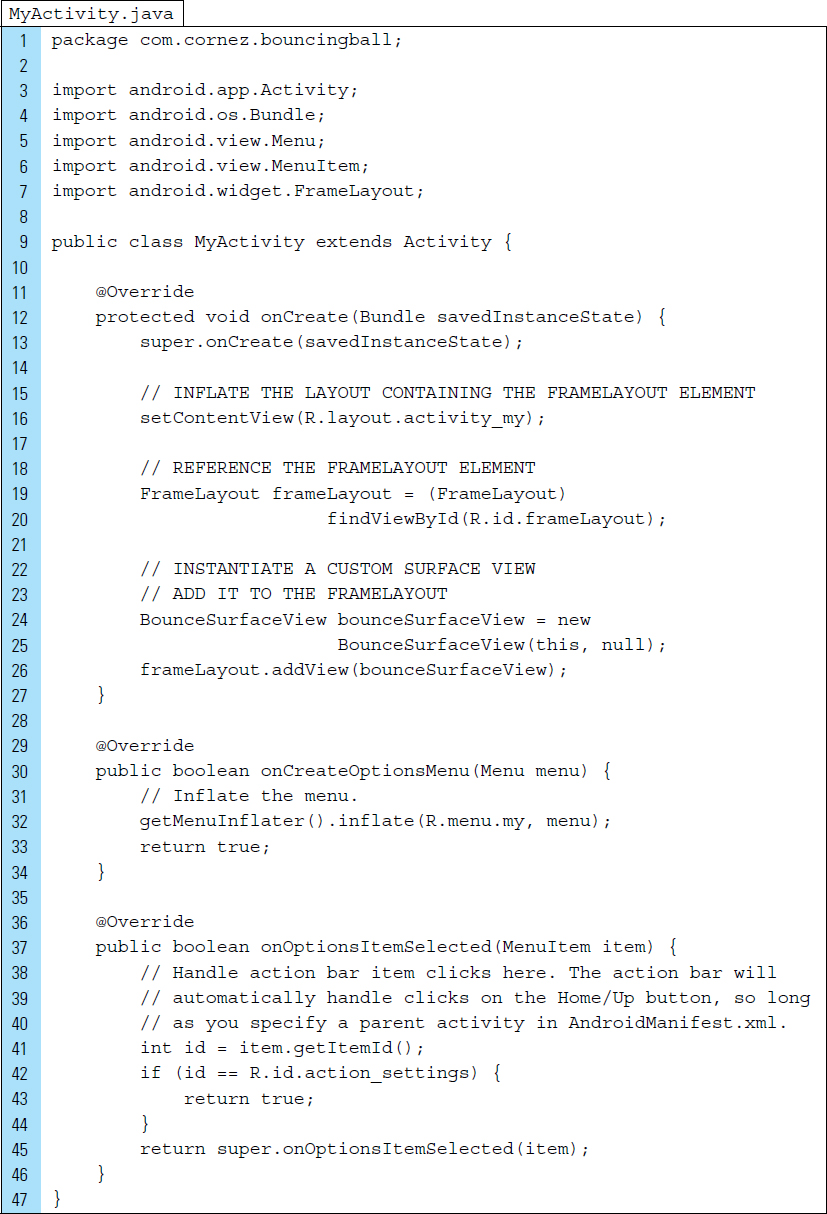
MyActivity is the single Activity used by the application. Its controller role, which is to inflate the layout associated with the application and to add a SurfaceView to the inflated layout, is kept to a minimum.
Lines 24–26: |
A |
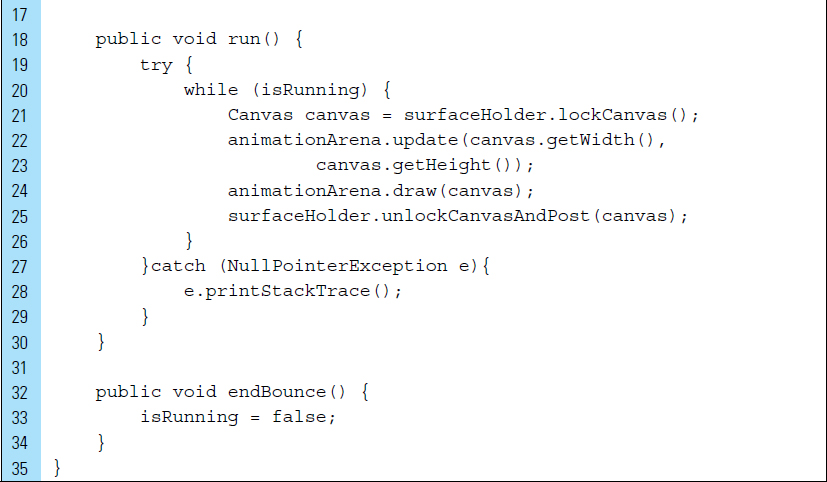
Part 7: Background Thread
BounceThread is the class that models the background thread for the application. It is implemented as a separate class that extends the Thread class. As an extension of Thread, it will provide the essential run() method, which will serve as the animation loop.
Lines 8–16: |
This background thread will be responsible for executing updates to an |
Lines 21: |
When making changes to the underlying drawing surface of a |
Lines 22–23: |
|
Line 24: |
|
Line 25: |
|
Lines 32–34: |
A method for ending the animation is implemented. |

Part 8: AnimationArena for the Game World Model
The AnimationArena class is essentially the model for the game world. This class holds the ball and implements a set of methods that controls when the ball moves and is drawn to the canvas.
The background thread of the application will call the update() and draw() methods over and over again to create animation. The Java code for AnimationArena is shown as follows:


■ 6.8 Efficient Threading
Developing applications with multiple threads requires careful programming. Concurrency is not a trivial subject and can be very challenging. Despite the complexities, there are obvious advantages of multithreading, such as the provision of greater responsiveness by using idle time to perform background tasks. It might seem that if a little threading improves efficiency, the employment of many threads must be better. In fact, having too many threads can lead to a sluggish application.
The impact of having too many threads in an application can result in the following two conditions. First, partitioning a fixed amount of work among too many threads gives each thread too little work. In this case, the overhead of starting and terminating threads swamps the useful work. Second, having too many threads running incurs overhead in the way they share finite processing resources. On a given device, the number of threads that can execute concurrently is limited by the number of processors. When the start() method is called on a thread, that thread may or may not start executing immediately, depending on the number of processors built into the device, as well as the number of threads currently waiting to execute.
Multithreaded code should be tested for efficiency and should provide a useful abstraction of concurrent execution. Applications should be designed so that few background threads are responsible for waiting until a task is available, executing it, and notifying other components of the program when it is complete. Because threads are able to share execution resources, thread-safe mechanisms, such as locks and queues, can be used to control access.
Sophisticated locking idioms are supported by the java.util package. When designing applications that require multiple threads, it is advisable to strategize the detection of possible deadlocks. Deadlocks occur when a given thread is waiting for a previous thread to finish; likewise, that thread is waiting for the previous one to complete. These deadlocks must be avoided, or they must be resolved when they occur. While threads are communicating through state variables on shared memory, they can use the Java library’s built-in signaling mechanism that lets a thread notify other threads of changes in the state. Lock is a Java utility that provides locking operations that control access to a shared resource by multiple threads. A lock provides exclusive access to a shared resource: only one thread at a time can acquire the lock, and all access to the shared resource requires that the lock be acquired first.
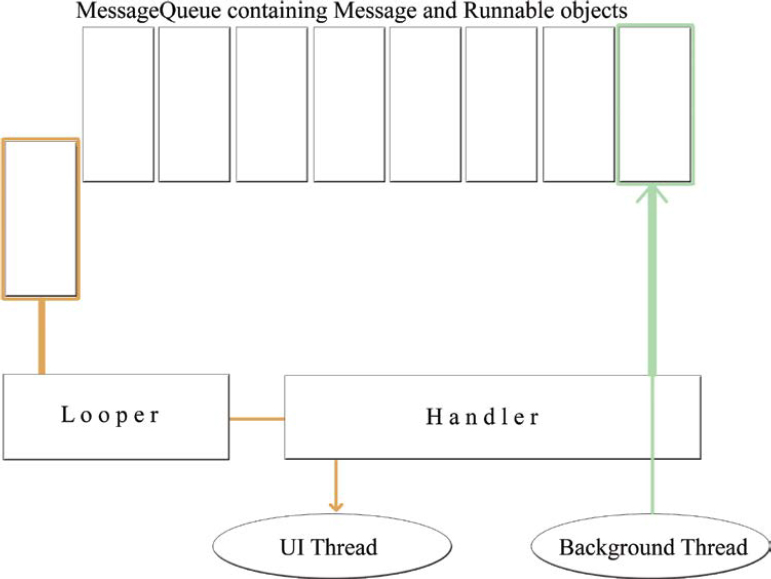
The most common thread communication between threads occurs between the UI thread and background threads. As illustrated in previous lab examples, the UI thread offloads long tasks by sending data messages to be processed on background threads. Multithreaded applications should follow an efficient message passing mechanism, such as the one illustrated in Figure 6-17. This diagram shows messages passed between a background thread and the UI thread.
The background thread adds messages to the queue, using the Handler connected to the UI thread. The Looper runs in the UI thread and retrieves messages from the queue in a First-In, First-Out order. The Handler is then responsible for processing the messages on the UI thread. In applications that create multiple Handler instances for processing messages on a thread, the Looper must be used to ensure that messages are dispatched to the correct Handler.
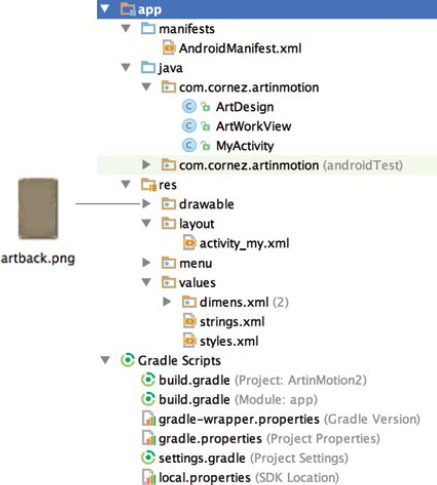
■ Lab Example 6-5: Art in Motion Application—Multiple Threads

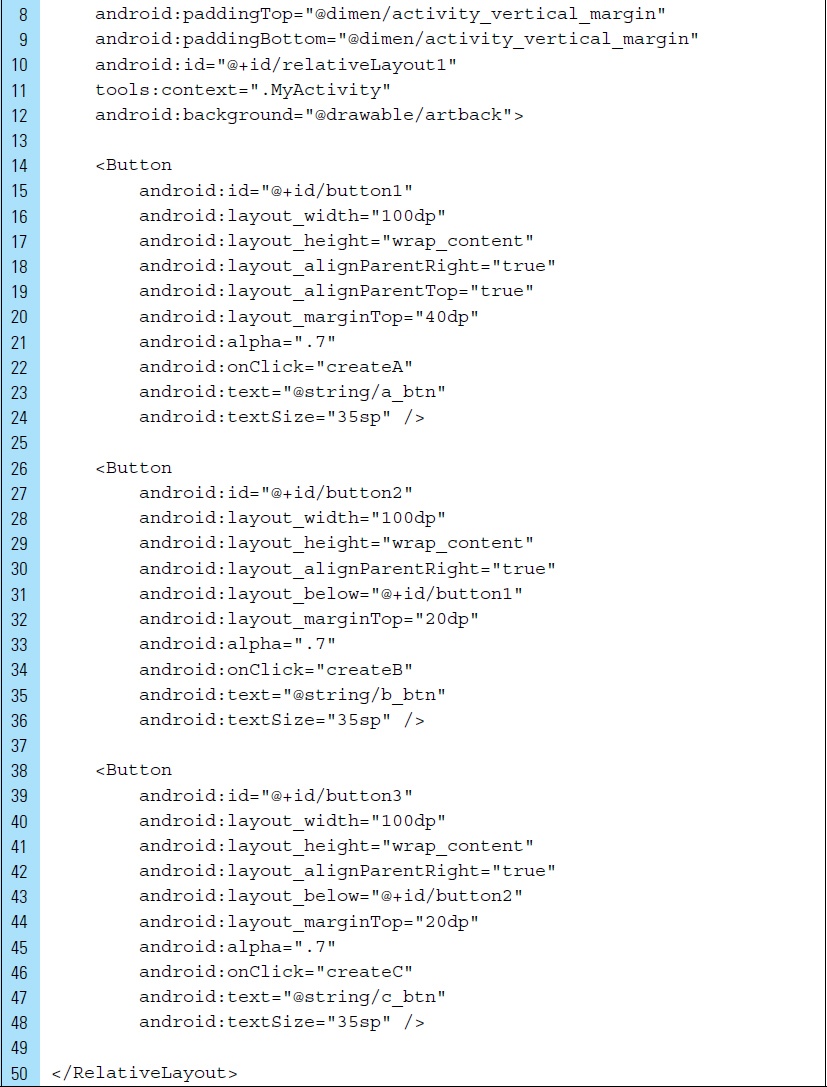
This application explores proportional motion animation using a canvas and two background threads. A single Handler will be implemented to update drawings in the canvas. As shown in Figure 6-18, the letters A, B, and C are formed with 19 spherical objects. When the user launches the Art In Motion application for the first time, all 19 spheres are positioned in the exact same location on the canvas. When the user clicks on one of the letter buttons, the spheres “ease” into position until they have formed the letter clicked by the user.
Part 1: Animation Movement Design
Velocity, the fundamental property of an object that is moving, is characterized by direction and speed. The concept of proportional motion is an easing motion that involves moving an object from an existing position to a target position. The easing motion is evident as the object appears to slide into the target and then eventually stops.
Creating an easing motion requires that velocity is computed proportional to distance. For example, the further away from the target, the faster the object moves. As an object gets very close to the target, it moves an imperceptible amount. As Figure 6-19 shows, the illusion of an easing motion is achieved by repositioning the spherical object half the distance to the target position at each interval. The new velocity of the moving object is recomputed at each interval.

Part 2: Application Structure and Setup
The settings for the application are as
Application Name: |
Art In Motion |
Project Name: |
ArtInMotion |
Package Name: |
|
Android Form: |
Phone and Tablet |
Minimum SDK: |
API 18: Android 4.3 (Jelly Bean) |
Target SDK: |
API 21: Android 5.0 (Lollipop) |
Compile with: |
API 21: Android 5.0 (Lollipop) |
Activity Name: |
|
Layout Name: |
|
The final project structure for the application is shown in Figure 6-20.
The orientation of the application’s activity is locked into portrait mode within the AndroidManifest.xml file. The XML code for this file is shown as follows:

Part 3: The User Interface External Value Resources
The external string values for the button labels, A, B, and C, are set in strings.xml. This file is shown as follows:

The layout associated with the main activity is activity_my.xml, shown in Figure 6-21.
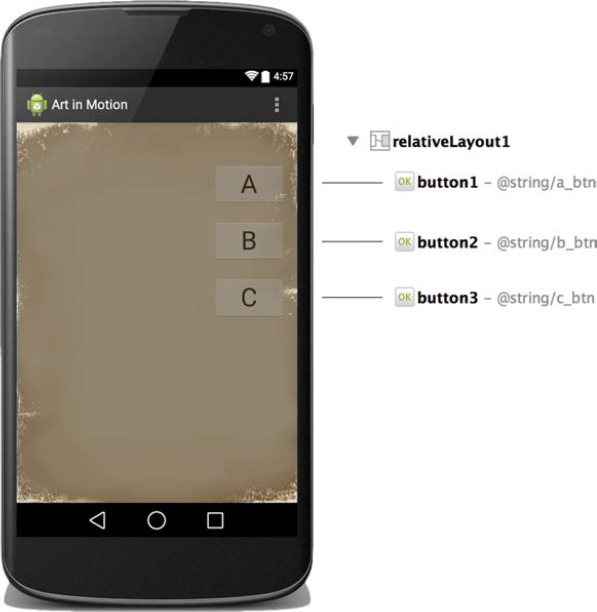
activity_my.xml requires a reference to the root element, relativeLayout1. This reference will be used programmatically to add a customized View to the layout. This customized View is designed to contain a drawing canvas that will hold animated spheres. The XML code for activity_my.xml is shown as follows:
Part 4: Designing the Art Letters
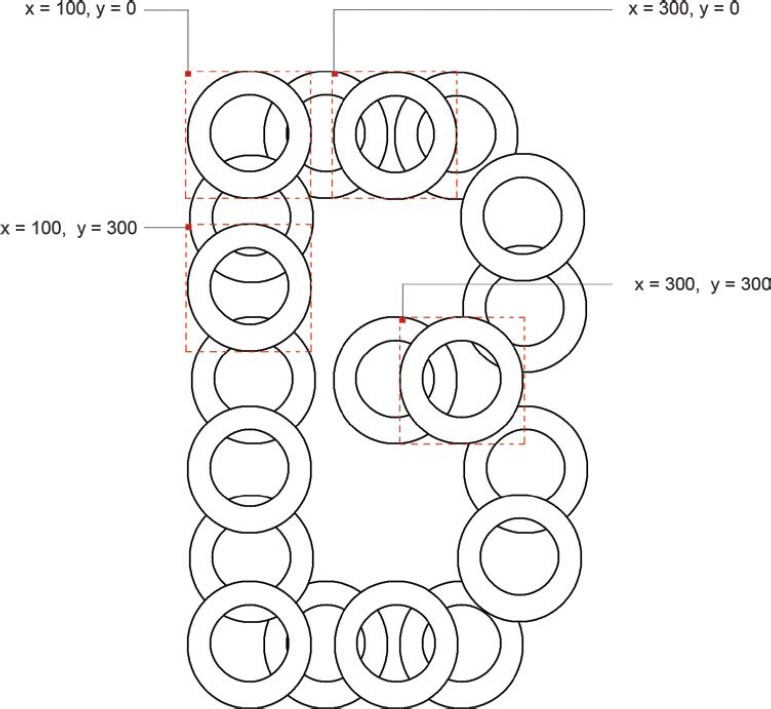
Each of the “art” letters for A, B, and C is composed of an arrangement of spheres. For example, the arrangement of spheres that form the letter B is shown in Figure 6-22. The location of these spheres is specified in the file ArtDesign.java as two-dimensional arrays. These x, y locations are used to establish final target positions when computing proportional movement. The Java code for ArtDesign.java is shown as follows:
Part 5: MyActivity.java–The Application Controller
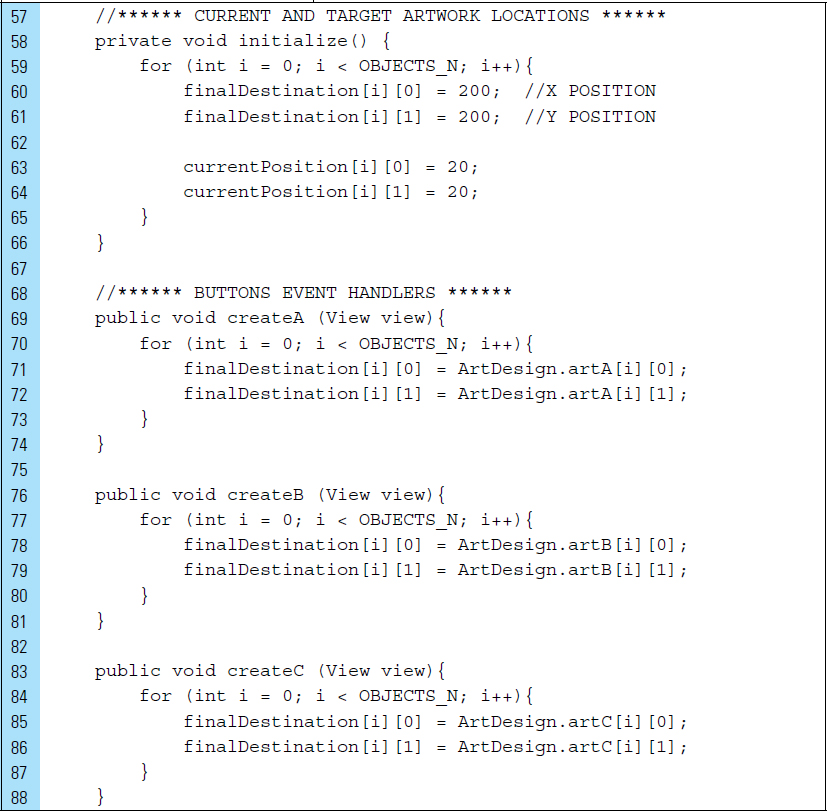
MyActivity is the sole activity of the application. Its objective is to coordinate the background threads that perform the workload of computing the proportional movement and scheduling rendering to the canvas. A Handler, the UI Looper, and the MessageQueue are used to synchronize the animation process. The Java code for MyActivity is shown as follows:

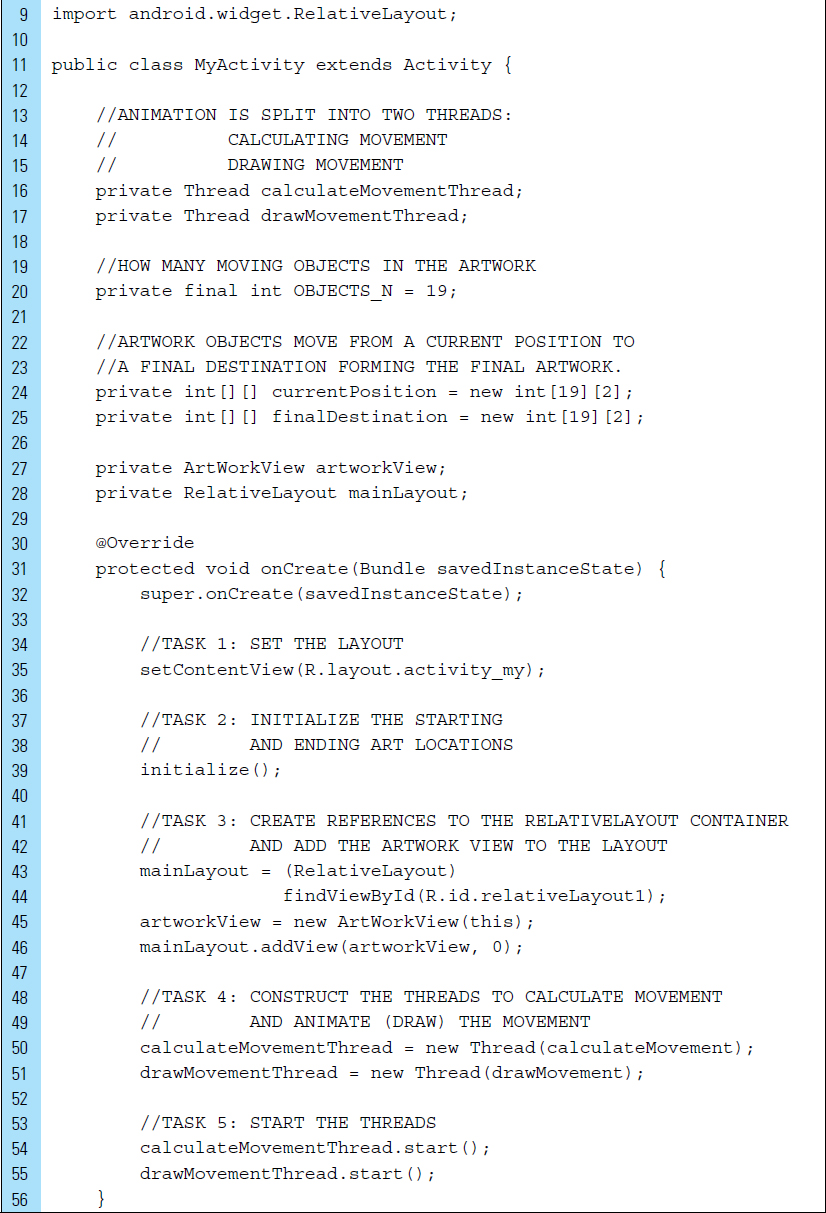
Lines 58–66: |
The current position of each moving sphere is updated at regular intervals. The target position is used to compute the next current position of a given sphere. This data is stored in the array’s finalDestination and currentPosition. |
Lines 69–88: |
The |
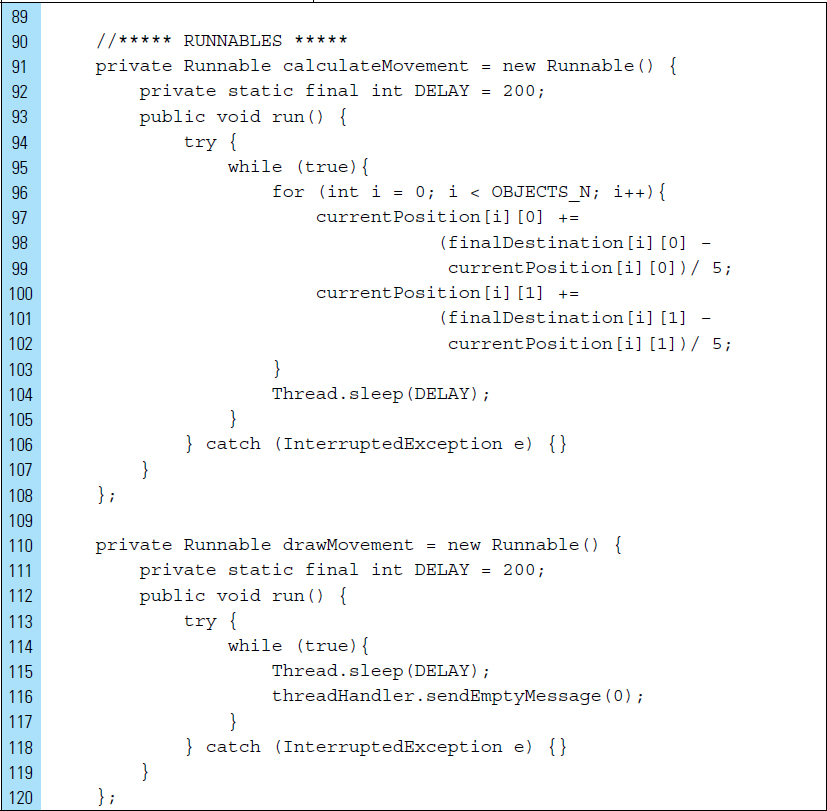
The unit of work on background threads is divided into movement calculations and drawing.
Lines 91–108: |
The |
Lines 110–120: |
The drawMovement Runnable is associated with the drawmovementThread. The threadHandler is used to send empty messages to the MessageQueue at intervals of approximately 200 milliseconds. |
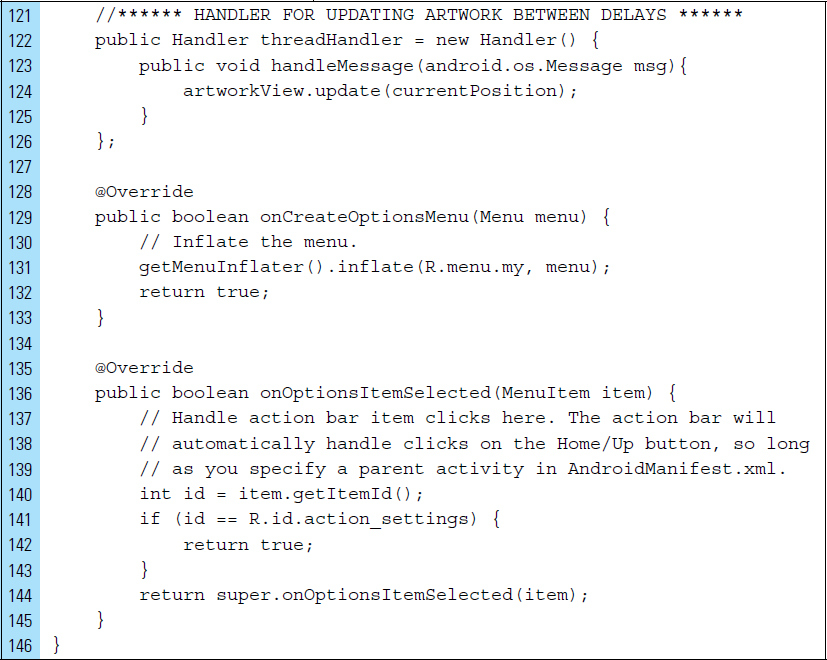
Lines 123–125: |
|
Part 6: ArtWorkView.java—The Custom View Containing a Canvas
ArtWorkView is the class that models the custom View. onDraw() is implemented to perform drawing. The Java code for ArtworkView is shown as follows.

■ 6.9 Materials and Functionality
With the release of Lollipop in October 2014, new visual enhancement features were added to the platform and given the name Material Design. One specific feature that stood out was fluid animations. Material is partly a metaphor for a system of motion; surfaces and edges of material provide visual cues. The use of familiar tactile attributes helps users quickly comprehend how to maneuver. Movement is important for providing understanding that leads to instinctive interactions.
Applying material design to an application requires the android: Theme attribute in AndroidManifest.xml to be set to Material. This specification provides a collection of default animations for touch feedback and activity transitions.
Beginning with Android 5.0 (ApI level 21), animations can be customized as transitions. Two interesting animations provided by Material Design are “circular reveal” and “curved motion.” These transitions do not require the use of a background thread to execute.
Consider the following onCreate() callback method for MyActivity. The single objective of this code is to reveal a previously invisible ImageView using an Animator object, anim. anim is created and configured within the activity and will therefore execute on the UI thread.
The method calls getLeft(), getRight(), getTop(), and getBottom() are used to get the pixel positions of the ImageView relative to the parent.
The createCircularReveal() method call returns an animation object that transitions the ImageView into full view in a clipping circle motion. View AnimationUtils defines a collection of common animation utilities to apply to View objects. The call to start() is required to set the animation in motion.

When start() is called within a background thread, a Looper should be used to avoid a runtime exception. When the animation is used to update properties of objects in the view hierarchy, a UI thread is required to perform View updates.
Activity transitions in material design support the visual connections between different states, using motion and transformations between common elements. For example, it is possible to specify custom animations for entering and exiting transitions, as well as for transitions of shared elements between activities; these transitions include explode, slide, and fade. A system-managed processing thread called RenderThread keeps animations smooth, even when there are delays in the main UI thread.
ValueAnimator, an extension of Animator, can be used to provide a timing engine for running animations that calculate animated values and set them on target objects. These animations use a single timing pulse that runs in a custom handler to ensure that property changes happen on the UI thread.
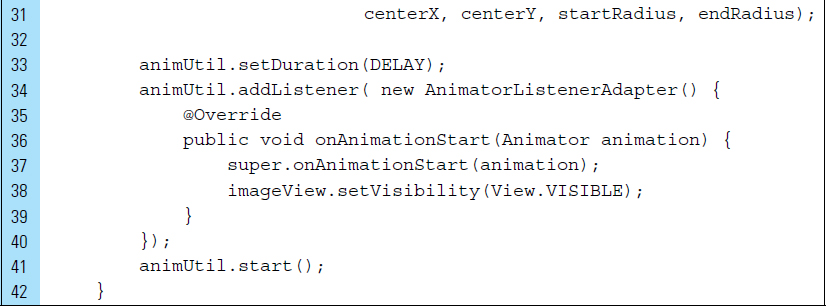
The code segment below illustrates a circular reveal animation that changes the visibility of an ImageView at a specified time using an animation listener. The showImageView () method uses a DELAY value that will cause the animation to be spread over a period of two seconds. The hideImageView() method will produce a rapid circular reveal.

■ Lab Example 6-6: Virtual Pet Fish—Animated ImageViews
Android users often have high expectations for the production values of the apps they use on their devices. Applications providing the same basic functionality often compete with each other on Google Play. The most outstanding products are delivered with high-end production values that can include graphics, sound and music, and a narrative.
Sophisticated visual graphics may not make an application any better, but they will contribute to a more satisfying experience for the user. Visuals furnish a well-developed representation of a brand and provide an interesting context for an application.
Part 1: The Design
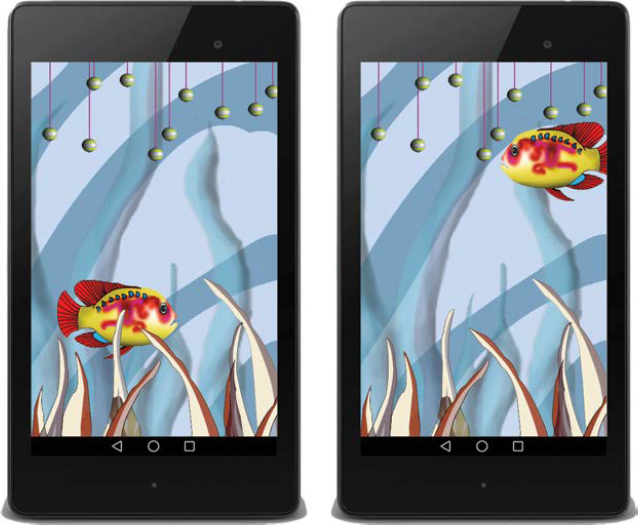
This lab explores animated movement, using imported higher-quality graphics. The completed application, a dynamic aquarium containing a fish, is shown in Figure 6-23. The fish is a virtual pet. As the fish swims within the aquarium, it will burn calories and will eventually become hungry. Once hungry, the fish will feed at the bottom of the aquarium. When the fish is not searching for a meal to supply calories, it will explore the top part of the aquarium.
Part 2: Application Structure and Setup
The settings for the application are as follows:
Application Name: |
Virtual Fish |
Project Name: |
VirtualFish |
Package Name: |
|
Android Form: |
Phone and Tablet |
Minimum SDK: |
API 18: Android 4.3 (Jelly Bean) |
Target SDK: |
API 21: Android 5.0 (Lollipop) |
Compile with: |
API 21: Android 5.0 (Lollipop) |
Activity Name: |
|
Layout Name: |
|
The application is to be divided into three parts:
Fish.java (Model): The behavior of the virtual fish is driven by logic rules that primarily deal with the current state of hunger.
Visuals (Views): A small set of ImageViews is used to depict the elements in the fishtank, including the fish, foliage, and water.
MyActivity.java (Controller): The main activity of the application requires two threads: the UI thread and a background thread. The UI thread is responsible for updating the visuals, while the background thread provides the logic and calculations determining how the fish will behave.
The project structure for the application is shown in Figure 6-24. Three graphic PNG files are stored in the res/drawable folders. background.png provides the water context for the aquarium. The other two visuals, fish.png and foliage.png, will be layered over the background in the final application. This will provide an interesting visual effect.

The orientation of the screen is locked into portrait mode. In addition, a fullscreen will be used with the titlebar removed. The XML code for AndroidManifest.xml is shown as follows:

Part 3: The User Interface and Graphic Elements
A FrameLayout is primarily used to hold a single child view. It can be difficult to organize child views in a way that is scalable to different screen sizes, and child views can overlap each other. However, when a View is added programmatically to a FrameLayout, its position can be controlled very easily. In addition, multiple View elements can be layered in a useful way. This is advantageous when creating games and applying movement to View elements.
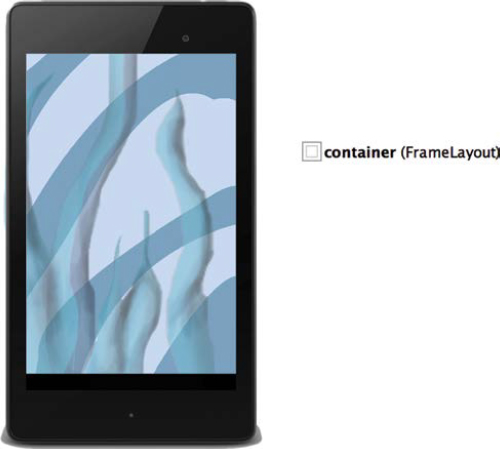
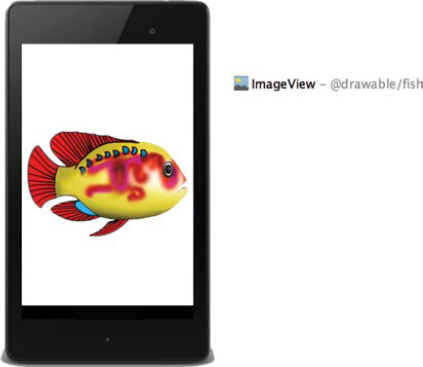
The user interface screen for the Virtual Fish application is the layout file activity_my.xml. This UI screen will be bound to the Activity of the application and will use a FrameLayout as the root element. No other View elements will be specified in the XML file. As shown in Figure 6-25, the background for the FrameLayout is set to the drawable representing the water in the aquarium-background.png.
The FrameLayout will serve as a container for the aquarium, with additional visual elements being added programmatically when the Activity of the application is launched for the first time. The XML code for activity_my.xml is shown as follows:
Line 5: |
The id for the |
Line 7: |
The image of water is applied to the background. |
The fish graphic will be added to the FrameLayout by inflating an ImageView XML file, depicted in Figure 6-26. The XML layout file is fish_image.xml and is located in app/src/main/res/layout.
The XML code for fish_image.xml is shown as follows:
Line 2: |
An ImageView is specified as the root element of the layout. |
Line 5: |
The image of a fish is identified as the source for the layout. |

Similar to the fish graphic, the image of foliage will also be added to the aquarium during runtime. By doing this programmatically, this allows us to position the fish between the water and the foliage. This provides an attractive visual effect, with the fish being able to swim behind the foliage as it searches for food.
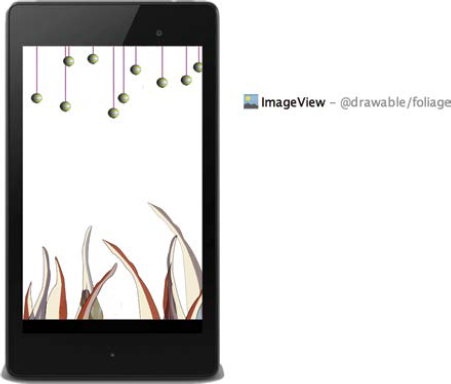
The XML code for foliage_layout.xml is shown as follows. As illustrated in Figure 6-27, the root element of the layout is an ImageView. foliage.png is specified as the image source, as shown on Line 5.

Part 4: Modeling the Behavior of the Fish
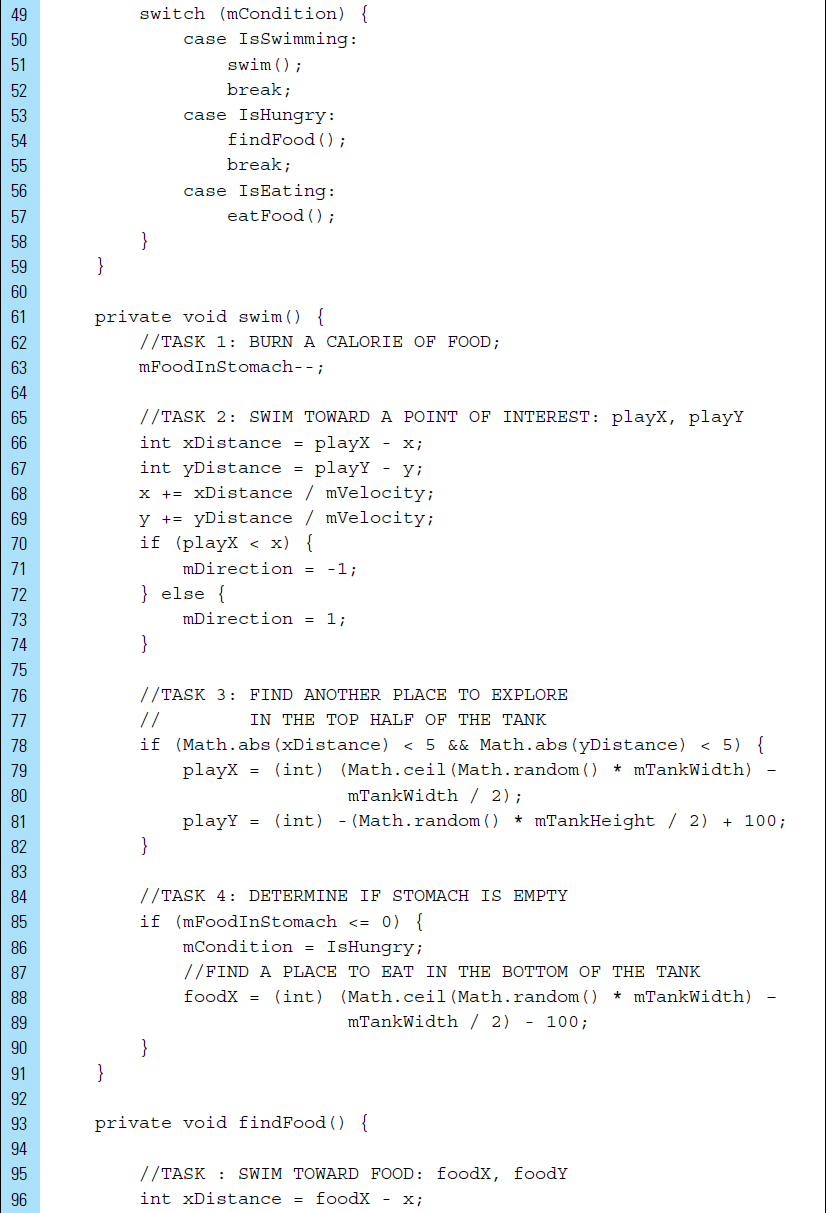
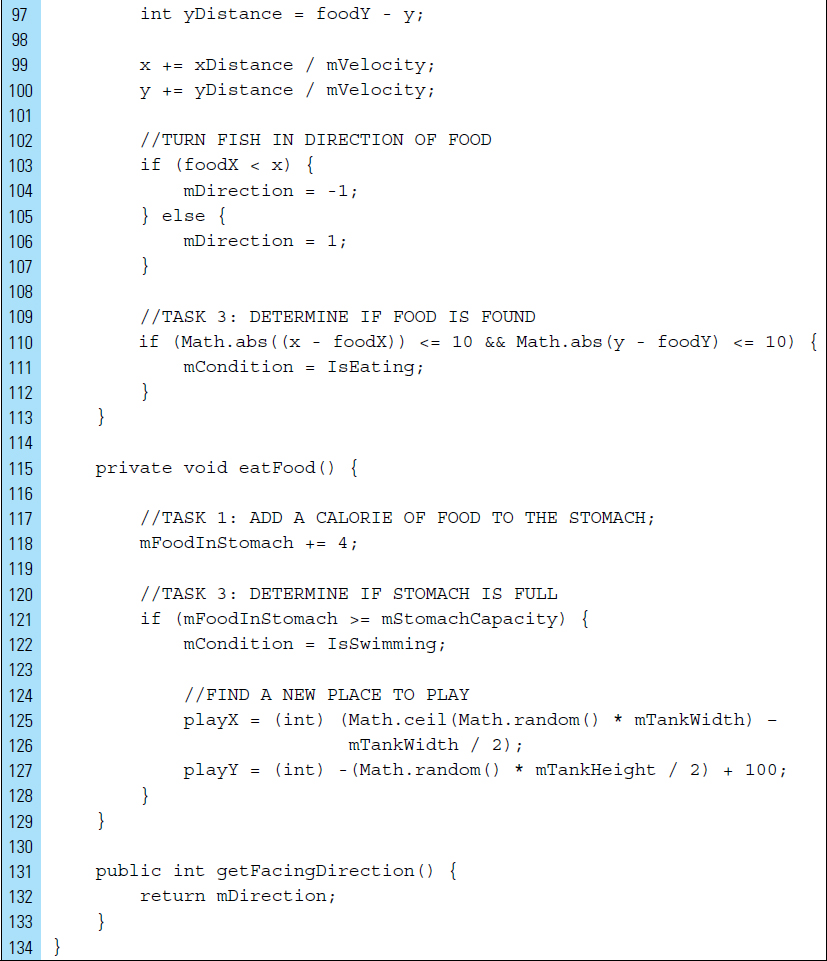
The Fish class is used to model a virtual fish living in the aquarium. The behavior of a fish will be governed by rules related to hunger or, more specifically, the amount of food in its stomach. For example, when the fish is hungry, it will actively search for food. If the fish has food in its stomach, it will swim around the tank while burning calories and depleting the food in its stomach. Once the fuel in the stomach has been used up, the fish will again seek out food. As the fish eats, food is added to his stomach. When the amount of food in the stomach has reached full capacity, the fish will leave its food and begin swimming around the tank. The state of the fish at any given moment is described by one of three conditions:
|
The fish is hungry and actively searching for food. |
|
The fish has food in its stomach and is looking for specific spots in the aquarium to play. As the pet swims, calories are burned until it becomes hungry again. |
|
A fish is eating when its state was previously changed from |
In addition to the x and y position of the fish, further attributes are defined as follows:
|
This attribute specifies the current state of the fish: |
|
This attribute refers to the easing velocity, or proportional movement of the fish. |
|
In this lab example, the maximum capacity of a fish’s stomach is set to 80. When multiple fish are added to the aquarium, this value can be randomized. When a Fish object is instantiated, its stomach will be set to full, as shown on Line 30. |
|
Food is located at the bottom area of the tank. Play locations will be computed within the top area of the tank. Both computations will rely on the height and width of the Android device. |
|
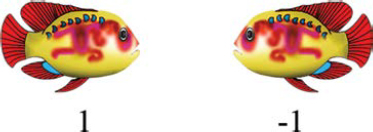
As the fish moves around the aquarium, the direction it faces will change, as shown in Figure 6-28. |

Part 5: The Application Activity
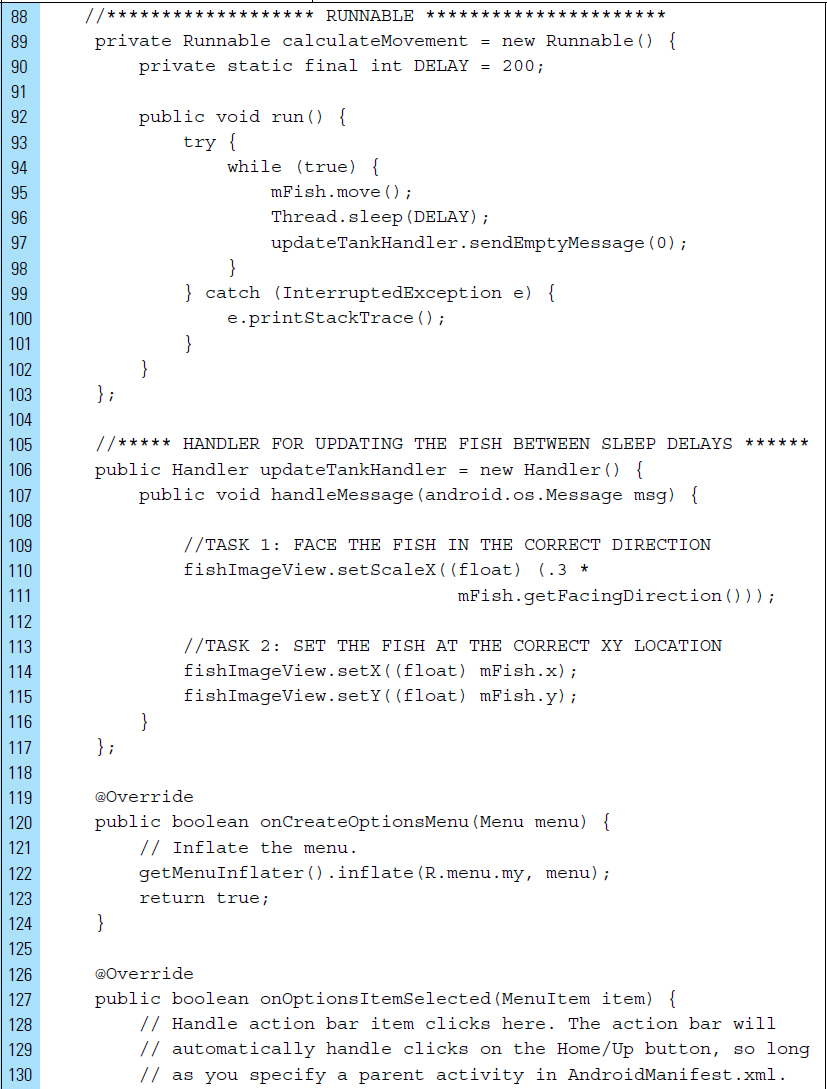
As the sole activity of the application, MyActivity is the controller that initializes the application threads and controls communication between elements. Two threads will be used to perform the application workloads. The UI thread will update the image elements, specifically repositioning and scaling the fish: ImageView. A background thread, calculateMovementThread, will perform the calculations that determine the x, y location and facing direction of the fish.
The Java code for MyActivity is shown as follows:
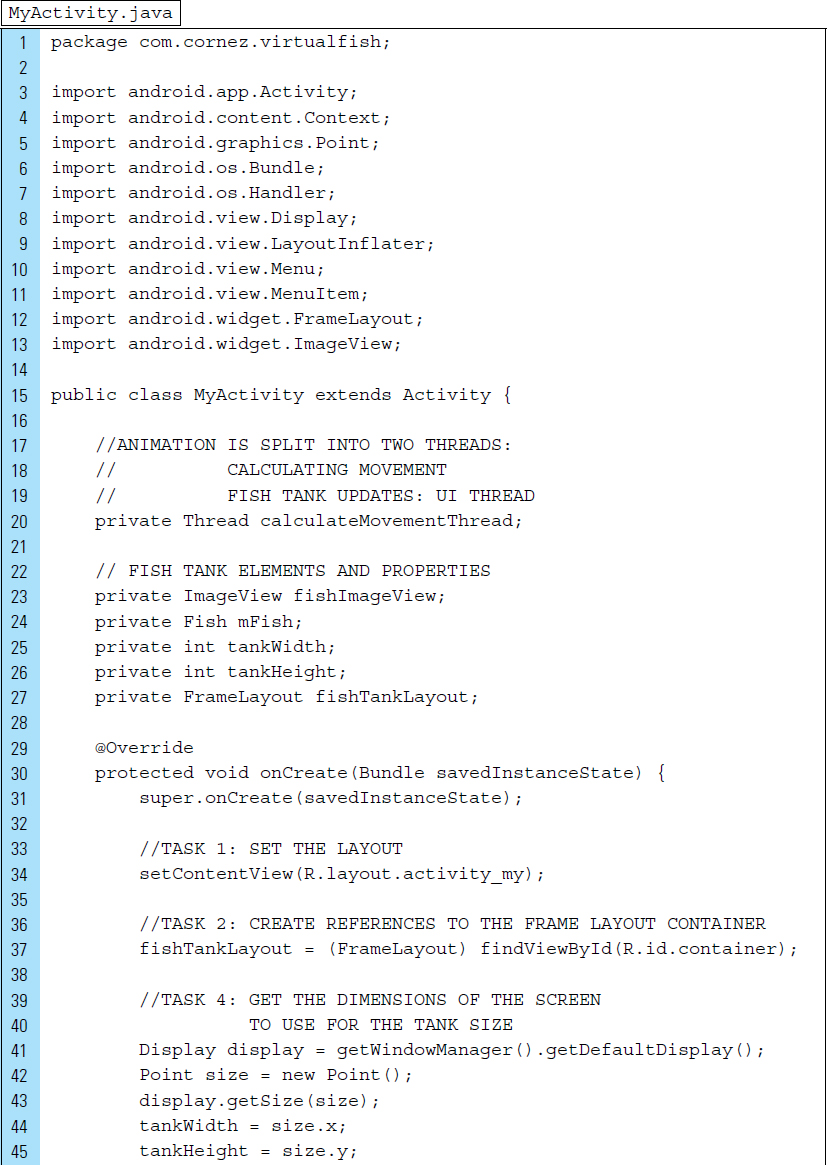
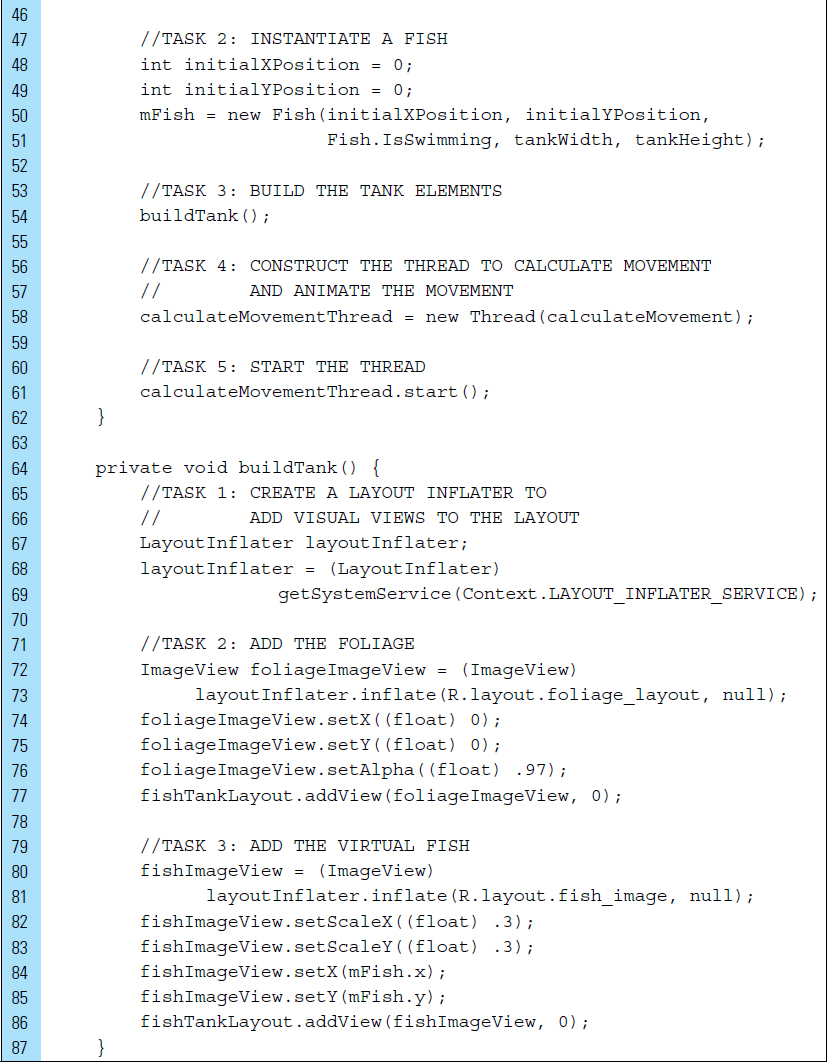
Lines 89–103: |
An inner class implementation is used to define the |
Lines 106–117: |
The instructions in the |

■ 6.10 AsyncTasks
In general, when performing parallel tasks running longer than a few seconds, it is best to use Java threads rather than the UI thread. As an alternate solution, Android provides an AsyncTask class as a convenient way to execute work units in parallel.
The AsyncTask class is similar to a thread in that it allows background work to execute outside the UI thread; however, it enables easy use of the UI thread by publishing background operation results on the UI thread. In addition, AsyncTask does not require the creation of a thread or handler. AsyncTask is an easy option for developers because it offers an uncomplicated framework for performing short-term background work.
AsyncTask is designed to be a helper class for Thread and Handler, and it does not constitute a generic threading mechanism. AsyncTask operations should not be used for long-running work. For example, in many cases, a networking operation requires a long process that is better performed using the Thread/Handler method. Ideally, AsyncTask should be used for tasks that take a few seconds at most.
AsyncTask is an abstract class that is designed to work with the UI thread in a seamless and convenient way. Within the asynchronous framework, a task is defined by a series of instructions that run on a background thread and whose results are published on the UI thread. The following four steps, each implemented as a callback method, define an asynchronous process:
|
This method is the first step in the asynchronous process and is called before the background tasks are performed. The objective of this step is to set up any required preliminary tasks before background work begins executing. |
|
Once The |
|
While the background tasks are being processed by |
|
This method is the final step in the asynchronous process and is called once the |
To create an AsyncTask, a subclass is constructed that inherits from AsyncTask. In addition, the defining callback methods are overridden. At a minimum, doInBackground() must be implemented.
Consider the following code segment that creates a photographic filter for a camera photograph. Computing a filter for a photograph is a relatively long operation that needs to be performed in the background. While the filter operation is processing, the user will observe a spinning ProgressBar, providing a visual indication that the process is on course. Once the filter has completed, the ProgressBar will be removed from the screen and the resulting filtered photograph will appear in an ImageView.
Lines 1–2: |
An |
Lines 4–10: |
The first step in the asynchronous process is defined. |
Lines 12–23: |
|
Lines 25–27: |
Updates to UI elements are published by |
Lines 29–39: |
|


■ Lab Example 6-7: AsyncTask to Read a File in the Background
This lab illustrates the creation of an asynchronous process. Specifically, the example application built in this lab will be used to explore the four steps of AsyncTask:onPreExecute(), doInBackground(Params…), onProgressUpdate(Progress…), and onPostExecute(Result).
Part 1: The Design
This lab application is designed to simulate the downloading of a document. The download will occur in an AsyncTask background thread. The progress of the download will be updated and displayed in a ProgressBar. In addition, a textfield is used to provide specific asyncronous callback information, as shown in Figure 6-29.

Part 2: Application Structure and Setup
The settings for the application are as follows:
Application Name: |
AsyncTask Explore |
Project Name: |
AsyncTaskExplore |
Package Name: |
|
Android Form: |
Phone and Tablet |
Minimum SDK: |
API 18: Android 4.3 (Jelly Bean) |
Target SDK: |
API 21: Android 5.0 (Lollipop) |
Compile with: |
API 21: Android 5.0 (Lollipop) |
Activity Name: |
|
Layout Name: |
|
The project structure, shown in Figure 6-30, contains a single Activity and an associated layout file. The strings.xml file is the only required value resource for the application.

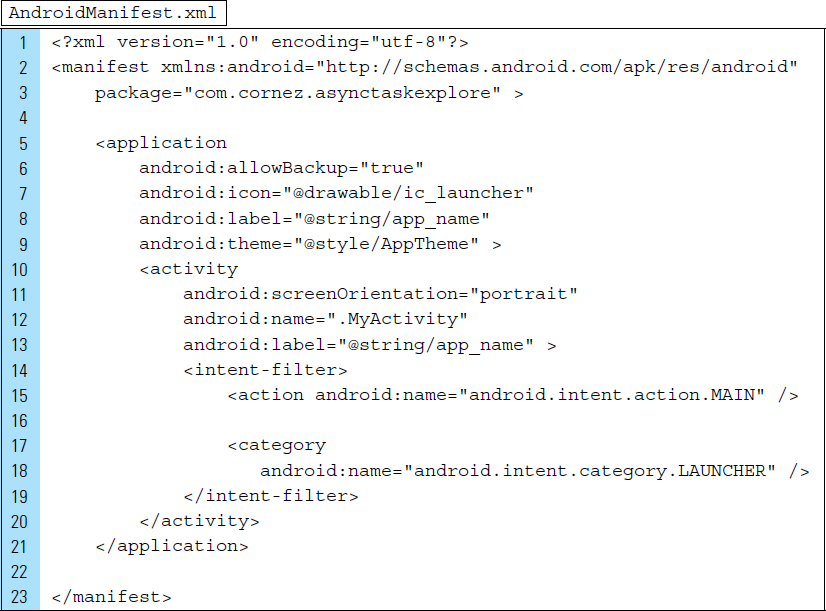
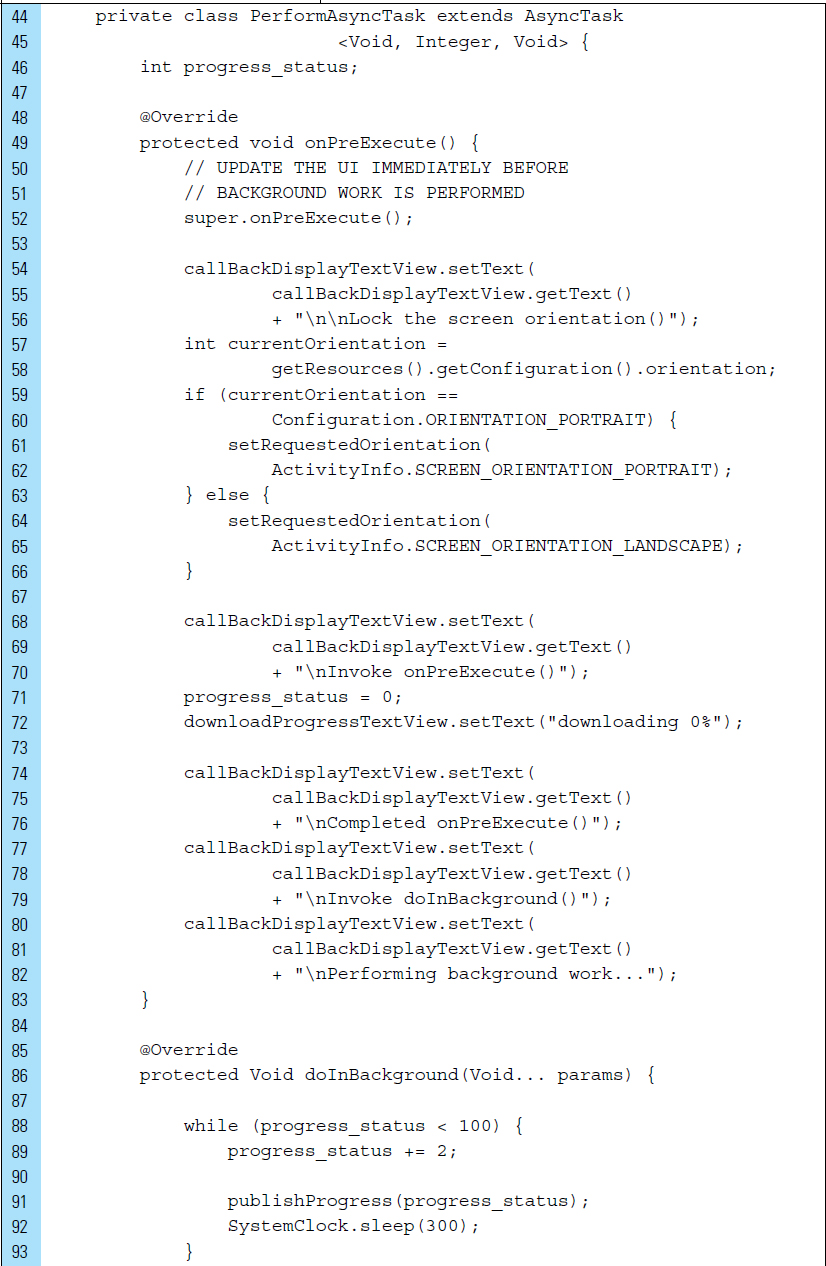
The orientation of the application will be specified as portrait within the Android-Manifest file. Depending on the Android platform, an error can occur when a user rotates the device while an asynchronous background thread is in progress. This is caused when an Activity lifecycle is required to restart. The AsyncTask reference to the Activity may become invalid.
A simple solution is to permanently lock the screen orientation of the activity, as shown on Line 11 of the AndroidManifest file. A second solution will be discussed in the implementation of the AsyncTask subclass.
Part 3: The Application User Interface
The application uses text strings for labeling buttons and providing a title to the asynchronous feedback. The XML code for the strings file is shown as follows:

The layout design for the activity_my, the activity user interface, is shown in Figure 6-31. A RelativeLayout is used, along with a scrollable text element for detailed feedback. Both layout buttons contain onClick event handlers specified in the XML document.

The XML code for activity_my.xml is shown as follows:


Part 5: Activity Code for Application
The application requires the use of a single Activity. All operations are defined within this element file. The onCreate() method declares the ProgressBar, referenced by downloadProgressBar, which will be updated while the AsyncTask is running in the background. The Java code for MyActivity is shown as follows:
Line 27: |
|
Lines 29–30: |
A |
Lines 31–32: |
A |
Lines 35–43: |
The methods |
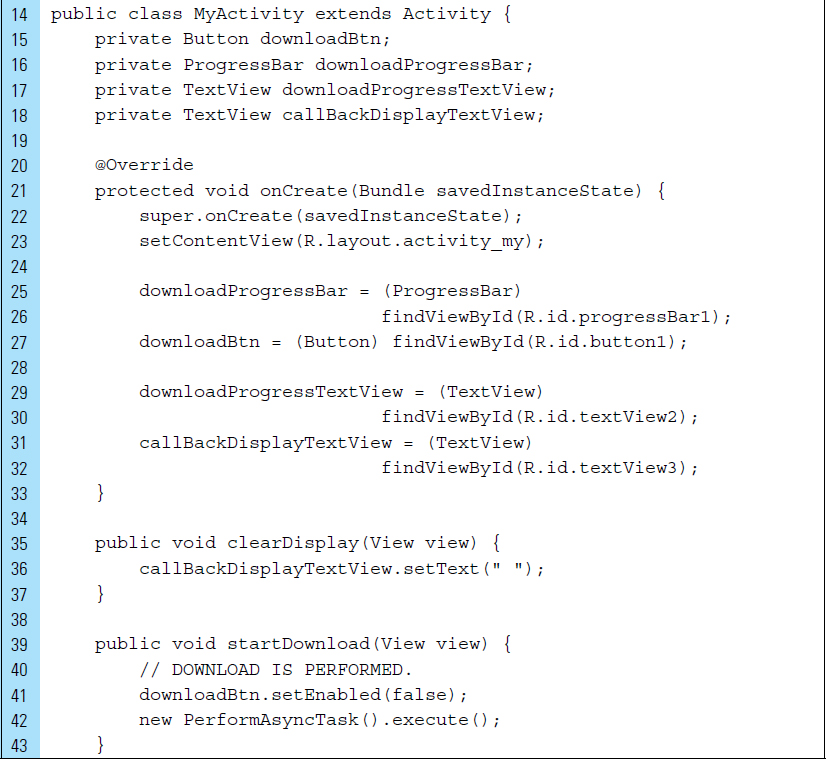
Lines 44–123: |
An |
Lines 54–66: |
A temporary locking of the screen is performed in OnPreExecute(). This will prevent an orientation change to the device while the AsyncTask is processing work in the background. |
Line 91: |
The |

■ Exercises
What is multithreading?
What does the acrynom ANR stand for? Provide several reasons why an ANR will occur.
What tasks should be performed only on the UI thread?
Briefly describe two approaches to creating threads in an Android application.
List three application components that are created on the UI thread.
Explain the purpose of the MessageQueue.
What is the purpose of a call to Looper.loop() ?
How is an AsyncTask similar to a Thread? How is it different?
Briefly describe the four callback methods implemented in an asynchronous process.