Chapter 4
Getting Set to Go
In This Chapter
![]() Signing on the first time
Signing on the first time
![]() Turning on Wi-Fi
Turning on Wi-Fi
![]() Signing up for things
Signing up for things
![]() Locking and encrypting information
Locking and encrypting information
![]() Making things more accessible
Making things more accessible
One of the hallmarks of the human race is the fact that almost from the very start we have been determined to communicate in a lasting way, beyond mere grunts and ephemeral spoken language. I travel the world almost obsessively and have seen ancient sites decorated with the equivalent of billboards: good hunting over here, fresh water over there, the party house is the third door down on the left. Signs were chiseled into stone, painted onto walls, inscribed on papyrus, hand-illustrated in early books, and then machine-printed all the way until near the end of the 20th century when we all beheld the first portable electronic publications.
I guess what I’m getting at is that a NOOK tablet is, at its core, merely amongst the latest forms of communication. Quite advanced and quite adaptable and requiring a battery and a means of connection to the invisible but almost omnipresent Internet, but still a cousin to those ancient means of communication.
Because a digital tablet has so many advanced features, as a user your first interaction with the Samsung Galaxy Tab S2 NOOK must involve configuring — setting up — the device so that it looks and acts the way you want. Later on, you return to those same configuration and settings screens to fine-tune its behavior.
Being a First Timer
Everybody has a first time, sooner or later. It’s exciting and terrifying and often awkward. But it has to be done, and eventually (often sometime around the second time) it all becomes familiar because you have now learned what goes where, and when.
It’s that way, too, with the Samsung Galaxy Tab S2 NOOK.
 In this section, I discuss the steps you need for the very first time you turn on your new tablet. The first time is different because it involves registering the device with at least three separate providers. You may also be tempted to add other accounts (like Facebook, Twitter, and Dropbox). I suggest that you keep it simple, sweetheart. Add optional services later, after you have your NOOK tablet up and running.
In a moment I make passing mention of the EULA, which isn’t (by any definition) a musical instrument, but instead a mess of legalese to which you must agree in order to use the various systems and software of the tablet. You have two choices here: agree or return the tablet to its maker.
Setting up a Google account
The first major step involves setting up (or adding an existing) Google account for your machine. Why does this come first? Because the underlying operating system of the Samsung Galaxy Tab S2 NOOK is a version of Android, which is developed by and maintained by Google.
With a Google account, your tablet is set up to automatically receive updates to the operating system (or notifications that updates are available), and also gain access to other Google services, Gmail. And you use the same account to go to Google’s Play Store, where you can download apps to expand the capabilities of your device.
When you turn on your device for the first time, you automatically go to a screen where you can enter the username and password for a Google account you may already have, or create a new Google account from the tablet.
You can sign up for a new Google account from your Samsung Galaxy Tab S2 NOOK, but it might be easier to preregister from a regular desktop or laptop computer. Regardless, for most users, it’s a good idea to have the same username and password on both devices. If you also have a smartphone, use the same account. This allows you to synchronize calendars, Gmail, and apps you install on your tablet or phone (or both).
Here’s how to sign up for a Google account from a desktop or laptop computer that’s connected to the Internet:
- Open a web browser and go to
www.google.com. - Click the Sign In link.
- Click the Create New Account link.
-
Choose a login name and password.
Now you can use that same account when you register your NOOK tablet.
 The fact that you have so much information and perhaps one or more credit cards included in your Google account should tell you one important thing: Use a complex password and change it from time to time.
Signing on for the first time
Your tablet has been fully charged, right? If not, get thee to Chapter 1.
-
 Press and hold the Power/Lock key to turn on the tablet.
The key is on the right side of the tablet.
Brace yourself: It’s going to take a while before the tablet comes to life for the very first time. Four, five, maybe even six or eight whole seconds. Think of it as a cute little puppy waking up from a dreamy sleep; it’s going to take just a little bit of extra time while it figures out who it is, where it is, who you are, and if it feels all warm and fuzzy. When that’s all done, it’s going to roll over on its back and let you rub its tummy. The puppy, that is. Your Tab S2 NOOK is going to just sit there, but it will eventually be ready to welcome the strokes and taps of your fingers.
-
Give your device a name, like I’ve done in Figure 4-1.
Why bother? This is how you’ll recognize your tablet when you attach it by USB cable to a PC or laptop, or when you use Bluetooth or Wi-Fi Direct or other wireless technologies. I explain more about these technologies in Part II of this book.
You can call your tablet anything you want. But remember, someday someone else may use your NOOK or connect to it or just see its name appear on a list of nearby wireless devices. Device names are generally visible to anyone within radio range. Can I suggest you consider for a moment how you want the world to think of you, or at least of your device?
The other thing: Don’t give your device a name that in any way would hint at its password. -
Touch the screen about two-thirds of the way down from the top and swipe from left to right.
You can use any finger on either hand.
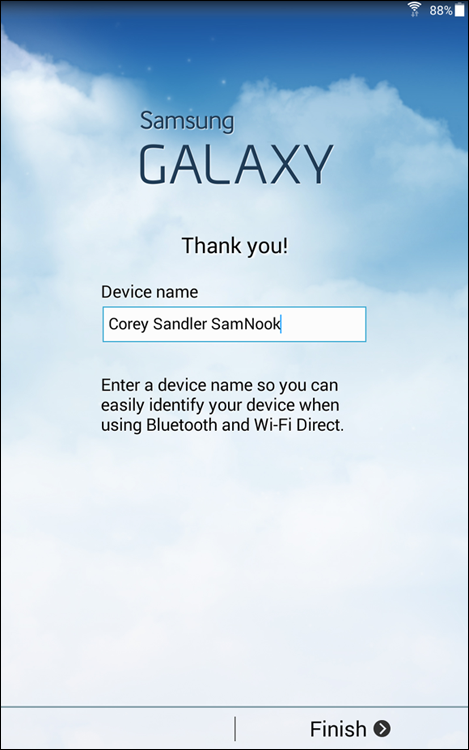
Figure 4-1: Please allow me to introduce myself: This is your tablet’s ID in Wi-Fi, Bluetooth, and wired communication with other devices.
Later in this chapter, I show you how to require a more demanding key to unlock your tablet. You lock your tablet to protect against unauthorized use: You don’t want just anybody to read your email or notes, riffle through the books you’ve purchased or, perhaps most frighteningly, to use your accounts to buy books or airline tickets or entire airliners.
The very first set of options — Accessibility — is mostly aimed at users who might have difficulty reading small print, certain colors, or performing particular actions. I put accessibility options at the end of this chapter, and you can go there for guidance any time you need to.
Firing Up the Wi-Fi
Owning a tablet without regular or at least occasional access to the Internet is kind of like owning a broken pencil: pretty pointless.
Without Wi-Fi, you can’t register your device with Samsung for updates and apps and offers, sign in to B&N for NOOK Shop access, or contact Google and get stuff from them. You also can’t go to the Internet or get email without establishing a Wi-Fi link.
Four links in the Wi-Fi chain
When you first turn on your Tab S2 NOOK, you’re guided right into the Wi-Fi setup.
Very important point here, please: You need certain elements to successfully connect your Tab S2 NOOK to the Internet through a Wi-Fi system. You have to set them up correctly. Work on that now. Here’s what you need:
- Turn on your tablet’s Wi-Fi radio system.
- Be near a router. You must be within range of a functioning Wi-Fi router (a signal transmitter/receiver), also called a WAP (Wireless Access Point). The Wi-Fi router itself has to communicate with the Internet. Your tablet may connect to a router but get no further than the box on the wall. If you can establish a link with a Wi-Fi system but get no further, check with the owner or operator of the router, or find another one to use.
- Choose a signal. You must connect to an available signal. Some Wi-Fi signals may be open to any user. Others (most, these days) require a password and sometimes a username or other details.
The Samsung Galaxy Tab S2 NOOK is a Wi-Fi device; it doesn’t have a cellular radio. (Parts of the Galaxy Tab S2 can work with cellular systems; this book covers only the Wi-Fi features. You’ll also have to add the NOOK app to your tablet, which is easily done by visiting either the NOOK.com website or Google’s Play Store.)
I discuss Wi-Fi and two device-to-device close-proximity systems, Wi-Fi Direct and Bluetooth, in detail in Chapter 5 of this book. If you have a non-standard setup in your home, office, or elsewhere, you might want to go there now and return to this page later.
For 98.2 percent of users (I just made that number up, but by 98.2 I mean “nearly everyone”), connecting to a Wi-Fi system is quite simple. You probably already have one in your home or office. You’ll also find them in most public libraries and many stores and restaurants. Barnes & Noble, as part of its intense desire to get you to buy a NOOK tablet and visit their stores, offers free Wi-Fi access. You can even read free samples or certain books in their entirety while you’re in the store.
Hunting for Wi-Fi
The steps you go through are very similar to what you have to do any time you use your tablet somewhere new. And so, I explain the process of finding and signing on to Wi-Fi. When you turn on your Galaxy Tab S2 NOOK, it hunts around for any available Wi-Fi networks.
You will likely find three types of Wi-Fi network:
-
Open networks aren’t protected by any password or login requirements. Just choose the network, and you’re on the Internet. It’s probably safe, but be very careful about the sites you might visit; I would advise not doing your banking or making a purchase involving a credit card on an open network. If you have no choice, go ahead. Then plan on changing passwords and monitoring your credit card and bank statements regularly, which is something you should be doing anyhow.
- Open networks with login don’t need a password, but the browser asks you to log in. You may have to provide your name, address, email address, and other information. In some cases, you may be asked to prove you are who you say you are by providing a smartphone number and then verifying that information by responding to a text message sent to the phone. Use your judgment about how much information you want to provide, and don’t assume this sort of system is protected from hackers, either.
- Locked networks require a password and sometimes other information, such as a login name and security settings. If the locked network is in your own home or office, it’s probably safe for things like banking and shopping.
But still: Change your passwords and regularly monitor your credit card and banking statements.
Enabling Wi-Fi on the tablet
When you first sign on to your tablet, turn on the Wi-Fi.
Why does the Tab S2 NOOK have an on/off setting for this essential function? Because when you’re reading a book or watching a video or listening to music stored on your tablet, Wi-Fi is unnecessary and you can save some battery power by turning it off. And there are certain places — like an airplane in flight — where using transmitting radios isn’t permitted, and for that reason there’s also a switch to enable Airplane Mode, which turns off Wi-Fi and Bluetooth radios.
Here’s how to set up your tablet to communicate with Wi-Fi:
- From any Home screen, tap the Apps icon and then tap the Settings icon.
-
Tap Wi-Fi and then tap On/Off.
When you turn on the radio, the tablet automatically scans for available networks within range and then displays them. See Figure 4-2.
-
Tap the name of the network to which you want to connect.
The strongest signal is first; the icon shows the signal strength. A small lock icon means the network is locked; you’ll see the word Secured below the network name. You can tap the name to read details.
- If it’s an open network, the connection happens automatically, which takes a few seconds of back-and-forth communication between the devices. If you do it right, the name of the network changes from black to a color, and you’ll see Connected below its name.
- If the network is locked, a screen asks for your username and password. In most secured cases, all you need is the password. Some devices require additional settings. Tap Advanced to show more options, including proxy and IP settings.
- Some systems show a registration screen that requires information such as your name and address. And certain systems require payment for you to use their facilities.

Figure 4-2: You’ll see system names and signal strength. Networks that require a login name, password, or both are indicated with a lock icon.
Be cautious with systems that demand a great deal of information from you unless you know and trust the owner. And use a password that’s different from ones you use for sensitive sites like banking.
If you return to a place where you have previously successfully connected via Wi-Fi, your tablet will try to reconnect.
Manually connecting to a Wi-Fi network
Some systems are set up in a non-standard way because of security or unusual equipment or sometimes just because. You can manually add a Wi-Fi network to your system.
Before you start, get the network information in advance from the owner of the system.
Here’s how to set up manually:
- From any Home screen, tap the Apps icon and then tap the Settings icon.
- Tap Wi-Fi and then tap On/Off.
- Tap More and then Add Network.
-
Type in the information about the network.
Hopefully, you already got this information from the system owner.
-
Tap Enter Network Name to type in the name of the system.
In technobabble that’s Network SSID.
- Tap Security, choose the right protocol, and enter your password.
- Tap Show Advanced Options to enter additional options such as IP settings and proxy settings.
- Tap Connect to store the new information and begin communication.
Switching Wi-Fi systems
When you’re using a particular system, the tablet stays with it as long as it has a usable signal. If you notice the speed dropping, or if you get an onscreen message about a weak or unstable signal, go back to the Wi-Fi connections page and see if there’s a stronger signal listed.
Signing Up for Accounts and Other Preliminaries
After you connect successfully to a Wi-Fi system that’s on the Internet, your tablet (or, actually, your tablet’s owner, which is probably you) needs to agree to all sorts of legal fine print from hardware and software providers; sorry to have to tell you, but these agreements serve almost exclusively to protect them from claims by us for failure to satisfy. It’s their game, and they make the rules.
In addition to this, you need to set the internal clock and calendar and a few other housekeeping details.
Click here; read the fine print later
There’s no way to avoid it: The lawyers will make you agree to their terms in the euphoniously named EULA (end-user license agreement). It’s either that or put the tablet back in its box and return the device to the place you bought it.
There’s nothing out of the ordinary in the terms of the EULA, other than promising to turn over the keys to your house and the technical specs for the gravity-free hovercraft you’ve just designed. It’s all in there, except for the part about the house and the hovercraft.
You’ll have to accept a take-it-or-leave it deal from Samsung and Google to use the device, and from Barnes & Noble for the NOOK Shop. Tap Confirm to agree. Tap Confirm even if you don’t want to.
Use a credit card with premium insurance or buyer’s assistance programs. For example, certain American Express, Visa, or MasterCards let you return purchases for a full refund, even if the store says otherwise. And some cards extend (usually by a year) the standard warranty of many products. Here’s an instance where it does pay to read the fine print in an agreement, or call your card’s customer service to discuss these sorts of protections.
It’s a Google world after all
If you already have a Google account, it generally makes sense to use that login and password across most (or all) of your digital devices. You can set up an account on the Tab S2 NOOK or register from a PC or laptop and then enter the name and password on your tablet.
When you first sign in to your tablet, you’re get to create or sign in to an existing Google account. It’s worthwhile, with two caveats:
-
Think twice about revealing too much personal information to the public.
- Protect what you unveil with a strong password.
With a Google account you’ll also be able to back up your data, including apps, app settings, system settings, and Wi-Fi passwords.
Another part of the Google registration asks if you want to allow apps to better determine your location.
- This is a good thing when you want to use an online map.
- The less-than-good thing is that Google or advertisers might want to place ads on pages that are frighteningly specific to your location. (In theory, the advertisers don’t know your name or physical address, but it’s still a bit somewhere between curious and unsettling to some.)
The Google universe, in addition to the Android operating system for your NOOK, also includes the Chrome Internet browser, Gmail, YouTube, and Google Earth, and more. You don’t need to register to use the base search engine and many other services, but you need to agree to terms of service (a EULA) for apps that live on your device, like Google Chrome. See Figure 4-3.

Figure 4-3: To use the Chrome search engine and other apps on your tablet, you’ll need to agree to terms of service that protect them from claims by you.
Signing up for a NOOK account
You did buy this particular model, the Samsung Galaxy Tab S2 NOOK, because of its integration of the NOOK Shop, right? You’re going to want to create a Barnes & Noble account.
If you already have an account, your tablet can retrieve any eBooks and periodicals already in your account from other NOOK devices or from PCs, laptops, or other tablets running a NOOK app.
You can create a B&N account from your personal computer ahead of time. Then all you need is your username and password when you set up your tablet. You can create a B&N account from www.bn.com, www.barnesandnoble.com, or www.nook.com. They all go to the same place.
- If you don’t have a NOOK account, tap No, I Need to Create an Account.
- Tap Create an Account.
-
Fill in the form with your name, email, password, and other information.
You can have only one credit card linked to your NOOK.
-
Check the time that’s displayed while you’re setting up.
Use the up or down arrows to adjust the time; pay attention to the AM or PM settings and tap that indicator if you need to change it.
-
Tap Submit.
To see an example of a NOOK Account registration on your tablet, see Figure 4-4.

Figure 4-4: Registration (or transfer of an existing NOOK account) leads to the Account & Profile page. Adjust shop and purchase permissions, add or remove profiles, and change the associated credit card.
In addition to the NOOK reading and shopping tools on the Samsung Galaxy Tab S2 NOOK (and previous NOOK models), Barnes & Noble offers free software that lets you read (and buy) publications on devices including desktop and laptop PCs, Macintoshes, iPads, iPhones, and various Android devices. It’s easy to start reading on one device and finish on another; what you can’t do is have the same book or publication open and connected to the NOOK Internet system on two devices at the same time.
Going into Private Mode
Making someone enter a pattern, PIN, or password before they can use your tablet is like locking the front door. But if you really want to secure your tablet’s contents, consider encrypting the device, or the external microSDHC card, or both.
Why would you want to do this? If you’re merely storing eBooks and a few photographs, videos, and music files, this might be a bit of overkill. But if you plan to store personal or business files that would be damaging or embarrassing if seen without your permission, you can encrypt them. Now, it must be said that the level of encryption within an Android device isn’t government spy-agency level. (And, as you know, even Top Secret government files can leak like a sieve.)
An encrypted Tab S2 NOOK is difficult (if not impossible) for an amateur to read. Your strongest defense is a complex, unobvious password.
You can set up private folders for certain applications, including:
- Gallery
- Music
- My Files
- Video
- Voice Recorder
Certain other third-party apps may also use the same system or add their own form of encryption.
Setting up Private Mode
Here’s how to set up and use Private Mode:
- From any Home screen, tap the Apps icon, and then tap the Settings icon.
- Tap Private Mode.
- Select an access type from amongst those offered: Pattern, PIN, Fingerprint, or Password.
- Follow the prompts to record your access code or other information.
It doesn’t make sense to use a password like password or private, or to write the password on a sticky note and attach it to your tablet. Oh, and don’t forget your password or PIN or pattern, either. You won’t be able to gain access to the material without it, and the only way to reset this form of security is to do a complete (hard) reset, which deletes all your personal material and some of the system settings and is in just about every respect a true pain in the ear.
To help protect your privacy, tap Auto Off. This automatically turns off Private Mode anytime the screen turns off. Otherwise, the Private folder you unlocked is accessible to anyone who uses the tablet until the next time it’s completely shut down and restarted. See Figure 4-5.

Figure 4-5: You can encrypt folders of images, text, and certain other types of files behind a password, pattern, or fingerprint.
Don’t forget the code, though, or whatever is held in the folder (and I truly don’t want to know) will be irretrievable by you and me, although I’m sure some government agency somewhere in the world might be able to get in to read your recipe file (which is what I assume you have locked away; I really don’t want to know).
Moving an item into a Private folder
To move an item into a private folder, follow along:
-
Find and select the folder in the Gallery (or in another folder).
It has to be eligible to use this procedure.
- Tap More.
- Tap Move to Private.
- Enter your PIN or password or pattern or allow scanning of your fingerprint to complete the transfer.
Viewing items from a Private folder
When you’ve closed a private folder, you can’t see the items in it within MyFiles or Gallery or other applications until you return to Settings and turn on Private Mode, and enter the password, pattern, or fingerprint protection you required.
Doing First Things Last: Accessibility Options
If you have impaired vision or need specific accommodations when using the touchscreen and other Tab S2 NOOK features, you have options. You’ll have a chance to make these settings the very first time you turn on your Samsung Galaxy Tab S2 NOOK, but you can make those changes later.
Here’s how to get to the accessibility settings:
- From any Home screen, tap the Apps icon and then tap the Settings icon.
- Tap Accessibility.
-
Choose from and enable options under Vision, Hearing, Dexterity and Interaction, or More sections.
See Figure 4-6. The following sections explain these features.

Figure 4-6: The NOOK can adapt to make it easier to use. You may also be able to include more adaptations from third parties as apps.
Accessibility
The first screen deals with some very basic settings:
- Auto Rotate Screen. This option is available in other places, too. Tap a checkmark to rotate the view onscreen if you change the way you hold the tablet. If you don’t want it to rotate, leave this option off.
-
Screen Timeout. Select the period of time before the screen shuts off. I recommend at least two minutes. It depends on how often you let your mind wander; I regularly drift off into very important but soon forgotten daydreams of several minutes in length.
Vision
These options can enlarge text, reverse the colors to increase contrast, and let you adjust for color blindness. Here are some of the many options:
- Font Size. The default setting is Small, but you can go up four stages to Huge or down two increments to Tiny.
-
Magnification Gestures. Touch and slide the switch at the top of the panel to enable this feature. It lets you zoom in and out on an image by triple-tapping the screen; while zoomed in you can pan from side to side by dragging two or more fingers across the screen, and you can temporarily magnify something on the screen by triple-tapping and holding.
Triple-tap doesn’t enlarge the keyboard. Also, magnification gestures may slow down some apps. - Negative Colors. Touch this option to change black to white or to change colors to versions that are easier to see. You can also change some colors in the next option.
- Color Adjustment. Tap to display a description of the available adjustments, and then move the slider switch to On if you want to proceed. You’ll see color samples. It’s recommended that people using this tool make adjustments in an environment with normal indoor lighting.
- Grayscale changes all colors to shades of gray.
- Magnifier Window enlarges everything shown on the screen.
- Speak Passwords. If you put a checkmark in the box, the tablet will read out any entry you make in a password box. (Obviously, you want to do your best to maintain privacy when the system is announcing passwords in this manner.)
- Text-to-Speech Options. You can choose between the Samsung or Google text-to-speech engine. They both are quite capable; touch Listen to hear an example to select the one that’s clearer to you. You can also adjust the speech rate, the speed at which the computer voice jabbers.
- Accessibility Shortcut. This option adds accessibility options to the Power/Lock key. If you do turn on advanced features like Explore by Touch, I recommend adding this shortcut to allow for a quick exit from that feature.
Hearing
These customization features include adjustments for stereo and balance and the ability to turn on subtitles (for apps that offer them). See Figure 4-7. Here are the choices:
- Sound Balance. If you’ve got a set of earphones attached or are using an external set of speakers to play back music or the audio of a movie or television, you can adjust the sound balance to adjust the amount of sound going to the left or right earpiece; touch and hold the indicator and slide it left or right as desired. Touch Set to accept a change. Tap Cancel to back out and shut off the racket.
- Mono Audio. If you’re listening to your tablet using a headset with only one earphone, you can merge the stereo channels into a single mono signal.
- Turn Off All Sounds. It does what it says; someone who is deaf or who otherwise doesn’t want unnecessary noise can choose this option to mute the tablet.
- Google Subtitles/Samsung Subtitles. Touch and move the slide switch to enable one or the other or both schemes to display onscreen subtitles for certain apps. The Google system lets you change text size and the color and background of the subtitle; Samsung goes a few steps further by letting you choose a font and other effects.

Figure 4-7: The Accessibility panels allow customization of color profiles, sound styles, and interaction.
Dexterity and Interaction
Some of the settings here are quite helpful for users with physical challenges that may limit the use of one hand or make it difficult to use the physical keys on the side or top of the tablet. The choices here include
- Assistant Menu. You can add a small Quick menu on most screens with larger, easier-to-use icons for many features, including volume control, power off, settings, and zoom. You can choose a dominant hand. It comes preset for righties.
- Press and Hold Delay. The tablet is set up to respond to a press-and-hold for certain functions; you can define just how long that hold has to be.
- Interaction Control. Here you can fine-tune some of the ways you use your hands on the tablet, including blocking areas of the screen so that they don’t respond to touch; this is useful if you hold the tablet with one or more fingers on the screen at all times.
You can also control auto-rotation of images and other functions.
More Settings
These options are included here:
- Notification Reminder. Here you can instruct the tablet to beep — at an interval you select — to remind you of any unread notifications.
- Single Tap Mode. This option lets a single tap stop or snooze (temporarily delay) an alarm or calendar reminder.
- Manage Accessibility. You can save all the changes you’ve made to vision, touch, and sound options and update the file as needed; you can also share your setup with another device if this file is created.
Additional accessibility apps and utilities can be downloaded from the Google Play Store.