
Chapter 13
Collecting All Sorts of Data
In This Chapter
![]() Defining a collection
Defining a collection
![]() Using tuples
Using tuples
![]() Using dictionaries
Using dictionaries
![]() Developing stacks using lists
Developing stacks using lists
![]() Using the queue module
Using the queue module
![]() Using the deque module
Using the deque module
People collect all sorts of things. The CDs stacked near your entertainment center, the plates that are part of a series, baseball cards, and even the pens from every restaurant you’ve ever visited are all collections. The collections you encounter when you write applications are the same as the collections in the real world. A collection is simply a grouping of like items in one place and usually organized into some easily understood form.
 This chapter is about collections of various sorts. The central idea behind every collection is to create an environment in which the collection is properly managed and lets you easily locate precisely what you want at any given time. A set of bookshelves works great for storing books, DVDs, and other sorts of flat items. However, you probably put your pen collection in a holder or even a display case. The difference in storage locations doesn’t change the fact that both house collections. The same is true with computer collections. Yes, there are differences between a stack and a queue, but the main idea is to provide the means to manage data properly and make it easy to access when needed.
Understanding Collections
In Chapter 12, you’re introduced to sequences. A sequence is a succession of values that are bound together in a container. The simplest sequence is a string, which is a succession of characters. Next comes the list described in Chapter 12, which is a succession of objects. Even though a string and a list are both sequences, they have significant differences. For example, when working with a string, you set all the characters to lowercase — something you can’t do with a list. On the other hand, lists let you append new items, which is something a string doesn’t support. Collections are simply another kind of sequence, albeit a more complex sequence than you find in either a string or list.
No matter which sequence you use, they all support two functions: index() and count(). The index() function always returns the position of a specified item in the sequence. For example, you can return the position of a character in a string or the position of an object in a list. The count() function returns the number of times a specific item appears in the list. Again, the kind of specific item depends upon the kind of sequence.
You can use collections to create database-like structures using Python. Each collection type has a different purpose, and you use the various types in specific ways. The important idea to remember is that collections are simply another kind of sequence. As with every other kind of sequence, collections always support the index() and count() functions as part of their base functionality.
Python is designed to be extensible. However, it does rely on a base set of collections that you can use to create most application types. This chapter describes the most common collections:
- Tuple: A tuple is a collection used to create complex list-like sequences. An advantage of tuples is that you can nest the content of a tuple. This feature lets you create structures that can hold employee records or x-y coordinate pairs.
- Dictionary: As with the real dictionaries, you create key/value pairs when using the dictionary collection (think of a word and its associated definition). A dictionary provides incredibly fast search times and makes ordering data significantly easier.
- Stack: Most programming languages support stacks directly. However, Python doesn’t support the stack, although there’s a work-around for that. A stack is a first in/first out (FIFO) sequence. Think of a pile of pancakes: You can add new pancakes to the top and also take them off of the top. A stack is an important collection that you can simulate in Python using a list, which is precisely what this chapter does.
- queue: A queue is a last in/first out (LIFO) collection. You use it to track items that need to be processed in some way. Think of a queue as a line at the bank. You go into the line, wait your turn, and are eventually called to talk with a teller.
- deque: A double-ended queue (deque) is a queue-like structure that lets you add or remove items from either end, but not from the middle. You can use a deque as a queue or a stack or any other kind of collection to which you’re adding and from which you’re removing items in an orderly manner (in contrast to lists, tuples, and dictionaries, which allow randomized access and management).
Working with Tuples
As previously mentioned, a tuple is a collection used to create complex lists, in which you can embed one tuple within another. This embedding lets you create hierarchies with tuples. A hierarchy could be something as simple as the directory listing of your hard drive or an organizational chart for your company. The idea is that you can create complex data structures using a tuple.
Tuples are immutable, which means you can’t change them. You can create a new tuple with the same name and modify it in some way, but you can’t modify an existing tuple. Lists are mutable, which means that you can change them. So, a tuple can seem at first to be at a disadvantage, but immutability has all sorts of advantages, such as being more secure as well as faster. In addition, immutable objects are easier to use with multiple processors.
The two biggest differences between a tuple and a list are that a tuple is immutable and allows you to embed one tuple inside another. The following steps demonstrate how you can interact with a tuple in Python.
- Open a Python Shell window.
You see the familiar Python prompt.
- Type MyTuple = (“Red”, “Blue”, “Green”) and press Enter.
Python creates a tuple containing three strings.
- Type MyTuple and press Enter.
You see the content of MyTuple, which is three strings, as shown in Figure 13-1. Notice that the entries use single quotes, even though you used double quotes to create the tuple. In addition, notice that a tuple uses parentheses rather than square brackets, as lists do.
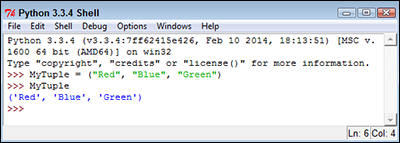
Figure 13-1: Tuples use parentheses, not square brackets.
- Type dir(MyTuple) and press Enter.
Python presents a list of functions that you can use with tuples, as shown in Figure 13-2. Notice that the list of functions appears significantly smaller than the list of functions provided with lists in Chapter 12. The count() and index() functions are present.
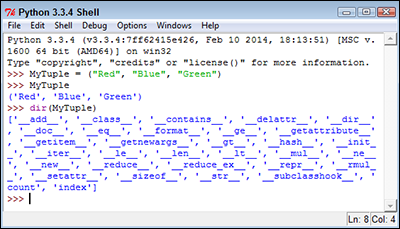
Figure 13-2: Fewer functions seem to be available for use with tuples.
However, appearances can be deceiving. For example, you can add new items using the __add__() function. When working with Python objects, look at all the entries before you make a decision as to functionality. - Type MyTuple = MyTuple.__add__((“Purple”,)) and press Enter.
This code adds a new tuple to MyTuple and places the result in a new copy of MyTuple. The old copy of MyTuple is destroyed after the call.
The __add__() function accepts only tuples as input. This means that you must enclose the addition in parentheses. In addition, when creating a tuple with a single entry, you must add a comma after the entry, as shown in the example. This is an odd Python rule that you need to keep in mind or you’ll see an error message similar to this one:TypeError: can only concatenate tuple (not "str") to
tuple - Type MyTuple and press Enter.
The addition to MyTuple appears at the end of the list, as shown in Figure 13-3. Notice that it appears at the same level as the other entries.
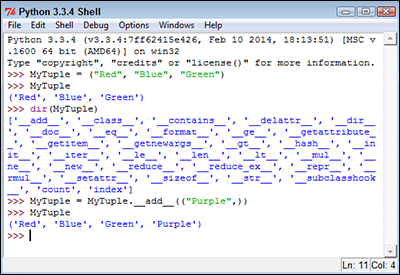
Figure 13-3: This new copy of MyTuple contains an additional entry.
- Type MyTuple = MyTuple.__add__((“Yellow”, (“Orange”, “Black”))) and press Enter.
This step adds three entries: Yellow, Orange, and Black. However, Orange and Black are added as a tuple within the main tuple, which creates a hierarchy. These two entries are actually treated as a single entry within the main tuple.
 You can replace the __add__() function with the concatenation operator. For example, if you want to add Magenta to the front of the tuple list, you type MyTuple = ("Magenta",) + MyTuple.
 - Type MyTuple[4] and press Enter.
Python displays a single member of MyTuple, Orange. Tuples use indexes to access individual members, just as lists do. You can also specify a range when needed. Anything you can do with a list index you can also do with a tuple index.
- Type MyTuple[5] and press Enter.
You see a tuple that contains Orange and Black. Of course, you might not want to use both members in tuple form.
Tuples do contain hierarchies on a regular basis. You can detect when an index has returned another tuple, rather than a value, by testing for type. For example, in this case, you could detect that the sixth item (index 5) contains a tuple by typing type(MyTuple[5]) == tuple. The output would be True in this case. - Type MyTuple[5][0] and press Enter.
At this point, you see Orange as output. Figure 13-4 shows the results of the previous three commands so that you can see the progression of index usage. The indexes always appear in order of their level in the hierarchy.
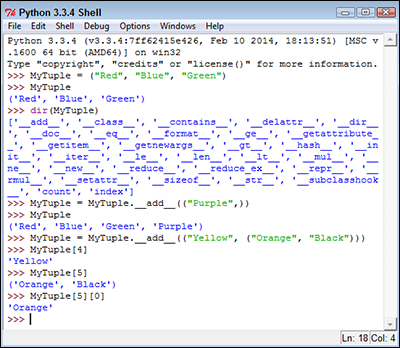
Figure 13-4: Use indexes to gain access to the individual tuple members.
Using a combination of indexes and the __add__() function (or the concatenation operator, +), you can create flexible applications that rely on tuples. For example, you can remove an element from a tuple by making it equal to a range of values. If you wanted to remove the tuple containing Orange and Black, you type MyTuple = MyTuple[0:5].
Working with Dictionaries
A Python dictionary works just the same as its real-world counterpart — you create a key and value pair. It’s just like the word and definition in a dictionary. As with lists, dictionaries are mutable, which means that you can change them as needed. The main reason to use a dictionary is to make information lookup faster. The key is always short and unique so that the computer doesn’t spend a lot of time looking for the information you need.
The following sections demonstrate how to create and use a dictionary. When you know how to work with dictionaries, you use that knowledge to make up for deficiencies in the Python language. Most languages include the concept of a switch statement, which is essentially a menu of choices from which one choice is selected. Python doesn’t include this option, so you must normally rely on if...elif statements to perform the task. (Such statements work, but they aren’t as clear as they could be.)
Creating and using a dictionary
Creating and using a dictionary is much like working with a list, except that you must now define a key and value pair. Here are the special rules for creating a key:
- The key must be unique. When you enter a duplicate key, the information found in the second entry wins — the first entry is simply replaced with the second.
- The key must be immutable. This rule means that you can use strings, numbers, or tuples for the key. You can’t, however, use a list for a key.
You have no restrictions on the values you provide. A value can be any Python object, so you can use a dictionary to access an employee record or other complex data. The following steps help you understand how to use dictionaries better.
- Open a Python Shell window.
You see the familiar Python prompt.
- Type Colors = {“Sam”: “Blue”, “Amy”: “Red”, “Sarah”: “Yellow”} and press Enter.
Python creates a dictionary containing three entries with people’s favorite colors. Notice how you create the key and value pair. The key comes first, followed by a colon and then the value. Each entry is separated by a comma.
- Type Colors and press Enter.
You see the key and value pairs, as shown in Figure 13-5. However, notice that the entries are sorted in key order. A dictionary automatically keeps the keys sorted to make access faster, which means that you get fast search times even when working with a large data set. The downside is that creating the dictionary takes longer than using something like a list because the computer is busy sorting the entries.

Figure 13-5: A dictionary places entries in sorted order.
- Type Colors[“Sarah”] and press Enter.
You see the color associated with Sarah, Yellow, as shown in Figure 13-6. Using a string as a key, rather than using a numeric index, makes the code easier to read and makes it self-documenting to an extent. By making your code more readable, dictionaries save you considerable time in the long run (which is why they’re so popular). However, the convenience of a dictionary comes at the cost of additional creation time and a higher use of resources, so you have trade-offs to consider.

Figure 13-6: Dictionaries make value access easy and self-documenting.
- Type Colors.keys() and press Enter.
The dictionary presents a list of the keys it contains, as shown in Figure 13-7. You can use these keys to automate access to the dictionary.
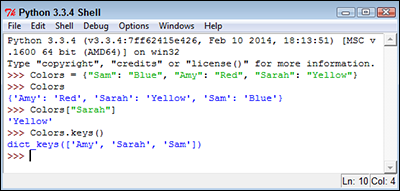
Figure 13-7: You can ask a dictionary for a list of keys.
- Type the following code (pressing Enter after each line and pressing Enter twice after the last line):
for Item in Colors.keys():
print("{0} likes the color {1}."
.format(Item, Colors[Item])) The example code outputs a listing of each of the user names and the user’s favorite color, as shown in Figure 13-8. Using dictionaries can make creating useful output a lot easier. The use of a meaningful key means that the key can easily be part of the output.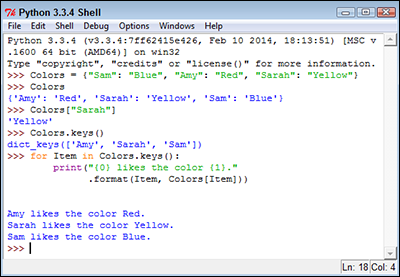
Figure 13-8: You can create useful keys to output information with greater ease.
- Type Colors[“Sarah”] = “Purple” and press Enter.
The dictionary content is updated so that Sarah now likes Purple instead of Yellow.
- Type Colors.update({“Harry”: “Orange”}) and press Enter.
A new entry is added to the dictionary.
- Place your cursor at the end of the third line of the code you typed in Step 6 and press Enter.
The editor creates a copy of the code for you. This is a time-saving technique that you can use in the Python Shell when you experiment while using code that takes a while to type. Even though you have to type it the first time, you have no good reason to type it the second time.
- Press Enter twice.
You see the updated output in Figure 13-9. Notice that Harry is added in sorted order. In addition, Sarah’s entry is changed to the color Purple.

Figure 13-9: Dictionaries are easy to modify.
- Type del Colors[“Sam”] and press Enter.
Python removes Sam’s entry from the dictionary.
- Repeat Steps 9 and 10.
You verify that Sam’s entry is actually gone.
- Type len(Colors) and press Enter.
The output value of 3 verifies that the dictionary contains only three entries now, rather than 4.
- Type Colors.clear() and press Enter.
- Type len(Colors) and press Enter.
Python reports that Colors has 0 entries, so the dictionary is now empty.
- Close the Python Shell window.
Replacing the switch statement with a dictionary
Most programming languages provide some sort of switch statement. A switch statement provides for elegant menu type selections. The user has a number of options but is allowed to choose only one of them. The program takes some course of action based on the user selection. Here is some representative code (it won’t execute) of a switch statement you might find in another language:
switch(n)
{
case 0:
print("You selected blue.");
break;
case 1:
print("You selected yellow.");
break;
case 2:
print("You selected green.");
break;
}
The application normally presents a menu-type interface, obtains the number of the selection from the user, and then chooses the correct course of action from the switch statement. It’s straightforward and much neater than using a series of if statements to accomplish the same task.
Unfortunately, Python doesn’t come with a switch statement. The best you can hope to do is use an if...elif statement for the task. However, by using a dictionary, you can simulate the use of a switch statement. The following steps help you create an example that will demonstrate the required technique. This example also appears with the downloadable source code as PythonSwitch.py.
- Open a Python File window.
You see an editor in which you can type the example code.
- Type the following code into the window — pressing Enter after each line:
def PrintBlue():
print("You chose blue! ")
def PrintRed():
print("You chose red! ")
def PrintOrange():
print("You chose orange! ")
def PrintYellow():
print("You chose yellow! ")Before the code can do anything for you, you must define the tasks. Each of these functions defines a task associated with selecting a color option onscreen. Only one of them gets called at any given time.
- Type the following code into the window — pressing Enter after each line:
ColorSelect = {
0: PrintBlue,
1: PrintRed,
2: PrintOrange,
3: PrintYellow
}This code is the dictionary. Each key is like the case part of the switch statement. The values specify what to do. In other words, this is the switch structure. The functions that you created earlier are the action part of the switch — the part that goes between the case statement and the break clause.
- Type the following code into the window — pressing Enter after each line:
Selection = 0
while (Selection != 4):
print("0. Blue")
print("1. Red")
print("2. Orange")
print("3. Yellow")
print("4. Quit")
Selection = int(input("Select a color option: "))
if (Selection >= 0) and (Selection < 4):
ColorSelect[Selection]()Finally, you see the user interface part of the example. The code begins by creating an input variable, Selection. It then goes into a loop until the user enters a value of 4.
During each loop, the application displays a list of options and then waits for user input. When the user does provide input, the application performs a range check on it. Any value between 0 and 3 selects one of the functions defined earlier using the dictionary as the switching mechanism.
- Choose Run⇒Run Module.
You see a Python Shell window open. The application displays a menu like the one shown in Figure 13-10.
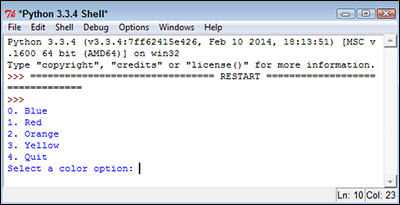
Figure 13-10: The application begins by displaying the menu.
- Type 0 and press Enter.
The application tells you that you selected blue and then displays the menu again, as shown in Figure 13-11.
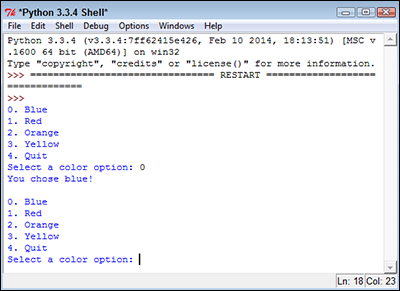
Figure 13-11: After displaying your selection, the application displays the menu again.
- Type 4 and press Enter.
The application ends.
Creating Stacks Using Lists
A stack is a handy programming structure because you can use it to save an application execution environment (the state of variables and other attributes of the application environment at any given time) or as a means of determining an order of execution. Unfortunately, Python doesn’t provide a stack as a collection. However, it does provide lists, and you can use a list as a perfectly acceptable stack. The following steps help you create an example of using a list as a stack. This example also appears with the downloadable source code as ListStack.py.
- Open a Python File window.
You see an editor in which you can type the example code.
- Type the following code into the window — pressing Enter after each line:
MyStack = []
StackSize = 3
def DisplayStack():
print("Stack currently contains:")
for Item in MyStack:
print(Item)
def Push(Value):
if len(MyStack) < StackSize:
MyStack.append(Value)
else:
print("Stack is full!")
def Pop():
if len(MyStack) > 0:
MyStack.pop()
else:
print("Stack is empty.")
Push(1)
Push(2)
Push(3)
DisplayStack()
input("Press any key when ready...")
Push(4)
DisplayStack()
input("Press any key when ready...")
Pop()
DisplayStack()
input("Press any key when ready...")
Pop()
Pop()
Pop()
DisplayStack()In this example, the application creates a list and a variable to determine the maximum stack size. Stacks normally have a specific size range. This is admittedly a really small stack, but it serves well for the example’s needs.
Stacks work by pushing a value onto the top of the stack and popping values back off the top of the stack. The Push() and Pop() functions perform these two tasks. The code adds DisplayStack() to make it easier to see the stack content as needed.The remaining code exercises the stack (demonstrates its functionality) by pushing values onto it and then removing them. There are four main exercise sections that test stack functionality.
- Choose Run⇒Run Module.
You see a Python Shell window open. The application fills the stack with information and then displays it onscreen, as shown in Figure 13-12. In this case, 3 is at the top of the stack because it’s the last value added.
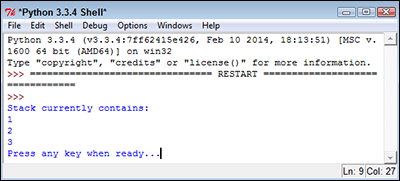
Figure 13-12: A stack pushes values one on top of the other.
- Press Enter.
The application attempts to push another value onto the stack. However, the stack is full, so the task fails, as shown in Figure 13-13.
- Press Enter.
The application pops a value from the top of the stack. Remember that 3 is the top of the stack, so that’s the value that is missing in Figure 13-14.
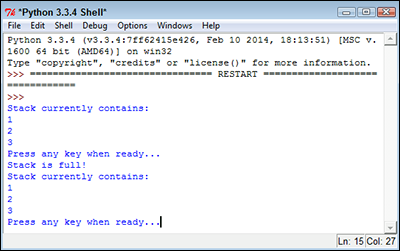
Figure 13-13: When the stack is full, it can’t accept any more values.
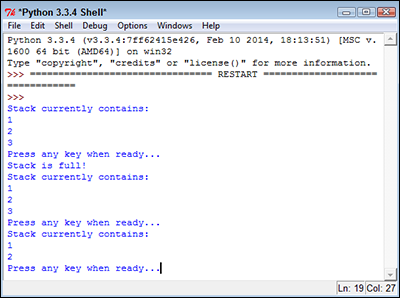
Figure 13-14: Popping a value means removing it from the top of the stack.
- Press Enter.
The application tries to pop more values from the stack than it contains, resulting in an error, as shown in Figure 13-15. Any stack implementation that you create must be able to detect both overflows (too many entries) and underflows (too few entries).
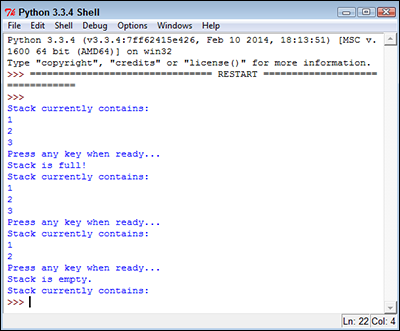
Figure 13-15: Make sure that your stack implementation detects overflows and underflows.
Working with queues
A queue works differently from a stack. Think of any line you’ve ever stood in: You go to the back of the line, and when you reach the front of the line you get to do whatever you stood in the line to do. A queue is often used for task scheduling and to maintain program flow — just as it is in the real world. The following steps help you create a queue-based application. This example also appears with the downloadable source code as QueueData.py.
- Open a Python File window.
You see an editor in which you can type the example code.
- Type the following code into the window — pressing Enter after each line:
import queue
MyQueue = queue.Queue(3)
print(MyQueue.empty())
input("Press any key when ready...")
MyQueue.put(1)
MyQueue.put(2)
print(MyQueue.full())
input("Press any key when ready...")
MyQueue.put(3)
print(MyQueue.full())
input("Press any key when ready...")
print(MyQueue.get())
print(MyQueue.empty())
print(MyQueue.full())
input("Press any key when ready...")
print(MyQueue.get())
print(MyQueue.get())To create a queue, you must import the queue module. This module actually contains a number of queue types, but this example uses only the standard FIFO queue.
When a queue is empty, the empty() function returns True. Likewise, when a queue is full, the full() function returns True. By testing the state of empty() and full(), you can determine whether you need to perform additional work with the queue or whether you can add other information to it. These two functions help you manage a queue. It’s not possible to iterate through a queue using a for loop as you have done with other collection types, so you must monitor empty() and full() instead.The two functions used to work with data in a queue are put(), which adds new data, and get(), which removes data. A problem with queues is that if you try to put more items into the queue than it can hold, it simply waits until space is available to hold it. Unless you’re using a multithreaded application (one that uses individual threads of execution to perform more than one task at one time), this state could end up freezing your application.
- Choose Run⇒Run Module.
You see a Python Shell window open. The application tests the state of the queue. In this case, you see an output of True, which means that the queue is empty.
- Press Enter.
The application adds two new values to the queue. In doing so, the queue is no longer empty, as shown in Figure 13-16.
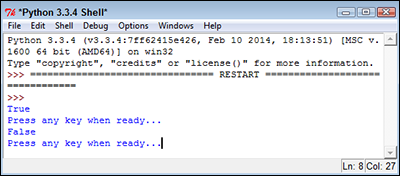
Figure 13-16: When the application puts new entries in the queue, the queue no longer reports that it’s empty.
- Press Enter.
The application adds another entry to the queue, which means that the queue is now full because it was set to a size of 3. This means that full() will return True because the queue is now full.
- Press Enter.
To free space in the queue, the application gets one of the entries. Whenever an application gets an entry, the get() function returns that entry. Given that 1 was the first value added to the queue, the print() function should return a value of 1, as shown in Figure 13-17. In addition, both empty() and full() should now return False.
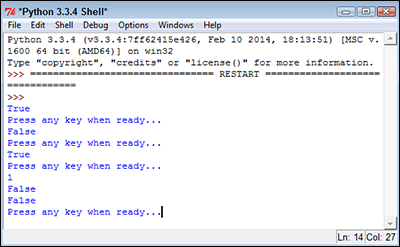
Figure 13-17: Monitoring is a key part of working with queues.
- Press Enter.
The application gets the remaining two entries. You see 2 and 3 (in turn) as output.
Working with deques
A deque is simply a queue where you can remove and add items from either end. In many languages, a queue or stack starts out as a deque. Specialized code serves to limit deque functionality to what is needed to perform a particular task.
When working with a deque, you need to think of the deque as a sort of horizontal line. Certain individual functions work with the left and right ends of the deque so that you can add and remove items from either side. The following steps help you create an example that demonstrates deque usage. This example also appears with the downloadable source code as DequeData.py.
- Open a Python File window.
You see an editor in which you can type the example code.
- Type the following code into the window — pressing Enter after each line.
import collections
MyDeque = collections.deque("abcdef", 10)
print("Starting state:")
for Item in MyDeque:
print(Item, end=" ")
print(" Appending and extending right")
MyDeque.append("h")
MyDeque.extend("ij")
for Item in MyDeque:
print(Item, end=" ")
print(" MyDeque contains {0} items."
.format(len(MyDeque)))
print(" Popping right")
print("Popping {0}".format(MyDeque.pop()))
for Item in MyDeque:
print(Item, end=" ")
print(" Appending and extending left")
MyDeque.appendleft("a")
MyDeque.extendleft("bc")
for Item in MyDeque:
print(Item, end=" ")
print(" MyDeque contains {0} items."
.format(len(MyDeque)))
print(" Popping left")
print("Popping {0}".format(MyDeque.popleft()))
for Item in MyDeque:
print(Item, end=" ")
print(" Removing")
MyDeque.remove("a")
for Item in MyDeque:
print(Item, end=" ")The implementation of deque is found in the collections module, so you need to import it into your code. When you create a deque, you can optionally specify a starting list of iterable items (items that can be accessed and processed as part of a loop structure) and a maximum size, as shown.
A deque differentiates between adding one item and adding a group of items. You use append() or appendleft() when adding a single item. The extend() and extendleft() functions let you add multiple items. You use the pop() or popleft() functions to remove one item at a time. The act of popping values returns the value popped, so the example prints the value onscreen. The remove() function is unique in that it always works from the left side and always removes the first instance of the requested data.Unlike some other collections, a deque is fully iterable. This means that you can obtain a list of items using a for loop whenever necessary.
- Choose Run⇒Run Module.
You see a Python Shell window open. The example outputs the information shown in Figure 13-18.
 It’s important to follow the output listing closely. Notice how the size of the deque changes over time. After the application pops the j, the deque still contains eight items. When the application appends and extends from the left, it adds three more items. However, the resulting deque contains only ten items. When you exceed the maximum size of a deque, the extra data simply falls off the other end.
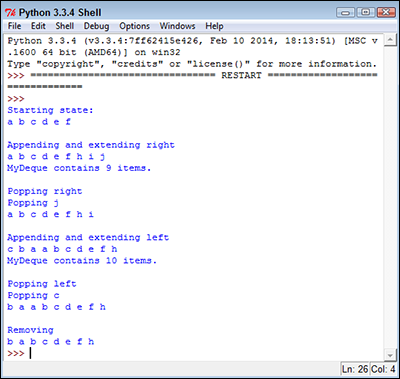
Figure 13-18: A deque provides the double-ended functionality and other features you’d expect.