
Chapter 2
Getting Your Own Copy of Python
In This Chapter
![]() Obtaining a copy of Python for your system
Obtaining a copy of Python for your system
![]() Performing the Python installation
Performing the Python installation
![]() Finding and using Python on your system
Finding and using Python on your system
![]() Ensuring your installation works as planned
Ensuring your installation works as planned
Creating applications requires that you have another application, unless you really want to get low level and write applications in machine code — a decidedly difficult experience that even true programmers avoid if at all possible. If you want to write an application using the Python programming language, you need the applications required to do so. These applications help you work with Python by creating Python code, providing help information as you need it, and letting you run the code you write. This chapter helps you obtain a copy of the Python application, install it on your hard drive, locate the installed applications so that you can use them, and test your installation so that you can see how it works.
Downloading the Version You Need
Every platform (combination of computer hardware and operating system software) has special rules that it follows when running applications. The Python application hides these details from you. You type code that runs on any platform that Python supports, and the Python applications translate that code into something the platform can understand. However, in order for the translation to take place, you must have a version of Python that works on your particular platform. Python supports these platforms:
- Advanced IBM Unix (AIX)
- Amiga Research OS (AROS)
- Application System 400 (AS/400)
- BeOS
- Hewlett-Packard Unix (HP-UX)
- Linux
- Mac OS X (comes pre-installed with the OS)
- Microsoft Disk Operating System (MS-DOS)
- MorphOS
- Operating System 2 (OS/2)
- Operating System 390 (OS/390) and z/OS
- PalmOS
- Playstation
- Psion
- QNX
- RISC OS (originally Acorn)
- Series 60
- Solaris
- Virtual Memory System (VMS)
- Windows 32-bit (XP and later)
- Windows 64-bit
- Windows CE/Pocket PC
 Wow, that’s a lot of different platforms! This book is tested with the Windows, Mac OS X, and Linux platforms. However, the examples could very well work with these other platforms, too, because the examples don’t rely on any platform-specific code. Let me know if it works on your non-Windows, Mac, or Linux platform at [email protected]. The current version of Python at the time of this writing is 3.3.4. I’ll talk about any Python updates on my blog at http://blog.johnmuellerbooks.com. You can find the answers to your Python book-specific questions there, too.
To get the right version for your platform, you need to go to http://www.python.org/download/releases/3.3.4/. The download section is initially hidden from view, so you need to scroll halfway down the page. You see a page similar to the one shown in Figure 2-1. The main part of the page contains links for Windows, Mac OS X, and Linux downloads. These links provide you with the default setup that is used in this book. The platform-specific links on the left side of the page show you alternative Python configurations that you can use when the need arises. For example, you may want to use a more advanced editor than the one provided with the default Python package, and these alternative configurations can provide one for you.

Figure 2-1: The Python download page contains links for all sorts of versions.
If you want to work with another platform, click the Other link on the left side of the page. You see a list of Python installations for other platforms, as shown in Figure 2-2. Many of these installations are maintained by volunteers rather than by the people who create the versions of Python for Windows, Mac OS X, and Linux. Make sure you contact these individuals when you have installation questions because they know how best to help you get a good installation on your platform.

Figure 2-2: Volunteers have made Python available on all sorts of platforms.
Installing Python
After you download your copy of Python, it’s time to install it on your system. The downloaded file contains everything needed to get you started:
- Python interpreter
- Help files (documentation)
- Command-line access
- Integrated DeveLopment Environment (IDLE) application
- Uninstaller (only on platforms that require it)
This book assumes that you’re using one of the default Python setups found at http://www.python.org/download/releases/3.3.4/. The following sections describe how to install Python on the three platforms directly supported by this book: Windows, Mac OS X, and Linux.
Working with Windows
The installation process on a Windows system follows the same procedure that you use for other application types. The main difference is in finding the file you downloaded so that you can begin the installation process. The following procedure should work fine on any Windows system, whether you use the 32-bit or the 64-bit version of Python.
- Locate the downloaded copy of Python on your system.
The name of this file varies, but normally it appears as python-3.3.4.msi for 32-bit systems and python-3.3.4.amd64.msi for 64-bit systems. The version number is embedded as part of the filename. In this case, the filename refers to version 3.3.4, which is the version used for this book.
- Double-click the installation file.
(You may see an Open File – Security Warning dialog box that asks whether you want to run this file. Click Run if you see this dialog box pop up.) You see a Python Setup dialog box similar to the one shown in Figure 2-3. The exact dialog box you see depends on which version of the Python installation program you download.
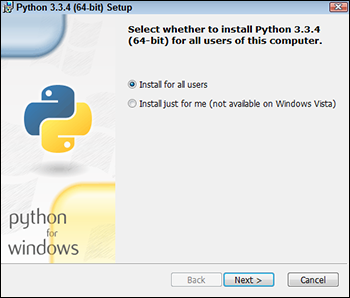
Figure 2-3: The setup process begins by asking you who should have access to Python.
- Choose a user installation option (the book uses the default setting of Install for All Users) and click Next.
Install asks you to provide the name of an installation directory for Python, as shown in Figure 2-4. Using the default destination will save you time and effort later. However, you can install Python anywhere you desire.

Figure 2-4: Decide on an installation location for your copy of Python.
 Using the Windows Program Files or Program Files (x86) folder is problematic for two reasons. First, the folder name has a space in it, which makes it hard to access from within the application. Second, the folder usually requires administrator access, so you’ll constantly battle the User Account Control (UAC) feature of Windows if you install Python in either folder.
 - Type a destination folder name, if necessary, and click Next.
Python asks you to customize its installation, as shown in Figure 2-5.
Enabling the Add python.exe to Path option will save you time later. This feature makes it possible to access Python from the Command Prompt window. Don’t worry too much about how you use this feature just yet, but it really is a good feature to have installed. The book assumes that you’ve enabled this feature. Don’t worry about the other features you see in Figure 2-5. They’re all enabled by default, which provides you with maximum access to Python functionality.
Figure 2-5: Customize your installation to meet your needs.
- (Optional) Click the down arrow next to the Add python.exe to Path option and choose the Will Be Installed On Local Drive option.
- Click Next.
You see the installation process start. At some point, you might see a User Account Control dialog box asking whether you want to perform the install. If you see this dialog box, click Yes. The installation continues and you see an Installation Complete dialog box.
- Click Finish.
Python is ready for use.
Working with the Mac
Your Mac system likely already has Python installed on it. However, this installation is normally a few years old — or whatever the age of your system happens to be. For the purposes of this book, the installation will likely work fine. You won’t be testing the limits of Python programming technology — just getting a great start using Python.
 The Leopard version of OS X (10.5) uses a really old version of Python 2.5.1. This particular version lacks direct access to the IDLE application. As a result, you may find that some book exercises won’t work properly. The article at https://wiki.python.org/moin/MacPython/Leopard tells you more about how to overcome this particular issue. The newest version of OS X at the time of this writing (Mavericks, or 10.9) comes with Python 2.7, which is just fine for working through the examples in the book.
Depending on how you use Python, you might want to update your installation at some point. Part of this process involves installing the GNU Compiler Collection (GCC) tools so that Python has access to the low-level resources it needs. The following steps get you started with installing a new version of Python on your Mac OS X system.
- Navigate to http://www.python.org/download/releases/3.3.4/ with your browser.
You see information regarding the latest version of Python, as shown in Figure 2-1.
- Click the appropriate link for your version of OS X:
- Python 3.3.4 Mac OS X 64-bit/32-bit x86-64/i386 Installer for 32-bit or 64-bit versions on the Intel processor
- Python 3.3.4 Mac OS X 32-bit i386/PPC Installer for 32-bit versions on the Power PC processor
The Python disk image begins downloading. Be patient: The disk image requires several minutes to download. Most browsers provide a method for monitoring the download process so that you can easily see how long the download will take. When the download is complete, your Mac automatically opens the disk image for you.
The disk image actually looks like a folder. Inside this folder, you see a number of files, including python.mpkg. The python.mpkg file is the one that contains the Python application. The text files contain information about the build, licensing, and any late-breaking notes.
- Double-click python.mpkg.
You see a Welcome dialog box that tells you about this particular Python build.
- Click Continue three times.
The installation program displays late-breaking notes about Python, licensing information (click Agree when asked about the licensing information), and, finally, a destination dialog box.
- Select the Volume (hard drive or other media) that you want to use for installing Python and click Continue.
The Installation Type dialog box appears. This dialog box performs two tasks:
- Click Customize to change the feature set that is installed on your system.
- Click Change Install Location to modify the place where the installer places Python.
The book assumes that you’re performing a standard installation and that you haven’t changed the installation location. However, these options are available in case you want to use them.
- Click Install.
The installer may request your administrator password. Type the administrator name and password, if required, into the dialog box and click OK. You see an Installing Python dialog box. The contents of this dialog box will change as the installation process proceeds so that you know what part of Python the installer is working with.
After the installation is completed, you see an Install Succeeded dialog box.
- Click Close.
Python is ready to use. (You can close the disk image at this point and remove it from your system.)
Working with Linux
Some versions of Linux come with Python installed. For example, if you have a Red Hat Package Manager (RPM)-based distribution (such as SUSE, Red Hat, Yellow Dog, Fedora Core, and CentOS), you likely already have Python on your system and don’t need to do anything else.
Depending on which version of Linux you use, the version of Python varies and some systems don’t include the Interactive DeveLopment Environment (IDLE) application. If you have an older version of Python (2.5.1 or earlier), you might want to install a newer version so that you have access to IDLE. Many of the book exercises require use of IDLE.
You actually have two techniques to use to install Python on Linux. The following sections discuss both techniques. The first technique works on any Linux distribution; the second technique has special criteria that you must meet.
Using the standard Linux installation
The standard Linux installation works on any system. However, it requires you to work at the Terminal and type commands to complete it. Some of the actual commands may vary by version of Linux. The information at http://docs.python.org/3/install/ provides some helpful tips that you can use in addition to the procedure that follows.
- Navigate to http://www.python.org/download/releases/3.3.4/ with your browser.
You see information regarding the latest version of Python, as shown in Figure 2-1.
- Click the appropriate link for your version of Linux:
- Python 3.3.4 compressed source tarball (any version of Linux)
- Python 3.3.4 xzipped source tarball (better compression and faster download)
- When asked whether you want to open or save the file, choose Save.
The Python source files begin downloading. Be patient: The source files require a minute or two to download.
- Double-click the downloaded file.
The Archive Manager window opens. After the files are extracted, you see the Python 3.3.4 folder in the Archive Manager window.
- Double-click the Python 3.3.4 folder.
The Archive Manager extracts the files to the Python 3.3.4 subfolder of your home folder.
- Open a copy of Terminal.
The Terminal window appears. If you have never built any software on your system before, you must install the build essentials, SQLite, and bzip2 or the Python installation will fail. Otherwise, you can skip to Step 10 to begin working with Python immediately.
- Type sudo apt-get install build-essential and press Enter.
Linux installs the Build Essential support required to build packages (see https://packages.debian.org/squeeze/build-essential for details).
- Type sudo apt-get install libsqlite3-dev and press Enter.
Linux installs the SQLite support required by Python for database manipulation (see https://packages.debian.org/squeeze/libsqlite3-dev for details).
- Type sudo apt-get install libbz2-dev and press Enter.
Linux installs the bzip2 support required by Python for archive manipulation (see https://packages.debian.org/sid/libbz2-dev for details).
- Type CD Python 3.3.4 in the Terminal window and press Enter.
Terminal changes directories to the Python 3.3.4 folder on your system.
- Type ./configure and press Enter.
The script begins by checking the system build type and then performs a series of tasks based on the system you’re using. This process can require a minute or two because there is a large list of items to check.
- Type make and press Enter.
Linux executes the make script to create the Python application software. The make process can require up to a minute — it depends on the processing speed of your system.
- Type sudo make altinstall and press Enter.
The system may ask you for your administrator password. Type your password and press Enter. At this point, a number of tasks take place as the system installs Python on your system.
Using the graphical Linux installation
All versions of Linux support the standard installation discussed in the “Using the standard Linux installation” section of this chapter. However, a few versions of Debian-based Linux distributions, such as Ubuntu 12.x and later, provide a graphical installation technique as well. You need the administrator group (sudo) password to use this procedure, so having it handy will save you time. The following steps outline the graphical installation technique for Ubuntu, but the technique is similar for other Linux installations:
- Open the Ubuntu Software Center folder. (The folder may be named Synaptics on other platforms.)
You see a listing of the most popular software available for download and installation.
- Select Developer Tools (or Development) from the All Software drop-down list box.
You see a listing of developer tools, including Python.
- Double-click the Python 3.3.4 entry.
The Ubuntu Software Center provides details about the Python 3.3.4 entry and offers to install it for you.
- Click Install.
Ubuntu begins the process of installing Python. A progress bar shows the download and installation status. When the installation is complete, the Install button changes to a Remove button.
- Close the Ubuntu Software Center folder.
You see a Python icon added to the desktop. Python is ready for use.
Accessing Python on Your Machine
After you have Python installed on your system, you need to know where to find it. In some respects, Python does everything it can to make this process easy by performing certain tasks, such as adding the Python path to the machine’s path information during installation. Even so, you need to know how to access the installation, which the following sections describe.
Using Windows
A Windows installation creates a new folder in the Start menu that contains your Python installation. You can access it by choosing Start⇒All Programs⇒ Python 3.3. The two items of interest in the folder when creating new applications are IDLE (Python GUI) and Python (command line).
Clicking IDLE (Python GUI) produces a graphical interactive environment like the one shown in Figure 2-6. When you open this environment, IDLE automatically displays some information so that you know you have the right application open. For example, you see the Python version number (which is 3.3.4 in this case). It also tells you what sort of system you’re using to run Python.

Figure 2-6: Use IDLE when you want the comforts of a graphical environment.
The Python (command line) option opens a command prompt and executes the Python command, as shown in Figure 2-7. Again, the environment automatically displays information such as the Python version and the host platform.

Figure 2-7: Use the command prompt when you want the speed and flexibility of a command-line interface.
A third method to access Python is to open a command prompt, type Python, and press Enter. You can use this approach when you want to gain additional flexibility over the Python environment, automatically load items, or execute Python in a higher-privilege environment (in which you gain additional security rights). Python provides a significant array of command-line options that you can see by typing Python /? at the command prompt and pressing Enter. Figure 2-8 shows what you typically see. Don’t worry too much about these command-line options — you won’t need them for this book, but it’s helpful to know they exist.

Figure 2-8: Using a standard command line offers the flexibility of using switches to change the way Python works.
 To use this third method of executing Python, you must include Python in the Windows path. This is why you want to choose the Add python.exe to Path option when installing Python on Windows. If you didn’t add the path during installation, you can add it afterward using the instructions found in the Adding a Location to the Windows Path article on my blog at http://blog.johnmuellerbooks.com/2014/02/17/adding-a-location-to-the-windows-path/. This same technique works for adding Python-specific environment variables such as
- PYTHONSTARTUP
- PYTHONPATH
- PYTHONHOME
- PYTHONCASEOK
- PYTHONIOENCODING
- PYTHONFAULTHANDLER
- PYTHONHASHSEED
None of these environment variables is used in the book. However, you can find out more about them at http://docs.python.org/3.3/using/cmdline.html#environment-variables.
Using the Mac
When working with a Mac, you probably have Python already installed and don’t need to install it for this book. However, you still need to know where to find Python. The following sections tell you how to access Python depending on the kind of installation you performed.
Locating the default installation
The default OS X installation doesn’t include a Python-specific folder in most cases. Instead, you must open Terminal by choosing Applications⇒Utilities⇒Terminal. After Terminal is open, you can type Python and press Enter to access the command-line version of Python. The display you see is similar to the one shown in Figure 2-7. As with Windows (see the “Using Windows” section of the chapter), using Terminal to open Python offers the advantage of using command-line switches to modify the manner in which Python works.
Locating the updated version of Python you installed
After you perform the installation on your Mac system, open the Applications folder. Within this folder, you find a Python 3.3 folder that contains the following:
- Extras folder
- IDLE application (GUI development)
- Python Launcher (interactive command development)
- Update Sh... command
Double-clicking IDLE application opens a graphical interactive environment that looks similar to the environment shown in Figure 2-6. There are some small cosmetic differences, but the content of the window is the same. Double-clicking Python Launcher opens a command-line environment similar to the one shown in Figure 2-7. This environment uses all the Python defaults to provide a standard execution environment.
Even if you install a new version of Python on your Mac, you don’t have to settle for using the default environment. It’s still possible to open Terminal to gain access to the Python command-line switches. However, when you access Python from the Mac Terminal application, you need to ensure that you’re not accessing the default installation. Make sure to add /usr/local/bin/Python3.3 to your shell search path.
Using Linux
After the installation process is complete, you can find a Python 3.3 subfolder in your home folder. The physical location of Python 3.3 on your Linux system is normally the /usr/local/bin/Python3.3 folder. This is important information because you may need to modify the path for your system manually. Linux developers need to type Python3.3, rather than just Python, when working at the Terminal window to obtain access to the Python 3.3.4 installation.
Testing Your Installation
To ensure that you have a usable installation, you need to test it. It’s important to know that your installation will work as expected when you need it. Of course, this means writing your first Python application. To get started, open a copy of IDLE. As previously mentioned, IDLE automatically displays the Python version and host information when you open it (refer to Figure 2-6).
To see Python work, type print(“This is my first Python program.”) and press Enter. Python displays the message you just typed, as shown in Figure 2-9. The print() command displays onscreen whatever you tell it to display. You see the print() command used quite often in this book to display the results of tasks you ask Python to perform, so this is one of the commands you work with frequently.
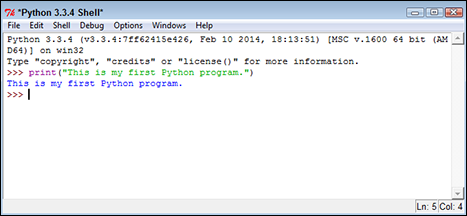
Figure 2-9: The print() command displays whatever information you tell it to print.
Notice that IDLE color codes the various entries for you so that they’re easier to see and understand. The colors codes are your indicator that you’ve done something right. Four color codes are shown in Figure 2-9 (although they’re not visible in the print edition of the book):
- Purple: Indicates that you have typed a command
- Green: Specifies the content sent to a command
- Blue: Shows the output from a command
- Black: Defines non-command entries
You know that Python works now because you were able to issue a command to it, and it responded by reacting to that command. It might be interesting to see one more command. Type 3 + 4 and press Enter. Python responds by outputting 7, as shown in Figure 2-10. Notice that 3 + 4 appears in black type because it isn’t a command. However, the 7 is still in blue type because it’s output.
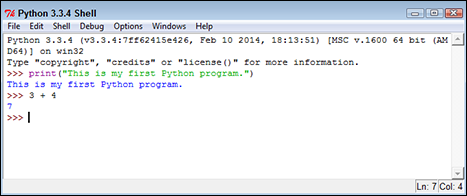
Figure 2-10: Python supports math directly as part of the interactive environment.
It’s time to end your IDLE session. Type quit( ) and press Enter. IDLE may display a message such as the one shown in Figure 2-11. Well, you never intended to kill anything, but you will now. Click OK, and the session dies.

Figure 2-11: IDLE seems to get a little dramatic about ending a session!
Notice that the quit() command has parentheses after it, just as the print() command does. All commands have parentheses like these two. That’s how you know they’re commands. However, you don’t need to tell the quit() command anything, so you simply leave the area between the parentheses blank.