
Chapter 12
Managing Lists
In This Chapter
![]() Defining why lists are important
Defining why lists are important
![]() Generating lists
Generating lists
![]() Looking through lists
Looking through lists
![]() Working with list items sequentially
Working with list items sequentially
![]() Changing list content
Changing list content
![]() Locating specific information in lists
Locating specific information in lists
![]() Putting list items in order
Putting list items in order
![]() Using the Counter object to your advantage
Using the Counter object to your advantage
A lot of people lose sight of the fact that most programming techniques are based on the real world. Part of the reason is that programmers often use terms that other people don’t to describe these real-world objects. For example, most people would call a place to store something a box or a cupboard — but programmers insist on using the term variable. Lists are different. Everyone makes lists and uses them in various ways to perform an abundance of tasks. In fact, you’re probably surrounded by lists of various sorts where you’re sitting right now as you read this book. So, this chapter is about something you already use quite a lot. The only difference is that you need to think of lists in the same way Python does.
You may read that lists are hard to work with. The reason that some people find working with lists difficult is that they’re not used to actually thinking about the lists they create. When you create a list, you simply write items down in whatever order makes sense to you. Sometimes you rewrite the list when you’re done to put it in a specific order. In other cases, you use your finger as a guide when going down the list to make looking through it easier. The point is that everything you normally do with lists is also doable within Python. The difference is that you must now actually think about what you’re doing in order to make Python understand what you want done.
Lists are incredibly important in Python. This chapter introduces you to the concepts used to create, manage, search, and print lists (among other tasks). When you complete the chapter, you can use lists to make your Python applications more robust, faster, and more flexible. In fact, you’ll wonder how you ever got along without using lists in the past. The important thing to keep in mind is that you have already used lists most of your life. There really isn’t any difference now except that you must now think about the actions that you normally take for granted when managing your own lists.
Organizing Information in an Application
People create lists to organize information and make it easier to access and change. You use lists in Python for the same reason. In many situations, you really do need some sort of organizational aid to hold data. For example, you might want to create a single place to look for days of the week or months of the year. The names of these items would appear in a list, much as they would if you needed to commit them to paper in the real world. The following sections describe lists and how they work in more detail.
Defining organization using lists
The Python specification defines a list as a kind of sequence. Sequences simply provide some means of allowing multiple data items to exist together in a single storage unit, but as separate entities. Think about one of those large mail holders you see in apartment buildings. A single mail holder contains a number of small mailboxes, each of which can contain mail. Python supports other kinds of sequences as well (Chapter 13 discusses a number of these sequences):
- Tuples
- Dictionaries
- Stacks
- Queues
- Deques
 Of all the sequences, lists are the easiest to understand and are the most directly related to a real-world object. Working with lists helps you become better able to work with other kinds of sequences that provide greater functionality and improved flexibility. The point is that the data is stored in a list much as you would write it on a piece of paper — one item comes after another, as shown in Figure 12-1. The list has a beginning, a middle, and an end. As shown in the figure, the items are numbered. (Even if you might not normally number them in real life, Python always numbers the items for you.)
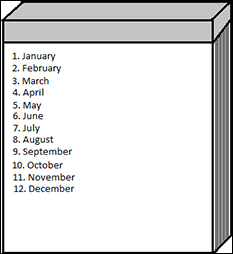
Figure 12-1: A list is simply a sequence of items, much as you would write on a notepad.
Understanding how computers view lists
The computer doesn’t view lists in the same way that you do. It doesn’t have an internal notepad and use a pen to write on it. A computer has memory. The computer stores each item in a list in a separate memory location, as shown in Figure 12-2. The memory is contiguous, so as you add new items, they’re added to the next location in memory.

Figure 12-2: Each item added to a list takes the next position in memory.
In many respects, the computer uses something like a mailbox to hold your list. The list as a whole is the mail holder. As you add items, the computer places it in the next mailbox within the mail holder.
Just as the mailboxes are numbered in a mail holder, the memory slots used for a list are numbered. The numbers begin with 0, not with 1 as you might expect. Each mailbox receives the next number in line. A mail holder with the months of the year would contain 12 mailboxes. The mailboxes would be numbered from 0 to 11 (not 12, as you might think). It’s essential to get the numbering scheme down as quickly as possible because even experienced developers get into trouble by using 1 and not 0 as a starting point at times.
Depending on what sort of information you place in each mailbox, the mailboxes need not be of the same size. Python lets you store a string in one mailbox, an integer in another, and a floating-point value in another. The computer doesn’t know what kind of information is stored in each mailbox and it doesn’t care. All the computer sees is one long list of numbers that could be anything. Python performs all the work required to treat the data elements according to the right type and to ensure that when you request item five, you actually get item five.
 In general, it’s good practice to create lists of like items to make the data easier to manage. When creating a list of all integers, for example, rather than of mixed data, you can make assumptions about the information and don’t have to spend nearly as much time checking it. However, in some situations, you might need to mix data. Many other programming languages require that lists have just one type of data, but Python offers the flexibility of using mixed data sorts. Just remember that using mixed data in a list means that you must determine the data type when retrieving the information in order to work with the data correctly. Treating a string as an integer would cause problems in your application.
Creating Lists
As in real life, before you can do anything with a list, you must create it. As previously stated, Python lists can mix types. However, it’s always a best practice to restrict a list to a single type when you can. The following steps demonstrate how to create Python lists.
- Open a Python Shell window.
You see the familiar Python prompt.
- Type List1 = [“One”, 1, “Two”, True] and press Enter.
Python creates a list named List1 for you. This list contains two string values (One and Two), an integer value (1), and a Boolean value (True). Of course, you can’t actually see anything because Python processes the command without saying anything.
Notice that each data type that you type is a different color. When you use the default color scheme, Python displays strings in green, numbers in black, and Boolean values in orange. The color of an entry is a cue that tells you whether you have typed the entry correctly, which helps reduce errors when creating a list. - Type print(List1) and press Enter.
You see the content of the list as a whole, as shown in Figure 12-3. Notice that the string entries appear in single quotes, even though you typed them using double quotes. Strings can appear in either single quotes or double quotes in Python.
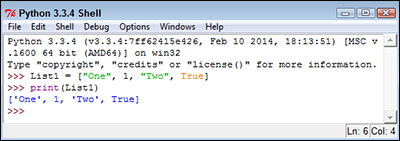
Figure 12-3: Python displays the content of List1.
- Type dir(List1) and press Enter.
Python displays a list of actions that you can perform using lists, as shown in Figure 12-4. Notice that the output is actually a list. So, you’re using a list to determine what you can do with another list.
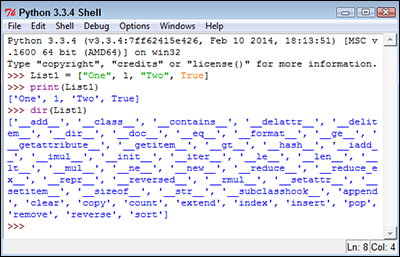
Figure 12-4: Python provides a listing of the actions you can perform using a list.
As you start working with objects of greater complexity, you need to remember that the dir() command always shows what tasks you can perform using that object. The actions that appear without underscores are the main actions that you can perform using a list. These actions are the following:- append
- clear
- copy
- count
- extend
- index
- insert
- pop
- remove
- reverse
- sort
- Close the Python Shell window.
Accessing Lists
After you create a list, you want to access the information it contains. An object isn’t particularly useful if you can’t at least access the information it contains. The previous section shows how to use the print() and dir() functions to interact with a list, but there are other ways to perform the task, as described in the following steps.
- Open a Python Shell window.
You see the familiar Python prompt.
- Type List1 = [“One”, 1, “Two”, True] and press Enter.
Python creates a list named List1 for you.
- Type List1[1] and press Enter.
You see the value 1 as output, as shown in Figure 12-5. The use of a number within a set of square brackets is called an index. Python always uses zero-based indexes, so asking for the element at index 1 means getting the second element in the list.

Figure 12-5: Make sure to use the correct index number.
- Type List1[1:3] and press Enter.
You see a range of values that includes two elements, as shown in Figure 12-6. When typing a range, the end of the range is always one greater than the number of elements returned. In this case, that means that you get elements 1 and 2, not elements 1 through 3 as you might expect.
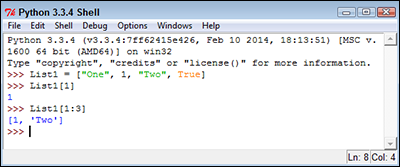
Figure 12-6: Ranges return multiple values.
- Type List1[1:] and press Enter.
You see all the elements, starting from element 1 to the end of the list, as shown in Figure 12-7. A range can have a blank ending number, which simply means to print the rest of the list.
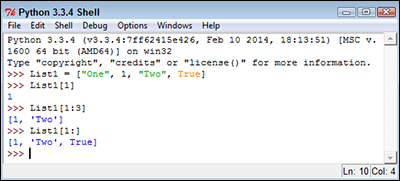
Figure 12-7: Leaving the ending number of a range blank prints the rest of the list.
- Type List1[:3] and press Enter.
Python displays the elements from 0 through 2. Leaving the start of a range blank means that you want to start with element 0, as shown in Figure 12-8.
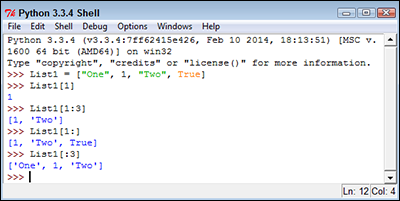
Figure 12-8: Leaving the beginning number of a range blank prints from element 0.
- Close the Python Shell window.
 Even though it’s really confusing to do so, you can use negative indexes with Python. Instead of working from the left, Python will work from the right and backward. For example, if you have List1 = ["One", 1, "Two", True] and type List1[-2], you get Two as output. Likewise, typing List[-3] results in an output of 1. The rightmost element is element -1 in this case.
Looping through Lists
To automate the processing of list elements, you need some way to loop through the list. The easiest way to perform this task is to rely on a for statement, as described in the following steps. This example also appears with the downloadable source code as ListLoop.py.
- Open a Python File window.
You see an editor in which you can type the example code.
- Type the following code into the window — pressing Enter after each line:
List1 = [0, 1, 2, 3, 4, 5]
for Item in List1:
print(Item)The example begins by creating a list consisting of numeric values. It then uses a for loop to obtain each element in turn and print it onscreen.
- Choose Run⇒Run Module.
You see a Python Shell window open. The output shows the individual values in the list, one on each line, as shown in Figure 12-9.
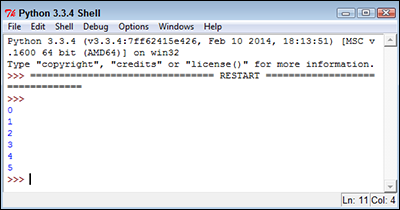
Figure 12-9: A loop makes it easy to obtain a copy of each item and process it as needed.
Modifying Lists
You can modify the content of a list as needed. Modifying a list means to change a particular entry, add a new entry, or remove an existing entry. To perform these tasks, you must sometimes read an entry. The concept of modification is found within the acronym CRUD, which stands for Create, Read, Update, and Delete. Here are the list functions associated with CRUD:
- append(): Adds a new entry to the end of the list.
- clear(): Removes all entries from the list.
- copy(): Creates a copy of the current list and places it in a new list.
- extend(): Adds items from an existing list and into the current list.
- insert(): Adds a new entry to the position specified in the list.
- pop(): Removes an entry from the end of the list.
- remove(): Removes an entry from the specified position in the list.
The following steps show how to perform modification tasks with lists. This is a hands-on exercise. As the book progresses, you see these same functions used within application code. The purpose of this exercise is to help you gain a feel for how lists work.
- Open a Python Shell window.
You see the familiar Python prompt.
- Type List1 = [] and press Enter.
Python creates a list named List1 for you.
Notice that the square brackets are empty. List1 doesn’t contain any entries. You can create empty lists that you fill with information later. In fact, this is precisely how many lists start because you usually don’t know what information they will contain until the user interacts with the list. - Type len(List1) and press Enter.
The len() function outputs 0, as shown in Figure 12-10. When creating an application, you can check for an empty list using the len() function. If a list is empty, you can’t perform tasks such as removing elements from it because there is nothing to remove.
- Type List1.append(1) and press Enter.
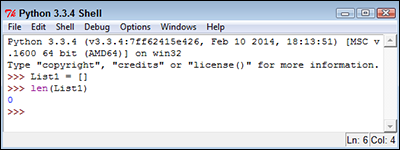
Figure 12-10: Check for empty lists as needed in your application.
- Type len(List1) and press Enter.
The len() function now reports a length of 1.
- Type List1[0] and press Enter.
You see the value stored in element 0 of List1, as shown in Figure 12-11.
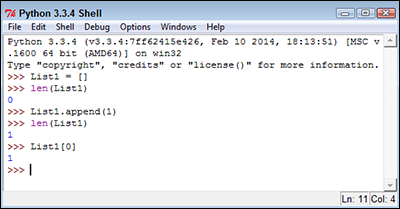
Figure 12-11: Appending an element changes the list length and stores the value at the end of the list.
- Type List1.insert(0, 2) and press Enter.
The insert() function requires two arguments. The first argument is the index of the insertion, which is element 0 in this case. The second argument is the object you want inserted at that point, which is 2 in this case.
- Type List1 and press Enter.
Python has added another element to List1. However, using the insert() function lets you add the new element before the first element, as shown in Figure 12-12.
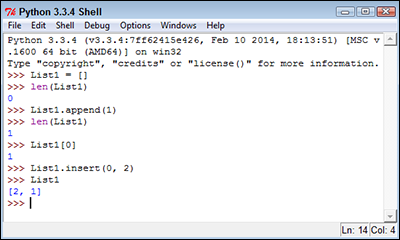
Figure 12-12: Inserting provides flexibility in deciding where to add an element.
- Type List2 = List1.copy() and press Enter.
The new list, List2, is a precise copy of List1. Copying is often used to create a temporary version of an existing list so that a user can make temporary modifications to it rather than to the original list. When the user is done, the application can either delete the temporary list or copy it to the original list.
- Type List1.extend(List2) and press Enter.
Python copies all the elements in List2 to the end of List1. Extending is commonly used to consolidate two lists.
- Type List1 and press Enter.
You see that the copy and extend processes have worked. List1 now contains the values 2, 1, 2, and 1, as shown in Figure 12-13.
- Type List1.pop() and press Enter.
Python displays a value of 1, as shown in Figure 12-14. The 1 was stored at the end of the list, and pop() always removes values from the end.
- Type List1.remove(1) and press Enter.
This time, Python removes the item at element 1. Unlike the pop() function, the remove() function doesn’t display the value of the item it removed.
- Type List1.clear() and press Enter.
Using clear() means that the list shouldn’t contain any elements now.
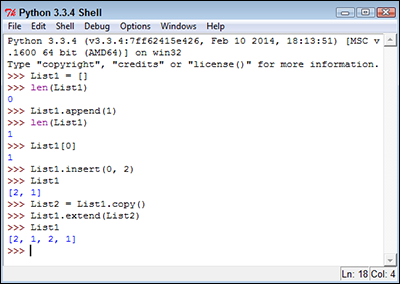
Figure 12-13: Copying and extending provide methods for moving a lot of data around quickly.
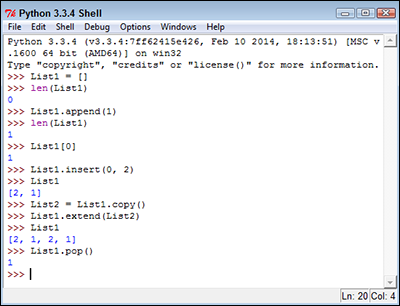
Figure 12-14: Use pop() to remove elements from the end of a list.
- Type len(List1) and press Enter.
You see that the output is 0. List1 is definitely empty. At this point, you’ve tried all the modification methods that Python provides for lists. Work with List1 some more using these various functions until you feel comfortable making changes to the list.
- Close the Python Shell window.
Searching Lists
Modifying a list isn’t very easy when you don’t know what the list contains. The ability to search a list is essential if you want to make maintenance tasks easier. The following steps help you create an application that demonstrates the ability to search a list for specific values. This example also appears with the downloadable source code as SearchList.py.
- Open a Python File window.
You see an editor in which you can type the example code.
- Type the following code into the window — pressing Enter after each line:
Colors = ["Red", "Orange", "Yellow", "Green", "Blue"]
ColorSelect = ""
while str.upper(ColorSelect) != "QUIT":
ColorSelect = input("Please type a color name: ")
if (Colors.count(ColorSelect) >= 1):
print("The color exists in the list!")
elif (str.upper(ColorSelect) != "QUIT"):
print("The list doesn't contain the color.")The example begins by creating a list named Colors that contains color names. It also creates a variable named ColorSelect to hold the name of the color that the user wants to find. The application then enters a loop where the user is asked for a color name that is placed in ColorSelect. As long as this variable doesn’t contain the word QUIT, the application continues a loop that requests input.
Whenever the user inputs a color name, the application asks the list to count the number of occurrences of that color. When the value is equal to or greater than one, the list does contain the color and an appropriate message appears onscreen. On the other hand, when the list doesn’t contain the requested color, an alternative message appears onscreen.
Notice how this example uses an elif clause to check whether ColorSelect contains the word QUIT. This technique of including an elif clause ensures that the application doesn’t output a message when the user wants to quit the application. You need to use similar techniques when you create your applications to avoid potential user confusion or even data loss (when the application performs a task the user didn’t actually request). - Choose Run⇒Run Module.
You see a Python Shell window open. The application asks you to type a color name.
- Type Blue and press Enter.
You see a message telling you that the color does exist in the list, as shown in Figure 12-15.
- Type Purple and press Enter.
You see a message telling you that the color doesn’t exist, as shown in Figure 12-16.
- Type Quit and press Enter.
The application ends. Notice that the application displays neither a success nor a failure message.
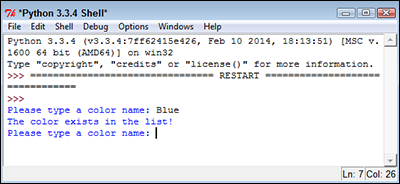
Figure 12-15: Colors that exist in the list receive the success message.
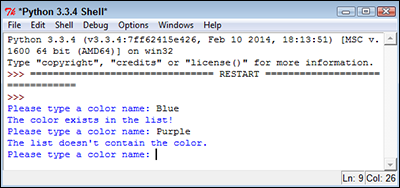
Figure 12-16: Entering a color that doesn’t exist results in a failure message.
Sorting Lists
The computer can locate information in a list no matter what order it appears in. It’s a fact, though, that longer lists are easier to search when you put them in sorted order. However, the main reason to put a list in sorted order is to make it easier for the human user to actually see the information the list contains. People work better with sorted information.
This example begins with an unsorted list. It then sorts the list and outputs it to the display. The following steps demonstrate how to perform this task. This example also appears with the downloadable source code as SortList.py.
- Open a Python File window.
You see an editor in which you can type the example code.
- Type the following code into the window — pressing Enter after each line:
Colors = ["Red", "Orange", "Yellow", "Green", "Blue"]
for Item in Colors:
print(Item, end=" ")
print()
Colors.sort()
for Item in Colors:
print(Item, end=" ")
print()The example begins by creating an array of colors. The colors are currently in unsorted order. The example then prints the colors in the order in which they appear. Notice the use of the end=" " argument for the print() function to ensure that all color entries remain on one line (making them easier to compare).
Sorting the list is as easy as calling the sort() function. After the example calls the sort() function, it prints the list again so that you can see the result. - Choose Run⇒Run Module.
You see a Python Shell window open. The application outputs both the unsorted and sorted lists, as shown in Figure 12-17.
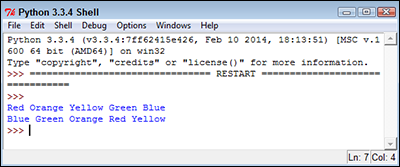
Figure 12-17: Sorting a list is as easy as calling the sort() function.
You may need to sort items in reverse order at times. To accomplish this task, you use the reverse() function. The function must appear on a separate line. So the previous example would look like this if you wanted to sort the colors in reverse order:
Colors = ["Red", "Orange", "Yellow", "Green", "Blue"]
for Item in Colors:
print(Item, end=" ")
print()
Colors.sort()
Colors.reverse()
for Item in Colors:
print(Item, end=" ")
print()
Working with the Counter Object
Sometimes you have a data source and you simply need to know how often things happen (such as the appearance of a certain item in the list). When you have a short list, you can simply count the items. However, when you have a really long list, it’s nearly impossible to get an accurate count. For example, consider what it would take if you had a really long novel like War and Peace in a list and wanted to know the frequency of the words the novel used. The task would be impossible without a computer.
The Counter object lets you count items quickly. In addition, it’s incredibly easy to use. This book shows the Counter object in use a number of times, but this chapter shows how to use it specifically with lists. The example in this section creates a list with repetitive elements and then counts how many times those elements actually appear. This example also appears with the downloadable source code as UseCounterWithList.py.
- Open a Python File window.
You see an editor in which you can type the example code.
- Type the following code into the window — pressing Enter after each line:
from collections import Counter
MyList = [1, 2, 3, 4, 1, 2, 3, 1, 2, 1, 5]
ListCount = Counter(MyList)
print(ListCount)
for ThisItem in ListCount.items():
print("Item: ", ThisItem[0],
" Appears: ", ThisItem[1])
print("The value 1 appears {0} times."
.format(ListCount.get(1)))In order to use the Counter object, you must import it from collections. Of course, if you work with other collection types in your application, you can import the entire collections module by typing import collections instead.
The example begins by creating a list, MyList, with repetitive numeric elements. You can easily see that some elements appear more than once. The example places the list into a new Counter object, ListCount. You can create Counter objects in all sorts of ways, but this is the most convenient method when working with a list.
The Counter object and the list aren’t actually connected in any way. When the list content changes, you must re-create the Counter object because it won’t automatically see the change. An alternative to re-creating the counter is to call the clear() method first and then call the update() method to fill the Counter object with the new data.The application prints ListCount in various ways. The first output is the Counter as it appears without any manipulation. The second output prints the individual unique elements in MyList along with the number of times each element appears. To obtain both the element and the number of times it appears, you must use the items() function as shown. Finally, the example demonstrates how to obtain an individual count from the list using the get() function.
- Choose Run⇒Run Module.
A Python Shell window opens, and you see the results of using the Counter object, as shown in Figure 12-18.
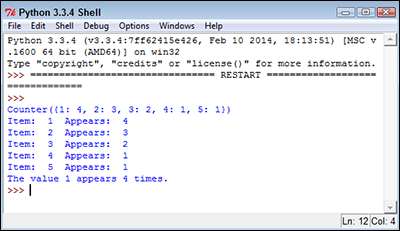
Figure 12-18: The Counter is helpful in obtaining statistics about longer lists.
Notice that the information is actually stored in the Counter as a key and value pair. Chapter 13 discusses this topic in greater detail. All you really need to know for now is that the element found in MyList becomes a key in ListCount that identifies the unique element name. The value contains the number of times that that element appears within MyList.