Chapter 7: Using Tools, Tips, and Tricks of the Trade
In This Chapter
![]() Working with offline editors
Working with offline editors
![]() Managing keyword traffic
Managing keyword traffic
![]() Placing demographic bids
Placing demographic bids
![]() Using geographic targeting
Using geographic targeting
![]() Structuring display/content network campaigns
Structuring display/content network campaigns
![]() Displaying extension ads
Displaying extension ads
Every industry has insider tips and golden bits of information to make your job either easier or more efficient, and the world of pay per click (PPC) is no different. In fact, because PPC can be so granular and complicated, you can find a lot of tools (some of them free) to make managing a PPC account much easier on yourself.
This chapter introduces some of the most popular tools and practices used by experts in the PPC industry. Not every tool is required for every campaign, but based on your PPC goals, you should be able to determine which of these tools may work for you.
Using Offline Editors
Both Google AdWords and MSN adCenter have offline editors that allow you to see your entire account and all your campaigns, ad groups, and keywords without having to wait for pages to load or multiple screens to click through.
The editors are organized a little differently, but they have the same purpose: to enable you to make PPC edits faster and more easily than you could with an online editor.
To use an offline editor, you load the program and the account you want to work on. (If you load the account without many of the stats and go for a basic download, the process is even faster.) Then you can go offline, sit at a bus stop or on an airplane, and make the edits you need to make. When you’re ready, simply go back online and upload your changes. Offline editors also make sharing changes among team members easier, holding proposed changes and saving previous work should you want to revert back to what you had before you uploaded changes.
These two editors allow you to do the following things:
• Copy entire campaigns, ad groups, ads, and keywords.
• Add negative keywords and websites (display/content network only). Negative websites work like negative keywords; they’re sites on which your ad will not appear. For more information, see the section “Managing a Display/Content Network Campaign,” later in this chapter.
• Use keyword suggestion tools and upload the suggested keywords.
• Change budgets and bids.
• Use campaign-level settings like geography, language, bidding methods, devices, and start and end dates.
• Find and replace text.
• Export and import Excel spreadsheets in a template format.
The following sections dive into a little more detail about each offline editor.
Google AdWords Editor
Google AdWords Editor continually undergoes upgrades that make it work more smoothly and provide more bells and whistles. You can save a copy of your entire account to upload again later, for example. Suppose that you hire a company or contractor to make some changes in your PPC account, but things don’t work out, and you want to go back to your original account. Simply download a copy of your account before granting the company or contractor access, and save the copy. Later, if you need to, upload the old account to replace the new one.
Google AdWords Editor is free. Just download it from www.google.com/intl/en/adwordseditor and then import your AdWords accounts.
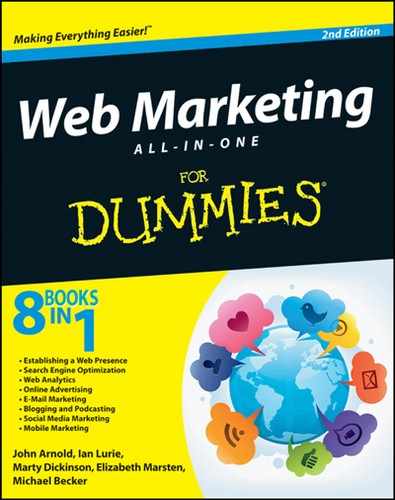
Each time you start your work in the editor, click the Get Recent Changes button to get the editor up to date with the most recent stats. A drop-down menu gives you a choice between the basic and minimum cost per click (CPC). If you choose the basic option, you’ll be up to date in a jiffy. If you go with the full version, updating takes only a few seconds more (depending on the size of your account) and includes first-page bid estimates, which the basic version doesn’t provide. Figure 7-1 shows the main dashboard.
Click different tabs to see different parts of your account, such as campaigns and keyword lists. You can also import statistics such as cost and performance; you just have to wait a couple of minutes for those stats to load. Click the View Statistics button in the top navigation bar, and select either the entire account or an ad group and the date range for which you want to download statistics.
Figure 7-1: A dash-board view in Google AdWords Editor.
For more information on using the AdWords Editor, click one of the help links on the main page.
The MSN adCenter editor
MSN adCenter’s editor is also constantly undergoing upgrades and feature additions and is a free tool. Download it at
http://advertising.microsoft.com/small-business/support- center/adcenter-downloads/adcenter-desktop
Figure 7-2 shows the Microsoft adCenter Desktop.
In many ways, the Desktop gives you the same capabilities as the Google AdWords Editor. You can download and upload entire campaigns or accounts for storage, change bids, edit ads, create new ad groups, and import statistical information such as click-through rates (CTR) and impressions. Additional features allow you to add dynamic text, use the keyword tool to generate and add keywords, and find and replace text.
Figure 7-2: A dash-board view of the Microsoft adCenter Desktop.

 The Desktop cuts down significantly on loading time, so if you plan to work in MSN beyond a couple of campaigns, it’s a big timesaver.
Using Keyword Traffic Tools
At some point, you’ll want to expand your keyword list (see Chapter 3 in this minibook). But how do you determine which keywords to add? The search engines offer tools that tell you — based on data from previous searches and related searches — how many impressions and clicks you may receive for your new list of keywords.
The following sections discuss the traffic-estimating keyword tools in Google and MSN.
Estimating traffic in Google
Google’s free keyword tool predicts — based on the keywords, URLs, or categories you select — how many clicks and searches you’ll record for that month. This tool can also show you the amount of competition and peak months of the year for searches on your selections.
To access the keyword tool, follow these steps:
1. Log in to your AdWords account.
2. Select the ad group for which you want to do traffic estimates.
3. On the ad group’s Keywords tab, click the + Add Keywords button.
4. Choose how you want to add keywords: Enter specific words and phrases, use suggested keywords by Google based on your website content, or click the link for the Keyword Tool.
For these steps, click the Keyword Tool link to use the full capabilities of keyword list expansion in Google.
The keyword tool opens on the Tools and Analysis tab.
5. Select the method (you have three options) you want to use to generate suggestions. Then click Search.
You can choose from these three methods to generate suggestions:
• Type a “seed” word or phrase.
• Paste the URL of a website or a category.
• Choose a category from the drop-down list provided by Google.
For these steps, type a seed word into the Word or Phrase box and then click Search.
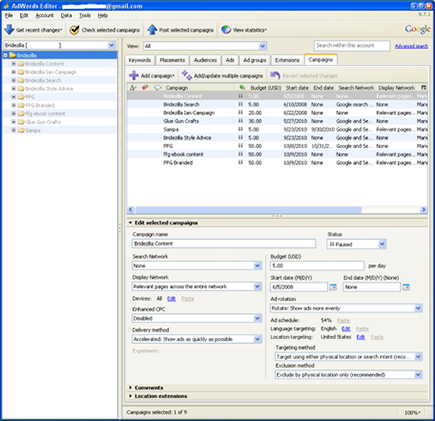
Google now shows you a list of keywords related to the term that you entered, with pertinent information like competition and estimated number of searches per month. (See Figure 7-3.)
You can filter your results further by changing the match type (see Chapter 3 in this minibook), adding words to exclude or include, or choosing one term and selecting More Like This from the drop-down list to see terms that are similar to your original keyword.
Google also has a free site that’s dedicated to tracking trends on keywords over time. On the Google Insights for Search site (www.google.com/insights/search), you can enter a keyword and see how many searches were made on it over time as far back as 2004. You can filter searches by location worldwide and by time ranges, as well as compare keywords.
Figure 7-3: Estimated traffic for keywords related to cubicles.
Estimating traffic in MSN
To use the free traffic-estimating tool for keywords in MSN adCenter, follow these steps:
1. Log in to your account.
2. Open the ad group that you want to add keywords to.
3. Click the Keywords tab and then click the Add Keywords button.
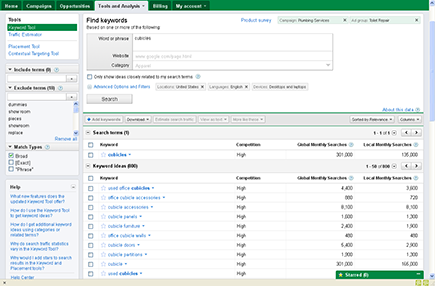
The Add Keywords Tool page opens, as shown in Figure 7-4.
4. In the Search for More Keywords section, choose the method in which you would like to search:
• Use a “seed” keyword that you type
• Paste a URL of a website
The third option — find keywords on the destination websites for your ads — applies to the content network only if you’re searching for specific sites in which to display your ads.
MSN displays a list of keywords and, next to them, the number of searches from the previous month. (See Figure 7-5.)
Figure 7-4: The key-word tool in MSN adCenter.

Figure 7-5: MSN adCenter keyword research results page.
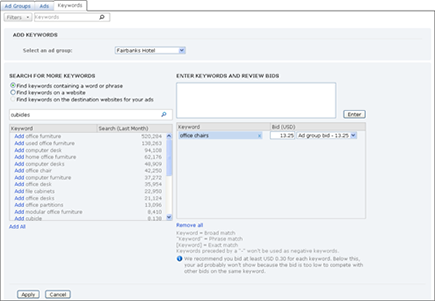
5. Click Add next to the keyword you want to use, and select the match type next to the keywords that you want to add to your keyword list.
When you make selections, the keyword is added to the new keyword box area and the ad group–level bid is displayed. Here you can change the bid for that specific keyword or leave it as is to apply to the ad group–level bid.
6. When you finish selecting keywords, click the Apply button to save your work and add the keywords to the ad group.
Employing Geotargeting
When you set up any new PPC account or campaign, you’re asked to select your target market area — a process called geographic targeting or geotargeting. The countries, states, cities, metro areas, or ZIP codes you select are the ones where users will see your ads when they search for keywords in your keyword list.
Making sure that your ads are shown in locations appropriate for your business is important. For example, what if you want to target a specific state more closely, or run ads in just a few states because your company serves only those areas and doesn’t have the licenses required to operate elsewhere? From a single dashboard, you can use geotargeting to optimize or filter out certain areas of the country or to run campaigns that serve multiple countries.
If you plan on advertising in multiple countries, you should set up a separate campaign for each country and then use ad scheduling to show those ads during peak hours in that country’s time zones — especially in AdWords because your account is set to run ads based on the time zone you selected during setup. (For more information on ad scheduling, refer to Chapter 5 in this minibook.) adCenter will use the IP address of the user to determine his time zone.
Local businesses in particular can benefit greatly from this feature so that ads for a flower shop in Miami aren’t being shown in Denver, for example. When a Miami business chooses to show ads only in the Miami area, the search engine will treat the ad a little differently, giving the ad a higher average position among searches in the Miami area. Also, the search volume for one city will be less than that of an entire country, because it’s such a targeted area, so the average daily cost will be significantly lower than that of a campaign that targets the entire United States.
The major search engines’ PPC platforms offer slightly different options for geographic targeting. For information on adjusting these settings, refer to Chapter 2 of this minibook.
Understanding Demographic Bidding
Demographic bidding is a great tool if you have a certain audience that you’re trying to reach. If you know that your product is wildly popular among women 35 to 49 years old, for example, you can increase the amount that you’re bidding to increase the chance that women in that age group will see and click your ad.
MSN adCenter offers an option that allows you to increase your bid in percentage increments based on the predicted gender or age of the searcher. (Google AdWords, unfortunately, doesn’t allow you to bid at a demographic level.) This option applies to both search and content networks on the ad group level.
To place a demographic bid in MSN adCenter, follow these steps:
1. Open the ad group or campaign you want to use.
2. Click the Edit Your Campaign Settings link.
3. Scroll down to the Advanced Targeting Option section and click Demographic (see Figure 7-6).
Figure 7-6: Set bids that increase based on location, time, and demo-graphics.

4. Set the options you want to use in the Gender and Age Groups sections.
Options are set in increments of 10 percent and are cumulative. When you choose both Gender and Age Groups options, for example, your choices will be added together for a total percentage increase. If you set your bids at a 10 percent increase for women and a 10 percent increase for the 18–24 age group, for example, your bid is increased by 20 percent when a woman in the 18–24 age group is detected as the user.
5. Click the Save button.
Managing a Display/Content Network Campaign
A display or content network (or partner network, as it’s sometimes called) is a set of websites affiliated with the search engine that are authorized to show PPC data provided by that search engine. The ads appear on those websites alongside their content, not alongside search results. If you’re on a website about chocolate (see Figure 7-7), and the person who owns the site is serving Google ads, you see ads related to chocolate alongside the article or even in the middle of the article.
Figure 7-7: Google AdWords display network ads, displayed in the upper-right corner.

In the Google display network, you can specify which websites are authorized to show your ads and which ones aren’t. In MSN adCenter, the ads appear on Microsoft-owned sites or partner sites. The following sections go into the nuances of each engine’s networks.
 You participate in display, content, and partner distribution networks by default. If you don’t want to participate in them, you must opt out at the campaign or ad group level.
Google’s display network
Of the three main search engines, Google’s display network gives you by far the most control of where your ads appear, when and to whom, as well as CPC and negative sites. Although total transparency isn’t available yet, you can get a much better idea of which sites are working for you and which ones aren’t. The Google display network is a busy one, and the best way to manage your account effectively is to separate your display and search campaigns at the start.
Tips for success in display and content networks
By following these examples, you can avoid costly mistakes and separate out your data (such as CTR, click through rate) to see more efficiently what is working in your campaigns and what isn’t working:
![]() Create separate campaigns for your search and display/content networks. You can use some of the same keywords and ads. They won’t overlap or compete, because the ads show on different networks.
Create separate campaigns for your search and display/content networks. You can use some of the same keywords and ads. They won’t overlap or compete, because the ads show on different networks.
![]() Don’t use exactly the same keywords and ads in all your search and display/content campaigns. Chances are that you’ll use some of the same keywords in both campaigns, but make the ad copy in the content campaign much more aggressive, gimmicky, or attention-getting. Remember, the ad appears amid web-page content, not in a targeted search result.
Don’t use exactly the same keywords and ads in all your search and display/content campaigns. Chances are that you’ll use some of the same keywords in both campaigns, but make the ad copy in the content campaign much more aggressive, gimmicky, or attention-getting. Remember, the ad appears amid web-page content, not in a targeted search result.
![]() Choose a keyword list that describes the sites on which you want your ad to appear. If you sell an energy-drink powder that’s perfect for hikers, bikers, and people on the go, for example, create an ad group around one of those niches, such as hiking, and create a keyword list that will get the ad picked up by sites with similar content. Keywords might include hiking drinks, hiking sites, places to hike, hiking equipment, and hiking supplies.
Choose a keyword list that describes the sites on which you want your ad to appear. If you sell an energy-drink powder that’s perfect for hikers, bikers, and people on the go, for example, create an ad group around one of those niches, such as hiking, and create a keyword list that will get the ad picked up by sites with similar content. Keywords might include hiking drinks, hiking sites, places to hike, hiking equipment, and hiking supplies.
![]() Don’t mix display, content, and partner networks. Create separate campaigns for any networks you want to run ads on.
Don’t mix display, content, and partner networks. Create separate campaigns for any networks you want to run ads on.
![]() Limit keywords to three words (preferably two). Long-tail keywords for more targeted searches, such as pink daisy wedding invitations, are good for search campaigns. Getting ads with a lot of long-tail terms on display/content networks is harder due to lower volume.
Limit keywords to three words (preferably two). Long-tail keywords for more targeted searches, such as pink daisy wedding invitations, are good for search campaigns. Getting ads with a lot of long-tail terms on display/content networks is harder due to lower volume.
![]() Bid lower on the display/content network than on the search network. The average CPC is generally lower, and a high maximum CPC can rack up clicks fast. Whatever your search CPC is, slash it in half to start the content campaign and adjust as needed.
Bid lower on the display/content network than on the search network. The average CPC is generally lower, and a high maximum CPC can rack up clicks fast. Whatever your search CPC is, slash it in half to start the content campaign and adjust as needed.
Remember: It’s normal to see a lower CTR in a display/content network–only campaign than in a search campaign. A search results page means that someone was specifically looking for that item; a display/content ad is trying to persuade someone to leave the page he’s looking at now and go to the advertiser’s site.
![]() Keep track of the network sites. If your display/content campaign is racking up impressions but no clicks, check which sites your ads are appearing on. You may need to add some sites to your lists of excluded domains.
Keep track of the network sites. If your display/content campaign is racking up impressions but no clicks, check which sites your ads are appearing on. You may need to add some sites to your lists of excluded domains.
Google’s display network allows you to choose between managed placements (website addresses that you choose) and automatic placements, where Google chooses which sites to show your ads on based on your keyword list. You also have the option of interest categories, where you can choose an “audience” from Google’s list of available audiences such as Arts & Entertainment or Beauty & Fitness. From these top-level lists, you can drill down even farther to Hair Care or Fashion Modeling and see an estimated number of “members” in these audiences. These audiences are put together by Google through its analysis of Google display network sites’ content, user cookies, and traffic thresholds to determine whether a site is a “fashion” site or a “cooking” site.
Click the Audiences tab in your Google AdWords account to view the available interest categories. (See Figure 7-8.) If you don’t see the Audiences tab in your AdWords account, click the little down arrow at the end of the row of tabs and choose Audiences from the drop-down menu to enable it.
Save this option for when you are more comfortable with basic PPC and are running a display network campaign on managed or automatic placements.
Figure 7-8: Google AdWords interest categories.

Disabling other options
Before you create a Google display network campaign, make sure that all your other campaigns have the display network option turned off. You have to repeat this process for each campaign individually. Follow these steps:
1. Open a campaign.
2. Click the Settings tab and scroll down to Networks and Devices. Click the Edit link in the Networks section.
3. Select the Let Me Choose radio button and deselect the Display Network check box (see Figure 7-9).
4. Click Save.
Figure 7-9: Enable or disable the Google, search, and display networks.

The search partner network is made up of sites that work directly with Google to provide Google search results, such as Google Product Search, AOL, and Ask.com. You can opt out of this network as well, but first check your traffic volumes before opting out.
Enabling a display network campaign
To create a Google display network campaign, follow these steps:
1. Create and save a new campaign as you normally would.
For details on setting up a campaign and expanding the keywords list in Google, refer to Chapter 3 in this minibook.
2. Click the Settings tab to open the Campaign Settings page.
3. Deselect the Google Search and Search Partners check boxes, and select the Display Network check box.
4. Click the Save button.
Remarketing on the Google display network
Google AdWords offers a remarketing tool through its display network that allows you to set a cookie on a user’s computer who visits your website through a display network ad. Remarketing occurs after the person has left your site and a specific amount of time (set by you) has passed in days. Google will then show that person ads that you wrote or uploaded specifically to remarket with. You would not want to show them the exact same ad as you did before, but rather something that speaks to the person’s first visit to your site.
For example, if someone were to click a display network ad, come to your site, and place an item in the shopping cart but not check out, you could remarket to her 7 days later (or however long you’d like), reminding her of the unfinished transaction. At the same time, you can set it so that users who did complete a checkout are not remarketed to and instead are excluded from being shown ads again.
Setting up remarketing can be a very complex and confusing process for someone new to working with PPC or AdWords. Become familiar and comfortable with the search aspect first before trying this. For more on remarketing and how you can set it up, see the Google AdWords Help Center.
MSN’s content and partner networks
MSN opts all new ad groups into its search, content, and syndicated search networks by default. The search network is the search engines of Bing.com and Yahoo.com and is referred to as the unified marketplace. This means that ads shown in search results on Bing.com and Yahoo.com are serving ads from MSN adCenter, and you can’t tell which search engine an ad served on. It is all aggregated together.
The content network comprises all Microsoft properties, including MSN Money, MSN Autos, Jobs, and Windows Marketplace. Other participating partner websites like NBC.com and Online.wsj.com are included. The content network is only available to U.S., Canada, and India customers.
The concept remains the same as Google’s display network: Ads appear alongside relevant content on web pages across these properties at a given CPC. You can set a different maximum CPC for the content network.
The syndicated search partner network is a collection of publishers (websites) that have partnered with Bing/Yahoo! search and show adCenter ads on their sites, alongside search results performed on their site. For example, if you were to go to the PCWorld website (a syndicated search partner) and search for netbook laptop, you would be shown a page of search results. Alongside those results on PCWorld would be ads from adCenter, as shown in Figure 7-10.
 The syndicated search partner network contains some high-quality sites like PCWorld but also a lot of very low-quality sites, parked pages, and often irrelevant sites. Make sure that if you want to use this network, you set up a separate campaign. Do not combine it with Bing and Yahoo! search or the content network. Check often on which sites are showing your ads, and begin excluding sites that are irrelevant or performing poorly.
Figure 7-10: A syndicated search partner network results page.

You can also disable this network at the ad group level until you’re comfortable with PPC and adCenter. To opt out at the ad group level, follow these steps:
1. Open the ad group.
2. Click the Edit Your Ad Group Settings link.
3. Click the Ad Distribution link under Advanced Settings, as shown in Figure 7-11.
4. Select the Bing and Yahoo! Search (Owned and Operated) Only radio button.
This step enables your ads to only show on Bing.com and Yahoo.com search results pages.
Figure 7-11: Select or deselect search, syndicated search partner, and content networks here.

5. Deselect the Content Network check box, and leave the Search Network box selected.
This step makes it so you are now opted out of the Content Network.
6. Click Save.
Using Extension Ads
Both AdWords and adCenter offer extension ads, ads that show more than just the 70 characters of body text, headline, and display URL, that you can also control. They are a nice way of calling extra attention or adding information to your ad for searchers. Extensions are enabled at the campaign level and affect all ad groups in that campaign. So make sure that all your ad groups make sense or match up to the type of extension you select for the entire campaign.
Extension ads don’t show with impression. They show up to 30 percent at most and can’t be controlled in terms of the amount of impressions (more or less).
Google AdWords offers these types of extension ads at this time:
• Location: These work with a manual address that you enter or the one associated with your Google Places account. If you have a brick-and-mortar business, these are especially useful. Log in to Google Places and follow the instructions to link accounts. See Figure 7-12 for a location extension ad.
• Sitelinks: You can add up to ten additional links and text to different pages on your site. The additional line of text can be up to 35 characters long, and AdWords will show anywhere from zero to six of your sitelinks depending on the searcher’s query, the CTR (click-through rate), and the competition on the page. When you first enter the text and URLs of the pages you want to feature, Google will optimize them to show the most popular or relevant links first. See Figure 7-13 for an ad with sitelinks.
Figure 7-12: A Google AdWords location extension ad.

At this time, you cannot see a breakdown of CTR or impressions per sitelink. You only see how many times in total that sitelinks were shown with an ad, clicks, conversions, and CTR.
Sitelink extension ads are useful for campaigns that cover a range of options. For example, a campaign that focuses on specific types of women’s shoes could have links for sneakers, pumps, boots, and clearance. Or, a campaign that focuses on a restaurant location could have sitelinks for menus, happy hour, reservations, directions, and special occasions.
Figure 7-13: A Google AdWords sitelinks extension ad.

If you’re using a third-party tracking/analytics package or bid management program, append the end of your ad destination URLs with a tracking code to add that to each of your sitelink URLs too.
• Call: This allows you to enter a phone number manually to show with ads, as shown in Figure 7-14. Call extension ads also have call metrics, where Google assigns a trackable phone number to your account to be shown to searchers that forwards to the phone number you entered at setup. When a person calls that number, Google can tell whether someone answered the phone, how long the call lasted, and how many people called in total. The cost is $1 per call instead of a CPC (cost per click). It cannot tell whether a sale is made, however. You still need to match your call logs with your AdWords account call metrics to determine which calls converted into sales or sign-ups.
Figure 7-14: A call extension ad.

• Product: These are the most complicated of the extension ads offered by Google because they require a Google Base/Google Merchant account. If you have a product feed that you’re using on Google Shopping for free, you can link this account to AdWords in Settings and begin to show products alongside your ads. AdWords shows up to four products underneath your ad text with little “plus” boxes; when clicked, these boxes expand to show a product from your feed. (See Figure 7-15.) If a searcher clicks the plus box, it does not count as an impression. It only counts if the searcher clicks the product and is taken to your website. The click also only counts in the AdWords and not in the Google Merchant center.
The products shown are chosen largely by Google to be the “most relevant” to the searcher’s query. You can control which products show up with which campaigns and group them as you like by adding parameters to the shopping feed that you submit to Google Merchant. For more on this, see the Google Merchant Help Center.
Figure 7-15: A Google AdWords product extension ad.

In addition to product extension ads, you find product listing ads, which you can control even further and show one product at a time with an image and an optional line of promotional text. Product listing ads can be controlled with attributes in the Google Merchant shopping feed and on the Auto Targets tab in the AdWords interface. For more on product listing ads, consult the AdWords Help Center.
Product extension and product listing ads are the most difficult of the available options to set up and run if you’re new to PPC. Before diving into these, make sure to read through the Google Merchant Help Center, as you’ll need to satisfy the requirements for a product feed before you can utilize these.
MSN adCenter offers two types of extension ads: location extension ads, where you input the physical address of the location you want to display with your ad text, and image/product ads. The product ads extension is in beta at this time and requires the assistance of a customer service representative from adCenter or Yahoo!. This program is called RAIS, or Rich Ads in Search, and comes in several formats or image, videos, and text. You’ll need to fill out an Excel template, supply product images and videos in very specific formats, and adhere to strict size limitations. After the spreadsheet of ads and images has been entered into the system, you can manage and run these ads from your adCenter account. For more on RAIS, contact an adCenter representative.
Location extension ads are enabled at the campaign level. They’re great for brick-and-mortar businesses in particular and appear on Bing and Yahoo! search results pages. Simply click the Manage Your Business Locations link on the Campaigns tab, add your locations, and save. Then go to the Ad Extensions section of your campaign settings and select the Location Extensions check box.