In the previous chapter, we explored how to create a new child theme from the Thematic framework using a few files and some CSS smarts. Now you’re probably wondering how to make that child theme work a bit harder for you and put your own stamp on it. If so, this is the chapter for you!
Before we start messing with code, however, it’s time to reiterate what we learned in Chapter 4: hands off the parent theme! Even if you decide you absolutely detest the way a particular part of your parent theme works, and you’re desperate to change it, it’s best to avoid hacking the guts out of the parent theme. We have ways to modify it in a safe, simple fashion.
Understanding how to do so first requires some explanation of how WordPress thinks about your templates—here’s the backstory.
Template files are a blend of HTML and PHP and can contain your own code, as well as calls to WordPress’s core functionality. When developing your theme, one of your main tasks will be to look through your parent theme’s templates and find the places where the markup you want to modify is being generated. In order to do that you need to have some background knowledge of how WordPress templates work, so we’ll start there.
When WordPress renders a page, it checks in the active theme’s directory for the right template to use for the type of content it’s going to display. How does it know which template file to pick? It depends on the type of page being rendered at the time, and which templates are available for use. WordPress will check for template files with very specific names, in a very specific order, before finally falling back to index.php; this serves as a sort of catch-all for rendering pages when no particular templates are defined.
Here’s a quick reference to the filenames WordPress looks for when it renders each type of page.
In WordPress 3.0, a blog administrator can specify whether to show the latest posts or a static page as the blog’s home page. The templates WordPress looks for, in order, are:
-
front-page.php
-
page.php or home.php, depending on what was chosen in the blog’s settings
-
index.php
WordPress 2.x lacks this feature, so the order will simply be:
-
home.php
-
index.php
-
WordPress will first look for a template specified in the page’s template setting—more on this later.
-
page-slug.php, where
slugis the slug specified on the page. For example, if you had a page called About, WordPress would first look for page-about.php. -
page-id.php, being the numeric ID of the page. If your About page had an ID of 2, then the template WordPress would look for is page-2.php.
-
page.php
-
index.php
Note: What are mimes doing in WordPress?
On the Internet, the format of a piece of data, such as a
document or a web page, is specified by a header called a MIME type.
MIME stands for Multipurpose Internet Mail
Extension, although MIME headers are in use for more
than just mail. Common MIME types for familiar documents include
text/html for HTML documents,
application/zip for ZIP documents,
image/gif for GIF images, and so on.
Custom taxonomies are new to WordPress 3, so these templates are never called by WordPress 2.
-
taxonomy-taxonomyname-term.php, where
taxonomynamerepresents the slug of the custom taxonomy, andtermrepresents that of the term. If your taxonomy was called Cheeses and your term was Brie, then WordPress will look for taxonomy-cheese-brie.php when listing items from that term. -
taxonomy-taxonomyname.php, similar to the above, but without the term.
-
taxonomy.php
-
archive.php
-
index.php
-
author-nicename.php, where
nicenameis the author’s username made suitable for URLs—all lowercase, with spaces transformed into hyphens. If an author’s username was Kelly Steele, then the template WordPress would look for would be author-kelly-steele.php (WP3). -
author-id.php, where the
idis the author. If Kelly’s ID were 3, then author-3.php would be the template WordPress would choose (WP3). -
author.php
-
archive.php
-
index.php
-
404.php
-
index.php
That sure is a lot of stuff to remember. Fortunately, Rami from wp-tricks has made a neat diagram that explains the template hierarchy visually. You might like to print it and use it as a cheat sheet!
Note: Always in Motion Is the Future
New versions of WordPress arrive roughly every three to four months, and new template names could be added to any of the upcoming releases. Check the WordPress Codex Template Hierarchy page for the latest and greatest.
When you’re using a child theme, the template hierarchy becomes a little more complex. WordPress will first look for the most specific template in your child theme, then to the parent, then back to the child for the next most specific, then back to the parent again—all the way down the line until it finally falls back on the parent’s index.php file. Is your head spinning yet? Here’s an example.
Let’s say you have an FAQ page with a slug of
faq and an ID of 12. WordPress will first check
whether you’ve specified a template in the page’s settings; if not, it
checks for the following files in order:
-
the child theme’s page-faq.php
-
the parent’s page-faq.php
-
the child again for page-12.php
-
the parent’s page-12.php
-
the child’s page.php (Are we detecting a pattern here?)
-
the parent’s page.php
-
the child’s index.php
-
finally, the parent’s index.php
Of course, WordPress can do all this in the blink of an eye.
As we learned back in Chapter 4, Thematic is a great framework because it’s packed with cool functionality. To best understand how to build on its templates, we should spend some time finding out how they’re put together.
Let’s take a look again inside Thematic’s directory; you’ll see a pile of template files, and if you were paying close attention to the previous section, many of these should be familiar to you:
-
404.php
-
archive.php
-
archives.php
-
attachment.php
-
author.php
-
category.php
-
comments.php
-
footer.php
-
functions.php
-
header.php
-
index.php
-
links.php
-
page.php
-
search.php
-
searchform.php
-
sidebar-index-bottom.php
-
sidebar-index-insert.php
-
sidebar-index-top.php
-
sidebar-page-bottom.php
-
sidebar-page-top.php
-
sidebar-single-bottom.php
-
sidebar-single-insert.php
-
sidebar-single-top.php
-
sidebar-subsidiary.php
-
sidebar.php
-
single.php
-
tag.php
There’s also a curious-looking directory, library, which is filled with directories for styles, languages, scripts, and so on. The most interesting subdirectory in there is extensions—it contains all the stuff that makes Thematic do the voodoo that it do. Erm, does. Here’s what’s inside:
-
comments-extensions.php
-
content-extensions.php
-
discussion.php
-
dynamic-classes.php
-
footer-extensions.php
-
header-extensions.php
-
helpers.php
-
shortcodes.php
-
sidebar-extensions.php
-
theme-options.php
-
widgets-extensions.php
-
widgets.php
The names of each of these files should give you a clue as to what they deal with: footer-extensions.php obviously relates to footers, comments-extensions.php to comments, and so on.
Now that we’ve acquired some understanding of how WordPress deals with templates, let’s put that knowledge into practice and begin customizing our theme.
The default look and behavior of Thematic is, well, kind of bloggy—nothing against blogs, mind you, but we want our theme to have a bit more zing. Throughout the rest of this chapter, we’ll modify the home page by ditching that sidebar, creating an area to list the excerpts and post thumbnails from a few of the most recent posts, and adding a homepage-specific footer element that repeats the page listing. We’ll also add social media links and an author bio to each post, wherever it happens to be displayed.
When you’re working with a theme framework, the simple way to build your own theme template is to copy the relevant file from the parent and place it into your child theme. As we’ve just seen, when WordPress is rendering a page, it will check the child theme first, so any template we put in our child theme will override the equivalent template in Thematic. For our first trick, we want to remove the sidebar from the home page. When WordPress wants to render the home page, it will first check the settings to see whether the blog administrator has specified a page to act as the home page; otherwise, it will look for the home.php template.
Thematic lacks a home.php file to copy, but index.php will suit our purposes nicely as it currently includes all the page elements we want, as well as a list of recent posts. Copy it from Thematic, place it into your child theme, and rename it to home.php. Here’s the new template in its entirety:
<?php

  // calling the header.php
  get_header();

  // action hook for placing content above #container
  thematic_abovecontainer();

?>

    <div id="container">

        <?php thematic_abovecontent(); ?>

        <div id="content">

          <?php

      // create the navigation above the content
      thematic_navigation_above();

      // calling the widget area 'index-top'
      get_sidebar('index-top'),

      // action hook for placing content above the index loop
      thematic_above_indexloop();

      // action hook creating the index loop
      thematic_indexloop();

      // action hook for placing content below the index loop
      thematic_below_indexloop();

      // calling the widget area 'index-bottom'
      get_sidebar('index-bottom'),

      // create the navigation below the content
      thematic_navigation_below();

      ?>

        </div><!-- #content -->

        <?php thematic_belowcontent(); ?>

    </div><!-- #container -->

<?php

  // action hook for placing content below #container
  thematic_belowcontainer();

  // calling the standard sidebar
  thematic_sidebar();

  // calling footer.php
  get_footer();

?>
Were you expecting a bunch of HTML, curly braces, and a mess of
if statements? All we have here is a couple of lonely
div elements, and a whole lot of PHP
function calls.
The reason for this is that Thematic templates are extremely modular—that extensions folder we noticed earlier is where much of the real action takes place. We’ll delve deeper into what all these functions do and how to make sense of this sort of template later in the chapter. For now, let’s focus on accomplishing our first task.
Looking at our freshly copied template, it’s easy to see where the sidebar is coming from:
// calling the standard sidebar
thematic_sidebar();
Removing it, of course, will be as simple as removing the call to the thematic_sidebar: feel free to remove or comment out[4] those two lines.
Since we’d like the content to now span the width of the entire
page, we’ll need to modify the CSS applied to the main content column.
We’re importing Thematic’s style sheets in our example, so there are two selectors
that apply to the two divs:
#container and #content, each
specifying a width. We also learned back in Chapter 4 that Thematic loads up a bunch of classes on the body element, one of which we know will tell
us we’re on the home page.
You CSS whizzes have surely already figured this one out: we can
alter the CSS in our child theme so that #container
and #content have a greater width when they descend
from a body with a class of home. To do that, simply insert the following
styles into your style.css file:
/* =Homepage specific styles
-------------------------------------------------------------- */
body.home #container {
  float: none;
  margin: 0;
  width: 960px;
}
body.home #content {
  width: 900px;
  overflow: hidden;
  margin: 0 0 0 10px;
}
body.home .hentry {
  width: inherit;
}

…
Now, open your browser and take a look at your site’s home page—you should find that the content occupies the entire width of the page, with nary a hint of a sidebar. And, if you navigate to any other page, you will see the sidebar reappear and the main content column take on its previous proportions.
Quite simple, right? But what we’ve just discovered is important: we’ve seen how easy it is to switch off an entire Thematic area without touching a single part of the parent theme’s templates.
Now that you have an idea of how the template hierarchy works and how to use it to your advantage, it’s time to learn another key feature of WordPress themes. You’ve already seen a hint of this if you paid close attention to the list of Thematic’s template files earlier. Some of them, like header.php, aren’t particular to a specific page or type of page on the site. So when and how are they used? As it happens, WordPress provides a group of functions that include various common page components:
-
get_headergrabs header.php -
get_footergrabs footer.php -
get_sidebargrabs sidebar.php -
get_searchformgrabs searchform.php—if this is missing, WordPress simply renders a default search form -
comments_templategrabs comments.php
What’s more, WordPress gives you two more useful ways to include
goodies. First, you can optionally use those functions with an argument
for the name: get_header('custom'), for example, will
grab a file called header-custom.php. And, if you’d
like to include other types of files that don’t fit into any of those
formats, you can use get_template_part('partname'),
which grabs a template called partname.php.
The more PHP-inclined among you may be wondering why
WordPress provides these functions when we have a perfectly good
include method in PHP. I’m glad you asked. The
reason why you might choose the get_ functions over
include is because they have some nifty, built-in
dummy-proofing. Let’s imagine your template needs to use a file called
footer-foobar.php, which you’d call on like
so:
get_footer('foobar'),
Let’s also imagine that some clumsy but well-meaning user deleted
footer-foobar.php. If you’d used
include, any page calling on it would show a
couple of PHP errors that would tell every visitor that there’s no such
file or directory, making your theme’s user look bad. With
get_footer, however, WordPress will first check
for footer-foobar.php, then try to include
footer.php as a fallback. If
footer.php is also missing, WordPress will give up
quietly, leaving your poor user’s reputation intact. Sweet!
If you really do have a need to use good old PHP includes, WordPress
also provides you with constants called STYLESHEETPATH and TEMPLATEPATH for easy use with regular PHP
include statements.
TEMPLATEPATH is for use with standalone themes, and
STYLESHEETPATH is for child themes. You’d use them like
so:
include(STYLESHEETPATH . '/extrastuff/somefile.php'),
The next step in our custom home page layout is to modify
the footer so that it includes a list of the blog’s top-level pages. We
now know that get_footer will look for a file
called footer.php and include it. But if you call
it with an argument, as in get_footer('homepage'), it
will instead pull in footer-homepage.php. Near the
bottom of home.php, you’ll see where
home.php calls on
get_footer:
To call on another file instead, give it an argument:
Of course, this will do very little for us at the moment—we’ll need to create footer-homepage.php. Again, copying from the parent theme is a great idea. We’ll copy footer.php from Thematic, and place it into our child theme, renaming it footer-homepage.php. It looks like this:
</div><!-- #main -->
<?php
// action hook for placing content above the footer
thematic_abovefooter();
?>
<div id="footer">
<?php
// action hook creating the footer
thematic_footer();
?>
</div><!-- #footer -->
<?php
// action hook for placing content below the footer
thematic_belowfooter();
if (apply_filters('thematic_close_wrapper', true)) {
echo '</div><!-- #wrapper .hfeed -->';
}
<?php
// calling WordPress's footer action hook
wp_footer();
// action hook for placing content before closing the BODY tag
thematic_after();
?>
</body>
</html>
Around line 13, thematic_footer appears:
this controls the display of the footer text, which you can set in the
options panel Thematic provides to the WordPress admin section. We’ll
learn more about custom options panels and how you can create one for
your child theme in Chapter 7.
Now, to put the list of pages in: WordPress’s wp_list_pages
function will do exactly that. Most times when you find yourself
wanting to include some additional content in your theme, WordPress will
have a function ready to provide the information you need. Just have a
look around the Codex: most functions have names that give a clear idea
of what they do.
We could plop wp_list_pages right there
in our new home page footer template, and it’d all work fine. But as a
point of good housekeeping, it’s a better idea to stash this away in our
functions.php file.
functions.php tends to serve as a catch-all for the
custom functionality you add to your child theme. By storing our page
list generator in there, we ensure that if we ever need to call on it in
some other part of our template, we can find it easily and refer to it
in a simple fashion. Pop open that functions.php
file and write your first custom function:
<?php
function wicked_footer_pagelinks() {
echo '<ul id="simplepages">';
wp_list_pages('depth=1&sort_column=menu_order&title_li='),
echo '</ul>';
}
?>
It’s fairly straightforward: we’re using PHP’s
echo function to spit out a ul element wrapping the list of pages, with an
id so we can target it easily in
our CSS. The only tricky part is the argument string passed to
wp_list_pages.
As always, the ultimate reference for understanding how to use a
WordPress function is the Codex, but I’ll break down the arguments I’m
using here. depth specifies how far WordPress
should dig into the site’s page hierarchy. By specifying
1, we’re telling WordPress that we only want
top-level pages. sort_column specifies how the
pages should be sorted. There are a number of different options that can
be provided here: you can sort by ID, name, author, date modified, and
so on. menu_order is the way the pages are ordered by
the user in the admin section, so it’s a sensible choice.
title_li is used to set a title that will appear
at the top of the list. By passing in '' (an empty
string), we’re telling WordPress to omit the title, and also not to wrap
the pages in a ul (since we’re
providing that ourselves).
Again, all these parameters (and several others) are described on
the Codex page for the wp_list_pages, so you
should have a read through that, or the page of any WordPress function
you plan on using.
Now that we’ve created our function in functions.php, back in our footer we can call on the function like so:
<div id="footer">
<?php
wicked_footer_pagelinks();
// action hook creating the footer
thematic_footer();
?>
</div><!-- #footer -->
Save all your changes, jump into your browser, and head on over to your child theme’s home page. If all went well, your list of pages will be waiting for you at the bottom. Now all you need to do is add some CSS to make them pretty, and you’re ready to rumble! Here are some starter styles that display the items horizontally and lose those pesky bullet points:
body.home ul#simplepages {
width: 940px;
margin: 0 auto;
}
body.home ul#simplepages li {
list-style-type: none;
display: inline;
margin-right: 30px;
}
What we’ve learned here is how to insert some new content using WordPress’s template tags, and how to take advantage of WordPress’s custom template includes. That’s great, but there’s one more big piece of the WordPress and Thematic puzzle that you’ll need to master: hooks and filters.
In the above example we put the markup generation inside a function in our functions.php file, but we still had to edit a template file to insert a call to that function. This works, but it turns out we can do this in an even cleaner way: WordPress exposes two different kinds of hooks, so called because code attached to a hook grabs on to WordPress’s functionality like Velcro. We can create new functions in functions.php, attach them to these hooks, and have them modify parts of the theme’s output without touching any template files.
Action hooks are provided for events, such as when a post is displayed or a page’s footer is rendered. You’ll commonly use an action hook when you want to attach a function you’ve written to a certain activity—for example, when WordPress displays a comment or widget.
Filter hooks allow you to pass content through a function and return it to WordPress—generally, these are used to modify text. For example, if you wanted to highlight certain words in your post’s content, or append a special icon image to links, you’d use a filter hook on the content of your posts.
In both cases, you write your function, then write a simple line of code that registers your hook with WordPress. Then, when WordPress wants to display content or take some action that triggers one of those hooks, it goes looking for any functions that were registered to it, and executes them. No need to worry if this seems confusing right now: as soon as you’ve seen a few practical examples it will make perfect sense.
This book is far too small to explain every single hook in WordPress—there are over 1,100 of them! You’ll find a list of all the actions available to you in the WordPress Codex Action Reference. For filters, check out the WordPress Codex Filter Reference. Another great reference is Adam R. Brown’s WordPress Hooks Database, which includes information on which hooks and filters were added or removed in each version of WordPress; you’ll find that this information is absolutely essential if you’re developing themes to be backwards-compatible with older versions of WordPress.
Note: Wait a minute ... eleven hundred hooks?!
Yup, WordPress sure does provide a whole lot of hooks. It’s okay—many of these hooks are about stuff like posting or pingbacks, and these are better suited to plugins. The most useful hooks for themers are the ones that relate to displaying markup and content.
Hooks are simple enough to use—write your function and then tell
WordPress you intend to hook into it. Adding an action or filter hook is
done with functions named add_action and
add_filter, strangely enough:
add_action($tag, $function_to_add, $priority, $accepted_args); add_filter($tag, $function_to_add, $priority, $accepted_args);
The $tag parameter is where you specify the
hook you want to add to; $function_to_add is the
name of your function. The next two are optional, but worth knowing about:
$priority is used to determine the order in which
your action ought to occur, relative to other actions that might be
happening on the same hook—larger numbers happen later.
$accepted_args is a number that tells WordPress how
many arguments your function will expect to receive.
If you decide that you want to “unhook” an action
or filter from a hook, that is simple too. Call WordPress’s
remove_filter. It’s constructed in much the same
way, with one slight caveat: you can’t call it directly, so you need to
hook it onto WordPress’s init action.
init is an action hook that WordPress runs as soon as
it loads. By delaying our remove_some_filter
function slightly, we ensure that the action we’re trying to remove has
already been added; otherwise this would produce an error. Here’s how you
use remove_filter:
function remove_some_filter() {
remove_filter(tag, function, priority, args);
}
add_action('init', 'remove_some_filter')
Note: What about remove_action?
What happened to remove_action, you wonder? It turns out that it’s an alias for
remove_filter: when you call remove_action,
WordPress simply calls remove_filter, which can
remove either action or filter hooks. If you’d rather keep your code
readable by always using remove_action for
hooks you know to be actions, go right ahead. If you find it simpler
just to use remove_filter all the time, then
feel free to do that instead. Either approach is quite correct.
Warning: Get Your Priorities Straight
If an action or filter was
assigned a priority when it was added, you must
specify the same priority if you remove it.
Otherwise WordPress won’t remove it, nor give you any clues as to why
not. This can be particularly frustrating if you’re unaware of this
rule! So remember: if remove_filter is failing,
be sure to check if the hook was added with a priority.
A thoughtfully developed theme framework will also bring its own hooks to the table, each of which you can augment, remove, or replace. Thematic, of course, provides plenty—we’ll talk about those in more detail later.
Let’s have a look at one simple example of how you can use a hook to modify your theme. Favicons are those little icons you see in the tabs, titles, bookmarks, and history areas of your browser. Why not add one to your theme? And while you’re at it, you might like to add a larger icon for iPhones, iPads, and iPod touches.
First, create your favicon—there are plenty of online resources to help you out. Call your icon favicon.ico, and upload it to your theme’s directory.
Next, in functions.php, we’ll make a simple
function that constructs a link to the location of the favicon. The URL
of your theme’s files is provided by WordPress’s get_bloginfo
function, and we’ll specify the rest of the URL ourselves:
function wicked_favicon() {
echo '<link rel="shortcut icon" href="'
. get_bloginfo('stylesheet_directory')
. '/images/favicon.ico"/>';
}
Note that in the above code, we’ve assumed that your favicon will live in a directory called images—if you put them elsewhere, be sure to say so in your function.
Now, we need to add the action to the theme’s head. Fortunately WordPress has an action hook
that’s triggered when the head
element is being constructed: it’s called wp_head.
So, following the format we saw above for using
add_action, all we need to write is:
Because the order of links in the head is of no consequence to us, there’s no
need to worry about specifying a priority; our
wicked_favicon function accepts no arguments,
so it’s unnecessary to specify $accepted_args
either. That leaves us with just the action
we want to hook into, and the function we want to attach.
The same technique works for including extra style sheets or
JavaScript files—anything that ought to go in the head can be added to
wp_head.
Of course, adding markup to your theme’s head element is fairly uninteresting: most
times you’ll want to be playing with markup inside the site’s body. Fortunately, Thematic provides a number
of its own hooks, which we can use to add, remove, or adjust code at
varying points throughout any page. Most of them are named according to
where they are in the template, or what they do; here are the hooks
you’ll find most useful as a themer:
-
thematic_before -
thematic_aboveheader -
thematic_header—this builds the entire headerdivand also contains the following actions:-
thematic_brandingopen -
thematic_blogtitle -
thematic_blogdescription -
thematic_brandingclose -
thematic_access—this builds the menu, and a “skip to content” link
-
-
thematic_belowheader -
thematic_abovecontent -
thematic_abovepost -
thematic_belowpost -
thematic_abovecomments -
thematic_belowcomments -
thematic_abovecommentslist -
thematic_belowcommentslist -
thematic_abovetrackbackslist -
thematic_belowtrackbackslist -
thematic_abovecommentsform -
thematic_belowcommentsform -
thematic_show_subscription_checkbox -
thematic_show_manual_subscription_form -
thematic_abovemainasides—asides are what Thematic calls its widget areas -
thematic_betweenmainasides -
thematic_belowmainasides -
thematic_abovefooter -
thematic_after
If you’re the more visual type, check out this nifty wireframe by ThemeShaper Forums member dwenaus. It shows every widget area, major chunks of markup, and the most useful hooks as they appear in a template.
Unless you have a much better memory than me, though, you’ll probably never remember every hook and function available to you, so there’s no sense in trying to learn them. Instead, you should focus on learning the process of finding what you want. Dig into the templates and Thematic’s extension files, and consult the WordPress Codex when you run into functions that are part of WordPress’s core functionality. To give you an idea of how that’s done, let’s tackle an example from top to bottom.
Before we move onto some more sophisticated modifications of our theme, I want to show you just one example of how all those template files and hooks work together to create the markup that you see when you load the site in your browser. single.php is a good template to start with; it’s the one that controls the display of a single post. Pop it open with your favorite text editor and take a peek:
<?php
// calling the header.php
get_header();
// action hook for placing content above #container
thematic_abovecontainer();
?>
<div id="container">
<?php thematic_abovecontent(); ?>
<div id="content">
<?php
the_post();
// create the navigation above the content
thematic_navigation_above();
// calling the widget area 'single-top'
get_sidebar('single-top'),
// action hook creating the single post
thematic_singlepost();
// calling the widget area 'single-insert'
get_sidebar('single-insert'),
// create the navigation below the content
thematic_navigation_below();
// calling the comments template
thematic_comments_template();
// calling the widget area 'single-bottom'
get_sidebar('single-bottom'),
?>
</div><!-- #content -->
<?php thematic_belowcontent(); ?>
</div><!-- #container -->
<?php
// action hook for placing content below #container
thematic_belowcontainer();
// calling the standard sidebar
thematic_sidebar();
// calling footer.php
get_footer();
?>
As we saw when we looked at home.php and footer.php, there’s little in the way of actual markup in this file. If we want to find out how the post’s heading, byline, and body are put together, we’re going to have to dig a little deeper.
Tip: It’s a Jungle in There
Thematic’s extension files are well-commented, but they’re often quite long. You’ll soon be making fast friends with the search function in your text editor. If it features a project-wide search function that lets you search for a string across multiple files in your working directory, it’s definitely a good idea to become acquainted with it now.
If your favorite editor lacks this functionality, one alternative is to search Thematic’s source code on Google Code, where it’s hosted. Just click on the tab, and then search for the function or hook that you’re looking for. Google Code will show you every occurrence of that text across Thematic’s entire codebase, complete with context and line numbers.
thematic_singlepost is the function that
pulls in the post itself. Searching for “thematic_singlepost” across the
entire thematic directory reveals that the function
declaration lies in
library/extensions/content-extensions.php:
// Located in single.php
// The Post
function thematic_singlepost() {
  do_action('thematic_singlepost'),
} //end thematic_singlepost
do_action is a way to tell WordPress that
an action is taking place, so it should execute any functions that are
hooked to that action. This is an important concept that might be a little
confusing, so let’s break it down:
-
When WordPress is rendering the single.php template, it comes across a call to the
thematic_singlepost()function. -
When it runs that function, Thematic tells WordPress to trigger the
thematic_singlepostaction. -
At that point, any functions that have been attached to that hook—via
add_actionas we saw above—will be executed.
So, in order to find out what exactly Thematic does next, we just need to find the functions that are hooked to that action. Let’s search for the next instance of the string “thematic_singlepost,” which turns out to be further down in the same file:
add_action('thematic_singlepost', 'thematic_single_post'),
Aha! There’s our add_action call. It’s
telling WordPress that when the event
thematic_singlepost occurs, we want to do whatever’s
contained in the function thematic_single_post
(note the extra underscore). We’re getting warmer! Lucky for us, that
function is located just above the add_action
call:
function thematic_single_post() { ?>
<div id="post-<?php the_ID(); ?>" class="<?php thematic_post_class(); ?>">
  <?php thematic_postheader(); ?>
    <div class="entry-content">
      <?php thematic_content(); ?>
      <?php wp_link_pages('before=<div class="page-link">' .
↵__('Pages:', 'thematic') . '&after=</div>') ?>
    </div>
  <?php thematic_postfooter(); ?>
</div><!-- .post -->
<?php
}
Found it! Well, mostly—much of this code is still calling on other
functions we’ve yet to discover. Some of them, like
thematic_content, are other functions in
Thematic’s library. Others, like wp_link_pages,
are built-in WordPress functionality. Despite these other function calls,
however, this code bears a resemblance to what we think a post should be
made of. There’s a div with some
classes and an id, a post header function, another div with the content inside, pagination, and a
post footer function.
That sure is a lot of searching to find out how one little object works. Why, you might ask, is everything stashed away in function upon function upon function? While it might seem like a lot of fiddling about, it’s actually for your benefit—breaking up all the functional elements into tiny chunks means that we can target specific parts of the template, reuse a lot of those Thematic functions in our own work, and generally have a lot of flexibility to change stuff.
That was a lot of information, and we’re yet to do very much actual template hacking! Rest assured, it’s all important: the more you understand the WordPress theming engine, the better equipped you are to make some seriously wicked themes. As you become acquainted with WordPress and Thematic, you’ll find that a good understanding of all these bits and pieces will make it easier for you to make precision changes to existing templates, or even build all-new ones.
For now, though, it’s probably time to grab a snack or tasty beverage. When you return, we’ll start putting that big, fat stack of knowledge to good use.
Back already? Great! We’re ready to start hacking on some of those juicy templates. We’ll make three more changes, in increasing order of complexity: first, we’ll add social media share buttons to every post; then, we’ll add author bios to the bottom of the posts; and finally, we’ll finish our magazine-style home page layout with a full-width featured post and a few excerpts.
All of the modifications we’ve made so far have relied on action hooks. Let’s try one with a filter hook, shall we? Unlike an action, a filter will receive some content from WordPress that it can modify and must then pass along, so that lower priority filters can act on it, and so that it can be output. This means that your filter function should accept an argument (the initial content), and needs to return the modified content (the output) when it’s done.
For this example, we’ll be adding a social media share button to the end of every post. We’ll grab a nifty combined share button from AddThis, though you could use whatever share buttons or combination of them you prefer. Head on over to AddThis.com and grab yourself a button (choose Website from Select your service, as the WordPress option provides you with a plugin rather than a code snippet). At the end of the process, you’ll be given some HTML to copy and paste into your template. We’ll use that in our function:
function wicked_linklove($content) {
  if(is_single()) {
    $content .= '<div class="linklove">
      Did you love this post? Tell everyone you know, right now!
      … Paste the markup you received from AddThis here.
    </div>';
  }
  return $content;
}
Notice that, unlike the action hook functions we wrote previously,
this one accepts an argument: $content. That
parameter will contain whatever content WordPress is applying a filter
to. We take that variable and append our new
.linklove div to
it, then return it for subsequent filters or for display (if our filter
was the last one).
Warning: Pass It Along
If you forget to return the content at the end of your filter, your filter will act like a black hole: WordPress will pass the content in, but nothing will come out. That would result in the entire contents of all our posts disappearing!
We’re also using a quick if statement to check
if the post is being displayed on its own page: we only want to display
the share link on the full view, not in excerpts. This is accomplished
with WordPress’s is_page function. WordPress
has a great selection of these conditional
tags that allow you to display content based on the conditions
met by the current page; it’s worth becoming familiar with them.
Now to tell WordPress to apply this filter to each post’s content.
Thematic passes the full content of every post through a filter handily
named thematic_post, so let’s try using that:
We have used a priority of 90 to try to ensure that our filter will execute after any other filters modifying the same content; the priority argument is entirely relative to the other filters, so if it appears in the wrong place just try adjusting the number up or down. Load it up in your browser: instant social media rockstardom is yours!
Many blogs often include a small biography of the author/s
at the bottom of a post. Here’s how to add a bio box to the end of your
posts. We’ll be using the same thematic_post filter
that we used above.
First, let’s write our function—the pattern should be growing
familiar to you by now! The first if statement checks
to see if we’re in a single post or a page (as we only want to display
the author bio on the full view, and not in lists of posts). Assuming
either of these conditions is true, our function then builds a div, a heading for the author’s name, the
author’s Gravatar at a size of 50 pixels, and the bio from the author’s
WordPress profile. We then return the post content with the new div attached. Here’s our function:
function wicked_showbio($content)  {
  if (is_single()) {
    $content .=  '<div id="authorbio">';
    $content .= '<h3>About ' . get_the_author() . '</h3>';
    $content .= '<p>' . get_avatar(get_the_author_meta("user_email"), "50");
    $content .= get_the_author_description() .'</p></div>';
  }
  return $content;
}
You’ll see that we’ve used some functions beginning with the word
“get”—get_the_author,
get_avatar,
get_the_author_meta, and
get_the_author_description. These are functions
WordPress provides to retrieve author info and avatars.
Tip: Is there an echo in here?
As a general rule, WordPress functions beginning with
the_ include an echo
statement, whereas those beginning with get_the_
don’t. For example, WordPress includes both the_author
and get_the_author
methods. Both retrieve the same information, but
get_the_author returns it for you to use in
your PHP code, whereas the_author outputs it
directly using echo.
Therefore:
<?php the_author ?>
is exactly the same as:
<?php echo get_the_author ?>
If you tried to use the_author by
mistake in the wicked_showbio function, you’d
end up with a mess: PHP would output the author name as soon as you
called the_author, which is well before you
return $content to the filter. This would result in
the author names showing up at the top of the post, instead of where
you wanted them.
In functions.php, a filter for
thematic_post will take care of attaching our
function to the end of the post content:
Remember to add some CSS to your theme to make that new div look sexy.
For our last trick, we’ll take some more drastic action: we’ll remove the default list of posts from the front page and replace it with a list of our own making. We’ll grab the four most recent posts: the newest will live in a large feature area and display its post thumbnail, with the next three arranged chronologically beneath it. Imagine a similar layout to Figure 5.1.
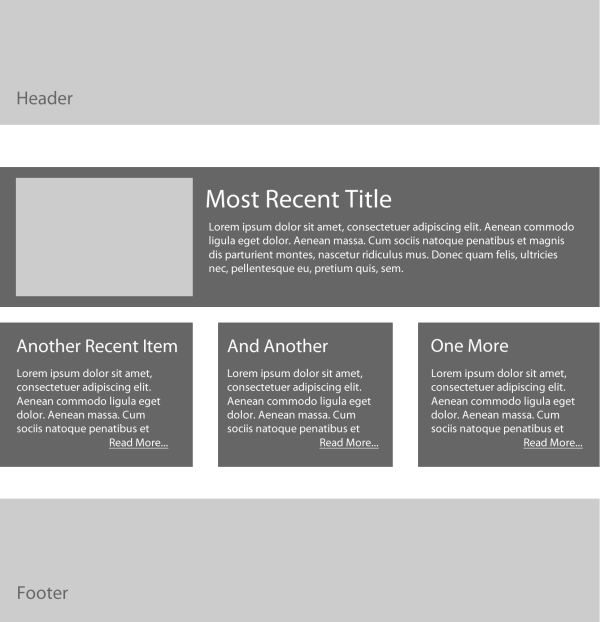
First, we’ll need to include post thumbnail support for our theme. Post thumbnails were introduced in version 2.9 of WordPress, enabling you to attach a feature image when you create a post. Your theme can provide support for this feature, define a number of various thumbnail sizes, and use different versions of the thumbnail in various listings. For example, you might want to use a small, square-sized thumbnail for search results and archive listings, a medium square for the home page, and a large, full-width size for single posts.
To enable thumbnail support in our theme, let’s add this code to functions.php:
set_post_thumbnail_size is the
WordPress function used to specify a default size for the image, while
add_image_size defines other thumbnail sizes.
Our home page is likely to be the only place where we’ll want a square
image of this size; if we want to add thumbnails to other parts of the
template, such as the single post template, they’ll almost certainly
be a different size. So let’s make the default one nice and big, and
choose a medium size for the home page image:
set_post_thumbnail_size(540, 300, true);
add_image_size('homepage-thumbnail', 300, 200, true);
Both of those functions accept the same three parameters: the
width of the thumbnail, its height, and a Boolean option that tells
WordPress whether or not to hard crop the
images. If you set this to false or omit it, the
images will be scaled to fit in a box of the given
dimensions while retaining their proportions; if you set it
to true they will be cropped to exactly
those dimensions—a hard crop, if you like. From now on,
whenever a user of the theme attaches a new featured image, WordPress
will create those two sizes for us. Sorted!
Our next task is to create a function to build a new Loop. As Brandon mentioned back in Chapter 2, The Loop is a process that grabs one or more posts, and it’s used wherever you need post information to appear. Any code that lives inside The Loop will appear for every post in the list. You can read all about The Loop on the WordPress Codex.
On a blog’s home page, The Loop grabs a list of the most recent blog posts. The number of posts it retrieves for listing pages is defined in the WordPress settings, under Reading. We only want four posts on our home page, so if we wanted to be lazy we could ask our users to enter 4 in that field. But this is impractical; that setting would also be used for search results, category and tag pages, and monthly archives, too. Instead, we should be polite and override that behavior just for our home page.
To start with, we’ll use WordPress’s function for retrieving
lists of posts: query_posts. This way we can
choose what sorts of posts should appear in a list, in which order,
and the amount. Our needs are simple: we just want the four most
recent posts. We’ll create a new function,
wicked_indexloop, and call on
query_posts like so:
function wicked_indexloop() {
  query_posts("posts_per_page=4");
}
This will grab the first four posts to display on the front page. Next, we’ll include the loop—excuse me, The Loop—in our function:
|
These statements check to see if we have posts; for each post, we’ll display some content, though we don’t need to worry about that just yet. | |
|
If the query fails to find any posts, we’ll display a message. | |
|
Finally, we tidy up The Loop by using
|
Note: The Loop Is Your New Best Friend
As you become a more accomplished themer, you’ll find that
query_posts
and The
Loop will become some of your favorite tools. When you’re
done playing with these examples, it’s well worth your time to check
out the Codex entries for each.
Tip: Advanced Querying
query_posts replaces the active Loop
on a page. If, down the road, you find yourself wanting to display
your custom Loop in addition to the default
Loop, or if you want multiple custom Loops, you’ll need to dig into
the documentation for the WP_Query
class—a more flexible way of using The Loop. It’s beyond the scope
of what we want to do here, but you might want to become familiar
with it as you become more experienced with WordPress.
We’re now ready to start plugging in the code that will make our
posts appear. Remember earlier in the chapter when we went hunting for
the function thematic_single_post? It’d be
great for our custom Loop to still have all that juicy Thematic
functionality, so we’ll reuse some of the functions we found there:
thematic_post_class, which generates that big
collection of classes we find on every post, and
thematic_postheader, which builds a heading,
byline, date, and edit link.
We also need to include the post’s thumbnail for the first item
only, so we’ll use a counter to figure out which post we’re up to. If
the counter is at 1, we’ll include the post’s home
page thumbnail using the WordPress template tag
the_post_thumbnail. At the end of The Loop,
we’ll increment the counter by 1. Below is the first part of The
Loop:
query_posts("posts_per_page=4");
$counter = 1;
if (have_posts()) : while (have_posts()) : the_post(); ?>
  <div id="post-<?php the_ID() ?>" class="<?php thematic_post_class() ?>">
    <?php thematic_postheader();
    if ($counter == 1 && has_post_thumbnail()) {
      the_post_thumbnail('homepage-thumbnail'),
    } ?>
    <div class="entry-content">
      <?php the_excerpt(); ?>
      <a href="<?php the_permalink(); ?>" class="more"><?php echo more_text() ?>
↵</a>
      <?php $counter++; ?>
    </div>
  </div><!-- .post -->
<?php endwhile; else: ?>
The only other new function used here is
more_text: it’s a Thematic method that
displays a “Read More” link that’s been passed through a filter, so
it’s easy to modify on a site-wide basis.
Our last little task is to define a message to display if the query retrieved no posts:
<?php endwhile; else: ?>
  <h2>Eek</h2>
  <p>There are no posts to show!</p>
<?php endif;
Here’s the entire function, put together:
function wicked_indexloop() {
  query_posts("posts_per_page=4");
  $counter = 1;
  if (have_posts()) : while (have_posts()) : the_post(); ?>
    <div id="post-<?php the_ID() ?>" class="<?php thematic_post_class() ?>">
      <?php thematic_postheader();
      if ($counter == 1 && has_post_thumbnail() && !is_paged()) {
        the_post_thumbnail('homepage-thumbnail'),
      } ?>
      <div class="entry-content">
        <?php the_excerpt(); ?>
        <a href="<?php the_permalink(); ?>" class="more">
↵<?php echo more_text() ?></a>
        <?php $counter++; ?>
      </div>
    </div><!-- .post -->
  <?php endwhile; else: ?>
    <h2>Eek</h2>
    <p>There are no posts to show!</p>
  <?php endif;
  wp_reset_query();
}
Whew! With all that done, we can now insert it into the
home.php template. Look for the line where
thematic_indexloop is called:
// action hook creating the index loop
thematic_indexloop();
All you need to do is replace it with a comment of your own and
a call to the wicked_indexloop
function:
// action hook creating the index loop
//thematic_indexloop();

// a custom homepage loop
wicked_indexloop();
Check out your blog’s home page; you should now see four posts, and if the most recent one has a thumbnail attached to it, that should be sitting there too.
There’s one slight problem, though: because we’ve replaced the
default Loop with our own, the pagination links to older posts no
longer work as intended. Because we’re going for a magazine-style home
page rather than a straight-up blog, we can simply remove those links,
which are generated by the call to
thematic_navigation_below:
// create the navigation below the content
thematic_navigation_below();
Remove or comment out that line, and you should be good to go!
All that’s left now is to style up those four posts as you see
fit: Thematic’s dynamic classes
will take care of identifying them for you, and arranging them should
be a piece of cake. The following example styles will create the basic
layout:
body.home div.p1 {
  font-size: 120%;
}

body.home div.p1 img {
  float: left;
  margin-right: 30px;
}

body.home div.p2 {
  clear: left;
}

body.home div.p2,
body.home div.p3,
body.home div.p4 {
  width: 270px;
  float: left;
  margin-top: 22px;
}

body.home div.p3 {
  margin-left: 30px;
  margin-right: 30px;
}
As we’ve progressed through this chapter, you’ve seen three different ways to modify your child theme: by creating and modifying template files, by using WordPress’s file include functionality, or by hooking into actions and filters in your functions.php file. We’ve also seen quite a few examples of how to bend WordPress and Thematic to your will using those three techniques.
I want to close off this chapter with a few hints and tips that will help you be the best themer you can be.
Have you ever found yourself lost in a maze of unfamiliar code, looking for a sign—any sign—of what it does and why it’s there? Worse yet, has it been code you’ve written yourself? Sure, right now you might know your code backwards and forwards, but what about in three or six months’ time when you want to update it? And what if you’re releasing your theme to the public?
Save yourself, and your users, some aggravation by leaving copious comments in your code. Bits are free!
If you have more than a few custom functions in your functions.php file, it’s probably time to start organizing them into separate files.
For example, you might want to move all your content filters into their own file. To do so, grab them out of your functions file and paste them into a new one—let’s call it functions-contentfilters.php. For extra neatness, create a new subdirectory in your theme’s directory, and give it a useful name—say, library.
Next, in your functions.php file, include it like so:
include('library/funcitons-contentfilters.php'),
Separating your functions by purpose means that you, and your theme’s users, will find it super-easy to locate your handiwork later on.
Remember, your theme will form just one part of a website. WordPress, plugins, and your theme all work together. If any of your functions’ names clash with one from a plugin or WordPress itself, there’ll be confusion—and bugs—aplenty. It’s a good idea to prefix all your function names with a reasonably unique string—the prevailing best practice in the WordPress community is to use an abbreviated form of your theme’s name, as we’ve done with our Wicked theme throughout the chapter.
Important: What’s in a name?
It might be tempting to start all your function names with
wp (for WordPress) or theme
(because it is one, right?), but strings like these are often in use
by WordPress and may well cause conflicts. Seriously, stick with the
name.
In this chapter, we learned how to override Thematic’s templates with code of our own making: we looked at how to create an all-new home page for our child theme with just a little poking and prodding, and how to add new features with hooks and filters.
What we’ve seen here is only a taster of what’s possible: it’s time for you to go out there, explore, and come up with some wicked new ways to enhance your theme.
By the way, many of the skills you pick up when adding functions to your theme will stand you in good stead if you ever plan to become a plugin developer: the methodology is much the same. Bonus!
[4] Meaning wrap in comments, so as to temporarily disable it while keeping the ability to restore it easily.