
There are many occasions when an application must store data for later use, or read configuration information from a configuration file. To handle these functions, the assembly language program must be able to interact with files on the UNIX system.
This chapter describes how to handle files within assembly language programs, both writing data out to them and reading data in from them. Two basic methods are used to access files from assembly language programs. One method is to use the standard C functions. If you already program in C or C++, you should be familiar with these—fopen(), read(), and write(). The C file I/O functions in turn use the Linux system calls (described in Chapter 12, "Using Linux System Calls") to access files. In assembly language programming, you can bypass the C function calls and directly access the Linux file I/O system calls provided by the kernel. This is the method described in this chapter.
The chapter starts out with a brief explanation of how the UNIX system handles files. Next it shows how to write data to files, specifying the proper permissions and access types. After that, how to read data from files is shown, along with how to process the data and write to another file. Finally, the topic of using memory-mapped files is presented. This feature enables you to read a complete file into memory, process and modify the data within the memory-mapped file, and write the data back to the original file.
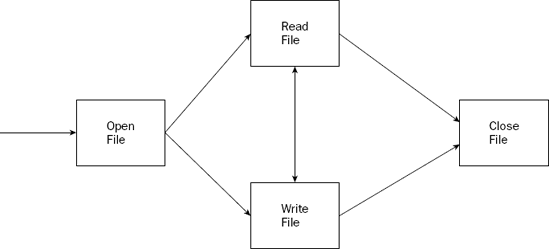
Just as in C and C++ programming, a specific sequence must be used when working with data files in assembly language programs. Figure 16-1 shows the sequence of events that must be taken.
Each of these actions—open, read, write, and close—is performed by a Linux system call. As shown in Chapter 12, "Using Linux System Calls," the system call value representing the system call is loaded into the EAX register, and any parameter values are loaded into other general-purpose registers.
The following table shows the Linux system call values for the file-handling system calls.
System Call | Value | Description |
|---|---|---|
Open | 5 | Open a file for access and create a file handle pointing to the file. |
Read | 3 | Read from an open file using the file handle. |
Write | 4 | Write to the file using the file handle. |
Close | 6 | Close the file and remove the file handle. |
Each file system call has its own set of input values that must be configured before the system call is made. The following sections describe each of these system calls in detail and show examples of how to use them in assembly language programs.
If you are familiar with opening and closing files in the C or C++ languages, opening and closing them in assembly language using the Linux system calls is exactly the same. The open() C function uses the open system call, passing the necessary parameters to the system call. The open system call returns a file handle, which is used to identify the open file to other file-handling system calls. When you are finished using the file, the close system call is used to close the file.
The format of the open system call is as follows:
int open(const char *pathname, int flags, mode_t mode);
The pathname is the full null-terminated file path including any subdirectories. If only a filename is specified, it is assumed to be in the same directory from which the application program was run. The flags input value determines the file access allowed for the file, and the mode input value determines the UNIX permissions set if the file is created.
The open assembly language system call reads its necessary parameters from the following registers:
EAX: Contains the system call value 5
EBX: Contains the memory address of the start of the null-terminated filename string
ECX: Contains an integer value representing the flags requesting the type of access to the file
EDX: Contains an integer value representing the UNIX permissions used if a new file is created
The access type and UNIX permissions defined for the file are crucial. The following sections describe the possible settings for these two values.
The type of access used to open the file must be declared for all file open requests. If you have opened files using the open() C function, you are probably familiar with using predefined constants such as O_RDNONLY or O_RDWR. Unfortunately, these constants are not defined for you within your assembly language program. You must use the numeric values they represent or define the constants yourself. The numeric values for these constants are usually represented as octal values. The numeric values of the constants are shown in the following table.
C Constant | Numeric Value | Description |
|---|---|---|
O_RDONLY | 00 | Open the file for read-only access. |
O_WRONLY | 01 | Open the file for write-only access. |
O_RDWR | 02 | Open the file for both read and write access. |
O_CREAT | 0100 | Create the file if it does not exist. |
O_EXCL | 0200 | When used with O_CREAT, if the file exists, do not open it. |
O_TRUNC | 01000 | If the file exists and is open in write mode, truncate it to a length of zero. |
O_APPEND | 02000 | Append data to the end of the file. |
O_NONBLOCK | 04000 | Open the file in nonblocking mode. |
O_SYNC | 010000 | Open the file in synchronous mode (allow only one write at a time). |
O_ASYNC | 020000 | Open the file in asynchronous mode (allow multiple writes at a time). |
The file access types can be combined to enable multiple access features. For example, if you want to create a file and open it for both read and write access, you would use the following instruction:
movl $0102, %ecx
This combines the O_CREATE value of 0100 with the O_RDWR value of 02. The leading zero in the constant value is important. This signifies that the value is in octal format. If you used the constant $102, you would get the wrong results, as the assembler would use the decimal value of 102.
If you want to append new data to an existing file, you would use this instruction:
movl $02002, %ecx
This combines the O_APPEND value of 02000 with the O_RDWR value of 02, and does not set the O_CREAT value. If the file does not exist, it will not be created.
Setting the UNIX permissions can often lead to complicated situations. Care must be taken to ensure that the proper permissions are set for the file access. The standard UNIX permissions are set for three categories of users:
The owner of the file
The default group for the file
Everyone else on the system
Each of the three categories is assigned specific permissions for the file. Three bits are used to indicate the access for each category:
The read bit
The write bit
The execute bit
The three bits are aligned to form a three-bit value for each category, as shown in Figure 16-2.

As shown in Figure 16-2, the three bits can also be represented by an octal value, indicating which bits are set. The values can be combined to produce various access levels, shown in the following table.
Permission Bits | Value | Access |
|---|---|---|
001 | 1 | Execute privileges |
010 | 2 | Write privileges |
011 | 3 | Execute and write privileges |
100 | 4 | Read privileges |
101 | 5 | Execute and read privileges |
110 | 6 | Execute and write privileges |
111 | 7 | Execute, write, and read privileges |
The file mode properties are combined to form a single three-digit octal number, representing the owner, group, and everyone privileges. This three-digit octal number is what is defined in the open system call, along with a leading zero to make it an octal value.
The instruction
movl $0644, %edx
assigns the octal value 644 to the EDX register. The 6 digit indicates that the file will have read/write privileges for the owner. The middle 4 digit indicates that the file will have read-only privileges for the file's assigned group, and the second 4 digit indicates that the file will have read-only privileges for everyone else on the system.
Note one caveat to this: The Linux system assigns an umask value for every user that logs into the system. The umask value masks the default privileges assigned to files created by that user. The final privileges for the created file would be as follows:
file privs = privs & ~umask
The umask is inverted, and AND'd with the requested privileges in the open system call. You can see the umask value assigned to your user account by using the umask command:
$ umask
022
$
The umask assigned to this account is the octal value 022. If an open system call is performed requesting the creation of a file with 0666 privileges (read/write for everyone), the final privileges assigned to the created file will be as follows:
final privileges = privs & ~umask
                 = 666 & ~022
                 = 666 & 755
                 = 644
The requested privileges for the owner are not modified, but the requested write privileges for the group and for everyone else are denied by the umask value. This is a commonly used umask value for systems. It prevents unintentionally granting write privileges to files.
If you really intended to grant write privileges to everyone for the file, you must either change your umask value, or use the chmod command to manually change the privileges of the file.
The last piece of the system call is to declare the filename to open. If no path is used, the filename is assumed to be located in the same directory from which the executable program was run.
The filename must be declared as a null-terminated string. This can be done using the .asciz declaration:
.section .data
filename:
   .asciz "output.txt"
.
.
.section .text
.
.
   movl $filename, %ebx
Because the EBX register contains the memory address for the location of the string, you must use the dollar sign with the variable name to get the memory address location of the string.
Another method that is commonly used is to allow the filename to be declared as a command-line parameter for the program. Chapter 11, "Using Functions," showed how to access command-line parameters from the program stack. The location 8(%ebp) contains a pointer to the memory location containing the first command-line parameter. This is exactly what we need for the filename; thus, you can use the instructions
movl %esp, %ebp
.
.
movl 8(%ebp), %ebx
to move the filename listed as the first command-line parameter into the open system call function call. This is shown in more detail in the examples later in this chapter.
Putting all of the pieces together, you can open a file with a simple code snippet such as this:
movl $5, %eax
movl $filename, %ebx
movl $0102, %ecx
movl $0644, %edx
int $0x80
test %eax, %eax
js badfile
This code snippet opens a file (declared by the filename data variable) with O_CREAT and O_WRONLY access, using UNIX permissions 0644 (read/write access for the owner, and read access for anyone else).
When the system call returns, the EAX register contains a signed integer value. This value will be either non-negative, which is the file handle for the open file, or negative, which is an error code indicating why the file could not be opened. Because the error code is a negative value, you can test for it by checking the sign bit using the JS conditional branch instruction.
Usually, you will want to store the file handle to the open file somewhere for use later in the program. Because the file handle is a simple 32-bit signed integer value, it can be kept anywhere you would store any other integer value:
A memory location defined in the
.datasectionA memory location defined in the
.bsssectionThe stack, in the local variables section
A register
The file handle value will remain valid during the entire time the file is considered open by the operating system. When the file is closed using the
closesystem call, the file handle becomes invalid, and cannot be used to access the file.
If the open system call does return an error code, you can compare it to the errno values defined in the errno.h header file on the system (the assembly language errorno.h file is usually located in the /usr/include/asm directory on the system). The following table describes some of the more common error codes that may be returned.
Error Name | Error Value | Description |
|---|---|---|
EPERM | 1 | Operation not permitted |
ENOENT | 2 | No such file |
EBADF | 9 | Bad file handle number |
EACCES | 13 | Permission denied |
EFAULT | 14 | Bad file address |
EBUSY | 16 | Device or resource busy |
EEXIST | 17 | File exists |
EISDIR | 21 | Is a directory |
EMFILE | 24 | Too many open files |
EFBIG | 27 | File too large |
EROFS | 30 | Read-only file system |
ENAMERTOOLONG | 36 | File name is too long |
Remember that the error code is returned as a negative number, so the value will be the negative of the value shown in the
errnotable.
When you are finished using a file, the proper thing to do is to close it; otherwise, file corruption is possible. The close system call uses a single input parameter, the file handle of the opened file to close. The parameter is placed in the EBX register:
movl filehandle, %ebx
movl $6, %eax
int $0x80
The close system call returns an error code in the EAX register, using the errno.h error codes. If the file was successfully closed, the EAX register will contain a zero.
Once the file is open, you can use the write system call to write to it. You have already seen examples of using the write system call in this book when we wrote data to the console display (such as in Chapter 4, "A Sample Assembly Language Program"). The console STDOUT file handle always defaults to the value 1. In this special case, you do not need to open the file handle, you just write to it. For writing to files, instead of writing to the console STDOUT file handle, the file handle returned from the file's open system call is used. The default STDERR file handle behaves similarly (it uses a file handle of 2).
A simple assembly language program that writes to a file is demonstrated in the following cpuidfile.s program:
# cpuidfile.s - An example of writing data to a file
.section .data

filename:
   .asciz "cpuid.txt"
output:
   .asciz "The processor Vendor ID is 'xxxxxxxxxxxx'
"
.section .bss
   .lcomm filehandle, 4
.section .text
.globl _start
_start:
   movl $0, %eax
   cpuid
   movl $output, %edi
   movl %ebx, 28(%edi)
   movl %edx, 32(%edi)
   movl %ecx, 36(%edi)

   movl $5, %eax
   movl $filename, %ebx
   movl $01101, %ecx
   movl $0644, %edx
   int $0x80
test %eax, %eax
   js badfile
   movl %eax, filehandle

   movl $4, %eax
   movl filehandle, %ebx
   movl $output, %ecx
   movl $42, %edx
   int $0x80
   test %eax, %eax
   js badfile

   movl $6, %eax
   movl filehandle, %ebx
   int $0x80

badfile:
   movl %eax, %ebx
   movl $1, %eax
   int $0x80
The cpuidfile.s program takes the original cpuid.s program from Chapter 4, "A Sample Assembly Language Program," and modifies it to place the output in a text file. It uses the O_TRUNC, O_CREAT, and O_WRONLY file access modes to open (or create) the cpuid.txt file for writing. If the file already exists, it is truncated (erased), as the O_APPEND access mode was not included. The UNIX permissions were set to 0644 to allow the user to read and write to the file, but only allow read access for others on the system. After the open system call is made, the return value is checked to ensure that it does not contain an error code. If it is a valid file handle, it is stored in the memory location labeled filehandle.
The file handle is then loaded into the EBX register and used with the write system call to write the output value stored from the CPUID instruction to the file.
You can test this program by simply assembling, linking, and running the program:
$ as -o cpuidfile.o cpuidfile.s
$ ld -o cpuidfile cpuidfile.o
$ ./cpuidfile
$ ls -al cpuid.txt
-rw-r--r--    1 rich     rich           42 Oct  6 09:18 cpuid.txt
[rich@test2 chap16]$ cat cpuid.txt
The processor Vendor ID is 'GenuineIntel'
$
The program successfully created the file and placed the output string into it as expected. You can test the file access settings by rerunning the program again and examining the output file:
$ ./cpuidfile
$ ls -al cpuid.txt
-rw-r--r--    1 rich     rich           42 Oct  6 09:20 cpuid.txt
$ cat cpuid.txt
The processor Vendor ID is 'GenuineIntel'
$
The output from the second run erased the original data, writing the new data into the existing file starting at the beginning of the file. This caused the new data to replace the data contained in the existing file (of course, you can't see that because it used the same data). You can test this by using an editor to add other lines to the cpuid.txt output file, and then rerun the cpuidfile program.
The new file generated by the program replaced the data in the existing file. If you want to append the new data to the existing data in the file, you can change the file access mode values. Just replace the open system call lines with the following:
movl $5, %eax
movl $filename, %ebx
movl $02101, %ecx
movl $0644, %edx
int $0x80
test %eax, %eax
js badfile
movl %eax, filehandle
Note that the only change was to the value set in the ECX register, which now adds the O_APPEND access mode value, along with the O_CREAT and O_WRONLY values. After reassembling and linking the new code, you can test it out:
$ ./cpuidfile2
$ ls -al cpuid.txt
-rw-r--r--    1 rich     rich           84 Oct  6 09:26 cpuid.txt
$ cat cpuid.txt
The processor Vendor ID is 'GenuineIntel'
The processor Vendor ID is 'GenuineIntel'
$
As expected, the new version of the program appended the output test string to the existing contents of the cpuid.txt file.
In Linux, there are many reasons why a file access attempt can fail. Other processes can lock files, users can accidentally delete files, or even novice system administrators can assign the wrong permissions to the file. You must ensure that your assembly language code is prepared to deal with failure.
As shown in the cpuidfile.s example, it is best to test the return code from the file access system calls. This example doesn't do anything other than use it as the return code for the exit system call, but in a production program you would want to display some type of error message related to the specific error code encountered.
A simple way to test the error code handling is to force an error condition. For this example, I will change the output file to a read-only file and run the program again:
$ chmod 444 cpuid.txt
$ ls -al cpuid.txt
-r--r--r--    1 rich     rich           84 Oct  6 09:46 cpuid.txt
$ ./cpuidfile
$ echo $?
243
$
The UNIX file mode of the cpuid.txt output file was set to 444, indicating read-only access for the owner of the file, as well as everyone else on the system. When the cpuidfile program was run and the return code checked, an error code was returned.
Because UNIX program return codes are unsigned integers, the return code value is interpreted as a positive value. You can determine the true error code value by subtracting this value from 256, which results in 13. From the errno.h file, you can determine that error code 13 is the EACCES error, which indicates that you do not have permission to write to the file.
The next step is to work on reading data contained in files. This function uses the read system call. The UNIX man page for the read system call is as follows:
ssize_t read(int fd, void *buf, size_t count);
The read system call uses three input values and produces a single output value. The three input values are as follows:
The file handle of the file from which to read the data
A buffer location to place the read data
The number of bytes to attempt to read from the file
The return value represents the number of bytes actually read from the file by the system call. The data type ssize_t is similar to the size_t data type, but is a signed integer value. This is because the read function can return a negative value if an error occurs. If the read system call returns a zero, the end of the file has been reached.
It is possible that fewer bytes can be read than the number specified in the input value. This can be caused by reaching the end of the file, or by the data not being available at the time the read call was made.
Of course, the input values are placed in registers before the read system call is made. The registers used for the read system call are as follows:
EAX: The
readsystem call value (3)EBX: The file handle of the open file
ECX: The memory location of a data buffer
EDX: An integer value of the number of bytes to read
As you can see, the read system call requires the file handle of an open file, so before you can use the read system call you must use the open system call to open a file. It is important to ensure that the file was opened with the read access mode set (using the O_RDONLY or O_RDWR mode values). There is one exception to this: Similar to the STDOUT situation, the STDIN file handle (value 0) can be used to read data from the standard input device (usually the keyboard) without having to open it.
The readtest1.s program demonstrates reading data from the cpuid.txt file created by the cpuidfile.s program shown earlier:
# readtest1.s - An example of reading data from a file
.section .bss
   .lcomm buffer, 42
   .lcomm filehandle, 4
.section .text
.globl _start
_start:
   nop
   movl %esp, %ebp
   movl $5, %eax
   movl 8(%ebp), %ebx
   movl $00, %ecx
   movl $0444, %edx
   int $0x80
   test %eax, %eax
   js badfile
   movl %eax, filehandle

   movl $3, %eax
   movl filehandle, %ebx
   movl $buffer, %ecx
   movl $42, %edx
   int $0x80
   test %eax, %eax
   js badfile

   movl $4, %eax
   movl $1, %ebx
   movl $buffer, %ecx
   movl $42, %edx
   int $0x80
   test %eax, %eax
   js badfile

   movl $6, %eax
   movl filehandle, %ebx
   int $0x80

badfile:
   movl %eax, %ebx
   movl $1, %eax
   int $0x80
The readtest1.s program opens the filename specified in the first command-line parameter from the program (located at 8(%ebp)). Because the program just reads the data, the file is opened in O_RDONLY mode. Next, the read system call is performed, pointing to the buffer area specified by the buffer label in the .bss section. The read system call is instructed to read 42 bytes of data (the output from the cpuidfile.s program, including the newline character).
The next section uses the write system call and the STDOUT file handle to display the data stored in the buffer area (again, specifying 42 bytes of data). Finally, the file handle pointing to the cpuid.txt file is closed using the close system call, and the exit system call is used to exit the program.
When you run the program, remember to include the cpuid.txt file name on the command line, as that is where the program will get the filename to open:
$ ./readtest1 cpuid.txt
The processor Vendor ID is 'GenuineIntel'
$
The program behaved as expected. If you forget to include the filename on the command line, nothing is displayed, and error code will result. You can view the error code using the $? shell value:
$ ./readtest1
$ echo $?
242
$
This equates to error code 256 – 242 = 14, or the EFAULT error, showing that no filename address is specified at the 8(%ebp) location.
Of course, in a real program it is far better to first check the number of parameters to ensure there is something on the command line to read, rather than let the
openfunction error out.
The readtest1.s program was somewhat of an unrealistic example. It specified exactly the amount of data that needed to be read from the file. More often, you will not know exactly how much data you need to read. Instead, you must loop through the entire file until you reach the end.
This method can be used because of the way the read system call works. Each time the read system call is used, a file pointer is used within the open file to indicate the last byte of data read from the file. If another read system call is used, it starts at the byte immediately following the file pointer location. When it is done reading, it moves the file pointer to the last byte read. This continues until the end of the file is reached.
The way you know the read system call is at the end of the file is that it returns a zero value from the read. You must check the return value at each iteration for either an error or a zero value. If the value is zero, you know that the end of the file has been reached.
The readtest2.s program demonstrates this technique:
# readtest2.s - A more complicated example of reading data from a file
.section .bss
   .lcomm buffer, 10
   .lcomm filehandle, 4

.section .text
.globl _start
_start:
   nop
   movl %esp, %ebp
   movl $5, %eax
   movl 8(%ebp), %ebx
   movl $00, %ecx
   movl $0444, %edx
   int $0x80
   test %eax, %eax
   js badfile
   movl %eax, filehandle

read_loop:
   movl $3, %eax
   movl filehandle, %ebx
   movl $buffer, %ecx
   movl $10, %edx
   int $0x80
   test %eax, %eax
   jz done
   js done
   movl %eax, %edx
   movl $4, %eax
   movl $1, %ebx
   movl $buffer, %ecx
   int $0x80
   test %eax, %eax
   js badfile
   jmp read_loop

done:
   movl $6, %eax
   movl filehandle, %ebx
   int $0x80

badfile:
   movl %eax, %ebx
   movl $1, %eax
   int $0x80
The readtest2.s program again gets the filename to open from the first command-line parameter. The file is opened, and a loop is started to read 10-byte blocks of data from the file, placing them into the buffer location. The buffer location is then written to the display using the write system call. When the read system call returns a zero value, we know we have reached the end of the file, and the file handle can be closed.
Now the readtest2.s program can be used to display a file of any size:
$ ./readtest2 cpuid.txt
The processor Vendor ID is 'GenuineIntel'
The processor Vendor ID is 'GenuineIntel'
$
The readtest2 program displayed the entire cpuid.txt file. You can test it out on any text file, including its own source code file:
$ ./readtest2 readtest2.s
# readtest2.s - A more complicated example of reading data from a file
.section .bss
   .lcomm buffer, 10
   .lcomm filehandle, 4
   .lcomm size, 4
.section .text
.
.
.
badfile:
   movl %eax, %ebx
   movl $1, %eax
   int $0x80
$
The entire source code file was displayed, and the readtest2 program properly stopped when it reached the end of the file.
The 10-byte block size was used to show the looping effect. In a production application, you would want to use a larger block size to perform fewer
readsystem calls, improving the application's performance.
Often when processing data that is read from a file, you want to write it back out to a file. In the readtest and readtest2 examples, the output file was the STDOUT console display. It could just as easily have been a file handle to another file.
Just as the read system call uses a file pointer to keep track of what data has been read from a file, the write system call keeps a file pointer pointing to the last data that has been written to a file. You can write a block of data to an output file and then use another write system call to write more data after the original block of data.
The readtest3.s program demonstrates reading data in from a file, processing the data, and writing it out to another file:
# readtest3.s - An example of modifying data read from a file and outputting it
.section .bss
   .lcomm buffer, 10
   .lcomm infilehandle, 4
.lcomm outfilehandle, 4
   .lcomm size, 4
.section .text
.globl _start
_start:
   # open input file, specified by the first command line param
   movl %esp, %ebp
   movl $5, %eax
   movl 8(%ebp), %ebx
   movl $00, %ecx
   movl $0444, %edx
   int $0x80
   test %eax, %eax
   js badfile
   movl %eax, infilehandle

   # open an output file, specified by the second command line param
   movl $5, %eax
   movl 12(%ebp), %ebx
   movl $01101, %ecx
   movl $0644, %edx
   int $0x80
   test %eax, %eax
   js badfile
   movl %eax, outfilehandle

   # read one buffer's worth of data from input file
read_loop:
   movl $3, %eax
   movl infilehandle, %ebx
   movl $buffer, %ecx
   movl $10, %edx
   int $0x80
   test %eax, %eax
   jz done
   js badfile
   movl %eax, size

   # send the buffer data to the conversion function
   pushl $buffer
   pushl size
   call convert
   addl $8, %esp

   # write the converted data buffer to the output file
   movl $4, %eax
   movl outfilehandle, %ebx
   movl $buffer, %ecx
   movl size, %edx
   int $0x80
   test %eax, %eax
   js badfile
   jmp read_loop
done:
   # close the output file
   movl $6, %eax
   movl outfilehandle, %ebx
   int $0x80

   # close the input file
   movl $6, %eax
   movl infilehandle, %ebx
   int $0x80
badfile:
   movl %eax, %ebx
   movl $1, %eax
   int $0x80

# convert lower case letters to upper case
.type convert, @function
convert:
   pushl %ebp
   movl %esp, %ebp
   movl 12(%ebp), %esi
   movl %esi, %edi
   movl 8(%ebp), %ecx
convert_loop:
   lodsb
   cmpb $0x61, %al
   jl skip
   cmpb $0x7a, %al
   jg skip
   subb $0x20, %al
skip:
   stosb
   loop convert_loop
   movl %ebp, %esp
   popl %ebp
   ret
If you have been following along in the book, you probably recognize the assembly language function convert used in the readtest3.s program. It is basically the convert.s program used in Chapter 10, "Working with Strings." It uses the LODS instruction to load a string of bytes into the EAX register one at a time. The ESI register points to the memory location of the source string, and the EDI register points to the memory location of the destination string (they are both set to point to the same buffer area).
The convert function checks each byte to see if it is a lowercase ASCII character. If so, 32 is subtracted from the value to convert it to an uppercase ASCII character. The STOS instruction is used to store the string back in the destination memory location.
The function was rewritten as an assembly language function, taking the buffer and buffer size variables from the stack. These values are pushed onto the stack by the main program before calling the function. When the function returns, the converted bytes are located in the same buffer area, which is then written to the output file.
The readtest3.s program uses two command-line parameters. The first is the filename of the input file to convert. The second parameter is the filename of the output file. Here's an example of using the assembled program:
$ ./readtest3 cpuid.txt test.txt
$ cat test.txt
THE PROCESSOR VENDOR ID IS 'GENUINEINTEL'
THE PROCESSOR VENDOR ID IS 'GENUINEINTEL'
$ cat cpuid.txt
The processor Vendor ID is 'GenuineIntel'
The processor Vendor ID is 'GenuineIntel'
$
The output file contains the converted data from the input file. Because the readfile3 program uses the same block reading method as the readfile2 program, you can use this program to convert any size of text file you want.
You may have been unfortunate enough to notice a problem with the readtest3 program. If you made the mistake of trying to use the same filename as the input and output filename, here's what happened:
$ ./readtest3 cpuid.txt cpuid.txt
$ echo $?
0
$ cat cpuid.txt
$ ls -l cpuid.txt
-rw-r--r--    1 rich     rich            0 Oct  6 15:00 cpuid.txt
$
The program ran and did not produce an error code, but the output file was empty. It exists, but has no output data in it.
The problem is that the system cannot simultaneously write the data to the same file it is reading. There are many applications for which it is necessary to update a file. If you need to use this function within your application, there are a few different ways to get around it. One method is called memory-mapped files.
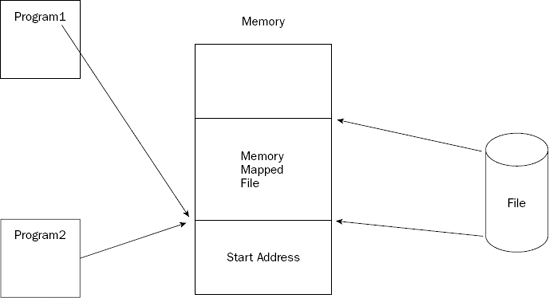
Memory-mapped files use the mmap system call to map parts of a file into memory on the system. Once the file (or part of the file) is placed in memory, programs can access the memory locations using standard memory-access instructions, and modify them if necessary. The memory locations can be shared by multiple processes, enabling multiple programs to update the same file simultaneously. This is shown in Figure 16-3.
After the file is loaded into memory, the operating system controls who has what type of access to the memory area. The contents of the memory-mapped file can be written back to the original file, replacing the contents of the file with the contents from the memory-mapped file. This is a quick and easy way to update files of almost any size (up to the virtual memory limits of the system).
The mmap system call is provided to create memory-mapped files. The format of the mmap system call is as follows:
void *mmap(void *start, size_t length, int prot, int flags, int fd, off_t offset);
Here are the input values:
start:Where in memory to map the filelength:The number of bytes to load into memoryprot:The memory protection settingsflags:The type of mapped object to createfd:The file handle of the file to map to memoryoffset:The starting point in the file to copy to memory
The start value can be set to 0 to enable the system to choose where to place the memory-mapped file in memory. If the offset value is set to 0 and the length value is set to the size of the file, the entire file is mapped to memory. The mmap function is heavily dependent on the system memory page size. If the length value does not fill an entire page (or fills multiple pages with a non-full page left over) the remainder of the page is zero-filled. If an offset value is used, it must be a multiple of the system page size.
The prot value contains settings to determine the access privileges allowed to the memory-mapped file (similar to the access privileges used in the open system call). The available values to use are shown in the following table.
Protection Name | Value | Description |
|---|---|---|
PROT_NONE | 0 | No data access is allowed. |
PROT_READ | 1 | Read access is allowed. |
PROT_WRITE | 2 | Write access is allowed. |
PROT_EXEC | 4 | Execute access is allowed. |
The flag's value defines how the operating system controls the memory-mapped file. Many different flags can be used, but the two most common are shown in the following table.
Flag Name | Value | Description |
|---|---|---|
MAP_SHARE | 1 | Share changes to the memory-mapped file with other processes. |
MAP_PRIVATE | 2 | Keep all changes private to this process. |
There is also one other huge difference between these two modes. The MAP_SHARE flag instructs the operating system to write any changes made to the memory-mapped file to the original file. The MAP_PRIVATE flag disregards any changes made to the memory-mapped file when it is closed. While this may seem odd, it actually comes in handy if you need to create a temporary file that requires quick access.
The changes are not written to the original file at the time they are made to the memory-mapped file. This is an important point to remember. Two system calls are used to ensure that the data in the memory-mapped file is written to the original file:
msync: Synchronizes the original file to the memory-mapped filemunmap: Removes the memory-mapped file from memory and writes any changes to the original file
If you are planning to keep the memory-mapped file in memory for a long period of time after any changes are made, it is a good idea to use the msync system call to ensure that the changes have been written to the file. If the program or operating system should crash before either the msync or munmap system calls are made, any changes made to the memory-mapped file will not be made to the original file.
The msync and munmap system calls have similar formats:
int msync(const void *start, size_t length, int flags);
int munmap(void *start, size_t length);
The start input value is the starting point in memory where the memory-mapped file is located. This value is returned by the mmap system call. The length input value is the number of bytes to write to the original file. The msync flags input value enables you to define how the updates are made to the original file:
MS_ASYNCUpdates are scheduled for the next time the file is available for writing, and the system call returns.MS_SYNCThe system call waits until the updates are made before returning to the calling program.
An important point to remember is that the memory-mapped file cannot change size from the original file.
Using the mmap system call in assembly language requires that you use the format shown in Chapter 12, "Using Linux System Calls." You must know the system call values found in the unistd.h file to place in the EAX register before performing the Linux system call. The system call values for the mmap system calls are shown in the following table.
System Call | Value |
|---|---|
mmap | 90 |
munmap | 91 |
msync | 144 |
However, there is one problem with using the standard Linux system call format as shown in Chapter 12 and the mmap system call. While most system calls use the general-purpose registers for input values, system calls that have more than five input values cannot (there are not enough registers to use).
Instead, system calls that have more than five input values (such as mmap) read input values from a structure defined in memory. Each of the input values is placed in memory in order, starting at a specific memory location. The starting point of the memory structure is placed in the EBX register before the system call is made. This is shown in Figure 16-4.
The input values can either be placed in a separately defined memory location or pushed onto the normal program stack before the function call. If the values are pushed onto the stack, remember to place them in opposite order (from right to left) on the stack. You must also remember to remove them from the stack (move the ESP pointer back) when the system call returns.

The template to use for the mmap system call looks something like this:
pushl $0    # offset of 0
pushl filehandle   # the file handle of the open file
pushl $1     # MAP_SHARED flag set to write changed data back to file
pushl $3     # PROT_READ and PROT_WRITE permissions
pushl size   # the size of the entire file
pushl $0     # Allow the system to select the location in memory to start
movl %esp, %ebx   # copy the parameters location to EBX
movl $90, %eax    # set the system call value
int $0x80
addl $24, %esp
movl %eax, mappedfile   # store the memory location of the memory mapped file
This example creates the memory-mapped file containing the entire file, enabling the process to both read and write data to it, and enabling all updates to be stored in the original file. The return value from the system call is in the EAX register and points to the memory location for the start of the memory-mapped file. This value can be stored and then used as any other memory location, such as the buffer location used in the readtest programs.
To unmap the file from memory, the format for the unmap system call is as follows:
movl $91, %eax
movl mappedfile, %ebx
movl size, %ecx
int $0x80
Because the munmap system call only uses two input values, they can be placed in the EBX and ECX registers before the system call is made. The munmap system call will return a value of zero if it successfully writes the data back to the file. If not, it will return a value of −1.
This section demonstrates how to use the mmap system call to map an entire file into memory, modify the data in the memory-mapped file, and write the data back to the original file.
Before building the main mmap program, a couple of other pieces need to be built. First, to use the mmap system call, you must know the size of the file to place in memory. You can use several different methods to determine the size of a file. One of the simplest is to use the llseek Linux system call (this is an extension of the lseek POSIX system call). A function will be created using the llseek Linux system call to calculate the file size, given a file handle of an open file.
Second, there must be a function to modify the memory-mapped file data so we know it was properly placed back into the file when we are done. The convert function from the readtest3.s program should do nicely, with a few modifications to make it a proper C-style assembly language function.
The llseek system call attempts to advance the file pointer to a specific place in the file. You can instruct the llseek system call to advance the pointer to the end of the file, and see how many bytes that point is from the start of the file.
The llseek system call has the following format:
int_llseek(unsigned int fd, unsigned long offset_high, unsigned long offset_low,
            loff_t *result, unsigned int whence);
The fd input value is the file handle of the file. The offset_high and offset_low values define the high and low longs of an offset value from the start of the file. Because we are using the system call to determine the entire size of the file, we will use zeros for these values. The result input value is somewhat misleading. It is the address of a memory location where the result of the system call will be stored.
The whence input value is what determines where in the file the llseek system call will go. The value we are interested in is SEEK_END, which has a value of 2.
The sizefunc.c function uses the llseek system call to determine the size of a file:
# sizefunc.s - Find the size of a file
.section .text
.globl sizefunc
.type sizefunc, @function
sizefunc:
   pushl %ebp
   movl %esp, %ebp
   subl $8, %esp
   pushl %edi
   pushl %esi
   pushl %ebx
movl $140, %eax
   movl 8(%ebp), %ebx
   movl $0, %ecx
   movl $0, %edx
   leal −8(%ebp), %esi
   movl $2, %edi
   int $0x80
   movl −8(%ebp), %eax

   popl %ebx
   popl %esi
   popl %edi
   movl %ebp, %esp
   popl %ebp
   ret
The first set of instructions performs the normal C-style function prologue functions, including reserving four bytes of space on the stack for a local variable (see Chapter 14, "Calling Assembly Libraries"). The local variable is used as the result value from the llseek system call.
The sizefunc function assumes the file handle of the file to check is passed as the first input value when it is called (location 8(%ebp)). The location of the local variable (−8(%ebp)) is placed in the %esi register using the LEA instruction (the local variable must be 8 bytes long because the llseek function returns the file size as a long value). When the system call completes, the size of the file will be in the local variable, which is then moved to the EAX register. This is the value that is returned to the calling program.
The convert function was modified to be a proper C-style function, and is shown in the convertit.s program:
# convert.s - A function to convert lower case letters to upper case
.section .text
.type convert, @function
.globl convert
convert:
   pushl %ebp
   movl %esp, %ebp
   pushl %esi
   pushl %edi

   movl 12(%ebp), %esi
   movl %esi, %edi
   movl 8(%ebp), %ecx

convert_loop:
   lodsb
   cmpb $0x61, %al
   jl skip
   cmpb $0x7a, %al
   jg skip
   subb $0x20, %al
skip:
   stosb
   loop convert_loop
pop %edi
   pop %esi
   movl %ebp, %esp
   popl %ebp
   ret
After the standard C-style function prologue stuff, the input values are read from the stack. First the location of the buffer is read and stored in the ESI register, and then the size of the file is read and stored in the ECX register. The next section performs the conversion function, walking through the buffer changing lowercase ASCII letters into uppercase ASCII letters. When the end of the buffer has been reached, the standard C-style function epilogue instructions are performed, and the function returns to the calling program.
Now that you have all of the required pieces, it's time to write the complete application. The fileconvert.s program converts the text in a file from lowercase to uppercase:
# fileconvert.s - Memory map a file and convert it
.section .bss
   .lcomm filehandle, 4
   .lcomm size, 4
   .lcomm mappedfile, 4
.section .text
.globl _start
_start:
   # get the file name and open it in read/write mode
   movl %esp, %ebp
   movl $5, %eax
   movl 8(%ebp), %ebx
   movl $0102, %ecx
   movl $0644, %edx
   int $0x80
   test %eax, %eax
   js badfile
   movl %eax, filehandle

   # find the size of the file
   pushl filehandle
   call sizefunc
   movl %eax, size
   addl $4, %esp

   # map file to memory
   pushl $0
   pushl filehandle
   pushl $1     # MAP_SHARED
   pushl $3     # PROT_READ | PROT_WRITE
   pushl size   # file size
   pushl $0     # NULL
   movl %esp, %ebx
   movl $90, %eax
   int $0x80   test %eax, %eax
   js badfile
   movl %eax, mappedfile
   addl $24, %esp
# convert the memory mapped file to all uppers
   pushl mappedfile
   pushl size
   call convert
   addl $8, %esp

   # use munmap to send the changes to the file
   movl $91, %eax
   movl mappedfile, %ebx
   movl size, %ecx
   int $0x80
   test %eax, %eax
   jnz badfile

  # close the open file handle
   movl $6, %eax
   movl filehandle, %ebx
   int $0x80

badfile:
   movl %eax, %ebx
   movl $1, %eax
   int $0x80
The complete program uses the two helper functions, plus the mmap and munmap system calls. Each instruction section in the code performs a single function in the application. The steps are as follows:
Open the file with read/write access.
Determine the size of the file using the
sizefuncfunction.Map the file to memory using the
mmapsystem call code.Convert the memory-mapped file to all uppercase letters.
Write the memory-mapped file to the original file using
munmap.Close the original file and exit.
Because the programs do not use any C functions, you can just assemble them and link them:
$ as -o sizefunc.o sizefunc.s
$ as -o convert.o convert.s
$ as -o fileconvert.o fileconvert.s
$ ld -o fileconvert fileconvert.o sizefunc.o convert.o
$ cat cpuid.txt
The processor Vendor ID is 'GenuineIntel'
The processor Vendor ID is 'GenuineIntel'
$ ./fileconvert cpuid.txt
$ cat cpuid.txt
THE PROCESSOR VENDOR ID IS 'GENUINEINTEL'
THE PROCESSOR VENDOR ID IS 'GENUINEINTEL'
$
You can test the fileconvert program on any text file you like. Just remember that the original file will be converted to uppercase, so you may want to copy it before playing around.
Because the fileconvert program uses system calls, you can use the strace program (described in Chapter 12) to watch the system calls made while it is running:
$ strace ./fileconvert test.txt
execve("./fileconvert", ["./fileconvert", "test.txt"], [/* 38 vars */]) = 0
open("test.txt", O_RDWR|O_CREAT, 0644)  = 3
_llseek(3, 0, [1419], SEEK_END)         = 0
old_mmap(NULL, 1419, PROT_READ|PROT_WRITE, MAP_SHARED, 3, 0) = 0x40000000
munmap(0x40000000, 1419)                = 0
close(3)                                = 0
_exit(0)                                = ?
$
Notice that the strace program shows the C-style version of the system calls, complete with the input values the program passed to them, and the return values generated. This is an excellent troubleshooting tool to use if you have problems with your system calls.
This chapter discussed using Linux system calls to handle file input and output in an assembly language program. Linux provides many different system calls that can be used to manipulate files. Before using a file, you must use the open system call. The open system call attempts to open a file on the system with defined permissions and an access type. You must remember to check the return value from the system call to ensure that there were no problems with opening the file.
Once the file is open, you can use the write system call to write data to the file. How the data is written to the file depends on the access type used in the open system call. You can either append new data to the end of an existing file or you can overwrite the existing file with the new data. Again, attention must be paid to the system call return value to ensure that the write instruction performed properly.
The read system call enables you to read data from a file and place the data in a memory buffer. You must specify how many bytes of the file to read from a single read system call. If the value is less than the number of bytes in the file, a file pointer is used to keep track of where the read system call left off, and another read system call will start reading data from that point in the file. If the value is more than the number of bytes in the file, the remaining bytes will be copied into the memory buffer, and the read system call return value will indicate how many bytes were read. If the return value is zero, you have reached the end of the file.
Many assembly language programs perform a complicated sequence of reading data from a file into a memory buffer, processing the data (by either modifying it or scanning it), and then writing data back out to either another file or the STDOUT console display. This sequence of events can be incorporated into a loop, reading blocks of data from the file, processing them, and writing them back out to another file. Each block of data is processed individually from the other blocks, performing the necessary processes on the block of data contained within the memory buffer.
Rather than manually reading blocks of data into a memory buffer and processing the data, UNIX systems provide a system call that enables you to read the contents of an entire file into memory at once (assuming the file size is less than the virtual memory size). This technique is called memory mapping. Once the file is mapped to memory, any number of different programs can scan and modify the data contained within the memory-map block. When the processing is done, you can choose to replace the original file with the modified memory-mapped file. This is an excellent technique to use to quickly modify large files.
The final chapter in this book dives into the advanced world of IA-32 MMX and SSE programming. The Intel MMX, SSE, SSE2, and SSE3 technologies provide programmers with advanced methods for processing large amounts of data quickly. Chapter 17 describes these technologies and demonstrates how they can be used in assembly language programs.