Chapter 12. Model-Driven Development with LCDS ES2
A computer is a stupid machine with the ability to do incredibly smart things, while computer programmers are smart people with the ability to do incredibly stupid things. They are, in short, a perfect match.
This chapter introduces you to the model-driven development workflow of LiveCycle Data Services ES2 (a.k.a. LCDS 3). The authors of this book are huge proponents of automated code generation wherever possible, and we applaud Adobe for moving in this direction. We believe that if this “stupid machine” is given the right instructions in the first place, it can generate smart code over and over again and free “smart programmers” to make their mistakes elsewhere.
Note
This chapter is not intended to be a detailed tutorial on building a sample application. Instead, we’ll highlight the key points and provide some sample configuration files that are important to understanding the process of model-driven development with LCDS 3.
If this leaves you hungry for more detail, you can consult several sources online. For example, at Adobe MAX 2009, Christophe Coenraets demonstrates the entire step-by-step process of model-driven development with Flash Builder 4 and LCDS 3. You can watch a recording of it at http://2009.max.adobe.com/online/session/277. A nicely written tutorial by Justin Shacklette, “Getting Real with LCDS 3,” was published at O’Reilly’s InsideRIA (http://www.insideria.com/2009/12/getting-real-with-lcds-3-beta.html and http://www.insideria.com/2009/12/getting-real-with-lcds-3-part.html).
Two major features that come with LCDS (but not BlazeDS) are support of RTMP and Data Management Services (DMS). Until LCDS version 2.6, however, DMS automated most of the work of Flex developers, but the server-side code had to be written manually. LCDS 3 introduces model-driven development in which not only is the entire CRUD application creation process automated, but Flash Builder 4 also includes a Modeler, which enables you to generate such applications just by working with a UML-like diagram. This chapter provides a high-level overview of this new workflow. In addition, you can easily find a number of articles and video tutorials online that contain step-by-step instructions on how to build an application using the LCDS 3 modeling tools and code generators.
Note
The graphical Modeler tool is used not only in Flash Builder, but also in Adobe LiveCycle Workbench ES2.
Besides the model-driven workflow, LCDS ES2 offers many other welcome features for enterprise developers, including:
Reliable messaging (implemented via
AdvancedChannelSet), which guarantees that no messages are lost in case of network failures. This mode also guarantees that the messages arrive properly ordered.Throttling, which restricts the number of messages that are being sent between the server and client per second. This is important in network congestion situations to prevent servers from flooding the clients with messages (the same is true for the client-to-server data flows).
An EDGE server, which can be deployed in the enterprise DMZ and can forward the messages of authenticated clients to other LCDS servers located in the secure zone behind the DMZ.
A load-test Java NIO testing tool, which allows Flex developers to emulate heavy server-side hits by multiple clients.
In this chapter, we’ll talk about model-driven development with LCDS. All features of LCDS 3 are described in the product documentation, available at http://www.adobe.com/products/livecycle/dataservices/.
Introduction to Model-Driven Development
LCDS ES2 eliminates the situation in which the client and server code don’t know much about each other (LCDS 2.6 and earlier) and lots of code has to be written manually by software developers on both the client and the server sides.
For example, this version of LCDS doesn’t require the manual creation of the same DTO on both the ActionScript and Java sides. You don’t need to manually create similar validators in Flex and Java. You don’t need to implement security in both in the Flex and Java classes. Now all this can be done at the Model level, abiding by the DRY principle of software engineering: Don’t Repeat Yourself.
Note
The DRY principle was introduced by Dave Thomas and Andy Hunt in their book The Pragmatic Programmer (Addison-Wesley Professional). It suggests that every piece of knowledge must have a single, unambiguous, authoritative representation within a system.
If the code generator and the tool know everything about the data, let them take care of the mundane task of writing tons of the boilerplate code and free yourself for implementing application-specific functionality.
Starting Model-Driven Development with Flash Builder 4
In the Flash Builder 4/LCDS 3 environment, the process of model-driven development starts with creating and saving a model. The model file gets deployed and code generators generate both client and server code, technically creating a CRUD application. In the next several pages, we’ll highlight some of the milestones of this process.
You start by creating a new Flash Builder 4 project, selecting J2EE as a server-side technology, and pointing Flash Builder to the Java servlet container (that is, Apache Tomcat) where LCDS 3 is installed.
While highlighting the major steps of a model-driven workflow,
we’ll assume that you want to populate a DataGrid with the data coming from the server
applying the model-driven workflow. You can do this with Flash Builder’s
new Data Services view. Remember, by “data service” we mean anything
that can return the data.
As long as you know the API from which to get the data—that is,
getEmployees()—it falls into a data
service category. We’re going to touch on modeling a new data service,
rather than working with an existing data service (such as SQL or
WebService). This way, you can start the model in the new Data Model
perspective, which allows you to create a model in both Design and
Source Code modes.
There is a new XML-based modeling language, which allows you to define the model for your application, save underlying XML in the file with the extension .fml, and deploy it on your LCDS 3 server. Typically, you’ll be creating the model in the Design view of Flash Builder, and the XML code supporting the model will be generated automatically. But the Source Code view will let you see and manually modify, if need be, the model’s XML. You can find a detailed explanation of all elements of this XML-based language at http://help.adobe.com/en_US/LiveCycleDataServicesES/3.0/Modeling/index.html.
Data Sources and RDS
You can open the Modeler by clicking the Model icon in Flash Builder’s Package Explorer and selecting the Data Model view. Any data modeling tool needs to know where the data resides, and you have two options here. You can create a model and automatically generate database tables in an empty database, if you have configured the data source. Alternatively, if you already have a database with tables, the Modeler will introspect the data and build the entities required for the model.
In either case, to work with a relational DBMS using Java, you need to configure JDBC data sources. We’ve tested this workflow using Apache Tomcat and MySQLServer DBMS, and our data source configuration to the database test for the user dba with the password sql looked as shown in Example 12-1.
<Context priviledged="true" antiResourceLocking="false"
   reloadable="true">
 <!-JOTM -->
 <Transaction factory="org.objectweb.jotm.UserTransactionFactory"
    jotm.timeout="60" />
 <Resource name="jdbc/test" type="javax.sql.DataSource"
     driverClassName="com.mysql.jdbc.Driver"
     url="jdbc:mysql:localhost:3306/test?autoReconnect=true"
     username="dba" password="sql" maxActive="20" maxIdle="10"
     maxWait="-1"
 />
</Context>
Flash Builder’s Modeler will be able to access such data sources with the help of the server called Remote Development Services (RDS). After installing LCDS 3 in the Java Servlet container, you’ll need to uncomment the RDS section shown in Example 12-2 in web.xml.
<servlet>
<servlet-name>RDSDispatchServlet</servlet-name>
<display-name>RDSDispatchServlet</display-name>
<servlet-class>
   flex.rds.server.servlet.FrontEndServlet
</servlet-class>
<init-param>
   <param-name>useAppserverSecurity</param-name>
   <param-value>false</param-value>
</init-param>
<load-on-startup>10</load-on-startup>
</servlet>
<servlet-mapping id="RDS_DISPATCH_MAPPING">
  <servlet-name>RDSDispatchServlet</servlet-name>
  <url-pattern>/CFIDE/main/ide.cfm</url-pattern>
</servlet-mapping>
Now, when the servlet container with LCDS starts, it’ll launch the
RDSDispatchServlet, which
serves as a means of communication with Flash Builder Modeler. This
RDSDispatchServlet tells the Modeler
about its configured data sources; in the case of Apache Tomcat, this is
in context.xml. Refer to the
documentation for your Java Servlet container to learn how to configure
data sources there.
The RDS server has to be configured in the Preferences panel of Flash Builder, as shown in Figure 12-1.

Figure 12-2 shows the RDS Data view of the Modeler that successfully connected to the test database configuration shown in Example 12-1.

If you drag one or more tables from the RDS view onto the Design perspective of the Modeler, you’ll get the entity model of your data source with all relationships between them. Figure 12-3 shows how the Employee entity was generated based on the employee database table.

If you drag one more table department, all primary/foreign key relations defined in DBMS will turn into associations—lines connecting model entities. An association has properties (e.g., cardinality), and you can specify whether the association is uni- or bidirectional.
To assign validation rules to any of the Employee’s properties, right-click on the property and enter the validation expression in the Styles panel.
You can also add to an entity so-called variants, which in other software tools are often called computed fields. Writing expressions for variants requires familiarity with the syntax of the expression language described in the product documentation. You can also use the graphical Expression Builder of Flash Builder 4.
Note
If an entity has a unique id
property, it’s considered a persistent entity. In other words, you can
save the changes to the entity’s data on some media on the server
side. Find the section <annotation> in the source code of the
generated model; you’ll see that by default, the entity will be
manipulated using Java’s JDBC notation with the help of the Hibernate
dialect (HSQLDialect). To change
the defaults and use custom classes as server-side assemblers, refer
to the annotations section
in the Adobe Application Modeling Technology Reference.
If you want to create a new table in DBMS, right-click somewhere in the blank area of the Model view and select New Entity.
Now you can save and deploy this model (the .fml file) in the LCDS server (this .fml file will be physically copied to the
server). Because the plan is to display the data in a Flex view that
will consist of the DataGrid and a
Form, call it masterDetailForm as in Figure 12-4.
Note the group of radio buttons in Figure 12-4. If you are building the model from an existing database, the Unchanged option is selected. When you need to modify existing database entities, choose Update; to create new ones, choose Create/Recreate.
After deploying the model, Flash Builder, with help of Fiber, generates code on both the server and the client sides. On the server side, it generates a service with a number of methods based on the properties of the deployed entities. It also generates destinations, assemblers, endpoints, and whatever else you wrote manually in earlier versions of LCDS; the difference is that Flash Builder does not create any custom Java classes on the disk. On the client side, Flash Builder deploys the model in the .model directory of your Flash Builder project and generates ActionScript classes acting as proxies for the service operations.
Figure 12-5 depicts
the service EmployeeService with a
number of generated methods. It’s easy to guess that the method getAll() is for retrieval of all employees
from the database table Employee.

Drag the getAll() method from
the Data Services view onto the DataGrid in the Design view, and you’ll see
that the DataGrid will display the
right-column names as defined in the entity Employee. Run the application, and the
DataGrid will be populated with data
from the database. No coding has been required.
What Has Been Generated?
What would you do after seeing the view shown in Figure 12-5? Chances are good
that a Java developer would immediately try to find the generated Java
class EmployeeService. But she wouldn’t find it,
because the Modeler generated Java access code in memory. So how does
the whole thing work? This data service has been generated from your
deployed model in the server’s memory.
LCDS 3 includes a popular object-relational mapping framework
called Hibernate, which is responsible for the data
retrieval and persistence, but the code for the EmployeeService itself is generated and
interpreted during the runtime in memory only.
On one hand, it’s great: now even people who don’t know Java can use LCDS. On the other hand, you are now completely dependent on the quality of this generated code. If the Java sources of the data service existed and something went wrong, you (as the Java developer) could debug and fix it. Because LCDS 3 was architected differently, you are at the mercy of the software engineers who created these code generators.
In the 1990s, the authors of this book had a very positive experience with the client/server tool PowerBuilder from Sybase, which was architected similarly. We didn’t see the generated code, but everything worked fine there. We hope that the quality of the generated LCDS code will be as good as it was in PowerBuilder.
On the client side, although the Flex code has been generated, you’ll be able to find classes for the DTOs and the ActionScript stubs that are required to support all CRUD operation communicating with the server-side methods from the data service. Generated DTOs are split into a superclass and its descendant; the superclass can be regenerated by the Modeler as often as needed, while the subclass, the descendant, is a placeholder for the custom code of an application developer.
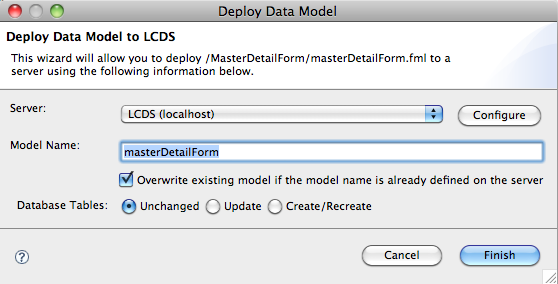
Creating Master/Detail/Search View
The function getAll() populated
the grid. To make this exercise a bit more complicated, you can add a
Master/Detail view and search functionality to this view. When an
employee is selected (say, Kristen Coe in Figure 12-6), you want to populate the form with
detailed information on this person. This form should be editable and
support data persistence (for example, the ability to update, delete,
and add a new employee) on the server side.
Right-click on the Employee entity in the Design view of the Modeler. Note the section Data Types above the function names (see Figure 12-5). Because the Employee entity has the data from only one table, you’ll see Employee as the only data type there. In a more generic case, you might have several data types there.
Right-click on the Employee data type and select the menu Generate Form. The resulting pop-up window asks you to select either Flex Form or Model Driven Form. If you select Flex Form, the generated code will contain only basic Flex form attributes; this form can be used in non-LCDS 3 applications.
You can also select the Model Driven Form option so that the code
generator can use the extended attributes of the model (such as
validations and associations). In either case, you’ll see newly
generated form next to the DataGrid.
The form has the same fields as the Employee entity. Switch to the source code
perspective and bind it to the DataGrid by adding to the <forms> tag the following
property:
valueObject="dataGrid.selectedItems as Employee"
where dataGrid is an id of the DataGrid with employees.
Run the application and you’ll see that selecting a row in the
DataGrid shows all the data about
this employee, as seen in the form in Figure 12-6.

If the entity Employee had an association with the entity Department, the generated form would contain a drop-down populated with departments. As you may remember, in order to achieve the same functionality with BlazeDS, we had to come up with the idea of resources (see Example 64), but in LCDS 3 using associations is even simpler.
The generated form displays all required form items in one column. The good news is that you can customize the template used for the form generation to make it as fancy as needed. Fiber uses templates generated by a template engine called FreeMarker, and you can tweak the form’s template as you wish.
Try to add a new employee using the form shown earlier. Clicking the Add button makes a server call to save a new row in the underlying database table.
Queries in this Modeler are called filters.
Defining a filter on the entity serves the same purpose as, say, writing
a Select statement against an RDBMS.
One entity can have multiple filters, which makes sense, because you
need to be able to retrieve more than one data set (for example, show
all employees or show only employees from New York) on the same data
entity.
Of course, you don’t always want to display all the data. What if
you’d like to filter the data based on some criterion? For example, you
may want to find all employees who have specific letters in their names.
In the SQL world, you’d use the like
keyword for this.
The generated function getByEmpLName() shown previously in Figure 12-5 can help only if you
know the exact last name you want, but not when you want to search just
by a couple of letters.
To specify more complex filters, just open the properties sheet of
the model by going back to the Data Model view, clicking the Employee
model and referring to the panel in the bottom left, and creating a new
filter as shown in Figure 12-7. In this
case, we want to find a particular text pattern in both first (empFname) and last (empLname) names. The Flex code provides the
argument searchModel, which contains
the text to search for.

Java EE developers may recognize the jpql prefix in the Query expression. Yes, this
is the Java Persistence Query Language used in the Java persistence
framework to define queries over entities independent of the syntax of
the particular database you store the data in.
You could’ve specified the search criteria in the Criteria Expression field shown in Figure 12-7, but JPQL allows you to create a lot more complex queries, which are also called pass-through filters. To get familiar with the expression syntax for filters, refer to the online manual “Application Modeling Technology Reference”.
Note
The DMS tab from Figure 12-7
enables you to configure pagination, which is a useful feature for
large result sets. The LCDS server will feed you the data in chunks
based on the configured number of records in the page and the size of
the visible portion of the UI control, that is, DataGrid.
The Modeler generates an appropriate function with a call
responder for the filter defined earlier. The rest is simple. Add a
button and a text field (say, MySearchText) on the top of the view as shown
in Figure 12-8.
On the click event of the button, make the call to the newly
generated filter function passing "%" +
MySearchText.text + "%" as an argument to the filter
expression defined in Figure 12-7.
Don’t forget to modify the dataProvider of the DataGrid to use the lastResult not from the getAll() method as it was done originally, but
from the method generated for the filter expression. With Fiber, the
result returned by the service call is placed into the property lastResult of the corresponding class CallResponder. The dataProvider of your DataGrid should get the data there.
Summary
Overall, the model-driven development workflow with LCDS 3 is a great move toward automation of creating data-driven enterprise RIA, but it is a work in progress.
After reading the first chapter of this book, you most likely got the feeling that we don’t see too much value in introducing MVC frameworks in a Flex RIA. By creating the Fiber architecture and this new model-driven design workflow, Adobe may be sending a similar message. Of course, you can use the generated view with Flex/LCDS/DBMS in conjunction with the MVC framework of your choice, but does it make much sense?
In this chapter, we’ve reviewed just one aspect of LCDS 3—model-driven development—but LCDS 3 has a number of other great improvements that will definitely make it a valuable addition to any enterprise application built with Flex and Java EE. As a matter of fact, now you don’t even have to know Java to create LCDS-based applications.
Epilogue
The book is over. We tried to discuss the most important subjects that Flex/AIR practitioners face while working on an enterprise RIA. We tried not to just give you better Flex components, but to explain how you can build similar or better ones for your enterprise-wide framework. We shared with you some not-so-obvious techniques for establishing communication between a Flex or an AIR client and the server-side systems.
We spent time explaining how to customize the networking protocols used in Flex/Java communications. We did this even though most of you can happily develop Flex RIAs without bothering much about what’s traveling over the wire. But if and when you are facing a challenge that requires changing the way Flex and Java communicate, this book will help make your project a success.
Adobe software engineers did a great job designing the Flex framework, but what’s more important is that they left all the doors open. Step in and enhance, extend, improve, and add more stuff to this great product as you see fit. Don’t be afraid!
The authors of this book would really appreciate your feedback. Please send your constructive critique and praises of this book our way.
—Yakov Fain, Victor Rasputnis, and Anatole Tartakovsky