
Mac OS X makes it easy to share your iMac with other people. Each user needs a separate user account, a private space for keeping documents, e-mail, and settings. You can apply restrictions to an account, prevent a user from seeing inappropriate content, and control what the user can do with the iMac.
Create a User Account for Another User 30
Configure Your iMac So Several People Can Use It 32
Share Your iMac with Fast User Switching 34
Turn On Parental Controls for an Account 36
Choose Which Applications a User Can Run 38
Prevent a User from Seeing Inappropriate Content 40
Control Whom a User Can E-mail and Chat With 42
Set Time Limits for Logging On 44
See What a Controlled User Has Done on the iMac 46
The first time you run your iMac, you set up a user account for yourself with administrator privileges, which means you can configure Mac OS X. You can then create a separate user account for each other person who uses your iMac regularly. This allows users to have their own folders for documents and use the settings they prefer.
Create a User Account for Another User


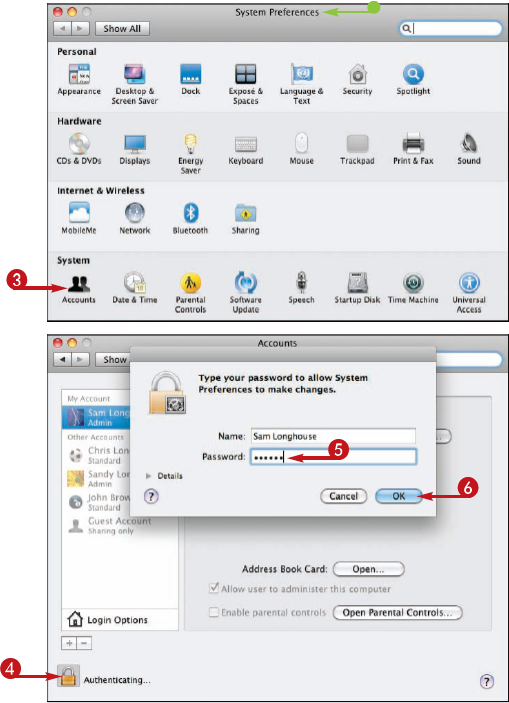
The System Preferences window opens.

Note
You must use an Administrator account to create another account. To check whether you are an administrator, see if your account shows Admin in the Accounts window.
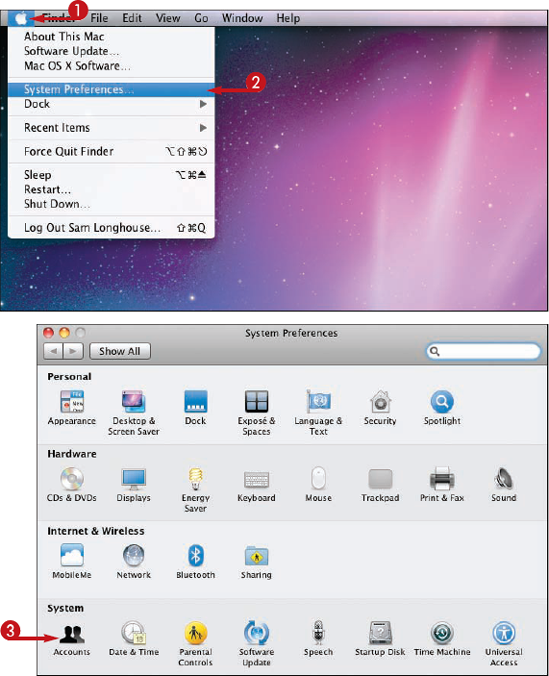
The Accounts pane opens.

System Preferences displays a dialog asking you to type your password.


The lock opens.

The New Account dialog opens.


The New Account dialog closes, and the new account appears in the Other Accounts list.

Tip
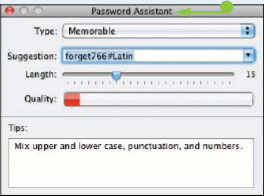
How do I choose a good password for a user?
For security, each user should choose his password after logging in. Only the user should know his password. Even you, the administrator, should not know other users' passwords. When you create a new user account, set a password to secure the account against hackers. Tell the user the password, and ask the user to create a new password the first time he or she uses the account. To change the password, the user clicks the Change Password button in the Accounts window. The Change Password dialog opens, and the user can type the new password. The user can click
When you have created an account for each user, turn on Fast User Switching so that multiple people can use the iMac without logging out. With Fast User Switching, your applications remain open in the background when another user logs in. When you log in again, you can resume where you left off.

Configure Your iMac So Several People Can Use It
The Accounts pane opens.
Note
To open the System Preferences window and unlock the settings, see the section "Create a User Account for Another User," earlier in this chapter.
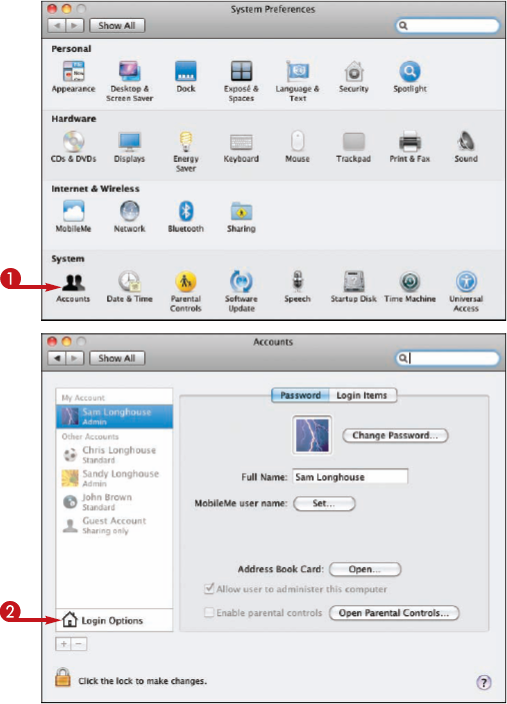
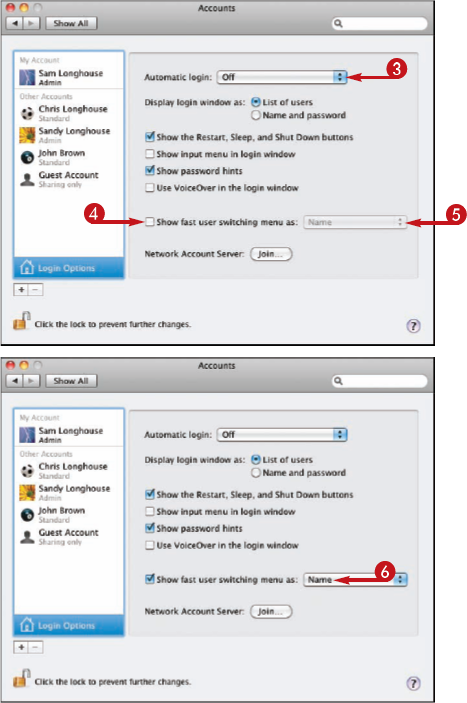
The login options pane appears.
The Show Fast User Switching Menu As pop-up menu opens.
Note
Using names for the Fast User Switching menu is clearest but takes most space on the menu bar. Short names are more compact, and icons are most compact.
Fast User Switching is now enabled.
Tip
Why should I not use automatic login with Fast User Switching?
Automatic login lets anyone who can turn on your Mac use the account set for automatic login. So when you turn on Fast User Switching, choose Off in the Automatic Login pop-up menu to ensure that whoever logs in to the iMac uses his own user account.
Are there any disadvantages to Fast User Switching?
Fast User Switching saves time and effort when several users need to share your iMac, but it can make your iMac run more slowly because applications are open in both the current user's session and any sessions running in the background. If your iMac runs too slowly, try turning Fast User Switching off and see if performance improves. You may also be able to improve performance with Fast User Switching on by adding RAM to your iMac.
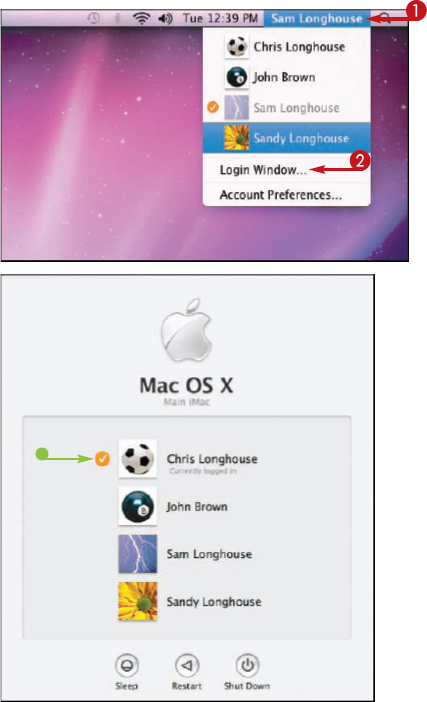
When Fast User Switching is switched on, two or more users can use your iMac without logging out. Only one user can use the keyboard, mouse, and screen at a time, but each other user's computing session keeps running in the background, with all her applications still open.

Share Your iMac with Fast User Switching
Log In to the iMac
Mac OS X prompts you for your password.
Your desktop appears.


Any of the iMac's users can log on by clicking his user name.
Tip
What is the quickest way to switch to my user account?
If another user has left her user session displayed, you do not need to go to the login window.

How can I log another user out so that I can shut down?
From the login window, you can see which other users are logged in to the iMac. If possible, ask each user to log in and then log out before you shut down. If you must shut down the iMac, and you are an administrator, click Shut Down in the login window. Mac OS X warns you that there are logged-in users. Type your name and password, and click Shut Down.
Parental controls are settings you as an administrator can apply to limit the actions that a user can take on the iMac. For example, you can prevent the user from running certain applications, allow her only to e-mail and chat with specific people, or prevent her from using the iMac at night.

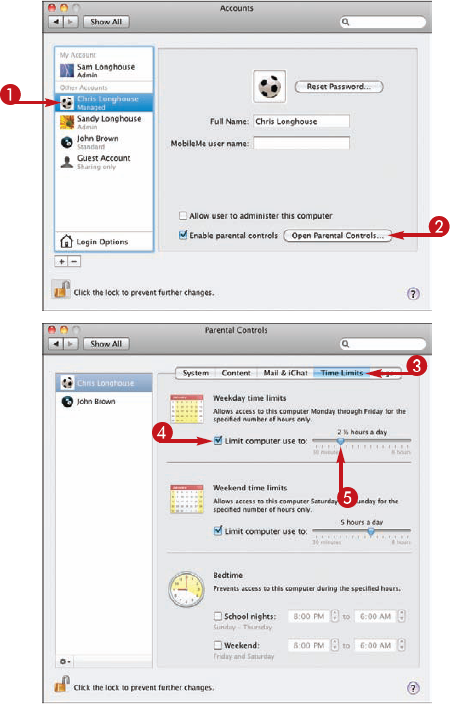
Turn On Parental Controls for an Account
The Apple menu opens.
The Accounts preferences pane opens.
The Authenticate dialog opens.

The settings for the account appear.
You can now choose parental control settings as described in the following four sections.

Tip
Can I apply parental controls to any user account?
You can apply parental controls to any Standard user account. To apply parental controls to an account, you must use an Administrator account. You cannot apply parental controls to an Administrator account, but you can downgrade an Administrator account to a Standard account, and then apply the controls to the Standard account. Your iMac must always have one Administrator account to manage the other user accounts.
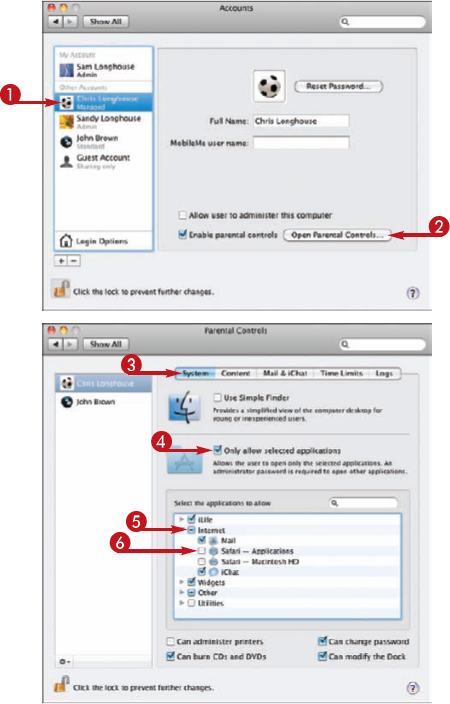
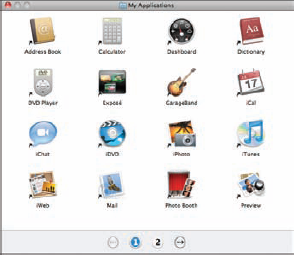
An effective way of limiting the actions users can take is by letting them use only some of the applications and utilities installed on the iMac. Parental controls let you choose exactly which applications the user can run. For example, if the user may not communicate via instant messaging, you can make iChat unavailable.

Choose Which Applications a User Can Run
Note
To open the System Preferences window and unlock the settings, see the section "Create a User Account for Another User," earlier in this chapter.
The Parental Controls preferences pane opens.
The System pane appears.
The list of applications appears.
Note
To prevent the user from using an entire category of applications, click


Tip
What is Simple Finder and when should I make a user use it?
Simple Finder is a simplified version of the Finder designed for use by younger, older, or less experienced computer users. Simple Finder provides a more streamlined look with fewer choices, making it easier to find applications and folders, and prevents the user from changing important settings. Some users benefit from using Simple Finder in the long term, whereas for others it is a step toward using the regular Finder after more computing experience.
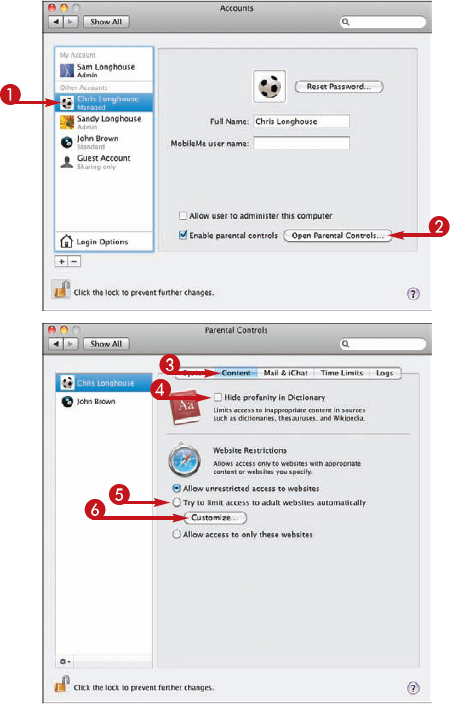
The Web includes sites containing almost every known depravity, and even the Mac OS X Dictionary contains words some people find offensive. Parental controls include settings for preventing a user from seeing inappropriate content in the Dictionary or on the Web.
Prevent a User from Seeing Inappropriate Content
Note
To open the System Preferences window and unlock the settings, see the section "Create a User Account for Another User," earlier in this chapter.
The Parental Controls preferences pane opens.
The Content pane appears.
Note
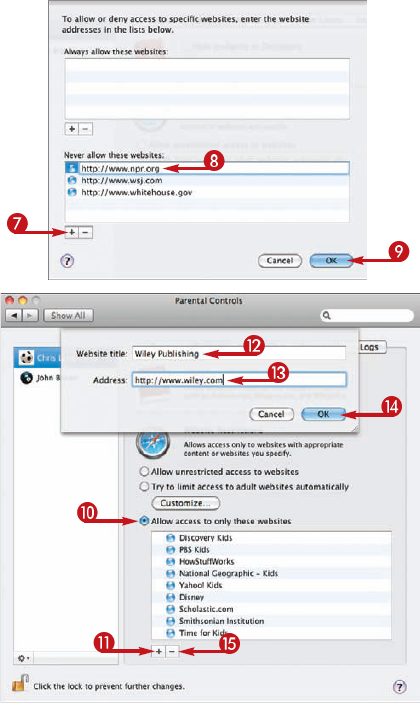
You can also add permitted addresses to the Always Allow These Websites field.
A list of inoffensive Web sites appears.


Note
When you permit a user to visit only certain Web sites, those sites appear on the Bookmarks bar in Safari.
Tip
How effective is the blocking of adult Web sites?
The blocking of adult Web sites is only partly effective. Mac OS X can block sites that identify themselves as adult sites using standard rating criteria, but many adult sites either do not use ratings or do not rate their content accurately. Because of this, do not rely on Mac OS X to block all adult material. It is much more effective to choose Allow access to only these websites and provide a list of acceptable sites. You can add to the list by vetting and approving extra sites when the user needs to access them.

When you have applied parental controls to an account, you can control the people with whom the user can exchange e-mail messages and chat. This capability is useful for protecting children and other vulnerable individuals from unsuitable e-mail messages and chat.

Control Whom a User Can E-mail and Chat With
Note
To open the System Preferences window and unlock the settings, see the section "Create a User Account for Another User," earlier in this chapter.
The Parental Controls preferences pane opens.
The Mail & iChat pane appears.

A dialog for adding allowed addresses appears.


The dialog expands to show the addresses in your address book.
The name appears in the list.
Note
To remove a name from the Only Allow E-mailing and Instant Messaging With list, click the name and then click

Tip
How effective is the blocking of e-mail and chat?
Mac OS X's blocking of e-mail and chat requests is highly effective for Mail and iChat. As long as you create a suitable list of allowed e-mail and chat addresses, you can give the user solid protection against unwanted messages and chat requests. Mac OS X does not block other e-mail and instant-messaging applications, however, so you must make sure that none are available for the user to circumvent the blocking.

After turning on parental controls, you can limit the times during which a controlled user can log on to the Mac. You can set the permitted number of hours for weekdays and weekends and define the hours during school nights and weekend nights when the user may not use the Mac.

Set Time Limits for Logging On
Note
To open the System Preferences window and unlock the settings, see the section "Create a User Account for Another User," earlier in this chapter.
The Parental Controls preferences pane opens.
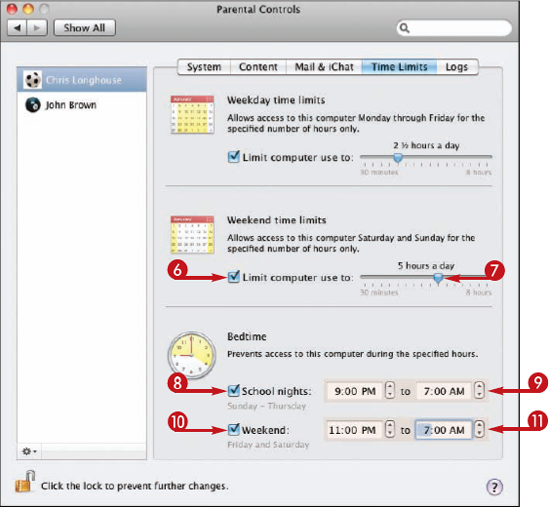
The Time Limits pane appears.
Note
You can set a weekday time limit of between 30 minutes and 8 hours a day.
Note
You can set a weekend time limit of between 30 minutes and 8 hours a day.
Note
Parental controls go strictly by the days of the week and make no exceptions for holidays and vacations.
Tip
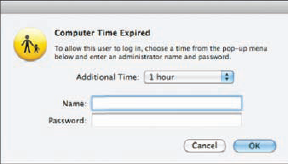
What happens if a controlled user tries to log in outside the allowed times?
If a controlled user tries to log on during blocked night hours, Mac OS X displays the Computer Time Expired dialog. An administrator can allow the user an extra period of time, from 15 minutes to the rest of the day, by typing the administrator user name and password.
What happens if a controlled user is still logged on when the time limit arrives?
Mac OS X displays the Your Computer Time Is Almost Up dialog to warn the user that he needs to log out. If the user does not have an administrator add time, log out, or switch the user by the deadline, Mac OS X switches users if Fast User Switching is turned on, or logs the user out if it is not.
Your iMac tracks the actions of each user to whose account you have applied parental controls. You can review the logs of each user's actions to decide whether the parental controls are effective, whether you need to adjust them, or whether it is time to remove them completely.

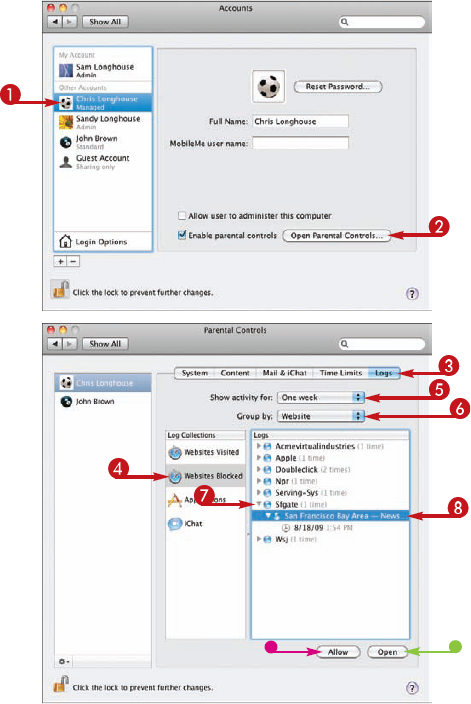
See What a Controlled User Has Done on the iMac
Note
To open System Preferences and unlock the settings, see "Create a User Account for Another User."
The Parental Controls preferences pane opens.
The Logs pane appears.
The list of blocked Web sites appears.
The list of blocked applications appears.
The list of iChat contacts appears.


Tip
Why do the restrictions I apply not take effect immediately?
Most of the restrictions you apply using parental controls do take effect immediately, but others may not take effect until the next time the user logs on and starts the application. So if the user is currently logged in using Fast User Switching, the restrictions may not take effect immediately. For best effect, apply the restrictions when the user is logged out.