
Microsoft Corporation released its C++ compiler, bundled with a set of library functions called the Microsoft Foundation Classes (MFCs) in the late 1980s. The library functions are targeted to support program development using C++ on the Windows environment. Microsoft Foundation Classes consist of a set of more than 200 classes for exploring the resources on Windows. Class is a grouping whose members consist of functions and variables. Each class has several functions for things like displaying text and graphics, creating dialog windows, and managing the events in Windows. Prior to MFC, programming on Windows was a difficult task as calls to the application program interface (API) for the Windows resources involved many low-level routines using C. MFC simplified this process as it was designed to gain control over the routines using a high-level language approach.
A window is a rectangular region on the desktop that allows the user to view the data and to navigate using the mouse. A window on the Microsoft operating system is referred to as Windows (with the first letter in capital). There are three types of windows, namely, overlapped, pop-up, and child. An overlapped window is the main window where all applications originate. A pop-up window is a small window that appears when a certain event such as a message box is invoked. A common form of a pop-up window is an error message box when a runtime error occurs. A child window is a window branching from the overlapped window for representing another series of events. Dialog boxes and push buttons are some of the most common form of child windows.

As a tradition, the name of a class in MFC is preceded by the letter C. Figure 3.1 shows some classes in MFC and their hierarchical structure. Top in the hierarchy is C0bject, which is a base class to a host of other MFC classes. A derived class from C0bject called CDC provides three important classes called CPaintDC, CClientDC, and CWindowDC, which provide the base for managing the resources in Windows. Another class called CGdi0bject has functions for creating pens, brushes, and fonts.
CWnd is another important class that is derived from C0bject via CCmdTarget. CWnd provides the creation of an overlapped window through CFrameWnd as well as its child windows in the form of resources on the CEdit, CListBox, and CButton classes. We will discuss these resources later in the subsequent chapters.
Programming on Windows requires extensive calls to the resources provided in the hardware. Before the introduction of MFC, this task is difficult as each call to the resources involves several low-level programming skills. As an improvement, MFC makes full use of a GDI, or graphics device interface, which is a layer in the Windows architecture that insulates the application from direct interaction with the hardware.
This interface has an extensive set of high-level functions that can be linked from its objects for drawing and managing graphics in Windows.
A class that is commonly derived from C0bject is CDC. In MFC, CDC is the base class for providing an interface with other classes, including CPaintDC, CClientDC, CWindowDC, and CMetaFileDC. An object abstraction called device context has been provided through these four classes, which links to the functions in CDC for supporting all the basic graphical and drawing functions on Windows. Table 3.1 describes each of these classes.
Device context is an object that is responsible for displaying text and graphics as output on Windows. In reality, a device context is a logical device that acts as an interface between a physical device (such as the monitor and printer) and the application. For achieving this task, a device context has a set of tools or attributes for putting text and drawing graphics on the screen using GDI functions. Device context is created from one of the following classes: CPaintDC, CClientDC, CWindowDC, and CMetaFileDC.
The tools in device context are represented as graphic objects such as pens, brushes, fonts, and bitmaps. Table 3.2 summarizes these objects. There are four types of device contexts in GDI: display context, memory context, information context, and printer context. A display context supports operations for displaying text and graphics on a video display. Before displaying text and graphics, a display context links with MFC functions for creating a pen, brush, font, color palette, and other devices. A memory context supports graphics operations on a bitmap and interfaces with the display context by making it compatible before displaying the image on the window. An information context supports the retrieval of a device data. A printer context provides an interface for supporting printer operations on a printer or plotter.
On Windows, everything including text is drawn as a graphics object. This is made possible as every text character and symbol is formed from pixels that may vary in shapes and sizes. This facility allows flexibility on the shape of the text by allowing it to be displayed from a selection of dozens of different typefaces, styles, and sizes. Text and graphics are managed by GDI functions that are called every time a graphics needs to be displayed on the screen.
Table 3.2. GDI objects for text and graphics.
GDI Object | Class | Description |
|---|---|---|
Pen |
| To draw a line, rectangle, circle, polyline, etc. |
Brush |
| To brush a region with a color. |
Color palette |
| Color palettes for pens and brushes. |
Font |
| To create a font for the text. |
Bitmap |
| To store a bitmap object. |
The color of an object on Windows is actually the color of a segregated set of pixels that make up the object. In MFC, the color of each pixel is controlled using the function RGB() from the CDC class. RGB() consists of three arguments in the order from left to right as the red, green, and blue components. The function is declared as follows:
RGB(int, int, int);Each component in RGB() is an integer that represents the monotone scale from 0 to 255, with 0 as the darkest value and 255 as the lightest. The monotone scales for red, green, and blue are easily obtained by blanking the other two color components, as follows:
Red, r      RGB(r,0,0)
Green, g    RGB(0,g,0)
Blue, b     RGB(0,0,b)
The three colors are the primitive colors for other color combinations. Figure 3.2 shows a hypercube that represents color combinations with axes at red, green, and Blue. Yellow is obtained by setting r=g and b=0, whereas r=0, g=255, and b=255 produces cyan. A solid black color is obtained by setting r=g=b=0, whereas r=g=b=255

produces pure white. It is obvious from this hypercube that a grayscale color is obtained by setting r=g=b, in RGB(r,g,b), which corresponds to a position along the diagonal line from (0,0,0) to (255,255,255) in the hypercube.
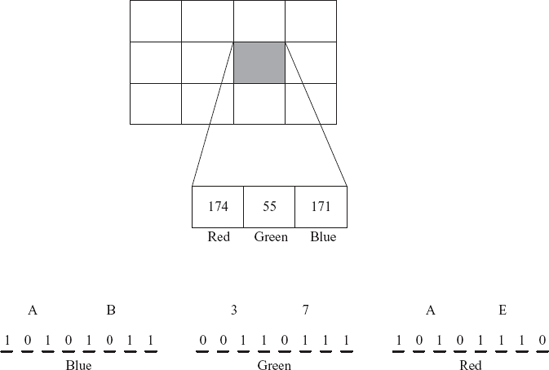
In Windows, a graphical object is formed from a rectangular composition of pixels of varying intensity. Each pixel displayed on Windows is represented by a string consisting of 24 bits of binary digits that is represented in MFC by RGB(). The first eight bits in the string starting from the right form the red component. This is followed by eight bits of green in the middle and the remaining bits make up blue. The alignment of a set of pixels in a rectangle makes up an image, a graphical object, and a text character. As one unit of the graphical object is represented by 24 bits of data, there are a total of 224, or 16,777,126, color combinations possible for supporting various graphical output requirements.
Figure 3.3 shows a pixel in the shaded square having its value defined as RGB(174,55,171) represented as a 24-bit string. The figure also shows the corresponding values in hexadecimals: AD for 171, 37 for 55, and B5 for 174. The value returned by RGB(174,55,171) is the 24-bit binary number 101010110011011110101110, or a decimal value of 11,220,910.
We start by discussing some basic concepts in creating an application on Windows. Microsoft Visual C++.Net provides an interface called Visual Studio for developing
an application. Besides C++, this interface is shared by other languages in the family, including Visual Basic and Visual C#. To develop an application using MFC, a person must know the C++ language very well. A good knowledge in C++ is a prerequisite to developing applications on Windows. This is necessary because MFC has classes and objects defined in a manner that can only be understood if one knows the language well.
A C++ project can be created in many ways depending on the user requirements. Table 3.3 lists some of the most common ways for creating an application on the Visual Studio. In its simplest form, a standard C++ project which runs without the support of any Windows functions is a console application. This option is necessary to a beginner in C++, or a person who does not wish to use the Windows facilities. The console option is available by choosing New Project, Win32 Application and by choosing Console Application in Application Type.
A Win32 Project is an option for creating an empty application with or without the support of MFC. This option does not provide a guide for creating an application as the person must know all the details. One advantage in this option is the small number of code required to generate an application. The option allows the application to exist as an executable file (EXE) or as a dynamic-link library (DLL).
The MFC Application option is a guided approach for creating an application using a tool known as wizard. With this option, the details about Windows are prepared by Visual Studio through a series of menus and dialog windows in wizard. Therefore, the user can concentrate on writing the code for an application. Wizard does not provide the whole solution for the application as it only assists by generating the code related to the Windows management.
The Managed Extension option is a structured way of writing an application. This new option provides an opportunity to integrate the application with .Net frameworks such as Passport, Windows XP, and Tablet PC.
We discuss the development of a skeleton program that produces a single-line message on Windows. The program is called a skeleton because it has a minimum number of codes, and it has been designed to be as simple as possible. This simple program will become the template for all other programs in the book as it is from here that the applications will be developed.
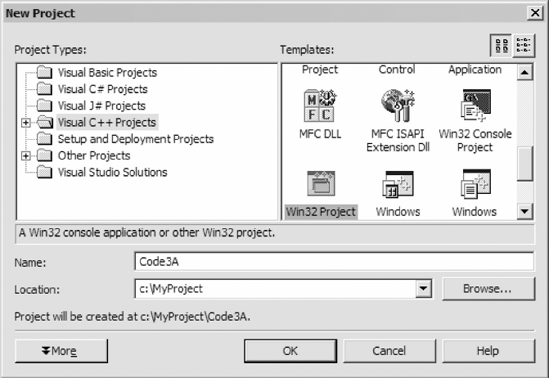
Step 1: Start a new project by choosing New from the menu, then Project. A window as shown in Figure 3.4 appears. Choose the Win32 Project icon, and name the project Code3A and the folder MyProject. Press the OK button to confirm.
Step 2: The window as shown in Figure 3.5 appears. Click Application Settings, and tick Empty project in the check box. Press the Finish button to confirm.
Step 3: From the Solution Explorer, right-click at Code3A and choose Properties from its menu. This is shown in Figure 3.6.
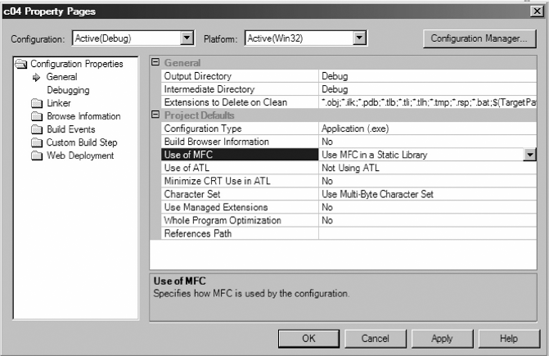
Step 4: The window in Figure 3.7 appears. In the Use of MFC category, choose Use MFC in a Static Library.
Step 5: Right-click Source Files in the Solution Explorer as shown in Figure 3.8, and choose Add from the menu followed by Add New Item. Name the file Code3A.h. Repeat by creating another file, Code3A.cpp.
Step 6: Enter the following codes in Code3A.h and Code3A.cpp.
// Code3A.h
#include <afxwin.h>

class CCode3A : public CFrameWnd
{

public:
CCode3A();
      ~CCode3A();
      afx msg void 0nPaint();
      DECLARE MESSAGE MAP()
};
class CMyWinApp : public CWinApp
{
public:
      virtual BOOL InitInstance();
};
// Code3A.cpp
#include "Code3A.h"

CMyWinApp MyApplication;

BOOL CMyWinApp::InitInstance()
{
      CCode3A* pFrame = new CCode3A;
      m pMainWnd = pFrame;
      pFrame->ShowWindow(SW SHOW);
      pFrame->UpdateWindow();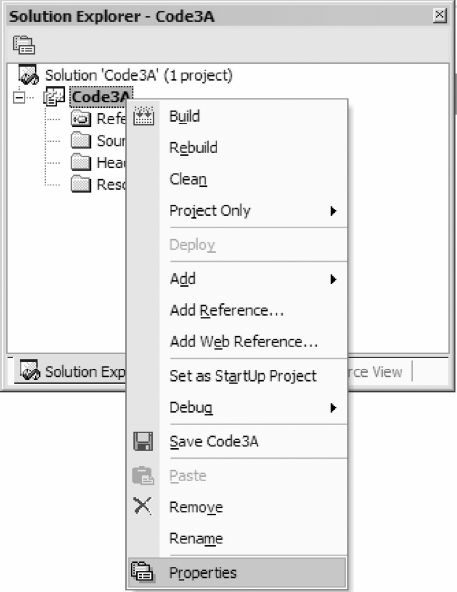
return TRUE;
}

BEGIN MESSAGE MAP(CCode3A,CFrameWnd)
      ON WM PAINT()
END MESSAGE MAP()

CCode3A::CCode3A()
{
Create(NULL,"Code3A: The Skeleton Program",
      WS OVERLAPPEDWINDOW,CRect(0,0,400,200),NULL);}
CCode3A::?CCode3A()
{
}


void CCode3A::OnPaint()
{
      CPaintDC dc(this);
      dc.TextOut(100,50,"Welcome to Windows...");
}
Step 7: The program is completed. Build the program and run to produce the output as shown in Figure 3.9.
Code3A is the simplest program that can be created to run on Windows. The project consists of two source files, Code3A.h and Code3A.cpp. The program displays a single line of message only involving a single application class and a single event. The application class is called CCode3A, and this class is derived from MFC's CFrameWnd. A header file called afxwin.h needs to be included as this file has all the declarations required for supporting CFrameWnd.
#include <afxwin.h>
CCode3A has a constructor function called CCode3A(), a destructor function called ~CCode3A(), and an application function called 0nPaint(). The last function is a message handler that must be preceded by afx msg in its declaration. A message handler requires a mapping through the declaration DECLARE MESSAGE MAP().
class CCode3A : public CFrameWnd
{

public:
     CCode3A();
     ~CCode3A();
afx msg void 0nPaint();
DECLARE MESSAGE MAP()
};
class CMyWinApp : public CWinApp
{
public:
virtual BOOL InitInstance();
};Any application in Windows needs to be registered, initialized, and updated. The following code segment performs these duties:
CMyWinApp MyApplication;

BOOL CMyWinApp::InitInstance()
{
      CCode3A* pFrame = new CCode3A;
      m_pMainWnd = pFrame;
      pFrame->ShowWindow(SW SHOW);
      pFrame->UpdateWindow();
      return TRUE;
}
A message map is needed to detect events in Windows. The events to be detected should be listed in the body that begins with BEGIN MESSAGE MAP() and ends with END MESSAGE MAP(). In Code3A, the only event mapped is the display output in the main window. This event is recognized as ON WM PAINT, and this event is handled by its default function called 0nPaint().
BEGIN MESSAGE MAP(CCode3A,CFrameWnd)
    ON WM PAINT()
END MESSAGE MAP()
CCode3A() is the constructor function in Code3A. The function creates memory for the class. This function is the best place to create the main window and its child windows. It is also in the constructor that most global variables and objects are initialized. In Code3A, the main window is created that occupies a rectangular area from (0,0) to (400,200).
CCode3A::CCode3A()
{
    Create(NULL,"Code3A: The Skeleton Program",
        WS OVERLAPPEDWINDOW,CRect(0,0,400,200),NULL);
}
In Code3A, the destructor function may be optionally needed to delete the memory allocated to global arrays. This is an important step in dynamic memory allocation so that the deleted memory can be returned to the computer to be used in other applications. In our case, no global arrays have been created, and therefore, the destructor has no code.
CCode3A::~CCode3A()
{
}
0nPaint() is the default function for handling ON_WM_PAINT. The function serves as the host for displaying the output in the main window. To display the output, a device context object from CPaintDC is needed in order to call functions from MFC, and this object is called dc. The main window in this case is referred simply as this. The message is displayed as a string at position (100,50) in the window.
void CCode3A::OnPaint()
{
    CPaintDC dc(this);
    dc.TextOut(100,50,"Welcome to Windows...");
}All output on Windows is displayed as graphics. Windows is a form of raster graphics that displays text and graphics through tiny dots called pixels. A pixel is the smallest unit that makes up the screen display. A typical screen resolution of 800 × 600 is a rectangular region consisting of 800 columns and 600 rows of pixels, or a total of 420,000 pixels. A higher resolution display such as in 1,280 × 800 has 1,024,000 pixels over the same rectangular region. This means each pixel in the latter is finer than the former, and this results in a sharper display.
Text display on Windows consists of fixed alphabet characters that are formed from pixels. By default, text is normally displayed in most applications using the Times New Roman font of size 12. MFC provides a variety of other fonts for selection, including Arial, Courier, Helvetica, and Avantgarde. Each character for display can also be resized ranging from the smallest at size 6 to the largest at 72. Text can also be aligned horizontally, vertically, or to some angle. Other attributes supported by MFC include underlined text, crossed text, bold, italic, and their combinations. A variety of text output functions are available for formatting a text message and its background, as shown in Table 3.4.
A single point on Windows with its own unique coordinates is represented by a pixel. As a consequence, all text and graphics objects in Windows are constructed from a group of pixels. For example, a line is produced from a set of successive pixels aligned according to the direction of the line. A circle is obtained from pixels that
Table 3.5. Some common GDI functions for displaying graphics
Function | Description |
|---|---|
Draws an arc. | |
Copies a bitmap to the current device context. | |
Draws an ellipse (including a circle). | |
Fills a rectangular region with the indicated color. | |
Creates a rectangle using the specified fill color. | |
Gets the pixel value at the current position. | |
Draws a line to the given coordinates. | |
Sets the current pen position to the indicated coordinates. | |
Draws a series of lines passing through the given points. | |
Draws a rectangle according to the given coordinates. | |
Creates color from the combination of red, green, and blue palettes. | |
Selects the indicated GDI drawing object. | |
Draws a pixel according to the chosen color. |
are aligned according to its radius. It follows that a rectangle is constructed from two pairs of matching lines. A curve is obtained from the successive placement of pixels whose shape is governed by a mathematical function.
What tools are needed in graphics? They are pens, brushes, paints, and so on, just like what an artist requires. Previously, a programmer will need to apply difficult low-level routines using Cor assembly languages in order to display graphicson Windows. Obviously, several ready-made tools from GDI bypass these tedious steps and cut the development time for displaying graphics on Windows. Table 3.5 summarizes some of the most common graphical GDI functions in MFC.
In object-oriented programming, an event is definedas a happening during the runtime that requires immediate attention and response. The response to an event is provided in the program in the form of a method, or a function. An event can be regarded as an interrupt where a call to a specific task in the computer is immediately performed. Some obvious examples of events are the left click of the mouse, a key stroke, a choice of an item in the menu, and a push button click.
In MFC, a message map is provided to detect the occurrence of an event during the runtime. The message map is written in the following format:
BEGIN MESSAGE MAP(CMain, CFrameWnd)
    <List of events, their ids and methods
END MESSAGE MAP()
For example, the following code shows two events, a keyboard press and an item in the pulldown menu:
BEGIN MESSAGE MAP(CMain, CFrameWnd)
    ON WM KEYDOWN()
    ON COMMAND(ID FILESAVE, 0nFileSave)
END MESSAGE MAP()
In the above example, ON_WM_KEYDOWN() is an event for detecting a keystroke, whereas ON_COMMAND(ID_FILESAVE,OnFileSave) is an event for detecting an item in the pulldown menu involving file saving. The two macros are called message handlers. The first event is acted on automatically by a user function called 0nKeyDown(), whereas the second is acted on through the mentioned function, 0nFileSave(). Since only two events are listed in the mapping, other events such as the left click of a mouse will have no effect on the program.
Table 3.6 lists some of the most common events in Windows. Of particular interest is ON_WM_PAINT, which is the most common event as it triggers the initial display of the application on the main window using a default function called 0nPaint(). The display is also updated through an interrupt specified by a function called Invalidate() or InvalidateRect(). We will come across ON_WM_PAINT in almost all applications in this book later.
Table 3.6. Some common message handlers
Function | Description |
|---|---|
| Default output drawn on the main window derived from the |
Left button click of the mouse. | |
Right button click of the mouse. | |
| Key press from the keyboard. |
| Button click on an object from the |
| Menu items as specified in its arguments. |
MFC provides hundreds of resources or tools that can enhance the viewing quality on Windows. They include buttons, control boxes, menus, and toolbars. These tools are important in providing a user-friendly environment on Windows, and they have become a standard interface on computers these days.
Because of the limited scope in this book, it is not possible for us to discuss all Windows resources here. Instead, we will only discuss some of the most essential tools that are relevant to numerical applications.
A push button is a rectangular object on Windows that becomes active when it is clicked with the mouse. Normally, a click at a push button indicates the user would like to see the effect when data input has been completed. This is useful, for example, in performing an analysis on a set of data, as the visual results from the analysis can help in some decision-making process.
A push button is a resource in the form of a child window created from the CButton class. An object for a push button is normally declared in the header file, as follows:
CButton 0bjectName;The object is created in the constructor according to a format given by
ObjectName.Create(Title,DisplayOptions, RectangularRegion,HostWindow,Id);
In the above format,
Title | The title in the title bar |
DisplayOptions | Defines the shape of the button |
RectangularRegion | Defines the coordinates and size of the button |
HostWindow | The host or parent window |
Id | The control id. |
For example, the following statement creates a push button object called MyButton that is displayed as Multiply:
CButton MyButton;
MyButton.Create("Multiply",WS CHILD | WS VISIBLE |
                BS DEFPUSHBUTTON, CRect(CPoint(100,130),
                CSize(100,25)),this, IDC MYBUTTON);
A click on a push button is an event. Therefore, a message handler for this event needs to be mapped according to
ON_BN_CLICKED (Id, Method)In the above message handler, Id is the control id and Method is the name of the function that will respond to this event. For example, a function called 0nMyButton() below responds to a click on a button with id IDC_MYBUTTON:
ON_BN_CLICKED(IDC_MYBUTTON,OnMyButton)
An edit box collects input directly from the keyboard. A typical input is an integer or double value that is needed in a calculation. Input can also be in the form of a string, such as the name of a person or a mathematical equation for evaluation. An entry in an edit box can also be edited or deleted.
An edit box is created from an object from the CEdit class. Each edit box is recognized through a unique control id that is defined in its creating function. The entry in an edit box is collected as a string from the CString class. An entry in the form of an integer or a double is read as a string, and then it is converted to the data value using the C functions atoi() or atof(), respectively.
An edit box can be created as a global object with its declaration in the header file, according to the following format:
CEdit 0bjectName;The above example creates an object called 0bjectName from the CEdit class. This object is created in the constructor function according to
ObjectName.Create(DisplayOptions, RectangularRegion,HostWindow, Id);
The following example creates a CEdit object called eBox:
CEdit eBox;
eBox.Create(WS CHILD | WS VISIBLE | WS BORDER,
      CRect(CPoint(250,50),CSize(80,25)),this, IDC x);
Input from the user is collected as a string according to
ObjectName.GetWindowText(stringxyp);As an example, an edit box eBox reads an input string called str. The string is converted into an integer value and stored into a variable called x using the C function, atoi().
CString str;
eBox.GetWindowText(str);
int x=atoi(str);
The static box is a rectangular region that displays a message in the form of a string. Unlike an edit box, the content of a static box is for viewing only as no input or editing is allowed. A static box finds its usefulness in displaying the result of a calculation or in displaying a fixed message.
A static box is created from the CStatic class. As in an edit box, each static box is identified through a control id that can be defined in its creating function. The global declaration of a static box is made in the header file, as follows:
CStatic 0bjectName;This is followed by its creation in the constructor according to
ObjectName.Create(Title, DisplayOptions, RectangularRegion,Host Window, Id);
By default, a static box is displayed as a shaded rectangle. The shape and style of a static box can be set and modified through DisplayOptions. As an example, the following statements create a CStatic object called sBox:
sBox.Create("",WS CHILD|WS VISIBLE|SS SUNKEN | SS CENTER,
            CRect(CPoint(250,130),CSize(80,25)),this,
            IDC STATIC);
Data in the form of a string can be displayed in a static box using the function SetWindowText() according to
ObjectName.SetWindowText(string);
For example, to display the content of the variable z into a static box, sBox, the value must be formatted to a string first, as shown below:
double z=6.05;
CString str;
str.Format(''%lf'',z);
sBox.SetWindowText(str);
List view box is an extension of the static box for displaying data usually in the form of a table. It is a more powerful tool as it has the horizontal and vertical scrolling bars for displaying data. In reality, it is not necessary to display all the data on Windows at the same time. Only a portion of the data needs to be displayed, and the scrolling bars control this portion in order to keep the overall window neat. With this wider scope, a single list view box is capable of displaying a large amount of data within its restricted window. The scrolling capability is very useful as displaying all the data from an application without this tool will be very troublesome.
A list view box can have a flexible size, and it can be placed anywhere in the main window. The object is first created from the CListCtrl class,
CListCtrl TableName;It is created using Create() according to
TableName.Create(DisplayOptions,RectangularRegion,HostWindow, Id);
The following example creates a list view table from (50,50) to (400,300):
CListCtrl table;
CRect rcTable=CRect(50,50,400,300);
table.Create(WS VISIBLE|WS CHILD|WS DLGFRAME|LVS REPORT
         |LVS_NOSORTHEADER, rcTable, this, IDC TABLE);
Further examples on the use of list view table will be discussed in the later chapters.
Edit and static boxes are useful resources for applications involving dialog between the user and the program. We discuss a sample application on a simple multiplication calculator that illustrates the use of edit and static boxes.
Figure 3.10 shows an output from Code3B. It consists of two edit boxes (white rectangles) for input, a static box (shaded rectangle) for the output and a push button called Multiply. The multiplication result from the input values of 4.5 and 1.7 in this example is displayed as 7.650000 in the static box once the push button is left clicked.
Code3B has two source files, Code3B.cpp and Code3B.h. The project extends from the skeleton program in Code3A with a few resources added. It is clear that a push button called Multiply represents an event that becomes active once it is left clicked with the mouse.
The application class in Code3B is called CCode3B, which is derived from MFC's CFrameWnd. The control ids are defined as macros in the header file through #define. Any integer numbers can be assigned to the ids as long as no two of them have the same value.
#define IDC_MYBUTTON 301
#define IDC x 302
#define IDC y 303
#define IDC z 304

The objects are declared from their respective classes. Since only one class is used, it is safe to declare the scope of these objects as private.
private:
    double x,y,z;
    CEdit ex,ey;
    CStatic sz;
    CButton MyButton;
Finally, the message mapping of the push button click requires its method called OnMyButton() to be declared according to
afx msg void 0nMyButton();
The full contents of Code3B.h are listed as follows:
#include <afxwin.h>
#define IDC_MYBUTTON 301
#define IDC_x 302
#define IDC_y 303
#define IDC_z 304
class CCode3B : public CFrameWnd
{
private:
      double x,y,z;
      CEdit ex,ey;
CStatic sz;
CButton MyButton;
public:
CCode3B();
~CCode3B() {}
afx_msg void 0nMyButton();
DECLARE MESSAGE MAP()
};
class CMyWinApp : public CWinApp
{
public:
virtual BOOL InitInstance();
};The coding in Code3B.cpp consists of an event and its method besides the constructor and destructor. The push button event is mapped as
ON BN CLICKED (IDC MYBUTTON,OnMyButton)In the constructor, the child windows in the form of edit boxes, a static box, and a push button are created in the main window as follows:
MyButton.Create("Multiply",WS CHILD | WS VISIBLE
      | BS_DEFPUSHBUTTON, CRect(CPoint(100,130),
      CSize(100,25)),this, IDC MYBUTTON);
ex.Create(WS CHILD | WS VISIBLE | WS BORDER,
      CRect(CPoint(250,50),CSize(80,25)),this, IDC x);
ey.Create(WS CHILD | WS VISIBLE | WS BORDER,
      CRect(CPoint(250,90),CSize(80,25)),this, IDC_y);
sz.Create("",WS CHILD | WS VISIBLE | SS SUNKEN | SS CENTER,
            CRect(CPoint(250,130),CSize(80,25)),this,
            IDC z);
It is necessary to place the initial position of the caret at ex, which is the first CEdit object using
ex.SetFocus();
The method for the push button event is a function called 0nMyButton(). Once activated, this function reads the input from the edit boxes through GetWindowText() and converts the strings into double variables using atof(). The calculation follows, and the result is converted into a string before it is displayed in the static box through SetWindowText(). The code for this function is shown below:
void CCode3B::OnMyButton()
{
     CString str;
     ex.GetWindowText(str); x=atof(str);
     ey.GetWindowText(str); y=atof(str);
     z=x*y;
     str.Format("%lf",z); sz.SetWindowText(str);
}
The full code listings for Code3B.cpp are shown below:
#include "Code3B.h" CMyWinApp MyApplication; BOOL CMyWinApp::InitInstance(){ CCode3B* pFrame = new CCode3B; m_pMainWnd = pFrame; pFrame->ShowWindow(SW SHOW); pFrame->UpdateWindow(); return TRUE; } BEGIN_MESSAGE_MAP(CCode3B, CFrameWnd) ON BN CLICKED (IDC MYBUTTON,OnMyButton) END_MESSAGE_MAP()CCode3B::CCode3B(){ Create(NULL, "Code3B: Simple multiplication calculator", WS_OVERLAPPEDWINDOW,CRect(0,0,450,250)); MyButton.Create("Multiply",WS_CHILD|WS VISIBLE | BS_DEFPUSHBUTTON, CRect(CPoint(100,130),CSize(100,25)),this, IDC_MYBUTTON); ex.Create(WS_CHILD|WS VISIBLE|WS_BORDER, CRect(CPoint(250,50),CSize(80,25)),this, IDC_x); ey.Create(WS_CHILD|WS VISIBLE|WS_BORDER, CRect(CPoint(250,90),CSize(80,25)),this, IDC_y); sz.Create("",WS_CHILD|WS_VISIBLE| SS_SUNKEN|SS_CENTER, CRect(CPoint(250,130),CSize(80,25)),this, IDC_z); ex.SetFocus(); } void CCode3B::OnMyButton() { CString str;
ex.GetWindowText(str);
      x=atof(str);
      ey.GetWindowText(str); y=atof(str);
      z=x*y;
      str.Format("%lf",z); sz.SetWindowText(str);
}Another indispensable resource in Windows is the menu, which provides a choice of items for the user to choose from. The standard style of menu in Windows is the pulldown menu, which is a menu that appears from the Windows top panel. A pulldown menu in Windows is a resource that can be invoked at any time during the runtime.
In making a program neat and tidy, data and programs should be separated and stored in different files. This is important in order to preserve the integrity of the program by not distracting its flow. A program tells the compiler on the method for running the application, whereas data are part of the elements that make up the application. Both items are equally important, and without any one of them, the program will not be able to function properly.
Data can be stored in a file as a text file or as a binary file. The text file is a common approach, and this option is suitable in cases where the data are open for free distribution. In this case, the file does not need any security feature, and it can be opened easily using any editor or word-processing program. On the other hand, data that are restricted are normally stored as a binary file. With this approach, the file cannot be easily viewed using the normal editor or word-processing programs. The file can only be opened using some special programs, and sometimes, it can be protected with a special login and password. A more confidential data are stored as binary files with some added security features involving several encryption technologies.
In this section, we discuss the common saving and opening methods for text files using a pulldown menu. This approach is the standard technique in Windows. We start the discussion with text file input and output methods.
A text file stores data in the form of a stream of bytes that represent the characters in the file. Several different methods for opening and saving files are applicable in Windows. MFC provides a special class called CFile for these purposes. However, the classic C programming approach in opening and saving a file can still be applied in both standard C++ and Visual C++. We discuss this approach.
In opening or saving a file, it is important to note that part or all the data may be lost if the program's operating procedure is not followed carefully. A common error happens when an opened file is not closed as the program ends. Both opening and saving a file involves four steps. In saving a file, the steps are as follows:
Create a pointer to the file. This is achieved using the built-in C structure called
FILE. The following example creates a pointer calledofp:FILE *ofp;
Open the file for writing. The standard C method uses
fopen(). The following example opens a file calledMyFile.txtfor writing:ofp=fopen("MyFile.txt","w");Write data to the file using
fprintf(). A text file stores data as strings only. Therefore, all data from other types, for example integer and double, will have to be formatted into strings. For example,int x=3; double y=6.5; fprintf(ofp,"x is %d, y is %lf ",x,y);
Close the file using
fclose().fclose(ofp);
Opening a file follows almost the same steps as in saving a file with some differences n the functions used. The steps are as follows:
Create a pointer to the file. The following example creates a pointer called
ifp:FILE *ifp;
Open the file for reading, for example,
ifp=fopen("MyFile.txt","r");Read the data using
fscanf(). A formatted data can be read according to their types by inserting their respective identifiers, for example,int x; double y; fscanf(ifp,"%d %lf ",x,y);
Close the file using
fclose().fclose(ofp);
In Windows, files are organized into folders. A folder may have many files from several different types, and it is going to be a difficult task for the user to remember the names of the required files and their location. A convenient mechanism provided in Windows is listing the names of the files for viewing in a pop-up window. This facility allows the user to select the required file for reading or saving using the mouse.
Files in a folder can be listed using a modal window. A modal window is a pop-up windows that does not allow access to other opened windows once it is active. Access to other opened windows can only be done by closing the modal window. We discuss the method for creating a modal window for listing and selecting files.
In listing the files, a filter is necessary to list the relevant files only based on their type. Without a filter, all files will be listed, and this makes the display a bit messy. As an example, the following statement creates a filter called strFilter for listing files of type txt only:
char strFilter[] = {"TXT Files (*.txt)|*.txt
                    |All Files (*.*)|*.*||"};
The next step in creating the modal window is to create an object to MFC's CFileDialog class. The following example creates an object called FileDlg:
CFileDialog FileDlg(FALSE, ".txt",NULL,0,strFilter);
The modal window can now be invoked by linking FileDlg to the MFC function, DoModal(), as follows:
FileDlg.DoModal()
The required file can now be selected using a function called GetFileName(). A string is needed to store the name of this file. The following example shows how a string called str stores the name of the selected file:
char str[80];
str=FileDlg.GetFileName();
We discuss a sample project to illustrate the use of menus for file input and output. The project is called Code3C, which has a single menu item called File and five subitems, Open, Save, Generate, Clear and Exit. The submenus Open and Save read and save ten sets of (x, y) coordinates from and to files, respectively. Generate produces ten sets of new (x, y) coordinates at random. Clear erases these data and clears the screen. Exit terminates the program.
Figure 3.11 shows an output from Code3C. It consists of a pulldown menu with an opened file called test.txt. The file consists of the coordinates of ten points that serve as the centers of ten equal-sized circles. With this information, Windows draws the circles at their corresponding locations.

Code3C has a single class called CCode3C. The project consists of the source files Code3C.cpp and Code3C.h and a resource file called Code3C.rc. Nine steps are involved in creating this application. The first four are the same steps as in Code3A, whereas the rest involve the creation of Code3C.rc, which stores the information about the items in the pulldown menu.
Steps 1—4: Follow the same steps 1—4 as in the Code3A project.
Step 5: Right-click Source Files in the Solution Explorer, and choose Add from the menu followed by Add Existing Item. Add Code3C.h and Code3C.cpp from the supplied files.
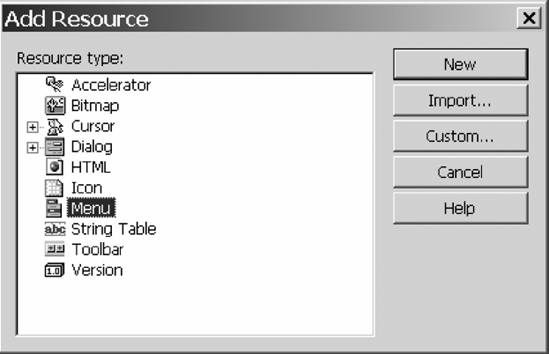
Step 6: From the Solution Explorer, right-click Resource Files, and then choose Add and Add Resource, as shown in Figure 3.12. Name the resource file, Code3C.rc.
Step 7: From the Solution Explorer, double-click Code3C.rc. The Add Resource window in Figure 3.13 appears. Double-click Menu to start creating the menu.
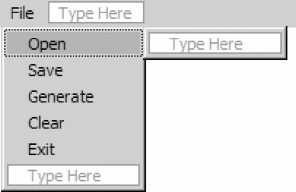
Step 8: Begin with File as the root menu, and fill up the items in the submenu as shown in Figure 3.14. In Properties, name the id for each item according to ID_FILEOPEN for Open, ID_FILESAVE for Save, ID_GENERATE for Generate, ID CLEAR for Clear, and ID EXIT for Exit.


Step 9: All the steps have been completed. Build the project and run to see the results as shown in Figure 3.15.
The full listings in Code3C.cpp and Code3C.h are available in the distribution files. We will only discuss their main contents here. Code3C.h consists of the declarations for the class. The resource file, Code3C.rc, requires two header files to be included. The first file is afxdlgs.h, which contains the declarations for the modal window. The second file is resource.h, which has all the declarations on the resources in the pulldown menu. This file is create automatically when a resource file is created, and it cannot be edited by the user.
#include <afxwin.h>
#include <afxdlgs.h>
#include "resource.h"
CCode3C contains an array called pt for storing the coordinates of the centers of the circles. The class also specifies member functions for the project. Each item in the menu is considered as an event that must be attended by its respective function. Therefore, each item is mapped as an event with its declaration shown below:
class CCode3C : public CFrameWnd
{
private:
      CPoint *pt;
public:
      CCode3C();
      CCode3C::~CCode3C();
      afx_msg void 0nFileOpen();
      afx_msg void 0nFileSave();
      afx_msg void 0nGenerate();
      afx_msg void 0nClear();
      afx_msg void 0nExit();
      DECLARE MESSAGE MAP()
};
Mapping for each event is done in Code3C.cpp, as follows:
BEGIN_MESSAGE_MAP(CCode3C,CFrameWnd)
    ON_COMMAND(ID_FILEOPEN,OnFileOpen)
    ON_COMMAND(ID_FILESAVE,OnFileSave)
    ON_COMMAND(ID_GENERATE,OnGenerate)
    ON_COMMAND(ID_CLEAR,OnClear)
    ON_COMMAND(ID_EXIT,OnExit)
END_MESSAGE_MAP()
The constructor in CCode3C creates the main window and initializes the array pt whose maximum size is n+1. In this case n is a macro whose value is predefined in Code3C.h. The contents in the constructor function are given as follows.
CCode3C::CCode3C()
{
      Create(NULL, "Code3C: File menus",
            WS_OVERLAPPEDWINDOW,CRect(0,0,600,400),
            NULL,MAKEINTRESOURCE(IDR MENU1));
      pt=new CPoint [n+1];
}
A file is selected by invoking Open from the menu. This selection is mapped as ON COMMAND(ID FILEOPEN,OnFileOpen), which calls OnFileOpen(). The function opens the modal window, which displays all the filtered txt files in the current folder. The selected file is stored in str and opened. 0nFileOpen() reads the contents of the opened file and draws circles according to their stored locations. The code for these operations in OnFileOpen() are given by
void CCode3C::OnFileOpen()
{
      CClientDC dc(this);
      CString str;
      CRect rc;
      FILE *ifp;
      char strFilter[] = {"TXT Files (*.txt)|*.txt
                          |All Files (*.*)|*.*||"};
      CFileDialog FileDlg(TRUE,".txt",NULL,0,strFilter);
      if (FileDlg.DoModal()==IDOK)
      {
             str=FileDlg.GetFileName();
             ifp=fopen(str,"r");
             dc.TextOut(350,50,"File Opened: "+str);
             for (int i=1;i<=n;i++)
             {
                  fscanf(ifp,"%d %d",&pt[i].x,&pt[i].y);
                  rc=CRect(pt[i].x-30,pt[i].y-30,pt[i].x+30,
                           pt[i].y+30);
                  dc.Ellipse(rc);
                  rc=CRect(pt[i].x-1,pt[i].y-1,pt[i].x+1,
                  pt[i].y+1);
                  dc.Rectangle(rc);
             }
            fclose(ifp);
      }
}
0nGenerate() is a function that generates ten circles at ten random locations. Random integer numbers are produced from a C function called time() based on the clock cycle in the computer. Another function called srand() determines the scope or range of these numbers. A number from this range is then generated through rand().
void CCode3C::OnGenerate()
{
      CClientDC dc(this);
      CString str;
      time t seed=time(NULL);
      srand((unsigned)seed);
0nClear();
dc.TextOut(50,50,"Generating Random Numbers");
for (int i=1;i<=n;i++)
{
pt[i].x=100+rand()%400; pt[i].y=50+rand()%300;
str.Format("%d %d",pt[i].x,pt[i].y);
dc.TextOut(50,80+20*i,str);
}
}OnFileSave() is doing the opposite of 0nFileOpen(). The function saves the coordinates of the currently displayed circles into a string called str, which then becomes the file name.
void CCode3C::OnFileSave()
{
      CClientDC dc(this);
      CString str;
      FILE *ofp;
      char strFilter[] = {"TXT Files (*.txt)|*.txt
                          |All Files (*.*)|*.*||"};
      CFileDialog FileDlg(FALSE,".txt",NULL,0,strFilter);
      if(FileDlg.DoModal()==IDOK)
      {
           str=FileDlg.GetFileName();
           ofp=fopen(str,"w");
           dc.TextOut(50,20,"File Saved: "+str);
           str.Format("%d",n);
           dc.TextOut(50,50,"Contents: "+str+" randomly
                      generated numbers");
           for (int i=1;i<=n;i++)
                 fprintf(ofp,"%d %d
",pt[i].x,pt[i].y);
           fclose(ofp);
      }
}
A function called 0nClear() resets the coordinates of all the points to (0,0) and erases the window. The main window has its location and size stored in a rectangular object called rc, which is read through GetClientRect(). The window is cleared by spraying the background color into rc.
void CCode3C::OnClear()
{
      CClientDC dc(this);
CRect rc;
GetClientRect(&rc);
CBrush whiteBrush(RGB(255,255,255));
dc.FillRect(&rc,&whiteBrush);
for (int i=1;i<=n;i++)
pt[i]=CPoint(0,0);
}0nExit() provides the formal way for exiting from the program. This is achieved by calling itself, as follows:
void CCode3C::OnExit()
{
      CCode3C::OnExit();
}
The last part of Code3C is to delete the unused array pt, and this is done in the destructor function.
CCode3C::~CCode3C()
{
       delete pt;
}The keys in the keyboard provide the standard input in all computers. Each key has been designed to represent a character or more in the standard American Standard Code for Information Interchange (ASCII) system. The standard keyboard in today's computers is based on the typewriter convention of key arrangement, QWERTY, which refers to the characters of the first six alphabetical keys of the standard keyboard from left.
Each key in the keyboard can also be programmed to perform things other than alphabetical input (see Table 3.7). For example, many computer games use the left, right, up, and down arrow keys for navigation in their games. Many learning-based software programs also make use of the arrow keys to perform certain functions in their course modules. This feature is interesting as personal computers have been known to have multipurpose uses, including office productivity, games, entertainment, multimedia, education, and scientific applications. Therefore, the keys contribute in making the software programs more user-friendly and interesting.
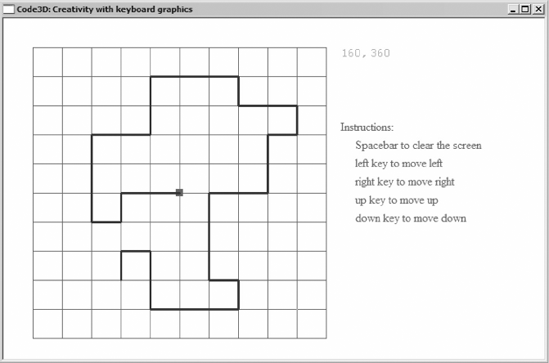
We discuss an interesting program involving the control of keys in the keyboard. A project called Code3D has been developed to illustrate the concept. Figure 3.16 shows the output from this project, which consists of rectangular grids and the origin marked as a shaded square in the middle. A path is created by pressing on one of the following keys: left arrow, right arrow, up arrow, and down arrow. A press on the spacebar clears the path and resets the position at the origin.
Code3D has been developed based on the template in Code3A. The project has one class called CCode3D. There are two source files in the project, Code3D.cpp and Code3D.h. The header file is given as follows:
#include <afxwin.h>

class CCode3D : public CFrameWnd
{
protected:
      CPoint home,end,origin,pt;
      int Increment,BgColor;
public:
      CCode3D();
      ~CCode3D() {}
      afx_msg void 0nPaint();
      afx_msg void OnKeyDown(UINT MyKey,UINT nRep,UINT nFlags);
      DECLARE MESSAGE MAP();
};

class CMyWinApp : public CWinApp
{
public:
      virtual BOOL InitInstance();
};
The contents of Code3D.cpp are given as
#include "Code3D.h"

BOOL CMyWinApp::InitInstance()
{
      CCode3D* pFrame = new CCode3D;
      m_pMainWnd = pFrame;
      pFrame->ShowWindow(SW SHOW);
      pFrame->UpdateWindow();
      return TRUE;
}
CMyWinApp MyApplication;

BEGIN_MESSAGE_MAP(CCode3D, CFrameWnd)
      ON_WM_PAINT()
      ON_WM_KEYDOWN()
END_MESSAGE_MAP()

CCode3D::CCode3D()
{
      Create(NULL,"Code3D: Creativity with keyboard graphics",
            WS_OVERLAPPEDWINDOW,CRect(0,0,750,500));
      home=CPoint(40,40); end=CPoint(440,440);
      origin.x=(home.x+end.x)/2; origin.y=(home.y+end.y)/2;
      pt.x=origin.x; pt.y=origin.y; Increment=40;
BgColor=RGB(255,255,255);
}
void CCode3D::OnPaint()
{
CPaintDC dc(this);
CString s;
CRect rc;
GetClientRect(&rc);
CBrush blackBrush(BgColor);
dc.FillRect(&rc,&blackBrush);
CPen penGray(PS SOLID,1,RGB(100,100,100));
dc.SelectObject (penGray);
for (int i=home.x;i<=end.x;i+=Increment)
for (int j=home.y;j<=end.y;j+=Increment)
{
dc.MoveTo(i,j); dc.LineTo(400,j);
dc.MoveTo(i,j); dc.LineTo(i,400);
}
rc=CRect(CRect(origin.x-5,origin.y-5,origin.x+5,
origin.y+5));
dc.FillSolidRect(&rc,RGB(200,0,0));
CFont fontCourier,fontTimesNR;
dc.SetBkColor(BgColor);
fontCourier.CreatePointFont (120,"Courier");
dc.SelectObject (fontCourier);
dc.SetTextColor(RGB(0,200,0));
s.Format("%d,",pt.x);
dc.TextOut(end.x+20,home.y,s);
s.Format("%d",pt.y); dc.TextOut(end.x+60,home.y,s);
fontTimesNR.CreatePointFont (120,"Times New Roman");
dc.SelectObject (fontTimesNR);
dc.SetTextColor(RGB(200,0,0));
dc.TextOut(end.x+20,home.y+100,"Instructions:");
dc.SetTextColor(RGB(0,100,200));
dc.TextOut(end.x+Increment,home.y+125,"Spacebar to clear
the screen");
dc.TextOut(end.x+Increment,home.y+150,"left key to move
left");
dc.TextOut(end.x+Increment,home.y+175,"right key to move
right");
dc.TextOut(end.x+Increment,home.y+200,"up key to move
up");dc.TextOut(end.x+Increment,home.y+225,"down key to move
down");
}
void CCode3D::OnKeyDown(UINT MyKey,UINT nRep,UINT nFlags)
{
CClientDC dc(this);
CRect rc;
CPen penBlue(PS SOLID,3,RGB(0,00,200));
CBrush whiteBrush(RGB(255,255,255));
dc.SelectObject(&penBlue);
rc=CRect(end.x+10,home.y-10,end.x+100,home.y+30);
InvalidateRect(&rc);
dc.MoveTo(pt.x,pt.y);
switch(MyKey)
{
case VK RIGHT:
if (pt.x<end.x)
pt.x += Increment;
break;
case VK_LEFT:
if (pt.x>home.x)
pt.x -= Increment;
break;
case VK_UP:
if (pt.y>home.y)
pt.y -= Increment;
break;
case VK_DOWN:
if (pt.y<end.y)
pt.y += Increment;
break;
case VK_SPACE:
{
pt.x=origin.x; pt.y=origin.y;
Invalidate();
break;
}
}
dc.LineTo(pt.x,pt.y);
}The .Net framework was introduced by Microsoft Corporation in its Visual Studio products beginning in 2002 as a massive improvement to its programming environment. With this extension, Visual C++ was rebranded as Visual C++.Net, and this compiler supports a new style of programming environment called Managed Extensions, which is a new language construct that consists of additional keywords, preprocessor directives, and several compiler options, including the .Net Base Class Library (BCL). Managed Extensions also improves on the garbage-collection mechanism, reflection, and security. With this extension, all the Visual C++ environment before this date, including those that run under MFC, has been referred to as unmanaged extensions.
In general, the .Net framework was developed to enable applications to run on top of the .Net Common Language Runtime (CLR). With this framework, Visual C++.Net allows the managed and unmanaged code to be mixed freely within the same application. A new preprocessor directive such as #using in .Net imports the named metadata from a .Net executable object and library.
Because of its popularity, MFC is still supported in the .Net framework. The MFC libraries have been well established, and it will take a great amount of time for diehard followers of MFC to migrate to the new system. The reader has the option of accessing .Net from MFC, or accessing MFC from .Net. We discuss two projects called Code3E and Code3F, for accessing .Net from MFC and accessing MFC from .Net, respectively.
Code3E shows a simple example how .Net commands can be called from MFC. The example is derived from the basic window framework in Code3A. Create a new project called Code3E by choosing Win32 Project in the new project template. Add two source files, Code3E.cpp and Code3E.h, into the project whose contents are exactly similar to Code3A.cpp and Code3A.h, respectively. Follow steps 1 to 6 of the Code3A project in Section 3.3 to produce the basic window.
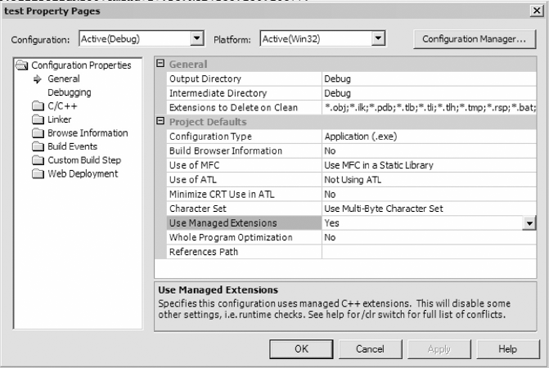
In the Solution Explorer, select Properties. Choose Use MFC in a Static Library and Yes in Use Managed Extensions option, as shown in Figure 3.17. These selections make MFC as the host and .Net as its guest.
Add the following .Net code fragments into Code3E.h:
#using <mscorlib.dll>
#using <System.Windows.Forms.dll>
using namespace System;
using namespace System::Windows::Forms;
Add the following .Net messages into 0nPaint() in Code3E.cpp:
String* str;                 //.Net command
str=S"this message box is from .Net";        // .Net command
AfxMessageBox((CString)str);                 // .Net command, typecast to MFC
It works! The following code listings show the two files, Code3E.cpp and Code3E.h:
// Code3E.h
#include <afxwin.h>
#using <mscorlib.dll>
#using <System.Windows.Forms.dll>
using namespace System;
using namespace System::Windows::Forms;

class CMain : public CFrameWnd
{

public:
      CMain();
      ~CMain();
      afx_msg void OnPaint();
      DECLARE MESSAGE MAP()
};
class CMyWinApp : public CWinApp
{
public:
virtual BOOL InitInstance();
};The main program consists of the following code:
// Code3E.cpp
#include "Code3E.h"

CMyWinApp MyApplication;

BOOL CMyWinApp::InitInstance()
{
  CMain* pFrame = new CMain;
  m pMainWnd = pFrame;
  pFrame->ShowWindow(SW SHOW);
  pFrame->UpdateWindow();
  return TRUE;
}

BEGIN_MESSAGE_MAP(CMain,CFrameWnd)
    ON_WM_PAINT()
END MESSAGE MAP()

CMain::CMain()
{
    Create(NULL,"Code3A: The Skeleton Program",
    WS_OVERLAPPEDWINDOW,CRect(0,0,400,300),NULL);
}
CMain::~CMain()
{
}

void CMain::OnPaint()
{
      CPaintDC dc(this);
      dc.TextOut(100,10,"Welcome to Windows...");
      String* str;                            //.Net command
      str=S"this message box is from .Net";   // .Net command
      AfxMessageBox((CString)str);            // .Net command,
                                                  typecasted to
                                                  MFC
}Create a new project by choosing Empty Project (.Net) in the new project template0. Go to Properties and enter the options as shown in Figure 3.17. Include the following codes into the header file:
include <afxwin.h>
using <mscorlib.dll>
using <System.Windows.Forms.dll>
using namespace System;
using namespace System::Windows::Forms;
MFC routines can now be called from .Net using Managed Extension. The directive #include <afxwin.h> needs to be included to enable classes such as CString to be called from the Managed Extension. Other include files will also have to be included according to the requirement in the application.
The chapter discusses the fundamental aspects of MFC from creating the simplest window, to using several basic resources, to mixing the codes from MFC and .Net. The concepts are illustrated with several simple programming projects. MFC has been widely used as a tool for proving a user-friendly interface based on Windows. Its rich resources provide all the necessary tools to produce a wide range of applications based on the friendly graphical user interface (GUI). Microsoft Corporation, which develops the new .Net platform, realizes the importance of MFC by making the platform compatible with MFC.