Taking the first pictures
Setup basics for the EOS 30D
Basic Zone shooting
Creative Zone shooting
Setting the ISO
Setting the white balance
Setting the autofocus point
Setting the color space
Setting the drive mode
Setting the metering mode
Setting the Picture Style
Welcome to the world of digital photography with the Canon EOS 30D SLR camera. The EOS 30D is a gateway into a creative world of visual fun, excitement, and professional-quality images. This section of the book is designed to give you a quick overview of camera setup and functions so that you can begin shooting right away.
Because the EOS 30D is designed to serve both the advanced amateur and the professional, the camera's versatility and ease of use make it a great choice for both traditional and creative genres of photography. Not only do you have the advantage of instant results, but also you have a powerful tool that serves you well in a variety of venues. The control you have during and after capture is gratifying, giving you more time to shoot while spending less time processing and tweaking images.
By now, you've probably already attached the lens, charged the battery, and inserted the media card, so you need a quick tour of setup controls and camera functions. This Quick Tour helps you double-check any setup that you've already done, points out areas that you may not know about, and guides you through getting images onto the computer.
After you've charged and inserted the battery, inserted the CompactFlash (CF) card, attached the lens, and turned on the camera, take a quick round of images to get a sense of the camera and the image quality from it. Depending on your skill level, you can use one of the programmed modes such as Portrait, Landscape, or Full Auto, or one of the semi-automatic modes to take the test shots. Even point-and-shoot images taken on Full Auto give you a sense of the dynamic range that you can expect from the image sensor.
The large, bright 2.5-inch, 230,000 pixel LCD monitor can display the image histogram and shooting information for you to make initial exposure evaluations. You can set the LCD to show the image histogram by pressing the Info button on the back of the camera twice right after the image is displayed. Or if the image display has already disappeared, press the Playback button, and then press the Info button twice to display the histogram. If you're shooting in Full Auto mode or semi-automatic mode such as Landscape or Portrait, the image preview and histogram are for the JPEG image. If you're shooting RAW, the display and histogram are also for a JEPG version of the image. Either way, you'll likely find that the camera tends toward rich color but somewhat dark images. After you've done further image evaluation, you can set positive exposure compensation if you find that you need to open up shadow areas to show more detail.
If you are new to digital SLR cameras, taking the first picture is simple. With the camera turned on, press the Shutter button halfway down to focus on the subject, and then press the Shutter button completely to take the picture. In Full Auto and semi-automatic modes, the camera chooses the autofocus points automatically. It chooses the appropriate autofocus points (displayed in the viewfinder with one or more red dots), and then focuses on the subject closest to the camera. If you want to set the autofocus points yourself, you must switch to one of the Creative Zone modes described later in the Quick Tour.
The EOS 30D displays the image you took for 2 seconds on the LCD monitor. If you have multiple images on the CF card, you can press the Playback button and then turn the Main dial to browse through the images.
Warning
Never open the media card door while the access light is lit. The access light remains lit as the camera records the pictures that you took to the CompactFlash card. If you open the media card door, the most recent images you took will be lost.
Canon's menus are simple and easy to navigate, which makes setup fast and painless. Minimizing the menu structure makes changing settings on the fly an easy task as well.
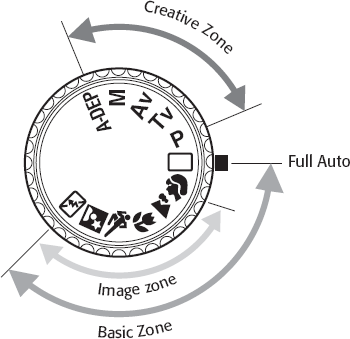
Setup on the camera is dependant on the shooting mode that you choose. The Mode dial on the EOS 30D has two broad categories, Basic Zone and Creative Zone modes. The diagram in figure QT.1 shows which modes fall into each category. In Basic Zone modes, the camera sets the ISO, f-stop, and shutter speed (file type). In Creative Zone modes, you can set the exposure elements as well as the autofocus points. During camera setup, be sure to set up for both zones as applicable. An overview of both zones is provided later in the Quick Tour.
Now is also a good time to format the CompactFlash card. Formatting the card the first time and periodically as you use the card is a good idea because it structures the card for the camera data.
Note
A more in-depth discussion of the CF card and how to work with it can be found in Chapter 2.
The file format and quality level that you select is one of the most important decisions you make when using your 30D. The settings determine the size at which you can print the images you take. It also affects the number of images that you can store on the CF card. Capturing images at a high-resolution setting is important in order to maximize printing capability over the long term. The higher the image quality you choose, the larger the print that you can make.
Note
For an overview of image quality settings, see Chapter 2.
To set the image recording quality, follow these steps:
Press the Menu button on the back of the camera. The Shooting (red) menu is displayed. If another menu is displayed, press the Jump button until the Shooting menu is displayed.
Press the Set button. The Quality submenu is displayed. If the camera is set to a Basic Zone mode, you can choose JPEG quality ranging from Large/Fine to (8.2 megapixel-images at 3504 × 2336 pixels) to Small/Normal (2 megapixels at 1728 × 1152 pixels). If the camera is set to a Creative Zone mode, the Quality menu includes the previous settings in addition to RAW options: RAW, or RAW + Large through to RAW + Small. These RAW + settings capture a RAW image in addition to a JPEG at a Large, Medium, or Small size image.
Rotate the Quick Control dial to select the image-recording quality setting that you want, and then press the Set button.
If you shoot in both Basic Zone and Creative Zone modes, you can repeat this procedure for the other mode category. For example, you can set the quality for Creative Zone modes, then set the camera to a Basic Zone mode, and repeat Steps 1 through 3 to set image-recording quality for those modes.
Lightly press the shutter button to dismiss the Menu display.
File numbering options are Continuous, Auto Reset, and Manual Reset. For most photographers, the Continuous option is best because it avoids the possibility of having duplicate filenames on the computer, and it records the shutter actuations on the camera, and that information can be helpful should you need to send the camera for repair or sell it.
To set a file numbering option, follow these steps:
Press the Menu button on the back of the camera. The Shooting (red) menu is displayed. If another menu is displayed, press the Jump button until the Shooting (red) menu is displayed.
Rotate the Main dial until File numbering is selected.
Press the Set button. The camera displays the File numbering options.
Rotate the Main dial to select the option you want and then press the Set button.
Lightly press the Shutter button to dismiss the Menu display.
The fully automated Basic Zone modes function as point-and-shoot options for catching quick grab shots and snapshots. The modes in this zone do not allow you to set the ISO, shutter speed, or aperture. The modes are grouped together on the Mode dial with symbols that depict the type of scene that they are best suited for. For example, Portrait mode is denoted by the image of a person's head.
In Basic Zone modes, you choose the mode that fits the scene, and the camera automatically sets the exposure settings for you. Focus on the subject by pressing the Shutter button halfway down, and then depress the Shutter button completely to take the picture.
Note
For an overview of camera controls, see Chapter 1.
The EOS 30D offers these Basic Zone modes:
Full Auto
Portrait
Landscape
Close-up
Sports
Night Portrait
Flash off
Creative Zone modes offer automatic, semi-automatic, and manual control over all or some of the exposure settings and focusing. Most of these modes operate in a fashion that is similar to their film camera counterparts. Using different Creative Zone modes, you can control depth of field, control how motion is shown in the image, switch between equivalent exposures, and have the camera maximize depth of field in specific scenes.
Note
For an overview of Creative Zone modes, see Chapter 1.
In the Creative Zone modes, you can set the ISO and the autofocus point, except for A-DEP mode where the camera sets the autofocus points automatically. You can choose the Picture Style that you want in any of the Creative Zone modes.
Program AE. Program AE is displayed as P on the Mode dial and is a fully automatic, but shiftable mode. Shiftable means that you can change the programmed exposure by changing, or shifting, the aperture or the shutter speed while the camera automatically adjusts the other setting to maintain an equivalent exposure. In many ways, this mode is convenient because it allows you to adjust either shutter speed or aperture, whereas the Aperture-priority AE and Shutter-priority AE modes allow you to adjust either aperture or shutter speed without the ability to switch between the two on the fly. To use this mode, turn the Mode dial to P. To shift the shutter speed or aperture, watch in the viewfinder as you rotate the Main dial to the desired setting, and then focus and take the picture.
Shutter-priority AE. This mode is displayed on the Mode dial as Tv (Time Value). In this mode, you set the shutter speed, and the camera automatically sets the aperture. To use this mode, rotate the Mode dial to Tv. Watch in the viewfinder as you rotate the Main dial to the desired shutter speed, and then focus and take the picture. If the aperture value shown in the viewfinder blinks, it means that the exposure cannot be made at the current combination of shutter speed and aperture. Rotate the Main dial to adjust the shutter speed until the blinking stops.
Aperture-priority AE. This mode is displayed on the Mode dial as Av (Aperture Value). In this mode, you set the aperture (f-stop), and the camera automatically chooses the correct shutter speed. To use this mode, rotate the Mode dial to Av, and watch in the viewfinder as you rotate the Main dial to the desired aperture. Focus on the subject, and take the picture.
Manual. This exposure mode is displayed on the Mode dial as M. In this mode, you can set all exposure settings independently: ISO, shutter speed, and aperture. Before using this mode, be sure that the Power/Quick Control dial is in the uppermost position. To get an accurate exposure, watch in the viewfinder as you adjust shutter speed using the Main dial and the aperture using the Quick Control dial until the marker on the Exposure Level Indicator is in the middle of the scale or is at the level of overexposure or underexposure that you want.
Automatic depth of field. This mode is displayed on the Mode dial as A-DEP. When you use this mode, the camera automatically calculates the optimum depth of field between near and far subjects in a scene. To use this mode, rotate the Mode dial to A-DEP, focus on the subject, and take the picture.
The ISO setting determines how sensitive the image sensor is to light in the scene. The EOS 30D can be set to ISO 100 to 1600 in 1/3–stop increments. In addition, ISO can be pushed to 3200 using ISO expansion offered in Custom Function 08 (C.Fn-08). The EOS 30D's default ISO setting is 100.
Note
See Chapter 2 for more information on ISO expansion.
If you want to change the ISO setting, follow these steps:
Turn the Mode dial, and select a Creative Zone mode.
Press the Drive-ISO button on the top of the camera. The camera displays the current ISO setting on the LCD panel. When the camera is set to a Basic Zone mode, the LCD panel displays Auto.
Rotate the Quick Control dial until the ISO setting that you want is displayed in the LCD panel.
Lightly press the Shutter button to begin shooting.
The white balance setting tells the camera the type of light that is in the scene so that the camera can render white and other colors accurately. The EOS 30D is initially set to Auto White Balance, abbreviated and displayed as AWB in the LCD panel. And in Basic Zone modes, the 30D automatically sets the white balance to Auto — a setting that you can't change in these modes.
Note
For more details on white balance options and white balance bracketing, see Chapter 2.
To change the white balance setting, follow these steps:
Turn the Mode dial, and pick a Creative Zone mode.
Press the AF-WB button on the top of the camera. The camera displays the current white balance setting on the LCD panel. When the camera is set to a Basic Zone mode, the LCD panel displays AWB.
Rotate the Quick Control dial until the white balance setting that you want is displayed in the LCD panel.
Lightly press the Shutter button to begin shooting.
The EOS 30D features a nine-point autofocus (AF) system that allows you to focus on the subject whether it is in the center of the frame or off center. By selecting the autofocus point, you set the point of sharpest focus in the image. Autofocus points can be manually selected only in Program AE, Shutter-priority AE, Aperture-priority AE, and Manual modes in the Creative Zone. In the Basic Zone, the camera automatically selects the AF points.
Note
For more on the EOS 30D autofocus system and autofocus modes, see Chapter 1.
To select the autofocus point, follow these steps:
Rotate the Mode dial to P, Tv, Av, or M mode.
Press the AF point selection button on the top-right side of the back of the camera.
Rotate the Main dial or use the Quick Control dial to cycle through the AF points until the point you want is highlighted in red in the viewfinder. As long as you do not press the Shutter button, you can continue to choose different AF points. If you press the Shutter button, repeat Steps 2 and 3 to set a different AF point.
Setting the color space determines the color gamut, or range of colors, that can be reproduced in your images. The EOS 30D offers sRGB, which encompasses a smaller gamut of colors, and Adobe RGB, a larger color gamut. In general, you should choose the color space the matches your color management system and your workflow.
To set the color space, follow these steps:
Set the Mode dial to a Creative Zone mode, and then press the Menu button. If the Shooting (red) menu is not displayed, press the Jump button until it is displayed.
Rotate the Quick Control dial to highlight Color space, and click the Set button. The camera displays two options.
Rotate the Main dial to choose sRGB or Adobe RGB, and press the Set button to confirm your choice.
Lightly press the Shutter button to return to shooting.
Choosing a drive mode determines whether the camera shoots one image at a time or multiple images in rapid sequence. The EOS 30D offers single, high-speed continuous at a maximum of 5 frames per second (fps), low-speed continuous at a maximum of 3 fps, and a 10-second self-timer mode. The EOS 30D is initially set to single shot mode.
Note
For more on drive modes, see Chapter 1.
To set the drive mode, follow these steps:
Rotate the Mode dial to P, Tv, Av, M, or A-DEP mode.
Press the Drive-ISO button, and rotate the Main dial until the drive mode that you want is displayed in the LCD panel. Note that the High-speed continuous mode is indicated with an H, and Low-speed continuous has no alphabetic notation. Self-timer mode is indicated with a clock-like icon.
If you set the camera to a continuous mode, focus on the subject and hold down the Shutter button to take a continuous sequence of images.
With the EOS 30D, you can choose Evaluative, Partial, Spot, and Center-weighted average metering when you are shooting with Creative Zone modes. The new Spot metering mode covers approximately 3.5 percent of the viewfinder area at the center, and it is a good choice when a specific area of the subject is critical for exposure, or when you want to properly expose a subject in difficult lighting such as backlighting. The EOS 30D is initially set to Evaluative metering.
In Basic Zone modes, the camera automatically sets the metering mode. You can change the metering mode in Creative Zone modes.
Note
If you're new to photography, a metering mode determines how the camera's built-in light meter measures light in the scene so that it can determine the correct exposure. Based on the ISO, the camera calculates the aperture and shutter speed combinations required to make a good exposure.
To set an exposure mode, follow these steps:
Rotate the Mode dial to P, Tv, Av, M, or A-DEP mode.
Press the Metering mode selection/Flash exposure compensation button above the LCD monitor, and then rotate the Main dial to select the metering mode that you want. If you rotate the dial to the right, the camera cycles through metering modes in this order: Evaluative, Partial, Spot, and Center-weighted average metering modes.
Canon's Picture Styles allow you to choose specific combinations of sharpness, contrast, color saturation and tone, filter effects, and color toning for a specific image effect. In Basic Zone modes, the camera automatically chooses the Picture Style. You can select the style in Creative Zone modes.
In addition, you also can modify the preset styles and set your own styles.
Note
For more on Picture Styles, see Chapter 2.
The EOS 30D offers these predefined Picture Styles:
Standard. Provides a vivid, sharp, and crisp look.
Portrait. Maximizes the appearance of skin tones with a sharp and crisp rendering. You can also change the color tone to adjust the skin tones.
Landscape. Provides vivid blues and greens with good sharpness.
Neutral. Produces natural colors and more subdued images with no sharpness applied to images.
Faithful. Used for images shot under 5200 K temperatures. The color is colorimetrically adjusted to match the subject color with no sharpening.
Note
For more information on white balance and Kelvin temperatures, see Chapter 2.
To choose a Picture Style, follow these steps:
Rotate the Mode dial to P, Tv, Av, M, or A-DEP mode.
Press the Menu button. If the Shooting (red) menu is not displayed, press the Jump button until it is displayed.
Rotate the Main dial to highlight Picture Style, and press the Set button. The camera displays Picture Style options.
Rotate the Quick Control dial to select the style you want.
Press the Set button to confirm your selection. Your selection remains in effect until you change it by repeating these steps.