Characteristics of RAW images
Choosing a RAW conversion program
Sample RAW image conversion
Creating an efficient workflow
By now, few digital photographers are new to RAW image capture, but for those who are, the advantages of RAW capture can't be overstated. Many digital photography professionals see RAW capture as the new frontier of photography — a frontier that allows greater creative freedom and expression than was possible in the traditional darkroom.
RAW capture allows you to save the data that comes off the image sensor with virtually no internal camera processing. Because the camera settings have been "noted" but not applied in the camera, you have the opportunity to make changes to key settings such as image brightness, white balance, contrast, and saturation after the capture is made. The only camera settings that the camera applies to a RAW image are ISO, shutter speed, and aperture. During RAW image conversion, you can make significant adjustments to exposure, color, and contrast. In addition to the RAW image data, the RAW file also includes information, called metadata, about how the image was shot, the camera and lens used, and other description fields.
RAW capture mode offers advantages that are akin to traditional film photography. For example, in some cases, you can push digital RAW exposures during shooting by 1/2 to a full f-stop, and then pull back the exposure during RAW conversion. The ability to push an exposure can, of course, make a noticeable difference in low-light shooting when you need to handhold the camera.
As with all images, the best first step in any workflow is to save the RAW images on either removable media or on another hard drive. This provides backup should anything happen to the files or computer.
An important characteristic of RAW capture is that it offers more latitude and file stability in making edits than is possible with a JPEG file. With JPEG images, large amounts of image data are discarded in the conversion to 8-bit mode, and then the data is further reduced by JPEG compression algorithms. As a result, the image leaves precious little, if any, wiggle room to correct tonal range, white balance, contrast, and saturation during image editing. Ultimately, this means that if the highlights are blown, then they're blown for good. If the shadows are blocked up, then they will likely stay blocked up. It may be possible to make improvement in Photoshop, but the edits make the final image susceptible to posterization and banding.
On the other hand, RAW images with rich data depth allow far more bits to work with during conversion and subsequent image editing. In addition, RAW files are more forgiving if you need to recover highlight detail. Table AA.1 illustrates the general differences in file richness between a RAW image and a JPEG image from a typical digital SLR camera. Note that this table assumes a five-stop dynamic range for an exposure.
The differences shown here translate directly to editing leeway. And having a good amount of editing leeway is important because all image editing after RAW conversion is destructive.
Proper exposure is important with any image, and it is no less so with RAW images. With RAW images, exposure is important in part because it pertains to the distribution of brightness levels in the linear capture. Linear capture can be contrasted with how the human eye adjusts to differences in light levels. When we go from one room to another room that is twice as light, our eyes automatically compress the differences in light so that we don't perceive the difference to be twice as bright, but only brighter. By contrast, the camera makes no such distinctions. Rather, the camera simply counts photons hitting the sensor. It records the tonal levels exactly to the number of photons captured. As Table AA.1 shows, linear capture has significant implications for digital exposure.
Table AA.1. Comparison of Brightness Levels
F-stop | Brightness Levels Available | |
|---|---|---|
12-bit RAW file | 8-bit JPEG file | |
First f-stop (brightest tones) | 2,048 | 69 |
Second f-stop (bright tones) | 1,024 | 50 |
Third f-stop (midtones) | 512 | 37 |
Fourth f-stop (dark tones) | 256 | 27 |
Fifth f-stop (darkest tones) | 128 | 20 |
Underexposure of an image sacrifices valuable bits of data that could have been — and need to be — captured in the image. And underexposure increases the likelihood that the few levels of brightness that are devoted to dark tones will be riddled with noise. With a miscalculation of one f-stop of brightness, half of the possible tonal levels are missing and the few dark levels that are captured must then be redistributed. Visualize this redistribution as stretching a rubber band. As the band is stretched, small holes analogous to breaks between tonal levels appear.
Modest overexposure of a RAW image delivers all the tonal levels that the camera is capable of providing, including the first f-stop of brightness that accounts for half the total tonal levels in the image. And when tone-mapping is applied, significantly more bits can be redistributed down the line to the midtones and darker tones — areas where the human eye is most sensitive to changes. In short, modest overexposure gives you the best image that the EOS 30D can produce.
RAW image data is stored in proprietary format, which means that the RAW images can be viewed and converted using the camera manufacturer's RAW conversion program, such as Canon's Digital Professional Pro conversion program, or a third-party RAW conversion program such as Adobe's Camera Raw plug-in or Phase One's Capture One.
Unlike standard TIFF and JPEG files, RAW files are not portable. They cannot be moved from computer to computer with the assurance that any system can display them. That means that you must first convert RAW files to a more universal file format or verify that clients have an operating system and conversion program that allows them to display RAW images before you hand off images. And unless the client has a third-party program such as Adobe Camera Raw, they must install and stay up to date with conversion programs from the camera manufacturer. Granted, few photographers hand off RAW images to clients, but as workflow and RAW capture matures, RAW image handoff could become a common part of the handoff process.
Note
Images captured in RAW mode include unique filename extensions such as .CR2 for Canon 30D RAW files.
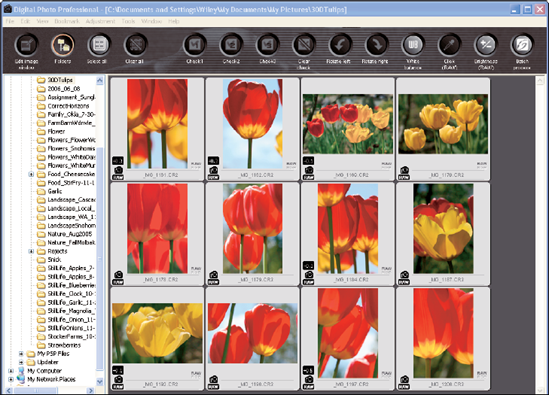
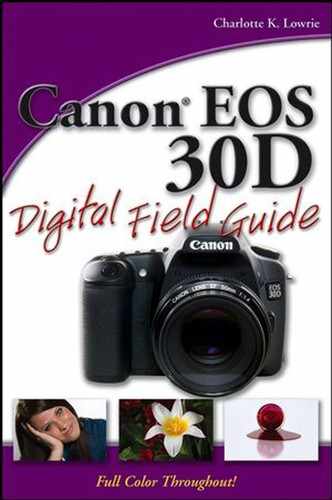
Figure A.1. This figure shows Canon's Digital Photo Professional's main window with the toolbar for quick access to commonly accessed tasks.
Although RAW conversion programs continue to offer more image-editing tools with each new release, you won't find some familiar image-editing tools in RAW conversion programs, including cloning, healing, history brushes, filters, gradient mapping, or the ability to work with layers in the traditional sense. Most conversion programs rightly focus on basic image conversion tasks, including white balance, exposure, shadow control, brightness, contrast, saturation, sharpness, noise reduction, and so on.
Choosing a RAW conversion program is a matter of personal preference in many cases. Canon's Digital Photo Professional (DPP) is included with the 30D, and updates to it are offered free of charge. Third-party programs, however, often have a lag time between the time that the camera is available for sale and the time that the program supports the new camera. For example, there was approximately a six-week lag time between when the 30D was available and the time when Adobe Camera Raw supported 30D files. Some photographers use the Canon conversion program during the lag time, while others use only the Canon program or wait for a third-party program to support the new camera.
Arguments can be made for using either the manufacturer's or a third-party program. The most often cited argument for using Canon's program is that because Canon knows the image data best, they are most likely to provide the highest quality RAW conversion. At the same time, many photographers have tested the conversion results from Canon's program and Adobe's Camera Raw plug-in, and they report no difference in conversion quality.

Figure A.2. By way of contrast, Adobe presents images in Bridge, and from Bridge or Photoshop you can open RAW images in Camera Raw for conversion.
Assuming that there is parity in image conversion quality, the choice of conversion programs boils down to which program offers the ease of use and features that you want and need. Certainly a company like Adobe has years of experience building feature-rich programs for photographers within an interface that is familiar and relatively easy to use. Canon, on the other hand, has less experience in designing features and user interfaces for software.
Because both programs are free (provided that you have Photoshop CS2 or an earlier version of Photoshop), you should try both programs and any other conversion software that offers free trials. Then decide which one best suits your needs. I often switch between using Canon's DPP program and Adobe Camera Raw. When I want to apply a Picture Style from Canon to a RAW image or when I want to convert a RAW image to monochrome and apply a color filter, I use DPP. For most everyday processing, however, I use Adobe Camera Raw, which offers more flexibility in setting curves and tweaking color.

Figure A.3. This figure shows the RAW image adjustment controls in Canon's Digital Photo Professional. Note that you can apply a Picture Style after capture.
Another consideration is which program offers the most and best batch features. DPP allows you to apply conversion settings from one photo to others in the folder, as does Camera Raw. Camera Raw also has the advantage of applying actions to batches of images.
Whatever conversion program you choose, be sure to explore the full capabilities of the program. Remember also that one of the advantages of RAW conversion is that as the conversion programs improve, you'll have the opportunity to go back to previous RAW image files and reconvert them using the improved conversion program.

Although RAW image conversion adds a step to the processing workflow, this important step is well worth the time spent processing images. To illustrate the process, I give a broad overview using Digital Photo Professional to convert a RAW EOS 30D image.
Start Digital Photo Professional. The program opens with the images in the currently selected folder displayed. RAW images are marked with a camera icon and the word RAW in the lower left of the thumbnail. On the right of the window, you can select a different directory and folder.
Double-click the image you want to process. The RAW image adjustment tool palette opens to the right of the image preview. In this mode, you can:
Drag the Brightness slider to tweak the exposure to a negative or positive setting by dragging the slider.
Use the White balance adjustment controls to adjust color. You can click the Click button, and then click an area that is white in the image to set white balance, choose one of the preset white-balance settings from the Shot Setting drop-down menu, or click the Tune button to adjust the white balance using a color wheel.
Choose a different Picture Style by clicking the drop-down arrow next to Standard and selecting a Picture Style from the list. The Picture Styles are the same as those offered on the menu on the EOS 30D. When you change the Picture Style in DPP, the thumbnail updates to show the change. You can adjust the curve, color tone, and saturation and sharpness. If you don't like the results, you can click Reset to change back to the original Picture Style.
Adjust the black and white points on the image histogram by dragging the bars at the far left and right of the histogram toward the center. By dragging the slider under the histogram, you can adjust the tonal curve. To set a Linear curve, select the Linear option, although I don't recommend using this adjustment because you cannot make further curve adjustments.
Adjust the Color tone, Color saturation, and Sharpness by dragging the sliders. Dragging the Color tone slider to the right increases the green tone, and dragging to the left increases the magenta tone. Dragging the Color saturation to the right increases the saturation, and vice versa. Dragging the Sharpness slider to the right increases the sharpness.
Click the RGB image adjustment tab. Here you can apply a more traditional RGB curve and apply separate curves in each of the three color channels, Red, Green, and Blue. You can also adjust the following:
Drag the Brightness slider to the left to darken the image or to the right to brighten the image. The changes you make are shown on the RGB histogram as you make them.
Drag the Contrast slider to the left to decrease contrast or to the right to increase contrast.
Drag the Color tone, Color saturation, and Sharpness sliders to make the appropriate adjustments.
In the preview window, choose File

Note
The File menu also enables you to save the current image's conversion settings as a recipe. Then you can apply the recipe to other images in the folder.
Click Save. DPP displays the Digital Photo Professional dialog box until the file is converted. DPP saves the image in the location and format that you choose.
When workflow became a buzzword several years ago, it typically encompassed the process of converting and editing images one at a time or several at a time. Since then, however, the concept of workflow has expanded to include the process from image capture to client handoff, often including pre-press settings, that ensures image quality and consistent settings that meet the client's needs and specifications.
While workflow varies depending on your needs or the needs of the client, here are some general steps that you can consider as you create your workflow strategy.
The first workflow step for many photographers is backing up original images to a separate hard drive or to DVD. Whether you do this step now or later, it's a critical aspect of any workflow.
Batch file renaming allows you to identify groups of images by subject, assignment, location, date, or all these elements. Programs such as DPP and Adobe Bridge offer tools for batch renaming that saves time in the workflow.
Create a standard IPTC template that has your name, address, phone number, and other important information about the image that is appended to the image metatdata. Then you can use the Tools
Select images and name files consistently. Regardless of whether you're shooting RAW or JPEG images, programs such as Adobe Bridge and Digital Photo Professional provide tools to rate images and then sort them to display top-rated images to process.
If you're processing RAW images, you can open the selected images in groups or all at once for conversion, depending on the RAW conversion program you're using. In some programs, you can select similar images, process one image, and then apply all or part of that image's conversion settings to similar images. Then save the images or open them in Photoshop for additional editing.
If you create JPEG versions of the images for client selection on your Web site, you can use a batch action in Photoshop to make and automatically size images for the Web and save the images in a separate subfolder.
If your workflow includes client selection, you can create subfolders for selected images and move non-selected images to other subfolders. This is a good time to add JPEG versions of the images to a main database of images, if you maintain that type of database. A good practice is to maintain tracking sheets of images that you update during each stage of the process of handing off images to clients, or for your own records for personal images.
Registering images with the Library of Congress protects the copyright to your images and is an important part of the workflow. You can create a 4-×6-inch contact sheet with approximately 12 images per sheet in Adobe Bridge of the images that you want to register. Be sure to leave space on the contact sheet to add your name and contact information.
Note
The copyright gives you the right to control use of your images for your lifetime plus 70 years. The annual fee for bulk image registration is provided on the Web site. For more information, visit
www.editorialphoto.com/copyright/.With the final selections made, you can do the final image processing in Photoshop according to the client's specifications.
When the final images are ready, you can burn a DVD or you can send images via FTP to the client or for your personal archives. Having a fire-safe and flood-safe place to archive hard drives and DVDs is important. Some photographers have a safety deposit box or other off-site location for storage.

The steps you incorporate into your workflow often depend on whether you're shooting for clients or for personal work, but these broad suggestions provide an overview of steps that you can consider for your workflow.