About the battery and CF card
When to use the Main and Quick Control dials
Choosing a media card
Using a CF card
Setting the date and time
Choosing the file format and quality
Setting file numbering
Choosing a white balance option
About Picture Styles
Choosing a color space
Setting ISO and extended-range ISO
Setting up the Canon EOS 30D is a quick process. Canon has simplified the menus and offered Custom Functions that allow you to customize the control and operation of the camera to suit your shooting style and preferences. The Quick Tour provided an overview of setup on the camera, but this chapter goes into more detail on the setup options and offers tips for ease of operation.
Chances are good that, if you've already done some of the setup tasks, you can skim through the chapter watching for tips that you may have missed in your initial setup. However, a couple of features that are new to the EOS 30D are covered in this chapter, including Canon's new Picture Styles and the ability to set your own custom styles with three user-defined options. Additionally the ability to expand the ISO settings up to an equivalent of 3200, shown as "H" on the camera, is also covered. All of these options are worth exploring in detail, both for workflow and for unique shooting situations.
Before you set up the EOS 30D, be sure that the lithium-ion battery (BP-511A) is fully charged. A charging cycle for a new or fully depleted battery is approximately 90 minutes. Be sure to leave the battery in the charger for an hour after the red light stops blinking to complete the charging cycle — making total charging time approximately 2.5 hours. For long shooting sessions such as weddings and news events, you can consider buying the optional battery grip that holds two BP-511A (or BP-511/512/513) lithium-ion batteries or six AA batteries in the magazine. Because the charger holds only one battery, you may consider buying an extra charger as well.
The camera also offers an AC adapter that is best accessed by opening the battery compartment door and flipping up the rubber covering for the DC coupler plug. To use AC power, you need to buy the optional AC Adapter Kit ACK-E2.
When traveling out of the country, you don't need a separate power transformer for the Battery Charger 9CG-580/CB-5L because it works with a 100 VAC and 240 VAC 50/60 Hz power source. Just be sure to pack a plug adapter for the charger.
Before discussing specific setup tasks, it's helpful to know when to use the Main and the Quick Control dials on the EOS 30D. In loose terms, the Main dial is used to set shooting-related settings. The Quick Control dial, however, also can be used for this purpose, provided that you have the Power switch in the uppermost position. And it can be used to select menu options and to set things such as exposure compensation. Also, you can use it to select AF points via C.Fn-13, which is detailed in Chapter 1.
Although in many cases, you can use either dial, Table 2.1 shows a rundown of which dial controls what function or setting.
Table 2.1. Main and Quick Control Dial Selection Functions
Quick Control Dial | |
|---|---|
Autofocus Mode | White Balance Mode |
|
|
Metering Mode | Flash Compensation |
|
|
Drive Mode | ISO |
|
|
The EOS 30D accepts CompactFlash (CF) Type I and Type II media cards as well as microdrives. And, because the EOS 30D supports the FAT32 file system, you can use media cards with capacities of 2GB and larger. While microdrives are economical, they contain moving mechanisms much like the hard drive of a computer and these moving mechanisms can be easily damaged by bumping or dropping the microdrive. Conversely, CF cards are virtually indestructible surviving drops, being driven over by a car, and accidentially being washed in the pockets of clothing in washing machines with no loss of images.
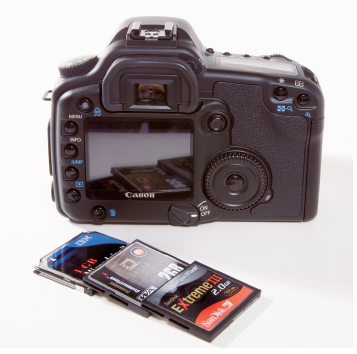
Not all media cards are created equal. In particular, the type and speed of media you use affect the camera's response times for tasks such as writing images to the media card and the ability to continue shooting during that process, the speed at which images are displayed on the LCD, and how long it takes to zoom images on the LCD. The type of file format that you choose also affects the speed of certain tasks — when writing images to the media card, for example. JPEG image files write to the card faster than RAW files or the RAW+JPEG option.
CF cards include a controller and multiple flash-memory chips that determine the -performance of the card. The controller determines the speed of communication with the camera and how much data can be written to and read from the card. The flash memory determines how fast data can be transferred to the card. You usually pay a premium for cards that offer the fastest memory.
Currently, CF cards of 2GB and 4GB are common while 8GB cards are gaining popularity. When selecting a CF card or microdrive, you should know that the card speed isn't the only determinant of performance. How the card interacts with the camera to exchange data affects speed and means that cards that are speedy performers when used in one camera may not be as speedy when used in another camera.
CF cards have a limited life span that is measured in write/erase cycles. Even if memory cells go bad or reach their lifespan limit, CF cards are designed to automatically skip bad cells. The life of a card depends on the manufacturer, but it is measured in hundreds of thousands or millions of write/erase cycles.
When you get a new card, always format it in the camera as was explained in the Quick Tour. Never format a card on your computer. If you are using CF cards that you've used in other cameras, formatting them in the EOS 30D is also important. Of course, formatting the card erases images, so be sure to off-load all images to the computer before you format the card. In general, you should format media cards every few weeks, and if you've used a media card in another camera, be sure to reformat it in the EOS 30D to ensure proper data structure is set and to clean up the card.
To reformat the card in the camera, follow these steps.
Press the Menu button.
Press the JUMP button until the Set-up (yellow) menu is displayed.
Rotate the Quick Control Dial to highlight Format, and then press the Set button. The camera displays a confirmation screen.
Rotate the Quick Control dial to select OK, and then press the Set button. The camera erases all images and formats the CF card.
As you take pictures, the LCD panel and viewfinder show the approximate number of images remaining on the media card. The number is approximate because each image varies slightly depending on the ISO setting, the file format and resolution, the parameters chosen on the camera, and the image (different images compress differently).
To avoid shooting without a memory card in the camera, you can set the camera so that you can't shoot unless a memory card is inserted. Just follow these steps.
Setting the date and time on the EOS 30D ensures that the data that travels with each image file has the correct date and time stamp. This data, commonly referred to as metadata, helps you identify when the image was taken and is very helpful when you want to organize your image collection.
Metadata is a collection of all the information about an image, including the filename, date created, size, resolution, color mode, camera make and model, exposure time, ISO, f-stop, shutter speed, lens data, and white balance setting, to name a few. EXIF, used interchangeably with metadata, is a particular form of metadata.
To set the date and time on the EOS 30D, follow these steps:
Press the Menu button on the back of the camera.
Press the JUMP button until the Set-up (yellow) menu is displayed.
Rotate the Quick Control dial to highlight Date/Time, and then press the Set button. The camera displays the date and time options with the month option highlighted.
Press the Set button, and then rotate the Quick Control dial to change the month.
Press the Set button to confirm the change.
Rotate the Quick Control dial to select the day option, and then press the Set button.
Rotate the Quick Control dial to change the day, and then press the Set button to confirm the change. Repeat Steps 6 and 7 to change the year, minute, second, and date/time format options. You can choose to show the date as mm/dd/yy, dd/mm/yy, or yy/mm/dd.
When all options are set, rotate the Quick Control dial to select OK, and then press the Set button.
The file format and quality level used to take your pictures determines not only the number of images you can store on the media card, but also the sizes at which you can enlarge and print images taken with the EOS 30D. The setting you choose also determines whether images are stored as JPEGs, in RAW, or both RAW and JPEG format.
Table 2.2 shows the options from which you can choose.
Table 2.2. EOS 30D File Format and Quality
Image Quality | Approximate Recording and Print Sizes | Image Size (Pixels) | Format | Approximate File Size |
|---|---|---|---|---|
L (Large/Fine) L (Large/Normal) | Records images at approximately 8.2 megapixels, sufficient for making A3-size prints (12″ × 8.6″). | 3054 × 2336 | JPEG | 3.6 MB 1.8 MB |
M (Medium/Fine) M (Medium/Normal) | Records images at approximately 4.3 megapixels sufficient for making A5- (8.5″ × 6″) to A4-size (8.3″ × 11.7″) prints. | 2544 × 1696 | 2.2 MB 1.1 MB | |
S (Small/Fine) S (Small/Normal) | Records images at approximately 2 megapixels sufficient for making A5 (8.5″ × 6″) prints. | 1728 × 1152 | 1.2 MB 0.6 MB | |
RAW | Records images at approximately 8.2 megapixels with no image degradation from compression. Sufficient for printing images at A3 size (12″ × 8.6″) or larger. RAW images must be processed on the computer and cannot be printed directly from the camera. | 3054 × 2336 | .CR2 | 8.7 MB |
RAW+JPEG | Simultaneously records RAW images at 8.2 megapixels and any of the JPEG sizes. Both the RAW and JPEG images have the same filename and are saved in the same folder. This is a good option to choose when you need to quickly send the client low-resolution proofs of a shoot or to post proofs on your Web site for client viewing. Because the JPEG and RAW filenames are the same, you can have the client choose by filename, and then use the JPEG filename to reference the RAW file for final processing and printing. | 3054 × 2336 | .CR2 and .jpg | 8.7 MB and the JPEG size you've selected |
In Basic Zone modes, the EOS 30D automatically sets the recording format to JPEG, although you can choose the level of quality. In Creative Zone modes, you can choose to capture images in JPEG, RAW, or RAW+JPEG format.
JPEG, which stands for Joint Photographic Experts Group, is a lossy file format, meaning that it discards some image data during the process of compressing image data stored on the media card as well as during subsequent saves when editing if you edit in JPEG format. Because JPEG images are compressed, you can store more images on the CF card. However, as the compression ratio increases, more of the original image data is discarded and image quality subtly degrades.
Other important things to know about choosing JPEG formats are that, unlike RAW images that allow you to change many settings after the picture is taken, JPEG images are processed by Canon's internal hardware/software before being stored on the media card. JPEG images can be opened in any image-editing program and can be printed directly from the computer.
If you choose the JPEG format, then you can choose among different image sizes and among compression ratios ranging from low (Fine settings) and high (Normal settings).
Shooting in RAW format means that data directly from the image sensor is stored on the CF card with minimal in-camera processing. However, unlike JPEG images that can be viewed in any image-editing program and printed directly from the camera, RAW files must be viewed and converted using Canon's Digital Photo Professional program or Adobe's Bridge file viewer and Adobe's Camera Raw plug-in (or other third-party RAW applications). If you've chosen to shoot with the RAW+JPEG option, you can view the JPEG files using any image-editing program.
Capturing RAW images has undisputable advantages. First, RAW data gives you the ultimate flexibility: You can change some camera settings after the picture is taken. For example, if you didn't set the correct white balance or exposure, you can change it in a RAW conversion program on the -computer. This gives you a second chance to correct underexposed or overexposed images within reason, and to correct the color balance after you take the picture.
Second, you can also do additional processing during the conversion. Depending on the conversion program that you use, you can also reduce color and luminance noise, correct chromatic aberrations, and correct lens vignetting. Third, as RAW conversion programs evolve, you will be able to go back to images taken months or years ago and reprocess them for improved results or with different renderings.
The image quality that you choose affects the maximum burst rate as shown in Table 2.3.
Table 2.3. EOS 30D Image Quality and Maximum Burst Rates
Maximum Burst Rate for High-Speed Continuous Shooting[a] | Maximum Burst Rate for Low-Speed Continuous Shooting[a] | |
|---|---|---|
L (Large/Fine) | 30 | 37 |
L (Large/Normal) | 55 | 100 |
M (Medium/Fine) | 50 | 60 |
M (Medium/Normal) | 100 | 165 |
Small (Small/Fine) | 105 | 240 |
Small (Small/Normal) | 220 | 850[b] |
RAW | 11 | 11 |
RAW+JPEG | 9 | 9 |
[a] Figures are approximate and depend on the speed of the CF card. [b] You can continue shooting in continuous shooting mode until the CF card is full. | ||
The maximum number of shots remaining during maximum burst is displayed to the lower-right of the viewfinder. If you pause shooting, the maximum burst rate catches up and the maximum number of shots increases. If you've set white-balance bracketing, the number of images will be fewer than shown here.
To set the image quality of your pictures, follow these steps:
Rotate the Mode dial to a Creative Zone mode.
Press the Menu button.
Press the JUMP button to display the Shooting (red) menu.
Rotate the Quick Control dial to highlight Quality, and then press the Set button. The image quality options are displayed.
Rotate the Quick Control dial to select the recording quality you want, and then press the Set button.
Rotate the Mode dial to a Basic Zone mode, and then repeat Steps 2 through 5 to set the JPEG image quality for the Basic Zone modes. Remember that you are not able to choose RAW when the camera is in a Basic Zone mode.
With the EOS 30D, you can have the camera number images continuously or have it restart numbering each time you change the media card, or you can choose to manually reset file numbering. File numbering is assigned from 0001 to 9999. Folders numbered from 100 to 999 hold up to 9,999 images each.
With Continuous numbering, images are numbered sequentially using a unique four-digit number from 0001 to 9999. With unique filenames, managing and organizing images on the computer is easy because you can easily ensure that images do not have duplicate filenames. This option is also useful to track the total number of images, or actuations, on the camera. The EOS 30D's default setting is Continuous file numbering.
If you use Auto Reset, both file and folder numbering restarts when you insert a newly formatted CF card. Folder numbers begin with 100, and file numbering begins with 0001, unless the CF card contains a previous image, in which case, numbering begins with the highest file number in the highest numbered folder on the CF card. If you like to organize images by media card, Auto Reset may be a useful option. However, multiple images will have the same filename. This means that you should create separate folders for each off-load and otherwise follow scrupulous folder organization to avoid filename conflicts and potential overwriting of images on the computer.
You also can choose to manually reset numbering. With this option, a new folder is created with the next higher number and the file number restarts with 0001. Subsequent images are saved in the new folder. Whichever file numbering method you previously used (Auto Reset or Continuous) takes effect when you take additional images.
To change the file numbering method on the EOS 30D, follow these steps:
Press the Menu button.
Press the JUMP button until the Set-up (yellow) menu is displayed.
Rotate the Quick Control dial to highlight File numbering.
Press the Set button. The camera displays the File numbering options.
Rotate the Quick Control dial to select Continuous, Auto Reset, or Manual Reset.
Press the Set button.
A white balance setting tells the camera the type of light that is in the scene so that the camera can render white and other colors accurately. The temperature, or color, of light, measured in degrees Kelvin, varies by source and during daylight, by the time of day. The three primary colors, Red, Green, and Blue (RGB), exist in different proportions in different temperatures of light. Setting a white balance option allows the in-camera software to render colors more naturally. When shooting RAW images, you can also readjust the white balance in the image conversion program.
With the EOS 30D, you have various options for setting white balance, depending on whether you're capturing JPEG or RAW images. Table 2.4 provides an overview of the white balance options and when you can use them, depending on the image format and mode you've chosen.
Table 2.4. EOS 30D White Balance Options by Image Format
JPEG | RAW or RAW+JPEG | |
|---|---|---|
Preset white balance settings: | Available. | Available. |
Auto (AWB) (3,000 - 7,000 K)
| In Basic Zone modes, the camera automatically selects AWB. | |
Custom white balance. Allows you to photograph a white or gray object that serves as the basis for white balance for one or more images. | Available only in Creative Zone modes. | Available. |
Kelvin temperature (2,800 to 10,000 K). Allows you to set the specific color temperature for a scene.[a] | Available only in Creative Zone modes. | Available. |
White balance correction. Similar to using a traditional color-conversion filter, this option allows you to shift color bias toward blue, amber, magenta, or green. | Available only in Creative Zone modes. | Available. |
White balance auto bracketing. Bracketed shots include one standard color temperature shot, shot biased with blue/amber, and shot biased toward magenta/green. | Available. | Available. |
[a] This option is best used with a color temperature meter or in scenes where you know the color temperature of the light source. | ||
Note
Chapter 4 provides more detail on light and color temperature.
The automatic white balance setting evaluates the colors in the scene and makes an educated guess on white balance. AWB works well except in scenes dominated by one or two colors and where no white is present. In general, the best white balance is achieved when you are shooting in the following manners:
For JPEG images. Choose one of the preset white balance options, and the option closely matches the actual color temperature in the scene. Or if you know the temperature of the light source, use the color temperature to match it. In some scenes, for example, when shooting in mixed light, white balance bracketing provides some assurance of getting accurate color in one or more shots.
For RAW images. Set a Custom white balance, or in the series of images under the same light, shoot one image with a gray card in the scene. In an image-editing program, set the white balance by clicking the gray or white card, and then apply that white balance setting to the other images in the series during image conversion.

To change to a preset white balance option or to set a specific color temperature on the EOS 30D, follow these steps:
Set the Mode dial to a Creative Zone mode.
Press the AF-WB button.
Rotate the Quick Control dial until the White Balance option you want is displayed on the LCD panel.
If you chose K to set the color temperature, press the Menu button.
Press the JUMP button until the Shooting (red) menu is displayed, and then rotate the Quick Control dial to highlight Color temp.
Press the Set button, and then rotate the Quick Control dial to set the color temperature that you want.
Press the Set button. The color temperature you set remains in effect for the K (Color Temperature) setting until you change it.
Press the shutter button halfway to return to shooting.
Mixed light scenes, such as tungsten and daylight, used to drive photographers crazy. Shooting film in these scenes meant that you had to hold your breath and hope for the best. But digital photography changed everything. With the EOS 30D, you can set a custom white balance to get accurate color in mixed light, as well as in any lighting situation. Setting a custom white balance saves time that you'd otherwise spend color correcting images on the computer.
To set a custom white balance, follow these steps:
Set the camera to a Creative Zone mode, and ensure that the Picture Style is not set to Monochrome.
Position the camera so a sheet of white paper fills the center of the viewfinder, and take a picture. If the camera cannot focus, switch the lens to MF (Manual Focusing), and focus on the paper. Also ensure that the exposure is neither underexposed nor overexposed.
Press the Menu button.
Press the JUMP button until the Shooting (red) menu is displayed, and then rotate the Quick Control dial to highlight Custom WB. The camera displays the last image taken and the Custom WB screen.
If necessary, rotate the Quick Control dial to select the image of the white or gray card or paper.
Press the Set button. The EOS 30D imports the white balance data from the selected image and displays a message reminding you to set the white balance to Custom WB.
Press the shutter button halfway to dismiss the menu.
Press the AF-WB button.
Rotate the Quick Control dial to select Custom WB. The Custom WB icon is two triangles on their side with a solid rectangle between them. The Custom white balance remains in effect until you change it by setting a new Custom white balance.
White balance auto bracketing helps ensure that one or more images offer accurate color. White balance bracketing captures three images, each with +/−3 shifts in blue/amber and magenta/green bias from the base white balance setting.
Note
You can use white balance auto bracketing together with autoexposure bracketing. If you do this, nine images are taken for each shot.
To set a white balance auto bracketing, follow these steps:
If you have the camera recording set to RAW, reset the image recording to JPEG.
Press the Menu button on the back of the camera, and then press the JUMP button until the Shooting (red) menu is displayed.
Rotate the Quick Control dial to highlight WB SHIFT/BKT, and then press the Set button. The camera displays the WB correction/WB bracketing screen.
Rotate the Quick Control dial to set the bracketing direction and level. Rotating the dial to the right sets the blue/amber bracketing. Rotating the dial to the left sets the magenta/green bracketing. One or more small boxes are displayed to indicate the level of bracketing up to +/−3 levels in single-level increments. To the right, the camera indicates the bracketing direction and level under BKT.
Press the Set button.
Take the picture. The EOS 30D captures the standard white balance first and then the blue and amber bias shots. If a magenta/green bias is set, then the image capture sequence is the standard, then the magenta, and then the green bias images.
The white balance selection blinks in the LCD when bracketing is set. To cancel white balance bracketing, reset the bias to +/−0 and 1 level by repeating Steps 1 through 5.
For anyone familiar with using color—compensation filters, the EOS 30D offers a similar function with its white balance correction. Correction can be shifted toward a blue (B), amber (A), magenta (M), or green (G) bias in up to nine levels measured as mireds, or densities. Each level is equivalent to five mireds of a color-temperature conversion filter. You can set a white balance correction if you're shooting either JPEG or RAW format images.

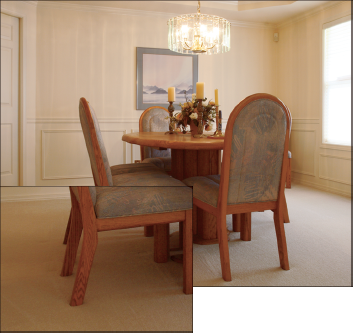
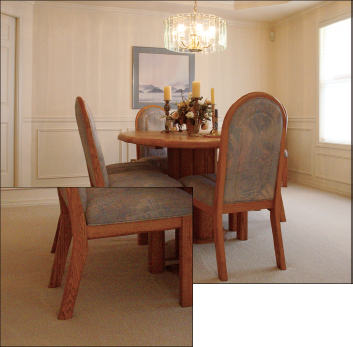
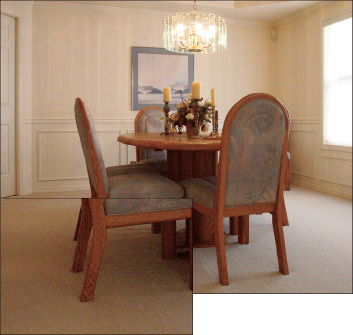
Figure 2.4. This image taken under mixed daylight and tungsten light used standard Auto White Balance with no correction.

To set White Balance Correction, follow these steps.
Set the camera to a Creative Zone mode.
Press the Menu button.
Press the JUMP button until the Shooting (red) menu is displayed.
Rotate the Quick Control dial to highlight WB SHIFT/BKT, and then press the Set button. The camera displays the WB correction/WB bracketing screen.
Press the Multi-controller to move the cursor toward a blue, amber, magenta, or green correction. On the right of the screen, the SHIFT panel shows the bias and correction amount. For example, A2, G1 shows a two-level amber correction with a one-level green correction.
Press the Set key to confirm the changes. The shift you set remains in effect until you change it.
To cancel White Balance Correction, repeat Steps 1 through 5, but in Step 5 use the Multi-controller to set the cursor to 0,0, or the center of the graph, and then press the Set button. You also can combine White Balance Correction with White Balance bracketing.
Picture Styles are settings that determine the sharpness, contrast, color saturation, and color tone that can be applied to images in the camera or, with RAW images, after capture using Canon's Digital Photo Professional conversion program. For example, when the Monochrome picture style is chosen, filter effects and color toning options can also be applied. In addition, you can modify and register up to three custom Picture Styles by modifying an existing style.
Because Picture Styles are in use on most of Canon's EOS digital SLR cameras, using and/or modifying Picture Styles can help standardize image settings across different cameras, which can make workflow in studio environments more efficient. If you want to see how the new Picture Styles relate to the formerly used Parameters, visit www.canon.co.jp/Imaging/picturestyle/shooting/index.html.
Table 2.5 provides an overview of Picture Styles.
Table 2.5. EOS 30D Picture Styles
Description | Color Saturation | Tonal Curve | Default Settings[a] | |
|---|---|---|---|---|
Vivid, moderately sharp, crisp | Higher contrast | High saturation | 3,0,0,0 | |
Enhanced skin tones, soft texture, lower sharpness | Higher contrast | Slightly high saturation | 2,0,0,0 | |
Landscape | Vivid blues and greens, high sharpness | Higher contrast | High saturation for greens/blues | 4,0,0,0 |
Neutral | Natural but subdued color. No sharpness applied. | Medium, subdued contrast | Low saturation | 0,0,0,0 |
Faithful | Colorimetrically adjusted to match 5200 K. No sharpness applied. | Medium, subdued contrast | Low saturation | 0,0,0,0 |
Monochrome | Black-and-white or toned[b] images with slightly high sharpness | Higher contrast | Low saturation; yellow, orange, red, and green filter effects available | 3,0 |
[a] Settings shown in this sequence: Sharpness, Contrast, Color saturation, Color Tone, Filter effect (Monochrome), and Color toning (Monochrome). [b] RAW images captured in Monochrome can be converted to color using the software bundled with the camera. However, JPEG images captured as Monochrome cannot be converted to color. | ||||
The following series of images shows the differences in Canon's Picture Styles using the same scene.
Note
Okay, you probably aren't going to use a portrait style for a -residential image, but for the sake of illustrating the changes across each style, I'm using a residential image here.
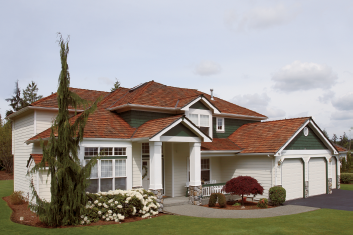
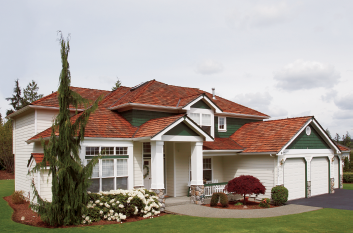

Figure 2.8. Landscape Picture Style (with a sharper curve and saturated green and blue colors, it is best suited to this kind of image)
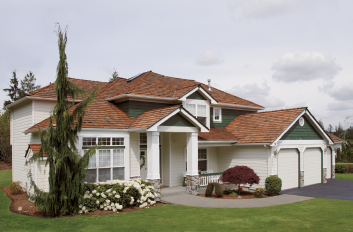
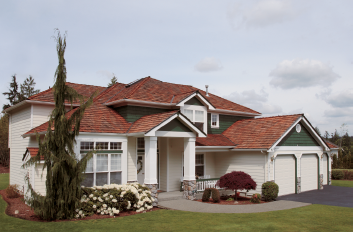
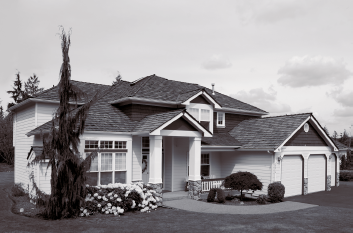
Figure 2.10. Faithful Picture Style (best in venues where you know the color temperature is 5,200 K)
You can choose a Picture Style by following these steps:
Set the camera to a Creative Zone mode.
Press the Menu button.
Press the JUMP button until the Shooting (red) menu is displayed.
Rotate the Quick Control dial to highlight Picture Style. The camera displays the Picture Style screen.
Rotate the Quick Control dial to select the Picture Style you want, and then press the Set button.
You also can modify the settings for a Picture Style and register up to three customized sets as user-defined styles. Settings for Sharpness can be adjusted from 0 to +7. Settings for Contrast and Color saturation can be adjusted in a range of +/−4. Color tone for skin tones can be set to more red (negative settings) to more yellowish (plus settings) to +/−4.
To customize any Picture Style except Monochrome, follow these steps:
Set the camera to a Creative Zone mode.
Press the Menu button.
Press the JUMP button until the Shooting (red) menu is displayed.
Rotate the Quick Control dial to highlight Picture Style, and then press the Set button. The camera displays the Picture Style selection screen.
Rotate the Quick Control dial to select a Picture Style except Monochrome, and then press the JUMP button. The camera displays the Detail set. screen.
Rotate the Quick Control dial to select one of the settings, for example, Sharpness, and then press the Set button.
Rotate the Quick Control dial to set the level that you want for the setting, and then press the Set button.
Rotate the Quick Control dial to select the next setting that you want to modify, and then press the Set button. Repeat Steps 6 and 7 to change the setting. Continue the process until all of the settings are adjusted.
Press the Menu button. The camera displays the Picture Style selection screen with modified settings shown in blue.
Note
To return to the default settings for a Picture Style, follow Steps 1 through 4 — except in Step 4 rotate the Quick Control dial to select Default set., which is at the bottom left of the Detail set. screen. Press the Set button to reset the style to the default settings.
To customize the Monochrome Picture Style, follow these steps.
Set the camera to a Creative Zone mode.
Press the Menu button.
Press the JUMP button until the Shooting (red) menu is displayed.
Rotate the Quick Control dial to highlight Picture Style, and then press the Set button. The camera displays the Picture Style selection screen.
Rotate the Quick Control dial to select Monochrome, and then press the JUMP button. The camera displays the Detail set. screen.
Rotate the Quick Control dial to select the setting you want to change, and then press the Set button.
Rotate the Quick Control dial to adjust the setting
Repeat steps 6 through 7 until all the changes are made.
Press the JUMP button to return to the Picture Style menu, and then press the Set button again or press the Shutter button to begin shooting.
Note
If you want to reset the Monochrome Picture Style to the default settings, follow Steps 1 through 5. Then rotate the Quick Control dial to choose Default set. at the bottom of the Detail set. screen and then press the Set button to restore default settings.
You can also save up to three styles that you define yourself. To create a style you begin with one of the existing styles, and then set the Sharpness, Contrast, Saturation, and Color Tone to suit your preferences. User-defined styles are handy if you have multiple camera bodies in the studio, and you want to ensure consistency among the cameras.
To save user-defined Picture Style, follow these steps:
Press the Menu button.
Press the JUMP button until the Shooting (red) menu is displayed.
Rotate the Quick Control dial to highlight Picture Style, and then press the Set button. The camera displays the Picture Style selection screen.
Rotate the Quick Control dial to highlight User Def. 1/2/3, and then press the JUMP button. The camera displays the settings screen.
To change the base setting of Standard Picture Style, press the Set button, rotate the Quick Control dial until the base style that you want is displayed, and then press the Set button.
Rotate the Quick Control dial to select one of the settings, for example, Sharpness, and then press the Set button.
Rotate the Quick Control dial to set the level that you want for the setting, and then press the Set button.
Press the Menu button to register the style. The camera displays the Picture Style selection screen. The camera displays the base Picture Style to the right of User Def. 1/2/3 and shows changed settings in blue.
Press the Set button.
Note
To undo the changes to a User-Defined style, repeat Steps 1 through 7 and move the settings for each option back to zero.
The EOS 30D offers a choice of two color spaces: sRGB and Adobe RGB. A color space defines the range of colors that can be reproduced. The Adobe RGB color space contains more colors, which is better for inkjet and commercial printing. Adobe RGB images have much more subdued color and saturation than images taken with sRGB. The sRGB color space encompasses fewer colors, but colors appear to be brighter and more saturated than with Adobe RGB. sRGB is well suited for images displayed on the Web or to send in e-mail.
The choice of color space should be made to enhance your overall color workflow. It is always best to capture as much data, including color, in an image as possible, making Adobe RGB the better choice for high-quality images. It is always possible to convert images to sRGB in an image-editing program if you want to display a copy of the image on the Web or in e-mail.
Image filenames captured in Adobe RGB are appended with _MG_. The ICC profile is not appended to the file. ICC is an abbreviation for the International Color Consortium, which promotes the use and adoption of open, vendor-neutral, cross-platform color management systems.
To change the color space on the EOS 30D, follow these steps.
Set the camera to a Creative Zone mode.
Press the Menu button.
Press the JUMP button until the Shooting (red) menu is displayed.
Rotate the Quick Control dial to highlight Color space, and then press the Set button. The camera displays the color space options.
Rotate the Quick Control dial to select the color space you want, either sRGB or Adobe RGB.
Press the Set button.
An ISO setting sets the sensor's apparent sensitivity to light by increasing the signal amplification. The higher the ISO number, the more "sensitive" the sensor is to light and the shorter the time and narrower the -aperture necessary to make an exposure. Conversely, the lower the ISO number, the less "sensitive" the sensor is to light and the longer the time required and the wider the aperture needed to make an exposure.
The EOS 30D offers an ISO range from 100 to 1600 in the default settings and up to the 3200 ISO via the ISO expansion in Custom Function 8 (C.Fn-08). ISO can be set in 1/3-stop increments, and the currently selected ISO setting is displayed (not in the viewfinder-right, thanks) as well as on the LCD. In Basic Zone modes, the ISO is automatically set between 100 and 400. You can set the ISO to any of the available settings in Creative Zone modes.
Note
Custom Functions are discussed in detail in Chapter 1.
As with all digital cameras, the higher the ISO is, the greater the likelihood that digital noise, unwanted color, and luminance artifacts will be introduced into the image, particularly in the shadow areas. In practice, the digital noise depends on your tolerance level. Also note that the camera's overall dynamic range, the difference between the lightest and darkest values in an image, at ISO settings higher than 800 decreases from approximately 8 Exposure Values (EV) to approximately 6 EV.
The set of images here shows selected ISO settings. All images were shot in RAW format and processed in Canon's Digital Photo Professional. No noise reduction has been applied.
Note
To set expanded ISO, see Chapter 1.
To set the ISO on the EOS 30D, follow these steps:
Set the camera to a Creative Zone mode.
Press the DRIVE-ISO button. The camera displays the current ISO setting on the LCD panel.
Rotate the Quick Control dial until the ISO setting you want is displayed in the LCD panel or in the viewfinder.