In This Chapter
Camera and lens controls
Programmed modes
Metering modes
Exposure compensation
Auto exposure bracketing
AE lock
Bulb exposure
Evaluating exposure
Autofocus Modes
Understanding AF point selection
Viewing and image playback
Erasing images
Protecting images
Using the built-in flash
Setting custom functions
Whether you're a wedding photographer, a photojournalist, or an advanced photography aficionado, the Canon EOS 30D is a versatile tool with excellent image resolution and quality, a range of usable and expandable ISO settings so that you can rely on getting great images in low light at higher ISO settings. And at 5 frames per second (fps), you can capture everything from a bride and groom's quick exit to a limousine to the action of a breaking news story.
Weighing in at 24.7 ounces sans lens, the EOS 30D is easy to pack and easy to use. With instant on and instant wake-up from the battery-saving sleep mode via the shutter button and other camera buttons, there is no delay between seeing the image and capturing it.
In this chapter, you get an overview of exposure controls on the 30D, metering and autofocus modes, as well as customizing camera operations to suit your shooting preferences using Custom Functions.
Any professional photographer knows that the most important first step in photography is learning the camera so thoroughly that he or she can operate it in the dark or blindfolded. Only then can camera adjustments be made instinctively and confidently without missing a shot.
You may not think that you need to know your camera that well, but the point is well taken. Knowing your camera inside and out not only instills confidence, but it also allows you to react quickly and get those important shots that you would otherwise miss or that you wish had been better.

Because of the design, the EOS 30D makes mastering the camera easy and fun. Easy-to-access body controls translate into ease of use, while the full-function features offer exceptional creative control. And internally, Canon's high-resolution CMOS (complementary metal oxide semiconductor) sensor dependably delivers vivid, rich, and crisp images, especially at full resolution.
The following sections help you achieve the goal of mastering the EOS 30D. And remember that the more you use the camera, the faster you'll master it.

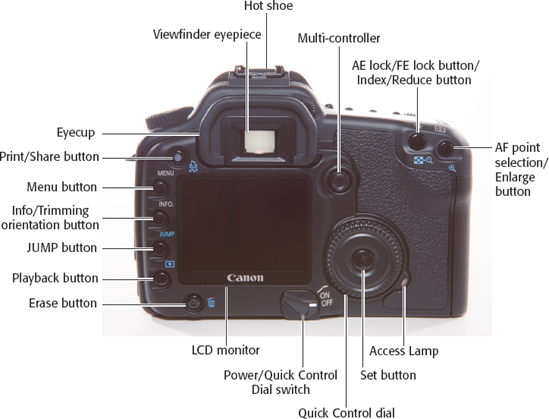
You use the rear camera controls most often. The EOS 30D offers shortcut buttons that are handy for making quick adjustments as you're shooting.
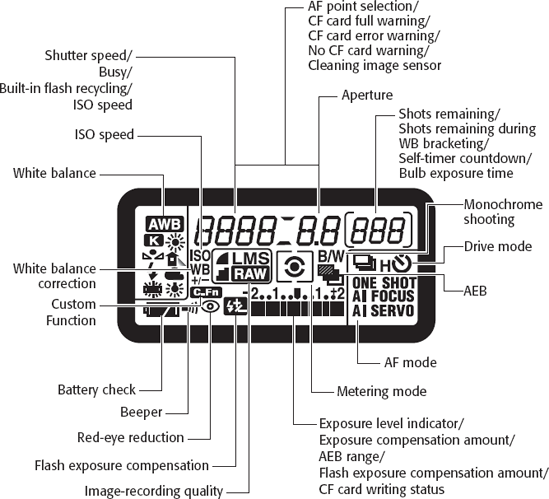
On the top-right of the camera is an LCD panel that shows everything you need to know about exposure settings, frames remaining, battery status, and camera settings. This panel replicates many of the displays that you also see in the viewfinder.
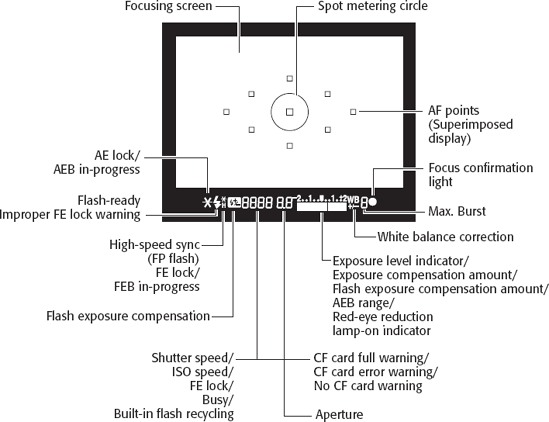
On the EOS 30D, the pentaprism viewfinder displays approximately 95 percent of the vertical and horizontal coverage. In addition to displaying the scene you're shooting, the viewfinder displays the essential shooting information you need.
Auto Focus (AF) points are etched in the focusing screen. If you manually change AF points, the viewfinder highlights AF points as you rotate the Multi-controller. The selected AF points are displayed in red on the focusing screen when you press the shutter button halfway down. The spot metering circle is etched in the center of the matte focusing screen.
To ensure that the viewfinder image and focusing screen elements are adjusted for your vision, you can adjust the diopter from −3 to +1 diopter. Simply rotate the diopter control, located to the right of the viewfinder eyecup, clockwise or counterclockwise until the AF points shown in the viewfinder are sharp.
For quick shots, the programmed Basic Zone modes and Full Auto mode are convenient and easy to use. In the programmed modes, the camera automatically sets all the settings, but you can provide some control over the way the picture looks by specifying the type scene you're shooting.
The Basic Zone modes are quick and easy to use because you set the camera to the type scene that you're shooting, and the camera automatically sets the exposure for you.
For example, if you want a softly blurred background for a portrait, you can select Portrait mode and the camera sets a wide aperture (f-stop), which allows the subject in the foreground to be sharp, but the background blurred.
In Basic Zone modes, the camera automatically sets the Image quality to JPEG, although you can select the level of JPEG quality. The camera also automatically selects the following settings in all Basic Zone modes:
Automatic ISO selection
sRGB color space
Auto white balance
Evaluative metering
Auto flash depending on the light.
In Full Auto mode, the camera automatically sets the exposure. Because the camera does everything, this is a good mode to use for quick snapshots. However, this is not always true because the camera defaults to using the flash, even in scenes where you may not want to use the flash. And in low-light scenes, the camera may select high ISO that can introduce digital noise in the image. In Full Auto mode, the camera sets AI (Focus AF) with automatic auto-focus point (AF) selection, Single-shot (one-image-at-a-time) drive mode, and Standard Picture Style.

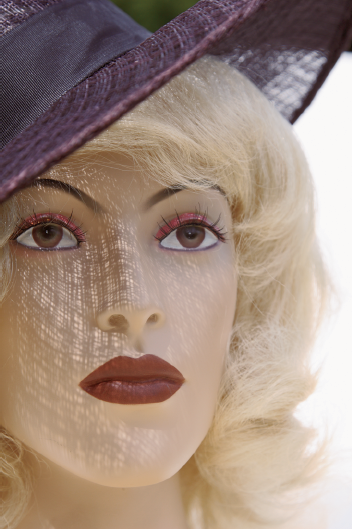
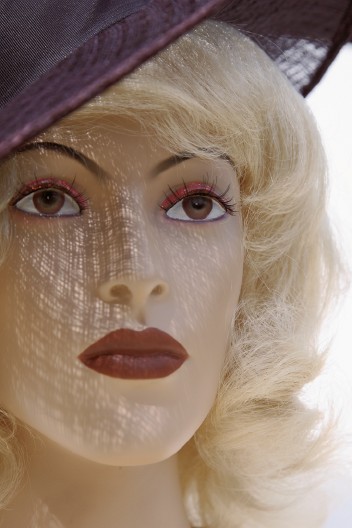
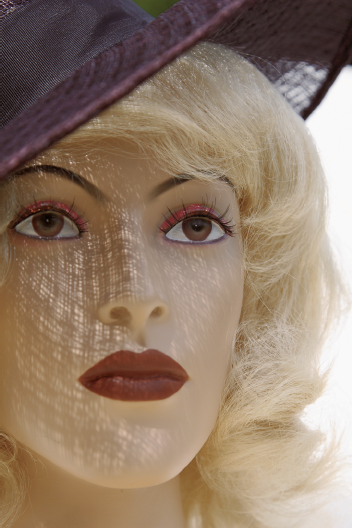
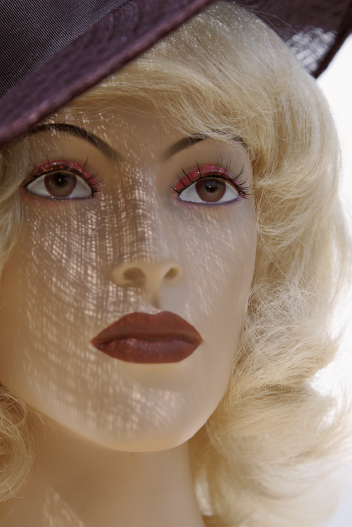
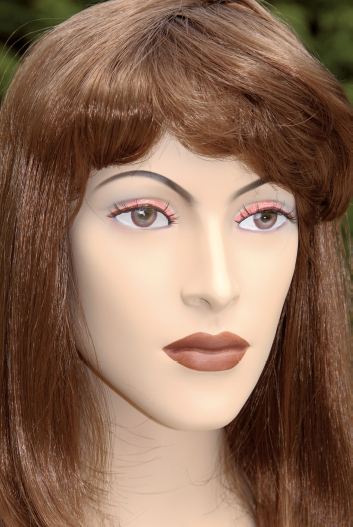
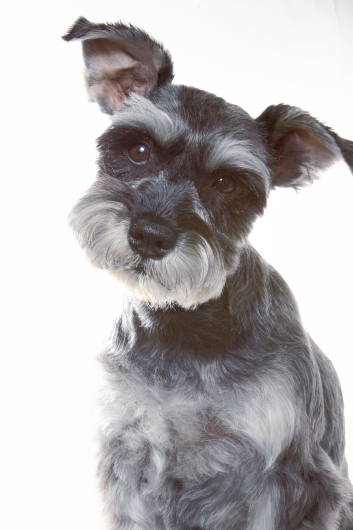
In Portrait mode, the EOS 30D sets a wide aperture (small f-stop number) that makes the subject stand out against a softly blurred background. The EOS 30D also switches to Portrait Picture Style to enhance the subject's skin tones. This mode works well for quick portraits in good light. In low-light scenes, the camera automatically fires the flash, which may or may not be the effect you want in the portrait. In Portrait mode, the camera automatically selects One-shot autofocus and automatic auto-focus point (AF) selection, and Low-speed continuous drive mode at 3 fps.

Figure 1.10. This image was taken in Portrait mode. The camera's automatic exposure was ISO 100, f/4, 1/1000 sec.
As with other programmed modes, you can use scene modes for a variety of other types of subjects. For example, Portrait mode works well for nature and still-life photos indoors and outdoors. If the camera detects insufficient light, the flash fires automatically.
In Landscape mode, the EOS 30D chooses a narrow aperture to ensure that both background and foreground elements are sharp and that the fastest shutter speed possible, depending on the amount of light in the scene, is used. This mode works well not only for landscapes, but also cityscapes, portraits of large groups of people, and for some tabletop photography such as architectural models.

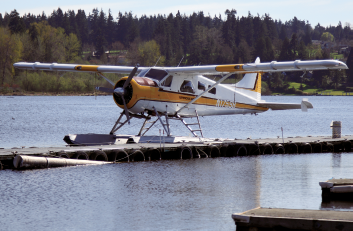
Figure 1.11. This image was taken in Landscape mode. The camera's automatic exposure was ISO 100, f/10 at 1/400 sec.
In lower light, the camera uses slower shutter speeds to maintain a narrow aperture for good depth of field, and it may increase the ISO. As the light fades, watch the viewfinder or LCD panel to monitor the shutter speed and ISO. If the shutter speed is 1/30 second or slower, or if you're using a telephoto lens, be sure to steady the camera on a solid surface or use a tripod. In Landscape mode, the camera automatically sets One-shot autofocus with automatic auto-focus point (AF) selection, Single-shot drive mode, Flash-off mode, and Landscape Picture Style
In Close-up mode, the EOS 30D allows a close focusing distance and provides the same basic results as Portrait mode but chooses one-shot drive mode rather than low-speed continuous drive mode. You can enhance the close-up effect of a close-up image further by using a macro lens. If you're using a zoom lens, zoom to the telephoto end of the lens.
All lenses have a minimum focusing distance that varies by lens. For the best images, focus at the lens's minimum focusing distance. In Close-up mode, the camera automatically sets One-shot autofocus with automatic auto-focus point (AF) selection, Single-shot drive mode, Automatic flash with the option to turn on red-eye reduction, and Standard Picture Style.

In Sports mode, the EOS 30D freezes subject motion by setting a fast shutter speed. While this mode is designed for action and sports photography, you can use it in any scene where you want to suspend motion such as the motion of a moving child or a pet. In addition to sports, this can be a useful mode for shooting news events, weddings and receptions, and some editorial assignments with a telephoto lens.

Figure 1.13. This image was taken in Sports mode. The camera's automatic settings were ISO 400, f/7.1 at 1/1600 sec.
In this mode, the EOS 30D automatically focuses on the subject and tracks the -subject's movement until good focus is achieved, which is confirmed with a low beep. If you continue to hold the shutter button down, the camera maintains focus for -continuous shooting. In Sports mode, the -camera automatically sets AI Servo autofocus with automatic auto-focus point (AF) selection, High-speed continuous drive mode at 5 fps, Flash off, and Standard Picture Style.
In Night Portrait mode, the EOS 30D uses the flash to correctly expose the person combined with a slow synch speed to correctly expose the background. With a longer exposure such as this, the subject should remain still during the entire exposure to avoid blur. Be sure to use a tripod or set the camera on a solid surface to take night portraits.
This mode is best used when people are in the picture rather than for general night shots because the camera blurs the background somewhat as it does in Portrait mode. For night scenes without people, use Landscape mode and a tripod. In Night Portrait mode, the camera automatically sets One-shot autofocus with automatic auto-focus point (AF) selection, Single-shot drive mode, automatic flash with the ability to turn on red-eye reduction, and Standard Picture Style.
In Flash Off mode, the EOS 30D does not fire the built-in flash or an external Canon Speedlite regardless of how low the scene light is. In low-light scenes using Flash Off mode, be sure to use a tripod. This is the mode to use in scenes where flash is -prohibited and when the subject is out of range of flash coverage. In Flash Off mode, the camera automatically sets AI focus AF with automatic auto-focus point (AF) selection, single-shot.
Creative Zone modes offer automatic, semiautomatic, or manual control over some or all exposure settings. This zone includes two automatic modes, Program AE and A-DEP, which offer both automation and creative opportunities. The other three Creative Zone modes, Aperture-priority AE, TV Shutter-priority AE, and Manual exposure mode, put full or partial creative control in your hands.
Program AE mode, shown as P on the Mode dial, is a fully automatic but shiftable mode. When you shift the aperture or shutter speed, the camera automatically adjusts the other setting (aperture or shutter speed) to maintain the same or equivalent exposure.
Note
To learn about exposures and maintaining the same, or equivalent, exposure, see Chapter 3.
This mode allows you to control depth of field and/or shutter speed with a minimum of manual adjustments. For example, if the camera sets the aperture at f/8, but you want to soften background using a wide aperture. By holding down the shutter button halfway and turning the Main dial, you can shift the programmed exposure settings, and use a wide aperture, such as f/4.0 or f/2.8, while the camera automatically adjusts shutter speed to maintain the same exposure value.
You cannot shift the program if you are using a flash. And, the camera automatically cancels program shifts and reverts to the automatic settings after you take a picture.
A-DEP, or Automatic Depth of Field, mode automatically sets the exposure to achieve the optimum depth of field (range of sharpness) between near and far subjects. This is a handy mode for photos where subjects are positioned at staggered distances: One subject is close to the camera, and the other subjects are each at successively farther -distances from the camera. A-DEP mode automatically detects near and far subject distances, and sets the aperture to achieve extensive depth of field to keep all subjects in sharp focus.

Figure 1.15. This image was taken in A-DEP mode. The camera's automatic settings were ISO 100, f/54.0 at 1/800 sec.
In A-DEP mode, you can select all settings except AF points and autofocus mode, which is automatically set to one-shot. The camera does not automatically switch to AI Servo or AI Focus if the subjects move.
Note
You can learn more about depth of field in Chapter 3.
To use A-DEP mode, first make sure the lens is set to AF because A-DEP doesn't work with the lens set to manual focus. Turn the Mode dial to A-DEP. Pressing the shutter button halfway down chooses the AF points.
You can also press the depth-of-field preview button on the front of the camera for a preview of the depth of field.
Aperture-priority AE mode, shown on the camera Mode dial as Av, allows you to set the aperture (f-stop), while the camera automatically chooses the appropriate shutter speed.

Figure 1.16. This image was taken in Aperture-priority AE mode. The exposure was ISO 100, f/9, 1/400 sec.
Note
To learn about aperture, see Chapter 3.
Tip
You can preview the depth of field for an image by pressing the depth-of-field preview button on the front of the camera. When you press the button, the lens diaphragm closes to the aperture you've set so you can see the range of acceptable focus.
For most day-to-day shooting, you'll care most about your ability to control the depth of field, and that makes Aperture-priority AE mode the mode of choice for most photographers.
To use Aperture-priority mode, turn the Mode dial to Av. Aperture values are displayed in the viewfinder in 1/3-stop increments. Turn the Main dial to set the aperture. If "30" blinks in the viewfinder, the image will be underexposed. If "8000" blinks, the image will be overexposed.
Shutter-priority AE mode, shown as Tv on the Mode dial, allows you to set the shutter speed. In this mode, you set the shutter speed, and the camera automatically chooses an appropriate aperture. The shutter speeds that you can choose from and freeze subject action depend on the light in the scene. In low-light scenes without a flash, you may not be able to get a fast enough shutter speed to freeze the action.

Figure 1.17. This picture was taken in Shutter-priority AE mode. The exposure was ISO 100, f/22, 1/30 sec.
The EOS 30D features an electronic, focal-plane shutter with speeds from 1/8000 to 30 sec. in 1/3- and 1/2-stop increments, and a Bulb setting, a setting where the shutter remains open until you release the shutter button. Flash sync speed for most Speedlites and studio strobes is 1/125 sec. or slower, although high-speed sync (FP flash) is available for sync speeds faster than 1/250 sec. The sync speed for non-Canon flash units is 1/250 sec. or slower.
Note
To learn about shutter speeds, see Chapter 3.
To use Shutter-priority AE mode, turn the Mode dial to Tv. Then turn the Main dial to the shutter speed that you want. Time values are shown in the viewfinder in 1/3-stop increments. The camera sets the aperture automatically.
Manual mode, as the name implies, allows you to set both the aperture and the shutter speed based on the light meter reading displayed in the viewfinder. Because it takes more time to set both the aperture and shutter speed, Manual mode is useful in scenes where you want to intentionally overexpose or underexpose the image. Otherwise, the semi-automation of Tv and Av modes is preferred.
However, Manual mode is helpful in difficult lighting situations when you want to override the automatic settings the camera sets in either Av Aperture-priority AE or Tv Shutter-priority AE modes and in situations where you want consistent exposures across a series of photos, such as for a panoramic series.
To use Manual mode, turn the Mode dial to M. Set the Power/Quick Control dial to the uppermost position. Turn the Main dial to set the shutter speed, and then turn the Quick Control dial to set the aperture you want. Then press the shutter halfway to meter the subject, and rotate the Quick Control dial and/or Main dial until the indicator under the exposure level meter in the viewfinder is in the center.
Drive modes determine how many shots the camera takes at a time. The EOS 30D has four drive modes that are appropriate in different shooting situations: Single-shot, High-speed continuous, Low-speed continuous, and Self-timer/Remote control. In the Basic Zone, the EOS 30D automatically chooses the drive mode based on the mode you choose. In all Creative Zone modes, you can choose the drive mode.
As the name implies, Single-shot drive mode allows you to make one picture when you press the shutter-release button. Single-shot mode is useful for subjects that remain still, such as when photographing a portrait (excluding children), a still life, and some nature and landscape subjects.
In Basic Zone modes, the EOS 30D automatically switches to Single-shot drive mode in Full Auto, Landscape, Close-up, Night Portrait, and Flash Off modes.
The EOS 30D also offers two continuous drive shooting options:
High-speed continuous that allows a maximum of 5 frames per second (fps)
Low-speed continuous that offers a maximum of 3 fps
You don't have to wait for the buffer to empty all images to the media card before you can continue shooting. After a continuous burst sequence, the camera begins offloading pictures from the buffer to the card, and as offloading progresses, you can take additional pictures.
When the buffer is filled, the word "busy" blinks in the viewfinder until enough images are offloaded to continue shooting. You can continue to keep the shutter button depressed, and the camera shoots as the buffer has available space.
The maximum burst rate depends on the image format and quality settings. Table 1.1 shows the relationship with approximate burst rate for a 512MB CF card using High-speed continuous drive mode. Results vary based on ISO speed, Picture Style, and CF card speed.
To make a good exposure, the camera has to know the amount of light that illuminates the subject or scene. To determine this, the camera's light meter measures the amount of light in the scene, and, based on the ISO, the camera calculates the aperture and shutter speed combinations required to make the standard exposure. On the EOS 30D, Canon's 35-zone through-the-lens (TTL) Evaluative metering is linked to the currently selected AF point. The EOS 30D offers four metering modes that are differentiated by how much of the scene the meter uses to take the reading:
Evaluative metering (linked to any AF point)
Partial metering (approximately 9 percent of the viewfinder at the center)
Spot metering (approximately 3.5 percent of the center of the viewfinder)
Center-weighted average metering
Although you cannot manually switch among metering modes in Basic Zone modes, you can set the metering modes in all of the Creative Zone modes. In Basic Zone modes, the EOS 30D always uses Evaluative metering.
To set the EOS 30D to a metering mode, press the Metering mode button on the top of the camera, and rotate the Main dial until the icon for the metering mode you want appears in the LCD panel. The Partial metering mode icon is an empty circle. The Evaluative metering icon is a black dot in a partial circle, the Spot metering icon is a black dot in a rectangle, and the Center-weighted Averaging metering icon is an empty rectangle. The next sections explain these modes in more detail.
Evaluative metering, the default metering mode on the EOS 30D, analyzes light from the entire viewfinder area to calculate exposure. Canon's 35-zone Evaluative metering system is linked to the autofocus system. The meter analyzes the point of focus and automatically applies compensation if surrounding areas are much lighter or darker than the point of focus. To determine exposure, the camera analyzes subject position, brightness, background, front lighting, and backlighting to determine the proper exposure.
Evaluative metering produces excellent exposures in average scenes that include an average distribution of light, medium, and dark tones, and it functions well even in backlit conditions. However, in scenes where there is a large expanse of predominately light or dark areas, the metering averages the tones to middle gray, thereby rendering snow scenes and large expanses of dark water as gray. In these situations, you can use exposure compensation to increase or decrease exposure by one to two stops for scenes with predominately light or dark tones, respectively.
Partial metering meters from the centermost 9 percent of the viewfinder. Partial metering is handy in backlit or side lit scenes where you want to ensure that the main subject is properly exposed, although spot metering is also a good option in those types of scenes.
The Spot metering mode evaluates the subject using the centermost 3.5 percent of the view-finder area. This is a very precise metering method that is best used when exposure for a -specific area of the subject or scene is critical. In general shooting situations where specific expo-sure is not critical, Spot metering does not consider the overall scene, and the results may not be what you want.
In scenes with large expanses of white or dark areas, you can use exposure compensation to override the camera's default exposure. This is convenient for snowscapes and ocean and lake scenes. Exposure compensation resets the camera's standard exposure setting by the amount of compensation (in partial or whole f-stops) that you choose.
For example, if you're taking a picture of a snow scene, setting positive exposure compensation adds light to produce white snow instead of gray. In this situation, a positive compensation of +1 to +2 f-stops does the trick.
Conversely in scenes with predominately dark tones, you can set a negative exposure compensation of −1 to −2 to get true dark tones. Exposure compensation is also useful when you want to maintain detail in highlight areas other than specular highlights.
Exposure compensation is set in 1/3-stop increments up to +/−2 stops. Whatever exposure compensation amount you set is used until you change the exposure back to standard exposure indicated by the exposure level indicator in the viewfinder.
You can set exposure compensation by following these steps:
Switch to any Creative Zone mode except Manual, and set the Power/Quick Control Dial switch to the uppermost position.
Press the Shutter button halfway down, and check the exposure level indicator in the viewfinder or on the LCD panel, and then rotate the Quick Control dial to the left to set negative exposure compensation or to the right to set positive exposure compensation. Exposure compensation remains in effect until you set it back to the center position on the exposure level indicator.
Tip
After you've set exposure compensation, it's easy to inadvertently change the setting by mistakenly turning the Quick Control dial. To avoid this, set the Power switch to the On position instead of to the uppermost position.
With Auto Exposure Bracketing (AEB), you can take three pictures at three different exposures: one picture at the standard exposure, one picture at an increased (lighter) exposure, and another picture at a decreased (darker) exposure. AEB, a favorite technique of film photographers for years, is a way to ensure that at least one exposure in a series of three images is acceptable. And with the advent of digital photography, AEB is a way to capture a high-dynamic range scene that exceeds the dynamic range of the sensor. By capturing two or more exposures metered for highlights, midtones, and shadows, photographers can later composite the exposures in Photoshop to maintain highlight detail, clean shadow detail, and properly exposed midtones.
You can set AEB in 1/3-stop increments up to +/−2 stops for three successive exposures. AEB is extremely useful for getting the best exposure in tricky lighting.
While exposure bracketing isn't necessary in all scenes, it's a good technique to use in scenes that are difficult to set up or that can't be reproduced and in scenes with contrasty lighting, such as a landscape with a dark foreground and much lighter sky area. AEB can't be used with the flash or when the shutter is set to Bulb.
Here's how AEB works in the different drive modes:
In the continuous and Self-Timer drive modes, pressing the Shutter button once automatically takes three bracketed exposures.
In single-image mode, you have to press the shutter three separate times to get three bracketed -exposures.
If the custom function (C.Fn) 12 mirror lockup is turned on, then the drive mode is automatically single-image mode even if the camera is set to continuous drive mode. Custom functions are discussed later in this chapter.
In either case, the camera takes the standard exposure first, the decreased exposure second, and then the increased exposure.
AEB settings are temporary. If you change lenses, replace the CF card or battery, or turn off the camera, the AEB settings are cancelled. You can also use AEB in combination with exposure compensation.
Table 1.2 shows examples of AEB. Bracketing here is set in 1-stop increments.
Table 1.2. Auto Exposure Bracketing
Aperture | Shutter Speed | |
|---|---|---|
Standard Exposure | f/8 | 1/125 sec. |
Decreased Exposure | f/11 | 1/250 sec. |
Increased Exposure | f/5.6 | 1/60 sec. |
On the EOS 30D, you can set AEB by following these steps:
Press the Menu button. If the Shooting menu (red) is not displayed, press the Jump button until it is displayed.
Rotate the Quick Control dial to select AEB, and then press the Set button. The camera activates the exposure level indicator.
Rotate the Quick Control dial to set the AEB amount, and then press the Set button. Each turn sets AEB in 1/3rd-stop increments above and below the standard exposure.
Press the shutter button lightly to dismiss the menu. The camera displays the AEB level on the exposure level indicator in the LCD panel and in the viewfinder. The AEB setting remains in effect until you turn off the camera or change lenses or memory cards.
To cancel AEB, you can repeat Steps 1 and 2, and then rotate the Quick Control dial until the indicators move back to the middle mark on the exposure level indicator. Then press the Set button. Or just turn the camera off and back on again.
With the EOS 30D, the exposure and the focus are locked simultaneously by pressing the shutter button halfway down. However, there are times when you don't want to meter on the same area where you set the focus. For example, if a subject is lit by a spotlight, the brightest light may fall on the subject's cheek or nose. Metering and setting the exposure for the brightest area maintains detail in the brightest area, but that isn't where you want the focus. You want to focus on the subject's eyes. In short, you have to de-couple the autofocusing from the metering, and you can do this by using auto-exposure or AE lock.
However, there are a couple of situations worth noting with AE lock:
If the AF mode is One-Shot AF or AI Focus AF and you're using Evaluative metering, then pressing the shutter button halfway automatically sets AE lock at the same point when focus is set.
In Creative Zone modes, the AE lock differs depending on the AF point and metering mode selected as shown in Table 1.3.
Table 1.3. AE Lock with Metering Modes and Auto-Focus Point Selection
Metering Mode | AF Point Selection | |
|---|---|---|
Automatic AF Point Selection | Manual AF Point Selection | |
Evaluative[a] | AE lock is applied at the AF point selected that achieved focus. | AE lock is applied at the AF point. |
Partial | AE lock is applied at the center AF point. | |
Spot | ||
Center-Weighted Average | ||
[a] If the lens is set to Manual focus (MF), AE lock is set to the center AF point. | ||
You can set AE lock by following these steps:
Focus on the part of the scene that you want to expose -correctly.
Continue to hold the Shutter button halfway down as you press and hold the AE Lock -button on the back right side of the camera. An asterisk is displayed in the viewfinder indicating that the exposure is locked.
Move the camera to recompose the shot, press the shutter halfway to focus on the subject, and then take the picture, -continuing to hold down the AE Lock button. As long as you continue holding down the AE lock button, you can take additional -pictures using the locked exposure.
As old as cameras themselves, Bulb exposure allows the shutter to remain open as long as the shutter button is completely depressed. Using Bulb, you can make pictures of fireworks, star trails, and other extremely low-light scenes.
In long exposures, digital noise can become more obvious. You can set custom function 2 (C.Fn-02, Long exp. Noise reduction) to Auto or On to reduce noise in long exposures. You should also use a remote control such as Remote Switch RS-80N3 or Timer Remote Controller TC-80N3 to reduce the possibility for camera movement during bulb exposures.
Note
Custom Functions are discussed later in this chapter.
To set Bulb exposure, follow these steps:
Set the Power switch to the uppermost position to enable use of the Quick Control dial and set the Mode dial to M (Manual).
Rotate the Main dial to select buLB, the setting next to "30."
Rotate the Quick Control dial to select the aperture you want. The aperture is shown in the viewfinder and in the LCD panel.
Press the shutter button halfway down to focus on the subject, and then press it completely and hold it down for the desired length of time. The elapsed exposure time (from 1 to 999 sec.) is displayed in the LCD panel.
Getting an accurate exposure is critical to getting a good image, but you may be wondering how you can judge whether an image is accurately exposed at the time you take the picture. On the EOS 30D, you can evaluate the exposure immediately after you take the picture by looking at the image histogram.
If you're new to digital photography, the concept of a histogram may also be new. A histogram is a bar graph that shows grayscale brightness values in the image from black (level 0) to white (level 255) along the bottom. The vertical axis displays the number of pixels at each location.
Naturally, some scenes cause a distribution of values that are weighted more toward one side of the scale or the other. For example, in scenes that have predominately light tones, the pixels are weighted toward the right side of the histogram. But in average scenes, the goal of good exposure is to have the values, or tones, with a fairly even distribution across the entire graph and, in most cases, to avoid having pixels crowded against the far left or right side of the graph.
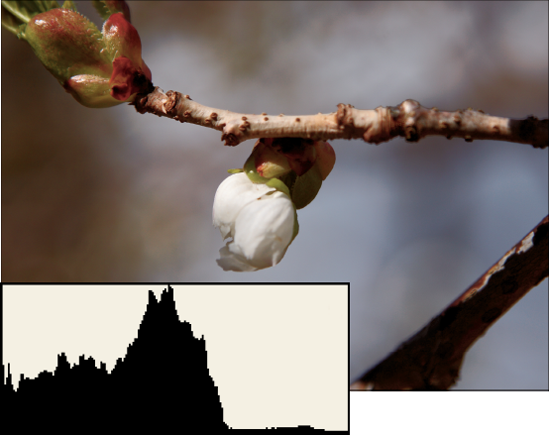
Figure 1.22. The tones in this image are primarily dark as shown by the weighting of pixels to the left side of the histogram.

Figure 1.23. Despite the bright tones in the foreground in this image, the distribution of tonal values is relatively even across the histogram.
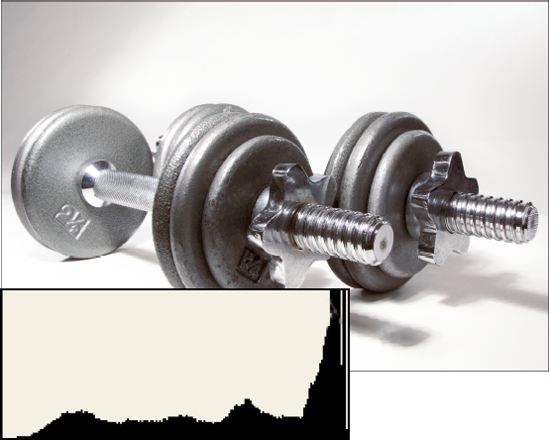
Figure 1.24. The tones in this image are primarily light as shown by the weighting of pixels to the right side of the histogram.
It is important to know that half of the tonal values in an image are contained in the first f-stop of bright tones. In an image with a six-stop dynamic range (12-bits per channel per pixel for a possible 4,096 levels in each channel), the first f-stop contains 2,048 levels while the second f-stop contains 1,024 levels, the third f-stop contains 512 levels, the fourth f-stop contains 256 levels, the fifth f-stop contains 128 levels, and the sixth f-stop, the darkest shadows, contains only 64 levels.
This means that with RAW images, you should expose toward the right side of the histogram to get the maximum levels from a capture. In other words, check the histogram to ensure that the exposure maintains highlight detail (pixels should not be slammed against the right side of the graph), but also to ensure that there is no empty space between the right edge of the histogram and where the pixels begin.
During image playback, you can press the Info button twice to display the image with a histogram. This display also has a highlight alert that flashes to show areas of the image that are overexposed (or areas that have no detail in the highlights). Although the histogram is based on the JPEG image rather than RAW, if you're shooting RAW capture, you can evaluate the exposure and retake the picture if the highlights are blown or shadow areas are solid black (the pixels are pushed against the left side of the scale).
You can set the 30D to display either Brightness (or luminance) or RGB color levels during image playback.
To set the type of histogram displayed, follow these steps:
Press the Menu button.
If the Playback (blue) menu isn't displayed, press the JUMP button until it is displayed.
Rotate the Main dial to highlight Histogram, and then press the Set button. The camera displays the Histogram options.
Rotate the Main dial to choose RGB or to reset the camera to Brightness if RGB was previously chosen, and then press the Set button.
The success of a picture depends as much on crisp focus as it does on good exposure. In addition to keeping the camera steady, getting tack-sharp focus depends on three factors: the resolving power of the lens (or its ability to render fine details sharply), the resolution of the image sensor, and the resolution of the printer (if you print the image).
For sharp focus in quick shooting situations, autofocus speed is equally important. Autofocus speed depends on factors such as the size of the lens and the speed of the lens focusing motor, the speed of the autofocus sensor in the camera, and how easy or difficult the subject is to focus on.
Three AF modes are available: One-Shot AF for still subjects, AI Servo AF for moving subjects, and AI Focus AF that switches from One-Shot AF to AI Servo AF if the subject begins to move. For most shooting situations, the EOS 30D's wide-area AI (artificial intelligence) autofocus (AF) system — a system tied closely to the camera's drive modes — provides acceptable results.
In Basic Zone modes, the camera automatically chooses the AF mode and the AF point or points. You can choose the AF mode in all Creative Zone modes except A-DEP, where the AF mode is set to one-shot and AF points are automatically selected.
Table 1.4 shows which mode is selected in each drive and exposure mode.
Table 1.4. Autofocus and Drive Modes
Drive Mode | Focus Mode | ||
|---|---|---|---|
One-Shot AF | AI Servo AF | AI Focus AF | |
One-Shot Shooting | The camera must confirm accurate focus before you can take the picture. After focus is achieved, it is locked as long as the shutter is pressed halfway down. Exposure is locked as well with Evaluative metering. | Focus tracks a moving subject, and exposure is set when the picture is taken. Predictive AF allows the camera to track a subject that approaches or retreats from the camera at a steady rate and predicts the focusing distance just before the picture is taken. If the AF point is Automatically selected, the camera uses the center AF point and tracks the subject as it moves across AF points. If the AF point is manually selected, the camera uses the selected AF point to track the subject. | Automatically switches between One-Shot AF and AI Servo AF based on the subject movement or lack of movement. |
Same as previous during continuous shooting. In both continuous shooting modes, focusing is not achieved during continuous shooting. | Same as previous with autofocus continuing during continuous shooting in either high- speed or low-speed shooting modes. |
To set the AF mode, follow these steps:
Set the lens to AF mode. You -cannot set or change the AF mode if the lens is set to manual focus (MF).
Set the Mode dial to a Creative Zone mode except A-DEP.
Press the AF-WB button.
Rotate the Main dial until the AF mode you want is displayed. Rotating the dial cycles through modes in this sequence: One Shot (One-Shot AF), AI Focus (AI Focus AF), and AI Servo (AI Servo AF).
The EOS 30D uses a wide-area artificial intelligence (AI) Auto Focus (AF) system with 9 autofocus (AF) points. An AF point determines the area of the subject that is in sharpest focus. In Basic Zone modes, the camera automatically selects the autofocus point or points. In Creative Zone modes except A-DEP, you can select the autofocus point. When no focus point is selected, the camera automatically determines the focus point by analyzing the scene and determining which AF point is over the closest part of the subject. The camera shows the selected AF point in red in the viewfinder.
Although wide-area AI Focus AF is handy, it weights focus to the part of the subject that is nearest the lens. This area of the subject may or may not be what you want in sharpest focus. For example, in a close-up portrait, the closest area the subject to the lens may be the nose, but you want to focus on the eyes. You can shift your position slightly to try to force the camera to reset focus on the eyes, or you can switch to a Creative Zone mode (except A-DEP) and set the focus point manually — the most reliable way to ensure accurate focus on the part of the subject that you want rendered in sharpest focus.

Figure 1.25. Nine autofocus points, shown in the viewfinder, are selectable in Creative Zone modes except A-DEP mode.
The autofocus system is reliable, but it can fail if subjects are in low light, if subjects are low in contrast or monotone in color, or when other objects overlap the main subject. For this reason, be sure to confirm in the LCD that the camera selected the best autofocus point. If you still can't get sharp focus, you can switch the lens to manual focus (MF) and turn the focusing ring manually to focus on low-contrast, dim, or monotone subjects.
In One-Shot AF, you cannot release the shutter until focus is established. In AI Servo AF, you can release the shutter whether or not the subject is in focus because the focus subsequently catches up with the subject's movement.
To manually select the AF point, follow these steps:
Set the Mode dial to any Creative Zone mode except A-DEP.
Press the shutter button halfway, and then press the AF Point Selector button on the back right side of the camera. The currently selected AF point is displayed in the viewfinder and on the LCD panel.
As you watch in the viewfinder, turn the Main dial until the AF point you want is highlighted in the viewfinder. The camera moves through the AF points in the direction that you turn the dial. You can also use the Multi-controller located next to the LCD to select the AF point. The Multi—controller moves left, right, up, and down through the AF points according to the direction you press the controller.
Press the Shutter button halfway down to focus on the subject and lock the focus, and then take the picture. Or, if you want to recompose the scene, -continue pressing the Shutter button halfway down, move the camera to recompose the shot, and then press the Shutter button completely.
Tip
In close focusing situations, and at times when the subject can't be reliably focused on with the autofocus system, you can switch to MF. You can use manual focusing of the lens in both Basic Zone and Creative Zone modes.
The ability to see the picture immediately after you take it is one of the primary benefits of using digital photography. On the EOS 30D, you can not only view images after you take them, but you can also magnify images to verify that the focus is sharp, display multiple images stored on the memory card, display the image with a histogram showing the tonal distribution, display images as a slideshow, and display the image along with the exposure settings.
The first image playback that you see is right after you take a picture, when it is displayed on the LCD. The default setting is 2 seconds, which is hardly enough time to move the camera from your eye in time to catch the image preview. The display time is intentionally set to a short amount of time to maximize battery life, but given the excellent performance of the battery, a longer display time of 4 to 8 seconds is more useful. You can change the display time on the Playback menu. You also can select the Hold option for review that displays the image until you press the Shutter button to dismiss it.
To change the initial image playback review time, follow these steps:
Press the Menu button.
Press the JUMP button until the Playback (blue) menu is displayed.
Rotate the Main dial to highlight Review time, and then press the Set button. The Review time options are displayed.
Rotate the Main dial, and select the Review time option that you want. If you select Hold, the picture is displayed until you press the Shutter button to dismiss the display. Viewing images for a longer time also depletes the -battery.
Press the Set button to confirm your selection.
The following sections cover viewing options.
In Single-image playback, the EOS 30D displays one image at a time on the LCD. If you have multiple pictures on the CF card, you can use the Main dial or the Quick Control dial to move forward and backward through the images.
Playback begins with the most recent image displayed on the LCD. You also can turn either dial counterclockwise to begin viewing the first image on the CF card.
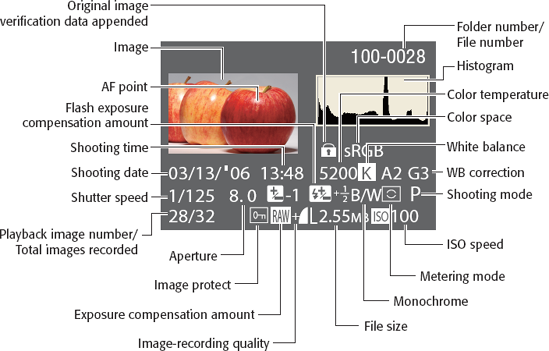
Figure 1.26. This diagram shows the information that is shown in single-image mode by pressing the Info button twice.
In this mode, you also can set how little or how much information about the image is displayed along with the image on the LCD. You have three display options:
Single-image display with no shooting or exposure information.
Single-image display with basic information. This provides the file number, shutter speed setting, aperture, and image number on the CF card as an overlay on the image preview. Press the Info button once to get this display.
Shooting information displays the file number, histogram, color space, color temperature setting, exposure settings, metering mode, mode setting, image quality, and other information. In addition, any overexposed areas of the image blink, alerting you that you may want to reshoot using a negative exposure compensation to avoid blowing out detail in the highlight areas. If AF points are set to Display, the AF point that achieved focus in One-Shot AF mode is displayed, or the AF points in AI Servo AF mode are displayed. Press the Info button twice to display full exposure, shooting information, and the histogram.
Tip
You can set the AF points to display by pressing the Menu button, navigating to the Playback (blue) menu, highlighting AF points, and then choosing Display. Then press the Set button to confirm your selection.
Using the magnified view, you can scroll through an image to check image sharpness. You can magnify images 1.5 times to 10 times on the LCD monitor. Then you can use the Main dial or the Quick Control dial to move to the next or previous image maintaining the same magnification and scroll position.
To display an image in magnified view, follow these steps:
Press the Playback button.
Press the Enlarge button. The image is magnified from the center. To continue magnifying the view, hold down the Enlarge button until the image is as large as you want or is at the maximum 10 times magnification.
You can then do the following:
Press the Multi-controller to scroll to another area of the magnified image.
Rotate the Main dial or the Quick Control dial to move to the next or previous image at the same position and magnification.
Press the shutter button to return to shooting. To reduce the magnification, press the Reduce button (playback returns to normal).
Tip
You can set image review and playback to Magnified view by setting options in C.Fn-17. See Custom Functions later in this chapter for details.
The index display is an electronic version of a traditional contact sheet. Index display shows nine thumbnails of images on the CF card. This display is handy when you need to ensure that you have a picture of everyone at a party or event, and it's handy as a way to quickly select a particular image on the media card when the card is full of images.
To turn on the index display, follow these steps:
Press the Playback button.
Press the AE lock/FE lock/Index button on the back of the camera. The camera displays images on the CF card nine images at a time. The selected image is displayed with a green border.
Rotate the Main dial to move among individual images. To display a larger view of a selected image, press the Enlarge button to magnify the image. To return to Index display, press the AE lock/FE lock/Index button again.
Press the JUMP button to display a scroll bar, and then rotate the Main dial or the Quick Control dial to move among sets of nine images. To return to a single-image selection in Index display, press the Jump button again. To return to single-image display, press the Play -button.
To cancel the Index display, press the Shutter button. The next time you press the Playback button, the display returns to Single-image playback mode.
Tip
In Single-image playback mode, you can press the Jump button to display a scroll bar that allows you to move 10 images forward or backward. And you can press the Set button to choose a different number of images to scroll by.
When you want to sit back and enjoy all the pictures on the CF card, the Auto Playback option plays a slide show of images on the card, displaying each image for 3 seconds. This is a great option to use when you want to share pictures with the people you're photographing or as a review to verify that you've taken all the shots you intended to take during a shooting session.
To use Auto Playback, follow these steps:
Press the Menu button.
If the Playback (blue) menu is not displayed, press the JUMP button until it is displayed.
Rotate the Main dial or the Quick Control dial to highlight Auto play. The camera loads images and displays them in the Playback mode display you've chosen. The best way to review images is to have the display set to Single-image. You can pause and restart the slide show by pressing the Set button.
Press the Shutter button lightly to return to shooting.
Erasing images is a fine advantage only when you know without a doubt that you don't want the image you're deleting. From experience, however, I know that some images that appear to be mediocre on the LCD often can be salvaged with some judicious image editing on the computer. For that reason, erase images with due caution.
If you want to delete an image, follow these steps:
Press the Playback button on the back of the camera, and rotate the Main dial or the Quick Control dial to navigate to the image you want to delete.
Press the Erase button, and rotate the Main dial or the Quick Control dial to select Erase (only the displayed image), All (all images on the CF card), or Cancel.
Press the Set button to erase the image or images. If you chose All, the camera displays a message asking you to confirm that you want to erase all images. Rotate the Main dial or the Quick Control dial to select OK, and press the Set button.
When the access lamp goes out, lightly press the Shutter button to continue shooting.
On the other end of the spectrum from erasing images is the ability to ensure that images you want to keep do not get accidentally deleted. When you have that perfect or once-in-a-lifetime shot, apply protection to it so you can be sure it doesn't get erased.
Setting protection means that no one can erase the image when using the Erase or Erase All options.
Warning
Even protected images are erased if you or someone else formats the CF card.
You can protect an image by following these steps:
Press the Playback button. The last image taken is displayed on the LCD.
Rotate the Main dial or the Quick Control dial to move to the image you want to protect.
Press the Menu button, and then press the JUMP button to select the Playback (blue) menu.
Rotate the Main dial or the Quick Control dial to select Protect, and press the Set button. A small key icon appears at the top of protected images. You can use Main dial or the Quick Control dial to scroll to other images and press the Set button to add protection.
Using either the built-in or a Canon EX-series Speedlite, the EOS 30D allows you to make flash images that look more natural than previously possible, and the camera and Speedlite controls allow you to control flash exposure more precisely. In addition, the EOS 30D features a PC sync terminal so that you can use studio strobes with the camera, and the EOS 30D is a standout performer in studio conditions.
The EOS 30D features E-TTL II autoflash that uses evaluative flash metering and preflash for calculating exposure in both automatic and flash exposure compensation modes. The built-in flash has a guide number of 13, which means the flash works at approximately 3.3' at 17 mm and 2.3' at 85 mm using an ISO 100 setting.
The built-in flash recycle time is approximately 3 seconds. The maximum flash sync speed is 1/250 second, which the camera sets automatically, although in some exposure modes, you (or the camera in automatic modes) can set a slower shutter speed. Flash exposure compensation is +/−2 stops in 1/3 or 1/2-stop increments.
Tip
When you use the built-in flash, be sure to remove the lens hood first to prevent obstruction of the flash coverage. And if you use a fast, super-telephoto lens, the built-in flash coverage may also be obstructed.
Tables 1.5 and 1.6 describe the behavior of the built-in flash and the options in various exposure modes, the ranges of the flash, and flash sync speed and aperture settings. Table 1.7 describes using the built-in flash in Creative Zone modes and in Basic Zone exposure modes that automatically activate the flash.
Note
The range depends on the type lens you use and the ISO. In general, the longer the focal length is, the shorter the distance that the flash covers. And the higher the ISO is, the farther the distance the flash illumination covers.

Table 1.5. 30D Built-in Flash Range* with the EF-S 18–55mm Lens
ISO | 18mm | 55mm |
|---|---|---|
100 | 1 to 3.7m (3.3 to 12.1 ft.) | 1 to 2.3m (3.3 to 7.5 ft.) |
200 | 1 to 5.3m (3.3 to 17.4 ft.) | 1 to 3.3m (3.3 to 10.8 ft.) |
400 | 1 to 7.4m (3.3–24.3 ft.) | 1 to 4.6m (3.3 to 15.1 ft.) |
800 | 1 to 10.5m (3.3 to 34.4 ft.) | 1 to 6.6m (3.3 to 21.7 ft.) |
1600 | 1 to 14.9m (3.3 to 48.9 ft.) | 1 to 9.3m (3.3 to 30.5 ft.) |
H (3200) | 1 to 21m (3.3 to 68.9 ft.) | 1 to 13.1m (3.3 to 43 ft.) |
[a] All distances are approximate. | ||
Table 1.6. 30D Built-in Flash Range* with the EF-S 17–85mm Lens
17mm | 85mm | |
|---|---|---|
100 | 1 to 3.3m (3.3 to 10.8 ft.) | 1 to 2.3m (3.3 to 7.5 ft.) |
200 | 1 to 4.6m (3.3 to 15.1 ft.) | 1 to 3.3m (3.3 to 10.8 ft.) |
400 | 1 to 6.5m (3.3–21.3 ft.) | 1 to 4.6m (3.3 to 15.1 ft.) |
800 | 1 to 9.2m (3.3 to 30.2 ft.) | 1 to 6.6m (3.3 to 21.7 ft.) |
1600 | 1 to 13m (3.3 to 42.7 ft.) | 1 to 9.3m (3.3 to 30.5 ft.) |
H (3200) | 1 to 18.4m (3.3 to 60.4 ft.) | 1 to 13.1m (3.3 to 43 ft.) |
[a] All distances are approximate. | ||
Table 1.7. Creative Zone Exposure Modes with the Built-in Flash
Mode | Using the Flash |
|---|---|
P and A-DEP | The camera automatically sets the shutter speed (1/60 to 1/250 sec.) and aperture, and uses full autoflash. |
Tv | You set the shutter speed between 30 sec. to 1/250 sec., and the camera automatically sets the aperture. |
Av | You set the aperture, and the camera automatically sets the shutter speed (30 sec. to 1/250 sec.). In low-light scenes, slow-sync shooting allows the flash to correctly expose the subject and the longer exposure to correctly expose the background. For longer exposures, always use a tripod or set the camera on a solid surface. |
You can set C.Fn-03 to a fixed 1/250 sec. if you do not want the camera to set a slow shutter speed. | |
M | You set both the aperture and shutter speed (bulb or 30 sec. to 1/250 sec.). The flash exposes the subject correctly, and the background exposure is based on the aperture and shutter speed that you choose. |
Long the bane of photographers of all skill levels, the red-eye effect has ruined many, many pictures. This ghoulish appearance of the eyes occurs when light from the flash reflects off the subject's retina, making the eyes appear red. Red-eye reduction fires a preflash that helps to constrict the pupil and lessen the effect; however, it cannot eliminate it entirely.
You can use red-eye reduction in all exposure modes except Landscape, Sports, and Flash Off modes. To turn on red-eye reduction, follow these steps:
Press the Menu button, and if the Shooting (red) menu isn't displayed, press the JUMP button until it is displayed.
Rotate the Main dial or the Quick Control dial to highlight Red-eye On/Off, and press the Set key.
Rotate the Main dial or the Quick Control dial to select On, and press the Set button to confirm your selection.
Press the Shutter button to focus on the subject, and ask the subject to look at the preflash light. After the red-eye reduction light indicator goes off, press the Shutter button completely.
Tip
To reduce the appearance of red eyes, turn on additional lights in the room and move closer to the subject.
One of the most valuable flash features on the EOS 30D is Flash Exposure (FE) lock, which you can use to take a meter reading of the subject using the flash before you make the picture. For example, if you want to ensure that a subject's face isn't overexposed, you can point the center of the frame at the subject, press the shutter halfway down to set and lock the flash exposure for the face, and then recompose the picture and shoot with the locked flash exposure setting.
FE lock also can be used to increase or decrease flash intensity. For example, to increase flash intensity, point the camera to a white object or a subject that is closer to the camera. To decrease flash intensity, point the camera to a dark or farther-away subject.
To use FE lock, follow these steps:
Set the camera to a Creative Zone mode, and then press the Flash button to pop up the built-in flash.
Focus on the subject by pressing the Shutter button halfway down. Continue to hold the Shutter button halfway down during the next steps.
Position the center of the viewfinder over the area of the subject where you want to lock flash exposure, and then press the FE lock button. A preflash fires, FEL is displayed momentarily in the viewfinder, and the flash icon appears in the viewfinder.
Canon EX-series Speedlites and studio strobes
The EOS 30D is compatible with Canon EX-series Speedlites (sold separately) and with third-party flash units. Depending on the EX Speedlite you use, you can use these features with an external Speedlite:
E-TTL II Autoflash is a system that offers improved flash exposure control combined with focusing distance information from the lens to more accurately gage flash intensity, provided that you use a ring-type USM Canon lens.
High-speed sync (FP flash) allows setting a faster sync speed than 1/250 sec.
Flash exposure compensation can be set to + /−2 stops in 1/3-stop increments.
Flash exposure bracketing (FEB) brackets the flash exposure for three successive shots up to + /−3 stops at 1/3-stop increments. This function is available only with FEB-compatible Speedlites.
E-TTL II Wireless autoflash with multiple Speedlites allows -wireless E-TTL II autoflash with the previous features using the Canon Speedlite transmitter ST-E2, which is sold separately.
The EOS 30D proves to be an excellent performer in the studio.
A PC terminal located on the left side of the camera allows the use of studio flash units or flash units attached with a sync cord. The terminal has no polarity and works with any sync cord, regardless of polarity. The camera can be used with flash equipment that does not require 250 volts or more.
Note that with EZ/E/EG/ML/TL-series Speedlites, you must use the Speedlite's manual flash mode, and you cannot use the TTL or A-TTL autoflash modes. Also, if an EX-series Speedlite is set to TTL autoflash using the Custom Function, the flash will not fire.
Reposition the camera to compose the shot, and take the picture.
Tip
In Manual mode, you can experiment with shutter speeds (1/250 sec. and slower) to lighten or darken the scene. The shutter speed controls the overall scene exposure, and the aperture controls the flash exposure. Try experimenting with one or both settings to get the effect you want.
If you find that FE lock doesn't produce the exposure you want, you can use flash exposure compensation to increase or decrease the flash exposure up to +/−2 stops in 1/3-stop increments. You can use flash exposure compensation with Creative Zone modes, and the compensation remains in effect until you change it.
Note
If you're using an EX-series Speedlite and set flash exposure compensation on the flash and on the camera, the Speedlite's flash exposure compensation overrides compensation set on the camera.
Set the camera set to a Creative Zone mode, and then press the Flash button to pop up the built-in flash.
Press the Metering mode -selection/Flash exposure compensation button on top of the camera.
Rotate the Quick Control dial while looking at the LCD panel or in the viewfinder to set a negative or positive compensation amount in 1/3-stop increments.
Focus on the subject by pressing the Shutter button halfway down and take the picture. The flash exposure compensation icon appears in the viewfinder.
Custom functions enable you to customize camera controls and operation to better suit your shooting style and to save you time. After you set a custom function option, it remains in effect until you change it. Some custom functions are exceptionally handy while others are specific to different situations. For example, if you grow weary of pressing the AF Point Selection button and trying to simultaneously adjust the Multi-controller, then by all means, check out Custom Function 13, where you can assign AF point selection to the Quick Control dial to save time and make your selection more quickly than the standard method.
Note
Canon refers to Custom Functions by using the abbreviation C.Fn-[number].
The EOS 30D offers 19 Custom Functions. Some custom functions are more broadly useful than others, and some are useful for specific shooting specialty areas. Be sure to remember how you have set the custom functions because some options change the behavior of the camera and, in some cases, the lens controls.
C.Fn-1: SET function when shooting. Offers options for you to change the function of the SET button. Choose from: 0. Default; 1. Change quality; 2. Change picture style; 3. Menu display, or 4. Image replay.
C.Fn-2: Long exp. noise reduction. Allows you to turn noise reduction on or off for long exposures. With noise reduction on, the reduction process takes as long to apply as the exposure. In other words, if the exposure was 1.5 sec., then noise reduction takes 1.5 sec., and you cannot take another picture until the noise reduction process finishes. Choose from:
0: Off.
1: Auto. Applies noise reduction for exposures of 1 sec. or longer if exposure noise is detected.
2: On. Applies noise reduction for all 1 sec. or longer exposures without checking for noise. May reduce noise for exposures that would not have been noise detected and reduced using the Auto option.
C.Fn-03: Flash sync speed in Av mode. Enables you to set a faster flash sync speed. Choose from:
0: Auto.
1: 1/250 sec. (fixed). Sets the flash sync speed to 1/250 sec. in Aperture-priority AE mode. The faster synch speed in low light or nightlight allows the background to go dark. Otherwise, the flash sync speed is 1/125 sec.
C.Fn-04: Shutter/AE lock button. Changes the function of the AF/AE lock button. C.Fn-18 also affects this function, and if you set both, the latter operation will not work, except when AF stop is executed after AF start. Choose from:
0: AF/AE lock.
1: AE lock/AF. Allows you to focus and meter separately. Press the AE/AF lock button to focus, and then press the Shutter button halfway to lock exposure (AE).
2: AF/AF lock, no AE lock. In AI Servo AF mode, pressing the AF/AE lock button momentarily stops autofocusing to prevent the focus from being thrown off by an object passing between the lens and the subject. The camera sets exposure at the moment the picture is taken.
3: AE/AF, no AE lock. In AI Servo AF mode, pressing the AF/AE lock button starts and stops the continuous autofocus operation and is handy for subjects that start moving and stop. With this option set, the focus and exposure theoretically are at the optimum point because the exposure is set the moment the image is taken.
C.Fn-05: AF-assist beam. Controls whether the autofocus assist light is used by either the built-in flash or by an accessory Speedlite. Choose from:
0: Emits. Both the built-in flash and an accessory Speedlite use the beam to establish focus.
1: Does not emit. Neither the built-in flash nor an accessory Speedlite uses the beam to establish focus.
2: Only external flash emits. The built-in flash does not use the AF-assist light, but an accessory Speedlite does use the light when necessary, provided that the Speedlite's AF-assist beam Custom Function is not set to Disabled.
C.Fn-06: Exposure level increments. Allows you to set the amount to use for shutter speed, aperture, exposure compensation, auto-exposure bracketing, etc. The exposure increment you choose is displayed in the viewfinder and on the LCD as double marks at the bottom of the exposure level indicator. Choose from:
0: 1/3-stop. Sets 1/3 stop as the exposure increment for shutter speed, aperture, exposure compensation, and auto-exposure bracketing changes.
1: 1/2-stop. Sets 1/2 stop as the exposure increment for shutter speed, aperture, exposure compensation, and auto-exposure bracketing changes.
C.Fn-07: Flash firing. Allows or prevents an accessory Speedlite and a non-Canon flash connected to the PC terminal to fire. Choose from:
0: Fires. Fires a flash connected to the PC terminal or the built-in flash if needed in Creative Zones.
1: Does not fire. Disables firing of an accessory flash unit (or built-in flash in Creative Zones) connected to the PC terminal, but does not disable the AF-assist beam from lighting, depending on the C.Fn-05 setting.
C.Fn-08: ISO expansion. Enables you to expand the ISO range to "H," equivalent to ISO 3200. Choose from:
0: Off. Prevents you from choosing the "H" ISO, equivalent to ISO 3200 setting.
1: On. Allows you to select the equivalent of ISO 3200 shown as "H" on the LCD panel and in the viewfinder. H is displayed after ISO 1600.
C.Fn-09: Bracket sequence/Auto cancel. Allows you to change the sequence for pictures bracketed by shutter speed or aperture, and the file-saving sequence for white-balance bracketing (WB-BKT). Note that when Auto Cancellation is set, bracketing is cancelled as follows:
AEB. When you turn the power switch to Off, change lenses, have flash-ready, replace the battery, or replace the CF card.
WB-BKT. When you turn the power switch to Off or replace the battery or the CF card.
Choose from:
0: 0, -, +/Enable; 1: 0, -, and =/Disable. Starts the bracketing sequence with the standard exposure (AEB) or the standard white balance (WB-BKT). The sequence can be repeated. Note that during bracketing, automatic canceling is disabled if the flash is engaged and the bracketing sequence is cancelled. See Table 1.8.
2: -, 0, +/Enable. The bracketing sequence begins with the minus or bluish/magenta bias setting.
3: -, 0, +/Disable. Repeats the bracketing sequence starting with the minus (AEB), or the bluish/magenta bias (WB-BKT) setting. The sequence can be repeated.
C.Fn-10: Superimposed display. Allows you to turn off the red flash for the selected AF point in the viewfinder. Choose from:
0: On.
1: Off. Turns off the AF point red flash in the viewfinder, although the AF point is still lit when you select it.
C.Fn-11: Menu button display position. Enables you to determine which menu screen is displayed. Choose from:
0: Previous (top if power off). Displays the last menu screen you used. The top menu screen, Quality, is displayed instead when the power switch is set to Off.
1: Previous. Displays the last menu you used.
2: Top. Always displays the Quality (top) menu.
C.Fn-12: Mirror lockup. Turning this option on prevents potential blur as the camera mirror flips up to begin an exposure. Choose from:
0: Disable. Prevents you from selecting mirror up or mirror acts normal.
1: Enable. Allows you to lock the mirror for close-up and telephoto images to prevent mirror reflex vibrations that can cause blur. When this option is enabled, you press the Shutter button once to swing up the mirror, and then press the Shutter button again to make the exposure. With mirror lockup, the drive mode is automatically set to Single-shot. The mirror remains locked for 30 seconds.
C.Fn-13: AF point selection method. Allows you to choose which camera controls you use to for selecting the AF point. Choose from:
0: Normal. Press the AF Point Selection button, and then press the Multi-controller to select the AF point (or use the Quick Control Dial).
1: Multi-controller direct. Allows you to select the AF point by using only the Multi-controller. If you press the AF-WB button, this function sets the camera to AF point selection.
2: Quick Control Dial direct. Allows you to select the AF point by rotating the Quick Control dial without first pressing the AF-WB button. Pressing the AF Point Selection button and turning the Main dial sets exposure compensation.
C.Fn-14: E-TTL II. Enables you to choose between Evaluative and Average flash exposure. Choose from:
0: Evaluative. Provides fully automatic flash photography in all situations ranging from low light to daylight fill flash.
1: Average. Averages the flash for the entire area being covered and does not apply automatic flash exposure compensation. To use flash exposure compensation and FE lock, you must set them yourself.
C.Fn-15: Shutter curtain sync. Allows you to set whether the flash fires at the beginning or end of an exposure, thereby determining whether light trails come before or after the subject. Choose from:
0: 1st-curtain sync. With a slow shutter speed, the flash fires at the beginning of the exposure, allowing light trails in front of the subject.
1: 2nd-curtain sync. With a slow shutter speed, the flash fires just before the shutter closes, allowing light trails that follow the subject. This function works with an accessory Speedlite whether you have this feature. A preflash is fired for flash metering control after the shutter button is pressed completely, but the main flash fires right before the shutter closes. If the Ex-series Speedlite has this feature, it overrides this Custom Function.
C.Fn-16: Safety shift in Av or Tv. Provides automatic shifting of the aperture or shutter speed in cases where sudden shifts in lighting might otherwise cause an improper exposure. Choose from:
0: Disable. Prevents changes in exposure regardless of subject brightness changes.
1: Enable. In Shutter-priority AE (Tv) and Aperture-priority AE (Av) modes, the shutter speed or aperture automatically shifts if the subject brightness suddenly changes. The shift helps ensure good exposure in shifting light.
C.Fn-17: Magnified view. Enables you to view a magnified image display either only during playback or during image review and playback. Choose from:
0: Image playback only. Allows you to magnify images when viewing them only by pressing the Playback button.
1: Image review and playback. Allows you to press the Print/Share button and the Enlarge button. You can also magnify the view in the same procedure as C.Fn-17-0.
C.Fn-18: Lens AF stop button function. Enables you to set the AF functions, AE lock, and Image Stabilizer operation. Choose from:
0: AF stop.
1: AF start. Allows autofocus only while the AF stop button is pressed and the camera AF operation is disabled.
2: AE lock. Applies AE lock when the AE lock button is pressed. Choose this option when you want to focus and meter separately.
3: AF point. In manual AF point selection mode, the button switches to automatic AF point selection from manual AF point selection while it is held down. This is handy if you can no longer focus-track a moving subject with a manually selected AF point in AI Servo AF mode. In automatic AF point selection mode, the button selects the center AF point only while you hold it down.
4: ONE SHOT/AI SERVO. When using One-Shot AF mode, holding down the button switches to AI Servo AF mode. When using AI Servo AF mode, holding down the button switches to One-Shot AF mode.
5: IS start. If the lens's Image Stabilizer (IS) switch is turned on, the Image Stabilizer operates only while you press the button.
Note
AF stop buttons are offered only on super telephoto lenses.
C.Fn-19: Add original decision data. Provides data to verify that the image is original by displaying an icon when used with the Data Verification Kit DVK-E2. Choose from:
0: Off. Does not append image verification data.
1: On. Appends image data to verify whether the image is original. When an image appended with the verification data is played back, an icon is displayed. To verify whether the image is original, the Data Verification Kit DVK-E2 (sold separately) is required.
To set a Custom Function, follow these steps:
Set the camera to a Creative Zone mode.
Press the Menu button, and then press the Jump button to go to the Set-up (yellow) menu.
Rotate the Quick Control dial to highlight Custom Functions (C.Fn), and then press the Set button. The Custom Functions screen appears.
Rotate the Quick Control dial to select the Custom Function number you want, and then press the Set button. The Custom Function option control is highlighted.
Rotate the Quick Control dial to scroll through the options. When you see the option you want, press the Set button. You can repeat Steps 3 through 5 to set other custom functions.
Press the Menu button to return to the menu.