In This Chapter
The four elements of exposure
What is depth of field?
Time: The role of shutter speed
Equivalent exposures
Putting it all together
What can you expect from the EOS 30D in terms of exposure? That's what this chapter helps you determine. Also, if you're new to photography or if you're returning after some time away from shooting, this chapter is also a helpful refresher on the elements of exposure. Additionally, the information in this chapter helps you build a foundation from which you can expand your skills and creative options.
You can control the exposure elements discussed in this chapter when you use the Creative Zone modes Tv, Av, M (Manual), and P (Program AE) on the EOS 30D. In Basic Zone modes, the camera automatically sets exposure elements.
Figure 3.1. The 30D offers excellent creative control and responsiveness. Taken at ISO 100, f/25, at 1/125 sec. with the Canon EF 100mm f/2.8 L Macro lens.
Finally, this chapter also covers exposure as it directly relates to using the EOS 30D in various venues so that you have a head start on knowing what to expect from the camera.
Exposure is a precise combination of four elements, all of which are related to light. Each element depends on the others to create a successful result. If the amount of one element changes, then the other elements must be increased or decreased proportionally to get a successful result.
These four elements are discussed in detail in this chapter:
Light. The starting point of exposure is the amount of light that's available in the scene to make a picture. In some cases, the amount of available light in a scene can't easily be changed. So, for now, consider the amount of light in the scene as fixed for the purposes of this chapter.
Sensitivity. Sensitivity refers to the amount of light that the camera's image sensor needs to make an exposure or to the sensor's sensitivity to light: Does the sensor need lots of light or a little light to make the exposure? Sensitivity is measured in ISO rating. In digital photography, choosing an ISO setting determines how sensitive the image sensor is to light.
Intensity. Intensity refers to the strength or amount of light that reaches the image sensor. Intensity is controlled by the aperture, or f-stop, an adjustable opening on the lens that allows more or less light to reach the sensor.
Time. Time refers to the length of time that light is allowed to reach the sensor. Time is controlled by the shutter speed.
In general terms, you think of good exposure as an image with detail in the highlights and shadows. In other words, a good exposure is one in which the highlights are not blown out and the shadows are not blocked up. Getting the ideal exposure depends on the dynamic range of the camera, or its ability to hold detail in highlights and shadows, even in contrasty light. The EOS 30D delivers approximately an 8-stop dynamic range at 100 to 400 ISO. However, the range drops off in extended range ISO (equivalent to ISO 3200).
ISO is an abbreviation for International Organization of Standards, which measures, tests, and sets standards for many (technologies) photographic products, including the rating or speed for film, which has, in turn, been applied to equivalents for the sensitivity of digital image sensors. So, in short, the ISO is a rating that describes the sensitivity of the image sensor to light.
The higher the ISO number, the less light that's needed to make a picture; conversely, the lower the ISO number, the more light that's needed to make a picture.
On the EOS 30D, the ISO sequence encompasses ISO 100, 125, 160, 200, 250, 320, 400, 500, 640, 800, 1000, 1250, and 1600, and H (equivalent to 3200) using extended ISO via C.Fn-08.

Figure 3.2. In bright light, you can set a low ISO such as 100 to get fast shutter speeds even at narrow apertures. Taken in bright sunlight at ISO 100, f/11, at 1/125 sec. using a Canon EF 24-105mm L IS f/4.0 lens.
Tip
Each ISO setting is twice as sensitive to light as the previous setting. For example, ISO 800 is twice as sensitive to light as ISO 400. As a result, the sensor needs half as much light to make an exposure at ISO 800 as it does at ISO 400.
ISO contributes to overall image quality in several areas, including these: sharpness, saturation, contrast, and digital noise or lack thereof.
Low ISO settings provide images with good sharpness, saturation, and contrast. Of course, a longer shutter speed is needed, and your ability to handhold the camera and get a sharp picture is more limited.
In low-light scenes, you can switch to a fast (high) ISO setting. This allows faster shutter speeds that help reduce the risk of blur if the subject moves or from handshake as you press the shutter.
However, because increasing the ISO setting amplifies the analog signal (even though they are called digital cameras, the image sensors still have analog sections), increasing the ISO amplifies the noise. Noise in -digital images is analogous in some ways to film grain. In digital photography, noise is comprised as luminance and color, or chroma, noise. Luminance noise looks similar to grain in film. Chroma noise, which varies by color channel, appears as mottled color variations, depending on the frequency texture of the noise. Chroma noise shows up in images as colorful pixels scattered about, particularly in the shadow areas of the image.
Regardless of the type, digital noise degrades overall image quality by overpowering fine detail in foliage and fabrics, reducing sharpness and color saturation, and giving the image a mottled look. Digital noise increases with high ISO settings, long exposures, underexposure, and high temperatures.
The tolerance for digital noise varies by photographer and sometimes by assignment. For example, some applications such as newspaper printing tolerate higher noise levels than commercial publications such as magazine advertisements. The performance of the EOS 30D is illustrated in the photos here. For most commercial applications, ISO 100 to 400 provides noise that is unobjectionable for most applications. ISO 800 shows evidence of noise that can be tamed in noise reduction or RAW image conversion programs. For higher ISO settings, the noise level generally is equivalent to that seen at ISO 800. For long exposures, you can also enable a Custom Function (C.Fn-02: Long exp. noise reduction) to reduce digital noise in exposures of 1 second or longer. This option doubles the length of exposure time, but the noise is virtually imperceptible. See Chapter 1 for details on setting Custom Functions.
Note
You can see comparisons of ISO settings in an interior scene in Chapter 2.
To change the ISO, follow these steps:
Choose a mode in the Creative Zone.
Press the DRIVE-ISO button, and then rotate the Quick Control dial to select the ISO.

The lens aperture (the size of the lens opening) determines the amount, or intensity, of light that strikes the image sensor. Aperture is shown as f-stop numbers, such as f/2.8, f/4, f/5.6, f/8, and so on.
Smaller f-stop numbers, such as f/2.8, set the lens to a large opening that lets more light reach the sensor. A large lens opening is referred to as wide aperture. At wide apertures, the amount of time the shutter stays open to let light into the camera is decreased.
Larger f-stop numbers, such as f/16, set the lens to a small opening that lets less light reach the sensor. A small lens opening is referred to as a narrow aperture. At narrow apertures, the amount of time the shutter stays open to let light into the camera is increased.
Your choice of aperture depends on several factors. If you want to avoid blur from camera shake or subject motion in lower light, choose a wide aperture (smaller f-number) so that you get the faster shutter speeds. If you're using a telephoto (long) lens and you want to handhold the camera, choosing a wide aperture such as f/2.8 or f/4.0 helps achieve the fast shutter speed you need to handhold longer lenses.
Of course, an important consideration in choosing an aperture is to control the depth of field, discussed in the next section, in your images.
In the Creative Zone modes, you can control the aperture by switching to Aperture-priority AE, P, or Manual mode. Just turn the Mode dial to Av, P, or M to change to these modes. In Aperture-priority AE mode, you set the aperture and the camera automatically sets the correct shutter speed. In P mode, you set the aperture, and the camera sets the shutter speed and shifts the program as you change aperture for an equivalent exposure. In Manual mode, you set both the aperture and the shutter speed based on the reading from the camera's light meter. The light meter shows a scale, the exposure level indicator, in both the viewfinder and the LCD panel that indicates over-, under-, and correct exposure based on the aperture and shutter speed combination.
Note
You can learn more about exposure modes in Chapter 1.
To set the aperture on the EOS 30D, follow these steps.
Turn the Mode dial to Av (Aperture-priority AE) or M (Manual mode). You also can change the aperture in P (Program AE mode), but in this mode, the camera also adjusts the shutter speed to achieve an equivalent exposure.
In Av mode, rotate the Main dial until the f-stop you want appears on the LCD panel or in the viewfinder. The camera automatically sets the correct shutter speed.
In Manual mode, hold the AF point selection/Enlarge button as you rotate the Main dial to select the aperture. Then rotate the Quick Control dial to set the appropriate shutter speed. The maximum aperture value depends on the lens you're using.
Note
If "30" blinks in the viewfinder, turn the Main dial to select a wider aperture to avoid underexposure. If "8000" blinks in the viewfinder, turn the Main dial and select a narrow aperture to avoid overexposure.
Depth of field is the zone of acceptably sharp focus in front of and behind a subject. Aperture is the main factor that affects depth of field, although camera-to-subject distance and focal length affect depth of field as well. Depth of field is as much a practical matter — based on the light available to make the picture — as it is a creative choice to enhance the content of the image.
Images where the background is a soft blur and the subject is in sharp focus have a shallow depth of field. Shallow depth of field is tradition for many formal portraits, for some still-life images, for most food photography, for low-light sports, and for some stadium venues. To get a shallow depth of field, choose a wide aperture such as f/2.8, f/4, or f/5.6. The subject will be sharp, and the background will be soft and non-distracting.
Pictures with acceptably sharp focus from front to back have extensive depth of field. Extensive depth of field is required for images such as pictures of large groups of people, landscape, architecture, and interior images. To get extensive depth of field, choose a narrow aperture, such as f/8 or f/11 or narrower.
When you choose a narrow aperture such as f/16, a longer shutter speed is required to ensure that enough light reaches the sensor for a correct exposure. Conversely, with wide apertures, a shorter shutter speed, given the same ISO, is required for the exposure.
While aperture is the most important factor that affects the range of acceptably sharp focus in a picture, other factors also affect depth of field:

Figure 3.6. An extensive depth of field in this image shows the coffee cup in reasonably sharp focus in the background. The exposure for this image was ISO 100, f/22, 1/125 sec. using a Canon EF 100mm f/2.8 Macro USM lens.

Figure 3.7. A very shallow depth of field is created here by combining a close camera-to-subject distance, a telephoto lens, and a wide aperture. The exposure for this image was ISO 100, f/ 3.2, 1/40 sec. using a Canon EF 100mm f/2.8 Macro USM lens.
Camera-to-subject distance. At any aperture, the farther you are from a subject, the greater the depth of field is. If you take a scenic photo of a distant mountain, the foreground, midground, and background will be acceptably sharp. If you take a portrait and the camera is close to the subject, only the subject will be acceptably sharp.
Focal length. Focal length, or angle of view, is how much of a scene the lens "sees." From the same shooting position, a wide-angle lens takes in more of the scene than a telephoto lens and produces more extensive depth of field. A wide-angle lens may have a 110-degree angle of view, while a telephoto lens may have only a 12-degree (narrow) view of the scene.
Note
For more information on focal length, see Chapter 6.
Because the EOS 30D has a 1.6 focal multiplication factor, you might assume that the depth of field would match the lens aperture at the magnification factor. For example, if you're shooting with the Canon EF 100mm f/2.8 Macro lens, it's the equivalent of a 160mm lens, and you might expect a rendering of the background equivalent to a 160mm lens. That, however, is not the case because the focal length does not change. The multiplication factor affects the effective angle of view, but not the depth of field.
Shutter speed controls how long the curtain in the camera stays open to let light from the lens strike the image sensor. The longer the shutter stays open, the more light reaches the sensor (at the aperture you set). Shutter speed affects your ability to get a sharp image in low light while handholding the camera and the ability to freeze motion or show it as blurred in a picture.
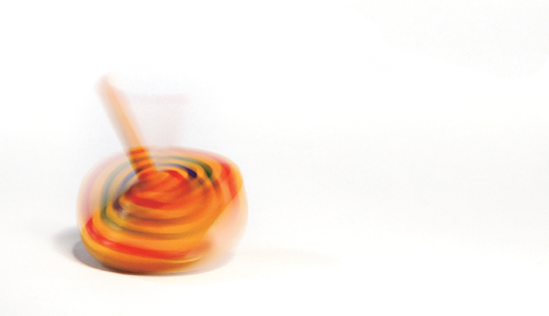
Figure 3.8. To show the motion of the top as it lost momentum, a shutter speed of 1/6 sec. was used. Taken at ISO 100, f/13, 1/6 sec. using a Canon EF 24-105mm, f/2.8, IS, USM lens set to 105mm.
When you increase or decrease the shutter speed by one full setting, it doubles or halves the exposure. For example, twice as much light reaches the image sensor at 1/30 second as at 1/60 second.
Shutter speed determines whether you can freeze a moving subject or allow it to be blurred in the picture. For example, you can adjust shutter speed to freeze a basketball player in midair, or adjust it to show the motion of water cascading over a waterfall. As a general rule, to stop motion, set the shutter speed to 1/60 second or faster. To show motion as a blur, try 1/30 second or slower, and use a tripod.
Note
The EOS 30D offers an electronically controlled, focal-plane shutter with settings in 1/2 or 1/3-stop increments. Shutter speeds, shown in fractions of a full second in the LCD panel and the viewfinder, include from Bulb (the shutter stays open until you close it by releasing the shutter button), and 30 to 1/8000 sec.
Tip
The EOS 30D offers dark-frame reduction for exposures of 30 sec. and longer. The camera exposes the shot, and then takes a second exposure of equal duration with the shutter closed. It then subtracts pixel noise and any hot pixels from the first exposure to create a cleaner, long-exposure image. Be sure that you have a good charge on the battery for these kinds of shots. You can enable noise reduction (dark-frame reduction) for exposures of 1 sec. or longer using C.Fn-02. See Chapter 1 for more details on setting Custom Functions.
If you shoot in Creative Zone modes using Shutter Priority or Manual mode, you can set the shutter speed. In Manual mode, you set both the shutter speed and the aperture independently.

Figure 3.9. A fast shutter speed of 1/1600 sec. stopped the action of this skateboarder. Taken at ISO 400, f/7, 1/1600 sec. using a Canon EF 24-105mm, f/2.8, IS, USM lens set to 105mm.
To set the shutter speed, follow these steps:
Turn the Mode dial to Tv (Shutter-Priority AE) or M (Manual).
Rotate the Main dial until the shutter speed you want appears on the LCD panel or in the viewfinder. In Shutter-Priority AE mode, the camera automatically sets the aperture based on the shutter speed you choose.
In Manual mode, rotate the Quick Control dial to set the correct aperture based on the exposure level indicator scale shown in the viewfinder and on the LCD panel.
Tip
As a guideline, never handhold a camera at a shutter speed slower than the inverse of the focal length of the lens. For example, with a 100mm lens, don't handhold the camera at shutter speeds slower than 1/100 second. And, with long telephoto lenses, you should always use a monopod or tripod.
Cameras require a very specific amount of light to make a good exposure. As you have seen, after the ISO is set, two factors determine the amount of light that makes the exposure: the size of the lens opening (aperture or f-stop) and the shutter speed. Set a wide aperture, and you can use a fast shutter speed. But switch to a small aperture (f-stop), and you must use a slower shutter speed.
Many combinations of aperture (f-stop) and shutter speed produce exactly the same exposure; in other words, the same amount of light will expose the image. For example, an exposure setting of f/22 at 1/4 second is equivalent to f/16 at 1/8 second, f/11 at 1/15, f/8 at 1/30, and so on. The exposures are the same because you decrease the amount of exposure time as you change to the next larger aperture.
Tip
To maintain an equivalent exposure automatically, use P (Program AE mode). In this mode, you can set the aperture or shutter speed, and the camera automatically sets the other exposure element to maintain an equivalent exposure — Tv and Av work this way too. In this mode, you can also control the AF point and the white balance.
The camera's light meter measures the amount of light reflected from the subject. The meter uses this information to calculate the necessary exposure, depending on the ISO, aperture size, and shutter speed. If you change the aperture, the camera recalculates the amount of time needed for the exposure. Change the shutter speed, and the camera's meter determines what aperture is required for a correct exposure.
ISO, aperture, shutter speed, and the amount of light in a scene are the essential elements of photographic exposure. On a bright, sunny day, you can select from many different f-stops and still get fast shutter speeds to prevent image blur. You have little need to switch to a high ISO for fast shutter speeds at small apertures.
Figure 3.10. Practicing with aperture, shutter speed, and ISO combinations is the best way to learn how they work together to create the effect that you want. Taken at ISO 100, f/5.6 at 1/100 sec. using a Canon EF 16-35mm, f/2.8L USM lens.
As it begins to get dark, your choice of f-stops becomes limited at ISO 100 or 200. You need to use wide apertures, such as f/4 or wider, to get a fast shutter speed. Otherwise, your images will show some blur from camera shake or subject movement. Switch to ISO 400 or 800, however, and your options increase and you can select narrow apertures, such as f/8 or f/11, for greater depth of field. The higher ISO allows you to shoot at faster shutter speeds to reduce the risk of blurred images, but it increases the chance of digital noise.