

Workflow
YOU'VE READ THE INTERLUDE, so you know: simply put, workflow is the step-by-step process that you follow every time you create animation. It is your go-to guide. It is your savior when things go wrong. It is the ever-evolving and improving rubric for success that you depend on.
No? Still not sold on workflow? Fine, maybe this chapter will change your mind. We're going to walk through a shot and demonstrate all of the great cheats that repeatedly make an appearance in a professional's workflow. If by the end you are still not convinced, then consider this: before I started committing myself to improving my workflow, this shot would have taken me over a week to complete. With workflow? This shot took three afternoons without a single headache!
Planning/Reference
THE BEST WORKFLOWS START with a strong foundation. This means thoroughly planning out your scene. There are a lot of planning methods but the most common and beneficial planning tools are definitely thumbnails and reference video.
With thumbnails, it's important to your workflow that the drawings are very strong. Focus primarily on the body positioning and pose, and less on the staging and camera. You want these drawings to be your guide through the entire shot, so getting too caught up in the staging and direction of the shot at the thumbnail stage will get in the way. With the focus solely on the character's body and pose, you can be sure these thumbnails will be helpful through the whole life of your shot.
Reference video is easy to gather on YouTube. Spend some good time finding as many related clips as you can. The more the merrier. You should also be creating your own reference footage. For this shot, the animation needed to be very cartoony. I've found the best way to make a reference video for really cartoony actions is to ‘puppet’ your hands around and create a ‘sound effects track’ by making noises with your voice. It may seem a little silly to be yelling and screeching at your desk, walking your fingers around like legs, but when you see how closely the animation was timed to my reference video, I think you'll see the benefits outweigh the embarrassment.
We're going to go through a few cheats that are great for making sure your drawings and reference video are at your fingertips. We're then going to import your reference video as well and keep it handy.

1 Open 01 – Cartoony_Start.ma. This scene has been laid out with the character and set, and is ready for our awesome planning to be imported in a way that will keep it at our fingertips.

4 Let's save this view for later. Go to Panels>Panel Editor. Go to the New Panel tab, select “Model Panel” in the list and hit “Make New Panel”. In the Panel Editor go back to the Panels Tab, select the new panel you just made (at the bottom of the list) and name it thumbPanel, and press ![]() .
.


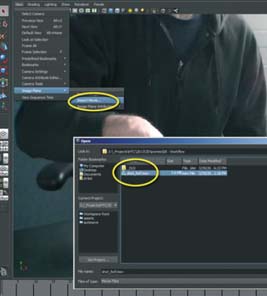
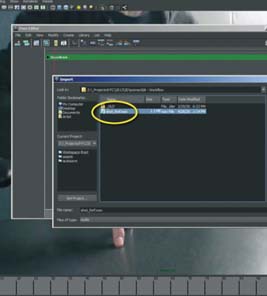
3 Go to Create>Cameras>Camera. Name your new camera “ThumbCam”. In any panel go to Panels>Look Through Selected. In the panel go to View>Image>Plane>Import Image. SelectThumbs.tif. Very nice. The image is now loaded into this Maya camera.

5 Maya may change your panel back to Camera1. Go to Panels>Panel>thumbPanel. In the Panel menu go to Show>None. Then again to Show>Cameras. Lastly turn off the grid by hitting the Grid button at the top of the panel.

6 Now go to Panels>Tear off. The panel now floats and you can move, minimize, and maximize it. This is a great way to work with your thumbnails right at your fingertips.

01 – Cartoony_Start.ma
If you ever accidentally close this panel, get it back by going into any panel, switching to the thumbPanel you created, and tearing off the panel for easy use. Your thumbs are never far away…
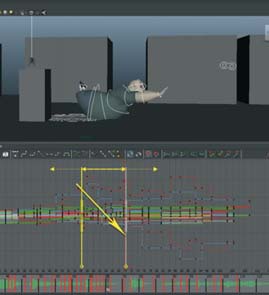
ONE OF THE BIGGEST CHEATS of all involves timing your scene. In the old days, animators would use stopwatches to time their animation. By repeating an action over and over in their head and timing it with the stopwatch, they could write down the specific frame numbers and always have this timing reference close by. I find it alarming that now that we've moved into the digital age, this cheat hasn't been updated as well! We are going to use a piece of video reference created specifically to give us really high-energy timing to our scene.
Maya 2014 imports all kinds of movie files, making video reference accessible and valuable deep into the production of your shot. With multiple codecs and formats supported, you will always have your video reference at your fingertips.
The movie file we're going to load was created to give a very specific sense of timing that could not be acted out. Hence the reason why I use my hands and sound effects (whistles and screams) to get a feel for the energy. “Acting out” your scenes like this, especially when they are cartoony-styled shots, is an invaluable piece of reference. Don't be shy, the more energy you put into this “timing reference”, the better the shot will turn out!

1 Open 02 – Cartoony_Timing_Start.ma. Here is our scene with the thumbnails loaded that we created in the last cheat. In order to nail the timing and energy, let's load the reference video.
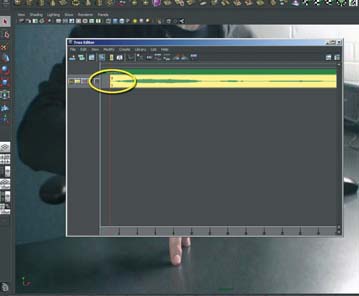
4 Slide the audio to the right in the Trax Editor so that it starts on f01. Retrace the steps in the previous cheat to create a new model panel so that you can always get back to the “refVideoCam” in case you close it.
3 Open the Trax Editor by going to Windows>Animation Editors>Trax Editor. We want to see the footage in a camera, but also the audio in the Trax Editor for timing. In the Trax Editor go to File>Import Audio, and choose “shot_ref.wav”.

5 Look how awesome we are set up if we open the thumbCam and the refVideoCam alongside our Perspective and Camera panels! Ready to Block and Roll!

02 – Cartoony_Timing_Start.ma
If you go into Panels>Saved Layouts>Edit Layouts you can save this panel layout as well, and get even more time-saving customization in Maya.
Converting Cycles
WHEN YOU HAVE A WALK CYCLE, you have to decide if the character is going to be walking in world space, or if the character is going to be cycling in place. In general, world space cycles are used in film and television, and most game engines use cycles that are in place.
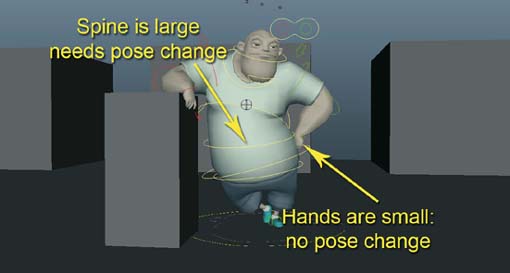
The reasons are fairly simple. In film work, complex interactions between the characters and the environments mean that the footfalls and contacts need to be happening in a precise way. It makes sense that the character is actually going to progress through the scene. In order to preview the walk cycle and assess the fluidity of the movement, we counter-animate the master controller against the Z-axis movements of the IK controllers (hands, feet and root).
In games, frequently the movement of the character is controlled by the player. Which means that you have to sacrifice the extremely detailed contact and floor interaction in lieu of fast reaction from your character. So walk cycles are ‘in place’ and the character's feet slide within the object space of the master controller (which the player is actually moving around when they play).
Here is a step-by-step cheat to change your walk cycles from world space to be within the object space of the master control.

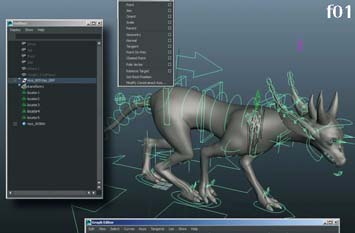
1 Open convert_Cycle_Start.ma. This is a film-style cycle that we are going to convert to a game-style cycle. I've taken the liberty of doing the first step: parent constrain locators to all the IK controls with “maintain offset” OFF.
4 Go to f01. Select all of the IK controls AND the master control on the floor (the world “con”, the “cog”, both feet and both paws). In the Graph Editor, select all of their curves and delete them.


3 In the Outliner, delete all of the parent constraints on the locators by expanding their hierarchies and deleting the parent constraint node.

5 Now one by one, constrain the IK controls back to the locators. Select the IK controls and open the Graph Editor. Click on Curves>Bake Channel.

6 Delete the locators. Now your animation has been converted to the object space of the master controller, and Nico is cycling in place. Beautiful.

convert_Cycle_Start.ma convert_Cycle_Finish.ma
You have to finish all the steps without changing the frame number after you delete the animation on the IK controls. If you change the frame, the animation will not bake correctly.
Stepped Keys
WE KNOW FROM THE GRAPH EDITOR Chapter that stepped keys give us instantaneous transitions between values. When you key all of the body's controls in stepped mode, you could say that the resulting keyframes are almost like “images” that you can retime at will to give yourself the best result.
Workflow-wise, blocking is the most efficient stage to be doing this retiming. Maya 2014 has awesome tools for retiming keys. We'll practice this by using both the Retime tool in the Graph Editor, as well as the Dope Sheet.
With the Retime tool, our goal is to retime whole sections so that they line up with the energy of the beats much better. This is achieved easily because the Retime tool is intuitive and rock solid.
With the Dope Sheet, a very underutilized tool in Maya, we get a top-level view of the distribution of the keys in our scene. It's very important at the blocking stage to make sure you are hitting your beats exactly. We'll use the Dope Sheet to make sure the impacts of the feet are right on the same frames as the sound, and the impact of the body on the ground also matches the audio we've recorded.
Many novices think that the best animators create perfect timing on their first try. It is quite the contrary! The best animators are normally really good at quickly RETIMING and adjusting their animation. If you can go through a dozen iterations in the time it takes another animator to do just one version, you will be far ahead of the pack. Some might say it looks like you're cheating…

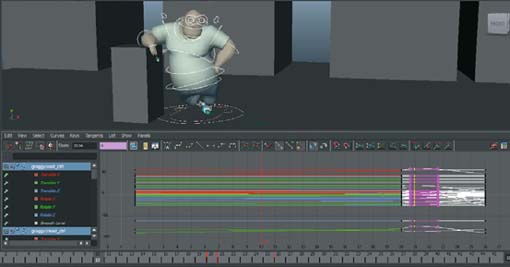
1 Open up 03 – Cartoony_blocking_start.ma. This is our Stepped-Key Blocking. Hit play and see how, although the key poses are all there, the timing is off. Now select all of Groggy's controls and see how tidy stepped keys look in the Graph Editor.

4 Now let's find the moment of impact in the audio. It seems to be somewhere around f80. Drag the middle of the right Retime handle to the right until it's sitting above f80.

3 We need to choose a moment that is easy to pick out from the audio file. The moment of impact when he falls is a good choice. It is currently happening on f70. Let's create another retime handle there by double clicking on f70.
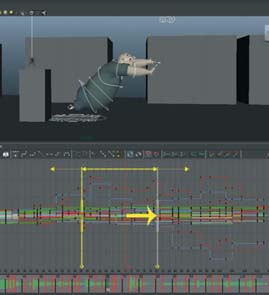
5 It's a good idea to snap your keys to frames, so let's do that. Go to Edit>Snap. Play the animation and see how much better the timing is working now.

6 The Retime handles are preserved. To delete them, click on the little X at the bottom of the handle. You will want to put your handles on integer frame values if you do more retiming from here on out.

03 – cartoony_Blocking_Start.ma03 – cartoony_Blocking_Finish.ma
If you right click on a Retime handle, you can insert a key on all channels of the selected objects. This is a great, quick way to create a hold.

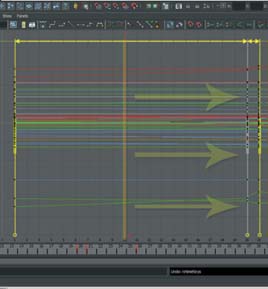
1 First let's switch to the Dope Sheet. The Dope Sheet is the most top-level view of the keys in your scene that we have in Maya. While it can be cumbersome once you get too far into the progress of your shot, the Dope Sheet offers some very quick keyframe editing capabilities. Specifically, the ability to slide around all of the keys on a frame by selecting only a single block in the “Dopesheet Summary” row is a great way to cheat having to select multiple keys in the Graph Editor, or even more time consuming, shift click a range of keys in the timeline. Another little cheat is that moving the keys around in the Dope Sheet snaps the keys to integer frames.

4 The third hit in the audio is happening on frame 64, but our keyframe is only on f65. Select it and move it one frame to the left.


3 Let's use this top-level view to improve our timing. Select the keys on f46, F48, and f50, and hit ![]() to switch the move tool. These keys are a touch late, move them a frame to the left by dragging with the MMB.
to switch the move tool. These keys are a touch late, move them a frame to the left by dragging with the MMB.

5 The last moment is the big splat on the ground. Let's fix the timing there too. Select all the keys from f71 to f81 and move them a frame to the left. Play it back and see how these small changes make all the difference.

03 – cartoony_Blocking_Start.ma03 – cartoony_Blocking_Finish.ma
If you notice in the top right corner of the Dope Sheet, there are buttons for the Graph Editor and the Track Editor. Maya makes it easy to switch between these common editors. Using these quick buttons frequently will save lots of time!
Stepped Preview
Stepped keys offer animators the convenience of pose-to-pose workflow in a digital medium. Like we learned in the last cheat, they are super useful for blocking your work, retiming poses, and keeping good keyframe economy.
We will now use the feature in Maya 2014 called “Stepped Preview”. It is an awesome tool that allows us to work in a hybrid mode between stepped and spline. Best of all, it makes it so that you do not risk ruining all of your keyframes if you want to go back and forth between stepped and spline.
Normally, if you wanted to see a splined version of your stepped animation, or wanted to go back to splines to add more breakdowns, you would have to convert the curves themselves to do so. Not so anymore. This is a HUGE workflow improvement for character animators. Why? Now you can keep your tangent in and out types set to Auto, but work in stepped mode by enabling Stepped Preview. When you are confident that you are ready to move onto splined curves, then you can turn off the Stepped Preview Mode, and see if you have enough breakdowns and in-betweens. If not, simply turn it back on and refine a little bit more. It's that simple.
Gone are the days of doing your animation in stepped, then holding your breath as you click the spline button, wondering what your animation is going to look like after it has been completely changed by Maya.

1 Open stepped_Preview_Start.ma. Groggy is pretty much through blocking on his crazy exit, but let's use Stepped Preview to practice this new workflow.

4 Create a new pose on f83 that has Groggy flattened out on the ground.

3 Where are there problems? He looks like he's on the ground too long between f80 and f85.

5 Since we are in Stepped Preview mode, it is very easy to see that the pose is a teeny bit too early. Select all of Groggy's controls and move the keyframe on f83-f82. That looks a little better.

6 Now for the magic of Stepped Preview. Right click on the timeline again and disable Stepped Preview. Playback the animation. Whereas before your splines would be all wiped out if you converted back and forth to stepped, the animation is preserved!

stepped_Preview_Start.mastepped_Preview_Finish.ma
The type of tangents you are choosing are still being created in the background if you are in Stepped Preview mode. This mode only changes the DISPLAY of the animation, not the curves being created. I prefer clamped tangents because they work well with how I like to create moving holds.
Moving Holds When Splining
THE SPLING STAGE IS SO TERRIFYING; it's very hard to I know what you are going to get! When you are done adding essential breakdowns in stepped mode, most animators hold their breath, close their eyes, and click “Spline” in the Graph Editor only to fret when the resulting mush doesn't carry any of the old appeal of the stepped version. Transitions seem slow and floaty, the character cruises “through” poses without any of the snap that you imagined in stepped, and overall it seems that all of your amazing timing choices have changed.
This is fine and normal, but it won't do for production. Pros know that when you are going through your workflow, you can't have a step that basically leaves the success of your shot up to chance! And one of the most striking difference between stepped animation and keys that have been freshly splined is the absence of any moving holds.
In the last edition of How To Cheat in Maya we showed you how to do copied pairs. This cheat is an expansion on that thought; we'll start with a copied pair but this time in stepped mode. Then we'll use a fancy cheat I've devised to give just the right amount of movement on a character in a moving hold. It's the best kind of cheat – one that you can and should use over and over in your workflow, but more importantly one that takes all the guess work out of a scary stage in your shot!
1 Open 05 – cartoony_Moving_Holds_start.ma. This scene has only the two poses that represent the beginning of the animation. Select all of Groggy's controls and in the Graph Editor you'll see the keys are in stepped mode.

3 Click “Stepped” again to get us back to stepped keys. We'll build the pose now that gives us a good moving hold.

2 Now let's take a close look in the Graph Editor at what happens when we spline the animation. Press ![]() + RMB and drag upwards to zoom in vertically a bit. With all the controls still selected, hit the AutoTangent button and see what happens to your curves. This is expected. Maya thinks you want to ease in on each of these keys, so it chose flat tangents for you.
+ RMB and drag upwards to zoom in vertically a bit. With all the controls still selected, hit the AutoTangent button and see what happens to your curves. This is expected. Maya thinks you want to ease in on each of these keys, so it chose flat tangents for you.
4 Let's build a relaxed pose. With this cheat, we try to imagine the character after he's been holding the pose for 10 minutes. To do this, imagine the big muscles like his legs and shoulders relaxing the most, and the smaller muscles like the neck and fingers, relaxing least. You'll see why in a second.

05 – cartoony_Moving_Holds_start.ma05 – cartoony_Moving_Holds_finish.ma
Remember from our Splines chapter that clamped gives us flat tangents when there's not much change in value, and spline when there is a big change in value. We can use this knowledge to predict the results of going From stepped to spline.


6 Switch to the Graph Editor and with all of the controls selected, hit ![]() . Make sure a key is placed on all of the curves.
. Make sure a key is placed on all of the curves.
9 Now we're going to use a little cheat to adjust the amount of movement that is happening in our moving hold. Switch to the panel configuration of Persp/Graph as above and play the animation. He's moving too much!


8 Let's try clamped instead. Clamped will give us much more predictable results when creating moving holds WITHIN stepped mode. I recommend you convert from stepped to clamped as part of your workflow.

10 To reduce the amount of movement, we're going to use a tried and true cheat, of MMB copying the keys on the timeline. MMB click on the timeline on f10, and drag your mouse to f20. Release your mouse and press ![]() .
.

05 – cartoony_Moving_Holds_start.ma05 – cartoony_Moving_Holds_finish.ma
If you go halfway between two keys, you get roughly 50% change, but for more fine-tuned adjustment, you can copy a key only a frame or two before your last frame and get a 5% adjustment. If s common to do a 50% copy and then a couple of smaller copies to get a finely-tuned result.

13 Don't forget the arms. On f23 check that his right arm is staying generally still by rotating the shoulder and elbow. Flip back and forth between the three keys (20, 23, and 26) using the comma (,), and period ![]() keys.
keys.


14 At f110, the body, spine, head and arms are dragging, creating an arced path into the next pose. The R leg is easing out to the extended position. Dragging the R foot in an exaggerated way helps the expanding feel as well.
Converting your stepped keys to clamped when splining gives the most predictable results if you create your holds using this method. But, change your default tangent to AutoTangent after converting everything to clamped to get the most help from Maya as you move on.
Moving Holds w/ Retime Tool
THE RETIME TOOL OFFERS a brand new paradigm for manipulating and creating keys in the Graph Editor. We can make broad adjustments to timing, or in this case, repeat the copy+paste method of moving hold creation in a snap.
Most professionals know that the best way to cheat in Maya is to find quick, effective methods of doing tasks that you must do repeatedly throughout the workday. And while Maya offers very powerful scripting capabilities, rarely will a script come in handy when it comes to something like a moving hold.
Instead we must use all of the tools Maya has to offer to refine and perfect our workflow. In the end, your workflow should take full advantage of the aggregate improvements added to Maya in every new version. To ignore these awesome tools is to ignore cheats that could save your shot!
1 Open 06 – cartoony_retime_Holds_start.ma. This is the same scene as before, only this time we're going to use the Retime tool to create the moving holds. Open the Graph Editor and familiarize yourself with the keys again.
3 Double click on f20 to add a Retime handle there too. Now drag the Retime handle from f10 to f20. The Retime handle we just created will shift over to near f21.

4 Hit ![]() to switch to the select tool. Select the keys on f21 and hit Del. Go to Edit>Snap to make sure your newly retimed moving hold is firmly on an integer frame. Moving hold, done!
to switch to the select tool. Select the keys on f21 and hit Del. Go to Edit>Snap to make sure your newly retimed moving hold is firmly on an integer frame. Moving hold, done!

06 – cartoony_retime_Holds_start.ma06 – cartoony_retime_Holds_finish.ma
Remember Retime handles are not saved into a scene. You need to make your timing adjustments before you close your file or you will lose the handles you've created.
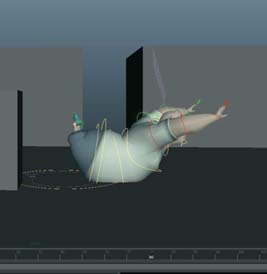
Refining Arcs in Polish
BY THE TIME YOU HAVE WORKED THROUGH your entire workflow and have made it to the polish phase, you are most likely dealing with an amount of keyframes that is unwieldy, to put it lightly. To make even the slightest adjustments can take hours of deleting, redoing, tweaking, and frustration.
Arcs are such an important fundamental that we need to make sure at this point in our workflow that we double-check that our arcs look great. However, like I mentioned before, finalizing your arcs in the polish phase means navigating a rat's nest of curves in the Graph Editor.
Fortunately for us, the Editable Motion Trail tool is good for not just creating and defining motion, but for keeping arcs manageable in this time of super dense keys. We took a look at how to use Editable Motion Trails in the Animation Principles chapter and the Techniques chapter so you should be pretty familiar with creating them by now. But unlike in those chapters when we created smooth motion, we will now be using them to finalize arcs among very dense keys. Maya 2014's Editable Motion Trails are rock solid and very stable now.

1 Open 07 – cartoony_Arcs_start.ma. This scene is at the end of Blocking Plus and is ready for polish in the arcs. Play a few times through and see if you can pick out the problems.

3 By default our trail shows no tangents nor influences on the keys. We'll show those later when it's time to refine. Select one of the keys in the panel and move it to test it.

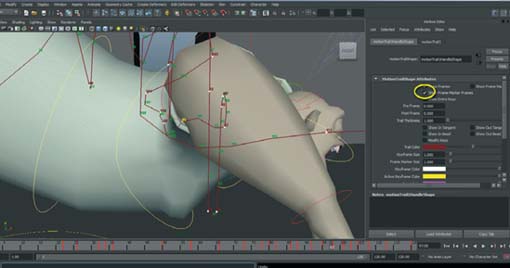
4 Things are easier to follow if you can see all of the frame markers and not just frames with keys on them. Turn them on by checking “Show Frame Marker Frames” in the Attribute panel with the motion trail selected.

07 – cartoony_Arcs_start.ma07 – cartoony_Arcs finish.ma
Remember that an Editable Motion Trail is most useful on controllers that have translation keys on them. You get much less predictable results if you add a motion trail to a controller that is in an FK Chain.


7 Click again on the key labeled “95”. The tangents will be selected and you can MMB-drag them around in the panel and see their influence. Adjust the keyframe's position and the tangent's influence until the arc looks smoother.


8 Now do the same adjustment to the position and the tangents on the other frames between f90 and f102. Don't stop until you have a nice clean arc in this chest movement.
Our final check of any arc is looking through the main camera. An arc may look great in perspective but until you see what it looks like to camera, you are not finished finessing.
Final Texture
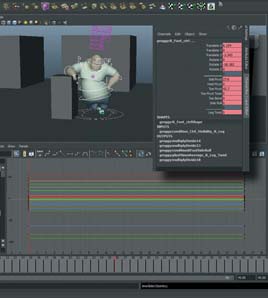
THE VERY LAST THING YOU SHOULD HAVE in your workflow is adding final details like little bits of texture to your scene. This is called non-performance texture; these little details aren't contributing to the performance choices you've made. Instead they are making the scene feel full of details and real.
With Maya 2014's animation layers, adding texture to your polished scene means that you can non-destructively experiment with ideas. It is crucial that you understand the importance of workflow at this point; animation layers need to be planned for very carefully. If, halfway through working on your shot, you suddenly decide to do some of the animation on a layer, chances are you will get horribly off track. Instead, you must either plan on your animation being done in layers (a walk cycle on the legs for example, and adding torso movement on a new layer), or you must wait to only add very fine details at the end.
By adhering to our strict workflow, we are safeguarding our scene against unforeseen problems later on. Animation layers give us an immense amount of control over the polished scene, without any destructive effects on the keys we already have.

1 Open 08 – cartoony_Texture_start.ma. We are going to add a little breath at the beginning of the scene. Turn off all the selection masks except “curves” and then drag a selection box around Groggy. You will select all of his controls.

4 Set another key on f30.


3 Click on the Breath animation layer to make it the active layer. Nothing you do now will affect keys on the BaseAnimation layer. Select all of Groggy's controls. On f01 hit ![]() to set a key for the beginning of the breath.
to set a key for the beginning of the breath.

5 On f15, create a pose with Groggy's spine bent backwards slightly like he's taking a breath. Don't forget to adjust his arms back into position. Include the pelvis, belly, chest, and head controls when you are making this pose.

6 Now you have a breath in the animation. You can adjust the amount that this animation is added to the BaseAnimation layer by adjust the weight value in the Layer Editor. You may even want to offset the keys of the spine to have the pelvis move first and the head last.
08 – cartoony_Texture_start.ma08 – cartoony_Texture finish.ma
You want to create all of your textural “moments” on different animation layers, just in case you want to adjust the weight of each separately.
Spotlight: Michael Cawood
MICHAEL CAWOOD HAS WORKED IN FILM, COMMERCIALS, GAMES and short films. He's won the ‘Orson Welles Award’ for his short film Devils, Angels & Dating, along with ‘Best Animated Short Film’ at the Burbank Film Festival and ‘Best Animation’ at IndieFest. Find out more at MichaelCawood.com.
TELL US A LITTLE BIT ABOUT HOW YOU USE MAYA IN YOUR EVERYDAY JOB
Well, I've been using Maya for about 14 years now for pretty much the entire 3D pipeline on numerous productions. I've used other packages before and since, but I always return to Maya…. it's more ingrained in my work methods… much like a pencil. The only part of the pipeline I've not gotten to go into any depth with is modelling as there's usually more talented modelers on the crew on each project I’m on.
Everyone has their workflow but I've varied the way I use it over the years. Once upon a time I was animating dinosaurs running over great distances, on SGI computers with one monitor. I had to be able to see as much of the 3D view-port as possible so that I could still see the details of smaller characters in the same scene. So I would hide away all the menus leaving only the timeline, hyper-graph and Graph Editor. I used the space bar to bring up all the menus I needed and customized my keyboard keys to cover the most common tools. Even going so far as to assign R to rotate, T to Translate, etc… as they seemed to make more sense at the time. But as I moved around teams and tried different production pipelines I discovered that my custom interface would confuse other artists too much when they came over to my machine to show me something. So, I gradually reduced my customization almost all the way back to the default setup. This was particularly handy as the industry trend switched to shorter contracts and I had to be able to get up to speed quicker and quicker on new machines in new companies. These days I only customize four keys on day one and get right to work.
WHAT ARE SOME OF YOUR FAVORITE TOOLS IN MAYA?
It might seem basic, but I really like the Graph Editor. I've used a few other packages Graph Editors and I prefer Maya's. The last few versions have added a few key features that bring it up to speed on any features the other packages held over Maya, and there's even a nice time-scaling feature that preserves the keys after the time scaling in 2013. It's very slick.
I've noticed many animators using only the red ticks on the timeline to time out their poses, and they're often not looking at the Graph Editor at all, relying instead on a lot of extra keys when they see something looking odd in motion. I like to keep the Graph Editor open all the time and I'll massage the shape of curves using simple, weighted and split tangents. It doesn't take long before you learn the shape of curves in common actions. It can actually be faster to pose the character then simply modify the curves to create those shapes in one complete pass without even reviewing the animation, then watch the whole thing afterwards to correct anything that doesn't conform to that pattern. Generally, the number of corrections you'll have to do are less than the number you would do from simply reviewing the default animation curves in the first place. Lip-sync is a fantastic example of this, and if you're working on a production that requires speed over quality, this technique is a life saver as you'll have something pretty decent looking even before you've had much of a chance to do revisions. It's a bit like using the “force”.
WHAT IS A WORKFLOW CHANGE YOU'VE MADE THAT HAS HELPED YOU TO CREATE GREAT ANIMATION?
On the first few projects I used Maya for I was creating a style of animation between realistic and cartoony and I tended to focus on a more physically correct way of animating each body part so I never got into the full body pose to pose workflow initially. This is actually a bit odd, as I studied as a traditional hand drawn 2D animator at university so you would have thought it would have been a more natural transition for me to do pose to pose. But the funny thing was that even in 2D I often animated each body mass in different passes to create physical actions. For 2D it meant I was creating very flowing and natural actions that looked nothing like other animators work and it really helped me stand out. In 3D it was natural to me to continue in this work flow and I almost left pose to pose behind. But one day I started working on a project that was much more cartoony and I'd been watching these fantastically snappy, funny animations from other animators so I forced myself to try the full body pose to pose method again, setting a key on every attribute so that I could focus on the timing and the strength of the poses. It brought back some of the wonder of my 2D animation training and opened up a whole new appreciation for 3D animation. From there I adapted to blend both techniques into my work, choosing when to apply each technique to each given style of movement. It has given me the best of both worlds, combining an understanding of mass, weight, momentum, arcs and anticipation with strong poses, silhouettes and snappier timing.
WHAT ARE SOME OF YOUR INTERESTS OR HOBBIES BESIDES ANIMATION?
Screenwriting, character design, layout (also for print and websites), video editing and pretty much anything that lends something important to the animated film-making process. I've also dabbled in coding for websites. In the past I've taught myself various forms of dance, and these days I’m finding a lot of interest in learning about business. I've hosted my own podcast before and now I’m reciting stories about my short film on my blog for the benefit of future short film animators. Check out AnimatedFilmmaker. com for that.
WHAT ARE SOME TIPS FOR GETTING INSIDE A CHARACTER'S HEAD, UNDERSTANDING THE MOTIVATION AND THE SUBTLETY OF A SCENE?
Taken from my screenwriting studies, if I have long enough to really absorb myself in a story I'll write up a one-page character outline. This will list basic facts about a character's personality, their background, their aspirations, needs, flaws, physicality, relationships, all sorts of things. There are several very good screenwriting books out there that each have different variations on the theme explaining what needs to be included, but just going through those steps really forces you to make a more fully fledged character in your mind. The idea is to get to a point where you know exactly how your character would react to any given situation.
In truth, on most projects you have to hit the ground running and you don't have time to do this, normally you aren't expected to do that much preparation work. So I've usually only had the luxury of going in-depth like this when there's been some down-time and you're waiting for some other decisions to be made before you can really get stuck into the work again. But when it has happened, it's given me the opportunity to really define the character, taking a cardboard cutout of a character in a much deeper and more satisfying direction. My performances have even triggered changes in the script, evolving the style of the written dialog and the performances of the voice actors.
DO YOU HAVE ANY PERSONAL PROJECTS THAT YOU'D LIKE TO TELL US ABOUT?
Well, the obvious one to talk about is my short film Devils, Angels Et Dating which I started in 2006. I took the project online to attract talent in 2009, running everything online for the public to see. Through the years, over 400 artists from around the world signed up on our development site volunteering their time, over 100 of which were selected to actually contribute their time at one point or another. We finished the film and put it online in January 2012. It's been winning awards at festivals since then and to date it's been viewed well over a million times. We didn't have any funding, but we did get some support from fans, mostly through a crowd-funding site, that gave us enough money to pay for most of the festival run. This also made it easier to pay to keep the development site online for future generations to learn from. It features various behind-the-scenes videos, thousands of work in progress videos, tutorials and images and all the forum threads showing the interaction between the team members discussing the progress of each asset and shot. Check it out at DevilsAngelsAndDating.com.
Since then I've also lent my time to The Oceanmaker, another animated short film, for which I acted as Head of Story. In a completely opposite approach from my previous short film, we had a small team of eight that went to an island with laptops for six weeks and we got most of the work done in this idyllic setting. I was mostly focused on translating the script into shots through storyboards, 3D previs, layout, animation and editing. Working very closely with the Director, we were able to really hammer out story points and try lots of approaches to “plus” the story. Since the trip, I've been screening a work-in-progress edit in the various cities to get impartial story notes, which we've then discussed and addressed to refine the film as it progresses. Learn more about that at TheOceanmaker.com.
HOW DO YOU KNOW WHEN YOU'VE FOUND THE “RIGHT” IDEA FOR A SHOT?
You can't, it's never perfect. You have to make something you can be passionate about as you're going to be doing it for years. But ultimately you can work on concepts and scripts for ever and eventually you have to just draw a line in the sand and get into production, otherwise you're never going to get anything made. Once you've learned from a few shorts, you're going to have a much better idea of what works, and asking other short filmmakers can give you some of that perspective but be sure to be making what you're passionate about. Since cultures evolve and audiences change, you can never know what's going to strike a cord with the audience that's a few years ahead of starting production, though, so it's still a huge gamble.
IN TODAY'S INDUSTRY, ARE ANIMATORS A DYING BREED?
The industry seems to need more and more animators as time goes on. But despite that, at the moment, there's more animators than there are jobs. So the smart thing is for anyone wanting to work in animation, to study at least one other area. Being a generalist can be useful and makes you much more hire-able on small teams, but larger studios are still focused on hiring specialists and generally the recruiters don't have the time to think outside the box during the hiring period. However once you've gotten your foot in the door, you're far more likely to keep a job if you know more than just what you were hired for. So you always have to present yourself in very different ways to different companies during the hiring period. It feels a lot like you're not presenting yourself completely honestly but really you're just making their job easier. Later on you can shine in all the other ways that make you stand out.
An interesting side observation to this is that companies in each branch of the animation industry (film, commercials, TV, games, etc.) tend to focus on the areas of your career that fall into their “world”. So when I’m working in games, conversations tend to focus around my work in games, completely overlooking my film and commercials work. Similarly, the same happens in film and commercials. It's a very irritating early in your career when you don't have as much experience in the area you've been hired for and you can be treated like a junior, even if you have loads of equivalent experience in one of the other areas. Now that I've done quite a bit in various areas, it means I have enough to bring to the table in any conversation, and it's as though I've lived three separate careers!
IF YOU HAD TO GIVE ONE PIECE OF ADVICE FOR A DEMO REEL, WHAT WOULD IT BE?
Doing character performance pieces like the work that the 11 Second Club encourages is a great staple of the common demo reel. But I'd also recommend that everyone makes the effort to create something really unique for every other shot in their reel. So, animating creatures, robots, unique physical situations and interactions, just put some thought into what studios need to see, and balance that with things they've never seen before that could be useful to them. That's what's going to make your reel stand out. For a while I had a very good routine of promising myself that I'd make something new and creative for my portfolio every month. It could be something as small as a sketch for my gallery or as ambitious as a new shot for my reel. Each month I was creating something completely different though and I quickly started to get more attention from high-profile companies. The other key thing about this approach is that you're bringing something unique to each team. You shouldn't always be trying to be the best animator on a team, but instead you want to be bringing a specialist skill that compliments the your future co-workers and makes the team as a whole capable of something great. Somewhere out there there's an animator who's really good at Spiderman swinging between buildings and he's in a lot of demand, but now that he already exists, you need to find a different type of shot to make yourself equally as in demand.
ARE WE IN THE GOLDEN AGE OF ANIMATION? IF YES, WHY DO YOU THINK SO? IF NO, WHAT WAS/WILL BE THE GOLDEN AGE OF ANIMATION?
It's an interesting question since the industry is producing so much more animated material than it was when I started back in the late 90s. Only time will tell whether what's produced now will stand the test of time. What's clear is that the talent pool is very different from that of a decade ago and the quality bar is set considerably higher in terms of character performances. The question is whether things have really changed in terms of design, story and subject matter. In those terms some things have evolved a little but I'd like to see some real changes shake things up over the next decade. Right now the tools have created a Golden Age of sorts because the films look so different from those of a decade ago, but when the subject matter becomes more sophisticated that's when the real Golden Age of animation can begin.
DO YOU HAVE ANY ADVICE FOR ANIMATORS?
Talk to animators that have really lived the life and done things. But don't just ask them about techniques in creating animation. Make sure to talk about what it's actually like to live and survive as an animator. Learning all the buttons in Maya can only get you so far. It's important to balance life and work. Find your creative sweet spot and mine it without burning out at a rate that compromises your life.