

Constraints
SOONER OR LATER every animator must have a character interact with a prop, and that means we need to work with constraints. They can seem a tad complicated at first, but once you understand how they work, you can design a constraint system that is simple and flexible. The next few cheats will tell you what you need to know about constraints as an animator. Then we'll look at some tools that will make constraining a breeze.
Parenting
NOVICE ANIMATORS SOMETIMES confuse parenting and constraining. These two processes behave somewhat similarly, but are quite different under the hood. First let's look at how parenting works.
Parenting is essentially indicating the center of an object's universe. By default, an object created in Maya exists in 3D space, and the infinite area inside the viewport is its central universe.
When we parent an object to another object (referred to as the child and parent), we are making the child object's central universe the parent object, instead of the 3D space. The child can still be moved independently, but its location is defined by where it is in relation to its parent, not where it is in space.
Think of it like this: you are currently parented to the earth. If you are sitting at your computer reading this book, as far as you're concerned, you're not moving. If you get up to get a soda from the fridge, you would say you've moved to a new location. Now think beyond earth and consider your position in the galaxy. When you're at your computer thinking you're not moving, you actually are moving through space (at 65,000 mph!) because the earth is moving through space and you are on it. It's your own perspective that you're not moving, but in relation to the entire universe, you are. This relationship of you to the earth to the galaxy is respectively the same as a child parented to its object in Maya's 3D space. Let's observe this in Maya.

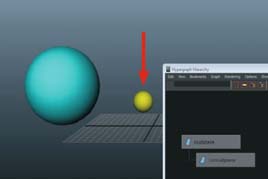
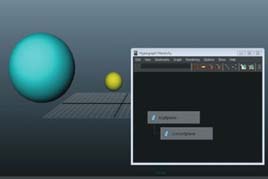
1 Open parenting.ma. Here I've created two spheres, and right now they're independent of each other. We can see in the hypergraph (Window > Hypergraph: Hierarchy) that they're side by side, indicating two separate objects.
4 This is also indicated in the channel box, where we see that, although nothing has changed in the viewport, the little sphere coordinates are different to reflect the new relationship.
7 Use the move tool again to translate the little sphere.

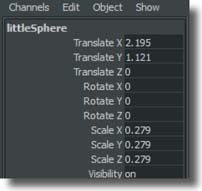
2 Notice the coordinates for the little sphere in the channel box, indicating its position in world space. Move the little sphere and you will see these coordinates update accordingly.

3 First select the little sphere (the child), then shift select the big sphere (the parent) and press ![]() to parent them. We can see in the hypergraph that they are now connected. We've created a hierarchy. The little sphere now uses the big sphere as its reference point.
to parent them. We can see in the hypergraph that they are now connected. We've created a hierarchy. The little sphere now uses the big sphere as its reference point.

5 Move the big sphere using the move tool ![]() , and the little sphere follows accordingly, maintaining its position.
, and the little sphere follows accordingly, maintaining its position.
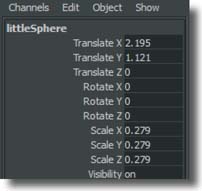
6 If we look at the little sphere's coordinates in the channel box they're still the same. Its reference point of moving is only in relation to the big sphere, just like our intro example: our perception of moving is related to the earth, rather than the universe.
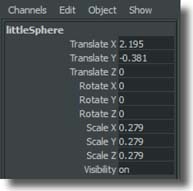
8 Now the translate channels for the little sphere change, because it's in a different position relative to the parent.
9 What's this have to do with animating? Knowing the difference between parenting and constraining will help you make a flexible system when using props with your characters. Next we'll look at how constraints work, and then how to use these methods together.

parenting.ma
HOT TIP
When parenting, the order you select the objects in determines what is parented to what. Think “child runs to the parent” to help you remember to select the child first. To unparent, use ![]() with the child selected.
with the child selected.
Parent Constraints
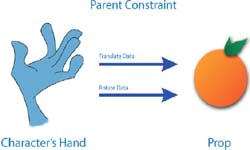
CONSTRAINED OBJECTS are fundamentally different from parented ones in that they still ultimately reference their position from the origin. They simply get their translate, rotate, and/ or scale information told to them by their master object. Think of it as a direct line from the master object's attributes into whichever attributes are constrained (which can be any or all of them) into the target object. When we have constrained a prop to a character's hand, it isn't actually “stuck” there; it just receives the same location information which makes it follow along.
Because of this direct line, we can't move constrained objects because they're “hardwired” to the master object. We can turn the constraint off (using what's called the weight), but if it's on, the constrained attributes cannot be altered independently of the master object.
We can see that there is sort of a yin/ yang balance with parenting and constraints. Parenting cannot be turned off or on over the course of an animation, but you can move the child object independently. Constraints can be turned on or off yet are locked to their master object while on. In setting up effective constraint systems, we can use the strengths of each to get the results we need.

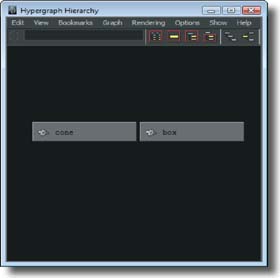
1 Open parentConstraint.ma. There are many types of constraints, but as an animator, you'll probably use parent constraints most of the time. Parent constraints connect the translate and rotate attributes, and the constrained object behaves as if it were parented, except for not being able to move it independently.
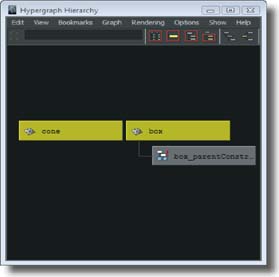
4 In the hypergraph, notice that the objects stay disconnected, and we see a constraint node appear. This is connected to the box, because it looks at the translate and rotate data of the cone, and “tells” the box to do the same.
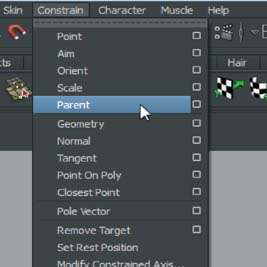
3 Constraint selection order is the opposite of parenting, where the master object is selected first. Select the cone, then shift select the box, and in the Animation menu set go to Constrain > Parent. The names can make things confusing, but keep in mind this is a constraint, so you are not actually parenting these objects.
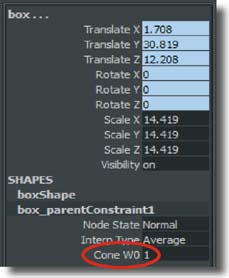
5 In the channel box the box's translate and rotate channels are blue, indicating they're constrained to something. If you click on the box_parentConstraint1 node, you'll see “Cone W0”. This is the weight, or how much the constraint is affecting the object. 1 = 100% influence.

6 Translate and rotate the cone and the box follows. Notice how it maintains its position relative to the cone. This is why it's a parent constraint, because it assumes the pivot point of its master object, just like in a parent-child relationship.

parentConstraint.ma
HOT TIP
Constraint weights are used when we need to have an object constrained to different objects at different times in an animation. For instance, if we had a character throw a ball to another character who catches it, the ball would need to be constrained to their hands at separate times. We set keys on the weights to tell Maya which constraint to use at a given time. It's also possible (but not common) to have multiple weights on. Two objects at 100% influence would keep the object halfway between both of them. We'll look at weights in the next cheat.
Constraining a Prop

IN THE NEXT CHAPTER I WILL SHOW you how to create a simple prop rig. In this cheat, we will walk through the process of how to constrain that prop to a character's hand like you would if you were working on a shot with the prop.
You want to avoid constraining the prop geometry to a control. Why? Remember we earned that the difference between parenting and constraining is that as a child of a parent, an object can move around, but it is locked into the constrained position when it is constrained. This prevents you from making adjustments to the position of the prop after it is constrained.
You will see when you take a look at the prop rig in our scene that we instead use a combination of parenting AND constraining when it comes to props. This provides an extra layer of control so that we can adjust the prop within the constrained group.

1 Open “prop_Constrain_Start.ma”. Bloke is standing in the scene and he has a prop in his hand. The prop will not move with the hand yet because we haven't constrained it.
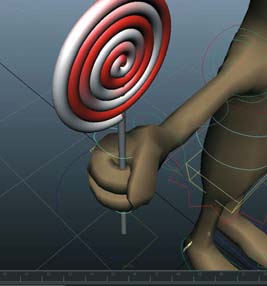
4 Now select Bloke's finger controls, and adjust the pose to make Bloke grip the lollipop.


3 Select Bloke's hand control, and ![]() select the lollipop's control. Click on Constrain>Parent.
select the lollipop's control. Click on Constrain>Parent.
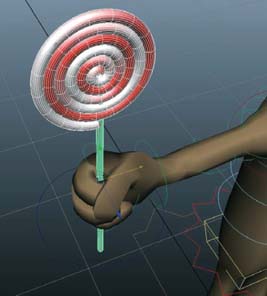
5 It doesn't matter that we can't get it exact. Now select the lollipop geometry and move it to be much more closely in Bloke's hand. This is the freedom we have given ourselves by placing a group in between the controller and the constrained geometry.

6 Test the prop is constrained correctly by moving Bloke's hand around. In the next chapter I will show you how we created this prop.

prop_Constrain_Start.ma
prop_Constrain_Finish.ma
HOT TIP
If you select all of the geometry of the prop to position it finely, make sure you are moving in World mode by holding down ![]() and LMB clicking and dragging left to “World”. If you are in Local mode, the geo may move oddly.
and LMB clicking and dragging left to “World”. If you are in Local mode, the geo may move oddly.
Constraint Weights
WHEN WE'RE USING PROPS and objects in our animations, there will be times when things need to be constrained to multiple characters. If a prop is passed between two or more things, it will have to be constrained to all of them at some point in the animation. To tell Maya which constraint we want active at a specific time, we need to use the constraint's weight attribute.
It may be helpful to think of the weight as an on/off switch. Every time we constrain an object to something else, a weight attribute for that particular object is automatically created in the constraint's node in the channel box. Then we simply need to key it at 1 (on) and 0 (off) at the appropriate times.
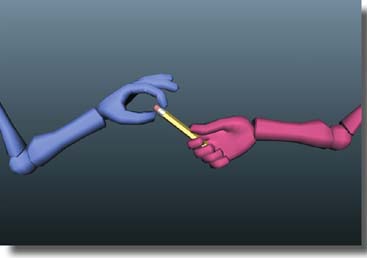
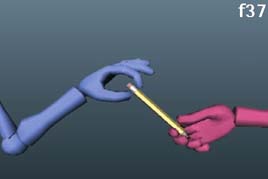
In this simple animation of one hand giving another a pencil, we're going to see how to switch the constraint weights over one frame to get a seamless transition.

1 Open constraintWeights_start.ma. In a viewport menu, go to Panels > Perspective > shotCam to see the camera for the animation. If you like, press the viewport's Film Gate button to frame the animation more accurately.

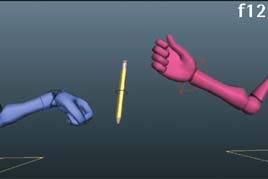
4 Go to f32. We want to constrain the pencil to the hand on this pose, as the blue hand will take control of it from this point on. Select the blue hand IK control, then the pencil control, and go to Constrain > Parent Constraint.
7 Go to f33, then switch the weights values to the opposite, turning off the pink hand constraint and turning on the blue hand's. Select both weights, right click and choose “Key Selected”.

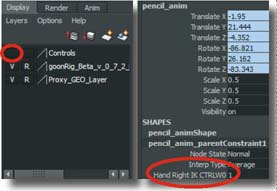
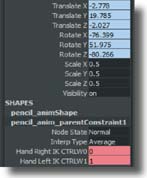
3 In the layer panel, turn on the Controls layer to see the rig controls. Select the control on the pencil and click on “pencil_anim_parentConstraint1” in the channel box. Here we can see the weight attribute for the right hand since it's constrained to it.
5 You'll see the new weight for the left hand created in the channel box, but now the pencil floats between both hands. This is because both weights are on, therefore pulling the object equally to keep it exactly between them.

6 Select the pencil control. At f32, set the Hand Left weight to 0 (off). Then select both weights, right click and choose “Key Selected” to set a key on both weights. If you scrub through now, the pencil stays with the pink hand the entire animation again.

8 The pencil should now get taken by the blue hand after f33. On your own projects, remember to design your animation so you have the right pose to pick up a prop and make the switch look natural.
9 You'll notice that the pencil goes through the pink hand's fingers after it is taken. Once we have the constraint working properly, its much easier to animate the fingers following the pencil as they let go. Open constraintWeightsEND.mb to see the final result.

constraintWeights_start.ma
constraintWeights_end.ma
HOT TIP
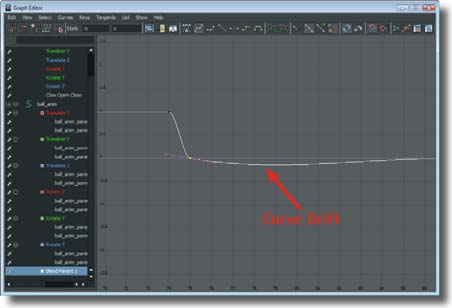
Constraint weights don't have to be switched over one frame. They can blend over however many frames you want by simply setting the weight keys further apart. Then the constraint will gradually drift into the next one. You can even edit the blend's curve in the Graph Editor. For animations like this one, that obviously wouldn't work, but for situations without obvious contact changes it can be handy.
Animating with Constraints
THERE WILL INEVITABLY be situations where the easiest way to animate something is to keyframe it at certain places, and constrain it in others. Maya makes this simple with an attribute called “Blend Parent”, which we can key on and off depending on what we need at a given moment. When Blend Parent is set to off (0), Maya will ignore any constraints on an object and follow the keyframe data. When Blend Parent is on (1), it will ignore keyframes and conform to any constraints currently active. The best part about Blend Parent is it's created automatically whenever you set a key on a constrained object, or constrain something that already has keyframes set on it. When either of these situations happens, Maya creates a pairBlend node that allows us to switch between the two modes (or even blend somewhere in between, hence the name…).
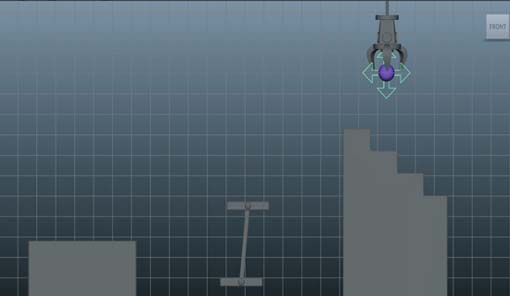
Many times, I find animations that need this approach are simplest when done in a rather straight-ahead fashion. That isn't to say the animation isn't planned out, it most certainly is, but I've always found keeping track of things easiest if the constraints are done during the blocking process. We're going to take that approach here, where we'll start by animating an object (a bouncing ball: the cornerstone of animation education), constrain it to a platform, then keyframe it again, constrain it to a claw, and finally keyframe it through the end. Sounds complicated in theory, but this exercise with a living ball as our character will show you how simple it really is.

1 Open ballCourse_constraints1.ma and switch to the front view. I've done some preliminary animation of a ball hopping over to a platform, which is also animated. Scrub through and you'll see that the ball doesn't follow the platform after f41.

4 At f41, right click on the Blend Parent attribute and do Key Selected to set a key on it. This ensures that we will be at 1 (on) at the frame where we want the ball to start following the platform. The channel will turn orange once you set the key.

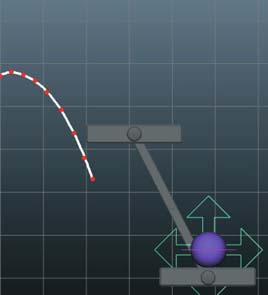
3 Scrubbing through the animation, we see that the ball now follows the platform, but stays there the entire time. Because Blend Parent is on 1, Maya ignores the keys and follows the constraint. We need to key it on at f41, but have it off up until then to see the animation.

5 Go to the frame before, f40, and set Blend Parent to 0 (off). Right click it and Key Selected again. Since this will be the first key for Blend Parent, all the frames up to it will be off as well.

6 Scrub again and you'll now see that the ball is once again animated until f41, where it follows the platform perfectly.

ballCourse_constraints1.ma
HOT TIP
An “all or nothing” approach is usually best when working with contraints. If it's a more complex character animation, it's often easier to ignore any constraints until the animaton is in its polish phase. Then you can constrain props without worrying about having to shift frames around or make big changes to the movement.
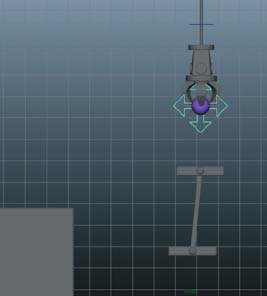

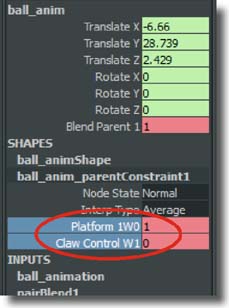
8 Select the claw control, then the ball control and go to Constrain > Parent. Notice in the channel box that we get a Claw Control W1 attribute. Remember that these weight attributes tell Maya which constraint is currently active.
11 At f88, key the Blend Parent to 1. This makes it switch on over one frame, making our transition seamless. The ball still doesn't follow the constraints properly though, as we need to set keys on the weights to tell Maya which constraint we want active.
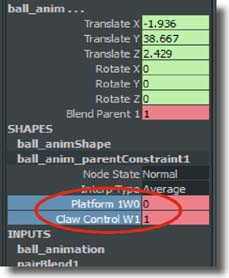
12 At f41, RMB > Key Selected the Platform weight to 1, and the Claw Control to 0. The ball will snap back to the platform. However, it should follow the claw at frame 88, so the weights need to change there.


10 Let's key the Blend Parent so the ball starts to follow the claw's constraint at f88. Go to frame 87, enter 0 in the Blend Parent attribute and RMB > Key Selected. At f75, key the Blend Parent at 0 as well. This will make the ball follow its keyed animation from f75-f87.
13 Set a key on both weights at f87 so this value holds through there. Then at f88, key the weights at the opposite values, the platform to 0 and the claw control to 1. Also key the Blend Parent back to 1 so it switches to following the constraint.

14 Now the ball stays with the platform when it's supposed to, jumps on its own from f75-f87, and follows the claw after f88.

ballCourse_constraints2.ma
HOT TIP
The reason we use 0 and 1 for turning constraints on or off is that it's like binary: 0 = off, 1 = on. Or you can think of 1 being 100% and 0 being 0%., whatever is clearer to you.
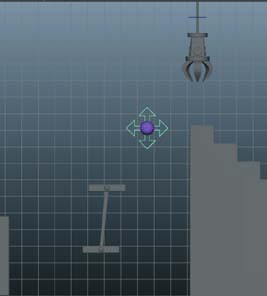
17 Open ballCourse_constraints3.ma and it will have everything we've done, along with the final blocking animation of the ball being released and bouncing down the stairs. We can't see it, however, because we need to key Blend Parent off once more to tell Maya to once again use the keyframe data on the ball.


18 At f112, key Blend Parent to 1 to hold it through that frame, then key it to 0 at f113. Scrubbing through you should see the ending blocking animation. We now have blocking of all the animation, including the constraints. If you have more constraints in an animation, remember to always have the active one's weight keyed at 1, and all others at 0. Always set a redundant key at the frame before the weights and Blend Parent change to hold the current state up to that point. Remembering those two steps will get you through any number of constraints, no matter how many there are!

ballCourse_constraints3.ma
HOT TIP
You can set the options for a parent constraint in Constrain > Parent > options. Here you can tell Maya to only constrain specific axes, if you only need certain ones for your animation.
A Well-rounded Approach
by Kenny Roy
I HAD THE CHANCE TO TALK TO SOMEONE RECENTLY who was my boss on a feature film a long time ago. What I learned about the circumstances that led to my hiring made me rethink my entire stance on demo reels, resumes, and overall attitude.
We've talked before about hobbies that contribute to animation; painting, drawing, acting, even sculpting can help you develop your aesthetics. But what we haven't touched on is the fact that being a well-rounded artist is more than just dedicating yourself fully to your craft. It is very beneficial to your animation skill to be constantly absorbing animation, but it can be detrimental to your career in the long run to not find the right balances.
Let's jump back to 2005. I was a bright-eyed and bushy-tailed animator new to Weta Digital, ready to start working on King Kong. By no means was I a super star animator. In fact, the entire show I struggled with my work, and relied heavily on the guidance and help of my supervisors and peers. I made it out the other end of that long, difficult project relatively unscathed, but always had the question in my mind, “how I could have possibly made it onto such a stellar team in a world-class studio?”
Fast forward again to the present day. I had lunch with the Animation Director, Eric Leighton, who let me in on a little secret; he hired me for one reason, and one reason alone: my resume. And not what you might think; it wasn't a slew of amazing credits or a long list of awards and accolades in my wake. No, it was that I had put on my resume my acting and improv interests. To follow that up, the very end of my demo reel had a recording of a section of a comedy show that I was a part of the year before. To be honest, I don't even know why I put it on there, but something told me that a recruiter might find the show interesting and remember me when it came time to hire again. Specifically, Eric told me that rather than fill the last few spots of the animation team with fanboys and copy+paste clones, he was looking for energy, enthusiasm, and a different dynamic. It was my improve experience (which I have been doing since high school) that gave me the edge over better animators.
As an employer myself now, I can relate to the sentiment that Eric was talking about. I too like to see my artists excited about what they are doing after work, on the weekends, etc. Especially when it has nothing to do with animation. An artist that gets a little stoked over an outside interest brings a little bit of the outside world into the studio. In fact, my best artist that I've worked with for more than two years now takes Wednesday afternoons off to be involved with a community group in her area. I don't think I've ever said no to her request each week to leave early to be a part of this. I like the idea that she is completely unplugging from animation to involve herself in something really important to her.
You need to establish a balance between work and home. But on top of that, your home life cannot just be an extension of animation. I know my story is quite unique, but on the other hand I feel like the trend for aspiring animators is to immerse themselves SO fully into animation that they have little depth to their lives otherwise. It's remarkable to see young animators so engrossed in the craft, but we have to ask ourselves, “Is this how the masters became the best?” The answer is an obvious “no”. The best artists in any field are always multi-talented and multi-interested individuals. Just look at any of the people at the top of our industry and you'll be able to find stories of their obsessions outside the field of animation (John Lasseter and his model train fetish, for instance).
We want to be the best candidates for the job so we can work at major studios and on high profile projects. That doesn't necessarily mean that we should be forsaking all else to be entirely focused solely on animation. Perhaps my story is unique, and perhaps Eric's goals for his animation team are different to the goals of most Animation Directors. But as someone who hires artists myself, I think it's a safe bet that any way you can distinguish yourself from the masses is good. Even better if it's a passion you have after the horn blows at the end of the workday.