
Lesson Files | Lessons > Lesson_02 > 02Presentation1_Stage1.key Lessons > Lesson_02 > Sustainability Photos Lessons > Lesson_02 > Sustainability.mp3 |
Time | This lesson takes approximately 60 minutes to complete. |
Goals | Understand supported media types Create an album in iPhoto Optimize images using iPhoto and Keynote Add transparency to a photo using Instant Alpha Add music to a slideshow Place a basic chart in a presentation Insert a webpage and hyperlinks Reduce the size of image files in a presentation Keep media files with the presentation |
While text is often the most important part of a presentation, a picture is worth the proverbial thousand words.
Keynote supports a wide variety of media formats—including graphics, sound, and video file formats—that are easy to pull into your presentation. The heart of this graphic support is QuickTime Player, the Mac’s versatile media player. In fact, if you can open a file in QuickTime Player, you can use it in Keynote to enhance your presentations.
You can also jazz up your presentation with embedded web links. And there’s a whole world of beautifully designed and animated charts waiting to be discovered.

In this lesson, we’ll create a photo album–type presentation that includes music, a basic chart, a webpage, and live links. Along the way, we’ll learn how enhancing a presentation with interesting, dynamic media content gives you greater flexibility and influence in addressing your audience.
There are four ways to add images to a Keynote presentation:
Drag the image directly into the Keynote document.
Choose Insert > Choose and navigate to the image file.
Drag a folder of images into Keynote’s Media Browser.
Use Keynote’s Media Browser to choose images from your iPhoto library.
In this exercise, you’ll use the Media Browser to access images that are located in your iPhoto library. (We’ll use all of these methods later in these lessons.)
Note
You can use the Media Browser to access any media files stored in systemwide default locations, such as your iPhoto or iTunes library, or your Movies folder.
iPhoto library is the place you’re most likely to keep your images, so you may frequently use iPhoto, an application in the iLife ’09 suite. iPhoto makes it easy to manage and adjust your photos—which can come in handy when you need to organize your images for a slideshow or presentation.
Of course, you can’t pull images from your iPhoto library until you’ve put them into that library in the first place. So we’ll start off by adding six images to iPhoto.
Open the Lesson_02 folder.
Select the Sustainability Photos folder.
The folder contains 13 photos for use in your presentation.
Drag the folder to the iPhoto icon in your Dock; then release the mouse button to begin importing the images.
iPhoto opens and becomes the active application.
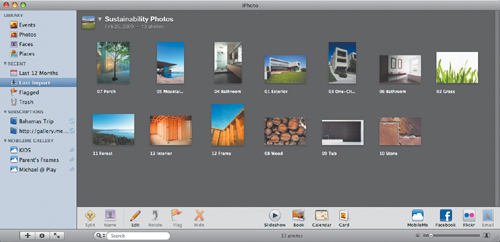
When the spinning progress indicator stops, the photos are available in your iPhoto library. iPhoto ’09 uses Events to organize your photos. The newly imported photos are associated with an Event called Sustainability Photos.
Click Events to view the Events in your library.
Locate the Event you just created, and double-click to open it.
Let’s sort the photos so that they’re in the right order for the presentation. The filenames contain numbers to indicate the order in which the photos will appear in your slideshow. The sorting order of your pictures in iPhoto affects their order in the Media Browser.
Choose View > Sort Photos > By Title.

The pictures are reordered to match their numbered filenames.
Close iPhoto.
Your photos are ready to be added to the green building presentation you started in Lesson 1. The first step is to replace the placeholder images in your presentation with real photos.
In the Lesson_02 folder, open 02Presentation1_Stage1.key.
In the toolbar, click the Media button to open the Media Browser.

Click the Photos button in the Media Browser. From the list beneath the iPhoto icon, choose the Events category.
Note
If you don’t see a list of items below the iPhoto icon, be sure to click the disclosure triangle next to the word iPhoto in the Media Browser. If you have several items in your library, you may need to scroll down to view them all.
The Media Browser displays a thumbnail for each Event.
Double-click the Sustainability Photos Event to open it.
In the slide navigator, click slide 1. The title slide is selected.
Drag 01 Exterior.jpg onto the media placeholder in the slide canvas.

The photo is added to the page and replaces the existing image in the frame.
Double-click the image so that you can edit it. Resize the image within its frame using the mask controls that appear when the image is selected. Drag the image within the picture frame to adjust its position to match the figure below.

Any portion of the image that extends beyond the mask will be hidden during your Keynote presentation.
Switch to slide 3. In the Media Browser, find the photo 02 Grass.jpg.
Drag the photo until the image is centered on the canvas. Yellow pop-up alignment guides will help you position the image.
You’ll further modify this slide in a moment.
Select slide 4 and add the image 03 One-City Homes.jpg.

Select slide 5 and add the image 04 Bathroom.jpg.
Select slide 6 and add the image 05 Mountain Villa.jpg.
Let’s skip slides 7 and 8 for now, as we’ll customize these layouts later in this lesson.
In a perfect world, photos would never need retouching. But most images can usually benefit from a little digital attention.
You can easily fix common image problems, such as exposure and color balance, within Keynote. The application includes a standard toolset for adjusting an image and improving its appearance. This toolset is similar to the image editing tools in iPhoto, but it’s often more convenient to adjust your images within Keynote than to leave that application and open the image in iPhoto.
Select slide 9 and add the image 11 Forest.jpg.

The image is overexposed and lacks detail.
Select the image and choose View > Show Adjust Image.
Click the Enhance button to improve the image’s contrast.
The image looks better but is still overexposed. Keynote is trying to brighten the trees in the image, but the sky is now too bright. Sometimes it takes human intervention to fully fix your photos.
Experiment with adjusting the Saturation, Temperature, and Exposure sliders. Notice how the image changes as you drag the sliders. Finish your experiments with values close to these:
Saturation—60
Temperature—10
Exposure— –15

The image is now better exposed and color balanced.
Examine the other photos in your presentation. Make any adjustments that you think are necessary. Close the Adjust Image window when you are finished.
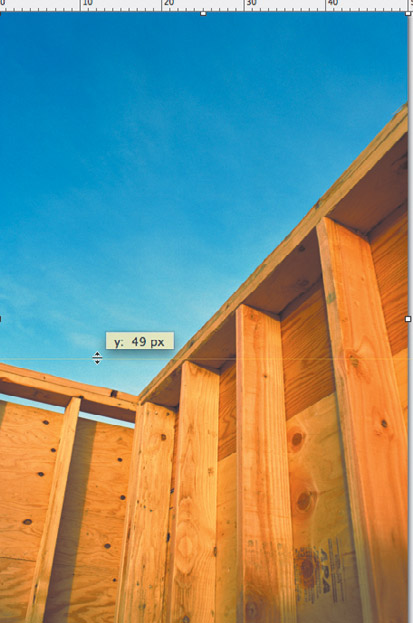
The photo you want to use for slide 10 is a little skewed in its frame. Because this is a construction photo, you’ll want to level the walls with a little digital adjustment.
Select slide 10, which discusses 85% recycled construction materials.
Add 12 Frame.jpg to the slide. The photo is crooked and needs to be straightened.
Choose View > Show Rulers to display the rulers.
Drag a guide from the ruler at the top of the photo to a location near the edge of the wall.
Double-click the image in the slide canvas to select it. Double-clicking an image lets you edit it within its mask.
Choose the Metrics inspector to access the image properties.
Determining the right adjustment in this case is a matter of trial and error. You can use alignment guides to assist you.
To adjust the image, you can click and turn the Rotate wheel, click the Angle steppers to incrementally increase and decrease the rotation, or enter a value directly in the field. In this case, an angle of 12 degrees effectively straightens the photo.

The image is now level. Although this was a minor adjustment, it was an important one. Crooked images can distract your audience and diminish the overall appearance of your presentation.
If necessary, adjust the Scale slider to better fit the image on the slide.

Select slide 11, which discusses a 75% eco-friendly supply chain.
Add 13 Interior.jpg to the slide.
Using the techniques you just learned, adjust the image to suit yourself and your slide. Use your creative judgment in positioning the photo.
Choose File > Save to save your work.
Enhancing Photos in iPhoto
If you want to take your image adjusting a little further, iPhoto offers some image editing tools that you won’t find in Keynote, Pages, or Numbers. Note that you need to make any iPhoto adjustments to an image before you bring a copy of an image from your iPhoto library into Keynote. Here’s a look at a few useful adjustments you’ll find in iPhoto.
Open iPhoto. In the Sustainability Photos Event, select 03 One-City Homes.
At the bottom of the iPhoto window, click the Edit button.

iPhoto switches to Edit mode. This mode allows you to adjust the image as well as enhance or crop it.
Click the Enhance button to automatically adjust the photo’s color and contrast. Notice that the image looks brighter and sharper after iPhoto has adjusted it.

Before

After
The photo looks better but still needs work.
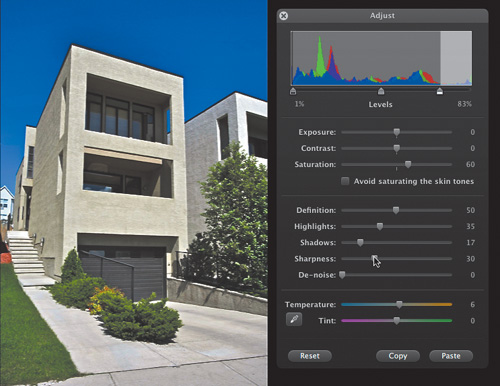
Click the Adjust button to open the Adjust pane. Make the following changes to the image:
Highlights—35 (increases detail by darkening highlights)
Saturation—60 (increases the vibrancy of the colors)
Temperature—6 (makes colors warmer)
Definition—50 (improves details and local contrast in the image)
Sharpness—30 (improves focus in the picture)
Tip
When adjusting Definition and Sharpness, it’s a good idea to view your image at 100 percent; this makes it easier to see subtle changes. Press the 1 key to zoom in on the image and view a higher degree of detail. When you’re finished making changes, press the 0 key to zoom out and view the whole picture.
If you want additional practice, you can use iPhoto to improve the overall look of the remaining images.
When you’re finished, click Done to accept the changes to the most recently edited photo. Close iPhoto. You can now bring your corrected images into Keynote, whenever you like.
So far, you’ve used only a single photo on a slide, but Keynote is excellent at handling multiple photos on a single slide.
Let’s create two slides that contain a total of five photos.
In the slide navigator, click slide 7 to select it.
Let’s select one additional slide and change both of their layouts at the same time.
Shift-click the thumbnail for slide 8.
Slides 7 and 8 are both selected.
Click the Masters button and choose Photo – 2 Up.
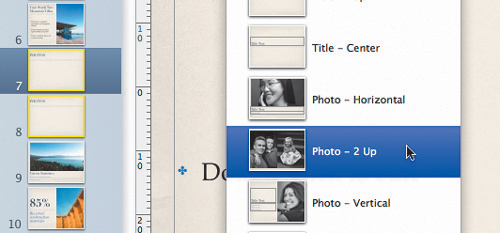
The layouts of both slides change.
Drag 06 Bathroom.jpg to the left placeholder on slide 7.
Drag 07 Porch.jpg to the right placeholder on slide 7.
Adjust the images to closely match the following figure.

You have successfully updated slide 7. You have three photos left to use, and two of them have definite landscape aspect ratios (meaning that the photos are very horizontal in their composition). Let’s customize the slide 8 layout to accommodate them.
In the slide navigator, select slide 8.
You can adjust the mask to orient the photo horizontally.
Select the right media placeholder and click the Edit Mask button.
Slowly drag the bottom edge of the mask upward until the yellow alignment guides indicate that you have reached the halfway point. The approximate height of the box will be 345 pixels.
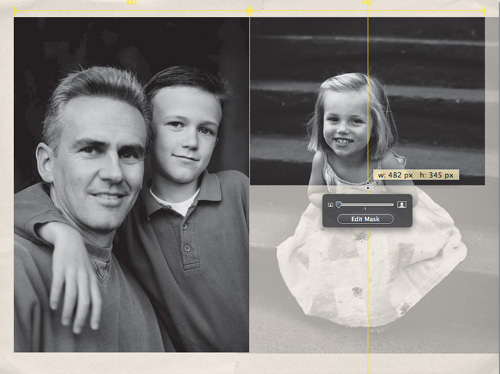
You now can duplicate the box directly below this image to fill out the slide.
Press Return to apply the mask.
Option-drag the smaller masked media placeholder downward.
Keynote creates a copy of the photo.
Align the top of the duplicated photo with the bottom edge of the larger photo. Use the yellow alignment guides for assistance.

Replace the media placeholders using the remaining three images (08 Wood.jpg, 09 Tub.jpg, 10 Stone.jpg).
Using the figure below for guidance, adjust the images within their masks using the techniques you’ve learned.

Choose File > Save to save your work.
Sometimes your photos include undesired elements or areas (such as in the grass photo on slide 3). The Instant Alpha tool allows you to make parts of an image transparent, effectively removing them.
In the slide navigator, select slide 3.
Select the photo of the grass.
In the toolbar, click Alpha, or choose Format > Instant Alpha.

Drag slowly over the white area near the top of the photo, which is the area that you want to make transparent.
Tip
For best results, try to remove areas with clear boundaries. The areas removed must be contiguous (touching).

As you drag, the selected area grows to add areas of similar colors. You can control how much is selected by dragging over more or less of the area.
The command worked well but didn’t get the noncontiguous areas of color in the image. The Instant Alpha command offers an important modifier key to solve this very problem.
Option-click to select another area of white.
The grass photo looks good, but it could be better integrated into the layout of the slide so as not to obscure the bulleted text.
Choose Arrange > Send to Back to place the photo behind the text layer.
Let’s blend the photo into the background a little more.
In the format bar, click the Opacity pop-up menu and lower the grass opacity to 40%.
The grass looks better, but it could be repositioned on the slide for a cleaner layout.
Press Shift–Down Arrow ten times to move the image down 100 pixels.
The layout is almost complete; let’s adjust the text box to finish it.
Select the text box that contains the three bullets.
Open the Text inspector.
Click the Align Top button to align the text with the top of the text box.
Click the Bold button to make the selected text bold.
Change the text size to 48 pt to make it easier to read.

Choose File > Save to save your work.
You can compare your results with the version in 02Presentation1_Stage2.key.
Keynote lets you add controls to navigate between slides. By adding hyperlinks, you can create a link to a specific part of your presentation. Additionally, you can embed links to point to webpages that you may want to access during a presentation. Let’s explore both techniques.
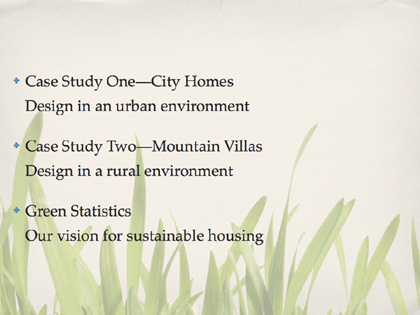
As your presentation begins, a title slide displays its title and introduces you as the presenter. The second slide includes important reasons why building green is so important. The third slide identifies the three sections of your presentation.
These slides represent a perfect opportunity to use hyperlinks. By linking each bullet to its respective section, you can have greater flexibility as a presenter. The links will take you and your presentation to whichever of the three sections seems most relevant to your current audience.
Note
Hyperlinks that you add to a presentation don’t have to be used. If you do not click a hyperlink, slides will naturally advance to the next slide in the presentation.
In the slide navigator, select slide 3.
Select the first bullet group.
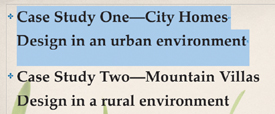
In the Hyperlink inspector, select the “Enable as a hyperlink” checkbox.
You can now identify and set up your link destination.
From the Link To pop-up menu, choose Slide. Then select the Slide button and set its pop-up menu to 4.

You have linked the first bullet to the first section of your presentation (slide 4).
Select the second bullet and link to slide 6.
Select the third bullet and link to slide 9.
Let’s remove the underlined hyperlink formatting so that the slide’s appearance is more subtle.
Choose Edit > Select All to highlight all the text in the box.
In the format bar, click the Underline button.
The underline is removed.
You now have links that jump from the main menu page to each section of your presentation. This is useful when you want to change the order of your presentation based on audience input. Links can also be useful at the end of a presentation to provide a way to quickly return to your opening.
Select slide 13.
Select the rounded blue rectangle.
In the Hyperlink inspector, link back to slide 3.

A small hyperlink icon is added to the rounded rectangle. This icon will not display while you are giving the slideshow.
You have just created an easy way to return to the opening menu and select a case study. This is extremely useful if your audience has questions at the end of your presentation.
Choose File > Save to save your work.
Sometimes, you will want to place a snapshot of a webpage into your presentation, either as a link to the actual webpage or as a still image. Your Mac has all the tools it needs to capture snapshots of webpages (or any computer screen).
Let’s embed a webpage image and attach a link so that you can visit it during the presentation.
In the slide navigator, select slide 12.
Click the New button to add a slide to your presentation.
Click the Masters button and choose Blank.
The canvas is ready, so let’s capture a screen shot of the webpage.
Open Safari by clicking its icon in your Dock.
Let’s visit the Green Building page for the U.S. Environmental Protection Agency. This page contains relevant information about our presentation’s topic.
In the address bar in Safari, enter http://www.epa.gov/greenbuilding and press Return.
When the page loads, you’ll want to capture an image of it.
Press Shift-Command-4 to select an area to capture.
By default, this mode allows you to drag to define a capture area. It also can be modified to capture an individual window.
Press the Spacebar.

The pointer turns into a camera icon, and you are ready to capture the Safari window as an image file and save it to your hard drive or copy it to the Clipboard.
To copy an image of the page to your Clipboard, Control-click the active Safari window.
Return to Keynote and choose Edit > Paste.
The screen shot is pasted onto your slide.
Size the image to a width of 1000 pixels; then center it on your canvas.
With the image selected, open the Hyperlink inspector.
Select the “Enable as a hyperlink” checkbox.
From the Link To pop-up menu, choose Webpage.
In the URL field, enter http://www.epa.gov/greenbuilding and press Return.
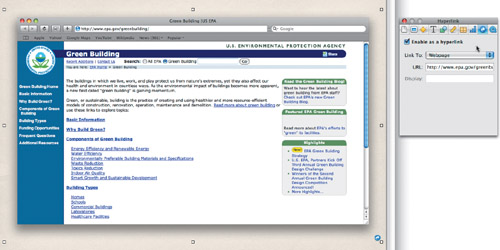
You have successfully added a screen shot to a slide and linked it to the original webpage.
Choose File > Save to save your work.
In addition to enabling you to add photos and images to a presentation, Keynote offers rich support for easy-to-read charts. A chart is a visually effective way to show trends or to display relationships between sets of data. Keynote includes 19 chart types.
Note
You’ll further explore charting in iWork in Lesson 5, “Importing from PowerPoint and Working with Charts” and Lesson 16, “Advanced Charting Operations.”
Let’s add a basic chart to show some of the data from the table on slide 12.
In the navigator, select slide 12.
Let’s show the results for the year 2010 as a column chart.
Press Command-D to duplicate the slide.
A copy of the slide is added to your presentation. Let’s copy the data to the Clipboard to use for the chart.
Select the table on slide 13 and choose Edit > Cut.
The data is removed from the page and stored on the Clipboard.
In the toolbar, click the Charts button and choose the 3D Column Chart.
When you create a chart, Keynote fills it with placeholder data in the Chart Data Editor. Let’s replace this with the data that you copied to your Clipboard. First, remove the placeholder data.
Click the first column (2007); then Shift-click the last column (2010). All four columns are selected and highlighted in blue.

Press Delete to remove all but the first row of data.
Let’s add the data currently on your Clipboard.
Choose Edit > Paste to insert the information from the table.
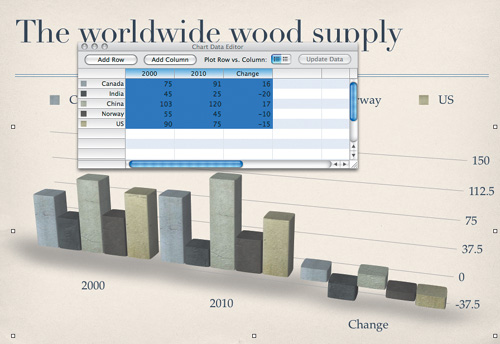
Keynote draws the chart, but it has too much information and might be unclear. Let’s refine what is shown.
Click the column for the year 2000 and press Delete. Do the same for the Change column. Close the Chart Data Editor.
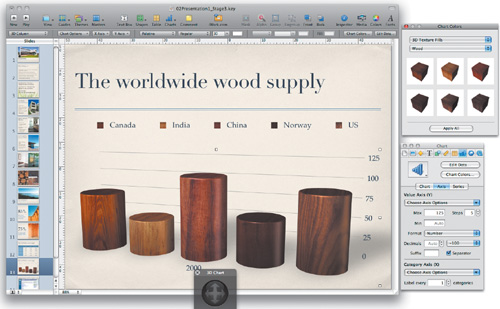
The chart updates and now shows just the 2010 data for a one-year comparison between countries. Let’s format the chart to improve its readability and to match the subject of your presentation.
Select the Chart inspector.
Keynote lets you change the shapes and colors of columns. Let’s make them look more like wooden pillars.
Click the Bar Shape pop-up menu and choose Cylinder.
Increase the setting in the “Gap between bars” field to 25% to provide a little separation between the cylinders.

Click the Chart Colors button, and from the pop-up menus, choose the 3D Texture Fills fill type and the Wood fill collection.
Click Apply All to update the chart.
The chart now matches the subject matter of the presentation. Let’s change its viewing angle slightly for a more distinctive appearance.
Select the Axis tab of the Chart inspector. In the Max field, enter 125, and in the Steps field, enter 5.
The y-axis is now numbered 0 to 125 with gridlines every 25 units.
Select the chart on the canvas, then drag the four-way arrowhead to experiment with different viewing angles.
Choose File > Save to save your work.
Keynote presentations support an audio bed—music or narration that plays along with your slideshow. You may want to add narration or sound effects to individual slides if you are preparing a kiosk or developing a self-running presentation(you’ll learn more about this in Lesson 6). You also can add underscore music that plays throughout your slideshow.
Note
Some audio files are protected by copyright law. Be sure to secure the necessary rights for any audio file you use in a presentation. If you use audio purchased from the iTunes Store, remember that the playback computer must be authorized for the files.
Open the Document inspector and click Audio.
Switch to the Finder. Open the Lesson_02 folder and locate Sustainability.mp3.
Drag the Sustainability.mp3 audio file from the Finder into the Audio well.

Note
The current Soundtrack playback option is Play Once, which means that the song will play through one time and stop. This works well for playing background music to set the mood at the start of your presentation. If you want the audio file to play continuously throughout the presentation, choose Loop in the Soundtrack pop-up menu. If needed, you can adjust the volume of the song with the Volume slider.
Choose File > Save to save your work.
You can compare your results with the file 02Presentation1_Stage3.key.
Now that we’ve populated the slideshow, let’s add a simple transition between the slides for a little more continuity and smoothness. For this presentation, we’ll add the same dissolve transition to every slide. In the next lesson, we’ll explore transitions in depth.
Click slide 1 in the Navigator.
Choose Edit > Select All to choose all your slides.
Click the Effect pop-up menu and choose Dissolve.

The default values for the effect is fine.
Click the Play button in the toolbar to view the slideshow.
Press the Spacebar to navigate your slides.
When finished, press Escape to exit the slideshow.
Choose File > Save to save your work.
As you add images and sounds to a presentation, its file size will increase. Larger Keynote files use more storage space on your hard drive; they also take longer to load (when you open the file and when animations are cached).
One inadvisable but common practice is to add large images to a presentation and then eventually scale them down or mask unwanted portions of them. While the images appear smaller in the presentation, they actually retain their full file size. Keynote can help keep your presentation document size at a minimum by saving only the smaller versions of the images in your presentation.
Note
There are several good reasons to shrink your files, but chief among them is that smaller files are easier to transport or email. Keep in mind, though, that reducing images is something you do at the very end of the process. Once you reduce the size of a masked or shrunken image file, you won’t be able to restore it to its original size. If you want to resize the image or restore masked portions, you will have to replace the original image files in the document.
Before you reduce the size of an image or media file, save your document. Choose File > Save to write the latest version to your hard drive, or choose File > Save As to save a copy of the presentation.
There are three methods for reducing file size:
To reduce the file size of an individual image that you’ve masked or scaled down, select the image and choose Format > Image > Reduce Image File Size. You can also Control-click (or right-click) the image and choose Reduce Image File Size from the shortcut menu.
To reduce the size of an individual media file, select a sound or movie file. If you’ve set the Start and Stop sliders in the QuickTime inspector to trim the media, you can discard those unused portions by choosing Format > Image > Reduce Media File Size.
To reduce the sizes of all masked and resized images and all trimmed video and audio files, choose File > Reduce File Size.
For this exercise, we’ll choose File > Reduce File Size.

Keynote calculates the amount of storage space that will be saved.
Click Reduce to process the media in the slideshow. A warning dialog will open.
The dialog usually states that some template images or files are used at their original sizes and were not further optimized. In this case, that will not significantly affect the look or size of the document.
Click Clear All and close the Document Warnings.
Keynote (by default) copies all of the media used in your presentation into the Keynote file, which simplifies the process of transporting your presentation to another Mac. So, when you take your Keynote presentation on the road, you have to take only one Keynote file.
Before we save our media, let’s verify that all of the elements made it into your presentation file.
Note
Fonts are not saved in a Keynote document. Fonts used in a presentation must also be installed on the computer running the presentation. If you use fonts that are not installed with iWork ’09 or that are not Mac OS X system fonts, be sure to install the necessary fonts on the presentation computer.
In Keynote, choose Keynote > Preferences.
Click the General button, and in the Saving area, make sure that checkboxes are selected as shown in the following figure.
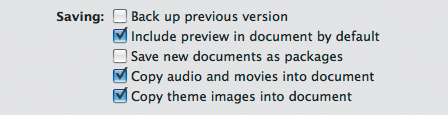
The Saving area includes a number of options:
Back up previous version—. A backup file is created each time you save. The backup is stored in the same folder as the original, which is helpful in the rare event that your project file is corrupted. It can also come in handy if you close your document and make some changes, but then have second thoughts and want to revert.
Include preview in document by default—. Allows you to use the Quick Look feature of your Mac running OS X 10.5 Leopard. This lets you browse a high-quality preview of your presentation without opening it in Keynote.
Copy audio and movies into document—. All media files are stored within the document and not linked. This may increase the file size but makes it easier to transport a presentation and guard against accidental deletions.
Copy theme images into document—. All template images are saved in the Keynote document, so the file has no dependent links for backgrounds or custom fills.
Close the Preferences window to store your preferences.
Tip
If you ever need to access an element from a presentation and don’t have access to the original files, you can borrow it from the Keynote document. You’ll need to first save a copy of the presentation as an iWork ’08 document with the File > Save As command. Then Control-click (or right-click) the Keynote document and choose Show Package Contents from the shortcut menu. The folder contains all the elements of your presentation. You can Option-drag any of the elements to a new folder to copy them. Be careful when modifying your presentation. If you remove the wrong element, you could damage the file. Be sure to use the Save As command to create a new copy of your presentation before modifying it.